Automatically deploy SUSI Web Chat on surge after Travis passes

We are using surge from the very beginning of this SUSI web chat and SUSI skill cms projects development. We used surge for provide preview links for Pull requests. Surge is really easy tool to use. We can deploy our static web pages really easily and quickly.  But If user had to change something in pull request user has to deploy again in surge and update the link. If we can connect this operation with travis ci we can minimise re-works. We can embed the deploying commands inside the travis.yml.

We can tell travis to make a preview link (surge deployment) if test cases are passed by embedding the surge deployment commands inside the travis.yml like below.

This is travis.yml file

sudo: required
dist: trusty
language: node_js
node_js:
 - 6
script:
 - npm test
after_success:
 - bash ./surge_deploy.sh
 - bash ./deploy.sh
cache:
 directories:
   - node_modules
branches:
 only:
   - master

Surge deployment commands are inside the “surge_deploy.sh” file.
In that we have to check the status of the pull request whether it is passing test cases or not. We can do it like below.

if [ "$TRAVIS_PULL_REQUEST" == "false" ]; then
   echo "Not a PR. Skipping surge deployment"
   exit 0
fi

Then we have to install surge in the environment. Then after install all npm packages and run build.

npm i -g surge
npm install
npm run build

Since there is a issue with displaying moving to child routes we have to take a copy of index.html file and name it as a 404.html.

cp ./build/index.html ./build/404.html

Then make two environment variables for your surge email address and surge token

export SURGE_LOGIN=fossasiasusichat@example.com
# surge Token (run ‘surge token’ to get token)
export SURGE_TOKEN=d1c28a7a75967cc2b4c852cca0d12206

Now we have to make the surge deployment URL (Domain). It should be unique so we made a URL that contains pull request number.

export DEPLOY_DOMAIN=https://pr-${TRAVIS_PULL_REQUEST}-susi-web-chat.surge.sh
surge --project ./build/ --domain $DEPLOY_DOMAIN;

Since all our static contents which made after the build process are in “build” folder we have to tell surge to get static html files from that.
Now make a pull request. you would find the deployment link in travis ci report after travis passed.

Expand the output of the surge_deploy.sh

You will find the deployment link as we defined in the surge_deploy.sh file

References:

  • Integrating with travis ci – https://surge.sh/help/integrating-with-travis-ci
  • React Routes to Deploy 404 page on gh-pages and surge – https://blog.fossasia.org/react-routes-to-deploy-404-page-on-gh-pages-and-surge/
Continue ReadingAutomatically deploy SUSI Web Chat on surge after Travis passes

How to Store Mobile Settings in the Server from SUSI Web Chat Settings Page

While we are adding new features and capabilities to SUSI Web Chat application, we wanted to provide settings changing capability to SUSI users. SUSI team decided to maintain a settings page to give that capability to users.

This is how it’s interface looks like now.

In this blog post I’m going to add another setting category to our setting page. This one is for  saving mobile phone number and dial code in the server.

UI Development:

First we need to  add new category to settings page and it should be invisible when user is not logged in. Anonymous users should not get mobile phone category in settings page.

     let menuItems = cookies.get('loggedIn') ?
            <div>
                <div className="settings-list">
                    <Menu
                        onItemTouchTap={this.loadSettings}
                        selectedMenuItemStyle={blueThemeColor}
                        style={{ width: '100%' }}
                        value={this.state.selectedSetting}
                    >
                       <MenuItem value='Mobile' className="setting-item" leftIcon={<MobileIcon />}>Mobile<ChevronRight className="right-chevron" /></MenuItem>
                        <hr className="break-line" />
                    </Menu>
                </div>
            </div>


Next we have to show settings UI when user clicks on the category name.

 if (this.state.selectedSetting === 'Mobile' && cookies.get('loggedIn')) {}
                currentSetting = (
  <Translate text="Country/region : " />
                            <DropDownMenu maxHeight={300}
               value={this.state.countryCode?this.state.countryCode:'US'}


Show US if the state does not deines the country code

                                onChange={this.handleCountryChange}>
                                {countries}
                            </DropDownMenu>
<Translate text="Phone number : " />
                            <TextField name="selectedCountry"
                            disabled={true}
                            value={countryData.countries[this.state.countryCode?this.state.countryCode:'US'].countryCallingCodes[0] }
                         	/>
                            <TextField name="serverUrl"
                                onChange={this.handleTelephoneNoChange}
                                value={this.state.phoneNo }
 />
)}


Then we need to get list of country names and country dial codes to show in the above drop down. We used country-data node module for that.

To install country-data module use this  command.

npm install --save country-data


We have used it in the settings page as below.

import countryData from 'country-data';
    	countryData.countries.all.sort(function(a, b) {
            if(a.name < b.name){ return -1};
            if(a.name > b.name){ return 1};
            return 0;
        });
        let countries = countryData.countries.all.map((country, i) => {
         	return (<MenuItem value={countryData.countries.all[i].alpha2} key={i} primaryText={ countryData.countries.all[i].name+' '+ countryData.countries.all[i].countryCallingCodes[0] } />);
        });


First we sort the country data list from it’s name. After that we made a list of “”s from this list of data.
Then we have to check whether the user changed or added the phone number and region (dial code).
It handles by this function mentioned above. ( onChange={this.handleCountryChange}> and
onChange={this.handleTelephoneNoChange} )

    handleCountryChange = (event, index, value) => {
        this.setState({'countryCode': value });
    }


Then we have to get the phone number using below function.

    handleTelephoneNoChange = (event, value) => {
        this.setState({'phoneNo': value});
    }


Next we have to update the function that triggers when user clicks the save button.

    handleSubmit = () => {
        let newCountryCode = !this.state.countryCode?
        this.intialSettings.countryCode:this.state.countryCode;
        let newCountryDialCode = !this.state.countryDialCode?
        this.intialSettings.countryDialCode:this.state.countryDialCode;
        let newPhoneNo = this.state.phoneNo;
        let vals = {
            countryCode: newCountryCode,
            countryDialCode: newCountryDialCode,
            phoneNo: newPhoneNo
}
let settings = Object.assign({}, vals);
cookies.set('settings', settings);
 this.implementSettings(vals);
 }


This code snippet stores Country Code, Country Dial code and phone no in the server.
Now we have to update the Store. Here we are going to change UserPreferencesStore “UserPreferencesStore” .
First we have to setup default values for things we are going to store.

let _defaults = {
	  CountryCode: 'US',
   	  CountryDialCode: '+1',
   	  PhoneNo: ''
}


Finally we have to update the dispatchToken to change and get these new data

UserPreferencesStore.dispatchToken = ChatAppDispatcher.register(action => {
   switch (action.type) {
       case ActionTypes.SETTINGS_CHANGED: {
           let settings = action.settings;
           if(settings.hasOwnProperty('theme')){
                   _defaults.Theme = settings.theme;
           }
           if(settings.hasOwnProperty('countryDialCode')){
               _defaults.countryDialCode = settings.countryDialCode;
           }
           if(settings.hasOwnProperty('phoneNo')){
               _defaults.phoneNo = settings.phoneNo;
           }
           if(settings.hasOwnProperty('countryCode')){
               _defaults.countryCode = settings.countryCode;
           }
           UserPreferencesStore.emitChange();
           break;
}
}


Finally application is ready to store and update Mobile phone number and region code in the server.

Resources:

Continue ReadingHow to Store Mobile Settings in the Server from SUSI Web Chat Settings Page

Implementing Version Control System for SUSI Skill CMS

SUSI Skill CMS now has a version control system where users can browse through all the previous revisions of a skill and roll back to a selected version. Users can modify existing skills and push the changes. So a skill could have been edited many times by the same or different users and so have many revisions. The version control functionalities help users to :

  • Browse through all the revisions of a selected skill
  • View the content of a selected revision
  • Compare any two selected revisions highlighting the changes
  • Option to edit and rollback to a selected revision.

Let us visit SUSI Skill CMS and try it out.

  1. Select a skill
  2. Click on versions button
  3. A table populated with previous revisions is displayed

  1. Clicking on a single revision opens the content of that version
  2. Selecting 2 versions and clicking on compare selected versions loads the content of the 2 selected revisions and shows the differences between the two.
  3. Clicking on Undo loads the selected revision and the latest version of that skill, highlighting the differences and also an editor loaded with the code of the selected revision to make changes and save to roll back.

How was this implemented?

Firstly, to get the previous revisions of a selected skill, we need the skills meta data including model, group, language and skill name which is used to make an ajax call to the server using the endpoint :

http://api.susi.ai/cms/getSkillHistory.json?model=MODEL&group=GROUP&language=LANGUAGE&skill=SKILL_NAME

We create a new component SkillVersion and pass the skill meta data in the pathname while accessing that component. The path where SkillVersion component is loaded is /:category/:skill/versions/:lang . We parse this data from the path and set our state with skill meta data. In componentDidMount we use this data to make the ajax call to the server to get all previous version data and update our state. A sample response from getSkillHistory endpoint looks like :

{
  "session": {
    "identity": {
      "type": "",
      "name": "",
      "anonymous":
    }
  },
  "commits": [
    {
      "commitRev": "",
      "author_mail": "AUTHOR_MAIL_ID",
      "author": "AUTOR_NAME",
      "commitID": "COMMIT_ID",
      "commit_message": "COMMIT_MESSAGE",
     "commitName": "COMMIT_NAME",
     "commitDate": "COMMIT_DATE"
    },
  ],
  "accepted": TRUE/FALSE
}

We now populate the table with the obtained revision history. We used Material UI Table for tabulating the data. The first 2 columns of the table have radio buttons to select any 2 revisions. The left side radio buttons are for selecting the older versions and the right side radio buttons to select the more recent versions. We keep track of the selected versions through onCheck function of the radio buttons and updating state accordingly.

if(side === 'right'){
  if(!(index >= currLeft)){
    rightChecks.fill(false);
    rightChecks[index] = true;
    currRight = index;
  }
}
else if(side === 'left'){
  if(!(index <= currRight)){
    leftChecks.fill(false);
    leftChecks[index] = true;
    currLeft = index;
  }
}
this.setState({
  currLeftChecked: currLeft,
  currRightChecked: currRight,
  leftChecks: leftChecks,
  rightChecks: rightChecks,
});

Once 2 versions are selected and we click on compare selected versions button, we get the currently selected versions stored from getCheckedCommits function and we are redirected to /:category/:skill/compare/:lang/:oldid/:recentid where we pass the selected 2 revisions commitIDs in the URL.

{(this.state.commitsChecked.length === 2) &&
<Link to={{
  pathname: '/'+this.state.skillMeta.groupValue+
            '/'+this.state.skillMeta.skillName+
            '/compare/'+this.state.skillMeta.languageValue+
            '/'+checkedCommits[0].commitID+
            '/'+checkedCommits[1].commitID,
}}>
  <RaisedButton
    label='Compare Selected Versions'
    backgroundColor='#4285f4'
    labelColor='#fff'
    style={compareBtnStyle}
  />
</Link>
}

SkillHistory Component is now loaded and the 2 selected revisions commitIDs are parsed from the URL pathname. Once we have the commitIDs we make ajax calls to the server to get the code for that particular commit. The skill meta data is also parsed from the URL path which is required to make the server call to getFileAtCommitID.

http://api.susi.ai/cms/getSkillHistory.json?model=MODEL&group=GROUP&language=LANGUAGE&skill=SKILL_NAME&commitID=COMMIT_ID

We make the ajax calls in componentDidMount and update the state with the received data. A sample response from getFileAtCommitID looks like :

{
  "accepted": TRUE/FALSE,
  "file": "CONTENT",
  "session": {
    "identity": {
       "type": "",
       "name": "",
       "anonymous":
    }
  }
}

We populate the code of each revision in an editor. We used react-ace as our editor component where we use the value prop to populate the content and display it in read-only mode.

<AceEditor
  mode='java'
  readOnly={true}
  theme={this.state.editorTheme}
  width='100%'
  fontSize={this.state.fontSizeCode}
  height= '400px'
  value={this.state.commitData[0].code}
  showPrintMargin={false}
  name='skill_code_editor'
  editorProps={{$blockScrolling: true}}
/>

We then show the differences between the 2 selected versions content. To compare and highlight the differences, we used react-diff package which takes in the content of both the commits as inputA and inputB props and we compare character by character using the type chars prop. Here input A is compared with input B. The component compares and returns the highlighted element which we display in a scrollable div preventing overflows.

{/* latest code should be inputB */}
<Diff
  inputA={this.state.commitData[0].code}
  inputB={this.state.commitData[1].code}
  type='chars'
/>

Clicking on Undo then redirects to /:category/:skill/edit/:lang/:latestid/:revertid where latest id is the commitID of the latest revision and revert id is the commitID of the oldest commit ID selected amongst the 2 commits selected initially. This redirects to SkillRollBack component where we again parse the skill meta data and the commit IDs from the URL pathname and call getFileAtCommitID to get the content for the latest and the reverting commit and again populate the content in editor using react-ace and also show the differences using react-diff and finally load the modify skill component where an editor is preloaded with the content of the reverting commit and a similar interface like modify skill is shown where user can edit the content of the reverting commit and push the changes.

let baseUrl = this.getSkillAtCommitIDUrl() ;
let self = this;
var url1 = baseUrl + self.state.latestCommit;
$.ajax({
  url: url1,
  jsonpCallback: 'pc',
  dataType: 'jsonp',
  jsonp: 'callback',
  crossDomain: true,
  success: function (data1) {
    var url2 = baseUrl + self.state.revertingCommit;
    $.ajax({
      url: url2,
      jsonpCallback: 'pd',
      dataType: 'jsonp',
      jsonp: 'callback',
      crossDomain: true,
      success: function (data2) {
        self.updateData([{
        code:data1.file,
        commitID:self.state.latestCommit,
      },{
        code:data2.file,
        commitID:self.state.revertingCommit,
      }])
      }
    });
  }
});

Here, we make nested ajax calls to maintain synchronization and update state after we receive data from both the calls else if we make ajax calls in a loop, then the second ajax call doesn’t wait for the first one to finish and is most likely to fail.

This is how the skill version system was implemented in SUSI Skill CMS. You can find the complete code at SUSI Skill CMS Repository. Feel free to contribute.

Resources:

Continue ReadingImplementing Version Control System for SUSI Skill CMS

Implementing Internationalization with Weblate Integration on SUSI Web Chat

SUSI Web Chat supports different browser languages on the Chat UI. The content used to render the date/time formats and the text is translated to the preferred language based on the language selected in the Language Settings.

To test it out on SUSI Web Chat, 

  1. Head over to http://chat.susi.ai
  2. Go to settings from the right dropdown.
  3. Set your preferred language inside Language Settings.
  4. Save and see the SUSI Chat render in the preferred language.

To achieve Internationalization, a number of important steps are to be followed –

  1. The best approach to follow would be to use po/pot files and get the translated string from the files. The format of the files can be used as follows. This is a JSON Structure for Javascript Projects. (File : de.json)
{
   "About":"About",
   "Chat":"Chat",
   "Skills":"Skills",
   "Settings":"Settings",
   "Login":"Login",
   "Logout":"Logout",
   "Themes": "Themes",
}


2. After creating the valid po/pot files in the right formats, we create a component which shall translate our text in the selected language and will import that particular string from that po file. To make it easier in Javascript we are using the JSON files that we created here.

3. Our Translate.react.js component is a special component which shall return us only a <span> text which shall get the User’s preferred language from the store and import that particular po/pot file and match the key as text which is being passed to it and give us the translated text. The following code snippet explains the above sentences more precisely.

changeLanguage = (text) => {
        this.setState({
            text:text
        })
  }
  // Here 'de' is the JSON file which we imported into this component
  componentDidMount() {
    let defaultPrefLanguage = this.state.defaultPrefLanguage;
    var arrDe = Object.keys(de);
    let text = this.state.text;
    if(defaultPrefLanguage!=='en-US'){
      for (let key=0;key<arrDe.length;key++) {
          if (arrDe[key]===text) {
              this.changeLanguage(de[arrDe[key]]);
          }
        }
    }
  } 
   render() {
        return <span>{this.state.text}</span>
     }

4. The next step is to bind all the text throughout our components into this <Translate text=” ”/> component which shall send us back the translated content. So any string in any component can be replaced with the following.

<Translate text="About" />

Here the text “About” is being sent over to the Translate.react.js component and it is getting us the German translation of the string About from the file de.json.

5. We then render the Translated content in our Chat UI. (File: Translate.react.js)


About Weblate

Weblate is a Web based translation tool with git integration supporting wide range of file formats and making it easy for translators to contribute. The translations should be kept within the same repository as source code and translation process should closely follow development. To know more about Weblate go to this link.

Integrating SUSI Web Chat with Weblate

  1. First, we deploy Weblate on our localhost using the installation guide given in these docs. I used the pip installation guide for Weblate as mentioned in this link. After doing that we copy weblate/settings_example.py to weblate/settings.py. Then we configure settings.py and use the following command to migrate the settings.
./manage.py migrate
  1. Next step is to create an admin using the following command.
./manage.py createadmin
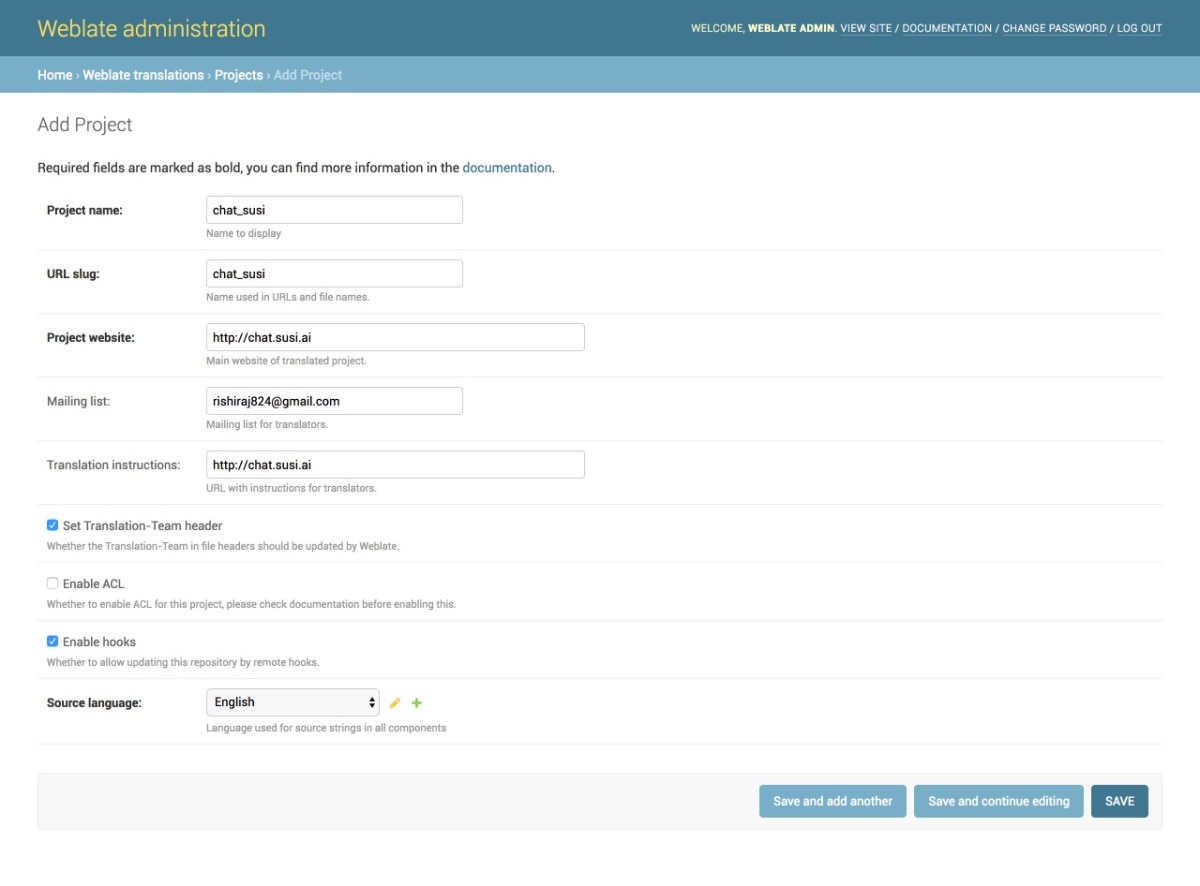
  1. We then add a project from our Admin dashboard by filling details in the following manner as shown in the image
  2. Once the project is added, we add the component to link our Translation files as shown in the image.
  3. Once the files are linked we will see our Overview Project Page and the Information. It can be seen in the image below. The screenshot shows a 100% translation that means all of our strings are translated correctly for German.
  4. To change any translation we make changes and push it to the repository where our SSH key generated from Weblate is added. A full guide to do that is mentioned in this link.
  5. We can push any changes to the repository by making changes in our local. This will generate a commit from the Weblate Admin in our repository as seen in the following screenshot.

Resources

  1. React Internationalization Library  – react-intl
  2. Official Docs about Weblate – Weblate docs.
  3. Format for po/pot files, JSON files etc. – https://docs.weblate.org/en/latest/formats.html#json-and-nested-structure-json-files
  4. Weblate – https://weblate.org
Continue ReadingImplementing Internationalization with Weblate Integration on SUSI Web Chat

Auto Deployment of SUSI Web Chat on gh-pages with Travis-CI

SUSI Web Chat uses Travis CI with a custom build script to deploy itself on gh-pages after every pull request is merged into the project. The build system auto updates the latest changes hosted on chat.susi.ai. In this blog, we will see how to automatically deploy the repository on gh pages.

To proceed with auto deploy on gh-pages branch,

  1. We first need to setup Travis for the project.
  2. Register on https://travis-ci.org/ and turn on the Travis for this repository.

Next, we add .travis.yml in the root directory of the project.

# Set system config
sudo: required
dist: trusty
language: node_js

# Specifying node version
node_js:
  - 6

# Running the test script for the project
script:
  - npm test

# Running the deploy script by specifying the location of the script, here ‘deploy.sh’ 

deploy:
  provider: script
  script: "./deploy.sh"


# We proceed with the cache if there are no changes in the node_modules
cache:
  directories:
    - node_modules

branches:
  only:
    - master

To find the code go to https://github.com/fossasia/chat.susi.ai/blob/master/.travis.yml

The Travis configuration files will ensure that the project is building for every change made, using npm test command, in our case, it will only consider changes made on the master branch.

If one wants to watch other branches one can add the respective branch name in travis configurations. After checking for build passing we need to automatically push the changes made for which we will use a bash script.

#!/bin/bash

SOURCE_BRANCH="master"
TARGET_BRANCH="gh-pages"

# Pull requests and commits to other branches shouldn't try to deploy.
if [ "$TRAVIS_PULL_REQUEST" != "false" -o "$TRAVIS_BRANCH" != "$SOURCE_BRANCH" ]; then
    echo "Skipping deploy; The request or commit is not on master"
    exit 0
fi

# Save some useful information
REPO=`git config remote.origin.url`
SSH_REPO=${REPO/https:\/\/github.com\//git@github.com:}
SHA=`git rev-parse --verify HEAD`

ENCRYPTED_KEY_VAR="encrypted_${ENCRYPTION_LABEL}_key"
ENCRYPTED_IV_VAR="encrypted_${ENCRYPTION_LABEL}_iv"
ENCRYPTED_KEY=${!ENCRYPTED_KEY_VAR}
ENCRYPTED_IV=${!ENCRYPTED_IV_VAR}
openssl aes-256-cbc -K $ENCRYPTED_KEY -iv $ENCRYPTED_IV -in deploy_key.enc -out ../deploy_key -d

chmod 600 ../deploy_key
eval `ssh-agent -s`
ssh-add ../deploy_key

# Cloning the repository to repo/ directory,
# Creating gh-pages branch if it doesn't exists else moving to that branch
git clone $REPO repo
cd repo
git checkout $TARGET_BRANCH || git checkout --orphan $TARGET_BRANCH
cd ..

# Setting up the username and email.
git config user.name "Travis CI"
git config user.email "$COMMIT_AUTHOR_EMAIL"

# Cleaning up the old repo's gh-pages branch except CNAME file and 404.html
find repo/* ! -name "CNAME" ! -name "404.html" -maxdepth 1  -exec rm -rf {} \; 2> /dev/null
cd repo

git add --all
git commit -m "Travis CI Clean Deploy : ${SHA}"

git checkout $SOURCE_BRANCH

# Actual building and setup of current push or PR.
npm install
npm run build
mv build ../build/

git checkout $TARGET_BRANCH
rm -rf node_modules/
mv ../build/* .
cp index.html 404.html

# Staging the new build for commit; and then committing the latest build
git add -A
git commit --amend --no-edit --allow-empty

# Deploying only if the build has changed
if [ -z `git diff --name-only HEAD HEAD~1` ]; then

  echo "No Changes in the Build; exiting"
  exit 0

else
  # There are changes in the Build; push the changes to gh-pages
  echo "There are changes in the Build; pushing the changes to gh-pages"

  # Actual push to gh-pages branch via Travis
  git push --force $SSH_REPO $TARGET_BRANCH
fi

This bash script will enable Travis CI user to push changes to gh pages, for this we need to store the credentials of the repository in encrypted form.

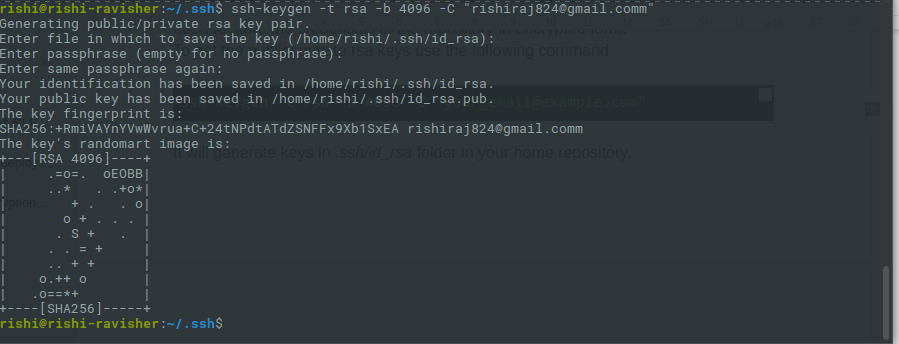
1. To get the public/private rsa keys we use the following command

ssh-keygen -t rsa -b 4096 -C "your_email@example.com"

2.  It will generate keys in .ssh/id_rsa folder in your home repository.

  1. Make sure you do not enter any passphrase while generating credentials otherwise Travis will get stuck at the time of decryption of the keys.
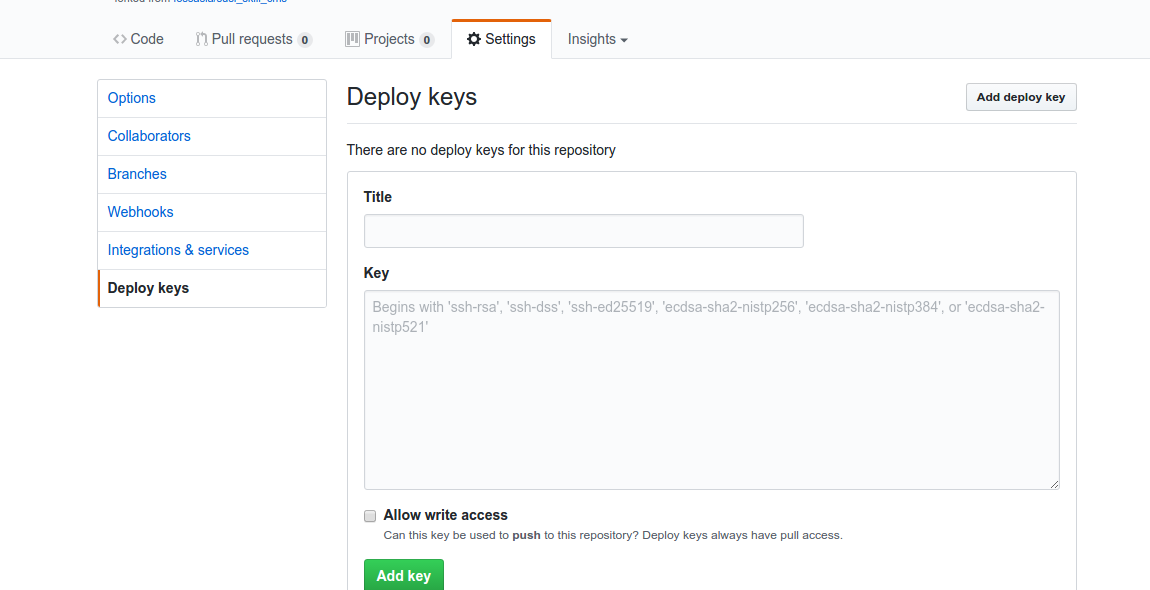
  2. Copy the public key and deploy the key to repository by visiting  

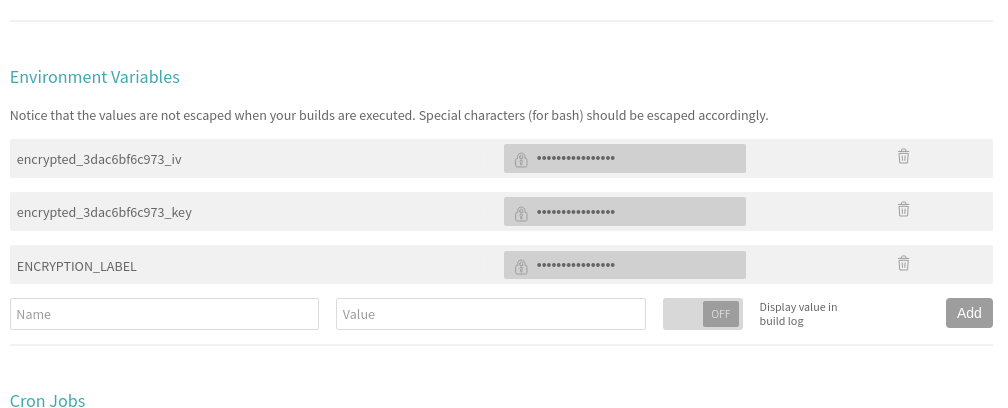
5. We also need to set the environment variable ENCRYPTED_KEY in Travis. Here’s a screenshot where to set it in the Travis repository dashboard.

6. Next, install Travis for encryption of keys.

sudo apt install ruby ruby-dev
sudo gem install travis

7. Make sure you are logged in to Travis, to login use the following command.

travis login

8. Make sure you have copied the ssh to deploy_key and then encrypt your private deploy_key and add it to root of your repository, use command –

travis encrypt-file deploy_key

9. After successful encryption, you will see a message

Please add the following to your build script (before_install stage in your .travis.yml, for instance):

openssl aes-256-cbc -K $encrypted_3dac6bf6c973_key -iv $encrypted_3dac6bf6c973_iv -in deploy_key.enc -out ../deploy_key -d
  1. Add the above-generated deploy_key in Travis and push the changes on your master branch. Do not push the deploy_key only the encryption file i.e., deploy_key.enc
  1. Finally, push the changes and create a Pull request and merge it to test the deployment. Visit Travis logs for more details and debugging.

Resources

Continue ReadingAuto Deployment of SUSI Web Chat on gh-pages with Travis-CI

Fetching Images for RSS Responses in SUSI Web Chat

Initially, SUSI Web Chat rendered RSS action type responses like this:

The response from the server initially only contained

  • Title
  • Description
  • Link

We needed to improvise the web search & RSS results display and also add images for the results.

The web search & RSS results are now rendered as :

How was this implemented?

SUSI AI uses Yacy to fetchRSSs feeds. Firstly the server using the console process to return the RSS feeds from Yacy needs to be configured to return images too.

"yacy":{
  "example":"http://127.0.0.1:4000/susi/console.json?q=%22SELECT%20title,%20link%20FROM%20yacy%20WHERE%20query=%27java%27;%22",
  "url":"http://yacy.searchlab.eu/solr/select?wt=yjson&q=",
  "test":"java",
  "parser":"json",
  "path":"$.channels[0].items",
  "license":""
}

In a console process, we provide the URL needed to fetch data from, the query parameter needed to be passed to the URL and the path to look for the answer in the API response.

  • url = <url>   – the URL to the remote JSON service which will be used to retrieve information. It must contain a $query$ string.
  • test = <parameter> – the parameter that will replace the $query$ string inside the given URL. It is required to test the service.

Here the URL used is :

http://yacy.searchlab.eu/solr/select?wt=yjson&q=QUERY

To include images in RSS action responses, we need to parse the images also from the Yacy response. For this, we need to add `image` in the selection rule while calling the console process

"process":[
  {
    "type":"console",
    "expression":"SELECT title,description,link FROM yacy WHERE query='$1$';"
  }
]

Now the response from the server for RSS action type will also include `image` along with title, description, and link. An example response for the query `Google` :

{
  "title": "Terms of Service | Google Analytics \u2013 Google",
  "description": "Read Google Analytics terms of service.",
  "link": "http://www.google.com/analytics/terms/",
  "image":   "https://www.google.com/images/branding/googlelogo/1x/googlelogo_color_116x41dp.png",
}

However, the results at times, do not contain images because there are none stored in the index. This may happen if the result comes from p2p transmission within Yacy where no images are transmitted. So in cases where images are not returned by the server, we use the link preview service to preview the link and fetch the image.

The endpoint for previewing the link is :

BASE_URL+'/susi/linkPreview.json?url=URL'

On the client side, we first search the response for data objects with images in API actions. And the amongst the remaining data objects in answers[0].data, we preview the link to fetch image keeping a check on the count. This needs to be performed for processing the history cognitions too.To preview the remaining links in a loop, we cannot make ajax calls directly in a loop. To handle this, nested ajax calls are made using the function previewURLForImage() where we loop through the remaining links and on the success we decrement the count and call previewURLForImage() on the next link and on error we try previewURLForImage() on the next link without decrementing the count.

success: function (rssResponse) {
  if(rssResponse.accepted){
    respData.image = rssResponse.image;
    respData.descriptionShort = rssResponse.descriptionShort;
    receivedMessage.rssResults.push(respData);
  }
  if(receivedMessage.rssResults.length === count ||
    j === remainingDataIndices.length - 1){
    let message = ChatMessageUtils.getSUSIMessageData(receivedMessage, currentThreadID);
    ChatAppDispatcher.dispatch({
      type: ActionTypes.CREATE_SUSI_MESSAGE,
      message
    });
  }
  else{
    j+=1;
    previewURLForImage(receivedMessage,currentThreadID,
BASE_URL,data,count,remainingDataIndices,j);
  }
},

And we store the results as rssResults which are used in MessageListItems to fetch the data and render. The nested calling of previewURLForImage() ends when we have the required count of results or we have finished trying all links for previewing images. We then dispatch the message to the message store. We now improvise the UI. I used Material UI Cards to display the results and for the carousel like display, react-slick.

<Card className={cardClass} key={i} onClick={() => {
  window.open(tile.link,'_blank')
}}>
  {tile.image &&
    (
      <CardMedia>
        <img src={tile.image} alt="" className='card-img'/>
      </CardMedia>
    )
  }
  <CardTitle title={tile.title} titleStyle={titleStyle}/>
  <CardText>
    <div className='card-text'>{cardText}</div>
    <div className='card-url'>{urlDomain(tile.link)}</div>
  </CardText>
</Card>

We used the full width of the message section to display the results by not wrapping the result in message-list-item class. The entire card is hyperlinked to the link. Along with title and description, the URL info is also shown at the bottom right. To get the domain name from the link, urlDomain() function is used which makes use of the HTML anchor tag to get the domain info.

function urlDomain(data) {
  var a = document.createElement('a');
  a.href = data;
  return a.hostname;
}

To prevent stretching of images we use `object-fit: contain;` to make the images fit the image container and align it to the middle.

We finally have our RSS results with images and an improvised UI. The complete code can be found at SUSI WebChat Repo. Feel free to contribute

Resources
Continue ReadingFetching Images for RSS Responses in SUSI Web Chat

Implementing Text To Speech Settings in SUSI WebChat

SUSI Web Chat has Text to Speech (TTS) Feature where it gives voice replies for user queries. The Text to Speech functionality was added using Speech Synthesis Feature of the Web Speech API. The Text to Speech Settings were added to customise the speech output by controlling features like :

  1. Language
  2. Rate
  3. Pitch

Let us visit SUSI Web Chat and try it out.

First, ensure that the settings have SpeechOutput or SpeechOutputAlways enabled. Then click on the Mic button and ask a query. SUSI responds to your query with a voice reply.

To control the Speech Output, visit Text To Speech Settings in the /settings route.

First, let us look at the language settings. The drop down list for Language is populated when the app is initialised. speechSynthesis.onvoiceschanged function is triggered when the app loads initially. There we call speechSynthesis.getVoices() to get the voice list of all the languages currently supported by that particular browser. We store this in MessageStore using ActionTypes.INIT_TTS_VOICES action type.

window.speechSynthesis.onvoiceschanged = function () {
  if (!MessageStore.getTTSInitStatus()) {
    var speechSynthesisVoices = speechSynthesis.getVoices();
    Actions.getTTSLangText(speechSynthesisVoices);
    Actions.initialiseTTSVoices(speechSynthesisVoices);
  }
};

We also get the translated text for every language present in the voice list for the text – `This is an example of speech synthesis` using google translate API. This is called initially for all the languages and is stored as translatedText attribute in the voice list for each element. This is later used when the user wants to listen to an example of speech output for a selected language, rate and pitch.

https://translate.googleapis.com/translate_a/single?client=gtx&sl=en-US&tl=TARGET_LANGUAGE_CODE&dt=t&q=TEXT_TO_BE_TRANSLATED

When the user visits the Text To Speech Settings, then the voice list stored in the MessageStore is retrieved and the drop down menu for Language is populated. The default language is fetched from UserPreferencesStore and the default language is accordingly highlighted in the dropdown. The list is parsed and populated as a drop down using populateVoiceList() function.

let voiceMenu = voices.map((voice,index) => {
  if(voice.translatedText === null){
    voice.translatedText = this.speechSynthesisExample;
  }
  langCodes.push(voice.lang);
  return(
    <MenuItem value={voice.lang}
              key={index}
              primaryText={voice.name+' ('+voice.lang+')'} />
  );
});

The language selected using this dropdown is only used as the language for the speech output when the server doesn’t specify the language in its response and the browser language is undefined. We then create sliders using Material UI for adjusting speech rate and pitch.

<h4 style={{'marginBottom':'0px'}}><Translate text="Speech Rate"/></h4>
<Slider
  min={0.5}
  max={2}
  value={this.state.rate}
  onChange={this.handleRate} />

The range for the sliders is :

  • Rate : 0.5 – 2
  • Pitch : 0 – 2

The default value for both rate and pitch is 1. We create a controlled slider saving the values in state and using onChange function to record change in values. The Reset buttons can be used to reset the rate and pitch values respectively to their default values. Once the language, rate and pitch values have been selected we can click on `Play a short demonstration of speech synthesis`  to listen to a voice reply with the chosen settings.

{ this.state.playExample &&
  (
    <VoicePlayer
       play={this.state.play}
       text={voiceOutput.voiceText}
       rate={this.state.rate}
       pitch={this.state.pitch}
       lang={this.state.ttsLanguage}
       onStart={this.onStart}
       onEnd={this.onEnd}
    />
  )
}

We use the VoicePlayer by passing the required props to get the speech output. onStart and onEnd functions are triggered at the beginning and ending of the speech synthesis and are used to control the state from the parent component. Chosen language, rate, pitch and translated text are passed as props to VoicePlayer which creates a new SpeechSynthesisUtterance() with the passed props and plays the speech output.

On saving these settings and then using the Mic button to get voice replies we see that the voice output is controlled according to the selected settings.

Finally, we have to store the selected settings on the server and ensure that these are pulled when the app is initialized. The format in which these settings are stored in the server is :

Speech Rate

- Used to control rate of speech output.
- SETTING_NAME :  `speechRate`
- SETTING_VALUE : `0.5 - 2`
- DEFAULT_VALUE : `1`
 
Speech Pitch

- Used to control pitch of speech output.
- SETTING_NAME :  `speechPitch`
- SETTING_VALUE : `0 - 2`
- DEFAULT_VALUE : `1`
 
TTS Language

- Used to set the language for Text-To-Speech used when the response from server doesnt specify language and the browser language is also undefined.
- SETTING_NAME :  `ttsLanguage`
- SETTING_VALUE : `Language Code (string)`
- DEFAULT_VALUE : `en-US`

This is how the Text To Speech Settings were implemented in SUSI Web Chat. The complete code can be found at SUSI Web Chat Repository.

PS: To test whether your browser supports Text To Speech, open your browser console and try the following :

  • var msg = new SpeechSynthesisUtterance(‘Hello World’);
  • window.speechSynthesis.speak(msg)

If you get a speech output then the Web API Speech Synthesis is supported by your browser and Text To Speech features of SUSI Web Chat will work. The Web Speech API has support for all latest Chrome browsers as mentioned in the Web Speech API Mozilla docs.However there are few bugs with some Chromium versions please check out more on how to fix them locally here in this link.

Resources:


Continue ReadingImplementing Text To Speech Settings in SUSI WebChat

Sorting Users and Implementing Animations on SUSI Web Chat Team Page

While we were developing the chat application, we wanted to show details of Developers.  So we planned to build a team page for SUSI Web Chat Application. In this post I discuss few things we built there. Like sorting feature, animations of the page, usage of Material UI.

First we made an array of objects to store user details. In that array we grouped them in sub arrays so we can refer them in different sections separately. We stored following data in “TeamList.js” in an array.

var team = [{
 'mentors': [{
   'name': 'Mario Behling',
   'github': 'http://github.com/mariobehling',
   'avatar': 'http://fossasia.org/img/mariobehling.jpg',
   'twitter': 'https://twitter.com/mariobehling',
   'linkedin': 'https://www.linkedin.com/in/mariobehling/',
   'blog': '#'
 }]
},{ 'server': [{
    }]
}

There was a requirement to sort developers by their name so we had to build a way to sort out array data which are in main array. This is how we built that.
The function we are going to use for sorting.

   function compare(a, b) {
     if (a.name < b.name) { return -1; }
     if (a.name > b.name) { return 1; }
     return 0;
   }

This is how we have used it to sort developers.

import team from './TeamList';
team[1].server.sort(compare);

In this function we took values of object two by two and compared.
Now we have to show these sorted information on view.
Extract data that we want from array and we used material UI Cards to show these data on view.
This is how we extracted data from the array.

   team[1].server.sort(compare);
   let server = team[1].server.map((serv, i) => {
     return ( <Card className='team-card' key={i}>
         <CardMedia className="container" >
           <img src={serv.avatar} alt={serv.name} className="image" />
           <div className="overlay" >
             <div className="text"> <FourButtons member={serv} /> </div>
           </div>
         </CardMedia>
         <CardTitle title={serv.name} subtitle={serv.designation} />
       </Card>)   })

Now it shows data on the view.
“” contains an image of the member. We need to show social media links of the user on mouseover. We did that using simple CSS. I added a block comment around those particular styles. Check those styles here.

.overlay {
 position: absolute;
 bottom: 100%;
 left: 0;
 right: 0;
 background-color: #000;
 overflow: hidden;
 width: 100%;
 height:0;
 transition: .3s ease;
 opacity:0;
}
.container:hover .overlay {
 bottom: 0;
 height: 100%;
 opacity:0.7;
}

Above lines show that how we made the animation of the overlay animation.

Now we want to show social media buttons on the overlay. We made another separate component for buttons and return those like this.

render() {
       let member= this.props.member;
       return (<div>
         <CardActions>
           <IconButton href={member.github} target="_blank" >
  <CardActions>
		</div>)}

Finally we showed those data on Team page. We returned these JSX from render(){} method.

         <div className="team-header">
           <div className="support__heading">Developers</div>
         </div>
         <div className='team-container'>{server}</div>

I have mentioned few resources which I used to implement these features. If you are willing to contribute SUSI AI Web Chat application. Fork our repository on github.

Resources

Documentation of Array.sort https://developer.mozilla.org/en-US/docs/Web/JavaScript/Reference/Global_Objects/Array/sort

How to use Image overlay CSS effects: https://www.w3schools.com/howto/howto_css_image_overlay.asp

Continue ReadingSorting Users and Implementing Animations on SUSI Web Chat Team Page

Implementation of React Routers in SUSI Web Chat

When we were developing the SUSI Web Chat application we wanted to implement set of static pages with the chat application. In the start we just wanted to navigate  through different static pages and move back to the web chat application. But it takes time to load a new page when user clicks on a link. Our goal was therefore to minimize the loading time by using lazy loading. For that we used react-route .It is standard library for react js.

From the docs:

“React Router keeps your UI synced with the URL. It has a simple API with powerful features like lazy code loading, dynamic route matching, and location transition handling built right in. Make the URL your first thought, not an after-thought.” (https://www.npmjs.com/package/react-router-plus)

We need react-route to be installed in our application first. We can install it using NPM by running this command on project folder.

npm install --save react-router-dom

Next we have to set up our routes. We have two types of headers in our application. One is chat application header, second one is static page header. In static page header we have a navigation to switch between static pages.
First we need to choose the router type because there are two types of routers in react. “” and “” we can use “” in our example because our server can handle dynamic requests. If we are requesting data from static page we should use “” .
We used that in “” and made another new component called “” and used it on “index.js” like this.

import { BrowserRouter as Router } from 'react-router-dom';
Import App from .App;
 ReactDOM.render(
  	<IntlProvider locale={defaultPrefLanguage}>
		<Router> <App /> </Router>
	</IntlProvider>,
  	document.getElementById('root')  );

In “App.js” we can set up routes like this.

        <Switch>
            <Route exact path='/' component={ChatApp}/>
            <Route exact path="/overview" component={Overview} />
            <Route exact path='/blog' component={Blog} />
            <Route exact path="/logout" component={Logout} />
            <Route exact path="/settings" component={Settings} />
            <Route exact path="*" component={NotFound} />
        </Switch>

We use elements to render component when they match with the corresponding path. We use “path” to add router location that we need to match width the component. We use “exact” property to render the component if location exactly matches with the “path”. If we do not use “exact” property it renders when we have child routes after the path like “/blog/1 “ .
We used “” element to group routes.
We can’t use anchor () tags to navigate pages without reloading. We have to use tags instead of that. We have to replace all the places we have used

<a href= ‘URL’>lable name </a>

with this,

<Link to=’URL’>Lable name</Link>   

After doing above changes application will perform faster and it will load all page contents soon after you click the navigation links.

If you would like to join with FOSSASIA and contribute to SUSI Web Chat Application please fork this repository on Github.

Resources

Continue ReadingImplementation of React Routers in SUSI Web Chat

Implementing the Feedback Functionality in SUSI Web Chat

SUSI AI now has a feedback feature where it collects user’s feedback for every response to learn and improve itself. The first step towards guided learning is building a dataset through a feedback mechanism which can be used to learn from and improvise the skill selection mechanism responsible for answering the user queries.

The flow behind the feedback mechanism is :

  1. For every SUSI response show thumbs up and thumbs down buttons.
  2. For the older messages, the feedback thumbs are disabled and only display the feedback already given. The user cannot change the feedback already given.
  3. For the latest SUSI response the user can change his feedback by clicking on thumbs up if he likes the response, else on thumbs down, until he gives a new query.
  4. When the new query is given by the user, the feedback recorded for the previous response is sent to the server.

Let’s visit SUSI Web Chat and try this out.

We can find the feedback thumbs for the response messages. The user cannot change the feedback he has already given for previous messages. For the latest message the user can toggle feedback until he sends the next query.

How is this implemented?

We first design the UI for feedback thumbs using Material UI SVG Icons. We need a separate component for the feedback UI because we need to store the state of feedback as positive or negative because we are allowing the user to change his feedback for the latest response until a new query is sent. And whenever the user clicks on a thumb, we update the state of the component as positive or negative accordingly.

import ThumbUp from 'material-ui/svg-icons/action/thumb-up';
import ThumbDown from 'material-ui/svg-icons/action/thumb-down';

feedbackButtons = (
  <span className='feedback' style={feedbackStyle}>
    <ThumbUp
      onClick={this.rateSkill.bind(this,'positive')}
      style={feedbackIndicator}
      color={positiveFeedbackColor}/>
    <ThumbDown
      onClick={this.rateSkill.bind(this,'negative')}
      style={feedbackIndicator}
      color={negativeFeedbackColor}/>
  </span>
);

The next step is to store the response in Message Store using saveFeedback Action. This will help us later to send the feedback to the server by querying it from the Message Store. The Action calls the Dispatcher with FEEDBACK_RECEIVED ActionType which is collected in the MessageStore and the feedback is updated in the Message Store.

let feedback = this.state.skill;

if(!(Object.keys(feedback).length === 0 &&    
feedback.constructor === Object)){
  feedback.rating = rating;
  this.props.message.feedback.rating = rating;
  Actions.saveFeedback(feedback);
}

case ActionTypes.FEEDBACK_RECEIVED: {
  _feedback = action.feedback;
  MessageStore.emitChange();
  break;
}

The final step is to send the feedback to the server. The server endpoint to store feedback for a skill requires other parameters apart from feedback to identify the skill. The server response contains an attribute `skills` which gives the path of the skill used to answer that query. From that path we need to parse :

  • Model : Highest level of abstraction for categorising skills
  • Group : Different groups under a model
  • Language : Language of the skill
  • Skill : Name of the skill

For example, for the query `what is the capital of germany` , the skills object is

"skills": ["/susi_skill_data/models/general/smalltalk/en/English-Standalone-aiml2susi.txt"]

So, for this skill,

    • Model : general
    • Group : smalltalk
    • Language : en
    • Skill : English-Standalone-aiml2susi

The server endpoint to store feedback for a particular skill is :

BASE_URL+'/cms/rateSkill.json?model=MODEL&group=GROUP&language=LANGUAGE&skill=SKILL&rating=RATING'

Where Model, Group, Language and Skill are parsed from the skill attribute of server response as discussed above and the Rating is either positive or negative and is collected from the user when he clicks on feedback thumbs.

When a new query is sent, the sendFeedback Action is triggered with the required attributes to make the server call to store feedback on server. The client then makes an Ajax call to the rateSkill endpoint to send the feedback to the server.

let url = BASE_URL+'/cms/rateSkill.json?'+
          'model='+feedback.model+
          '&group='+feedback.group+
          '&language='+feedback.language+
          '&skill='+feedback.skill+
          '&rating='+feedback.rating;

$.ajax({
  url: url,
  dataType: 'jsonp',
  crossDomain: true,
  timeout: 3000,
  async: false,
  success: function (response) {
    console.log(response);
  },
  error: function(errorThrown){
    console.log(errorThrown);
  }
});

This is how the feedback feedback mechanism works in SUSI Web Chat. The entire code can be found at SUSI Web Chat Repository.

Resources


Continue ReadingImplementing the Feedback Functionality in SUSI Web Chat