Adding Description to the Susi AI Skills

Susi skill CMS is an editor to write and edit skill easily. It follows an API-centric approach where the Susi server acts as API server and a web front-end act as the client for the API and provides the user interface. A skill is a set of intents. One text file represents one skill, it may contain several intents which all belong together. All the skills are stored in Susi Skill Data repository and the schema is as following.

Using this, one can access any skill based on four tuples parameters model, group, language, skill. To know what a skill is about we needed to add a !description operator which identifies the text as a description for the skill. Let’s check out how to achieve it.Susi Skill class provides parser methods for the set of intents, given as text files.

 public static JSONObject readEzDSkill(BufferedReader br) throws JSONException {}
if (line.startsWith("!") && (thenpos = line.indexOf(':')) > 0) {
        String head = line.substring(1, thenpos).trim().toLowerCase();
       String tail = line.substring(thenpos + 1).trim();
if (head.equals("description")) {
   description =tail;
    }
}
 if (description.length() > 0) intent.put("description", description); 

The method readEzDSkill parses the skill txt file, it checks if a line starts with ‘!description’ (‘bang operator with description’) it then stores the content in string variable description.
If a description is found in a skill, it is recorded and put into Json Array of intents.

private final Map<String, Set<String>> skillDescriptions; 
 if (intent.getDescription() !=null) {
  Set<String> descriptions = this.skillDescriptions.get(intent.getSkill());
  if (descriptions == null) {
     descriptions = new LinkedHashSet<>();
     this.skillDescriptions.put(intent.getSkill(), descriptions);
   }
   descriptions.add(intent.getDescription());
}

SusiMind class  process this json and stores the description in a map of skill path and description. This map is used by DescriptionSkillService to list descriptions for all the skills given its model, group and language. For adding the description servlet we need to inherit the service class from AbstractAPIHandler and implement APIhandler interface.In Susi Server, an abstract class AbstractAPIHandler extending HttpServelets and implementing API handler interface is provided.

 @Override
    public BaseUserRole getMinimalBaseUserRole() { return BaseUserRole.ANONYMOUS; }

    @Override
    public JSONObject getDefaultPermissions(BaseUserRole baseUserRole) {
        return null;
    }

    @Override
    public String getAPIPath() {
        return "/cms/getDescriptionSkill.json";
    }

The getAPIPath() methods sets the API endpoint path, it gets appended to base path which is 127.0.0.1:4000/cms/getDescriptionSkill.json for local host. The getMinimalBaseRole method tells the minimum Userrole required to access this servlet it can also be ADMIN, USER. In our case it is Anonymous. A User need not log in to access this endpoint.
Next, we implement serviceimpl method which gives us the desired response in JSON format.

@Override
    public ServiceResponse serviceImpl(Query call, HttpServletResponse response, Authorization rights, final JsonObjectWithDefault permissions) {
        String model = call.get("model", "");
        String group = call.get("group", "");
        String language = call.get("language", "");
        JSONObject descriptions = new JSONObject(true);
            for (Map.Entry<String, Set<String>> entry : DAO.susi.getSkillDescriptions().entrySet()) {
                String path = entry.getKey();
  if ((model.length() == 0 || path.indexOf("/" + model + "/") > 0) &&(group.length() == 0 || path.indexOf("/" + group + "/") > 0) &&(language.length() == 0 || path.indexOf("/" + language + "/") > 0)) {
      descriptions.put(path, entry.getValue());
   }
            }
            JSONObject json = new JSONObject(true)
                    .put("model", model)
                    .put("group", group)
                    .put("language", language)
                    .put("descriptions", descriptions);
        return new ServiceResponse(json);
    }

We can get the required parameters through a call.get() method where the first parameter is the key for which we want to get the value and second parameter is the default value. If the path contains the desired language, group and model, we return it as a response otherwise an error message is displayed. To check the response go to http://api.susi.ai/cms/getDescriptionSkill.json?model=general&group=knowledge&language=en or http://127.0.0.1:4000/cms/getDescriptionSkill.json.

This is how getDescriptionSkill service works. To add a description to the skill visit susi_skill_data, the storage place for susi skills. For more information and complete code take a look at Susi server and join gitter chat channel for discussions.

Resources

Continue ReadingAdding Description to the Susi AI Skills

How to integrate SUSI AI in Google Assistant

Google Assistant is a personal assistant by Google. Google Assistant can interact with other applications. In fact, we can integrate our own applications with Google Assistant using Actions on Google. In order to integrate SUSI action with Google Assistant we will follow these steps:

  1. Install Node.js from the link below on your computer if you haven’t installed it already. https://nodejs.org/en/
  2. Create a folder with any name and open a shell and change your current directory to the new folder you created. 
  3. Type npm init in the shell and enter details like name, version and entry point. 
  4. Create a file with the same name that you wrote in entry point in above-given step. i.e index.js and it should be in the same folder you created. 
  5. Type following commands in command line  npm install –save actions-on-google. After actions-on-google is installed, type npm install –save express.  On success, type npm install –save request, and at last type npm install –save body-parser. When all the modules are installed check your package.json file; therein you’ll see the modules in the dependencies portion.

    Your package.json file should look like this

    {
     "name": "susi_google",
     "version": "1.0.0",
     "description": "susi on google",
     "main": "app.js",
     "scripts": {
       "start": "node app.js"
     },
     "author": "",
     "license": "ISC",
     "dependencies": {
       "actions-on-google": "^1.1.1",
       "body-parser": "^1.17.2",
       "express": "^4.15.3",
       "request": "^2.81.0"
     }
    }
    
  6. Copy following code into file you created i.e index.js
    // Enable debugging
    process.env.DEBUG = 'actions-on-google:*';
    
    var Assistant = require('actions-on-google').ApiAiApp;
    var express = require('express');
    var bodyParser = require('body-parser');
    
    //defining app and port
    var app = express();
    app.set('port', (process.env.PORT || 8080));
    app.use(bodyParser.json());
    
    const SUSI_INTENT = 'name-of-action-you defined-in-your-intent';
    
    app.post('/webhook', function (request, response) {
     //console.log('headers: ' + JSON.stringify(request.headers));
     //console.log('body: ' + JSON.stringify(request.body));
    
     const assistant = new Assistant({request: request, response: response});
    
     function responseHandler (app) {
       // intent contains the name of the intent you defined in the Actions area of API.AI
       let intent = assistant.getIntent();
       switch (intent) {
         case SUSI_INTENT:
           var query = assistant.getRawInput(SUSI_INTENT);
           console.log(query);
    
           var options = {
           method: 'GET',
           url: 'http://api.asksusi.com/susi/chat.json',
           qs: {
               timezoneOffset: '-330',
               q: query
             }
           };
    
           var request = require('request');
           request(options, function(error, response, body) {
           if (error) throw new Error(error);
    
           var ans = (JSON.parse(body)).answers[0].actions[0].expression;
           assistant.ask(ans);
    
           });
           break;
    
       }
     }
     assistant.handleRequest(responseHandler);
    });
    
    // For starting the server
    var server = app.listen(app.get('port'), function () {
     console.log('App listening on port %s', server.address().port);
    });
    
  7. Now we will make a project on developer’s console of Actions on Google and after that, you will set up action on your project using API.AI
  8. Above step will open API.AI console create an agent there for the project you created above. 
  9. Now we have an agent. In order to create SUSI action on Google, we will define an “intent” from options in the left menu on API.AI, but as we have to receive responses from SUSI API so we have to set up webhook first.

     
  10. See “fulfillment” option in the left menu. Open to enable it and to enter the URL. We have to deploy the above-written code onto Heroku, but first, make a Github repository and push the files in the folder we created above.

    In command line change current directory to folder we created above and  write
    git init
    git add .
    git commit -m”initial”
    git remote add origin <URL for remote repository>
    git remote -v
    git push -u origin master 

    You will get URL for the remote repository by making a repository on your Github and copying this link of your repository.


  11. Now we have to deploy this Github repository to Heroku to get URL. 
  12. If you don’t have an account on Heroku sign up here https://www.heroku.com/ else just sign in and create a new app. 
  13. Deploy your repository onto Heroku from deploy option and choosing GitHub as a deployment method.
  14. Select automatic deployment so that when you make any changes in the Github repository, they are automatically deployed to Heroku.
  15. Open your app from an option on the top right and copy the link of your Heroku app and append it with /webhook and enter this URL into fulfillment URL.

    https://{Your_App_Name}.herokuapp.com/webhook
     
  16. After setting up webhook we will make an intent on API.AI, which will get what user is asking from SUSI. To create an intent, select “intent” from the left menu and create an intent with the information given in screenshot below and save your intent.

     
  17. After creating the intent, your agent is ready. You just have to integrate your agent with Actions on Google. Turn on its integration from the “integration” option in the left menu. 
  18. Your SUSI action on Google Assistant is ready now. To test it click on actions on Google in integration menu and choose “test” option.

  19. You can only test it with the same email you have used for creating the project in step 7. To test it on Google Assistant follow this demo video https://youtu.be/wHwsZOCKaYY

If you want to learn more about action on Google with API.AI refer to this link https://developers.google.com/actions/apiai/

Resources
Actions on Google: https://developers.google.com/actions/apiai/

Continue ReadingHow to integrate SUSI AI in Google Assistant

How to Receive Picture, Video and Link Type Responses from SUSI kik Bot

In this blog, I will explain how to receive picture, video and link messages from SUSI Kik bot. To do so we have to implement these types in our code.

We will start off by making SUSI kik bot first. Follow this tutorial to make SUSI Kik bot. Next, we will implement picture, video, and link type messages from our bot. To implement these message types we need chatID and username of a user who has sent the message to our bot. To get the username of user we will use the following code:

bot.onTextMessage((message) => {
    var chartID = message.chatId;
    var Username;
    bot.getUserProfile(message.from)
        .then((user) => {
            message.reply(`Hey ${user.username}!`);
            Username = user.username;
        });

Now as we have got the chatID and username we will use these and post a request to https://api.kik.com/v1/message to send pictures, video, and link type messages. To post these requests use below code.

1) Picture:

To send picture type message we will define the type to picture,  URL of the picture to be sent to user and username of the user that we got from the code above.

request.post({
   url: "https://api.kik.com/v1/message",
   auth: {
       user: 'your-bot-name',
       pass: 'your-api-key'
   },
   json: {
       "messages": [
       {
           'chatId': chatID,
           'type': 'picture',
           'to': Username,
           'picUrl': answer
       }
       ]
   }
});

2) Video:

To send video type message we will define the type to video, URL of the video to be sent to the user and username of the user that we got from the code above. In this request, we can also set extra attributes like mute and autoplay.

request.post({
   url: "https://api.kik.com/v1/message",
   auth: {
       user: 'your-bot-name',
       pass: 'your-api-key'
   },
   json: {
     "messages": [
       {
           "chatId": "chatID",
           "type": "video",
           "to": "laura",
           "videoUrl": "http://example.kik.com/video.mp4",
           "muted": true,
           "autoplay": true,
           "attribution": "camera"
       }
   ]
   }
});

3) Link:
To send link type message to the user we will define the type of link, URL to be sent to the user and username of the user that we got from the code above.

request.post({
   url: "https://api.kik.com/v1/message",
   auth: {
       user: 'your-bot-name',
       pass: 'your-api-key'
   },
   json: {
     "messages": [
       {
           "chatId": "chatID",
           "type": "link",
           "to": "laura",
           "url": "url-to-send"
       }
   ]
   }
});

If you want to learn more about kik API refer to https://dev.kik.com/#/docs/messaging

Resources
Kik API reference: https://dev.kik.com/#/docs/messaging

Continue ReadingHow to Receive Picture, Video and Link Type Responses from SUSI kik Bot

Encoding and Saving Images as Strings in Preferences in SUSI Android App

In this blog post, I’ll be telling about how to store images in preferences by encoding them into Strings and also how to retrieve them back. Many a times, you need to store an image in preferences for various purposes and then need to retrieve it back when required. In SUSI Android App, we need to store an image in preference to set the chat background. We just simply select image from gallery, convert image to a byte array, then do a Base 64 encoding to string, store it in preferences and later decode it and set the chat background.

Base64 Encoding-Decoding in Java

You may already know what Base 64 is but still here is a link to Wikipedia article explaining it. So, how to do a Base64 encoding-decoding in java? For that java has a class with all such methods already present. https://docs.oracle.com/javase/8/docs/api/java/util/Base64.html

According to the docs:

This class consists exclusively of static methods for obtaining encoders and decoders for the Base64 encoding scheme. The implementation of this class supports the following types of Base64 as specified in RFC 4648 and RFC 2045.

  • Basic
  • URL and Filename safe
  • MIME

So, you may just use Base64.encode to encode a byte array and Base64.decode to decode a byte array.

Implementation

1. Selecting image from gallery


Start Image Picker Intent and pick an image from gallery. After selecting you may also start a Crop Intent to crop image also. After selecting and cropping image, you will get a URI of the image.

override fun openImagePickerActivity() {
   val i = Intent(Intent.ACTION_PICK, android.provider.MediaStore.Images.Media.EXTERNAL_CONTENT_URI)
   startActivityForResult(i, SELECT_PICTURE)
}
val thePic = data.extras.getParcelable<Bitmap>("data")
val encodedImage = ImageUtils.Companion.cropImage(thePic)
chatPresenter.cropPicture(encodedImage)

2. Getting image from the URI using inputstream

Next step is to get the image from file using URI from the previous step and InputStream class and store it in a BitMap variable.

val imageStream: InputStream = context.contentResolver.openInputStream(selectedImageUri)
   val selectedImage: Bitmap
   val filePathColumn = arrayOf(MediaStore.Images.Media.DATA)
   val cursor = context.contentResolver.query(getImageUrl(context.applicationContext, selectedImageUri), filePathColumn, null, null, null)
   cursor?.moveToFirst()
   selectedImage = BitmapFactory.decodeStream(imageStream)

3. Converting the bitmap to ByteArray

Now, just convert the Bitmap thus obtained to a ByteArray using below code.

val baos = ByteArrayOutputStream()
   selectedImage.compress(Bitmap.CompressFormat.JPEG, 100, baos)
   val b = baos.toByteArray()

4. Base64 encode the ByteArray and store in preference

Encode the the byte array obtained in last step to a String and store it in preferences.

 val encodedImage = Base64.encodeToString(b, Base64.DEFAULT)
//now you have a string. You can store it in preferences

5. Decoding the String to image

Now whenever you want, you can just decode the stored Base64 encoded string to a byte array and then from byte array to a bitmap and use wherever you want.

fun decodeImage(context: Context, previouslyChatImage: String): Drawable {
   val b = Base64.decode(previouslyChatImage, Base64.DEFAULT)
   val bitmap = BitmapFactory.decodeByteArray(b, 0, b.size)
   return BitmapDrawable(context.resources, bitmap)
}

Summary

So, the main aim of this blog was to give an idea about how can you store images in preferences. There is no way to store them directly. So, you have to convert them to String by encoding them in Base64 format and then decoding it to use it. You also have other ways to store images like storing it in database etc but this one is simpler and fast.

Resources

  1. Stackoverflow answer to “How to save image as String” https://stackoverflow.com/questions/31502566/save-image-as-string-with-sharedpreferences
  2. Other Stackoverflow answer about “Saving Images in preferences” https://stackoverflow.com/questions/18072448/how-to-save-image-in-shared-preference-in-android-shared-preference-issue-in-a
  3. Official docs of Base64 class https://docs.oracle.com/javase/8/docs/api/java/util/Base64.html
  4. Wikipedia link for learning about Base64 https://en.wikipedia.org/wiki/Base64
  5. Stackoverflow answer for “What is Base64 encoding used for?” https://stackoverflow.com/questions/201479/what-is-base-64-encoding-used-for
Continue ReadingEncoding and Saving Images as Strings in Preferences in SUSI Android App

Adding IBM Watson TTS Support in Susi Assistant on Raspberry Pi

Susi Hardware project aims at creating a smart assistant for your home that you can run on your Raspberry Pi or similar Development Boards.
I previously wrote a blog on choosing a perfect Text to Speech engine for Susi AI and had used Flite as the solution for it. While Flite is an Open Source solution that can run locally on a client, it does not provide the same quality of voice and speed as cloud providers. We always crave for a more natural voice for better interaction with our assistant. It is always good to have more options. We, therefore, added IBM Watson Text to Speech API in SUSI Hardware project.

IBM Watson TTS can be added to a Python Project easily using the IBM Watson Developer SDK.

For using the IBM Watson Developer SDK for Text to Speech, first of all, we need to sign up for Bluemix
https://console.bluemix.net/registration/

After that, we will get the empty dashboard without any service added currently. We need to create a Text to Speech Service. To do so, click on Create Watson Service button


Select Watson on the left pane and then select Text to Speech service from the list.

Select the standard plan from the options and then click on create button.

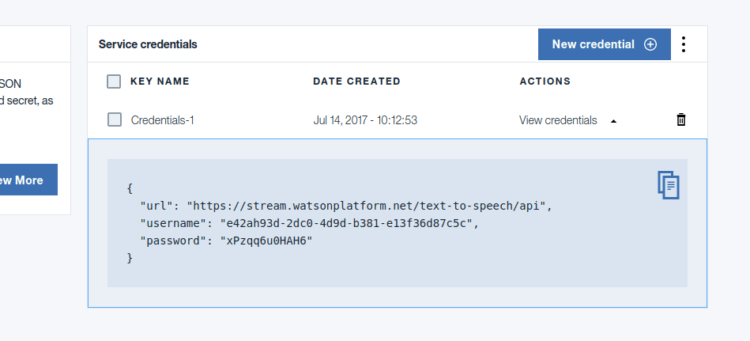
You will get service credentials for your newly created text to speech service. Save it for future reference.

After that, we need to add Watson developer cloud python package.

sudo pip3 install watson-developer-cloud

On Ubuntu with Python 3.5 watson-developer-cloud has some extra dependencies. Install them using the following command.

sudo apt install libssl-dev

Now we can add Text to Speech to our project. For that, we need to first import TextToSpeechV1 library. It can be added using following import statement.

from watson_developer_cloud import TextToSpeechV1

Now we need to create a new TextToSpeechV1 object using the Service Credentials we created earlier.

text_to_speech = TextToSpeechV1(
   username='API_USERNAME',
   password='API_PASSWORD')

We can now perform synthesis of a text input and write the incoming speech stream from IBM Watson API to a file.

with open('output.wav', 'wb') as audio_file:
   audio_file.write(
       text_to_speech.synthesize(text, accept='audio/wav’, voice='en-US_AllisonVoice'))

In the above code snippet,  we are opening an output file ‘output.wav’ for writing. We then write the binary audio data returned by text_to_speech.synthesize method. IBM Watson provides many free voices. We supply an argument specifying which voice we need to use. We are using English female ‘en-US_AllisonVoice’. You may test out more voices in the online demo here and select the voice that you find best.

We can play the ‘output.wav’ file using the play command from SoX. To do so, we need to install SoX binary.

sudo apt install sox libsox-fmt-all

We can play the file easily now using the following code.

import os
os.system('play output.wav')

The above code invokes the ‘play’ command from the SoX package to play the audio file. We can also use PyAudio to play the audio file but it would require us to manage the audio thread separately. Thus, SoX is a better solution.

Resources:

Continue ReadingAdding IBM Watson TTS Support in Susi Assistant on Raspberry Pi

Setup SUSI Assistant on Raspberry Pi in under 30 minutes

With our ever growing list of list of platforms supported by Susi AI, we now have a client that can run on Raspberry Pi and you can access it hands-free!! Here is a video that you can refer for its working.

But it might have left you wondering how you can replicate such a setup yourself? It is fairly easy and will be done fairly easy. Just follow the following instructions.

You need to have following hardware in order to have your own SUSI Assistant running on Raspberry Pi.

  • A Raspberry Pi (prefer 2 or 3) with Raspbian Jessie OS.
  • A stable internet connection.  ( Recommended 4 Mbps )
  • A USB Microphone /  USB Webcam with Microphone. You may buy one like this.
  • A Speaker that connects through 3.5mm jack. You may buy one like this.

After you get all the above items in order, you need to get access to a terminal of your Raspberry Pi. You can have that by either connecting a monitor to Raspberry Pi temporarily or by connecting to Raspberry Pi over SSH.

Once this is done, next step is the installation of the dependencies. The installation of the SUSI on Raspberry is automated after dependencies are installed. Run the following command on Raspberry Pi terminal.

sudo apt install git swig3.0 portaudio19-dev pulseaudio libpulse-dev unzip sox libatlas-dev libatlas-base-dev libsox-fmt-all python3

After this, you may check if your output and input devices are working alright. For this, run rec recording.wav . It will start recording audio and saving it to a file named recording.wav. Play back the file using play recording.wav If you hear your audio clearly, setup is done right else you need to configure your Audio Devices correctly.  Most of the time the configuration of Audio works out the box and devices are plug and play so you would not encounter any errors. If you are successful in configuring your devices, install extra dependencies for SUSI Hardware by running the automated install script. In your terminal run,

$ git clone https://github.com/fossasia/susi_hardware.git
$ cd susi_hardware
$ ./install.sh 

This will install all the remaining dependencies. After the above step is complete, you may run configuration file generator script to choose the Text to Speech and Speech to Text service according to your wish. For doing so, you need to run

$ python3 config_generator.py

Follow the instructions in the script. It will ask you to configure the default service for Text to Speech and Speech to Text and other options. After the configuration is complete, you can simply run the following command to start SUSI.

$ python3 main.py

This will start SUSI in a continuously listening mode. You may invoke SUSI anytime, just by saying SUSI followed by a query. The query will be answered by SUSI subsequently.

Since configurations for different hardware devices may vary, you may encounter some problems. In such a scenario, you may refer to the following resources to solve the issues.

Resources:

Continue ReadingSetup SUSI Assistant on Raspberry Pi in under 30 minutes

How RSS Action Type is Implemented in SUSI Android

Important skills of SUSI.AI are to display web search queries, a map of any location and provide a list of relevant information of a topic. RSS action type is similar to websearch action type but when the web search is to be performed on the client side, it is denoted by websearch action type and when the web search is performed by the server itself, it is denoted by rss action type. In this blog, I will show you how rss action type is implemented in SUSI Android.

In case of RSS action type server searches the internet and using RSS feeds, returns an array of objects containing :

  • Title
  • Description
  • Link
{
  “title”: “dog-doh: Definitions Index”,
  “description”: “dog-doh: Definitions Index. dog dog and pony show dog biscuit dog collar dog days …”,
  “link”: “http://websters.yourdictionary.com/index/dog-doh/”,
}

title: Title related to user query

description: Description of user query.

link: If user want to know more information then user can use link to find more information.

How rss action type is parsed in SUSI Android

SUSI  reply in json format. It should be parsed properly to show it in android app. We used retrofit library developed by square to parse json data. Retrofit library parse data according to model class. We code model class according to expected json reply. For example, each susi response contains answer jsonarray. There are two jsonarray data and action inside answer jsonarray. We made a different model class for each jsonarray.

First model class is SusiResponse. We used this model class to parse ‘answers’ jsonarray.

@SerializedName(“answers”)
private List<Answer> answers = new ArrayList<>();

Here we used List<>  because ‘answers’ jsonarray contain a list of jsonarray and jsonobject. Answer is second model class. We used it to parse two important jsonarray ‘data’ and ‘action’. The ‘action’ attribute has information about action type.

public class Answer {
   @SerializedName(“data”)
   private RealmList<Datum> data = new RealmList<>();
}

Here also we used the list because data jsonarray also contains a list of jsonobject but instead of simple list we used RealmList<> because after parsing we save data using realm. ‘data’ jsonarray contain multiple jsonobject and each jsonobject contain three important information ‘title’, ‘description’ and ‘link’.

Datum class is the main model class which is used to save and retrieve ‘title’, ‘description’ and ‘link’. setTitle, setLink and setDescription method of Datum class are used to save ‘title’, ‘description’ and ‘link’ and getTitle, getDescription and getLink method are use to retrieve ‘title’, ‘description’ and ‘link’.

How rss action type data is retrieved and saved

As already mentioned we used retrofit to retrieve data and realm to save data. susiResponse is response we received from SUSI server. We used susiResponse to retrieve a list of Datum class type data.

List<Datum> datumList = susiResponse.getAnswers().get(0).getData();

We then loop through datumList and from each element we extract ‘title’, ‘description’ and ‘link’ using getTitle(), getDescription() and getLink() method respectively. Datum class is model class for both retrofit and realm. realmDatum is instance of Datum class and datumRealmList is an instance of RealmList of Datum class type. After extracting data we save data using setTitle(), setDescription() and setLink().

for (Datum datum : datumList) {
          Datum realmDatum = bgRealm.createObject(Datum.class);
          realmDatum.setDescription(datum.getDescription());
          realmDatum.setLink(datum.getLink());
          realmDatum.setTitle(datum.getTitle());
         datumRealmList.add(realmDatum);
       }      

Layout design to show rss action type reply

There are three textview with id ‘title’, ‘description’ and ‘link’ to show ‘title’, ‘description’ and ‘link’ retrieved from SUSI’s reply. We used recyclerview to show list of results.

Datum datum = datumList.get(position);

holder.titleTextView.setText(Html.fromHtml(datum.getTitle()));

holder.descriptionTextView.setText(Html.fromHtml(datum.getDescription()));

holder.descriptionTextView.setText(Html.fromHtml(datum.getDescription()));

Resources

Continue ReadingHow RSS Action Type is Implemented in SUSI Android

How Anonymous Mode is Implemented in SUSI Android

Login and signup are an important feature for some android apps like chat app because user wants to save messages and secure messages from others. In SUSI Android we save messages for logged in user on the server corresponding to their account. But  users can also  use the app without logging in. In this blog, I will show you how the anonymous mode is implemented in SUSI Android .

When the user logs in using the username and password we provide a token to user for a limited amount of time, but in case of anonymous mode we never provide a token to the user and also we set ANONYMOUS_LOGGED_IN flag true which shows that the user is using the app anonymously.

PrefManager.clearToken()

PrefManager.putBoolean(Constant.ANONYMOUS_LOGGED_IN, true)

We use ANONYMOUS_LOGGED_IN flag to check user is using the app anonymously or not. When a user opens the app we first check user is already logged in or not. If the user is not logged in then we check ANONYMOUS_LOGGED_IN flag is true or false. The true means user is using the app in anonymous mode.

if(PrefManager.getBoolean(Constant.ANONYMOUS_LOGGED_IN, false)) {

 intent = new Intent(LoginActivity.this, MainActivity.class);

startActivity(intent);

}

Else we show login page to the user. The user can use app either by login using username and password or anonymously by clicking skip button. On clicking skip button ANONYMOUS_LOGGED_IN flag set to true.

public void skip() {

Intent intent = new Intent(LoginActivity.this,MainActivity.class);

PrefManager.clearToken();

PrefManager.putBoolean(Constant.ANONYMOUS_LOGGED_IN, true);

startActivity(intent);

}

If the user is using the app in anonymous mode but he/she want to login then he/she can login. There is an option for login in menu.

When the user selects login option from the menu, then it redirects the user to the login screen and ANONYMOUS_LOGGED_IN flag is set to false. ANONYMOUS_LOGGED_IN flag is set to false to ensure that instead of login if the user closes the app and again open it, then he/she can’t use the app until logged in or click skip button.

case R.id.action_login:

PrefManager.putBoolean(Constant.ANONYMOUS_LOGGED_IN, false);

Reference

Continue ReadingHow Anonymous Mode is Implemented in SUSI Android

How Settings of SUSI Android App Are Saved on Server

The SUSI Android allows users to specify whether they want to use the action button of soft keyboard as carriage return or else send action. The user can use SUSI.AI on different client like Android , iOS, Web. To give user uniform experience, we need to save user settings on the server so that if the user makes any change in setting in any chat client then that it changes in other chat clients too. So every chat client must store user specific data on the server to make sure that all chat clients access this data and maintain the same state for that particular user and must accordingly push and pull user data from and to the server to update the state of the app.

We used special key to store setting information on server. For eg.

Setting Key Value Use
Enter As Send enter_send true/false true means pressing enter key send message and false means pressing enter key adds new line.
Mic Input mic_input true/false true means default input method is speech but supports keyboard input too. false means the only input method is keyboard input.
Speech Always speech_always true/false true means we get speech output irrespective of input type.
Speech Output speech_output true/false true means we get speech output in case of speech input and false means we don’t get speech output.
Theme theme dark/light dark means theme is dark and light means theme is light

How setting is stored to server

Whenever user settings are changed, the client updates the changed settings on the server so that the state is maintained across all chat clients. When user change setting, we send three parameters to the server ‘key’, ‘value’ and ‘token’. For eg. let ‘Enter As Send’ is set to false. When user changes it from false to true, we immediately update it on the server. Here key will be ‘enter_send’ and value will be ‘true’.

The endpoint used to add or update User Settings is :

BASE_URL+’/aaa/changeUserSettings.json?key=SETTING_NAME&value=SETTING_VALUE&access_token=ACCESS_TOKEN’

SETTING_NAME’ is the key of the corresponding setting, ‘SETTING_VALUE’ is it’s updated value and ‘ACCESS_TOKEN’ is used to find correct user account. We used the retrofit library for network call.

settingResponseCall = ClientBuilder().susiApi .changeSettingResponse(key, value,  PrefManager.getToken())

If the user successfully updated the setting on the server then server reply with message ‘You successfully changed settings of your account!’

How setting is retrieved from server

We retrieve setting from the server when user login. The endpoint used to fetch User Settings is

BASE_URL+’/aaa/listUserSettings.json?access_token=ACCESS_TOKEN’

It requires “ACCESS_TOKEN” to retrieve setting data for a particular user. When user login, we use getUserSetting method to retrieve setting data from the server. PrefManager.getToken() is used to get “ACCESS_TOKEN”.

userSettingResponseCall = ClientBuilder().susiApi .getUserSetting(PrefManager.getToken())

We use userSettingResponseCall to get a response of ‘UserSetting’ type using which we can retrieve different setting from the server. ‘UserSetting’ contain ‘Session’ and ‘Settings’ and ‘Settings’ contain the value of all settings. We save the value of all settings on the server in string format, so after retrieving settings we convert them into the required format. For eg. ‘Enter As Send’ value is of boolean format, so after retrieving we convert it to boolean format.

var settings: Settings ?= response.body().settings

utilModel.setEnterSend((settings?.enterSend.toString()).toBoolean())

Reference

Continue ReadingHow Settings of SUSI Android App Are Saved on Server

How to Show Preview of Any Link in SUSI Android App

Sometimes in a chat app like Whatsapp, messenger we find that scrolling over a link, shows a preview of the link. Android-Link-Preview is an open source library which can be used to show the preview of a link. This library is developed by Leonardo Cardoso. This library makes preview from an url using all the information such as title, relevant texts and images. TextCrawler is the main class of this library. As the name suggests this class is used to crawl given link and grab relevant information. In this blog, I will show you how I used this library in SUSI Android to show the preview of the link.

How to include this library in your project

To use android-link-preview in our project we must add the dependency of the library in build.gradle(project) file

repositories {
  maven { url https://github.com/leonardocardoso/mvn-repo/raw/master/maven-deploy’   }
}

and build.gradle(module) file.

dependencies {
   compile org.jsoup:jsoup:1.8.3 // required
   compile com.leocardz:link-preview:1.2.1@aar
}

Now import these packages in class where you want to use link preview.

import com.leocardz.link.preview.library.LinkPreviewCallback;

import com.leocardz.link.preview.library.SourceContent;

import com.leocardz.link.preview.library.TextCrawler;

As the name suggests LinkpreviewCallback is a callback which has two important methods onPre() and onPos(). onPre() method called when library starts crawling the web to find relevant information and onPos() method called when crawling finished. This library uses SourceContent class to save and retrieve data.

LinkPreviewCallback linkPreviewCallback = new LinkPreviewCallback() {

@Override

public void onPre() { }

@Override

public void onPos(final SourceContent sourceContent, boolean b) {}

}

TextCrawler class is the main class which use makePreview() method to start web crawling.

makePreview() method needs two parameters

  • linkPreviewCallback : Instance of LinkPreviewCallback class.
  • Link : Link of web page to crawl.
TextCrawler textCrawler = new TextCrawler();

textCrawler.makePreview(linkPreviewCallback, link);

So when we call makePreview method, this library starts crawling the web. But before that, it checks if given link is URL of any image or not. If given link is URL of any image, then there is no need of crawling the web because we can’t find any other information from that link, but if it is not url of any image then it starts crawling the web. All websites are written in HTML. It uses jsoup library to parse HTML documents and extract useful data from that web page. After that it store different information separately i.e it store ‘title’, ‘description’ and ‘image url’ separately using setTitle(), setDescription() and setImage() methods of SourceContent class respectively.

sourceContent.setTitle(metaTags.get(“title”));

When it finishes all these tasks, it call onPos() method of LinkPreview class to inform that it has done its task and now we can use stored data using getTitle(), getDescription() and getImage() methods inside onPos() method.

sourceContent.getTitle();

Example :

We are using Android-link-preview in our SUSI Android app

Reference

Continue ReadingHow to Show Preview of Any Link in SUSI Android App