Ticketing System in Open-Event

So we implemented the ticketing system in the open-event. Basically we provide the user with two options – either add his/her own ticket url or use our own ticketing system. If the ticketing module is turned off then there is no option and the user has to add a Ticket URL.

1

2

Thus only Add Ticket URL is shown if the ticketing switch is turned off. However if the ticket switch is turned ON then we display our own ticketing system i.e. provide with an option to choose to the user.

3

Now the ticket feature can be either Free, Paid or by donation. If the ticket feature is free then just the normal ticketing details are entered by the user. However if Paid option is selected then a payment system is displayed to the user  where he/she has to choose the country and the currency in which the user will make the payment.

4

The user can pay through PayPal and we can also decide whether we want to add Tax to the event or not.

Continue ReadingTicketing System in Open-Event

Using Heroku pipelines to set up a dev and master configuration

The open-event-webapp project, which is a generator for event websites, is hosted on heroku. While it was easy and smooth sailing to host it on heroku for a single branch setup, we moved to a 2-branch policy later on. We make all changes to the development branch, and every week once or twice, when the codebase is stable, we merge it to master branch.

So we had to create a setup where  –

master branch –> hosted on –> heroku master

development branch –> hosted on –> heroku dev

Fortunately, for such a setup, Heroku provides a functionality called pipelines and a well documented article on how to implement git-flow


First and foremost, we created two separate heroku apps, called opev-webgen and opev-webgen-dev

To break it down, let’s take a look at our configuration. First step is to set up separate apps in the travis deploy config, so that when development branch is build, it pushed to open-webgen-dev and when master is built, it pushes to opev-webgen app. The required lines as you can see are –

https://github.com/fossasia/open-event-webapp/blob/master/.travis.yml#L25

https://github.com/fossasia/open-event-webapp/blob/development/.travis.yml#L25

Now, we made a new pipeline on heroku dashboard, and set opev-webgen-dev and opev-webgen in the staging and production stages respectively.

Screenshot from 2016-07-31 04-33-30 Screenshot from 2016-07-31 04-34-41

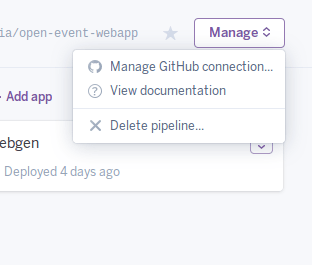
Then, using the “Manage Github Connection” option, connect this app to your github repo.

Screenshot from 2016-07-31 04-36-17

Once you’ve done that, in the review stage of your heroku pipeline, you can see all the existing PRs of your repo. Now you can set up temporary test apps for each PR as well using the Create Review App option.

Screenshot from 2016-07-31 04-37-38

So now we can test each PR out on a separate heroku app, and then merge them. And we can always test the latest state of development and master branches.

Continue ReadingUsing Heroku pipelines to set up a dev and master configuration

Working with Styles and Themes in Android

All those who have worked with styles and themes know that they’re hard to get right. We tend to get frustrated when we work with them. The hierarchy easily devolves into spaghetti code. How often did you want to change a style but feared you might break the continuity of the design of the app somewhere or the other.

I ran into a similar situation recently. I had to change the whole app’s style’s and theme by just changing the colors etc. in one location. This was for the Open Event android project where we wanted that while generating an apk by the apk generator we could change the color scheme of the app and could make it customisable for the needs of the organisations.

So, I’ll be talking about styling different views in this post. This shall be a long post!

When should we use styles

First of all, most of us get confused on when should we use styles instead of an inline attribute. Now I am going to show the rules that I follow:

When you have multiple views that should look identical ( Perhaps that do similar things)

Few Examples :

  • Payment screens. You want to get the user through a bunch of ordering and payment screens. You need similar kind of buttons there to make it look like a continuous process. Hence we make the Buttons follow one particular style
<style name="Payment_Buttons">
    <item name="android:minWidth">@dimen/button_min_width</item>
    <item name="android:minHeight">@dimen/button_min_height</item>
    <item name="android:background">@color/my_choice_color</item>
</style>

Try to use themes to tweak default styles

Themes provide a way of defining the default style of many widgets. For example :

If you want to define the default button for all of your payment screens in the example above, you can do something like :

<style name="ButtonTheme">
    <item name="android:buttonStyle">@style/MyButton</item>
</style>

But note that if you’re tweaking the default style, the only tricky part is to figure out the parent of your style but that’s really dificult due to a lot of variation within the different versions of android. If you’re using something that’s part of the AppCompat, then it’s okay. you don’t need to worry about the variations but when you want to style something not in AppCompat, then the main problem arises. So For example I want a button to be Holo until kitkat and then Material starting Lollipop, I’ll do something like this :

In values/styles.xml –

<style name="ButtonParent" Parent = "android:Widget.Holo.Button" />
<style name="ButtonParent.Holo">
    <item name="android:background">@drawable/my_bg</item>
</style>

Then in values-v21/styles.xml:

<style name="ButtonParent" parent ="android:Widget.Material.Button/>

This makes the button consistent with guidelines and the app looks perfect.

Now, Themes vs Styles

This is a topic which most of the developers don’t know about. They get confused on what is the difference between them. I was also not totally clear about this until recently. A theme is infact a style, the only difference is the usage.

  • We set a theme in the Manifest of the app or an activity
  • We set a style in a layout file or a widget
  • There are more styles than themes (Checkout styles.xml and themes.xml)
  • Definition of a theme is in the essence jsut a collection of references to stlyes that the theme will use.
  • To elaborate, let’s see the example of Theme.Holo :

It has a combination of

  1. Widget.Holo.Button
  2. Widget.Holo.Button.Small
  3. TextAppearence.Holo.Small
  4. TextAppearence.Holo.Small.Inverse

So, There can be different styles like this which can be referenced in a theme. Themes can be divided into 2 parts : General themes and sub themes

You can have a general them like Theme.ABC and if you want a variation of this general theme, for example no actionbar, you can add another theme like Theme.ABC.NoActionBar . This theme will not have the ActionBar

Inheritance

One of the interesting things that most people don’t know about is inhertance of styles/themes. What do I mean by this is that you can use existing styles and create some variations to suit different needs. There are 2 ways to use this inheritance. I’m going to try to explain and elorate on them :

  1. With a parent attribute

This is the most common way to use it and the way that most of the developers learn it while working on styles for the first time.

So how actually do we use it?

<style name = "Child" parent = "@style/Parent">
</style>

Here the child inherits all the properties of the style with the name “Parent” and define new properties in this style name “Child” where they can define new properties they want on top of the parent style.

2. With implicit style names

The other way to inherit styles/themes using the implicit way. Instead of setting a parent attribute, just prefix your new style/theme with the name of its parent and a dot. Something like this :

<style name = "Parent.Child">
</style>

This works the same as the previous method. Using this reduces some time to write additional parameter and is used by almost all experienced developers.

Plus you get some checks as well while writing code in Android studio. But be careful while using this as you need to take care of somethings :

For example,

  • The Parent style/theme needs to exist, Otherwise an error
  • You cannot inherit default themes and styles. For example you can’t create
<style name = "Theme.Holo.myTheme">

but you do this

<style name = "myTheme" parent = "Theme.Holo">

I know this can be overwhelming for a person who’s just starting with styles and themes. Trust me I was also not able to understand the concepts on the first go. I had to spend some time to grasp all that can be done using styles and themes. So I think this should be it for this blog. It’s already gotten pretty big.

Be sure to check out the Open event android project here and the usage of styles and themes there. Ciao till next time!

Continue ReadingWorking with Styles and Themes in Android

Implementing Module system in Open-Event

We had to implement the following modules in our system

  • Ticketing
  • Payments
  • Donations

However we wanted the super admin to enable or disable the modules. Hence we implemented the module system so that all three of them can be switched ON/OFF. The following screenshot will help understand better:

modules

So basically we have switches for all three modules. If ticketing is enabled only then can we see the payment and donations system because those two are part of the ticketing system. I created a module database table for storing the values in the database. To store the switch states I implemented the following javascript code:

<script type="text/javascript">

    var modulesForm = [{}];

    Array.prototype.setIncluded = function (field, state) {
        this[0][field].include = state ? 1 : 0;
    };


    function includeClick(button) {
        var $row = $(button).closest("tr");
        var $button = $(button);

        if ($button.data('group') == 'modules') {
            modulesForm.setIncluded($row.data('identifier'), button.checked);
        }
        persistData();
    }

    $(function () {
        $.each($(".modules-options-table").find('tr[data-identifier]'), function (key, row) {
            var $row = $(row);
            modulesForm[0][$row.data('identifier')] = {
                include: $row.find('.include-switch')[0].checked ? 1 : 0
            }
        });

        $('[data-toggle="tooltip"]').tooltip();

        persistData();
    });

    function persistData() {
        $("#modules-value-form").attr('value', JSON.stringify(modulesForm[0]));
    }


</script>

If a module is enabled i.e. if the module is included then the corresponding “include switch” is “checked” and then added to the modulesForm dict. In same way each value of the switch is added. Thus the dict will contain values for each switch/ module in the form:

[{ticketing:include:1},{payments:include:1},{donations:include:0}]

Now the only thing left to do is to iterate through the list and check if the module is included or not. Here is the code which does it:

class SuperAdminModulesView(SuperAdminBaseView):

    @expose('/')
    def index_view(self):
        module = DataGetter.get_module()
        include_settings = []

        if module:
            if module.ticket_include:
                include_settings.append('ticketing')
            if module.payment_include:
                include_settings.append('payments')
            if module.donation_include:
                include_settings.append('donations')

        return self.render('/gentelella/admin/super_admin/modules/modules.html', include_settings=include_settings)

    @expose('/save', methods=['GET', 'POST'])
    def modules_save_view(self):
        create_modules(request.form)

        include_settings = []
        settings = request.form.getlist('modules_form[value]')

        if settings[0][24] == '1':
            include_settings.append('ticketing')
        if settings[0][49] == '1':
            include_settings.append('payments')
        if settings[0][75] == '1':
            include_settings.append('donations')

        return self.render('/gentelella/admin/super_admin/modules/modules.html', include_settings=include_settings)

“settings” is the dict which we get from the modules page. “settings[0][24]” refers to the include value of ticketing, “settings[0][49]” refers to the include value of payments and the next for donations. Thus depending on whether it is 1 or 0 we add strings ‘ticketing’, ‘payments’ and ‘donations’ to the included_settings. Similarly the create_modules(form) adds the values to the database to store it.

def create_modules(form):
    modules_form_value = form.getlist('modules_form[value]')
    module = DataGetter.get_module()

    if module is None:
        module = Module()

    if str(modules_form_value[0][24]) == '1':
        module.ticket_include = True
    else:
        module.ticket_include = False

    if str(modules_form_value[0][49]) == '1':
        module.payment_include = True
    else:
        module.payment_include = False

    if str(modules_form_value[0][75]) == '1':
        module.donation_include = True
    else:
        module.donation_include = False

    save_to_db(module, "Module settings saved")
    events = DataGetter.get_all_events()

    if module.ticket_include:
        for event in events:
            event.ticket_include = True
            save_to_db(event, "Event updated")


Continue ReadingImplementing Module system in Open-Event

Can solving lint bugs be interesting?

Today I am going to present you how we’ve changed monotonous solving bugs into motivating process.

PEP

Most developers need to improve their code quality. To do  that they can use style guide for e.g for Python code (PEP). PEP contains an index of all Python Enhancement Proposals.

Below you can find which logs PEP returned in a command line.

Do you think that this logs’ presentation is  good enough to interest a developer? Will he solve these  thousands of bugs?

Undoubtedly, there are much information about errors and warnings so PEP returns long logs. But developer can not even know how to start solving bugs. And even if she/he finally starts, after each commit he/she needs to run that script again to check if quantity of bugs are increased or decreased. It seems to be endless, exhausting and very monotonous.  Nobody is encouraged to do it.

logi.png

Quality monitoring

Open Event team wants to increase our productivity and code quality. Therefore we use a tool which allow us to check code style, security, duplication complexity and test coverage on every commit. That tool is Codacy and it fulfils our requirements in 100%. It is very helpful because it adds comments to pull requests and enables developer quickly find where a bug is located. It’s very comfortable, because you don’t need to check issues in above awful logs results. Take a look how it looks in Codacy.

-DO NOT MERGE  Ticketing Flow by niranjan94 · Pull Request  1927 · fossasia open event orga server.png

Isn’t it clear? Of course that it’s. Codacy shows in which line issue ocurres and which type of issue it’s.

Awesome statistics dashboard

I’d like to give an answer how you can engage your team to solve issues and make this process more interesting. On the main page codacy tool welcomes you with great statistics about your project.

open event orga server   Codacy   Dashboard

You can see number of issues, category like code complexity, code style, compatibility, documentation, error prone, performance, security and unused code. That params show in which stage of code quality your project is. I think that every developer’s aim is to have the highest code quality and increasing these statistics. But if project has many issues, developer sees only a few changes in project charts.

Define Goals

Recently I’ve discovered how you can motivate yourself more. You can define a goal which you’d like achive. It can be goal of category or goal of file. For example Open Event team has defined goal for a specific file to achieve. If you define small separate goals, you can quicker see the results of your work.

open event orga server_2   Codacy   Goals

On the left sidebar you can find a item which is named “Goals”. In this area you can easily add your projects goals. Everything is user friendly so you shouldn’t have a problem  to create own goals.

Continue ReadingCan solving lint bugs be interesting?

Downloading Files from URLs in Python

This post is about how to efficiently/correctly download files from URLs using Python. I will be using the god-send library requests for it. I will write about methods to correctly download binaries from URLs and set their filenames.

Let’s start with baby steps on how to download a file using requests –

import requests

url = 'http://google.com/favicon.ico'
r = requests.get(url, allow_redirects=True)
open('google.ico', 'wb').write(r.content)

The above code will download the media at http://google.com/favicon.ico and save it as google.ico.

Now let’s take another example where url is https://www.youtube.com/watch?v=9bZkp7q19f0. What do you think will happen if the above code is used to download it ? If you said that a HTML page will be downloaded, you are spot on. This was one of the problems I faced in the Import module of Open Event where I had to download media from certain links. When the URL linked to a webpage rather than a binary, I had to not download that file and just keep the link as is. To solve this, what I did was inspecting the headers of the URL. Headers usually contain a Content-Type parameter which tells us about the type of data the url is linking to. A naive way to do it will be –

r = requests.get(url, allow_redirects=True)
print r.headers.get('content-type')

It works but is not the optimum way to do so as it involves downloading the file for checking the header. So if the file is large, this will do nothing but waste bandwidth. I looked into the requests documentation and found a better way to do it. That way involved just fetching the headers of a url before actually downloading it. This allows us to skip downloading files which weren’t meant to be downloaded.

import requests

def is_downloadable(url):
    """
    Does the url contain a downloadable resource
    """
    h = requests.head(url, allow_redirects=True)
    header = h.headers
    content_type = header.get('content-type')
    if 'text' in content_type.lower():
        return False
    if 'html' in content_type.lower():
        return False
    return True

print is_downloadable('https://www.youtube.com/watch?v=9bZkp7q19f0')
# >> False
print is_downloadable('http://google.com/favicon.ico')
# >> True

To restrict download by file size, we can get the filesize from the Content-Length header and then do suitable comparisons.

content_length = header.get('content-length', None)
if content_length and content_length > 2e8:  # 200 mb approx
	return False

So using the above function, we can skip downloading urls which don’t link to media.

Getting filename from URL

We can parse the url to get the filename. Example – http://aviaryan.in/images/profile.png.

To extract the filename from the above URL we can write a routine which fetches the last string after backslash (/).

url = 'http://aviaryan.in/images/profile.png'
if url.find('/'):
	print url.rsplit('/', 1)[1]

This will be give the filename in some cases correctly. However, there are times when the filename information is not present in the url. Example, something like http://url.com/download. In that case, the Content-Disposition header will contain the filename information. Here is how to fetch it.

import requests
import re

def get_filename_from_cd(cd):
    """
    Get filename from content-disposition
    """
    if not cd:
        return None
    fname = re.findall('filename=(.+)', cd)
    if len(fname) == 0:
        return None
    return fname[0]


url = 'http://google.com/favicon.ico'
r = requests.get(url, allow_redirects=True)
filename = get_filename_from_cd(r.headers.get('content-disposition'))
open(filename, 'wb').write(r.content)

The url-parsing code in conjuction with the above method to get filename from Content-Dispositionheader will work for most of the cases. Use them and test the results.

These are my 2 cents on downloading files using requests in Python. Let me know of other tricks I might have overlooked.

{{ Repost from my personal blog http://aviaryan.in/blog/gsoc/downloading-files-from-urls.html }}


Continue ReadingDownloading Files from URLs in Python

Autocomplete Address Form using Google Map API

Google map is one of the most widely used API of Google as most of the websites use Google map for showing address location. For a static address it’s pretty simple. All you need to do is mention the address and the map will show the nearest location. Problem arrives when the address is dynamically putted by the user. Suppose for an event in event organizer server, one enters the location. The main component used while taking input location is Google Autocomplete. But we went a step further and parsed the entire address based on city, state, country, etc. and allowed user to input the details as well which gave them the nearest location marked in Map if autocomplete couldn’t find the address.

Autocomplete Location

Screenshot from 2016-07-27 06:52:37

As we can see, in the above input box we get suggestions by Google Map on entering first few letters of our address. To this, we need the API https://maps.googleapis.com/maps/api/js?key=YOUR_API_KEY&libraries=places&callback=initMap. You can find an example code of how to do this here.

After this is done, what we wanted is not to just include this address, but to provide a form to fill up the entire address in case some parts were missing on this address. The function that the autocomplete listens to is “place_changed” . So once we click on one of the options, this event is triggered. Once the event is triggered, we use the autocomplete.getPlace() to get the complete address json. The json looks something like this:

Screenshot from 2016-07-27 07:04:49

Now what we do is we create a form with input fields having the id same as the ones we require(e.g., country, administrative_area_level_1, locality, etc.). After that we select the long_name or the short_name from this json and put the value in the corresponding input field with the ids. The code for the process after getting the json is elaborated here.

Editing Address Form

After doing this it looks something like this:
Screenshot from 2016-07-27 07:12:13

However, now the important part is to show the map according to this fields. Also, every time we update a field, the map should be updated. For this we use a hack. Instead of removing the initial location field completely, we hide the field but keep the binding to autocomplete intact. As a result the map is shown when we select a particular address.

Now when we update the fields in the address form, we append the value of this field to the value in the initial location field. Though the field is hidden but it is still bound to autocomplete. As a result as soon as we append something to the string contained in the field, the map gets updated. Also, the updated value gets stored to the DB. Thus, with every update in field, the pointer is moved to the nearest location formed by appending all the data from the form.

After saving the location data to DB, if we wish to edit it, we can get back the json by making the same request with the location value. And then we will get back the same address form and the map accordingly.

Finally it looks something like this:

Screenshot from 2016-07-27 07:19:56

Continue ReadingAutocomplete Address Form using Google Map API

Building interactive elements with HTML and javascript: Interact.js + resizing

{ Repost from my personal blog @ https://blog.codezero.xyz/building-interactive-elements-with-html-and-javascript-interact-js-resizing/ }

In a few of the past blog posts, we saw about implementing resizing with HTML and javascript. The functionality was pretty basic with simple resizing. In the last blog post we saw about interact.js.

interact.js is a lightweight, standalone JavaScript module for handling single-pointer and multi-touch drags and gestures with powerful features including inertia and snapping.

Getting started with Interact.js

You have multiple option to include the library in your project.

  • You can use bower to install (bower install interact) (or)
  • npm (npm install interact.js) (or)
  • You could directly include the library from a CDN (https://cdnjs.cloudflare.com/ajax/libs/interact.js/1.2.6/interact.min.js).
Implementing resizing

Let’s create a simple box using HTML. We’ll add a class called resizable to it so that we can reference it to initialize Interact.js

<div class="resizable">  
    Use right/bottom edge to resize
</div>

We need to create an interact instance. Once the instance is created, we have to call the resizable method on it to add resize support to the div.

interact('.resizable')
  .resizable({
    edges: { right: true, bottom: true }
  })
  .on('resizemove', function (event) {
    

  });

Inside the resizable method, we can pass configuration options. The edgesconfig key allows us to specify on which all edges, resizing should be allowed. Right now, we have allowed on the right and bottom edges. Similarly we can have resizing support in the top and left edges too.

The resizemove event is triggered by interact every time the user tries to resize the div. From the event, we can get the box that is being resized, (i.e) the target by accessing event.target.

The event object also provides us event.rect.width and event.rect.height which is the width and height of the div after resizing. We’ll not set this as the width of the div so that, the user is able to see the width change.

var target = event.target;
    // update the element's style
    target.style.width  = event.rect.width + 'px';
    target.style.height = event.rect.height + 'px';

We can also instruct Interact.js to preserve the aspect ratio of the box by adding an option preserveAspectRatio: true to the configuration object passed to resizable method during initialization.

JavaScript
interact('.resizable')
  .resizable({
    edges: { right: true, bottom: true }
  })
  .on('resizemove', function (event) {
    var target = event.target;

    // update the element's style
    target.style.width  = event.rect.width + 'px';
    target.style.height = event.rect.height + 'px';
  });

Resizing and drag-drop (with Interact.js) were used to create the Scheduler tool at Open Event. The tool allows event/track organizers to easily arrange the sessions into their respective rooms by drag-drop and also to easily change the timings of the events by resizing the event block. The entire source code of the scheduler can be viewed at app/static/js/admin/event/scheduler.js in the Open Event Organizer server’s GitHub repository.

Demo:
https://jsfiddle.net/xdfocdty/

Continue ReadingBuilding interactive elements with HTML and javascript: Interact.js + resizing

Using Cron Scheduling to automatically run background jobs

Cron scheduling is nothing new. It is basically a concept in which the system keeps executing lines of code every few seconds, minutes, or hours. It is required in many large applications which require some automation in their working. I had to use it for two purposes in our Open-Event application.

  • To automatically delete the items in the trash after a period of 30 days.
  • To automatically send after event mails to the speakers and organizers when an event gets completed

1. Delete items in Trash system

So the deleted items get stored in the trash of the admin. However if the items are not deleted or no action is performed on them then they should be deleted automatically if they stay in the trash for more than 30 days. I have used a framework – apscheduler (Advanced Python Scheduler) for this.The code is like this

from apscheduler.schedulers.background import BackgroundScheduler

def empty_trash():
 with app.app_context():
 print 'HELLO'
 events = Event.query.filter_by(in_trash=True)
 users = User.query.filter_by(in_trash=True)
 sessions = Session.query.filter_by(in_trash=True)
 for event in events:
 if datetime.now() - event.trash_date >= timedelta(days=30):
 DataManager.delete_event(event.id)

 for user in users:
 if datetime.now() - user.trash_date >= timedelta(days=30):
 transaction = transaction_class(Event)
 transaction.query.filter_by(user_id=user.id).delete()
 delete_from_db(user, "User deleted permanently")

 for session in sessions:
 if datetime.now() - session.trash_date >= timedelta(days=30):
 delete_from_db(session, "Session deleted permanently")


trash_sched = BackgroundScheduler(timezone=utc)
trash_sched.add_job(empty_trash, 'cron', day_of_week='mon-fri', hour=5,
                    minute=30)
trash_sched.start()

The trash_sched is initialized first. It is given an instance of BackgroundScheduler() meaning it will always run in the background as long as the application server is running.

The second line defines the trigger which is given to the scheduler meaning at what time intervals do we want the scheduler to execute the function.

trash_sched.add_job(empty_trash, 'cron', day_of_week='mon-fri', hour=5, 
                    minute=30)

Here the scheduler adds the function to the job list. The function is empty_trash and the trigger given here is ‘cron’. The following line:

day_of_week='mon-fri', hour=5, minute=30

sets the time at which the sheduler executes the job. The above line means that the job will be executed every day from Monday to Friday at 5:30 AM. Now coming to the function which is to be executed:

def empty_trash():
    with app.app_context():
        events = Event.query.filter_by(in_trash=True)
        users = User.query.filter_by(in_trash=True)
        sessions = Session.query.filter_by(in_trash=True)
        for event in events:
            if datetime.now() - event.trash_date >= timedelta(days=30):
                DataManager.delete_event(event.id)

        for user in users:
            if datetime.now() - user.trash_date >= timedelta(days=30):
                transaction = transaction_class(Event)
                transaction.query.filter_by(user_id=user.id).delete()
                delete_from_db(user, "User deleted permanently")

        for session in sessions:
            if datetime.now() - session.trash_date >= timedelta(days=30):
                delete_from_db(session, "Session deleted permanently")

There are three items in the trash: events, users and sessions. We get all the items in the trash by the query.all() method. Each model: Events, Users and Sessions has a column

trash_date = db.Column(db.DateTime)

The date on which the item is moved to the trash is stored in the trash_date column. And the following line:

 if datetime.now() - event.trash_date >= timedelta(days=30)

checks if the item has been in the trash for more than 30 days. If yes then it is deleted automatically. This function is constantly executed by the apscheduler according to the time settings given by us. Thus we do not need to manually delete the trash after 30 days.

2. Send After Event Mails

This is similar to the trash emptying function.

from apscheduler.schedulers.background import BackgroundScheduler

def send_after_event_mail():
 with app.app_context():
 events = Event.query.all()
 for event in events:
 upcoming_events = DataGetter.get_upcoming_events(event.id)
 organizers = DataGetter.get_user_event_roles_by_role_name(event.id, 'organizer')
 speakers = DataGetter.get_user_event_roles_by_role_name(event.id, 'speaker')
 if datetime.now() > event.end_time:
 for speaker in speakers:
 send_after_event(speaker.user.email, event.id, upcoming_events)
 for organizer in organizers:
 send_after_event(organizer.user.email, event.id, upcoming_events)

#logging.basicConfig()
sched = BackgroundScheduler(timezone=utc)
sched.add_job(send_after_event_mail, 'cron', day_of_week='mon-fri', hour=5, minute=30)
#sched.start()

The scheduler settings are the same as the trash scheduler settings. The function returns all the events and checks whether the event’s end_date has come or not. This check is performed against the present date by the following line:

if datetime.now() > event.end_time

If yes then the speakers and organizers for that event are obtained and after event mails are sent to them automatically.

In this way the whole system is automated. 🙂

Continue ReadingUsing Cron Scheduling to automatically run background jobs

Import/Export feature of Open Event – Challenges

We have developed a nice import/export feature as a part of our GSoC project Open Event. It allows user to export an event and then further import it back.

Event contains data like tracks, sessions, microlocations etc. When I was developing the basic part of this feature, it was a challenge on how to export and then further import the same data. I was in need of a format that completely stores data and is recognized by the current system. This is when I decided to use the APIs.

API documentation of Open Event project is at http://open-event.herokuapp.com/api/v2. We have a considerably rich API covering most aspects of the system. For the export, I adopted this very simple technique.

  1. Call the corresponding GET APIs (tracks, sessions etc) for a database model internally.
  2. Save the data in separate json files.
  3. Zip them all and done.

This was very simple and convenient. Now the real challenge came of importing the event from the data exported. As exported data was nothing but json, we could have created the event back by sending the data back as POST request. But this was not that easy because the data formats are not exactly the same for GET and POST requests.

Example –

Sessions GET –

{
	"speakers": [
		{
			"id": 1,
			"name": "Jay Sean"
		}
	],
	"track": {
		"id": 1,
		"name": "Warmups"
	}
}

Sessions POST –

{
	"speaker_ids": [1],
	"track_id": 1
}

So the exported data can only be imported when it has been converted to POST form. Luckily, the only change between POST and GET APIs was of the related attributes where dictionary in GET was replaced with just the ID in POST/PUT. So when importing I had to make it so such that the dicts are converted to their POST counterparts. For this, all that I had to do was to list all dict-type keys and extract the id key from them. I defined a global variable as the following listing all dict keys and then wrote a function to extract the ids and convert the keys.

RELATED_FIELDS = {
    'sessions': [
        ('track', 'track_id', 'tracks'),
        ('speakers', 'speaker_ids', 'speakers'),
    ]
}

Second challenge

Now I realized that there was even a tougher problem, and that was how to re-create the relations. In the above json, you must have realized that a session can be related to speaker(s) and track. These relations are managed using the IDs of the items. When an event is imported, the IDs are bound to change and so the old IDs will become outdated i.e. a track which was at ID 62 when exported can be at ID 92 when it is imported. This will cause the relationships to break. So to counter this problem, I did the following –

  1. Import items in a specific order, independent first
  2. Store a map of old IDs v/s new IDs.
  3. When dependent items are to be created, get new ID from the map and relate with it.

Let me explain the above –

The first step was to import/re-create the independent items first. Here independent items are tracks and speakers, and the dependent item is session. Now while creating the independent items, store their new IDs after create. Create a map of old ids v/s new ids and store it. This map will hold a clue to what became what after they were recreated from the json. Now the key final step is that when dependent items are to be created, find the indepedent related keys in their json using the above defined RELATED_FIELDS listing. Once they are found, extract their IDs and find the new ID corresponding to their old ID. Link the new ID with the dependent item and that would be all.

This post covers the main challenges I faced when developing the import/export feature and how I overcame them. I hope it will provide some help when you are dealing with similar problems.


{{ Repost from my personal blog http://aviaryan.in/blog/gsoc/open-event-import-export-algo.html }}

Continue ReadingImport/Export feature of Open Event – Challenges