Implementation of Pagination in Open Event Organizer Android App

Pagination (Endless Scrolling or Infinite Scrolling) breaks down a list of content into smaller parts, loaded one at a time. It is important when the quantity of data to be loaded is huge and loading all the data at once can result in timeout.

Here, we will discuss about the implementation of pagination in the list of attendees in the Open Event Organizer App (Eventyay Organizer App).

It is an Android app used by event organizers to create and manage events on the Eventyay platform. Features include event creation, ticket management, attendee list with ticket details, scanning of participants etc.

In the Open Event Organizer App, the loading of attendees would result in timeout when the number of attendees would be large. The solution for fixing this was the implementation of pagination in the Attendees fragment.

First, the API call needs to be modified to include the page size as well as the addition of page number as a Query.

@GET("events/{id}/attendees?include=order,ticket,event&fields[event]=id&fields[ticket]=id&page[size]=20")
Observable<List<Attendee>> getAttendeesPageWise(@Path("id") long id, @Query("page[number]") long pageNumber);

Now, we need to modify the logic of fetching the list of attendees to include the page number. Whenever one page ends, the next page should be fetched automatically and added to the list.

The page number needs to be passed as an argument in the loadAttendeesPageWise() method in AttendeesViewModel.

public void loadAttendeesPageWise(long pageNumber, boolean forceReload) {

    showScanButtonLiveData.setValue(false);

    compositeDisposable.add(
        getAttendeeSourcePageWise(pageNumber, forceReload)
            .doOnSubscribe(disposable -> progress.setValue(true))
            .doFinally(() -> progress.setValue(false))
            .toSortedList()
            .subscribe(attendees -> {
                attendeeList.addAll(attendees);
                attendeesLiveData.setValue(attendees);
                showScanButtonLiveData.setValue(!attendeeList.isEmpty());
            }, throwable -> error.setValue(ErrorUtils.getMessage(throwable).toString())));
}

Also in the getAttendeeSourcePageWise() method:

private Observable<Attendee> getAttendeeSourcePageWise(long pageNumber, boolean forceReload) {
    if (!forceReload && !attendeeList.isEmpty())
        return Observable.fromIterable(attendeeList);
    else
        return attendeeRepository.getAttendeesPageWise(eventId, pageNumber, forceReload);
}

Now, in the AttendeesFragment, a check is needed to increase the current page number and load attendees for the next page when the user reaches the end of the list. 

if (!recyclerView.canScrollVertically(1)) {

    if (recyclerView.getAdapter().getItemCount() > currentPage * ITEMS_PER_PAGE) {
        currentPage++;
    } else {
        currentPage++;                       
        attendeesViewModel.loadAttendeesPageWise(currentPage, true);
    }
}

When a new page is fetched, we need to update the existing list and add the elements from the new page.

@Override
public void showResults(List<Attendee> attendees) {
    attendeeList.addAll(attendees);
    fastItemAdapter.setNewList(attendeeList);
    binding.setVariable(BR.attendees, attendeeList);
    binding.executePendingBindings();
}

Now, list of attendees would be fetched pagewise, thus improving the performance and preventing timeouts.

Resources:

Further reading:

Open Event Organizer App: Project repo, Play Store, F-Droid

Continue ReadingImplementation of Pagination in Open Event Organizer Android App

Migration to Model-View-ViewModel Architecture and LiveData in Open Event Organizer App

Open Event Organizer App (Eventyay Organizer App) is the Android app used by event organizers to create and manage events on the Eventyay platform as well as check-in and check-out attendees along with other functionalities. The app used the MVP (Model-View-Presenter) architecture and is being ported to MVVM (Model-View-ViewModel). This article will explain the procedure of migrating MVP to MVVM architecture and implementing LiveData. 

Why migrate to MVVM?

The MVVM architecture is designed to store and manage UI-related data in a lifecycle conscious way. Configuration changes such as screen rotations are handled properly by ViewModels.

Tight Coupling:

The issue of tight coupling is resolved since only the View holds the reference to ViewModel and not vice versa. A single View can hold references to multiple ViewModels.

Testability:

Since Presenters are hard bound to Views, writing unit tests becomes slightly difficult as there is a dependency of a View.

ViewModels are more unit test friendly as they can be independently tested. There is no dependency of the View.

Here, the implementation is being described with the example of About Event module in the Open Event Organizer App.

First step is the creation of a new class AboutEventViewModel which extends ViewModel.

@Binds
@IntoMap
@ViewModelKey(AboutEventViewModel.class)
public abstract ViewModel bindAboutEventViewModel(AboutEventViewModel aboutEventViewModel);

The new ViewModel has to be added to the ViewModelModule:

Constructor for the ViewModel:

@Inject
public AboutEventViewModel(EventRepository eventRepository,  CopyrightRepository copyrightRepository,
DatabaseChangeListener<Copyright> copyrightChangeListener) {
    this.eventRepository = eventRepository;
    this.copyrightRepository = copyrightRepository;
    this.copyrightChangeListener = copyrightChangeListener;

    eventId = ContextManager.getSelectedEvent().getId();
}

We are using Dagger2 for dependency injection. 

LiveData

LiveData is a lifecycle-aware data holder with the observer pattern.

When we have a LiveData object (e.g. list of attendees), we can add some LifecycleOwner (it can be Activity or Fragment) as an observer. Using this:

The Activity or Fragment will remain updated with the data changes.

Observers are only notified if they are in the STARTED or RESUMED state which is also known as the active state. This prevents memory leaks and NullPointerExceptions because inactive observers are not notified about changes.

Now, let’s discuss about the implementation of LiveData. We will create objects of SingleEventLiveData<> class.

private final SingleEventLiveData<Boolean> progress = new SingleEventLiveData<>();
private final SingleEventLiveData<String> error = new SingleEventLiveData<>();
private final SingleEventLiveData<Event> success = new SingleEventLiveData<>();
private final SingleEventLiveData<Copyright> showCopyright = new SingleEventLiveData<>();
private final SingleEventLiveData<Boolean> changeCopyrightMenuItem = new SingleEventLiveData<>();
private final SingleEventLiveData<String> showCopyrightDeleted = new SingleEventLiveData<>();

The functions to get the LiveData objects:

public LiveData<Boolean> getProgress() {
    return progress;
}

public LiveData<Event> getSuccess() {
    return success;
}

public LiveData<String> getError() {
    return error;
}

public LiveData<Copyright> getShowCopyright() {
    return showCopyright;
}

public LiveData<Boolean> getChangeCopyrightMenuItem() {
    return changeCopyrightMenuItem;
}

public LiveData<String> getShowCopyrightDeleted() {
    return showCopyrightDeleted;
}

Now, we can remove getView() methods and instead, these objects will be used to call various methods defined in the fragment.

Let’s discuss the changes required in the AboutEventFragment now.

The Fragment will have ViewModelProvider.Factory injected.

@Inject
ViewModelProvider.Factory viewModelFactory;

Declare an object of the ViewModel.

private AboutEventViewModel aboutEventViewModel;

Then, in onCreateView(), viewModelFactory will be passed to the ViewModelProviders.of() method as the factory, which is the second parameter.

aboutEventViewModel = ViewModelProviders.of(this, viewModelFactory).get(AboutEventViewModel.class);

Replace all references to the Presenter with references to the ViewModel.

Add the Fragment as an observer to the changes by adding the following in the onStart() method:

aboutEventViewModel.getProgress().observe(this, this::showProgress);
aboutEventViewModel.getSuccess().observe(this, this::showResult);
aboutEventViewModel.getError().observe(this, this::showError);
aboutEventViewModel.getShowCopyright().observe(this, this::showCopyright);
aboutEventViewModel.getChangeCopyrightMenuItem().observe(this, this::changeCopyrightMenuItem);
aboutEventViewModel.getShowCopyrightDeleted().observe(this, this::showCopyrightDeleted);

Two parameters are passed to the observe() method  –  first one is LifecycleOwner, which is our Fragment in this case. The second one is a callback along with a parameter and is used to call the required method.

With this, the implementation of MVVM and LiveData is brought to completion.

Resources:

Documentation: ViewModel, LiveData

Further reading:

Open Event Organizer App: Project repo, Play Store, F-Droid

Continue ReadingMigration to Model-View-ViewModel Architecture and LiveData in Open Event Organizer App

Performing Database Migrations using DbFlow

In Open Event Organizer Android App we decided to add database migrations for every change in database while development. Two of the reasons behind this –

  1. The users have some version of the app installed and then during development the developers had to modify the database, let’s say, add a table or modify existing ones. This makes the existing database incompatible with the new app. On adding database migration the upgradation of database takes place automatically and prevent the situation of reinstalling the app.
  2. Migrations makes it possible to rollback or upgrade to some particular database state. Thus, help in debugging certain changes in isolation.

Let’s discuss the implementation details. Consider the scenario when a user adds a new table named SpeakersCall. For creating migration for this change we need to add migration class inside OrgaDatabase class annotated with @Database. We will break it down to look closely at each step.

  1. Use @Migration annotation in DbFlow library and specify the new database version (by incrementing the existing version) and the database class.
  2. Extend BaseMigration and override migrate method.
  3. The logic used inside the migrate method can be different for different tasks. In the present case we first need to delete any existing table (if exists) with the name SpeakersCall and then recreate that table in database.
  4. Create an array of java classes which are created/modified.
  5. We wrap the SQL query inside a Database Wrapper class which prevents it from running recursively.
  6. FlowManager uses reflection to look up and construct the generated database holder class used in defining the structure for all databases used in this application. So we will getModelAdapter for the class to be recreated and use creation query returned by Model Adapter and execute it.
@Migration(version = 15, database = OrgaDatabase.class)
public static class MigrationTo15 extends BaseMigration {

@Override
public void migrate(@NonNull DatabaseWrapper databaseWrapper) {
Timber.d(“Running migration for DB version 14”);

Class<?>[] recreated = new Class[] {SpeakersCall.class};

for (Class<?> recreate: recreated) {
ModelAdapter modelAdapter = FlowManager.getModelAdapter(recreate);
databaseWrapper.execSQL(DROP_TABLE + modelAdapter.getTableName());
databaseWrapper.execSQL(modelAdapter.getCreationQuery());
}
}
}

Similarly, we can write migration for changing a column of table(s).

Continue ReadingPerforming Database Migrations using DbFlow

Testing the ViewModels in Open Event Organizer App

In Open Event Organizer Android App we follow Test Driven Development Approach which means the features added in the app are tested thoroughly by unit tests. More tests would ensure better code coverage and fewer bugs. This blog explains how to write tests for Viewmodel class in MVVM architecture.

Specifications

We will use JUnit4 to write unit tests and Mockito for creating mocks. The OrdersViewModel class returns the list of Order objects to the Fragment class. The objects are requested from OrderRepository class which fetches them from Network and Database. We will create a mock of OrderRepository class since it is out of context and contain logic that doesn’t depend on Orders Respository. Below is the getOrders method that we will test.

 public LiveData<List<Order>> getOrders(long id, boolean reload) {
if (ordersLiveData.getValue() != null && !reload)
return ordersLiveData;

compositeDisposable.add(orderRepository.getOrders(id, reload)
.compose(dispose(compositeDisposable))
.doOnSubscribe(disposable -> progress.setValue(true))
.doFinally(() -> progress.setValue(false))
.toList()
.subscribe(ordersLiveData::setValue,
throwable -> error.setValue(ErrorUtils.getMessage(throwable).toString())));

return ordersLiveData;
}

We will be using InstantTaskExecutorRule() which is a JUnit Test Rule that swaps the background executor used by the Architecture Components with a different one which executes each task synchronously. We will use setUp() method to load the RxJavaPlugins, RxAndroid plugins and reset them in tearDown method which will ensure each test runs independently from the other and avoid memory leaks. After doing this initialization and basic setup for tests we can begin code the method shouldLoadOrdersSuccessfuly() to test the getOrders method present in ViewModel class. Let’s see the step by step approach.

  1. Use Mockito.when to return Observables one by one from ORDERS_LIST whenever the method getOrders of the mock orderRepository is called.
  2. We will use Mockito.InOrder and pass orders, orderRepository and progress to check if they are called in a particular order.
  3. We will use .observeForever method to observe on LiveData objects and add a ArrayList on change.
  4. Finally, we will test and verify if the methods are called in order.
@Test
public void shouldLoadOrdersSuccessfully() {
when(orderRepository.getOrders(EVENT_ID, false))
.thenReturn(Observable.fromIterable(ORDERS_LIST));

InOrder inOrder = Mockito.inOrder(orders, orderRepository, progress);

ordersViewModel.getProgress().observeForever(progress);

orders.onChanged(new ArrayList<>());

ordersViewModel.getOrders(EVENT_ID, false);

inOrder.verify(orders).onChanged(new ArrayList<>());
inOrder.verify(orderRepository).getOrders(EVENT_ID, false);
inOrder.verify(progress).onChanged(true);
inOrder.verify(progress).onChanged(false);
}

Similar approach can be followed for writing tests to check other behaviour of the ViewModel.

References

  1. Official Documentation for testing. https://developer.android.com/reference/android/arch/core/executor/testing/InstantTaskExecutorRule
  2. Official Documentation for JUnit.  https://junit.org/junit4/
  3. Official documentation for Mockito.  http://site.mockito.org/
  4. Open Event Organizer App codebase.  https://github.com/fossasia/open-event-orga-app
Continue ReadingTesting the ViewModels in Open Event Organizer App

Using DialogFragment to show sales data in Open Event Organizer App’s Events List

In the Open Event Organizer Android App The events list shows the list of events, but organizers often need to compare sales of different events fast. Until now they had to select each and every item and go to the dashboard to see the sales. This is about to change in the Pull Request #1063. It provides an intuitive way to show ticket sales by showing a dialog box upon long pressing event list items.

To implement it, we needed a BaseDialogFragment class which would implement Injectable and handle the presenter life cycle for us.

public class BaseDialogFragment<P extends BasePresenter> extends DialogFragment implements Injectable {

BaseDialogFragment class is very similar to the BaseFragment class, except that it extends DialogFragment instead of Fragment, And the new class SalesSummaryFragment is also similar to any other fragment class we are using.

When an item in the events list is clicked, the long click listener for the events’ list adapter opens the SalesSummaryFragment for the corresponding event, and when the data completes loading it calls ItemResult#showResult and binds the event with the data.

@Override
public void showResult(Event event) {
    binding.setEvent(event);
    binding.executePendingBindings();
}

The  SalesSummaryPresenter  is the almost the same as the TicketsPresenter, since it is loading ticket sales. In its onStart() method, it calls the method  loadDetails()  which on completion calls  analyseSoldTickets()  on  ticketAnalyser, which basically updates an event’s analytics after calculations.

public class SalesSummaryPresenter extends AbstractDetailPresenter<Long, SalesSummaryView> {
    …

    public void loadDetails(boolean forceReload) {
        …
        getEventSource(forceReload)
            …
            .subscribe(attendees -> {
                this.attendees = attendees;
                ticketAnalyser.analyseSoldTickets(event, attendees);
            }, Logger::logError);
    }

   …

    @Override
    public void showResult(Event event) {
        binding.setEvent(event);
        binding.executePendingBindings();
    }
}

For  SalesSummaryFragment , we are using the layout  fragment_sales_summary.xml. And this layout mainly makes use of the layout ticket_analytics_item.xml which is a layout designed to produce the three circular views to show the data.

<include
    layout="@layout/ticket_analytics_item"
    android:layout_width="match_parent"
    android:layout_height="wrap_content"
    bind:color='@{"red"}'
    bind:completed="@{event.analytics.soldDonationTickets}"
    bind:ticketName="@{@string/ticket_donation}"
    bind:total="@{event.analytics.donationTickets}" />

This is how the result looks like:

References:
Open Event Orga Android App: Pull Request #1063:
https://github.com/fossasia/open-event-orga-app/pull/1063

Codepath guides: Using Dialog Fragment
https://github.com/codepath/android_guides/wiki/Using-DialogFragment

Continue ReadingUsing DialogFragment to show sales data in Open Event Organizer App’s Events List

Supporting Toolbar Options – Edit and multiple deletions – in Open Event Organizer App

The Open Event Organizer Android App was supporting deletion for only one item, and didn’t support the edit option. It needed to support multiple deletions for items and the edit operation. This PR and hence the blog covers details on how to handle multiple deletions and implementing the edit option.

Here are the steps I followed to implement these options from scratch:

Step 1: Create toolbar menu

First create a menu for toolbar with the desired toolbar actions (delete and edit in our case)

<?xml version=“1.0” encoding=“utf-8”?>
<menu xmlns:android=“http://schemas.android.com/apk/res/android”
   xmlns:app=“http://schemas.android.com/apk/res-auto”>

   <item android:id=“@+id/del”
       android:title=“Delete”
       android:icon=“@drawable/ic_delete”
       android:visible=“false”
       app:showAsAction=“ifRoom”>
   </item>

   <item android:id=“@+id/edit”
       android:title=“Update”
       android:icon=“@drawable/ic_edit”
       android:visible=“false”
       app:showAsAction=“ifRoom”>
   </item>

</menu>

Step 2: Setup helper options:

We need to keep track of which items have been selected and also be able to get the count of these selected items many times. Therefore, we need to setup the following helper methods  isTrackSelected()  and countSelected()

Both these methods make use of the HashMap:

private final Map<Long, ObservableBoolean> selectedTracks = new HashMap<>();

Every time a method uses  isTrackSelected() , it checks whether or not there is an entry of that track in the HashMap selectedTracks. If not, it adds the entry and returns the corresponding default set ObservableBoolean.

public ObservableBoolean isTrackSelected(Long trackId) {
       if (!selectedTracks.containsKey(trackId))
           selectedTracks.put(trackId, new ObservableBoolean(false));

       return selectedTracks.get(trackId);
   }

   private int countSelected() {
       int count = 0;
       for (Long id : selectedTracks.keySet()) {
           if (selectedTracks.get(id).get())
               Count++;
       }
       return count;
   }

Step 3: Handling clicks

The logic to be followed had to be consistent with existing popular apps, which users are habitual of using. It thus had to be intuitive. And so here’s the logic we follow:

Click -> Opens intent (if toolbar not already active)

Click -> Selects item (if toolbar is active and item is not already selected)

Click -> Deselects item (if item already selected)

Click -> Deselects item and de-activates toolbar (if the already selected item was the only one)

Long Click -> Activates toolbar and selects item (if toolbar not already active)

Long Click -> Selects item (if toolbar already active)

> Handling single clicks:

Following the described logic, we see if a toolbar is not active, we simply open the detailed view of the already selected item.

public void click(Long clickedTrackId) {
       if (isToolbarActive) {

           if (countSelected() == 1 && isTrackSelected(clickedTrackId).get()) {
               selectedTracks.get(clickedTrackId).set(false);
               resetToolbarDefaultState();
           } else if (countSelected() == 2 && isTrackSelected(clickedTrackId).get()) {
               selectedTracks.get(clickedTrackId).set(false);
               getView().changeToolbarMode(true, true);
           } else if (isTrackSelected(clickedTrackId).get())
               selectedTracks.get(clickedTrackId).set(false);
           else
               selectedTracks.get(clickedTrackId).set(true);

           if (countSelected() > EDITABLE_AT_ONCE)
               getView().changeToolbarMode(false, true);

       } else
           getView().openSessionsFragment(clickedTrackId);
   }

> Handling long clicks:

If the toolbar is active, long clicks behave same as simple clicks. Otherwise, we first add them to the selectedTracks, set isToolbarActive to true and change toolbar mode to activate edit and delete options.

public void longClick(Track clickedTrack) {
       if (isToolbarActive)
           click(clickedTrack.getId());
       else {
           selectedTracks.get(clickedTrack.getId()).set(true);
           isToolbarActive = true;
           getView().changeToolbarMode(true, true);
       }
   }

   public void resetToolbarDefaultState() {
       isToolbarActive = false;
       getView().changeToolbarMode(false, false);
  }

Step 4: Add relevant methods in presenter

We need to add the deleteSelectedTracks() method to the presenter so that we can delete all the tracks selected for deletion.

This methods only iterates from iterable selectedTracks.entrySet() and then executes the already existing deleteTrack() method from the presenter

private void deleteTrack(Long trackId) {
        trackRepository
            .deleteTrack(trackId)
            .compose(disposeCompletable(getDisposable()))
           .compose(progressiveErroneousCompletable(getView()))
            .subscribe(() -> {
               getView().showTrackDeleted(“Track Deleted”);
               loadTracks(true);
               selectedTracks.remove(trackId);
               Logger.logSuccess(trackId);
           }, Logger::logError);
   }

   public void deleteSelectedTracks() {
       Observable.fromIterable(selectedTracks.entrySet())
           .compose(dispose(getDisposable()))
           .compose(progressiveErroneous(getView()))
           .doFinally(() -> {
               getView().showMessage(“Tracks Deleted”);
               resetToolbarDefaultState();
           })
           .subscribe(entry -> {
               if (entry.getValue().get()) {
                   deleteTrack(entry.getKey());
               }
            }, Logger::logError);
    }

This is how the result looks like:

Implementation in Open Event Organizer Android App

Resources

Continue ReadingSupporting Toolbar Options – Edit and multiple deletions – in Open Event Organizer App

Implementation of Sponsors API in Open Event Organizer Android App

New contributors to this project are sometimes not experienced with the set of libraries and MVP pattern which this app uses. This blog post is an attempt to walk a new contributor through some parts of the code of the app by implementing an operation for an endpoint of the API. We’ll be implementing the sponsor endpoint.

Open Event Organizer Android app uses a robust architecture. It is presently using the MVP (Model-View-Presenter) architecture. Therefore, this blog post aims at giving some brief insights to the app architecture through the implementation Sponsor endpoint. This blog post will focus only on one operation of the endpoint – the list operation – so as to make the post short enough.

This blog post relates to Pull Request #901 of Open Event Organizer App.

Project structure:
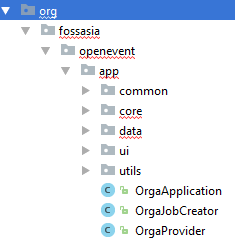
These are the parts of the project structure where major updates will be made for the implementation of Sponsor endpoint:

core

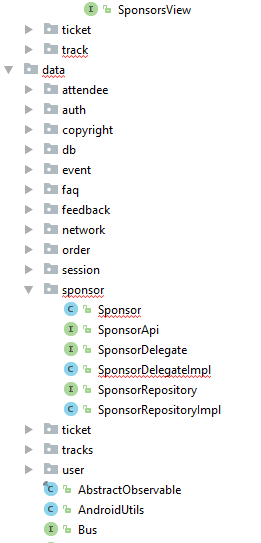
data

Setting up elements in the data module for the respective endpoint

Sponsor.java

@Data
@Builder
@Type(“sponsor”)
@AllArgsConstructor
@JsonNaming(PropertyNamingStrategy.KebabCaseStrategy.class)
@EqualsAndHashCode(callSuper = false, exclude = { “sponsorDelegate”, “checking” })
@Table(database = OrgaDatabase.class)
public class Sponsor extends AbstractItem<Sponsor, SponsorsViewHolder> implements Comparable<Sponsor>, HeaderProvider {

   @Delegate(types = SponsorDelegate.class)
   private final SponsorDelegateImpl sponsorDelegate = new         SponsorDelegateImpl(this);

This class uses Lombok, Jackson, RaizLabs-DbFlow, extends AbstractItem class (from Fast Adapter) and implements Comparable and HeaderProvider.

All the annotations processor help us reduce boilerplate code.

From the Lombok plugin, we are using:

Lombok has annotations to generate Getters, Setters, Constructors, toString(), Equal() and hashCode() methods. Thus, it is very efficient in reducing boilerplate code

@Getter,  @Setter, @ToString, @EqualsAndHashCode

@Data is a shortcut annotation that bundles the features of @Getter, @Setter, @ToString and @EqualsAndHashCode

The @Delegate is used for direct calls to the methods that are annotated with it, to the specified delegate. It basically separates the model class from other methods which do not pertain to data.

Jackson

@JsonNaming – used to choose the naming strategies for properties in serialization, overriding the default. For eg:  KEBAB_CASE, LOWER_CASE, SNAKE_CASE, UPPER_CAMEL_CASE

@JsonNaming(PropertyNamingStrategy.KebabCaseStrategy.class)

@JsonProperty – used to store the variable from JSON schema as the given variable name. So, “type” from JSON will be stored as sponsorType.

@JsonProperty(“type”)
public String sponsorType;

RaizLabs-DbFlow

DbFlow uses model classes which must be annotated using the annotations provided by the library. The basic annotations are – @Table, @PrimaryKey, @Column, @ForeignKey etc.

These will create a table named attendee with the columns and the relationships annotated.

SponsorDelegate.java and SponsorDelegateImpl.java

The above are required only for method declarations of the classes and interfaces that Sponsor.java extends or implements. These basically separate the required method overrides from the base item class.

public class SponsorDelegateImpl extends AbstractItem<Sponsor, SponsorsViewHolder> implements SponsorDelegate {

SponsorRepository.java and SponsorRepositoryImpl.java

A Repository mediates between the domain and data mapping layers, acting like an in-memory domain object collection. Client objects construct query specifications declaratively and submit them to Repository for satisfaction. Objects can be added to and removed from the Repository, as they can from a simple collection of objects, and the mapping code encapsulated by the Repository will carry out the appropriate operations behind the scenes.

public interface SponsorRepository {
  @NonNull
  Observable<Sponsor> getSponsors(long eventId, boolean reload);
}

Presently the app uses MVP architecture and the core package contains respective Views and their Presenters, whereas the data package contains the Model implementation.

To understand Observable, one will need to dive in RxJava. This video of a presentation by Jake Wharton can be a great start.

So, basically Observables represent sources of data, and whenever there is a change in our observable, i.e. our data, it fires an event and we get to know about it only if we have subscribed to it.

Setting up elements in core module (views and presenters)

Presently the app uses MVP architecture and the core package contains respective Views and Presenters for different properties of an event.

SponsorView.java

public interface SponsorsView extends Progressive, Erroneous, Refreshable, Emptiable<Sponsor> {
}

SponsorsFragment.java

This is a simple Fragment that extends BaseFragment (a generic fragment class predefined in the project) and implements SponsorView interface.

SponsorsListAdapter.java

A simple adapter for a RecyclerView.

SponsorsPresenter.java

The presenter is the middle-man between model and view. All your presentation logic belongs to it. A Presenter in a MVP architecture is responsible for querying the model and updating the view, reacting to user interactions and updating the model.

In this Presenter we have used the @Inject annotation and some RxJava code:

@Inject
public SponsorsPresenter(SponsorRepository sponsorRepository, DatabaseChangeListener<Sponsor> sponsorChangeListener) {
  this.sponsorRepository = sponsorRepository;
  this.sponsorChangeListener = sponsorChangeListener;
}

The @Inject annotation is used to request dependencies. It can be used on a constructor, a field, or a method. If you annotate a constructor with @Inject, Dagger 2 can also use an instance of this object to fulfill dependencies. Note that we are not instantiating any object here ourselves.

Some RxJava part, which is not in the scope of this blog.

private void listenChanges() {
  sponsorChangeListener.startListening();
  sponsorChangeListener.getNotifier()
      .compose(dispose(getDisposable()))
      .map(DbFlowDatabaseChangeListener.ModelChange::getAction)
      .filter(action -> action.equals(BaseModel.Action.INSERT))
      .subscribeOn(Schedulers.io())
      .subscribe(sponsorModelChange -> loadSponsors(false), Logger::logError);
}


public void loadSponsors(boolean forceReload) {
  getSponsorSource(forceReload)
      .compose(dispose(getDisposable()))
      .compose(progressiveErroneousRefresh(getView(), forceReload))
      .toList()
      .compose(emptiable(getView(), sponsors))
      .subscribe(Logger::logSuccess, Logger::logError);
}

Make changes to Dependency Injection modules

We are using Dagger for Dependency Injection, and therefore we need to update the modules that provide endpoint specific objects.

This video and this blog are a great start to learn about dependency injection using dagger.

Dependency injection is a technique whereby one object supplies the dependencies of another object. A dependency is an object that can be used (a service). An injection is the passing of a dependency to a dependent object (a client) that would use it. The service is made part of the client’s state. Passing the service to the client, rather than allowing a client to build or find the service, is the fundamental requirement of the pattern.(source)

Dependency Injection in built upon the concept of Inversion of Control. Which says that a class should get its dependencies from outside. In simple words, no class should instantiate another class but should get the instances from a configuration class.

Dagger 2 analyzes the dependencies for you and generates code to help wire them together.  It relies purely on using Java annotation processors and compile-time checks to analyze and verify dependencies. It is considered to be one of the most efficient dependency injection frameworks built to date.

@Provides is basically required to specify that the annotated method returns an object that should be available for injection to dependencies using @Inject

@Singleton annotation signals to the Dagger compiler that the instance should be created only once in the application.

@Binds annotation is a replacement for @Provides methods that simply returns an injected parameter. Its generated implementation is likely to be more efficient. A method annotated with @Binds must be: abstract.

ApiModule.java

@Provides
@Singleton
SponsorApi providesSponsorApi(Retrofit retrofit) {    return retrofit.create(SponsorApi.class);
}    

ChangeListenerModule.java

@Provides
DatabaseChangeListener<Sponsor> providesSponsorChangeListener() {
   return new DbFlowDatabaseChangeListener<>(Sponsor.class);
}

NetworkModule.java

@Provides
Class[] providesMappedClasses() {
   return new Class[]{Event.class, Attendee.class, Ticket.class, User.class,
   EventStatistics.class, Faq.class, Copyright.class, Feedback.class,           Track.class, Session.class, Sponsor.class};
   }

RepoModule.java

@Binds
@Singleton
abstract SponsorRepository bindsSponsorRepository(SponsorRepositoryImpl sponsorRepositoryImpl);

MainFragmentBuilderModule.java

@ContributesAndroidInjector
abstract SponsorsFragment contributeSponsorsFragment();

Also remember to make this change to FragmentNavigator.java

case R.id.nav_sponsor:
fragment = SponsorsFragment.newInstance(eventId);
break;

XML resources to be added:

  1. sponsors_item.xml
  2. sponsors_fragment.xml
  3. Make changes to activity_main_drawer.xml to include “sponsors” option.

Here’s what the result looks like:

References:

Lombok Plugin: https://blog.fossasia.org/using-lombok-to-reduce-boilerplate-code-in-open-event-android-app/

Jackson: https://blog.fossasia.org/shrinking-model-classes-boilerplate-in-open-event-android-projects/

RaizLabs DbFlow: https://blog.fossasia.org/persistence-layer-in-open-event-organizer-android-app/

Dependency Injection:
https://medium.com/@harivigneshjayapalan/dagger-2-for-android-beginners-di-part-i-f5cc4e5ad878

Continue ReadingImplementation of Sponsors API in Open Event Organizer Android App