UID file configuration for Meilix

Meilix has by default one user which is hotelos. Each user has a UID known as Unique Identification Display. Each UID is assigned some unique number. The range for uid is from 1000 to 65000. The login manager doesn’t create user which doesn’t have a uid in this range.

Problem:

We found out that hotelos has a uid = 999 through this autologin file meilix-default-settings/usr/share/initramfs-tools/scripts/casper-bottom/15autologin. Therefore sddm would not accept this as the username.

Solution:

Way 1: Increase the uid of the hotelos

Way 2: Decrease the default sddm uid through configuration file

We here tried with the second approach to decrease the uid of the sddm to 500, so that it will take hotelos as the default user.


[Users]
HideShells=/sbin/nologin,/bin/false
# Hidden users, this is if any system users fall within your range, see /etc/passwd on your system.
HideUsers=git,sddm,systemd-journal-remote,systemd-journal-upload

# Maximum user id for displayed users
MaximumUid=65000

# Minimum user id for displayed users
MinimumUid=500 #My UID is 999


This is one of the way through which we have decreased the UID to 500.

We can use id -u in the terminal to check the uid of the user.

Root has uid = 0.

We can see different operations uid in the file /etc/passwd .

It looks like this:

We have a file /etc/login.defs where we can manage the max and min uid for the user.

#
# Min/max values for automatic uid selection in useradd
#
UID_MIN                     	1000
UID_MAX                    	60000
# System accounts
#SYS_UID_MIN              	100
#SYS_UID_MAX              	999

We can modify it to accept hotelos as the user.

\sed -i '/UID_MIN/ c\UID_MIN 998' /etc/login.defs


This will change the UID_MIN value to 998.

References

  1. User ID definition: http://www.linfo.org/uid.html
  2. SDDM User Issue: https://wiki.archlinux.org/index.php/SDDM#One_or_more_users_don.27t_show_up_on_the_greeter
Continue ReadingUID file configuration for Meilix

apt-get update in building Meilix through Travis

Meilix uses Travis to build and then make a github release of the ISO. There are packages that get built in the script executed by Travis.

What problem it is solving? It’s the need of apt-get update which are:

  • Update of the system to support for the newest builds.
  • Adding of the repo after adding a Personal Package Archives (‘PPAs’)

By default, Travis disabled apt-get update for every build. So if we want to run it automatically for each build, we can do it in two different ways.

Way 1:Running apt-get update in before_install step.

Implementation in .travis.yml of Meilix

print 'hello world!'
sudo: required

before_install:
  - apt-get update


We already used sudo so there is no need to use sudo in the apt-get update.

This is the most simplistic approach and it update the system packages and source list before installing any packages.

Way 2: executing apt-get update in Travis through APT addon.

The addon comes under the include step and the lint follows this order:

include:
  - os: linux
    addons:
      apt:
        update: true
        sources:
          - ubuntu-toolchain-r-test
        packages:
          - debootstrap
          - genisoimage
          - p7zip-full
          - squashfs-tools
          - ubuntu-dev-tools
          - dpkg-dev
          - debhelper
          - fakeroot
          - devscripts


This is helpful in case when we don’t have the before_install step. Additionally, it allows us to specify the packages we need to install.

Choosing between the two options

One can adopt any of the above process to implement apt-update in Travis.

Meilix uses the second approach as because we don’t have before_install parameter.

Sometimes we need some commands to get executed before updating the system, so in that case we prefer before_install to prioritize the tasks.

Resources:


Continue Readingapt-get update in building Meilix through Travis

Meilix Build Process

Meilix is an operating system developed in FOSSASIA. It has the capability to be easily customize which makes it different from other operating systems.

It is of 32 bit right now.

It is all started with build.sh script.

And the basic idea is:

  • Declaring the mirror, version, and language to use.
  • Referring to the source file
  • Download and updating required packages
  • Create chroot
  • Using chroot to execute script

At the very beginning, the webapp Meilix Generator trigger Travis with the input provided in the form with the event name as the tag name of the Travis build. This will help to distinguish between the releases.

Then the travis script .travis.yml executes build.sh script after changing its permission.

  - chmod +x ./build.sh
  - ./build.sh |& tee log.txt


Let’s get into the build.sh script and look into it.

arch=${1:-i386}


First we select the bit version of the OS which we need to build.

datafiles="image-${arch}.tar.lzma sources.list"


This provides necessary data files required to build the OS. The tar.lzma contains exactly the same file which are there in an ISO of a OS. So it gives us the capability to make changes into the system files.

Then it starts to download the required packages which will help during the process.

Then runs a debuild script which debuilds the metapackages.

chmod +x ./scripts/debuild.sh
./scripts/debuild.sh


The debuild script actually repacks the meilix-default-setting metapackages with the required settings. Meilix-default-settings metapackage is fully explained here. Debuilding process is explained here.

Then Meilix goes on installing required packages and deleting the unrequired files.

Meilix build script is well commented to help to understand the whole process line by line.

Then Travis release a Meilix ISO in github release and mail the user with the log in the attachment.

Special Features:

Meilix has some special features which makes it fully customizable:

  • Meilix-default-setting metapackages, it contains the home folder and the changes made inside it can be seen in the OS.
  • Metapackages in the Meilix are very helpful in installing any required package.
  • Meilix System Lock helps to clean the system and get back to a fixed time.

Reference:

Flask Web Forms- Generator

Shell Scripting- Meilix

chroot – Debian Wiki


Continue ReadingMeilix Build Process

Using file.io for Meilix Deployment

Meilix is developed in FOSSASIA and is deployed as a release on Github, but the download speed on GitHub for large files is slow. Alternatively deployment can be done on 3rd party servers. transfer.sh offers a good service for a start, but they only have a reduced storage for heavy usage such as what is required for Meilix. file.io is a good alternative. file.io has API features which can be used in .travis.yml to deploy meilix. For the time being, we are deploying a generator branch to file.io

Changes made in the .travis.yml

We need to edit the .travis.yml to deploy the artifact on file.io

deploy:
provider: script
script: curl -F "file=@/home/travis/$(image_name)" https://file.io
on:
branch: generator

We need to edit the deploy attribute in the travis to get the deployment done in file.io. Query contains the address of the file which needs to be uploaded on file.io. Then the branch name is provided on which deployment needs to be done.

Output:

Travis executes the command to deploy the application.

{"success":true,"key":"5QBEry","link":"https://file.io/5QBEry","expiry":"14 days"}

success: true  the artifact is successfully deployed.

key and link: gives the link from where the ISO can be downloaded.

expiry: tell the number of days after which the ISO will be deleted and by default it is set to 14 days.

We can manually input expiry parameter to declare the expiry time.

script: curl -F "file=@/home/travis/$(image_name)" https://file.io/?expires=1w

This will set the expiry time to seven days. If you set it with w, it will be number of weeks, m will be for number of months, y will be number of years.

file.io solved the most important issue of meilix deployment and this approach can be use several different project of FOSSASIA for the deployment purpose.

References:

Continue ReadingUsing file.io for Meilix Deployment

Keep your node server running using PM2

The open event webapp generator is a node projects (using an express server), and a copy of it runs all the time on my personal DigitalOcean box (other than our heroku instance).

On a service like Heroku, the platform manages the task of bringing your server process up. But on, say a Linux distro on the DO box, you have to manually do

 npm run server

to be able to run the server.

While that is all good, it is a foreground shell process, which means, you will lose the node server, when you log out (or your internet connection into the ssh breaks).
So we need to be able to keep the process running in the background.

The way we do it in bash on Unix, is that we can do either of the following

 npm run server&

The “&” at the end means it will make a background fork of this task. Or if you’ve already started it without it, you can also do the following.

npm run server # starts in foreground
#Press Ctrl + Z, this pauses task and frees the shell
bg 1 # sends task no 1 to background thread.

Again, both these are hacky methods, will work only on Unix OSs, and are not really recommended for production.
For production, we need a Process Manager, for Node.js the best we can get is pm2 – purpose built process manager for node.

Install pm2 first

sudo npm install -g pm2

Using pm2, we can start any process that can be started with node. We can start the app.js script like this

pm2 start src/app.js

Also, pm2 can run npm tasks too like

pm2 start npm -- start

Pm2 has a pretty status message display window. And we can start, stop, pause, kill and/or restart any process.


Screenshot from 2016-08-28 01-19-29

Continue ReadingKeep your node server running using PM2

Using ftp-deploy in node.js to publish websites over FTP

In the Open Event Webapp Generator, we recently added the functionality for organisers to submit their ftp credentials and when the website is generated, it’ll automatically upload the website to the chosen ftp server (allowing creation of subdirectory internally, if the organiser so wants).

To achieve we used the very useful nodejs module ftp-deploy which is a wrapper on the popular jsftp library

The code dealing with ftp deployment in our webapp generator can be found here  –

https://github.com/fossasia/open-event-webapp/blob/development/src/backend/ftpdeploy.js

As can be seen, deploying using ftp-deploy is pretty straightforward. Primarily we need a config object


  var config = {
    username: ftpDetails.user, //prompted on commandline if not given
    password: ftpDetails.pass, // optional, prompted if none given
    host: ftpDetails.host,
    port: 21,
    localRoot: path.join(__dirname, '/../../dist', appFolder), //local folder containing website
    remoteRoot: ftpDetails.path, //path on ftp server to host website
    exclude: ['.git', '.idea', 'tmp/*'],
    continueOnError: true
};

You can set up some event listeners for events like uploaded uploading and upload-error

Continue ReadingUsing ftp-deploy in node.js to publish websites over FTP

Doing asynchronous tasks serially using ‘async’ in node.js

In the open-event-webapp generator we need to perform a lot of asynchronous tasks in the background like –

  • Downloading images and audio assets
  • Downloading the jsons from the endpoints
  • Generating the html from handelbar templates
  • and so on . .

Sometimes tasks depend on previous tasks, and in such cases we need to perform them serially. Also there are tasks like image downloads, that would be better if done parallelly.

To achieve both these purposes, there is an awesome node.js library called async that helps achieve this.

To perform asynchronous tasks serially (one task, then another task), we can use something like this –


async.series([
    (done) => {
       someAsyncFunction(function () { done () })
    },
    //(done) => {..}, (done) => {..} more tasks here
    (done) => {
       someAsyncFunction(function () { done () })
    });
      
    }
]);

Basically async takes an array of functions. Each function contains a callback that you need to call when the internal task is finished. The 2nd task starts, only after the done() callback of first task is executed.

An example of it’s usage can be seen in the open-event-webapp project here

Continue ReadingDoing asynchronous tasks serially using ‘async’ in node.js

Using Heroku pipelines to set up a dev and master configuration

The open-event-webapp project, which is a generator for event websites, is hosted on heroku. While it was easy and smooth sailing to host it on heroku for a single branch setup, we moved to a 2-branch policy later on. We make all changes to the development branch, and every week once or twice, when the codebase is stable, we merge it to master branch.

So we had to create a setup where  –

master branch –> hosted on –> heroku master

development branch –> hosted on –> heroku dev

Fortunately, for such a setup, Heroku provides a functionality called pipelines and a well documented article on how to implement git-flow


First and foremost, we created two separate heroku apps, called opev-webgen and opev-webgen-dev

To break it down, let’s take a look at our configuration. First step is to set up separate apps in the travis deploy config, so that when development branch is build, it pushed to open-webgen-dev and when master is built, it pushes to opev-webgen app. The required lines as you can see are –

https://github.com/fossasia/open-event-webapp/blob/master/.travis.yml#L25

https://github.com/fossasia/open-event-webapp/blob/development/.travis.yml#L25

Now, we made a new pipeline on heroku dashboard, and set opev-webgen-dev and opev-webgen in the staging and production stages respectively.

Screenshot from 2016-07-31 04-33-30 Screenshot from 2016-07-31 04-34-41

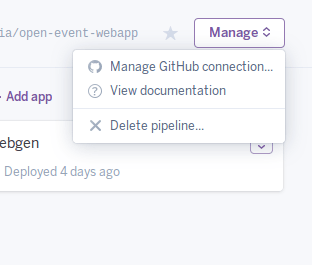
Then, using the “Manage Github Connection” option, connect this app to your github repo.

Screenshot from 2016-07-31 04-36-17

Once you’ve done that, in the review stage of your heroku pipeline, you can see all the existing PRs of your repo. Now you can set up temporary test apps for each PR as well using the Create Review App option.

Screenshot from 2016-07-31 04-37-38

So now we can test each PR out on a separate heroku app, and then merge them. And we can always test the latest state of development and master branches.

Continue ReadingUsing Heroku pipelines to set up a dev and master configuration

Open Event Apk generator

So we made this apk generator currently hosted on a server (http://192.241.232.231) which let’s you generate an android app for your event in 10 minutes out of which the server takes about 8 minutes to build 😛 . So, essentially you just have to spare 2 minutes and just enter 3 things(email, Desired app’s name and Api link). Isn’t this cool?

So how exactly do we do this?

At the backend, we are running a python scripts with some shell scripts where the python script is basically creating directories, interacting with our firebase database to get the data entered by a user. So we made these scripts to first of all to clone the open event android repo, then customise and change the code in the repo according to the parameters entered by the organiser earlier(shown in the image).

Screen Shot 2016-06-14 at 12.13.12 AM
Generator Website

After the code has been changed by the scripts to customise the app according to the event the app will be used for, we move on to the script to build the apk, where we build and sign the apk in release mode using signing configs and release keys from the server because we don’t the organiser to generate keys and store it on the server to avoid the hassle and also the privacy concerns involving the keys. So this is when the apk is generated on the server. Now you have questions like the apk is generated but how do I get it? Do I have to wait on the same page for 10 minutes while the apk is being sent? The answer is no and yes. What I mean by this is that you can wait to download the apk if you want but we’ll anyways send it to your email you specified on the apk generator website. This is the sample Email we got when we were testing the system

Screen Shot 2016-06-14 at 12.08.59 AM.png

So it’s an end to end complete solution from which you can easily get an android app for your event in just 2 minutes. Would love to hear feedback and reviews. Please feel free to contact me @ manan13056@iiitd.ac.in or on social media’s(Twitter, Facebook). Adios!

P.S. : Here is the link to the scripts we’re using.

Continue ReadingOpen Event Apk generator