Giving users option to switch between All and Reviewed Only Skills on SUSI Skill CMS

There are a lot of Skills on SUSI Skill CMS. Any registered user has the access to creating his/her own Skills. Hence, we need to give the users an option on SUSI Skill CMS whether they want to see all the Skills, or only those Skills that have been tested thoroughly and have been approved by the Admin and higher user roles. This blog post explains how this feature has been implemented on the SUSI Skill CMS.

How is review status of any Skill changed on the server?

The API endpoint which allows Admin and higher user roles to change the review status of any Skill on the server is ‘/cms/changeSkillStatus.json’. It takes the following parameters:

  • model: Model of the Skill
  • group: Group of the Skill
  • language: Language of the Skill
  • skill: Skill name
  • reviewed: A boolean parameter which if true, signifies that the Skill has been approved.

Sample API call:

https://api.susi.ai/cms/changeSkillStatus.json?model=general&group=Knowledge&language=en&skill=aboutsusi&reviewed=true&access_token=yourAccessToken


Fetching reviewed only Skills from the server

The ‘/cms/getSkillList.json’ endpoint has been modified to facilitate returning only the Skills whose review status is true. This is done by the following API call:

https://api.susi.ai/cms/getSkillList.json?reviewed=true


Creating checkbox to switch between All and Reviewed Only Skills

Checkbox is one of the many Material-UI components. Hence, we need to first import it before we can use it directly in our BrowseSkill component.

import Checkbox from 'material-ui/Checkbox';


In the constructor of the BrowseSkill class, we set states for two variables as follows:

constructor(props) {
  super(props);
    this.state = {
      // other state variables
      showSkills: '',
      showReviewedSkills: false,
    };
}


In the above code for the constructor, we have set two state variables. ‘showSkills’ is a string which can either be an empty string, or ‘&reviewed=true’. We want to append this string to the ‘/cms/getSkillList.json’ API call because it would determine whether we want to fetch All Skills or reviewed only Skills. The second variable ‘showReviewedSkills’ is a boolean used to keep record of the current state of the page. If it is true, then it means that currently, only the reviewed Skills are being displayed on the CMS site.

Implementation of the checkbox

This is how the Checkbox has been implemented for the purpose of switching between All and Reviewed Only Skills:

 <Checkbox
    label="Show Only Reviewed Skills"
    labelPosition="right"
    className="select"
    checked={this.state.showReviewedSkills}
    labelStyle={{ fontSize: '14px' }}
    iconStyle={{ left: '4px' }}
    style={{
      width: '256px',
      paddingLeft: '8px',
      top: '3px',
    }}
    onCheck={this.handleShowSkills}
  />


As can be seen from the above code, the initial state of the checkbox is unchecked as initially, the value of the state variable ‘showReviewedSkills’ is set to false in the constructor. This means that initially all Skills will be shown to the user. On clicking on the checkbox, handleShowSkills() function is called. Its implementation is as follows:

  handleShowSkills = () => {
    let value = !this.state.showReviewedSkills;
    let showSkills = value ? '&reviewed=true' : '';
    this.setState(
      {
        showReviewedSkills: value,
        showSkills: showSkills,
      },
      function() {
        this.loadCards();
      },
    );
  };


In the handleShowSkills() function, firstly we store the current value of the state variable ‘showReviewedSkills’. The value of ‘showSkills’ string is determined according to the value of ‘showReviewedSkills’. Then the states of both these variables are updated in the setState() function. Lastly, loadCards() function is called.

In the loadCards() function, we append the value of the state variable ‘showSkills’ to the AJAX call to the ‘/cms/getSkillList.json’ endpoint. The URL used for the API call is as follows:

https://api.susi.ai/cms/getSkillList.json?group=' +
  this.props.routeValue +
  '&language=' +
  this.state.languageValue +
  this.state.filter +
  this.state.showSkills;


This is how the implementation of the feature to give users an option to switch between All and Reviewed Only Skills has been done.

Resources

Continue ReadingGiving users option to switch between All and Reviewed Only Skills on SUSI Skill CMS

Fetching Skills using the ID of a user

The Dashboard on the SUSI Skill CMS is the page where all user specific Skill information is being displayed. It also has a section called “My Skills” which displays the Skills created by the user himself. The data for the “My Skills” section has to be fetched from the Skill metadata of each Skill. Hence, this blog post explains how the Skills created by an author are fetched using an API which takes author’s email as the only parameter.

Why is such an API required?

The task of displaying the “My Skills” section cannot be done entirely on the Client side with the use of existing APIs, as that would result in a lot of AJAX calls to the Server, because for each Skill, there would have to be an AJAX call for each user. Hence, we had to create an endpoint which could directly return the list of Skills created by a user using his ID. This would prevent multiple AJAX calls to the Server.

The endpoint used is:

"https://api.susi.ai/cms/getSkillsByAuthor.json?author_email="+author_email


Here, author_email is the email of the author who published the particular Skill, which is fetched from the Skill metadata object which looks like this:

"Antonyms": {
      // skill metadata
      "author_email": akjn11@gmail.com,
      // skill metadata
    }

Working of the API

The code to fetch the Skills created by an author is described in the GetSkillsByAuthor.java file. This API accepts either the author’s name, or the author’s email as the parameter. In our

We get all folders within a folder using the following method:

private void listFoldersForFolder(final File folder, ArrayList<String> fileList) {
        File[] filesInFolder = folder.listFiles();
        if (filesInFolder != null) {
            Arrays.stream(filesInFolder).filter(fileEntry -> fileEntry.isDirectory() && !fileEntry.getName().startsWith(".")).forEach(fileEntry->fileList.add(fileEntry.getName() + ""));
        }
    }


We use this method to get list of folders of all the group names for all the different Skills, and store them in a variable ‘folderList’ as per the following code:

File allGroup = new File(String.valueOf(model));
ArrayList<String> folderList = new ArrayList<String>();
listFoldersForFolder(allGroup, folderList);


For every folder corresponding to a group name, we traverse inside it and then further traverse inside the language folders to reach the place where all the Skill files are stored.

This is the code for the method to get all files within a folder:

private void listFilesForFolder(final File folder, ArrayList<String> fileList) {
    File[] filesInFolder = folder.listFiles();
    if (filesInFolder != null) {
        Arrays.stream(filesInFolder).filter(fileEntry -> !fileEntry.isDirectory() && !fileEntry.getName().startsWith(".")).forEach(fileEntry->fileList.add(fileEntry.getName() + ""));
    }
}


We need to get all Skill files inside the ‘languages’ folder, which itself is in ‘group’ folder. This is the code required to implement the same:

for (String temp_group_name : folderList){
        File group = new File(model, temp_group_name);
        File language = new File(group, language_name);
        ArrayList<String> fileList = new ArrayList<String>();
        listFilesForFolder(language, fileList);

        for (String skill_name : fileList) {
               // get skill metadata of each skill iteratively and put it in result JSONObject accordingly
            }
         }
    }


This is how the Skill metadata is fetched from the getSkillMetadata() method of SusiSkill class:

skill_name = skill_name.replace(".txt", "");
            JSONObject skillMetadata = SusiSkill.getSkillMetadata(model_name, temp_group_name, language_name, skill_name);

            if(skillMetadata.get("author_email").equals(author_email)) {
                skillMetadata.put("skill_name", skill_name);
                authorSkills.put(skillMetadata);


getSkillMetadata() method takes model of the Skill, group of the Skill, language of the Skill, Skill name and also duration (for usage statistical purposes) as the method parameters, and returns the metadata for the Skill in the format as shown below:

   "Antonyms": {
      "model": "general",
      "group": "Knowledge",
      "language": "en",
      "developer_privacy_policy": null,
      "descriptions": "A skill that returns the antonyms for a word",
      "image": "images/antonyms.png",
      "author": "akshat jain",
      "author_url": "https://github.com/Akshat-Jain",
      "author_email": akjn11@gmail.com,
      "skill_name": "Antonyms",
      "protected": false,
      "terms_of_use": null,
      "dynamic_content": true,
      "examples": ["Antonym of happy"],
      "skill_rating": {
        "negative": "0",
        "bookmark_count": 0,
        "positive": "0",
        "stars": {
          "one_star": 0,
          "four_star": 0,
          "five_star": 0,
          "total_star": 0,
          "three_star": 0,
          "avg_star": 0,
          "two_star": 0
        },
        "feedback_count": 0
      },
      "usage_count": 0,
      "skill_tag": "Antonyms",
      "creationTime": "2018-05-06T03:05:22Z",
      "lastAccessTime": "2018-06-23T18:48:36Z",
      "lastModifiedTime": "2018-05-06T03:05:22Z"
    }


This is how the Skills created by an author are fetched using this API. The JSON response of this endpoint shows the metadata of all Skills which have ‘author_email’ value the same as that given in the endpoint’s query parameter.

Resources

Continue ReadingFetching Skills using the ID of a user

Skill Development using SUSI Skill CMS

There are a lot of personal assistants around like Google Assistant, Apple’s Siri, Windows’ Cortana, Amazon’s Alexa, etc. What is then special about SUSI.AI which makes it stand apart from all the different assistants in the world? SUSI is different as it gives users the ability to create their own skills in a Wiki-like system. You don’t need to be a developer to be able to enhance SUSI. And, SUSI is an Open Source personal assistant which can do a lot of incredible stuff for you, made by you.

So, let’s say you want to create your own Skill and add it to the existing SUSI Skills. So, these are the steps you need to follow regarding the same –

  1. The current SUSI Skill Development Environment is based on an Etherpad. An Etherpad is a web-based collaborative real-time editor. https://dream.susi.ai/ is one such Etherpad. Open https://dream.susi.ai/ and name your dream (in lowercase letters).
  2. Define your skill in the Etherpad. The general skill format is

::name <Skill_name>
::author <author_name>
::author_url <author_url>
::description <description> 
::dynamic_content <Yes/No>
::developer_privacy_policy <link>
::image <image_url>
::term_of_use <link>

#Intent
User query1|query2|query3....
Answer answer1|answer2|answer3...


Patterns in query can be learned easily via this tutorial.

  1. Open any SUSI Client and then write dream <your dream name> so that dreaming is enabled for SUSI. Once dreaming is enabled, you can now test any skills which you’ve made in your Etherpad.
  2. Once you’ve tested your skill, write ‘stop dreaming’ to disable dreaming for SUSI.
  3. If the testing was successful and you want your skill to be added to SUSI Skills, send a Pull Request to susi_skill_data repository providing your dream name.

How do you modify an existing skill?

SUSI Skill CMS is a web interface where you can modify the skills you’ve made. All the skills of SUSI are directly in sync with the susi_skill_data.

To edit any skill, you need to follow these steps –

  1. Login to SUSI Skill CMS website using your email and password (or Sign Up to the website if you haven’t already).
  2. Click on the skill which you want to edit and then click on the “edit” icon.
  3. You can edit all aspects of the skill in the next state. Below is a preview:

Make the changes and then click on “SAVE” button to save the skill.

What’s happening Behind The Scenes in the EDIT process?

  • SkillEditor.js is the file which is responsible for keeping a check over various validations in the Skill Editing process. There are certain validations that need to be made in the process. Those are as follows –
  • Check whether User has logged in or not

if (!cookies.get('loggedIn')) {
            notification.open({
                message: 'Not logged In',
                description: 'Please login and then try to create/edit a skill',
                icon: <Icon type='close-circle' style={{ color: '#f44336' }} />,
            });
            this.setState({
                loading: false
            });
            return 0;
        }


  • Check whether Commit Message has been entered by User or not

if (this.state.commitMessage === null) {
            notification.open({
                message: 'Please add a commit message',
                icon: <Icon type='close-circle' style={{ color: '#f44336' }} />,
            });

            this.setState({
                loading: false
            });
            return 0;
        }


  • Check to ensure that request is sent only if there are some differences in old values and new values

if (this.state.oldGroupValue === this.state.groupValue &&
          this.state.oldExpertValue === this.state.expertValue &&
          this.state.oldLanguageValue === this.state.languageValue &&
          !this.state.codeChanged && !this.state.image_name_changed) {
            notification.open({
                message: 'Please make some changes to save the Skill',
                icon: <Icon type='close-circle' style={{ color: '#f44336' }} />,
            });
            self.setState({
                loading: false
            });
            return 0;
        }


  • After doing the above validations, a request is sent to the Server and the User is shown a notification accordingly, whether the Skill has been uploaded to the Server or there has been some error.

$.ajax(settings)
            .done(function (response) {
                this.setState({
                    loading: false
                });
                let data = JSON.parse(response);
                if (data.accepted === true) {
                    notification.open({
                        message: 'Accepted',
                        description: 'Your Skill has been uploaded to the server',
                        //success/>
                    });
                }
                else {
                    this.setState({
                        loading: false
                    });
                    notification.open({
                        message: 'Error Processing your Request',
                        description: String(data.message),
                        //failure />
                    });
                }
            }


  • If the User is notified with a Success notification, then to verify whether the Skill has been added or not, the User can go to susi_skill_data repo and see if he has a recent commit regarding the same or not.

Resources

Continue ReadingSkill Development using SUSI Skill CMS

Open Source Developer Guide and Best Practices at FOSSASIA

I would request you to please guide me as to how can I collaborate with you and also how can I contribute effectively to the organization.

At times I might get up to 20 private mails per day about “How to contribute to Open Source”. Usually I will direct developers to our mailing list or chat channels if they are asking about a specific project. But, how do contributions work at FOSSASIA? How can new developers join projects effectively? We have tried many different ways and spent a lot of time communicating with newcomers, many of them new to Git and Open Source development.

Over the years we have gotten better at helping new developers, designers and other contributors to join up. We have more than 1300 registered developers in our GitHub organization today. Not all of them can contribute every day, but we do have thousands of commits every year.

So, how are we able to scale up? I believe one reason are our Best Practices. We didn’t have a document “FOSSASIA Best Practices” yet, but in our daily work we have established excellent (mostly unwritten) best practices, that I would like to share in a concise form here now as a reference for new developers.

Happy to get your feedback and comments.

Development Best Practices at FOSSASIA

Culture and Communication

  • Please adapt your language to non-native English speakers and be super friendly. Remember we are an international community with contributors mainly from Asia and Europe. We are not used to swearing and will mostly understand words literally. At all times ensure your tone stays appropriate and friendly in the FOSSASIA community.
  • Stay modest. Sometimes newcomers already have an amazing knowledge in some areas. Still remember, it is no reason to be arrogant. Even the best developer does not know everything.
  • Be nice and welcoming. Why not add “please” in an issue or a comment “Thank you” in a pull request if someone did a good job? Show your appreciation for the good work of your co-developers.
  • If you are involved in a topic you don’t understand yet, try to learn yourself as much as possible from public channels (wikipedia, stackoverflow) but also do not hesitate to ask questions to other developers.

Communication Channels

Every project at FOSSASIA has its own channels. Many projects use Gitter, some Slack or IRC. Usually you will find information of the main communication channels of a project in the Readme.md.

While we are a community of Open Source and Free Software developers we still reserve our right to use whatever tools we deem necessary to help us to achieve our goal of developing the best possible Open Technologies – software and hardware. It is one step at a time 🙂

Private and Public Chat or Issue Tracker

Chat is a great way to connect with other contributors, but not all contributors are there all the time (consider time difference and personal schedules) and they are not always available to chat. Chat tends to be unstructured and with lots of people in a room there are often a number of threads. Therefore chat is great for help on setup issues and things where you got stuck.

Do not use chat for feature requests and detailed discussions on issues. These things are best for the issue tracker, where people from different timezones can join and where a focused conversation on one specific topic can happen.

Some people try to overcome the unstructured chats by switching to private communication. This shuts out other contributors who might have similar issues. A result I often observed is also, that contributors will bring up arguments in discussions like “I have discussed this already with xyz privately and he agrees”. Other contributors have not seen this discussion if it has not been taken place in public and we haven’t seen the arguments. We don’t know if xyz really agrees or if it was misunderstood. Private conversations are not transparent. Surely, there are cases where private chat is needed, e.g. for specific deployment questions of projects, but whenever you talk about development, please switch to public chat or open an issue.

Feature Requests and Bug Reports

  • Some newcomers are not accustomed to issue trackers and might try to inform developers on the mailing list, chat or even write private emails about bugs and features, but the right place to do this is: The issue tracker of a project.
  • Any bug or feature, please open an issue in the issue tracker right away and indicate if you want to work on it yourself.
  • Please include all relevant information when you submit an issue and wherever possible a link, information about the code that has issues and a screenshot.
  • When you file a bug report on the issue tracker, make sure you add steps to reproduce it. Especially if that bug is some weird/rare one.

Join Development

  • Before you join development, please set up the project on your local machine, run it and go through the application completely. Press on any button you can find and see where it leads to. Explore. (Don’t worry. Nothing will happen to the app or to you due to the exploring. Only thing that will happen is, you’ll be more familiar with what is where and might even get some cool ideas on how to improve various aspects of the app.).
  • If you would like to work on an issue, drop in a comment at the issue. If it is already assigned to someone, but there is no sign of any work being done, please free to drop in a comment so that the issue can be assigned to you if the previous assignee has dropped it entirely.

Commits/Pull Requests

  • All pull requests need to be associated to an issue.
  • All PRs need to be assigned to the person working on it.
  • If an issue cannot be completed in less than a day, it should be broken up into multiple issues.
  • Make pull requests from your own forks (even if you have write rights to the repository, do not create new branches, develop on your own branches).
  • State the actual change or enhancement in the commit message of PRs (do not just state “Fixes issue #123”).
  • Add the issue number into the description (this helps to speed up reviews as reviewers can simply click to get more info in the issue itself).
  • Write clear meaningful git commit messages (Do read http://chris.beams.io/posts/git-commit/).
  • Match pull requests with issues and make sure your pull requests description contains GitHub’s special keyword references that automatically close the related issue when the pull request is merged. (More info at https://github.com/blog/1506-closing-issues-via-pull-requests).
  • When you make very minor changes to a pull request of yours (like for example fixing a failing travis build or some small style corrections or minor changes requested by reviewers) make sure you squash your commits afterwards so that you don’t have an absurd number of commits for a very small fix (Learn how to squash at https://davidwalsh.name/squash-commits-git).
  • Add a screenshot if you changed anything in the UI of a project. When you’re submitting a pull request for a UI-related issue, please add a screenshot of your change or a link to a deployment where it can be tested out along with your pull request. It makes it much easier for the reviewers and helps to speed up the process. You’ll also get reviews quicker.
  • Add a link to your deployment of the project, where reviewers can check out what you have changed (especially for smaller changes this is very helpful as the reviewer might not even need to set up the system itself and test it. Again this speeds up the review process a lot).
  • Always ensure CI and tests are successful.
  • Help to resolve merge conflicts (especially if there are several PRs at the same time, merge conflicts are common. Help the reviewers and solve merge conflicts to speed up the process.).
  • Merging Pull Requests should only happen if at least two contributors reviewed the PR and approved it.

Scope of Issues and Commits

  • Stay focused on the issue and its specifics: Sometimes it is tempting to do more changes in a pull request and simply add a nice little feature after mentioning it in the issue tracker. Please do not do this. Contributors will look at the title of issues usually to check if it is relevant for them. For example, if an issue is about changing a font, do not also change the color even if this seems like small change to you. Many projects have a design template and standard colors etc. that they want to achieve. So your changes might need to be discussed in a bigger setting even if they seem small to you. Same applies to many other areas.
  • Do only the changes in a pull request that are mentioned in the issue. Do not change anything else without ever mentioning it (remember match issues with pull requests).

Branch Policies

Most FOSSASIA Projects have:

  • a development branch (which is the working branch. Please commit to this branch.) and
  • a master branch (which is the stable branch).

Some projects also keep additional branches e.g.:

  • gh-pages for documentation purposes (often autogenerated from md-files in docs folder)
  • apk branches for Android apps (often autogenerated with travis).

Getting Started

  • Newcomers are sometimes afraid to make a pull request. Don’t be! It is the responsibility of reviewers to review them. And Git is a beautiful tool when it comes to reverting pull requests with errors.
  • In simple issues keep it simple and “simply” contribute, e.g. in an issue “change the color of the button from green to red”, there is no need to mention and ask “here is a screenshot where I changed the color to red. Should I make a PR now?”. Just make the pull request and wait for the feedback of the reviewer.
  • Take on responsibility early and help to review other contributions. Even though you do not have write access in a repository you can already help to review other commits.

Documentation

  • Please ensure you provide information about your code and the functioning of your app as part of every code contribution.
  • Add information on technologies and the code into the code itself and into documentation files e.g. into the Readme.md or /docs folder. Documentation is not a thing that should be done at the end after a few weeks or months of coding! Documentation is a continuous effort at every step of software development.
  • If you add new libraries or technologies add information about them into the Readme file.
  • If you implement a different design or change the css in a web project, please add information to the design specifications/template. If there are not any design specifications in the project yet, why not start them and add a section into the Readme.md to start with?
  • Always help to keep documentation up to date and make it easy for new contributors to join the project.


Thank you for helping to define many of the practices while working on the Open Event project to the developer team and for additional input and links to Niranjan Rajendran.

Links to Other Resources

Continue ReadingOpen Source Developer Guide and Best Practices at FOSSASIA

Using Heroku pipelines to set up a dev and master configuration

The open-event-webapp project, which is a generator for event websites, is hosted on heroku. While it was easy and smooth sailing to host it on heroku for a single branch setup, we moved to a 2-branch policy later on. We make all changes to the development branch, and every week once or twice, when the codebase is stable, we merge it to master branch.

So we had to create a setup where  –

master branch –> hosted on –> heroku master

development branch –> hosted on –> heroku dev

Fortunately, for such a setup, Heroku provides a functionality called pipelines and a well documented article on how to implement git-flow


First and foremost, we created two separate heroku apps, called opev-webgen and opev-webgen-dev

To break it down, let’s take a look at our configuration. First step is to set up separate apps in the travis deploy config, so that when development branch is build, it pushed to open-webgen-dev and when master is built, it pushes to opev-webgen app. The required lines as you can see are –

https://github.com/fossasia/open-event-webapp/blob/master/.travis.yml#L25

https://github.com/fossasia/open-event-webapp/blob/development/.travis.yml#L25

Now, we made a new pipeline on heroku dashboard, and set opev-webgen-dev and opev-webgen in the staging and production stages respectively.

Screenshot from 2016-07-31 04-33-30 Screenshot from 2016-07-31 04-34-41

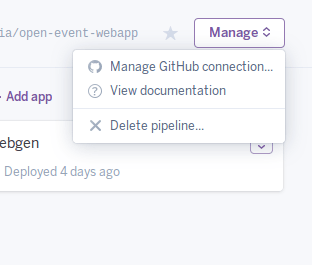
Then, using the “Manage Github Connection” option, connect this app to your github repo.

Screenshot from 2016-07-31 04-36-17

Once you’ve done that, in the review stage of your heroku pipeline, you can see all the existing PRs of your repo. Now you can set up temporary test apps for each PR as well using the Create Review App option.

Screenshot from 2016-07-31 04-37-38

So now we can test each PR out on a separate heroku app, and then merge them. And we can always test the latest state of development and master branches.

Continue ReadingUsing Heroku pipelines to set up a dev and master configuration