Implementing Contextual Action Bar in the Open Event Organizers App

The following blog post is regarding the using of Contextual Action Bar in the Open Event Orga App. In the Open Event Orga App, whenever an item was long pressed, then we had implemented a non standard way of showing the edit and delete button at the top. This would eventually degrade the UX of the app. So as to handle this, CAB was implemented.

When the user long presses on any item, we sometimes see a list of items such as Share, Delete or Edit on the toolbar. This is a standard functionality known as the Contextual Action Bar which is present in many apps. (image for reference given below)

Apart from the standard Action Bar, Android also provides us with the implementation of the Contextual Action Menu. A context menu is a floating menu that appears when the user performs a long-click on an element. It provides actions that affect the selected content or context frame.( image given below for reference)

(Contextual Action Bar)

(Contextual Action Menu)

To implement the standard CAB in the Orga App, the following steps given below have been followed.

In the FaqlistFragment class, an interface ActionMode.Callback is implemented. In its callback methods, you can specify the actions for the contextual action bar, respond to click events on action items, and handle other lifecycle events for the action mode.

Each of the callback methods have been discussed below:

  • onCreateActionMode( ) ->  This method is called first when the ActionMode is started. Here with the help of MenuInflater, the menu which has been made in the menus.xml file is inflated. Also when the app goes into Actions Mode , the status bar is black in color. Hence to handle that the color of the status bar is being changed programmatically.


  • onPrepareActionMode( ) -> This should generally return true.

  • onActionItemClicked( ) -> The action mode consists of many items which have separate action. The separate actions for the items are defined here. For eg.In the code snippet given below, when the icon with the id “del is selected then the showDeleteDialog( ) must be called.


  • onDestroyActionMode( ) -> When the user exits the Actions Mode, the mode should be assigned a null value and the app should be set to default state.
public ActionMode.Callback actionCallback = new ActionMode.Callback() {
  @Override
  public boolean onCreateActionMode(ActionMode mode, Menu menu) {
      MenuInflater inflater = mode.getMenuInflater();
      inflater.inflate(R.menu.menu_faqs, menu);
      if (Build.VERSION.SDK_INT >= Build.VERSION_CODES.LOLLIPOP) {
          //hold current color of status bar
          statusBarColor = getActivity().getWindow().getStatusBarColor();
          //set the default color
          getActivity().getWindow().setStatusBarColor(getResources().getColor(R.color.color_top_surface));
      }
      return true;
  }

  @Override
  public boolean onPrepareActionMode(ActionMode mode, Menu menu) {
       return true;
  }

  @Override
  public boolean onActionItemClicked(ActionMode mode, MenuItem item) {
      switch (item.getItemId()) {
          case R.id.del:
              showDeleteDialog();
              break;
          default:
              return false;
      }
      return false;
  }

  @Override
  public void onDestroyActionMode(ActionMode mode) {
      actionMode = null;
      getPresenter().resetToDefaultState();
      if (Build.VERSION.SDK_INT >= Build.VERSION_CODES.LOLLIPOP) {
          //return to “old” color of status bar
          getActivity().getWindow().setStatusBarColor(statusBarColor);
      }
  }
};
  1. In the styles.xml, the XML Tag given below needs to be added so that the Action Mode replaces the current Action Bar otherwise, a new Action Bar is created above the Action Bar which is already present.

 <item name=“windowActionModeOverlay”>true</item>

  1. In the Orga App, as the MVP pattern is followed we need to add the following to methods to the interface so that the View and Presenter can communicate via these methods.
public interface FaqListView extends Progressive, Erroneous, Refreshable, Emptiable<Faq> {

  void exitContextualMenuMode();

  void enterContextualMenuMode();
}


  1. In the enterContextualMenuMode( ) implementation in the FaqListFragment the startActionMode()  is called to enable the contextual action mode.
@Override
public void enterContextualMenuMode() {
  actionMode = getActivity().startActionMode(actionCallback);
}

References:

  • Official Android documentation for Menu’s

https://developer.android.com/guide/topics/ui/menus#CAB

  • Sample CAB implementation

http://www.technotalkative.com/contextual-action-bar-cab-android/

  • Action mode over Toolbar

http://www.androhub.com/android-contextual-action-mode-over-toolbar/            

Continue ReadingImplementing Contextual Action Bar in the Open Event Organizers App

Implementation of Sponsors API in Open Event Organizer Android App

New contributors to this project are sometimes not experienced with the set of libraries and MVP pattern which this app uses. This blog post is an attempt to walk a new contributor through some parts of the code of the app by implementing an operation for an endpoint of the API. We’ll be implementing the sponsor endpoint.

Open Event Organizer Android app uses a robust architecture. It is presently using the MVP (Model-View-Presenter) architecture. Therefore, this blog post aims at giving some brief insights to the app architecture through the implementation Sponsor endpoint. This blog post will focus only on one operation of the endpoint – the list operation – so as to make the post short enough.

This blog post relates to Pull Request #901 of Open Event Organizer App.

Project structure:
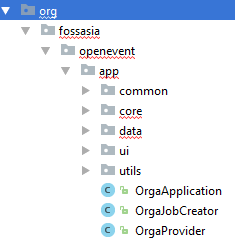
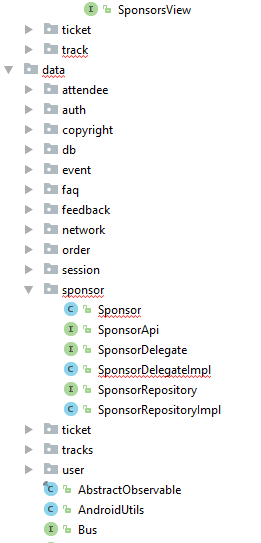
These are the parts of the project structure where major updates will be made for the implementation of Sponsor endpoint:

core

data

Setting up elements in the data module for the respective endpoint

Sponsor.java

@Data
@Builder
@Type(“sponsor”)
@AllArgsConstructor
@JsonNaming(PropertyNamingStrategy.KebabCaseStrategy.class)
@EqualsAndHashCode(callSuper = false, exclude = { “sponsorDelegate”, “checking” })
@Table(database = OrgaDatabase.class)
public class Sponsor extends AbstractItem<Sponsor, SponsorsViewHolder> implements Comparable<Sponsor>, HeaderProvider {

   @Delegate(types = SponsorDelegate.class)
   private final SponsorDelegateImpl sponsorDelegate = new         SponsorDelegateImpl(this);

This class uses Lombok, Jackson, RaizLabs-DbFlow, extends AbstractItem class (from Fast Adapter) and implements Comparable and HeaderProvider.

All the annotations processor help us reduce boilerplate code.

From the Lombok plugin, we are using:

Lombok has annotations to generate Getters, Setters, Constructors, toString(), Equal() and hashCode() methods. Thus, it is very efficient in reducing boilerplate code

@Getter,  @Setter, @ToString, @EqualsAndHashCode

@Data is a shortcut annotation that bundles the features of @Getter, @Setter, @ToString and @EqualsAndHashCode

The @Delegate is used for direct calls to the methods that are annotated with it, to the specified delegate. It basically separates the model class from other methods which do not pertain to data.

Jackson

@JsonNaming – used to choose the naming strategies for properties in serialization, overriding the default. For eg:  KEBAB_CASE, LOWER_CASE, SNAKE_CASE, UPPER_CAMEL_CASE

@JsonNaming(PropertyNamingStrategy.KebabCaseStrategy.class)

@JsonProperty – used to store the variable from JSON schema as the given variable name. So, “type” from JSON will be stored as sponsorType.

@JsonProperty(“type”)
public String sponsorType;

RaizLabs-DbFlow

DbFlow uses model classes which must be annotated using the annotations provided by the library. The basic annotations are – @Table, @PrimaryKey, @Column, @ForeignKey etc.

These will create a table named attendee with the columns and the relationships annotated.

SponsorDelegate.java and SponsorDelegateImpl.java

The above are required only for method declarations of the classes and interfaces that Sponsor.java extends or implements. These basically separate the required method overrides from the base item class.

public class SponsorDelegateImpl extends AbstractItem<Sponsor, SponsorsViewHolder> implements SponsorDelegate {

SponsorRepository.java and SponsorRepositoryImpl.java

A Repository mediates between the domain and data mapping layers, acting like an in-memory domain object collection. Client objects construct query specifications declaratively and submit them to Repository for satisfaction. Objects can be added to and removed from the Repository, as they can from a simple collection of objects, and the mapping code encapsulated by the Repository will carry out the appropriate operations behind the scenes.

public interface SponsorRepository {
  @NonNull
  Observable<Sponsor> getSponsors(long eventId, boolean reload);
}

Presently the app uses MVP architecture and the core package contains respective Views and their Presenters, whereas the data package contains the Model implementation.

To understand Observable, one will need to dive in RxJava. This video of a presentation by Jake Wharton can be a great start.

So, basically Observables represent sources of data, and whenever there is a change in our observable, i.e. our data, it fires an event and we get to know about it only if we have subscribed to it.

Setting up elements in core module (views and presenters)

Presently the app uses MVP architecture and the core package contains respective Views and Presenters for different properties of an event.

SponsorView.java

public interface SponsorsView extends Progressive, Erroneous, Refreshable, Emptiable<Sponsor> {
}

SponsorsFragment.java

This is a simple Fragment that extends BaseFragment (a generic fragment class predefined in the project) and implements SponsorView interface.

SponsorsListAdapter.java

A simple adapter for a RecyclerView.

SponsorsPresenter.java

The presenter is the middle-man between model and view. All your presentation logic belongs to it. A Presenter in a MVP architecture is responsible for querying the model and updating the view, reacting to user interactions and updating the model.

In this Presenter we have used the @Inject annotation and some RxJava code:

@Inject
public SponsorsPresenter(SponsorRepository sponsorRepository, DatabaseChangeListener<Sponsor> sponsorChangeListener) {
  this.sponsorRepository = sponsorRepository;
  this.sponsorChangeListener = sponsorChangeListener;
}

The @Inject annotation is used to request dependencies. It can be used on a constructor, a field, or a method. If you annotate a constructor with @Inject, Dagger 2 can also use an instance of this object to fulfill dependencies. Note that we are not instantiating any object here ourselves.

Some RxJava part, which is not in the scope of this blog.

private void listenChanges() {
  sponsorChangeListener.startListening();
  sponsorChangeListener.getNotifier()
      .compose(dispose(getDisposable()))
      .map(DbFlowDatabaseChangeListener.ModelChange::getAction)
      .filter(action -> action.equals(BaseModel.Action.INSERT))
      .subscribeOn(Schedulers.io())
      .subscribe(sponsorModelChange -> loadSponsors(false), Logger::logError);
}


public void loadSponsors(boolean forceReload) {
  getSponsorSource(forceReload)
      .compose(dispose(getDisposable()))
      .compose(progressiveErroneousRefresh(getView(), forceReload))
      .toList()
      .compose(emptiable(getView(), sponsors))
      .subscribe(Logger::logSuccess, Logger::logError);
}

Make changes to Dependency Injection modules

We are using Dagger for Dependency Injection, and therefore we need to update the modules that provide endpoint specific objects.

This video and this blog are a great start to learn about dependency injection using dagger.

Dependency injection is a technique whereby one object supplies the dependencies of another object. A dependency is an object that can be used (a service). An injection is the passing of a dependency to a dependent object (a client) that would use it. The service is made part of the client’s state. Passing the service to the client, rather than allowing a client to build or find the service, is the fundamental requirement of the pattern.(source)

Dependency Injection in built upon the concept of Inversion of Control. Which says that a class should get its dependencies from outside. In simple words, no class should instantiate another class but should get the instances from a configuration class.

Dagger 2 analyzes the dependencies for you and generates code to help wire them together.  It relies purely on using Java annotation processors and compile-time checks to analyze and verify dependencies. It is considered to be one of the most efficient dependency injection frameworks built to date.

@Provides is basically required to specify that the annotated method returns an object that should be available for injection to dependencies using @Inject

@Singleton annotation signals to the Dagger compiler that the instance should be created only once in the application.

@Binds annotation is a replacement for @Provides methods that simply returns an injected parameter. Its generated implementation is likely to be more efficient. A method annotated with @Binds must be: abstract.

ApiModule.java

@Provides
@Singleton
SponsorApi providesSponsorApi(Retrofit retrofit) {    return retrofit.create(SponsorApi.class);
}    

ChangeListenerModule.java

@Provides
DatabaseChangeListener<Sponsor> providesSponsorChangeListener() {
   return new DbFlowDatabaseChangeListener<>(Sponsor.class);
}

NetworkModule.java

@Provides
Class[] providesMappedClasses() {
   return new Class[]{Event.class, Attendee.class, Ticket.class, User.class,
   EventStatistics.class, Faq.class, Copyright.class, Feedback.class,           Track.class, Session.class, Sponsor.class};
   }

RepoModule.java

@Binds
@Singleton
abstract SponsorRepository bindsSponsorRepository(SponsorRepositoryImpl sponsorRepositoryImpl);

MainFragmentBuilderModule.java

@ContributesAndroidInjector
abstract SponsorsFragment contributeSponsorsFragment();

Also remember to make this change to FragmentNavigator.java

case R.id.nav_sponsor:
fragment = SponsorsFragment.newInstance(eventId);
break;

XML resources to be added:

  1. sponsors_item.xml
  2. sponsors_fragment.xml
  3. Make changes to activity_main_drawer.xml to include “sponsors” option.

Here’s what the result looks like:

References:

Lombok Plugin: https://blog.fossasia.org/using-lombok-to-reduce-boilerplate-code-in-open-event-android-app/

Jackson: https://blog.fossasia.org/shrinking-model-classes-boilerplate-in-open-event-android-projects/

RaizLabs DbFlow: https://blog.fossasia.org/persistence-layer-in-open-event-organizer-android-app/

Dependency Injection:
https://medium.com/@harivigneshjayapalan/dagger-2-for-android-beginners-di-part-i-f5cc4e5ad878

Continue ReadingImplementation of Sponsors API in Open Event Organizer Android App

Use Of DBFlowChangeListener for Automatic Updation of FAQ List in the Open Event Orga App

In the Open Event Orga App, whenever a faq is created in via the CreatefaqFragment, the new faqs aren’t updated in the FAQ’s list. The user has to swipe down and refresh to see the newly created FAQ. This seems to be a major problem and hence to solve this issue a DBFlowChangeListener class has been created.

Following blog post shows the implementation of the ChangeListener class.

Steps of Implementation

In the FaqListPresenter constructor pass an argument of the type DatabaseChangeListener<Faq> and assign it to local variable faqChangeListener.

@Inject
public FaqListPresenter(FaqRepository faqRepository, DatabaseChangeListener<Faq> faqChangeListener) {
  this.faqRepository = faqRepository;
  this.faqChangeListener = faqChangeListener;
}

A method listenChanges( ) is made in the Presenter that will initiate the listening of database. Following code shows the listenChanges( ) . startListening( ) is a method in the DBFlowDatabaseChangeListener which is accessed with the help of DatabaseChangeListener interface.

private void listenChanges() {
  
  faqChangeListener.startListening();
  
  faqChangeListener.getNotifier()
      .compose(dispose(getDisposable()))
      .map(DbFlowDatabaseChangeListener.ModelChange::getAction)
      .filter(action -> action.equals(BaseModel.Action.INSERT) || action.equals(BaseModel.Action.DELETE))
      .subscribeOn(Schedulers.io())
      .subscribe(faqModelChange -> loadFaqs(false), Logger::logError);
}

In the startListening( )  in DatabaseChangeListener, DirectModelNotifier is used to get notified of database changes. It is ultimately registered for any kind of model change as shown in the following code snippet. ReplaySubject is one of the 4 kinds of subjects ( Publish Subject, Replay Subject, Behavior Subject, Async Subject) that RxJava provides. It emits all the items of the source Observable, regardless of when the subscriber subscribes.

public void startListening() {
  if (disposable == null || disposable.isDisposed())
      replaySubject = ReplaySubject.create();

  modelModelChangedListener = new DirectModelNotifier.ModelChangedListener<T>() {

      @Override
      public void onTableChanged(@Nullable Class<?> aClass, @NonNull BaseModel.Action action) {
          replaySubject.onNext(new ModelChange<>(null, action));
      }

      @Override
      public void onModelChanged(@NonNull T model, @NonNull BaseModel.Action action) {
          replaySubject.onNext(new ModelChange<>(model, action));
      }
  };

  DirectModelNotifier.get().registerForModelChanges(classType, modelModelChangedListener);
}

When the faqChangeListener is subscribed it calls the loadFaqs( ) , it ultimately loads the updated values from the database. Hence all the updated values are now displayed in the FaqListFragment.

public void loadFaqs(boolean forceReload) {
  getFaqSource(forceReload)
      .compose(dispose(getDisposable()))
      .compose(progressiveErroneousRefresh(getView(), forceReload))
      .toList()
      .compose(emptiable(getView(), faqs))
      .subscribe(Logger::logSuccess, Logger::logError);
}

Hence the use of DBFlowListener makes it possible to communicate between 2 fragments. Its usability has also been exploited in Tracks, Tickets, Sponsors fragments as well.

References:

  1. RaizLab’s DBFLow:      https://github.com/Raizlabs/DBFlow
  2. Docs related to DBFlow:             https://agrosner.gitbooks.io/dbflow/content/Observability.html
  3. Subjects used in RxJavahttps://blog.mindorks.com/understanding-rxjava-subject-publish-replay-behavior-and-async-subject-224d663d452f
Continue ReadingUse Of DBFlowChangeListener for Automatic Updation of FAQ List in the Open Event Orga App

“STOP” action in SUSI Android App

Generally whenever there was a long query asked from SUSI through speech, it would respond to the user with a speech output, similarly the output is given through speech whenever the user clicks on the “Try it” button on the skill details activity.

The long answers for e.g. asking SUSI “How to cook biryani ?” gives a very long response which when conveyed through the speech output takes a long amount of time. Also most of the time users don’t want to listen to such long answers, but at the same time there is no option or feature to stop SUSI. The user either needs to switch over to another activity or has to close the app.

So, to solve this problem such that neither the user has to shut down the app nor the user has to switch over to another activity, the “STOP” action was added in SUSI.

The “STOP” action was integrated in the server and is of following type :


“actions”: [{“type”: “stop”}],

How to define STOP response ?

To integrate this action type in the app, a separate response type was added and checked for. In the file ParseSusiResponseHandler.kt the action type stop was added as :

Constant.STOP -> try {
  stop = susiResponse.answers[0].actions[1].type
} catch (e: Exception) {

}

So, now whenever the query of type “stop” was entered by the user it would be caught by this block and further processing could be done. The stop variable takes the value from the JSON response fetched and the value extracted is the one stored against the type key in the second field of the actions JSON in the first field of the answers JSON.

What to be done when executing STOP?

After the STOP action was caught the task to do was to define the behaviour of the app when this response was caught. So, first thing that should happen when STOP is received is that the TextToSpeech Engine should close so that SUSI no longer can speak the sentence but defining top is more than just closing the TTS engine. STOP signifies that any activity that is being continued right now should be stopped.

So, Using the android lifecycle methods I added a function in the IChatView interface to define what actions should take place in the stopping process.

override fun stopMic() {
  onPause()
  registerReceiver(networkStateReceiver, IntentFilter(ConnectivityManager.CONNECTIVITY_ACTION))

  window.setSoftInputMode(
          WindowManager.LayoutParams.SOFT_INPUT_STATE_ALWAYS_HIDDEN
  )

  if (recordingThread != null)
      chatPresenter.startHotwordDetection()

  if (etMessage.text.toString().isNotEmpty()) {
      btnSpeak.setImageResource(R.drawable.ic_send_fab)
      etMessage.setText(“”)
      chatPresenter.micCheck(false)
  }

  chatPresenter.checkPreferences()
}

The above function sends the activity to the onPause() lifecycle method to put the activity in a pausing state so that all that is taking place right now in the activity stops and this definitely serves our purpose. But after pausing the activity, there was a further need to perform some functionality that had to done on the start of the activity and therefore the code for that was also added in this function.

How to catch STOP?

The below code was added in ChatPresenter.kt file in which if the actionType from the psh object of type ParseSusiResponseHelper is “STOP” then the view function stopMic() is called which was defined above.

val psh = ParseSusiResponseHelper()
psh.parseSusiResponse(susiResponse, i, utilModel.getString(R.string.error_occurred_try_again))

var setMessage = psh.answer
if (psh.actionType == Constant.ANSWER && (PrefManager.checkSpeechOutputPref() && check || PrefManager.checkSpeechAlwaysPref())) {
  setMessage = psh.answer

  var speechReply = setMessage
  if (psh.isHavingLink) {
      speechReply = setMessage.substring(0, setMessage.indexOf(“http”))
  }
  chatView?.voiceReply(speechReply, susiResponse.answers[0].actions[i].language)
} else if (psh.actionType == Constant.STOP) {
  setMessage = psh.stop
  chatView?.stopMic()
}

Final Output

References

  1. Stop  json response from susi server : https://api.susi.ai/susi/chat.json?timezoneOffset=-330&q=susi+stop
  2. Android life cycle methods – Google: https://developer.android.com/guide/components/activities/activity-lifecycle
  3. Interaction between view and presenters : https://medium.com/@cervonefrancesco/model-view-presenter-android-guidelines-94970b430ddf
Continue Reading“STOP” action in SUSI Android App

Implementing Map View in Devices Tab in Settings

The Table View implemented in the Devices tab in settings on SUSI.AI Web Client has a column “geolocation” which displays the latitudinal and longitudinal coordinates of the device. These coordinates needed to be displayed on a map. Hence, we needed a Map View apart from the Table View, dedicated to displaying the devices pinpointed on a map. This blog post explains how this feature has been implemented on the SUSI.AI Web Client.

Modifying the fetched data of devices to suitable format

We already have the fetched data of devices which is being used for the Table View. We need to extract the geolocation data and store it in a different suitable format to be able to use it for the Map View. The required format is as follows:

[
   {
      "location":{
         "lat": latitude1,
         "lng": longitude2
      }
   },
   {
      "location":{
         "lat": latitude1,
         "lng": longitude2
      }
   }
]


To modify the fetched data of devices to this format, we modify the apiCall() function to facilitate extraction of the geolocation info of each device and store them in an object, namely ‘mapObj’. Also, we needed variables to store the latitude and longitude to use as the center for the map. ‘centerLat’ and ‘centerLng’ variables store the average of all the latitudes and longitudes respectively. The following code was added to the apiCall() function to facilitate all the above requirements:

let mapObj = [];
let locationData = {
  lat: parseFloat(response.devices[i].geolocation.latitude),
  lng: parseFloat(response.devices[i].geolocation.longitude),
};
centerLat += parseFloat(response.devices[i].geolocation.latitude);
centerLng += parseFloat(response.devices[i].geolocation.longitude);
let location = {
  location: locationData,
};
mapObj.push(location);
centerLat = centerLat / mapObj.length;
centerLng = centerLng / mapObj.length;
if (mapObj.length) {
  this.setState({
    mapObj: mapObj,
    centerLat: centerLat,
    centerLng: centerLng,
  });
}


The following code was added in the return function of Settings.react.js file to use the Map component. All the modified data is passed as props to this component.

<MapContainer
  google={this.props.google}
  mapData={this.state.mapObj}
  centerLat={this.state.centerLat}
  centerLng={this.state.centerLng}
  devicenames={this.state.devicenames}
  rooms={this.state.rooms}
  macids={this.state.macids}
/>


The implementation of the MapContainer component is as follows:

 componentDidUpdate() {
    this.loadMap();
  }

  loadMap() {
    if (this.props && this.props.google) {
      const {google} = this.props;
      const maps = google.maps;
      const mapRef = this.refs.map;
      const node = ReactDOM.findDOMNode(mapRef);

      const mapConfig = Object.assign({}, 
        
          center: { lat: this.props.centerLat, lng: this.props.centerLng },
          zoom: 2,
        }
      )
      this.map = new maps.Map(node, mapConfig);
    }
  }


Let us go over the code of MapContainer component step by step.

  1. Firstly, the componentDidUpdate() function calls the loadMap function to load the google map.

  componentDidUpdate() {
    this.loadMap();
  }


  1. In the loadMap() function, we first check whether props have been passed to the MapContainer component. This is done by enclosing all contents of loadMap function inside an if statement as follows:

  if (this.props && this.props.google) {
    // All code of loadMap() function
  } 


  1. Then we set the prop value to google, and maps to google maps props. This is done as follows:

  const {google} = this.props;
  const maps = google.maps;


  1. Then we look for HTML div ref ‘map’ in the React DOM and name it ‘node’. This is done as follows:

  const mapRef = this.refs.map;
  const node = ReactDOM.findDOMNode(mapRef);


  1. Then we set the center and the default zoom level of the map using the props we provided to the MapContainer component.

  {
    center: { lat: this.props.centerLat, lng: this.props.centerLng },
    zoom: 2,
  }


  1. Then we create a new Google map on the specified node (ref=’map’) with the specified configuration set above. This is done as follows:

this.map = new maps.Map(node, mapConfig);


  1. In the render function of the MapContainer component, we return a div with a ref ‘map’ as follows:

 render() {
    return (
      <div ref="map" style={style}>
        loading map...
      </div>
    );
  }


This is how the Map View has been implemented in the Devices tab in Settings on SUSI.AI Web Client.

Resources

Continue ReadingImplementing Map View in Devices Tab in Settings

Implementing Table View in Devices Tab in Settings

We can connect to the SUSI.AI Smart Speaker using our mobile apps (Android or iOS). But there needs to be something implemented which can tell you what all devices are linked to your account. This is in consistency with the way how Google Home devices and Amazon Alexa devices have this feature implemented in their respective apps, which allow you to see the list of devices connected to your account. This blog post explains how this feature has been implemented on the SUSI.AI Web Client.

Fetching data of the connected devices from the server

The information of the devices connected to an account is stored in the Accounting object of that user. This is a part of a sample Accounting object of a user who has 2 devices linked to his/her account. This is the data that we wish to fetch. This data is accessible at the /aaa/listUserSettings.json endpoint.

{
  "devices": {
    "37-AE-5F-7B-CA-3F": {
      "name": "Device 1",
      "room": "Room 1",
      "geolocation": {
        "latitude": "50.34567",
        "longitude": "60.34567"
      }
    },
    "9D-39-02-01-EB-95": {
      "name": "Device 2",
      "room": "Room 2",
      "geolocation": {
        "latitude": "52.34567",
        "longitude": "62.34567"
      }
    }
  }
} 


In the Settings.react.js file, we make an AJAX call immediately after the component is mounted on the DOM. This AJAX call is made to the /aaa/listUserSettings.json endpoint. The received response of the AJAX call is then used and traversed to store the information of each connected device in a format that would be more suitable to use as a prop for the table.

apiCall = () => {
    $.ajax({
      url: BASE_URL + '/aaa/listUserSettings.json?' + 'access_token=' +
  cookies.get('loggedIn');,
      type: 'GET',
      dataType: 'jsonp',
      crossDomain: true,
      timeout: 3000,
      async: false,
      success: function(response) {
        let obj = [];
         // Extract information from the response and store them in obj object
        obj.push(myObj);
        this.setState({
          dataFetched: true,
          obj: obj,
        });
      }
      }.bind(this),
  };


This is how the extraction of keys takes place inside the apiCall() function. We first extract the keys of the ‘devices’ JSONObject inside the response. The keys of this JSONObject are the Mac Addresses of the individual devices. Then we traverse inside the JSONObject corresponding to each Mac Address and store the name of the device, room and also the geolocation information of the device in separate variables, and then finally push all this information inside an object, namely ‘myObj’. This JSONObject is then pushed to a JSONArray, namely ‘obj’. Then a setState() function is called which sets the value of ‘obj’ to the updated ‘obj’ variable.

let keys = Object.keys(response.devices);
keys.forEach(i => {
    let myObj = {
        macid: i,
        devicename: response.devices[i].name,
        room: response.devices[i].room,
        latitude: response.devices[i].geolocation.latitude,
        longitude: response.devices[i].geolocation.longitude,
    };
}


This way we fetch the information of devices and store them in a variable named ‘obj’. This variable will now serve as the data for the table which we want to create.

Creating table from this data

The data is then passed on to the Table component as a prop in the Settings.react.js file.

<TableComplex
    // Other props
    tableData={this.state.obj}
/>


The other props passed to the Table component are the functions for handling the editing and deleting of rows, and also for handling the changes in the textfield when the edit mode is on. These props are as follows:

<TableComplex
    startEditing={this.startEditing}
    stopEditing={this.stopEditing}
    handleChange={this.handleChange}
    handleRemove={this.handleRemove}
/> 


The 4 important functions which are passed as props to the Table component are:

  1. startEditing() function:

When the edit icon is clicked for any row, then the edit mode should be enabled for that row. This also changes the edit icon to a check icon. The columns corresponding to the room and the name of the device should turn into text fields to enable the user to edit them. The implementation of this function is as follows:

startEditing = i => {
    this.setState({ editIdx: i });
}; 


‘editIdx’ is a variable which contains the row index for which the edit mode is currently on. This information is passed to the Table component which then handles the editing of the row.

  1. stopEditing() function:

When the check icon is clicked for any row, then the edit mode should be disabled for that row and the updated data should be stored on the server. The columns corresponding to the room and the name of the device should turn back into label texts. The implementation of this function is as follows:

stopEditing = i => {
  let data = this.state.obj;
  this.setState({ editIdx: -1 });
  // AJAX call to server to store the updated data
  $.ajax({
    url:
      BASE_URL + '/aaa/addNewDevice.json?macid=' + macid + '&name=' + devicename + '&room=' + room + '&latitude=' + latitude + '&longitude=' + longitude + '&access_token=' + cookies.get('loggedIn'),
    dataType: 'jsonp',
    crossDomain: true,
    timeout: 3000,
    async: false,
    success: function(response) {
      console.log(response);
    },
  });
};


The value of ‘editIdx’ is also set to -1 as the editing mode is now off for all rows.

  1. handleChange() function:

When the edit mode is on for any row, if we change the value of any text field, then that updated value is stored so that we can edit it without the value getting reset to the initial value of the field.

handleChange = (e, name, i) => {
  const value = e.target.value;
  let data = this.state.obj;
  this.setState({
    obj: data.map((row, j) => (j === i ? { ...row, [name]: value } : row)),
  });
};


  1. handleRemove() function:

When the delete icon is clicked for any row, then that row should get deleted. This change should be reflected to us on the site, as well as on the server. Hence, The implementation of this function is as follows:

handleRemove = i => {
  let data = this.state.obj;
  let macid = data[i].macid;

  this.setState({
    obj: data.filter((row, j) => j !== i),
  });
  // AJAX call to server to delete the info of device with specified Mac Address
  $.ajax({
    url:
      BASE_URL + '/aaa/removeUserDevices.json?macid=' + macid + '&access_token=' + cookies.get('loggedIn'),
    dataType: 'jsonp',
    crossDomain: true,
    timeout: 3000,
    async: false,
    success: function(response) {
      console.log(response);
    },
  });
};  


This is how the Table View has been implemented in the Devices tab in Settings on SUSI.AI Web Client.

Resources


Continue ReadingImplementing Table View in Devices Tab in Settings

Adding Multiple Select Checkboxes to Select Multiple Tickets for Discount Code in Open Event Frontend

This blog illustrates how we can add multiple select checkboxes to open event frontend using EmberJS.

Here we take an example of discount code creation in open event frontend. Since a discount code can be related to multiple tickets. Hence we should allow the organizer to choose multiple tickets from the event’s ticket list for which he/she wants the discount code to be applicable.

We start by generating a create route where we create a record for the discount code and pass the model to the template.

// routes/events/view/tickets/discount-codes/create.js

import Route from '@ember/routing/route';

export default Route.extend({
 titleToken() {
   return this.get('l10n').t('Create');
 },

 model() {
   return this.get('store').createRecord('discount-code', {
     event    : this.modelFor('events.view'),
     tickets  : [],
     usedFor  : 'ticket',
     marketer : this.get('authManager.currentUser')
   });
 }
});

We can see that we have a tickets relationship for new record of discount code which can accept multiple ticket as an array. We access this model in our template and create checkboxes for all tickets related to the event. So that the organizer can select multiple tickets for which he/she wants the discount code to be applicable.

// templates/components/forms/events/view/create-discount-code.hbs

{{t 'Select Ticket(s) applied to the discount code'}}
   {{ui-checkbox label='Select all Ticket types' name='all_ticket_types' value='tickets' checked=allTicketTypesChecked onChange=(action 'toggleAllSelection')}}

   {{#each data.event.tickets as |ticket|}}
     {{ui-checkbox label=ticket.name checked=ticket.isChecked onChange=(action 'updateTicketsSelection' ticket)}}
     <br>
   {{/each}}

This is part of the code that contain checkboxes for tickets. Full code can be seen here. We can see that first div contains the checkbox that allows us to select all the tickets at once. Once checked, this calls the action toggleAllSelection. This action is defined like this.

// components/forms/events/view/create-discount-code.js

toggleAllSelection(allTicketTypesChecked) {
     this.toggleProperty('allTicketTypesChecked');
     let tickets = this.get('data.event.tickets');
     if (allTicketTypesChecked) {
       this.set('data.tickets', tickets.slice());
     } else {
       this.get('data.tickets').clear();
     }
     tickets.forEach(ticket => {
       ticket.set('isChecked', allTicketTypesChecked);
     });
   },


In the toggleAllSelection action we loop over all the tickets of an event and set their isCheck property to either true or false depending on whether Select All checkbox was checked or unchecked. This is done to make all individual tickets checkboxes as checked or unchecked depending on whether we have selected all or unselected all. Also we set or unset the data.tickets array which contains all the tickets of discount-code record that were selected using checkboxes.

Going back to template in second div we render all the tickets individually with their checkbox. Each time a ticket is checked or unchecked we call updateTicketSelection action. Let us have a look at updateTicketSelection action.

// components/forms/events/view/create-discount-code.js

updateTicketsSelection(ticket) {
     if (!ticket.get('isChecked')) {
       this.get('data.tickets').pushObject(ticket);
       ticket.set('isChecked', true);
       if (this.get('data.tickets').length === this.get('data.event.tickets').length) {
         this.set('allTicketTypesChecked', true);
       }
     } else {
       this.get('data.tickets').removeObject(ticket);
       ticket.set('isChecked', false);
       this.set('allTicketTypesChecked', false);
     }
   },


In this action, we check if the ticket is checked or not. If it is checked we add it to the data.tickets array and further check if we have selected all the tickets or not. In case we have selected all the tickets then we also mark select all checkbox as checked through allTicketTypesChecked property. If it is unchecked we remove that ticket from the array. You can see full code here.

In this way, we implement multiple select checkboxes to select more than one data of a particular type through Ember.

Resources:

Continue ReadingAdding Multiple Select Checkboxes to Select Multiple Tickets for Discount Code in Open Event Frontend

Adding Code of Conduct in Open Event Web app

Open Event Server sends JSON data as a response of its REST (Representational State Transfer) API. The main eventyay platform allows organizers to add code of conduct to their event, as a result the JSON data sent by the server contains code of conduct key value pair, this value is extracted from the data and is used to create a separate page for Code of Conduct in any event.

The steps for data extraction and compilation are as follows:

Extracting code of conduct

Since open event server has two types of JSON data formats v1 and v2, both of them contains code of conduct. The key for code of conduct in v1 is code_of_conduct and for v2 is code-of-conduct. The data extraction for v1 data format occurs in fold_v1.js and the main event details are stored in an object urls as shown below:

fold_v1.js

const urls= {
 ....
 ....
 ....

 email: event.email,
 orgname: event.organizer_name,
 location_name: event.location_name,
 featuresection: featuresection,
 sponsorsection: sponsorsection,
 codeOfConduct: event.code_of_conduct
};


fold_v2.js

const urls= {
 ....
 ....
 ....

 email: event.email,
 orgname: event['organizer-name'],
 location_name: event['location-name'],
 featuresection: featuresection,
 sponsorsection: sponsorsection,
 codeOfConduct: event['code-of-conduct']
};

Adding template for CoC

Now we have extracted the data and have stored the value for code of conduct in an object, we need to render this in a template. For this, we created a template named CoC.hbs and the data for code of conduct is accessed via {{{eventurls.codeOfConduct}}} as shown below.

{{>navbar}}
<div class="main-coc-container container">
 <div class="row">
   <div class="middle col-sm-12">
     <h2 class="filter-heading track-heading text-center">
       <span>Code of Conduct</span>
     </h2>
   </div>
 </div>

 <div class="row">
   <div class="col-sm-12 col-md-12">
     <div class="coc">
       {{{eventurls.codeOfConduct}}}
     </div>
   </div>
 </div>
</div>
{{>footer}}

Compiling and minifying

Now we have stored the event details in an object we copy this object as a key to jsonData, this data is passed as an argument for compiling the code of conduct template namely CoC.hbs to a HTML file and is lately minified. For minification purpose gulp module is used.

if(jsonData.eventurls.codeOfConduct) {
 setPageFlag('CoC');
 fs.writeFileSync(distHelper.distPath + '/' + appFolder + '/CoC.html', minifyHtml(codeOfConductTpl(jsonData)));
}

Adding link to CoC page

Till now, we have successfully compiled a HTML page for code of conduct of an event. This page is linked under a heading in the footer section of every page by placing reference to it in footer.hbs.

{{#if eventurls.codeOfConduct}}
 <li><a target="_self" href="CoC.html">Code of Conduct</a></li>
{{/if}}

Customizing the CoC container

The code of conduct page is customized by placing the container in the center and aligning the text. Styling like background-color, padding and margin are set on the container to provide a better appearance to the page.

.coc {
 margin: auto;
 text-align: justify;
 width: 60%;

 a {
   &:hover {
     color: $dark-black;
   }
 }
}

.main-coc-container {
 background-color: $main-background;
 margin-bottom: 4%;
 margin-top: 2%;
 padding-bottom: 50px;
 padding-top: 2%;
}

Resources

Continue ReadingAdding Code of Conduct in Open Event Web app

Implementing job queue in Open Event Web app

Open Event Web app enables multiple request handling by the implementation of queue system in its generator. Every request received from the client is saved and stored in the queue backed by redis server. The jobs are then processed one at a time using the FCFS (First come First Serve) job scheduling algorithm. Processing the requests one by one prevents the crashing of app and also prevents the loss of requests from the client.

Initialising job queue

The job queue is initialised with a name and the connection object of redis server as the arguments.

const redisClient =  require('redis').createClient(process.env.REDIS_URL);
const Queue = require('bee-queue');
const queue = new Queue('generator-queue', {redis: redisClient});

Handling jobs in queue

The client emits an event namely ‘live’ when request for event generation is received, the corresponding event is listened and a new job for the request is created and enqueued in the job queue. Every request received by the client is saved to ensure that there is no loss of request. The queue is then searched for the requests or the jobs which are in ‘waiting’ state, if the current request status for the job Id is waiting the socket emits an event namely ‘waiting’.

socket.on('live', function(formData) {
 const req = {body: formData};
 const job = queue.createJob(req);

 job.on('succeeded', function() {
   console.log('completed job ' + job.id);
 });

 job.save(async function(err, currentJob) {
   if (err) {
     console.log('job failed to save');
   }
   emitter = socket;
   console.log('saved job ' + currentJob.id);
   const jobs = await queue.getJobs('waiting', {start: 0, end: 25});
   const jobIds = await jobs.map((currJob) => currJob.id);

   if(jobIds.indexOf(currentJob.id) !== -1) {
     socket.emit('waiting');
   }
 });

});

Updating the status of request

If the socket emits the event ‘waiting’ it signifies that some other job is currently in process and the status of the current request is ‘waiting’.

socket.on('waiting', function () {
 updateStatusAnimate('Request status: Waiting');
});

Processing the jobs

When the queue is in ready state and no job is currently in process, it starts processing the saved job. The job is not completed until it receives a callback. The generator starts generating the event when the processing of request starts.

queue.on('ready', function() {
 queue.process(function(job, done) {
   console.log('processing job ' + job.id);
   generator.createDistDir(job.data, emitter, done);
 });
 console.log('processing jobs...');
});


The generator calls the callback function for the current job when the event generation completes or it is halted in between due to some error. As soon as the current job completes, next job in the queue starts being processed.

generator.createDistDir() = function(req, socket, callback){
  
  .....
  .....
  .....

  mailer.uploadAndsendMail(req.body.email, eventName, socket, (obj) => {
    if(obj.mail)
      logger.addLog('Success', 'Mail sent succesfully', socket);
    else
      logger.addLog('Error', 'Error sending mail', socket);

    if(emit) {
      socket.emit('live.ready', {
        appDir: appFolder,
        url: obj.url
      });
      callback(null);
    }
    else {
      callback(appFolder);
    }

    done(null, 'write');
   });
}

Resources

Continue ReadingImplementing job queue in Open Event Web app

Add Feature to Post Feedback for a Skill in SUSI.AI Server

In this blog post, we are going to discuss on how the feature to post user feedback was implemented on the SUSI. AI server side. The API endpoint by which a user can post feedback for a Skill is https://api.susi.ai/cms/feedbackSkill.json.

It accepts five url parameters –

  • model – It tells the model to which the skill belongs. The default value is set to General.
  • group – It tells the group(category) to which the skill belongs. The default value is set to Knowledge.
  • language – It tells the language to which the skill belongs. The default value is set to en.
  • skill – It is the name of the skill to be given a feedback. It is a compulsory param.
  • feedback – It is the parameter that contains the string type feedback of the skill, that the user wants to update.

The minimalUserRole is set to USER for this API, as only logged-in users can use this API.

Going through the API development

  • The parameters are first extracted via the call object that is passed to the main function. The  parameters are then stored in variables. If any parameter is absent, then it is set to the default value.
  • There is a check if the skill exists. It is done by checking, if there exists a file corresponding to that skill. If no, then an exception is thrown.
  • This code snippet discusses the above two points –

@Override
public ServiceResponse serviceImpl(Query call, HttpServletResponse response, Authorization authorization, final JsonObjectWithDefault permissions) throws APIException {

        String model_name = call.get("model", "general");
        File model = new File(DAO.model_watch_dir, model_name);
        String group_name = call.get("group", "Knowledge");
        File group = new File(model, group_name);
        String language_name = call.get("language", "en");
        File language = new File(group, language_name);
        String skill_name = call.get("skill", null);
        File skill = SusiSkill.getSkillFileInLanguage(language, skill_name, false);
        String skill_feedback = call.get("feedback", null);

        JSONObject result = new JSONObject();
        if (!skill.exists()) {
            throw new APIException(422, "Skill does not exist.");
        }
.
.
.


  • Then the  feedbackSkill.json that was initialized in the DAO object, is then opened. It is a JSONTray, which is then parsed.
  • It is checked if the skill is previously rated or not. If yes, has the user rated it before or not. In the case, when the user has given a feedback for it already, we just need to make changes in the feedbackSkill.json file as the feedback_count key present in the skillRatings.json doesn’t change. In case, the user hasn’t given the feedback earlier, the changes also needs to be reflected on the skillRatings.json file. For this use,  the utility function addToSkillRatingJSON is called. The feedback_count of that skill is increased by one, as it is a unique feedback and changes need to be reflected on the file.
  • The response object is then sent with three key values mainly, apart from the session object. They are
    • accepted –  true – It tells that the skill feedback has been updated.
    • message – “Skill feedback updated”
    • feedback –  <feedback> – It is the string that the client has sent as feedback.

Here are code snippets and data objects that will help in understanding the API well –

  • addToSkillRating function –
    public void addToSkillRatingJSON(Query call) {
        String model_name = call.get("model", "general");
        String group_name = call.get("group", "Knowledge");
        String language_name = call.get("language", "en");
        String skill_name = call.get("skill", null);

        JsonTray skillRating = DAO.skillRating;
        JSONObject modelName = new JSONObject();
        JSONObject groupName = new JSONObject();
        JSONObject languageName = new JSONObject();
        JSONObject skillName = new JSONObject();
        if (skillRating.has(model_name)) {
            modelName = skillRating.getJSONObject(model_name);
            if (modelName.has(group_name)) {
                groupName = modelName.getJSONObject(group_name);
                if (groupName.has(language_name)) {
                    languageName = groupName.getJSONObject(language_name);
                    if (languageName.has(skill_name)) {

                        skillName = languageName.getJSONObject(skill_name);
                    }
                }
            }
        }

        if (skillName.has("feedback_count")) {

            int skillFeedback = skillName.getInt("feedback_count");
            skillName.put("feedback_count", skillFeedback + 1 );
        } else {

            skillName.put("feedback_count", 1);
        }
                        
        if (!skillName.has("stars")) {

            JSONObject skillStars = new JSONObject();
            skillStars.put("one_star", "0");
            skillStars.put("two_star", "0");
            skillStars.put("three_star", "0");
            skillStars.put("four_star", "0");
            skillStars.put("five_star", "0");
            skillStars.put("avg_star", "0");
            skillStars.put("total_star", "0");
            skillName.put("stars", skillStars);
        }

        languageName.put(skill_name, skillName);
        groupName.put(language_name, languageName);
        modelName.put(group_name, groupName);
        skillRating.put(model_name, modelName, true);
        return;
    }
}


  • Sample  of feedbackSkill.json file –

{
  "general": {
    "Knowledge": {
      "en": {
        "aboutsusi": [
          {
            "feedback": "The skill is awesome!",
            "email": "email1@domain.com",
            "timestamp": "2018-06-06 02:20:20.245"
          },
          {
            "feedback": "Great!",
            "email": "email2@domain.com",
            "timestamp": "2018-06-06 02:20:20.245"
          }
        ],
        "quotes": [
          {
            "feedback": "Wow!",
            "email": "email1@domain.com",
            "timestamp": "2018-06-06 02:19:53.86"
          }
        ]
      }
    }
  }
}
  • Sample  of skillRatings.json file –

{
  "general": {
    "Knowledge": {
      "en": {
        "aboutsusi": {
          "negative": "0",
          "positive": "0",
          "stars": {
            "one_star": 0,
            "four_star": 2,
            "five_star": 0,
            "total_star": 5,
            "three_star": 3,
            "avg_star": 3.4,
            "two_star": 0
          },
          "feedback_count": 2
        },
        "quotes": {
          "negative": "0",
          "positive": "0",
          "stars": {
            "one_star": 0,
            "four_star": 0,
            "five_star": 0,
            "total_star": 0,
            "three_star": 0,
            "avg_star": 0,
            "two_star": 0
          },
          "feedback_count": 1
        }
      }
    }
  }
}


I hope the development of creating the aforesaid API is clear and proved to be helpful for your understanding.

Continue ReadingAdd Feature to Post Feedback for a Skill in SUSI.AI Server