Specifying Configurations for Yaydoc with .yaydoc.yml

Like many continuous integration services, Yaydoc also reads configurations from a YAML file. To get started with Yaydoc the first step is to create a file named .yaydoc.yml and specify the required options. Recently the yaydoc team finalized the layout of the file. You can still expect some changes as the projects continues to grow on but they shall not be major ones. Let me give you an outline of the entire layout before describing each in detail. Overall the file is divided into four sections.

  • metadata
  • build
  • publish
  • extras

For the first three sections, their intention is pretty clear from their names. The last section extras is meant to hold settings related to integration to external services.

Following is a description of config options under the metadata section and it’s example usage.

Key Description Default
author

The author of the repository. It is used to construct the copyright text.

user/organization
projectname

The name of the project. This would be displayed on the generated documentation.

Name of the repository
version

The version of the project. This would be displayed alongside the project name

Current UTC date
debug

If true, the logs generated would be a little more verbose. Can be one of true|false.

true
inline_math

Whether inline math should be enabled. This only affects markdown documents.

false
autoindex

This section contains various settings to control the behavior of the auto generated index. Use this to customize the starting page while having the benefit of not having to specify a manual index.

metadata:
  author: FOSSASIA
  projectname: Yaydoc
  version: development
  debug: true
  inline_math: false

Following is a description of config options under the build section and it’s example usage.

Key Description Default
theme

The theme which should be used to build the documentation. The attribute name can be one of the built-in themes or any custom sphinx theme from PyPI. Note that for PyPI themes, you need to specify the distribution name and not the package name. It also provides an attribute options to control specific theme options

sphinx_fossasia_theme
source

This is the path which would be scanned for markdown and reST files. Also any static content such as images referenced from embedded html in markdown should be placed under a _static directory inside source. Note that the README would always be included in the starting page irrespective of source from the auto-generated index

docs/
logo

The path to an image to be used as logo for the project. The path specified should be relative to the source directory.

markdown_flavour

The markdown flavour which should be used to parse the markdown documents. Possible values for this are markdown, markdown_strict, markdown_phpextra, markdown_github, markdown_mmd and commonmark. Note that currently this option is only used for parsing any included documents using the mdinclude directive and it’s unlikely to change soon.

markdown_github
mock

Any python modules or packages which should be mocked. This only makes sense if the project is in python and uses autodoc has C dependencies.

autoapi

If enabled, Yaydoc will crawl your repository and try to extract API documentation. It Provides attributes for specifying the language and source path. Currently supported languages are java and python.

subproject

This section can be used to include other repositories when building the docs for the current repositories. The source attribute should be set accordingly.

github_button

This section can be used to include various Github buttons such as fork, watch, star, etc.

hidden
github_ribbon

This section can be used to include a Github ribbon linking to your github repo.

hidden
build:
  theme:
    name: sphinx_fossasia_theme
  source: docs
  logo: images/logo.svg
  markdown_flavour: markdown_github
  mock:
    - numpy
    - scipy
  autoapi:
    - language: python
      source: modules
    - language: java
  subproject:
    - url: <URL of Subproject 1>
      source: doc
    - url: <URL of subproject 2>

Following is a description of config options under the publish section and it’s example usage.

Key Description Default
ghpages

It provides a attribute url whose value is written in a CNAME file while publishing to github pages.

heroku

It provides an app_name attribute which is used as the name of the heroku app. Your docs would be deployed at <app_name>.herokuapp.com

publish:
  ghpages:
    url: yaydoc.fossasia.org
  heroku:
    app_name: yaydoc 

Following is a description of config options under the extras section and it’s example usage.

Key Description Default
swagger

This can be used to include swagger API documentation in the build. The attribute url should point to a valid swagger json file. It also accepts an additional parameter ui which for now only supports swagger.

javadoc

It takes an attribute path and can include javadocs from the repository.

extras:
  swagger:
    url: http://api.susi.ai/docs/swagger.json
    ui: swagger
  javadoc:
    path: 'src/' 

Resources

Continue ReadingSpecifying Configurations for Yaydoc with .yaydoc.yml

Implementing Copyright API in Open Event Frontend

This article illustrates how the copyright details have been displayed in the Open Event Frontend project using the Open Event Orga API. The API endpoints which will be mainly focussing on for fetching the copyright details are:

GET /v1/event-copyright/{event_copyright_id}

The events have copyrights which give the creator of the event exclusive rights for its use and distribution. In the Open Event application, the copyright details can be seen on the public event page. The public event page contains the events details like description, venue, tickets, speakers, sponsors along with the copyright details and these details are present on the public/index route in the application. Apart from index route, we have multiple subroutes to display the detailed information of speakers, sessions and schedule. The one thing which remains common to all the public event pages is the copyright information. Most of the time the copyright details are event specific so they are nested within the event model so if we want to display them we need to fetch the event model first.

The code to fetch the event model looks like this:

model(params) {
return this.store.findRecord('event', params.event_id, { include: 'social-links, event-copyright' });
}

If we try to comprehend the code then we can see that ‘event-copyright’ details are included inside the model. The reason behind this is the fact that the copyright information is not specific to a particular route and is displayed on the all the public event pages. After fetching the copyright details the next step we need to perform is to display them on the event’s index page.

The code to display the copyright details looks like this:

{{#if model.event.copyright}}
  <div class="copyright">
    {{public/copyright-item copyright=model.event.copyright}}
  </div>
{{/if}}

In the first line, we have an if conditional statement which verifies whether the copyright data exists or not. If the data does not exist then the copyright class will not be visible on the page and if the model is not empty then it will be displayed with the help of model.event.copyright which is responsible for displaying the fetched data on the page.

If we see in the third line, we have called an another template ‘copyright-item’ which is responsible for how the data will look or in simpler words the UI of the copyright data.

The code which determines UI of the copyright details looks like this:

<img src="{{copyright.logoUrl}}" class="copyright-image" alt="{{copyright.licence}}">
<br>
<div class='copyright text'>
  <p>
    {{t 'This event is licenced under'}} <a href="{{copyright.licenceUrl}}"> {{copyright.licence}} </a>.
  </p>
</div>

In the first line of code, we are providing the src to the image which is stored in ‘logoUrl’ variable of the copyright object. If we hover the image we can see the copyright license which is stored in the ‘license’ variable. Then finally we have copyright license’s URL which is stored under ‘licenceUrl’ variable of copyright object. The resulting UI from the above source code looks like this :

Fig. 1: The user interface of the copyright details

Now we need to test whether the copyright details are completely displayed or not. To test it we created an integration test in which we created a sample ember object to check the correctness of the code. The sample ember object for copyright details looks like this:

To view the complete code regarding the copyright API integration check this.

const copyright = EmberObject.create({
  holder     : 'Creative Commons',
  holderUrl  : 'https://creativecommons.org',
  licence    : 'Public Domain Dedication (CC0)',
  licenceUrl : 'https://creativecommons.org/publicdomain/zero/1.0/',
  year       : 2007,
  logoUrl    : 'http://image.ibb.co/gt7q7v/pdd.png'
});

To conclude, this is how we integrated copyright information inside the Open Event Frontend project using the Open Event Orga API efficiently.

Resources:

Image Source : https://libsource.com/understanding-creative-commons-licensing/

Continue ReadingImplementing Copyright API in Open Event Frontend

Ember Mixins used in Open Event Frontend

This post will illustrate how ember mixins are used in the Open Event Frontend to avoid code duplication and to keep it clean to reduce code complexity.

The Open Event application needs forms at several places like at the time of login, for the creation of the event, taking the details of the user, creating discount codes for tickets etc. Every form performs similar actions which taking input and finally storing it in the database. In this process, a set of things keep executing in the background such as continuous form validation which means checking inputted values to ensure they are correctly matched with their type as provided in the validation rules, popping out an error message in case of wrong inputted values, etc. which is common to all the forms. The only thing which changes is the set of validation rules which are unique for every form. So let’s see how we solved this issue using Ember Mixins.

While writing the code, we often run into the situation where we need to use the similar behaviour in different parts of the project. We always try not to duplicate the code and keep finding the ways to DRY ( Don’t Repeat Yourself ) up the code. In Ember, we can share the code in the different parts of the project using Ember.Mixins.

While creating the forms, we mostly have differing templates but the component logic remains same. So we created a mixin form.js which contains all the properties which are common to all the forms. The code mixin contains can be reused throughout different parts of the application and is not a concern of any one route, controller, component, etc. The mixins don’t get instantiated until we pass them into some object, and they get created in the order of which they’re passed in. The code for form.js mixin looks like this.

export default Mixin.create({
  autoScrollToErrors : true,
  autoScrollSpeed    : 200,

  getForm() {
    return this.get('$form');
  },

  onValid(callback) {
    this.getForm().form('validate form');
    if (this.getForm().form('is valid')) {
      callback();
    }
  },
  
  didRender() {
      const $popUps = this.$('.has.popup');
      if ($popUps) {
        $popUps.popup({
          hoverable: true
        });
      }
      let $form = this.$('.ui.form');
      if ($form) {
        $form = $form.first();
        if (this.get('getValidationRules') && $form) {
          $form.form(merge(defaultFormRules, this.getValidationRules()));
        }
      },
  didInsertElement() {
    $.fn.form.settings.rules.date = (value, format = FORM_DATE_FORMAT) => {
      if (value && value.length > 0 && format) {
        return moment(value, format).isValid();
      }
      return true;
    };
  }

The complete code can be seen here.

Let’s start understanding the above code. In the first line, we created a mixin via Ember.Mixin.create() method. We have then specified the property ‘autoScrollToErrors’ to true so in case if there is some error, the form will automatically scroll to the error. The property ‘autoScrollSpeed’ specifies the speed with which the form will auto scroll to show the error. ‘getForm()’ method helps in getting the object which will be passed to the mixin. In ‘onValid()’ method we’re validating the form and passing the callbacks if it is correctly validated. We then have ‘didRender()’ method which renders the popups, checkboxes and form rules. The popups help in showing the errors on the form. In this method, we’re fetching the validation rules which are written in child/subclasses which are using this mixin to create the form.  The validation rules help in validating the form and tells if the value inputted is correct or not. In most of the forms, we have a field which asks for some specific date. The piece of code under ‘didInsertElement()’ helps in validating the date and returns true if it is correct. We have ‘willDestroyElement()’ method which destroys the popup if the window is changed/refreshed.

Let see the use case of the above form mixin. At the time of login, we see a form which asks for the user’s credentials to validate if the user is already registered or not. To create that login form we use form mixin. The code for login-form.js looks like this.

export default Component.extend(FormMixin, {
getValidationRules() {
  
fields : {
        identification: {
          identifier : 'email',
          rules      : [
            {
              type   : 'empty',
              prompt : this.l10n.t('Please enter your email ID')
            },
            {
              type   : 'email',
              prompt : this.l10n.t('Please enter a valid email ID')
            }
          ]
        },
        password: {
          identifier : 'password',
          rules      : [
            {
              type   : 'empty',
              prompt : this.l10n.t('Please enter your password')
            }
          ]
        }
      }
   }
});

The complete code can be found here.

We can see that in above code we are creating the form by extending our FormMixin which means that the form will have all the properties which are part of mixin along with the properties which remain unique to this class. Since the validation rules remain unique per form so we’re also providing the rules (easy to comprehend) which will help in validating the fields.

This is how our forms look like after and before applying validation rules.

Fig. 1: Login form before applying validation rules

          Fig. 2: Login form after applying validation rules

To sum it up, we can say that mixins are of great use when we want to keep our code DRY or reduce the code duplication. It helps in removing the unnecessary inheritance keeping it short. The code written using mixin is lesser complex and easily understandable.

References:

Continue ReadingEmber Mixins used in Open Event Frontend

Adding Build Type option in the Apk Generator of the Open Event Android App

The apk-generator provided ability to the event organiser to build an apk from a single click by providing the necessary json/binary files. However it gave only one type of apk where on the other hand the Open Event Android was available with apk of different build versions.

Recently the functionality of the apk generator of the Open Event Android App was enhanced where the user is asked to select an option for build type either Google Play or FDroid which generates the apk according to that selected type.

The main difference in the googleplay apk and fdroid apk is the inclusion of googleplay libraries which aren’t included in the app/build.gradle file in case of fdroid build.

To include support for build type the following files for the apk-generator had to be changed:

  1. app/views/__init__.py
  2. app/tasks/__init__.py
  3. app/static/js/main.js
  4. app/generator/generator.py
  5. scripts/build.sh
  6. app/templates/index.html

Changes to the files

  • app/templates/index.html

This file was where the changes to the UI of the apk-generator showing build type option to the user were made. With this the user was presented with an option to choose build type among googleplay and fdroid apart from the rest of the essential information.

  • scripts/build.sh

The android app supported two different flavours one for google play and the other for fdroid. This required the build script to be modified according to the build type selected by the user during the filling of form.

If user selected “Google Play” or “Fdroid”, the script would look something like this:

#!/bin/bash
./gradlew assemblegoogleplayRelease --info
echo "signing"
jarsigner -keystore ${KEYSTORE_PATH} -storepass ${KEYSTORE_PASSWORD} app/build/outputs/apk/app-googleplay-release-unsigned.apk ${KEY_ALIAS}
echo "zipaligning"
${1}/zipalign -v 4 app/build/outputs/apk/app-$2-release-unsigned.apk release.apk
echo "done"

Where $2 is googleplay or fdroid depending on what build type the user has selected while building the apk from the apk generator.

  • app/views/__init__.py and app/tasks/__init__.py

These files were modified by adding another parameter for supporting the two build type options in the desired functions.

  • app/static/js/main.js

This is where the option selected by the user was taken and accordingly the apk corresponding to the build type option selected was made available to the user. The code for it was shown as follows:

$buildTypeRadio.change(
   function () {
       if (this.checked) {
           enableGenerateButton(true);
           buildType = $(this).val();
       }
  }
);

This was how the option to display build type option to the user was incorporated. This gave the user the ability to install different build versions of an apk, thus making it more useful from the user point of view.

Related Links:

Continue ReadingAdding Build Type option in the Apk Generator of the Open Event Android App

Using Elasticsearch Aggregations to Analyse Classifier Data in loklak Server

Loklak uses Elasticsearch to index Tweets and other social media entities. It also houses a classifier that classifies Tweets based on emotion, profanity and language. But earlier, this data was available only with the search API and there was no way to get aggregated data out of it. So as a part of my GSoC project, I proposed to introduce a new API endpoint which would allow users to access aggregated data from these classifiers.

In this blog post, I will be discussing how aggregations are performed on the Elasticsearch index of Tweets in the loklak server.

Structure of index

The ES index for Twitter is called messages and it has 3 fields related to classifiers –

  1. classifier_emotion
  2. classifier_language
  3. classifier_profanity

With each of these classifiers, we also have a probability attached which represents the confidence of the classifier for assigned class to a Tweet. The name of these fields is given by suffixing the emotion field by _probability (e.g. classifier_emotion_probability).

Since I will also be discussing aggregation based on countries in this blog post, there is also a field named place_country_code which saves the ISO 3166-1 alpha-2 code for the country of creation of Tweet.

Requesting aggregations using Elasticsearch Java API

Elasticsearch comes with a simple Java API which can be used to perform any desired task. To work with data, we need an ES client which can be built from a ES Node (if creating a cluster) or directly as a transport client (if connecting remotely to a cluster) –

// Transport client
TransportClient tc = TransportClient.builder()
                        .settings(mySettings)
                        .build();

// From a node
Node elasticsearchNode = NodeBuilder.nodeBuilder()
                            .local(false).settings(mySettings)
                            .node();
Client nc = elasticsearchNode.client();

[SOURCE]

Once we have a client, we can use ES AggregationBuilder to get aggregations from an index –

SearchResponse response = elasticsearchClient.prepareSearch(indexName)
                            .setSearchType(SearchType.QUERY_THEN_FETCH)
                            .setQuery(QueryBuilders.matchAllQuery())  // Consider every row
                            .setFrom(0).setSize(0)  // 0 offset, 0 result size (do not return any rows)
                            .addAggregation(aggr)  // aggr is a AggregatoinBuilder object
                            .execute().actionGet();  // Execute and get results

[SOURCE]

AggregationBuilders are objects that define the properties of an aggregation task using ES’s Java API. This code snippet is applicable for any type of aggregation that we wish to perform on an index, given that we do not want to fetch any rows as a response.

Performing simple aggregation for a classifier

In this section, I will discuss the process to get results from a given classifier in loklak’s ES index. Here, we will be targeting a class-wise count of rows and stats (average and sum) of probabilities.

Writing AggregationBuilder

An AggregationBuilder for this task will be a Terms AggregationBuilder which would dynamically generate buckets for all the different values of fields for a given field in index –

AggregationBuilder getClassifierAggregationBuilder(String classifierName) {
    String probabilityField = classifierName + "_probability";
    return AggregationBuilders.terms("by_class").field(classifierName)
        .subAggregation(
            AggregationBuilders.avg("avg_probability").field(probabilityField)
        )
        .subAggregation(
            AggregationBuilders.sum("sum_probability").field(probabilityField)
        );
}

[SOURCE]

Here, the name of aggregation is passed as by_class. This will be used while processing the results for this aggregation task. Also, sub-aggregation is used to get average and sum probability by the name of avg_probability and sum_probability respectively. There is no need to specify to count rows as this is done by default.

Processing results

Once we have executed the aggregation task and received the SearchResponse as sr (say), we can use the name of top level aggregation to get Terms aggregation object –

Terms aggrs = sr.getAggregations().get("by_class");

After that, we can iterate through the buckets to get results –

for (Terms.Bucket bucket : aggrs.getBuckets()) {
String key = bucket.getKeyAsString();
long docCount = bucket.getDocCount(); // Number of rows
// Use name of sub aggregations to get results
Sum sum = bucket.getAggregations().get("sum_probability");
Avg avg = bucket.getAggregations().get("avg_probability");
// Do something with key, docCount, sum and avg
}

[SOURCE]

So in this manner, results from aggregation response can be processed.

Performing nested aggregations for different countries

The previous section described the process to perform aggregation over a single field. For this section, we’ll aim to get results for each country present in the index given a classifier field.

Writing a nested aggregation builder

To get the aggregation required, AggregationBuilder from previous section can be added as a sub-aggregation for the AggregationBuilder for country code field –

AggregationBuilder aggrs = AggregationBuilders.terms("by_country").field("place_country_code")
    .subAggregation(
        AggregationBuilders.terms("by_class").field(classifierName)
            .subAggregation(
                AggregationBuilders.avg("avg_probability").field(probabilityField)
            )
            .subAggregation(
                AggregationBuilders.sum("sum_probability").field(probabilityField)
            );
    );

[SOURCE]

Processing the results

Again, we can get the results by processing the AggregationBuilders by name in a top-to-bottom fashion –

Terms aggrs = response.getAggregations().get("by_country");
for (Terms.Bucket bucket : aggr.getBuckets()) {
    String countryCode = bucket.getKeyAsString();
    Terms classAggrs = bucket.getAggregations().get("by_class");
    for (Terms.Bucket classBucket : classAggr.getBuckets()) {
        String key = classBucket.getKeyAsString();
        long docCount = classBucket.getDocCount();
        Sum sum = classBucket.getAggregations().get("sum_probability");
        Avg avg = classBucket.getAggregations().get("avg_probability");
        ...
    }
    ...
}

[SOURCE]

And we have the data about classifier for each country present in the index.

Conclusion

This blog post explained about Elasticsearch aggregations and their usage in the loklak server project. The changes discussed here were introduced over a series of patches to ElasticsearchClient.java by @singhpratyush (me).

Resources

Continue ReadingUsing Elasticsearch Aggregations to Analyse Classifier Data in loklak Server

Encoding and Saving Images as Strings in Preferences in SUSI Android App

In this blog post, I’ll be telling about how to store images in preferences by encoding them into Strings and also how to retrieve them back. Many a times, you need to store an image in preferences for various purposes and then need to retrieve it back when required. In SUSI Android App, we need to store an image in preference to set the chat background. We just simply select image from gallery, convert image to a byte array, then do a Base 64 encoding to string, store it in preferences and later decode it and set the chat background.

Base64 Encoding-Decoding in Java

You may already know what Base 64 is but still here is a link to Wikipedia article explaining it. So, how to do a Base64 encoding-decoding in java? For that java has a class with all such methods already present. https://docs.oracle.com/javase/8/docs/api/java/util/Base64.html

According to the docs:

This class consists exclusively of static methods for obtaining encoders and decoders for the Base64 encoding scheme. The implementation of this class supports the following types of Base64 as specified in RFC 4648 and RFC 2045.

  • Basic
  • URL and Filename safe
  • MIME

So, you may just use Base64.encode to encode a byte array and Base64.decode to decode a byte array.

Implementation

1. Selecting image from gallery


Start Image Picker Intent and pick an image from gallery. After selecting you may also start a Crop Intent to crop image also. After selecting and cropping image, you will get a URI of the image.

override fun openImagePickerActivity() {
   val i = Intent(Intent.ACTION_PICK, android.provider.MediaStore.Images.Media.EXTERNAL_CONTENT_URI)
   startActivityForResult(i, SELECT_PICTURE)
}
val thePic = data.extras.getParcelable<Bitmap>("data")
val encodedImage = ImageUtils.Companion.cropImage(thePic)
chatPresenter.cropPicture(encodedImage)

2. Getting image from the URI using inputstream

Next step is to get the image from file using URI from the previous step and InputStream class and store it in a BitMap variable.

val imageStream: InputStream = context.contentResolver.openInputStream(selectedImageUri)
   val selectedImage: Bitmap
   val filePathColumn = arrayOf(MediaStore.Images.Media.DATA)
   val cursor = context.contentResolver.query(getImageUrl(context.applicationContext, selectedImageUri), filePathColumn, null, null, null)
   cursor?.moveToFirst()
   selectedImage = BitmapFactory.decodeStream(imageStream)

3. Converting the bitmap to ByteArray

Now, just convert the Bitmap thus obtained to a ByteArray using below code.

val baos = ByteArrayOutputStream()
   selectedImage.compress(Bitmap.CompressFormat.JPEG, 100, baos)
   val b = baos.toByteArray()

4. Base64 encode the ByteArray and store in preference

Encode the the byte array obtained in last step to a String and store it in preferences.

 val encodedImage = Base64.encodeToString(b, Base64.DEFAULT)
//now you have a string. You can store it in preferences

5. Decoding the String to image

Now whenever you want, you can just decode the stored Base64 encoded string to a byte array and then from byte array to a bitmap and use wherever you want.

fun decodeImage(context: Context, previouslyChatImage: String): Drawable {
   val b = Base64.decode(previouslyChatImage, Base64.DEFAULT)
   val bitmap = BitmapFactory.decodeByteArray(b, 0, b.size)
   return BitmapDrawable(context.resources, bitmap)
}

Summary

So, the main aim of this blog was to give an idea about how can you store images in preferences. There is no way to store them directly. So, you have to convert them to String by encoding them in Base64 format and then decoding it to use it. You also have other ways to store images like storing it in database etc but this one is simpler and fast.

Resources

  1. Stackoverflow answer to “How to save image as String” https://stackoverflow.com/questions/31502566/save-image-as-string-with-sharedpreferences
  2. Other Stackoverflow answer about “Saving Images in preferences” https://stackoverflow.com/questions/18072448/how-to-save-image-in-shared-preference-in-android-shared-preference-issue-in-a
  3. Official docs of Base64 class https://docs.oracle.com/javase/8/docs/api/java/util/Base64.html
  4. Wikipedia link for learning about Base64 https://en.wikipedia.org/wiki/Base64
  5. Stackoverflow answer for “What is Base64 encoding used for?” https://stackoverflow.com/questions/201479/what-is-base-64-encoding-used-for
Continue ReadingEncoding and Saving Images as Strings in Preferences in SUSI Android App

Adding IBM Watson TTS Support in Susi Assistant on Raspberry Pi

Susi Hardware project aims at creating a smart assistant for your home that you can run on your Raspberry Pi or similar Development Boards.
I previously wrote a blog on choosing a perfect Text to Speech engine for Susi AI and had used Flite as the solution for it. While Flite is an Open Source solution that can run locally on a client, it does not provide the same quality of voice and speed as cloud providers. We always crave for a more natural voice for better interaction with our assistant. It is always good to have more options. We, therefore, added IBM Watson Text to Speech API in SUSI Hardware project.

IBM Watson TTS can be added to a Python Project easily using the IBM Watson Developer SDK.

For using the IBM Watson Developer SDK for Text to Speech, first of all, we need to sign up for Bluemix
https://console.bluemix.net/registration/

After that, we will get the empty dashboard without any service added currently. We need to create a Text to Speech Service. To do so, click on Create Watson Service button


Select Watson on the left pane and then select Text to Speech service from the list.

Select the standard plan from the options and then click on create button.

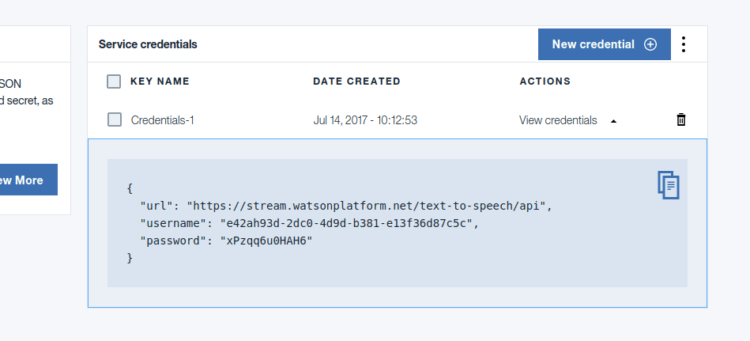
You will get service credentials for your newly created text to speech service. Save it for future reference.

After that, we need to add Watson developer cloud python package.

sudo pip3 install watson-developer-cloud

On Ubuntu with Python 3.5 watson-developer-cloud has some extra dependencies. Install them using the following command.

sudo apt install libssl-dev

Now we can add Text to Speech to our project. For that, we need to first import TextToSpeechV1 library. It can be added using following import statement.

from watson_developer_cloud import TextToSpeechV1

Now we need to create a new TextToSpeechV1 object using the Service Credentials we created earlier.

text_to_speech = TextToSpeechV1(
   username='API_USERNAME',
   password='API_PASSWORD')

We can now perform synthesis of a text input and write the incoming speech stream from IBM Watson API to a file.

with open('output.wav', 'wb') as audio_file:
   audio_file.write(
       text_to_speech.synthesize(text, accept='audio/wav’, voice='en-US_AllisonVoice'))

In the above code snippet,  we are opening an output file ‘output.wav’ for writing. We then write the binary audio data returned by text_to_speech.synthesize method. IBM Watson provides many free voices. We supply an argument specifying which voice we need to use. We are using English female ‘en-US_AllisonVoice’. You may test out more voices in the online demo here and select the voice that you find best.

We can play the ‘output.wav’ file using the play command from SoX. To do so, we need to install SoX binary.

sudo apt install sox libsox-fmt-all

We can play the file easily now using the following code.

import os
os.system('play output.wav')

The above code invokes the ‘play’ command from the SoX package to play the audio file. We can also use PyAudio to play the audio file but it would require us to manage the audio thread separately. Thus, SoX is a better solution.

Resources:

Continue ReadingAdding IBM Watson TTS Support in Susi Assistant on Raspberry Pi

Setup SUSI Assistant on Raspberry Pi in under 30 minutes

With our ever growing list of list of platforms supported by Susi AI, we now have a client that can run on Raspberry Pi and you can access it hands-free!! Here is a video that you can refer for its working.

But it might have left you wondering how you can replicate such a setup yourself? It is fairly easy and will be done fairly easy. Just follow the following instructions.

You need to have following hardware in order to have your own SUSI Assistant running on Raspberry Pi.

  • A Raspberry Pi (prefer 2 or 3) with Raspbian Jessie OS.
  • A stable internet connection.  ( Recommended 4 Mbps )
  • A USB Microphone /  USB Webcam with Microphone. You may buy one like this.
  • A Speaker that connects through 3.5mm jack. You may buy one like this.

After you get all the above items in order, you need to get access to a terminal of your Raspberry Pi. You can have that by either connecting a monitor to Raspberry Pi temporarily or by connecting to Raspberry Pi over SSH.

Once this is done, next step is the installation of the dependencies. The installation of the SUSI on Raspberry is automated after dependencies are installed. Run the following command on Raspberry Pi terminal.

sudo apt install git swig3.0 portaudio19-dev pulseaudio libpulse-dev unzip sox libatlas-dev libatlas-base-dev libsox-fmt-all python3

After this, you may check if your output and input devices are working alright. For this, run rec recording.wav . It will start recording audio and saving it to a file named recording.wav. Play back the file using play recording.wav If you hear your audio clearly, setup is done right else you need to configure your Audio Devices correctly.  Most of the time the configuration of Audio works out the box and devices are plug and play so you would not encounter any errors. If you are successful in configuring your devices, install extra dependencies for SUSI Hardware by running the automated install script. In your terminal run,

$ git clone https://github.com/fossasia/susi_hardware.git
$ cd susi_hardware
$ ./install.sh 

This will install all the remaining dependencies. After the above step is complete, you may run configuration file generator script to choose the Text to Speech and Speech to Text service according to your wish. For doing so, you need to run

$ python3 config_generator.py

Follow the instructions in the script. It will ask you to configure the default service for Text to Speech and Speech to Text and other options. After the configuration is complete, you can simply run the following command to start SUSI.

$ python3 main.py

This will start SUSI in a continuously listening mode. You may invoke SUSI anytime, just by saying SUSI followed by a query. The query will be answered by SUSI subsequently.

Since configurations for different hardware devices may vary, you may encounter some problems. In such a scenario, you may refer to the following resources to solve the issues.

Resources:

Continue ReadingSetup SUSI Assistant on Raspberry Pi in under 30 minutes

Building Meilix in Travis using Heroku

Suppose you have to trigger (start) Travis but not through making a commit but through clicking a button on the webapp of the Meilix Generator. Through the webapp of Meilix Generator, we can pass the tag of the build which will be initiated and can also get the build link which is built by Travis.
Heroku is the place where we have deployed our webapp and through a button on the webapp that we used to start the build on the Travis. We have the access to give a tag to the build and with the help of this, we can even predict the URL of the build beforehand. So one can use it for its own personal project in a number of ways. And how I used this feature in Meilix Generator using Meilix script is described below:

How I used this idea

FOSSASIA meilix repository consists the script of a Linux Operating System based on Lubuntu. It uses Travis to build that script to result in a release of an iso file.

Now we thought an idea of building an autonomous system to start this build and get the release and in the meanwhile also make some required changes to the script to get it into the OS. We came up with an idea of a webapp which ask user its email id and tag of the build and till now a picture from the user which will be set as a wallpaper. It means the user would be able to config its distro according to its need through the graphical interface without a single line to code from the user end.

Through the webapp, a build button is taken as an input to go to a build page which triggers the Travis with the same user configuration to build the iso and deploy it on Github page. The user gets the link to the build on the next page only.

How I implemented this idea

Thanks to Travis API without which our idea is impossible to implement. We used a shell script to outframe our idea. The script takes the input of the user’s, repository, and branch to decide to where the trigger to take place.

There are two files one as travis_token as:

fossasia meilix master    # in the format of user repo branch

And script.sh as:  

#!/bin/bash
cat travis_tokens | while read line;     # this lines takes input of the user, repo and branch
do
    array=(${line})
    user="${array[0]}"
    project="${array[1]}"
    len=${#array[@]}
    for ((i=2; i<len; i++)); do
        branch="${array[i]}"            # supplied each value as variable
        body="{\"request\":{
            \"branch\":\"${branch}\",
            \"config\":{
                \"env\":{
                    \"email\":\"${email}\",    # supplied email and travis tag as environment variable
                    \"TRAVIS_TAG\":\"${TRAVIS_TAG}\"
                }
            }
    }}"
    echo "This Link Will be ready in approx 20 minutes"
    echo "https://github.com/fossasia/meilix/releases/download/${TRAVIS_TAG}/meilix-zesty-`date +%Y%m%d`-i386.iso"                  # a pre-predication of the link, we provide tag from user and date from system.
        curl -s -X POST \           # sending an API POST request to Travis to trigger the build of most recent commit 
            -H "Content-Type: application/json" \
            -H "Accept: application/json" \
            -H "Travis-API-Version: 3" \
            -H "Authorization: token ${KEY}" \     # this is stored in Heroku as KEY as environment variable and supplied from there only
            -d "${body}" \
            "https://api.travis-ci.org/repo/${user}%2F${project}/requests"  #%2 is used to interpret user and repo name as a single URL segment.
    done
done

After the trigger, you will get email which consists of a downloadable link to the iso.

How can this idea be helpful to a developer

There are lots of ways a developer can use this idea out. If a developer wants their user to automatically trigger the build and get the release build directly.

One can use it to set even the commit message through the shell script and customizing build configuration like replace, merge or deep_merge a configuration with the original .travis.yml file present in source repo.

Useful repositories and link which uses this:

Know more about Travis API v3:
Triggering the build
API blog

Have a look at our webapp and generate your own iso:
https://melix-generator.herokuapp.com/

Source code here:
https://github.com/fossasia/meilix-generator
https://github.com/fossasia/meilix

Continue ReadingBuilding Meilix in Travis using Heroku

Making loklak Server’s Kaizen Harvester Extendable

Harvesting strategies in loklak are something that the end users can’t see, but they play a vital role in deciding the way in which messages are collected with loklak. One of the strategies in loklak is defined by the Kaizen Harvester, which generates queries from collected messages.

The original strategy used a simple hash queue which drops queries once it is full. This effect is not desirable as we tend to lose important queries in this process if they come up late while harvesting. To overcome this behaviour without losing important search queries, we needed to come up with new harvesting strategy(ies) that would provide a better approach for harvesting. In this blog post, I am discussing the changes made in the kaizen harvester so it can be extended to create different flavors of harvesters.

What can be different in extended harvesters?

To make the Kaizen harvester extendable, we first needed to decide that what are the parts in the original Kaizen harvester that can be changed to make the strategy different (and probably better).

Since one of the most crucial part of the Kaizen harvester was the way it stores queries to be processed, it was one of the most obvious things to change. Another thing that should be allowed to configure across various strategies was the decision of whether to go for harvesting the queries from the query list.

Query storage with KaizenQueries

To allow different methods of storing the queries, KaizenQueries class was introduced in loklak. It was configured to provide basic methods that would be required for a query storing technique to work. A query storing technique can be any data structure that we can use to store search queries for Kaizen harvester.

public abstract class KaizenQueries {

     public abstract boolean addQuery(String query);

     public abstract String getQuery();

     public abstract int getSize();

     public abstract int getMaxSize();

     public boolean isEmpty() {
         return this.getSize() == 0;
     }
}

[SOURCE]

Also, a default type of KaizenQueries was introduced to use in the original Kaizen harvester. This allowed the same interface as the original queue which was used in the harvester.

Another constructor was introduced in Kaizen harvester which allowed setting the KaizenQueries for an instance of its derived classes. It solved the problem of providing an interface of KaizenQueries inside the Kaizen harvester which can be used by any inherited strategy –

private KaizenQueries queries = null;

public KaizenHarvester(KaizenQueries queries) {
    ...
    this.queries = queries;
    ...
}

public void someMethod() {
    ...
    this.queries.addQuery(someQuery);
    ...
}

[SOURCE]

This being added, getting new queries or adding new queries was a simple. We just need to use getQuery() and addQuery() methods without worrying about the internal implementations.

Configurable decision for harvesting

As mentioned earlier, the decision taken for harvesting should also be configurable. For this, a protected method was implemented and used in harvest() method –

protected boolean shallHarvest() {
    float targetProb = random.nextFloat();
    float prob = 0.5F;
    if (this.queries.getMaxSize() > 0) {
        prob = queries.getSize() / (float)queries.getMaxSize();
    }
    return !this.queries.isEmpty() && targetProb < prob;
}

@Override
public int harvest() {
    if (this.shallHarvest()) {
        return harvestMessages();
    }

    grabSuggestions();

    return 0;
}

[SOURCE]

The shallHarvest() method can be overridden by derived classes to allow any type of harvesting decision that they want. For example, we can configure it in such a way that it harvests if there are any queries in the queue, or to use a different probability distribution instead of linear (maybe gaussian around 1).

Conclusion

This blog post explained about the changes made in loklak’s Kaizen harvester which allowed other harvesting strategies to be built on its top. It discussed the two components changed and how they allowed ease of inheriting the original Kaizen harvester. These changes were proposed in PR loklak/loklak_server#1203 by @singhpratyush (me).

Resources

Continue ReadingMaking loklak Server’s Kaizen Harvester Extendable