Using ftp-deploy in node.js to publish websites over FTP

In the Open Event Webapp Generator, we recently added the functionality for organisers to submit their ftp credentials and when the website is generated, it’ll automatically upload the website to the chosen ftp server (allowing creation of subdirectory internally, if the organiser so wants).

To achieve we used the very useful nodejs module ftp-deploy which is a wrapper on the popular jsftp library

The code dealing with ftp deployment in our webapp generator can be found here  –

https://github.com/fossasia/open-event-webapp/blob/development/src/backend/ftpdeploy.js

As can be seen, deploying using ftp-deploy is pretty straightforward. Primarily we need a config object


  var config = {
    username: ftpDetails.user, //prompted on commandline if not given
    password: ftpDetails.pass, // optional, prompted if none given
    host: ftpDetails.host,
    port: 21,
    localRoot: path.join(__dirname, '/../../dist', appFolder), //local folder containing website
    remoteRoot: ftpDetails.path, //path on ftp server to host website
    exclude: ['.git', '.idea', 'tmp/*'],
    continueOnError: true
};

You can set up some event listeners for events like uploaded uploading and upload-error

Continue ReadingUsing ftp-deploy in node.js to publish websites over FTP

Responsive Image Overlay

Image overlay is a very common concept in front-end development. It is easy to implement but difficult when we deal it with different screen sizes, where we need to cover the image with the overlay each time the screen size is changed. I have gone through various blog posts when I need to implement the same for Open-event webapp and researched a solution that works for all screen sizes without any media query.

1234

How to add an overlay to an image ?

If we need four images in a single row nearly 300*300px.  The code below shows the markup.

image-holder : The parent class to take the image and overlay inside it.

background-image: This class takes image source.

responsive-overlay: This is the key point to make it responsive. Responsive-overlay contains a class hover-state to add overlay absolutely and a class social-links.

social-links: It adds content to hover-state.


<div class="image-holder">
  <img class="background-image" alt="" src="">
   <div class="responsive-overlay">
     <div class="hover-state text-center preserve3d">
       <div class="social-links vertical-align">

       </div>
     </div>
   </div>
 </div>

The styling is written with SASS in .scss file as shown below.

//overlayimage and backgroundshade can be set in config.scss

 .image-holder {
   position: relative;
   overflow: hidden;
   margin-bottom: 12px;

   .background-image {
     height: 300px;
     width: 300px;
     display: block;
     margin: 0 auto;
     background-color: $background-shade;
    }
 
   .responsive-overlay {
     @include responsiveoverlay;

    .preserve3d {
       height: 300px;
      }

    .hover-state {
     @include hoverstate;
     height: 300px;
     width: 300px;
    }

  @mixin responsiveoverlay {
     height: 100%;
     position: absolute;
     top: 0;
     width: 100%;
}

   @mixin hoverstate {
     background: $overlayimage;
     display: block;
     height: 300px;
     left: 0;
     margin: 0 auto;
     opacity: 0;
     position: relative;
     top: 0;
     -moz-transition: all 0.3s ease-out;
     -webkit-transition: all 0.3s ease-out;
     transition: all 0.3s ease-out;
     width: 300px;
     z-index: 2;
   }

This code will work for responsiveness as well. The main catch here is the responsive-overlay class which is made 100% in width but set to position absolute. The images which are 300 * 300 px in size will take an overlay of the same size because of hover-state class. Instead, if we adjust sizes of images in small screens the above code will adjust overlay on the image automatically.

Like, on tablets we can have an overlay like this.

345

And on mobile screen output is like that :

23

Conclusion

Responsiveness is easy if we follow correct concepts. Here, the concepts of absolute and relative positioning in CSS have done the magic. Now we can play by adding different contents and effect on hover following the same basics.

Continue ReadingResponsive Image Overlay

Doing asynchronous tasks serially using ‘async’ in node.js

In the open-event-webapp generator we need to perform a lot of asynchronous tasks in the background like –

  • Downloading images and audio assets
  • Downloading the jsons from the endpoints
  • Generating the html from handelbar templates
  • and so on . .

Sometimes tasks depend on previous tasks, and in such cases we need to perform them serially. Also there are tasks like image downloads, that would be better if done parallelly.

To achieve both these purposes, there is an awesome node.js library called async that helps achieve this.

To perform asynchronous tasks serially (one task, then another task), we can use something like this –


async.series([
    (done) => {
       someAsyncFunction(function () { done () })
    },
    //(done) => {..}, (done) => {..} more tasks here
    (done) => {
       someAsyncFunction(function () { done () })
    });
      
    }
]);

Basically async takes an array of functions. Each function contains a callback that you need to call when the internal task is finished. The 2nd task starts, only after the done() callback of first task is executed.

An example of it’s usage can be seen in the open-event-webapp project here

Continue ReadingDoing asynchronous tasks serially using ‘async’ in node.js

GET and POST requests

If you wonder how to get or update page resource, you have to read this article.

It’s trivial if you have basic knowledge about HTTP protocol. I’d like to get you little involved to this subject.

So GET and POST are most useful methods in HTTP protocol.

What is HTTP?

Hypertext transfer protocol – allow us to communicate between client and server side. In Open Event project we use web browser as client and for now we use Heroku for server side.

Difference between GET and POST methods

GET – it allows to get data from specified resources

POST – it allows to submit new data to specified resources for example by html form.

GET samples:

For example we use it to get details about event

curl http://open-event-dev.herokuapp.com/api/v2/events/95

Response from server:

Of course you can use this for another needs, If you are a poker player I suppose that you’d like to know how many percentage you have on hand.

curl http://www.propokertools.com/simulations/show?g=he&s=generic&b&d&h1=AA&h2=KK&h3&h4&h5&h6&_

POST samples:

curl -X POST https://example.com/resource.cgi

You can often find this action in a contact page or in a login page.

How does request look in python?

We use Requests library to communication between client and server side. It’s very readable for developers. You can find great documentation  and a lot of code samples on their website. It’s very important to see how it works.

>>> r = requests.get('https://api.github.com/user', auth=('user', 'pass'))
>>> r.status_code
200

I know that samples are very important, but take a look how Requests library fulfils our requirements in 100%. We have decided to use it because we would like to communicate between android app generator and orga server application. We have needed to send request with params(email, app_name, and api of event url) by post method to android generator resource. It executes the process of sending an email – a package of android application to a provided email address.

data = {
    "email": login.current_user.email,
    "app_name": self.app_name,
    "endpoint": request.url_root + "api/v2/events/" + str(self.event.id)
}
r = requests.post(self.app_link, json=data)


Continue ReadingGET and POST requests

Allowing web-user on apache server to run scripts as root

Allowing web-user on apache server to run scripts as root

If you are new to this, you might be wondering, what the hell is a web user anyways?

So let’s say that you need a server which hosts a simple web page and does a particular task based on data entered into that web-page.

The normal way of doing this is to navigate to /var/www/html and place the web page you want to host here.

You also need to put your php script in this folder so that it is accessible from the website.
This php script will take in the data from your web-page and run the necessary commands that you need to be executed on the server.( I am assuming you are not using “The Real Dev Language” for now. :p )

I will be using a simple web page and script that I have made for this post.

<html>
<head>
  <title>Apk Generator</title>
  <meta charset="utf-8">
  <meta http-equiv="X-UA-Compatible" content="IE=edge">
  <meta name="viewport" content="width=device-width, initial-scale=1">
  <link href="https://maxcdn.bootstrapcdn.com/bootstrap/3.3.6/css/bootstrap.min.css" rel="stylesheet" integrity="sha384-1q8mTJOASx8j1Au+a5WDVnPi2lkFfwwEAa8hDDdjZlpLegxhjVME1fgjWPGmkzs7" crossorigin="anonymous">
  <link href='https://fonts.googleapis.com/css?family=Roboto:400,100' rel='stylesheet' type='text/css'>
  <link href="css/main.css" rel="stylesheet">
</head>
<body>
<div class="container"><br><br>
<form name="htmlform" id="form" enctype="multipart/form-data" class="col-md-offset-4 col-xs-offset-2 col-xs-8 col-md-4 form-group generator_form" >
  <label for="name">Email</label>
      <input type="email" class="form-control" id="Email" name="Email">
      <br>
      <input type="hidden" id="theme" name="theme" value="light">

      <label for="name">App's Name</label>
      <input type="text" class="form-control" id="App_Name" name="App_Name">
      <br>
      <label> Choose your data source </label>
      <ul style="list-style-type:none">
        <li><input type="radio" name="datasource" value="jsonupload"> Upload your own JSON files </input></li>
        <li><input type="radio" name="datasource" value="eventapi"> API endpoint of event on OpenEvent </input></li>
      </ul>
      <br>
      <section id="eventapi-input" style="display:none;">
        <label for="apiendpoint">Link to Open Event API endpoint</label>
        <input type="url" class="form-control"
        id="Api_Link" name="Api_Link">
      </section>
      <br>
      <section id="jsonupload-input" style="display:none;">
        <input type="file" name="uploadZip" id="uploadZip" class="form-control"/>
        <br>
      </section>
      <br>
      <input type="hidden" name="assetmode" value="download">
      <center>
        <br>
        <div id="status"></div>
        <br>
<tr>
 <td colspan="5" style="text-align:center">
  <button type="submit">Generate and Download app</button>
</td>
</tr>
</table>
</form>
<script src="https://www.gstatic.com/firebasejs/live/3.0/firebase.js"></script>
<script src="https://code.jquery.com/jquery-3.1.0.min.js"></script>
<script src="https://code.jquery.com/ui/1.12.0/jquery-ui.js"></script>
<script>
  $('input:radio[name="datasource"]').change(
  function() {
    if ($(this).is(':checked')) {

      if ($(this).val() === 'mockjson') {
        $('#jsonupload-input').hide(100);
        $('#eventapi-input').hide(100);
      }

      if ($(this).val() === 'jsonupload') {
        $('#jsonupload-input').show(100);
        $('#eventapi-input').hide(100);
      }

      if ($(this).val() === 'eventapi') {
        $('#eventapi-input').show(100);
        $('#jsonupload-input').hide(100);
      }
    }
  });
  var $ = jQuery;
  var timestamp = Number(new Date());
  var form = document.querySelector("form");
      form.addEventListener("submit", function(event) {
        event.preventDefault();
        var ary = $(form).serializeArray();
        var obj = {};
        for (var a = 0; a < ary.length; a++) obj[ary[a].name] = ary[a].value;
          console.log("JSON",obj);
        if(obj.Email == "" || obj.App_Name ==""){
          alert("It seems like you forgot to fill up your email address or the app's name");
          setTimeout("location.reload(true);", 1);
        }
        else{
	alert("Please wait while we generate the app, meanwhile you can stick around to directly download it.The app will also be emailed to you."); 
            $.ajax({
              type: "POST",
              url: "/test.php",
              data: { timestamp : timestamp },
              success: function(response){
                console.log("Success",response);
                window.location = response;
              }
            });
        }
      });
    </script>
    </div>
</body>
</html>

This is basically a web page with some inputText widgets which accept response and send it to a php file named test.php on the server via an AJAX post.

<?php
if(isset($_POST['timestamp']))
{
    $uid = escapeshellcmd($_POST['timestamp']);
    exec("sudo sh /var/www/email.sh $uid");
}
?>

This php script will call a bash script which in turns an email to me with the user’s timestamp as the subject.

Well, here is where the problem arises, as I am trying to run the bash file as root.

You might wonder as to why is this such a big issue?
Why can’t we do that?

Well, we can surely do that on the server but the point to be noted here is that we are not running this script directly from the server.

We are running it from a web page which is hosted on a server.

So our user here is a web user aka www-data rather than being a root user.

The web user is not provided root access by default, but there are ways to get this done.

Solution 1 :

Allow the web user to run only specific scripts as root.

Please note that this is not a ideal workaround.
Ideally your web user should not have root access in any case.
Since that’s cleared up, lets proceed.

This can be done by editing your sudoers list and adding www-data to it.
Open up your terminal and enter the following command.

sudo visudo

Next up, navigate to the end of the file and add the following command there

www-data = (root) NOPASSWD: /path/to/script.sh

In case you have to execute one script as root which in turn executes some more scripts as root, you don’t need to set the path to all of them over here.
Doing it only for the parent script will do the job.

Solution 2 :

Using SuExec

DigitalOcean blog has a very good article on how to execute python scripts as root via the web user through cgi.

You can go through the article here :https://www.digitalocean.com/community/tutorials/how-to-use-suexec-in-apache-to-run-cgi-scripts-on-an-ubuntu-vps

Well, that was all about my findings on properly handling sudo requirements for your web user on your apache server.

I’ll be adding more solutions as I find them along the way.
Meanwhile feel free to comment below your thoughts, suggestions and queries.

Cheers.

Continue ReadingAllowing web-user on apache server to run scripts as root

Sending mails using Sendgrid on Nodejs

The open-event webapp generator project needs to send an email to the user notifying him whenever generating the webapp is finished, containing the links to the preview and zip download.

For sending emails, the easiest service we found we could use was SendGrid  which provides upto 15000 free emails a month for students who have a Github Education Pack. (It anyway provides 10000 free emails to all users).

To use sendgrid, it’s best to use the sendgrid npm module that SendGrid officially builds. To get that installed just use the following command –

npm install --save sendgrid

Also, once you have made an account on Sendgrid, create an API key, and save it as an environment variable (so that your API key is not exposed in your code). For example in our project, we save it in the environment variable SENDGRID_API_KEY
To make it permanent you can add it to your ~/.profile file

export SEDGRID_API_KEY=xxxxxxxxxxxxxxxxxxx

The actual sending takes place in the mailer.js script in our project.

Basically we are using the mail helper class provided in the sendgrid module, and the bare minimum code required to send a mail is as follows

  var helper = require('sendgrid').mail
  from_email = new helper.Email('test@example.com')
  to_email = new helper.Email('test@example.com')
  subject = 'Hello World from the SendGrid Node.js Library!'
  content = new helper.Content('text/plain', 'Hello, Email!')
  mail = new helper.Mail(from_email, subject, to_email, content)
 
  var sg = require('sendgrid')(process.env.SENDGRID_API_KEY);
  var request = sg.emptyRequest({
    method: 'POST',
    path: '/v3/mail/send',
    body: mail.toJSON()
  });
 
  sg.API(request, function(error, response) {
    console.log(response.statusCode)
    console.log(response.body)
    console.log(response.headers)
  })

You need to replace the to and from emails to your requirements.

Also as you can see in our project’s code, if you want to send HTML formatted data, you can change the content type from text/plain to text/html and then add any html content (as a string) into the content.

Continue ReadingSending mails using Sendgrid on Nodejs

Creating an API in PHP

One of the key components of my GSoC Project was to have a POST API for the Android App generator.

This was required so that the app generator could be plugged into the server and can be called directly instead of someone manually visiting the webpage and entering his/her details.

It takes in a JSON input and compiles and emails the app to the organizer based on his email address in the input JSON.

The input to the API will look something like this :

{
“email”: “harshithdwivedi@gmail.com”,
“app_name”: “MyApp”,
“endpoint”: “https://open-event-dev.herokuapp.com/api/v2
}

Once the data is sent, on the server I have a php file which intercepts the requests and performs an action based on the request.

<?php
function sendResponse($data) {
    header('Content-type: application/json');
    echo json_encode($data);
    die();
}
/* If the request isn't a POST request then send an error message*/
if ($_SERVER['REQUEST_METHOD'] != 'POST') {
    sendResponse([
        "status"=>"error",
        "code"=>405,
        "message"=>"Method Not Allowed",
    ]);
}
/* Store the input received in a variable named body */
$body = json_decode(file_get_contents('php://input'), true);
/* If the user is nissing any important input parameters, don't process the request */
if (!array_key_exists('email', $body) || !array_key_exists('app_name', $body) || !array_key_exists('endpoint', $body)) {
    sendResponse([
        "status"=>"error",
        "code"=>422,
        "message"=>"Unprocessable entity",
    ]);
}
$uid = mt_rand(1000,9999). "_" .time();  //A random User ID
/* Extracting variables from the body */
$email = escapeshellcmd($body['email']);
$appName = escapeshellcmd($body["app_name"]); 
$endpoint = escapeshellcmd($body["endpoint"]);

/* Run a script based on the input parameters */
exec("sudo python /var/www/html/api/appgenserver.py $email $appName $endpoint");

The code above is pretty much self explanatory.

So basically, first we check for a valid request (GET/POST) and throw an error if it is invalid.

Next up, for a valid request we store the body into a variable and then execute a followup script as per our needs using data from this response.

This PHP file should be located in the public-html (/var/www/data) of the server so as to be accessible from outside of the server.

You can test out this API by calling it directly by prepending the server’s ip address to the name of php file containing this code.

Something like :

domain-name.com/api/api.php

You can also use Postman for Chrome or RESTClient for Firefox for making API calls easily.

Well, that’s it then!

You can easily modify the PHP code provided and modify it to suite your needs for making you own API.

Let me know your thoughts and your queries in the “response” 😉 below.

Until next time.

Continue ReadingCreating an API in PHP

Handling images inside ZIP or with URL’s

The Open-event webapp generator now provides the user a facility to upload the speakers and sponsors images inside the ZIP as images/speakers and images/sponsors.  After that the user will just have to specify the path of the images inside JSON such as /images/speakers/photoname.jpg  instead of URL’s.

How It Works ?

Whenever a user uploads a ZIP containing different files, it is extracted in dist/ folder according to the filename inside ZIP.

//fold.js... function to extract files according to folder name

var admZip = require('adm-zip');
const distPath = __dirname + '/../../../dist';
const uploadsPath = __dirname + '/../../../uploads';
const mockPath = __dirname + '/../../../mockjson'

copyUploads: function(appFolder, uploadedFile) {
 const appPath = distPath + '/' + appFolder;
 fs.mkdirpSync(appPath + '/json');
 var zip = new admZip(uploadedFile);
 var zipEntries = zip.getEntries(); 

 zipEntries.forEach(function(zipEntry) {
 
 switch(zipEntry.entryName){
 case 'images/speakers/':
 zip.extractEntryTo("images/speakers/", appPath ); 
 break;
 case 'images/sponsors/':
 zip.extractEntryTo("images/sponsors/", appPath ); 
 break;
 case 'audio/':
 zip.extractEntryTo("audio/", appPath);
 break;
 case 'sessions':
 zip.extractEntryTo("sessions", appPath +'/json/');
 break;
 case 'speakers':
 zip.extractEntryTo("speakers", appPath +'/json/');
 break;
 case 'microlocations' :
 zip.extractEntryTo("microlocations", appPath+'/json/');
 break;
 case 'event' :
 zip.extractEntryTo("event", appPath +'/json/');
 break;
 case 'sponsors' :
 zip.extractEntryTo("sponsors", appPath +'/json/');
 break;
 case 'tracks':
 zip.extractEntryTo("tracks", appPath +'/json/');
 break;
 default:
 }

This will send all the speaker images to images/speakers in dist and all sponsors images to images/sponsors in dist ( dist is the folder served to the user).


const appFolder = reqOpts.email + '/' + slugify(reqOpts.name);
 speakers.forEach((speaker) => {
  if ((speaker.photo !== null) && (speaker.photo.substring(0, 4) ===     'http')) {
 speaker.photo = urlencode(distHelper.downloadSpeakerPhoto(appFolder,    speaker.photo));
 }
 else {
 var reg = speaker.photo.split('');
 if(reg[0] =='/'){
 speaker.photo =    urlencode(speaker.photo.substring(1,speaker.photo.length));
 }
 
 }

 });
//dist.js

downloadSpeakerPhoto: function(appFolder, photoUrl) {
 const appPath = distPath + '/' +appFolder;
 const photoFileName = photoUrl.split('/').pop();
 const photoFilePath = 'images/speakers/' + photoFileName;

 console.log('Downloading photo : ' + photoFileName);
 downloadFile(photoUrl, appPath + '/' + photoFilePath);
 return photoFilePath;
 },

The code above shows how the image URL’s are split on the basis of ‘/’ to get the last element of the URL that is photoFileName. After that the image can be written inside the folder.

images/speakers/' + photoFileName

This code also handles the case when the images are downloaded by taking URL paths from JSON. If the photo in JSON has a string matched with ‘HTTP’ .Then it is downloaded in images/speakers/ . Finally, the image is downloaded with the same path as specified in JSON which can then be easily related in HTML image tag.

//dist.js Function to download files

const downloadFile = function(url, filePath) {
 const fileStream = fs.createWriteStream(filePath);

 fileStream.on('error', function(err) {
 console.log(err);
 });
 try {
 request(url).pipe(fileStream);
 } catch (err) {
 console.log(err);
 }
};

That’s how the images inside the ZIP and the image URL’s inside JSON files are handled in Open-event webapp generator.

Continue ReadingHandling images inside ZIP or with URL’s

Using Heroku pipelines to set up a dev and master configuration

The open-event-webapp project, which is a generator for event websites, is hosted on heroku. While it was easy and smooth sailing to host it on heroku for a single branch setup, we moved to a 2-branch policy later on. We make all changes to the development branch, and every week once or twice, when the codebase is stable, we merge it to master branch.

So we had to create a setup where  –

master branch –> hosted on –> heroku master

development branch –> hosted on –> heroku dev

Fortunately, for such a setup, Heroku provides a functionality called pipelines and a well documented article on how to implement git-flow


First and foremost, we created two separate heroku apps, called opev-webgen and opev-webgen-dev

To break it down, let’s take a look at our configuration. First step is to set up separate apps in the travis deploy config, so that when development branch is build, it pushed to open-webgen-dev and when master is built, it pushes to opev-webgen app. The required lines as you can see are –

https://github.com/fossasia/open-event-webapp/blob/master/.travis.yml#L25

https://github.com/fossasia/open-event-webapp/blob/development/.travis.yml#L25

Now, we made a new pipeline on heroku dashboard, and set opev-webgen-dev and opev-webgen in the staging and production stages respectively.

Screenshot from 2016-07-31 04-33-30 Screenshot from 2016-07-31 04-34-41

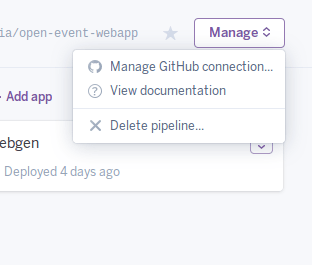
Then, using the “Manage Github Connection” option, connect this app to your github repo.

Screenshot from 2016-07-31 04-36-17

Once you’ve done that, in the review stage of your heroku pipeline, you can see all the existing PRs of your repo. Now you can set up temporary test apps for each PR as well using the Create Review App option.

Screenshot from 2016-07-31 04-37-38

So now we can test each PR out on a separate heroku app, and then merge them. And we can always test the latest state of development and master branches.

Continue ReadingUsing Heroku pipelines to set up a dev and master configuration

Working with Styles and Themes in Android

All those who have worked with styles and themes know that they’re hard to get right. We tend to get frustrated when we work with them. The hierarchy easily devolves into spaghetti code. How often did you want to change a style but feared you might break the continuity of the design of the app somewhere or the other.

I ran into a similar situation recently. I had to change the whole app’s style’s and theme by just changing the colors etc. in one location. This was for the Open Event android project where we wanted that while generating an apk by the apk generator we could change the color scheme of the app and could make it customisable for the needs of the organisations.

So, I’ll be talking about styling different views in this post. This shall be a long post!

When should we use styles

First of all, most of us get confused on when should we use styles instead of an inline attribute. Now I am going to show the rules that I follow:

When you have multiple views that should look identical ( Perhaps that do similar things)

Few Examples :

  • Payment screens. You want to get the user through a bunch of ordering and payment screens. You need similar kind of buttons there to make it look like a continuous process. Hence we make the Buttons follow one particular style
<style name="Payment_Buttons">
    <item name="android:minWidth">@dimen/button_min_width</item>
    <item name="android:minHeight">@dimen/button_min_height</item>
    <item name="android:background">@color/my_choice_color</item>
</style>

Try to use themes to tweak default styles

Themes provide a way of defining the default style of many widgets. For example :

If you want to define the default button for all of your payment screens in the example above, you can do something like :

<style name="ButtonTheme">
    <item name="android:buttonStyle">@style/MyButton</item>
</style>

But note that if you’re tweaking the default style, the only tricky part is to figure out the parent of your style but that’s really dificult due to a lot of variation within the different versions of android. If you’re using something that’s part of the AppCompat, then it’s okay. you don’t need to worry about the variations but when you want to style something not in AppCompat, then the main problem arises. So For example I want a button to be Holo until kitkat and then Material starting Lollipop, I’ll do something like this :

In values/styles.xml –

<style name="ButtonParent" Parent = "android:Widget.Holo.Button" />
<style name="ButtonParent.Holo">
    <item name="android:background">@drawable/my_bg</item>
</style>

Then in values-v21/styles.xml:

<style name="ButtonParent" parent ="android:Widget.Material.Button/>

This makes the button consistent with guidelines and the app looks perfect.

Now, Themes vs Styles

This is a topic which most of the developers don’t know about. They get confused on what is the difference between them. I was also not totally clear about this until recently. A theme is infact a style, the only difference is the usage.

  • We set a theme in the Manifest of the app or an activity
  • We set a style in a layout file or a widget
  • There are more styles than themes (Checkout styles.xml and themes.xml)
  • Definition of a theme is in the essence jsut a collection of references to stlyes that the theme will use.
  • To elaborate, let’s see the example of Theme.Holo :

It has a combination of

  1. Widget.Holo.Button
  2. Widget.Holo.Button.Small
  3. TextAppearence.Holo.Small
  4. TextAppearence.Holo.Small.Inverse

So, There can be different styles like this which can be referenced in a theme. Themes can be divided into 2 parts : General themes and sub themes

You can have a general them like Theme.ABC and if you want a variation of this general theme, for example no actionbar, you can add another theme like Theme.ABC.NoActionBar . This theme will not have the ActionBar

Inheritance

One of the interesting things that most people don’t know about is inhertance of styles/themes. What do I mean by this is that you can use existing styles and create some variations to suit different needs. There are 2 ways to use this inheritance. I’m going to try to explain and elorate on them :

  1. With a parent attribute

This is the most common way to use it and the way that most of the developers learn it while working on styles for the first time.

So how actually do we use it?

<style name = "Child" parent = "@style/Parent">
</style>

Here the child inherits all the properties of the style with the name “Parent” and define new properties in this style name “Child” where they can define new properties they want on top of the parent style.

2. With implicit style names

The other way to inherit styles/themes using the implicit way. Instead of setting a parent attribute, just prefix your new style/theme with the name of its parent and a dot. Something like this :

<style name = "Parent.Child">
</style>

This works the same as the previous method. Using this reduces some time to write additional parameter and is used by almost all experienced developers.

Plus you get some checks as well while writing code in Android studio. But be careful while using this as you need to take care of somethings :

For example,

  • The Parent style/theme needs to exist, Otherwise an error
  • You cannot inherit default themes and styles. For example you can’t create
<style name = "Theme.Holo.myTheme">

but you do this

<style name = "myTheme" parent = "Theme.Holo">

I know this can be overwhelming for a person who’s just starting with styles and themes. Trust me I was also not able to understand the concepts on the first go. I had to spend some time to grasp all that can be done using styles and themes. So I think this should be it for this blog. It’s already gotten pretty big.

Be sure to check out the Open event android project here and the usage of styles and themes there. Ciao till next time!

Continue ReadingWorking with Styles and Themes in Android