Handle app links and apply unit tests in Open Event Attendee Application

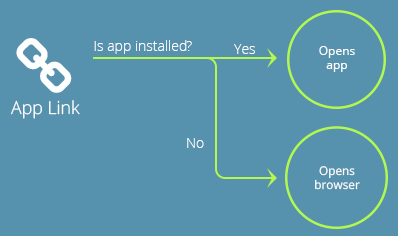
The open event attendee is an android app which allows users to discover events happening around the world using the Open Event Platform. It consumes the APIs of the open event server to get a list of available events and can get detailed information about them. Users following links on devices have one goal in mind: to get to the content they want to see. As a developer, you can set up Android App Links to take users to a link’s specific content directly in your app, bypassing the app-selection dialog, also known as the disambiguation dialog. Because Android App Links leverage HTTP URLs and association with a website, users who don’t have your app installed go directly to content on your site.

A unit test generally exercises the functionality of the smallest possible unit of code (which could be a method, class, or component) in a repeatable way. You should build unit tests when you need to verify the logic of specific code in your app.

  • Why unit test cases?
  • Setup app link intent in the app
  • Apply unit test cases
  • Conclusion
  • Resources

Let’s analyze every step in detail.

Why unit test cases?

As it is already discussed what the app link intents are, and it is basically for providing a better user experience for the application. These are some following reason why unit test cases should use – 

  1. Rapid feedback on failures.
  2. Early failure detection in the development cycle.
  3. Safer code refactoring, letting you optimize code without worrying about regressions.
  4. Stable development velocity, helping you minimize technical debt.

JUnit4 library is used for unit tests.

Setup app link intent in the app

Declare the frontend host according to build flavor in the app level gradle file:

buildTypes {
        release {
            resValue "string",  "FRONTEND_HOST", "eventyay.com"
        }
        debug {
            resValue "string", "FRONTEND_HOST", "open-event-fe.netlify.com"
        }
    }

Handle the app link intent in Manifest file by adding intent filter under main activity decleartion:

<intent-filter>
    <action android:name="android.intent.action.VIEW" />
    <category android:name="android.intent.category.DEFAULT" />
    <category android:name="android.intent.category.BROWSABLE" />

    <data
        android:scheme="https"
        android:host="@string/FRONTEND_HOST"/>
</intent-filter>

Manifest will through the intent in the main activity file.

Now handle the intent in main activity:

override fun onCreate(savedInstanceState: Bundle?) {
        super.onCreate(savedInstanceState)
        handleAppLinkIntent(intent)
    }

    override fun onNewIntent(intent: Intent?) {
        super.onNewIntent(intent)
        handleAppLinkIntent(intent)
    }

    private fun handleAppLinkIntent(intent: Intent?) {
        val uri = intent?.data ?: return
        val bundle = AppLinkUtils.getArguments(uri)
        val destinationId = AppLinkUtils.getDestinationId(uri)
        if (destinationId != null) {
            navController.navigate(destinationId, bundle)
        }
    }

Here a new class/object AppLinkUtils is defined which will return destination fragment id and the argument/data according to the intent URI.

Apply unit test cases:

First, implement the libraries in the gradle file –  1. JUnit for unit tests, 2. Robolectric for using android classes in the test class:

testImplementation 'junit:junit:4.12'
testImplementation 'org.robolectric:robolectric:3.4.2'

Create a test class for testing the app link functions and run it with RoboLectricTestRunner:

private const val EVENT = "event"
private const val RESET_PASSWORD = "resetPassword"
private const val VERIFY_EMAIL = "verifyEmail"

@RunWith(RobolectricTestRunner::class)
class AppLinkUtilsTest {

    private fun getAppLink(type: String): Uri {
        return when (type) {
            EVENT -> Uri.parse("https://eventyay.com/e/5f6d3feb")
            RESET_PASSWORD -> Uri.parse("https://eventyay.com/reset-password?token=822980340478781748445098077144")
            VERIFY_EMAIL -> Uri.parse("https://eventyay.com/verify?token=WyJsaXZlLmhhcnNoaXRAaG")
            else -> Uri.parse("")
        }
    }

    @Test
    fun `should get event link`() {
        val uri = getAppLink(EVENT)
        assertEquals(R.id.eventDetailsFragment, AppLinkUtils.getDestinationId(uri))
        assertEquals("""
            5f6d3feb
        """.trimIndent(), AppLinkUtils.getArguments(uri).getString(EVENT_IDENTIFIER))
    }// Find more test cases in the GitHub Repo.

Testing response:

GIF

In a Nutshell

So, essentially the Eventyay Attendee should have this feature to handle all links i.e. Reset password, verify user email and open event details in the app itself. So, we can provide a better user experience in-app instead of redirecting to the frontend for them.

Resources

  1. Android app links: https://developer.android.com/studio/write/app-link-indexing
  2. Developing android unit testing: https://www.vogella.com/tutorials/AndroidTesting/article.html

Tags

Eventyay, open-event, JUnit, AndroidUnitTest, AppLinks, Fossasia, GSoC, Android, Kotlin

Continue ReadingHandle app links and apply unit tests in Open Event Attendee Application

Testing the ViewModels in Open Event Organizer App

In Open Event Organizer Android App we follow Test Driven Development Approach which means the features added in the app are tested thoroughly by unit tests. More tests would ensure better code coverage and fewer bugs. This blog explains how to write tests for Viewmodel class in MVVM architecture.

Specifications

We will use JUnit4 to write unit tests and Mockito for creating mocks. The OrdersViewModel class returns the list of Order objects to the Fragment class. The objects are requested from OrderRepository class which fetches them from Network and Database. We will create a mock of OrderRepository class since it is out of context and contain logic that doesn’t depend on Orders Respository. Below is the getOrders method that we will test.

 public LiveData<List<Order>> getOrders(long id, boolean reload) {
if (ordersLiveData.getValue() != null && !reload)
return ordersLiveData;

compositeDisposable.add(orderRepository.getOrders(id, reload)
.compose(dispose(compositeDisposable))
.doOnSubscribe(disposable -> progress.setValue(true))
.doFinally(() -> progress.setValue(false))
.toList()
.subscribe(ordersLiveData::setValue,
throwable -> error.setValue(ErrorUtils.getMessage(throwable).toString())));

return ordersLiveData;
}

We will be using InstantTaskExecutorRule() which is a JUnit Test Rule that swaps the background executor used by the Architecture Components with a different one which executes each task synchronously. We will use setUp() method to load the RxJavaPlugins, RxAndroid plugins and reset them in tearDown method which will ensure each test runs independently from the other and avoid memory leaks. After doing this initialization and basic setup for tests we can begin code the method shouldLoadOrdersSuccessfuly() to test the getOrders method present in ViewModel class. Let’s see the step by step approach.

  1. Use Mockito.when to return Observables one by one from ORDERS_LIST whenever the method getOrders of the mock orderRepository is called.
  2. We will use Mockito.InOrder and pass orders, orderRepository and progress to check if they are called in a particular order.
  3. We will use .observeForever method to observe on LiveData objects and add a ArrayList on change.
  4. Finally, we will test and verify if the methods are called in order.
@Test
public void shouldLoadOrdersSuccessfully() {
when(orderRepository.getOrders(EVENT_ID, false))
.thenReturn(Observable.fromIterable(ORDERS_LIST));

InOrder inOrder = Mockito.inOrder(orders, orderRepository, progress);

ordersViewModel.getProgress().observeForever(progress);

orders.onChanged(new ArrayList<>());

ordersViewModel.getOrders(EVENT_ID, false);

inOrder.verify(orders).onChanged(new ArrayList<>());
inOrder.verify(orderRepository).getOrders(EVENT_ID, false);
inOrder.verify(progress).onChanged(true);
inOrder.verify(progress).onChanged(false);
}

Similar approach can be followed for writing tests to check other behaviour of the ViewModel.

References

  1. Official Documentation for testing. https://developer.android.com/reference/android/arch/core/executor/testing/InstantTaskExecutorRule
  2. Official Documentation for JUnit.  https://junit.org/junit4/
  3. Official documentation for Mockito.  http://site.mockito.org/
  4. Open Event Organizer App codebase.  https://github.com/fossasia/open-event-orga-app
Continue ReadingTesting the ViewModels in Open Event Organizer App

Adding new test cases for increasing test coverage of Loklak Server

It is a good practice to have test cases covering major portion of actual code base. The idea was same to add new test cases in Loklak Server to increase its test coverage. The results were quite amazing with a significant increase of about 3% in total test coverage of the overall project. And about 80-100% increase in the test coverage of individual files for which tests have been written.

Integration Process

For integration, a total of 6 new test cases have been written:

  1. ASCIITest
  2. GeoLocationTest
  3. CommonPatternTest
  4. InstagramProfileScraperTest
  5. EventBriteCrawlerServiceTest
  6. LocationWiseTimeServiceTest

For increasing code coverage, Java docs have been written which increase the lines of code being covered.

Implementation

Basic implementation of adding a new test case is same. Here’s is an example of EventBriteCrawlerServiceTest implementation. This can be used as a reference for adding a new test case in the project.

Prerequisite: If the test file being written tests any additional external service (e.g. EventBriteCrawlerServiceTest tests any event being created on EventBrite platform) then, a corresponding new test service or test event should be written beforehand on the given platform. For EventBriteCrawlerServiceTest, a test-event has been created.

The given below steps will be followed for creating a new test case (EventBriteCrawlerServiceTest), assuming the prerequisite step has been done:

  • A new java file is generated in test/org/loklak/api/search/ as EventBriteCrawlerServiceTest.java.
  • Define package for the test file and import EventBriteCrawlerService.java file which has to be tested along with necessary packages and methods.

package org.loklak.api.search;

import org.loklak.api.search.EventBriteCrawlerService;
import org.loklak.susi.SusiThought;
import org.junit.Test;
import org.json.JSONArray;
import org.json.JSONObject;
import static org.junit.Assert.assertEquals;
import static org.junit.Assert.assertTrue;
import static org.junit.Assert.assertNotNull;


  • Define the class and methods that need to be tested. It is a good idea to break the testing into several test methods rather than testing more features in a single method.

public class EventBriteCrawlerServiceTest {
  @Test
  public void apiPathTest() { }

  @Test
  public void eventBriteEventTest() { }

  @Test
  public void eventBriteOrganizerTest() { }

  @Test
  public void eventExtraDetailsTest() { }
}


  • Create an object of EventBriteCrawlerService in each test method.

EventBriteCrawlerService eventBriteCrawlerService = new EventBriteCrawlerService();


  • Call specific method of EventBriteCrawlerService that needs to be tested in each of the defined methods of test file and assert the actualresult to the expectedresult.

@Test
public void apiPathTest() {
    EventBriteCrawlerService eventBriteCrawlerService = 
        new EventBriteCrawlerService();

     assertEquals("/api/eventbritecrawler.json",
        eventBriteCrawlerService.getAPIPath());
}


  • For methods fetching an actual result (Integration tests) of event page, define and initialise an expected set of results and assert the expected result with the actual result by parsing the json result.

@Test
public void eventBriteOrganizerTest() {
    EventBriteCrawlerService eventBriteCrawlerService =
        new EventBriteCrawlerService();
    String eventTestUrl = "https://www.eventbrite.com/e/
        testevent-tickets-46017636991";
    SusiThought resultPage = eventBriteCrawlerService
        .crawlEventBrite(eventTestUrl);
    JSONArray jsonArray = resultPage.getData();
    JSONObject organizer_details =
        jsonArray.getJSONObject(1);
    String organizer_contact_info = organizer_details
        .getString("organizer_contact_info");
    String organizer_link = organizer_details
        .getString("organizer_link");
    String organizer_profile_link = organizer_details
        .getString("organizer_profile_link");
    String organizer_name = organizer_details
        .getString("organizer_name");

    assertEquals("https://www.eventbrite.com
        /e/testevent-tickets-46017636991
        #lightbox_contact",
        organizer_contact_info);
    assertEquals("https://www.eventbrite.com
        /e/testevent-tickets-46017636991
        #listing-organizer", organizer_link);
    assertEquals("", organizer_profile_link);
    assertEquals("aurabh Srivastava", organizer_name);
}


  • If the test file is testing the harvester, then import and add the test class in TestRunner.java file. e.g.

import org.loklak.harvester.TwitterScraperTest;

@RunWith(Suite.class)
@Suite.SuiteClasses({
  TwitterScraperTest.class
})

Testing

The last step will be to check if the test case passes with integration of other tests. The gradle will test the test case along with other tests in the project.

./gradlew build

Resources

Continue ReadingAdding new test cases for increasing test coverage of Loklak Server

Testing Presenter of MVP in Loklak Wok Android

Imagine working on a large source code, and as a new developer you are not sure whether the available source code works properly or not, you are surrounded by questions like, Are all these methods invoked properly or the number of times they need to be invoked? Being new to source code and checking manually already written code is a pain. For cases like these unit-tests are written. Unit-tests check whether the implemented code works as expected or not. This blog post explains about implementation of unit-tests of Presenter in a Model-View-Presenter (MVP) architecture in Loklak Wok Android.

Adding Dependencies to project

In app/build.gradle file

defaultConfig {
   ...
   testInstrumentationRunner "android.support.test.runner.AndroidJUnitRunner"
}

dependencies {
   ...
   androidTestCompile 'org.mockito:mockito-android:2.8.47'
   androidTestCompile 'com.android.support:support-annotations:25.3.1'
   androidTestCompile 'com.android.support.test.espresso:espresso-core:2.2.2'
}

Setup for Unit-Tests

The presenter needs a realm database and an implementation of LoklakAPI interface. Along with that a mock of the View is required, so as to check whether the methods of View are called or not.

The LoklakAPI interface can be mocked easily using Mockito, but the realm database can’t be mocked. For this reason an in-memory realm database is created, which will be destroyed once all unit-test are executed. As the presenter is required for each unit-test method we instantiate the in-memory database before all the tests start i.e. by annotating a public static method with @BeforeClass, e.g. setDb method.

@BeforeClass
public static void setDb() {
   Realm.init(InstrumentationRegistry.getContext());
   RealmConfiguration testConfig = new RealmConfiguration.Builder()
           .inMemory()
           .name("test-db")
           .build();
   mDb = Realm.getInstance(testConfig);
}


NOTE: The in-memory database should be closed once all unit-tests are executed. So, for closing the databasse we create a public static method annotated with @AfterClass, e.g. closeDb method.

@AfterClass
public static void closeDb() {
   mDb.close();
}


Now, before each unit-test is executed we need to do some setup work like instantiating the presenter, a mock instance of API interface generated  by using mock static method and pushing in some sample data into the database. Our presenter uses RxJava and RxAndroid which depend on IO scheduler and MainThread scheduler to perform tasks asynchronously and these schedulers are not present in testing environment. So, we override RxJava and RxAndroid to use trampoline scheduler in place of IO and MainThread so that our test don’t encounter NullPointerException. All this is done in a public method annotated with @Before e.g. setUp.

@Before
public void setUp() throws Exception {
   // mocking view and api
   mMockView = mock(SuggestContract.View.class);
   mApi = mock(LoklakAPI.class);

   mPresenter = new SuggestPresenter(mApi, mDb);
   mPresenter.attachView(mMockView);

   queries = getFakeQueries();
   // overriding rxjava and rxandroid
   RxJavaPlugins.setIoSchedulerHandler(scheduler -> Schedulers.trampoline());
   RxAndroidPlugins.setMainThreadSchedulerHandler(scheduler -> Schedulers.trampoline());

   mDb.beginTransaction();
   mDb.copyToRealm(queries);
   mDb.commitTransaction();
}


Some fake suggestion queries are created which will be returned as observable when API interface is mocked. For this, simply two query objects are created and added to a List after their query parameter is set. This is implemented in getFakeQueries method.

private List<Query> getFakeQueries() {
   List<Query> queryList = new ArrayList<>();

   Query linux = new Query();
   linux.setQuery("linux");
   queryList.add(linux);

   Query india = new Query();
   india.setQuery("india");
   queryList.add(india);

   return queryList;
}


After that, a method is created which provides the created fake data wrapped inside an Observable as implemented in getFakeSuggestionsMethod method.

private Observable<SuggestData> getFakeSuggestions() {
   SuggestData suggestData = new SuggestData();
   suggestData.setQueries(queries);
   return Observable.just(suggestData);
}


Lastly, the mocking part is implemented using Mockito. This is really simple, when and thenReturn static methods of mockito are used for this. The method which would provide the fake data is invoked inside when and the fake data is passed as a parameter to thenReturn. For example, stubSuggestionsFromApi method

private void stubSuggestionsFromApi(Observable observable) {
   when(mApi.getSuggestions(anyString())).thenReturn(observable);
}

Finally, Unit-Tests

All the tests methods must be annotated with @Test.

Firstly, we test for a successful API request i.e. we get some suggestions from the Loklak Server. For this, getSuggestions method of LoklakAPI is mocked using stubSuggestionFromApi method and the observable to be returned is obtained using getFakeSuggestions method. Then, loadSuggestionFromAPI method is called, the one that we need to test. Once loadSuggestionFromAPI method is invoked, we then check whether the method of the View are invoked inside loadSuggestionFromAPI method, this is done using verify static method. The unit-test is implemented in testLoadSuggestionsFromApi method.

@Test
public void testLoadSuggestionsFromApi() {
   stubSuggestionsFromApi(getFakeSuggestions());

   mPresenter.loadSuggestionsFromAPI("", true);

   verify(mMockView).showProgressBar(true);
   verify(mMockView).onSuggestionFetchSuccessful(queries);
   verify(mMockView).showProgressBar(false);
}


Similarly, a failed network request for obtaining is suggestions is tested using testLoadSuggestionsFromApiFail method. Here, we pass an IOException throwable – wrapped inside an Observable – as parameter to stubSuggestionsFromApi.

@Test
public void testLoadSuggestionsFromApiFail() {
   Throwable throwable = new IOException();
   stubSuggestionsFromApi(Observable.error(throwable));

   mPresenter.loadSuggestionsFromAPI("", true);
   verify(mMockView).showProgressBar(true);
   verify(mMockView).showProgressBar(false);
   verify(mMockView).onSuggestionFetchError(throwable);
}


Lastly, we test if our suggestions are saved in the database by counting the number of saved suggestions and asserting that, in testSaveSuggestions method.

@Test
public void testSaveSuggestions() {
   mPresenter.saveSuggestions(queries);
   int count = mDb.where(Query.class).findAll().size();
  // queries is the List that contains the fake suggestions
   assertEquals(queries.size(), count);
}

Resources:

Continue ReadingTesting Presenter of MVP in Loklak Wok Android

Best Practices when writing Tests for loklak Server

Why do we write unit-tests? We write them to ensure that developers’ implementation doesn’t change the behaviour of parts of the project. If there is a change in the behaviour, unit-tests throw errors. This keep developers in ease during integration of the software and ensure lower chances of unexpected bugs.

After setting up the tests in Loklak Server, we were able to check whether there is any error or not in the test. Test failures didn’t mention the error and the exact test case at which they failed. It was YoutubeScraperTest that brought some of the best practices in the project. We modified the tests according to it.

The following are some of the best practices in 5 points that we shall follow while writing unit tests:

  1. Assert the assertions

There are many assert methods which we can use like assertNull, assertEquals etc. But we should use one which describes the error well (being more descriptive) so that developer’s effort is reduced while debugging.

Using these assertions related preferences help in getting to the exact errors on test fails, thus helping in easier debugging of the code.

Some examples can be:-

  • Using assertThat() over assertTrue

assertThat() give more descriptive errors over assertTrue(). Like:-

When assertTrue() is used:

java.lang.AssertionError: Expected: is <true> but: was <false> at org.loklak.harvester.TwitterScraperTest.testSimpleSearch(TwitterScraperTest.java:142) at sun.reflect.NativeMethodAccessorImpl.invoke0(Native Method) at org.hamcr.......... 


When assertThat() is used:

java.lang.AssertionError:
Expected: is <true>
     but: was <false>
at org.loklak.harvester.TwitterScraperTest.testSimpleSearch(TwitterScraperTest.java:142)
        at sun.reflect.NativeMethodAccessorImpl.invoke0(Native Method)
    at org.hamcr...........


NOTE:- In many cases, assertThat() is preferred over other assert method (read this), but in some cases other methods are used to give better descriptive output (like in next examples)

  • Using assertEquals() over assertThat()

For assertThat()

java.lang.AssertionError:

Expected: is "ar photo #test #car https://pic.twitter.com/vd1itvy8Mx"

but: was "car photo #test #car https://pic.twitter.com/vd1itvy8Mx"

at org.hamcrest.MatcherAssert.assertThat(MatcherAssert.java:20)

at org.junit.Assert.assertThat(Ass........


For assertEquals()

org.junit.ComparisonFailure: expected:<[c]ar photo #test #car ...> but was:<[]ar photo #test #car ...>

at org.junit.Assert.assertEquals(Assert.java:115)

at org.junit.Assert.assertEquals(Assert.java:144)

at org.loklak.harvester.Twitter.........


We can clearly see that second example gives better error description than the first one.(An SO link)

  1. One Test per Behaviour

Each test shall be independent of other with none having mutual dependencies. It shall test only a specific behaviour of the module that is tested.

Have a look of this snippet. This test checks the method that creates the twitter url by comparing the output url method with the expected output url.

@Test

public void testPrepareSearchURL() {

    String url;

    String[] query = {

        "fossasia", "from:loklak_test",

        "spacex since:2017-04-03 until:2017-04-05"

    };

    String[] filter = {"video", "image", "video,image", "abc,video"};

    String[] out_url = {

        "https://twitter.com/search?f=tweets&vertical=default&q=fossasia&src=typd",

        "https://twitter.com/search?f=tweets&vertical=default&q=fossasia&src=typd",

    };

    // checking simple urls

    for (int i = 0; i < query.length; i++) {

        url = TwitterScraper.prepareSearchURL(query[i], "");


        //compare urls with urls created

        assertThat(out_url[i], is(url));

    }

}


This unit-test tests whether the method-under-test is able to create twitter link according to query or not.

  1. Selecting test cases for the test

We shall remember that testing is a very costly task in terms of processing. It takes time to execute. That is why, we need to keep the test cases precise and limited. In loklak server, most of the tests are based on connection to the respective websites and this step is very costly. That is why, in implementation, we must use least number of test cases so that all possible corner cases are covered.

  1. Test names

Descriptive test names that are short but give hint about their task which are very helpful. A comment describing what it does is a plus point. The following example is from YoutubeScraperTest. I added this point to my ‘best practices queue’ after reviewing the code (when this module was in review process).

/**

* When try parse video from input stream should check that video parsed.

* @throws IOException if some problem with open stream for reading data.

*/

@Test

public void whenTryParseVideoFromInputStreamShouldCheckThatJSONObjectGood() throws IOException {

    //Some tests related to method

}


AND the last one, accessing methods

This point shall be kept in mind. In loklak server, there are some tests that use Reflection API to access private and protected methods. This is the best example for reflection API.

In general, such changes to access specifiers are not allowed, that is why we shall resolve this issue with the help of:-

  •  Setters and Getters (if available, use it or else create them)
  •  Else use Reflection

If the getter methods are not available, using Reflection API will be the last resort to access the private and protected members of the class. Hereunder is a simple example of how a private method can be accessed using Reflection:

void getPrivateMethod() throws Exception {

    A ret = new A();

    Class<?> clazz = ret.getClass();

    Method method = clazz.getDeclaredMethod("changeValue", Integer.TYPE);

    method.setAccessible(true);

    System.out.println(method.invoke(ret, 2)); 
    //set null if method is static

}


I should end here. Try applying these practices, go through the links and get sync with these ‘Best Practices’ 🙂

Resources:

Continue ReadingBest Practices when writing Tests for loklak Server

Writing Simple Unit-Tests with JUnit

In the Loklak Server project, we use a number of automation tools like the build testing tool ‘TravisCI’, automated code reviewing tool ‘Codacy’, and ‘Gemnasium’. We are also using JUnit, a java-based unit-testing framework for writing automated Unit-Tests for java projects. It can be used to test methods to check their behaviour whenever there is any change in implementation. These unit-tests are handy and are coded specifically for the project. In the Loklak Server project it is used to test the web-scrapers. Generally JUnit is used to check if there is no change in behaviour of the methods, but in this project, it also helps in keeping check if the website code has been modified, affecting the data that is scraped.

Let’s start with basics, first by setting up, writing a simple Unit-Tests and then Test-Runners. Here we will refer how unit tests have been implemented in Loklak Server to familiarize with the JUnit Framework.

Setting-UP

Setting up JUnit with gradle is easy, You have to do just 2 things:-

1) Add JUnit dependency in build.gradle

Dependencies {

. . .

. . .<other compile groups>. . .

compile group: 'com.twitter', name: 'jsr166e', version: '1.1.0'

compile group: 'com.vividsolutions', name: 'jts', version: '1.13'

compile group: 'junit', name: 'junit', version: '4.12'

compile group: 'org.apache.logging.log4j', name: 'log4j-1.2-api', version: '2.6.2'

compile group: 'org.apache.logging.log4j', name: 'log4j-api', version: '2.6.2'

. . .

. . .

}


2) Add source for ‘test’ task from where tests are built (like here).

Save all tests in test directory and keep its internal directory structure identical to src directory structure. Now set the path in build.gradle so that they can be compiled.

sourceSets.test.java.srcDirs = ['test']


Writing Unit-Tests

In JUnit FrameWork a Unit-Test is a method that tests a particular behaviour of a section of code. Test methods are identified by annotation @Test.

Unit-Test implements methods of source files to test their behaviour. This can be done by fetching the output and comparing it with expected outputs.

The following test tests if twitter url that is created is valid or not that is to be scraped.

/**

 * This unit-test tests twitter url creation

 */

@Test

public void testPrepareSearchURL() {

String url;

String[] query = {"fossasia", "from:loklak_test",

"spacex since:2017-04-03 until:2017-04-05"};

String[] filter = {"video", "image", "video,image", "abc,video"};

String[] out_url = {

"https://twitter.com/search?f=tweets&vertical=default&q=fossasia&src=typd",

"https://twitter.com/search?f=tweets&vertical=default&q=from%3Aloklak_test&src=typd",

"and other output url strings to be matched…..."

};


// checking simple urls

for (int i = 0; i < query.length; i++) {

url = TwitterScraper.prepareSearchURL(query[i], "");


//compare urls with urls created

assertThat(out_url[i], is(url));

}


// checking urls having filters

for (int i = 0; i < filter.length; i++) {

url = TwitterScraper.prepareSearchURL(query[0], filter[i]);


//compare urls with urls created

assertThat(out_url[i+3], is(url));

}

}


Testing the implementation of code is useless as it will either make code more difficult to change or tests useless  . So be cautious while writing tests and keep difference between Implementation and Behaviour in mind.

This is the perfect example for a simple Unit-Test. As we see there are some points, which needs to be observed like:-

1) There is a annotation @Test .

2) Input array of query which is fed to the method TwitterScraper.prepareSearchURL() .

3) Array of urls out_url[], which are the expected urls to output.

4) asserThat() to compare the expected url (in array out_url[]) and the output url (in variable ‘url’).

NOTE: assertEquals() could also be used here, but we prefer to use assert methods to get error message that is readable (We will discuss about this some time later)

And the TestRunner

When we are working on a project, It is not feasible to run tests using gradle as they are first built  (else verified whether tests are build-ready) and then executed. gradle test shall be used only for building and testing the tests. For testing the project, one shall set-up TestRunner. It allows to run specific set of tests, one wants to run.

TestRunners are built once using gradle (with other tests) and can be run whenever you want. Also it is easy to stack up the test classes you want to run in SuiteClasses and @RunWith to run SuiteClasses with the TestRunner.

In loklak server, TestRunner runs the web-scraper tests. They are used by developers to test the changes they have made.

This is a sample TestRunner, code link here .

package org.loklak;


// Library classes imported

import org.junit.runner.RunWith;

import org.junit.runners.Suite;

// Source files to be tested

import org.loklak.harvester.TwitterScraperTest;

import org.loklak.harvester.YoutubeScraperTest;


/*

* TestRunner for harvesters

*/

@RunWith(Suite.class)

@Suite.SuiteClasses({

TwitterScraperTest.class,

YoutubeScraperTest.class

})

public class TestRunner {

}


You can also add TestRunners for different sections of the project. Like here it is initialized only to test harvesters.

To run the TestRunner

Add classpath of the jar file of the project and run ‘JUnitCore’ with TestRunner to get output on terminal.

java -classpath .:build/libs/<yourProject>.jar:build/classes/test org.junit.runner.JUnitCore org.loklak.TestRunner

In the project we have set up a shell script to run the tests.

Few points

1) Build the project and tests separately. Build tests only when changed as they take time to be built and executed.

2) Whenever you are done with the coding part, run the tests using TestRunner.

3) Write unit-tests whenever you add a new feature to the project to keep it up-to-date.

Now lets end up here.

So for now, Code it, Test it and Repeat.

Resources:

Continue ReadingWriting Simple Unit-Tests with JUnit