Badgeyay project is divided into two parts i.e front-end with Ember JS and back-end with REST-API programmed in Python.
Badgeyay comes with many features for customising the process of generation of Badges. Now to provide more freedom to the user in generation of badges, I have worked on feature which will provide user more freedom in choosing font sizes for different lines and create badges more creatively.
In this Blog, I will be discussing how I implemented Different Font Size for Different Line in Badgeyay Backend in my Pull Request.
To implement Different Font Size for Different Line feature, first, the component in SVG that is determining the font size of the label has to be identified. The label that determines the text on the badge is the <text> label and within it, the label that determines the properties of the text is <tspan>. So mainly we need to alter the properties in the tspan.
The property that determines the font size for the badge is font-size and its default value is set to 31.25 px. If the property in the labels changed, then we can see the corresponding changes in the PDF generated from the svg.
Now the challenges were:
To Determine the font-size value from the frontend.
Using the same for the font-size in SVG..
Changing the built SVG accordingly.
In this Blog, I will be dealing with changing the SVG in Backend according to Font Size provided by the User in the Frontend.
defchange_font_size(self,
filename,
badge_size,
paper_size,
Font_size_1, // Values fromFrontend
font_size_2,
font_size_3,
font_size_4,
font_size_5):
""" Module to change size of each badge lines :param `filename` - svg file to modify. :param `font_size_1` - Size to be applied on first line :param `font_size_2` - Size to be applied on Second line :param `font_size_3` - Size to be applied on Third line :param `font_size_4` - Size to be applied on Fourth line :param `font_size_5` - Size to be applied on Fifth line """// Storing the Values passed altogether in a list.
font_size = [1, font_size_1, font_size_2, font_size_3, font_size_4, font_size_5]
// Selecting the dimension config based on the parameters passed in the function.
dimensions = badge_config[paper_size][badge_size]
if config.ENV =='LOCAL':
filename ='static/badges/'+ dimensions.badgeSize +'on'+ dimensions.paperSize +'.svg'else:
filename = os.getcwd() +'/api/static/badges/'+ dimensions.badgeSize +'on'+ dimensions.paperSize +'.svg'
tree = etree.parse(open(os.path.join(self.APP_ROOT, filename), 'r'))
element = tree.getroot()
for idx inrange(1, dimensions.badges +1):
for row inrange(1, 6):
//Selecting the text element with the ID
_id ='Person_color_{}_{}'.format(idx, row) path = element.xpath(("//*[@id='{}']").format(_id))[0]
style_detail = path.get("style")
style_detail = style_detail.split(";")
for ind, i inenumerate(style_detail):
if i.split(':')[0] =='font-size':
style_detail[ind] ="font-size:"+ font_size[row]
style_detail =';'.join(style_detail)
text_nodes = path.getchildren()
path.set("font-size", style_detail)
for t in text_nodes:
text_style_detail = t.get("style")
text_style_detail = text_style_detail.split(";")
// Fill the font size argument of the selected object by changing the value of font-size.
text_style_detail[-1] ="font-size:"+ font_size[row]
text_style_detail =";".join(text_style_detail)
t.set("style", text_style_detail)
etree.ElementTree(element).write(filename, pretty_print=True)
print("Font Size Saved!")
After all the changes, the Updated SVG is used for Badge Generation with different font size embedded
Now, we are done with implementation of Different Font Size for Different Line in
The Badgeyay Ember JS frontend has many features like Login and Sign up features and Login with OAuth and most important, the badge generation feature is also up and running. Now the next important thing from User perspective is that there should be a settings panel where user can see its account details like username, Email & password and he should be able to change them if he want to.
I have implemented the setting panel in Badgeyay where user can see his account details. In this blog, I will be discussing how I implemented Update Password functionality in my Pull Request so that the User can change his Password at any point of time.
Let’s get started and understand it step by step.
Step 1:
Generate User Password component with help of ember cli.
Step 2:
Make changes in Handlebar of User Password. We will be using semantic UI form for making the changes in Handlebars.
<h2class="ui header">Password</h2><h5class="ui dividing header">Change your password.</h5><formclass="ui form"{{action'updateUserPassword'on="submit"}}>
</div></div><buttontype="submit"class="ui basic orange button"tabindex="0">
Save Changes
</button></form>
We have used action on submitting the Form for changing and updating the Password in Database and Firebase.
Step 3:
We will now define the action in user component JS file. We will also add the validations in Form so that empty form cannot be submitted to the server.
import Component from '@ember/component';
exportdefault Component.extend({
init() {
this._super(...arguments);
},
actions: {
updateUserPassword() {
let password =this.get('newPassword');
this.get('sendUserPassword')(password);
}
},
didRender() {
this.$('.ui.form')
.form({
inline :true,
delay :false,
fields : {
newPassword: {
identifier :'newPassword',
rules : [
{
type :'empty',
prompt :'Please enter a password'
},
{
type :'minLength[6]',
prompt :'Your password must have at least {ruleValue} characters'
}
]
},
newPasswordVerify: {
identifier :'newPasswordVerify',
rules : [
{
type :'match[newPassword]',
prompt :'Passwords do not match'
}
]
}
}
});
}
});
Step 4:
We will now configure the controller to customize the action that we have defined above.
We have configured the frontend for sending the details to backend. Now, we have to edit the endpoint so that if Password changes in params, It should change the password and send the response with the updated user schema.
The Badgeyay Ember JS frontend has many features like Login and Sign up features and Login with OAuth and the most important, the badge generation feature is also up and running. Now the next important thing from User perspective is that there should be a settings panel where user can see its account details like username, Email & password and he should be able to change them if he want to.
I have implemented the setting panel in Badgeyay where user can see his account details. In this blog, I will be discussing how I implemented Update Username functionality in my Pull Request so that the User can change his username at any point of time.
Let’s get started and understand it step by step.
Step 1:
Generate User account component with help of ember cli.
$ ember g component user-component/user-account
Step 2:
Make changes in Handlebar of User Account. We will be using semantic UI form for making the changes in Handlebars.
We have used action on submitting the Form for changing and updating the username in Database and Firebase.
Step 3:
We will now define the action in user component JS file. We will also add the validations in Form so that empty form cannot be submitted to the server.
We have configured the frontend for sending the details to backend. Now, we have to edit the endpoint so that if username is change in params, It should change the username and send the response with the updated username.
Badgeyay project is divided into two parts i.e front-end with Ember JS and back-end with REST-API programmed in Python.
Badgeyay comes with many features for customising the process of generation of Badges. Badgeyay also keeps record of all the badges generated by user and also gives option to directly download the previously generated badges.
All the badges appear on single page which creates problem when a user has generated lot of badges and all the badges listed on single page.
To resolve this issue and make Badgeyay more user friendly I have implemented pagination in listing badges so that if there are more number of badges, user can see the badges listed in multiple pages in my Pull Request.
To implement this, I have used actions and made the changes accordingly.
Let’s get started and understand it step by step.
Step 1:
We will use semantic icons in handlebars for changing pages.
Step 2:
I will add action for changing page to next and previous page.
Badgeyay project is divided into two parts i.e front-end with Ember JS and back-end with REST-API programmed in Python.
Badgeyay comes with many features for customising the process of generation of Badges. It gives freedom to user to choose Input Badge data which is to be printed on the individual badges, choosing the badge size, applying custom background to the badges and then optional features of font customization helps to generate cool badges.You have to just click on create badges and the generated badge with download link appear at bottom of form. But a problem arises with the generated badges link that after logout/login or generation of new badges just after creating badges one time, the link of the previously created badges is still there which is a bit confusing, as user might think the previous link to be the new link and press on that in order to download and find the old badges downloaded.
To resolve this issue, I have used the power of Ember notify library and customized it to show the generated badges link and disappear after a specified time in my Pull Request and after that user can always see his previously generated badges in My Badges route.
Let’s get started and understand it.
Customizing Notify library and making the changes in the send Badge data function to show the generated badge link just after the completion of badge generation process.
import Controller from '@ember/controller';
import { inject as service } from '@ember/service';
exportdefault Controller.extend({
....
routing : service('-routing'),
notify : service('notify'), // importing Notify service
.....
sendBadge(badgeData) {
const _this =this;
let badgeRecord = _this.get('store').createRecord('badge', badgeData);
badgeRecord.save()
.then(record => {
_this.set('badgeGenerated', true);
_this.set('genBadge', record);
var notify = _this.get('notify');
var link = record.download_link; // Assigning download link to a variable var message = notify.success( // Configuring the message of notify service
{ html:// Adding the html in notify message'
Badge generated successfully.
'+'<p>Visit this<b>'+'<a href='+ link
+'> Link </a></b> to download badge.</p>',
closeAfter:10000 }); // Specifying the time of closing the message
})
.catch(err => {
_this.get('notify').error('Unable to generate badge');
});
},
I have implemented the customized notify function to show the badge generation link for a specific time.
Now run the server to see the implemented changes by following command.
$ ember serve
Ember Notify service showing the generated Badges link:
Now, I am done with the implementation of customised notify function to show the badge generation link for a specific time of 10 seconds.
Badgeyay project is divided into two parts i.e front-end with Ember JS and back-end with REST-API programmed in Python.
Badgeyay comes with many features for customising the process of generation of Badges. It gives freedom to user to choose Input Badge data which is to be printed on the individual badges, choosing the badge size, applying custom background to the badges and then optional features of font customization helps to generate cool badges. If a helper is not there for the directions to use these features then these features may be difficult to use for a user.
To resolve this issue and make Badgeyay more user friendly I have implemented a User Guide to help user to go through the User Manual before generating Badges in my Pull Request.
To implement user guide, I have used Semantic UI tables to give examples for CSV format and used other components for Manual format.
Let’s get started and understand it step by step.
Step 1:
Create User Guide component with Ember CLI.
$ ember g component user-component/user-guide
Step 2:
Now, We will use Semantic UI while editing Handlebars.
class="user-guide">
class="ui center aligned huge header">User-Input Guide
class="ui center aligned small header">
Please check what is the "Correct Format"?
class="ui segments">
class="ui segment">
class="ui raised segment">
class="ui header">class="file excel icon">
class="content">
CSV Format
</div></div>
class="ui bulleted list">
class="item">The CSV must be uploaded with 5 columns of data.
class="item">Five comma (',') seperated values should be present in the CSV
In this blog post I am going to explain about implementation of inplace table sorting in badgeyay. This is not about just adding the sortable class as described in the semantic docs, but the data inside the table has different characteristics and needs to be sorted in a different manner. Not like the traditional way of comparing strings as it will not be suitable for dates. For creating a custom comparison function for sorting, either we can implement a custom comparator using JQuery or we can use the data values for comparison. The latter option is more preferable as it can be extended to different columns in the table.
Procedure
Adding the sortable class in the table, which needs to be sorted.
<table class=“ui sortable table”>
. . .
</table>
We need to enable a javascript function when DOM completely gets loaded.
After this we need to create a template helper to return us the time stamp from the UTC formatted DateTime string. The value that will be returned by the helper will be used as the data value for the column entries.
Now we need that certain columns do not sort, as there is no need. Such columns are photoURL, actions etc. These columns should be ignored by the sorter for sorting, so we will add a class to avoid sorting of these columns.
Badgeyay is an open source project developed by FOSSASIA Community. This project aims towards giving a platform for badge generation using several customizations options. Current structure of project is in two parts to maintain modularity, which are namely backend, developed in flask, and frontend, developed in ember.
After refactoring the frontend and backend API we need to create a controller for the badge generation in frontend. Controller will help the components to send and receive data from them and prepare the logic for sending request to API so that badges can be generated and can receive the result as response from the server. Particularly we need to create the controller for badge generation route, create-badges.
As there are many customizations option presented to user, we need to chain the requests so that they sync with each other and the logic should not break for the badge generation.
Procedure
Creating the controller from the ember-cli
ember g controller create-badge
After the component generation, we need to create actions that can be passed to components. Let’s build action to submit form and then chain the different actions together for the badge generation.
As we can see in the above code snippet that _this.send(action_name, arguments) is calling another action sendManualData. This action then sends a network request to the backend if the Manual data is selected as input source otherwise will go with the CSV upload. If no option is chosen then it will show an error on the user screen, notifying him to select one input source.
The above code will choose the manual data if the manual data boolean flag is set else not, and then does a network request and wait for the promise to be resolved. As soon as the promise is resolved it calls another action to for the default image.
After selecting the input source, now the background for the badge has to be selected. It will look for the boolean flags of the defaultImage, backgroundColorImage, customImage and will make the network request accordingly.
After the promise resolvement, the final action is called to send badge data payload to backend api for badge generation.
After the complete preparation of the payload, now it’s time to send the payload to the backend api for the badge generation and after the promise resolvement showing the respective downloadable link in the frontend.
Now after the promise resolvement the local variable badgGenerated is set to true so that the success message can be shown in the frontend for successful badge generation along with the link.
A Badge generator like Badgeyay must be able to generate, store and export the user data as and when needed. This blog post covers the addition of a preview section in the badge generator. It is discussed as to how the attributes on preview section are added.
Adding the functionality to badgeyay
Let us see how we implemented this functionality into the frontend of the project.
Step 1 : Adding the helper function
We need to add a helper function for determining the font of the preview items. We define a function “rel”, as in relative, which defines the relative font size according to the chosen one.
exportfunctionrel(params) { var [font_size] = params; var iFont = parseInt(font_size); if (iFont <= 10) { return (iFont * 2.7).toString();
} return (iFont * 2.15).toString();
}
Step 2 : Adding the styling in the scss file
Now we add the required styling in the SCSS file to ensure that the preview appears at the exactly as we desire it to be.
The state of variables inside the preview section changes whenever the user types in a new name or designation etc. The image gets populated once the image is added either using the custom image input or by selecting the default image.
A Badge generator like Badgeyay must be able to generate, store and export the user data as and when needed. This blog post covers the addition of a preview section in the badge generator. It is discussed as to how the feature of toggling the preview section was implemented in the project
Adding the functionality to badgeyay
Let us see how we implemented this functionality into the frontend of the project.
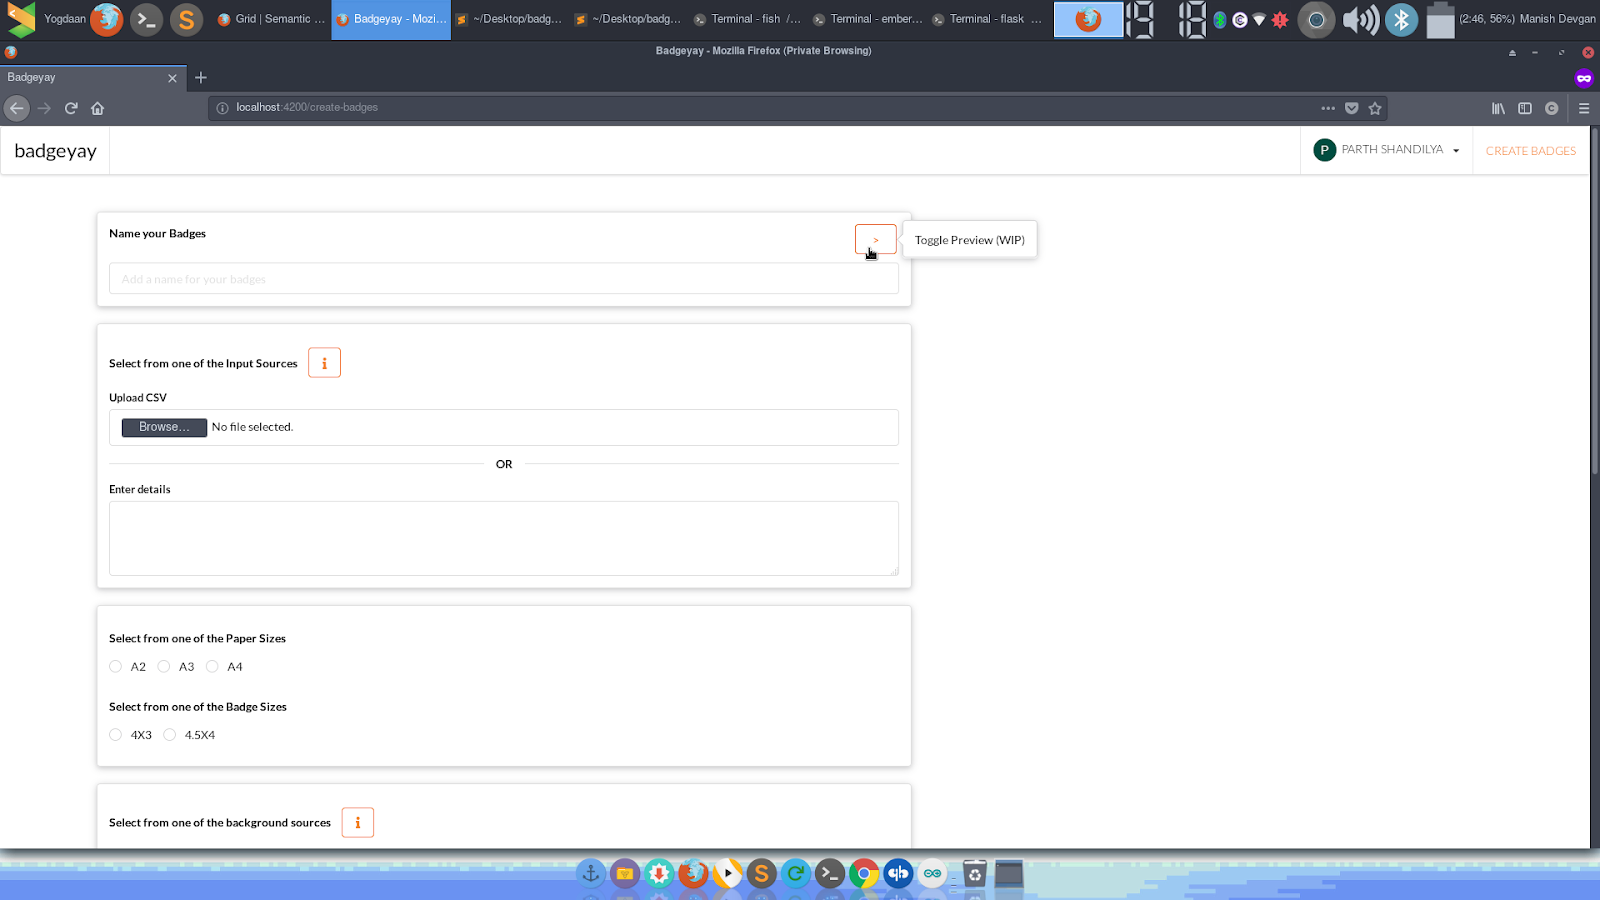
Step 1 : Adding the toggle button to the frontend UI
We add the button to toggle the preview on and off the screen using the standard handlebars convention. We add a button with the action ‘togglePreview’ to toggle the preview section in frontend.
The ‘togglePreview’ function changes the state of the preview, either rendering it on screen or off the screen. This is how we control the preview section being displayed on the screen.


You must be logged in to post a comment.