Getting started with Docker Compose

In this post, I will talk about running multiple containers at once using Docker Compose.

The problem ?

Suppose you have a complex app with Database containers, Redis and what not. How are you going to start the app ? One way is to write a shell script that starts the containers one by one.

docker run postgres:latest --name mydb -d
docker run redis:3-alpine --name myredis -d
docker run myapp -d

Now suppose these containers have lots of configurations (links, volumes, ports, environment variables) that they need to function. You will have to write those parameters in the shell script.

docker network create myapp_default
docker run postgres:latest --name db -d -p 5432:5432 --net myapp_default
docker run redis:3-alpine --name redis -d -p 6379:6379 \
    --net myapp_default -v redis:/var/lib/redis/data
docker run myapp -d -p 5000:5000 --net myapp_default -e SOMEVAR=value \
    --link db:db --link redis:redis -v storage:/myapp/static

Won’t it get un-manageable ? Won’t it be great if we had a cleaner way to running multiple containers. Here comes docker-compose to the rescue.

Docker compose

Docker compose is a python package which does the job of handling multiple containers for an application very elegantly. The main file of docker-compose is docker-compose.yml which is a YAML like syntax file with the settings/components required to run your app. Once you define that file, you can just do docker-compose up to start your app with all the components and settings. Pretty cool, right ?

So let’s see the docker-compose.yml for the fictional app we have considered above.

version: '2'

services:
  db:
    image: postgres:latest
    ports:
      - '5432:5432'

  redis:
    image: 'redis:3-alpine'
    command: redis-server
    volumes:
      - 'redis:/var/lib/redis/data'
    ports:
      - '6379:6379'

  web:
    build: .
    environment:
      SOMEVAR: value
    links:
      - db:db
      - redis:redis
    volumes:
      - 'storage:/myapp/static'
    ports:
      - '5000:5000'

volumes:
  redis:
  storage:

Once this file is in the project’s root directory, you can use docker-compose up to start the application. It will run the services in the order in which they have been defined in the YAML file.

Docker compose has a lot of commands that generally correspond to the parameters that docker runaccepts. You can see a full list on the official docker-compose reference.

Conclusion

It’s no doubt that docker-compose is a boon when you have to run complex applications. It personally use Compose in every dockerized application that I write. In GSoC 16, I dockerized Open Event. Here is the docker-compose.yml file if you are interested.

PS – If you liked this post, you might find my other posts on Docker interesting. Do take a look and let me know your views.


{{ Repost from my personal blog http://aviaryan.in/blog/gsoc/docker-compose-starting.html }}

Continue ReadingGetting started with Docker Compose

sTeam Docker Image

(ˢᵒᶜⁱᵉᵗʸserver) aims to be a platform for developing collaborative applications.
sTeam server project repository: sTeam.
sTeam-REST API repository: sTeam-REST

DOCKER IT!

What is Docker?

Docker is open source software to pack, ship and run any application as a lightweight container. Containers are completely hardware and platform independent so you don’t have to worry about whether what you are creating will run everywhere.

In order to facilitate development in all the environments and give the user the ease from the cumbersome installation steps a docker image was made for the sTeam project.
This docker image contains all the necessary dependencies to start the sTeam server.
It also includes the sTeam UI and the Rest API along with it’s dependencies. These have already been installed and developer can start collaborating to it.

docker-image

The docker image can be found at :


https://hub.docker.com/r/ajinkya007/societyserver/

It has all the necessary information for it’s usage and installation.

The dockerfile for the sTeam repository:


FROM ubuntu:latest
RUN apt-get update
RUN apt-get install -y wget git firefox nodejs nodejs-legacy npm
RUN apt-get install -y build-essential mysql-server libmysqld-dev bzip2 libjpeg$
RUN apt-get install -y pike7.8 pike7.8-bzip2 pike7.8-svg
RUN apt-get install -y libxml2-dev libxslt1-dev automake flex
RUN npm install -g npm bower gulp coffee-script jasmine-node frisby
RUN cd home
RUN wget -c https://raw.githubusercontent.com/societyserver/sTeam/steam-package$
RUN git clone www.github.com/societyserver/steam.git
RUN cd sTeam
RUN git checkout societyserver-source
RUN ./build
RUN sudo ./install
RUN cd ..
RUN git clone https://github.com/societyserver/sTeam-web-interface-gsoc-2015.git
RUN cd sTeam-web-interface-gsoc-2015
RUN npm install
RUN cd ..
RUN git clone https://github.com/societyserver/steam-rest.git
RUN cd steam-rest
RUN npm install

Feel free to explore the repository. Suggestions for improvements are welcomed.

Checkout the FOSSASIA Idea’s page for more information on projects supported by FOSSASIA.

Continue ReadingsTeam Docker Image

Small Docker images using Alpine Linux

Everyone likes optimization, small file sizes and such.. Won’t it be great if you are able to reduce your Docker image sizes by a factor of 2 or more. Say hello to Alpine Linux. It is a minimal Linux distro weighing just 5 MBs. It also has basic linux tools and a nice package manager APK. APK is quite stable and has a considerable amount of packages.

apk add python gcc

In this post, my main motto is how to squeeze the best out of AlpineLinux to create the smallest possible Docker image. So let’s start.

Step 1: Use AlpineLinux based images

Ok, I know that’s obvious but just for the sake of completeness of this article, I will state that prefer using Alpine based images wherever possible. Python and Redis have their official Alpine based images whereas NodeJS has good unoffical Alpine-based images. Same goes for Postgres, Ruby and other popular environments.

Step 2: Install only needed dependencies

Prefer installing select dependencies over installing a package that contains lots of them. For example, prefer installing gcc and development libraries over buildpacks. You can find listing of Alpine packages on their website.

Pro Tip – A great list of Debian v/s Alpine development packages is at alpine-buildpack-deps Docker Hub page (scroll down to Packages). It is a very complete list and you will always find the dependency you are looking for.

Step 3: Delete build dependencies after use

Build dependencies are required by components/libraries to build native extensions for the platform. Once the build is done, they are not needed. So you should delete the build-dependencies after their job is complete. Have a look at the following snippet.

RUN apk add --virtual build-dependencies gcc python-dev linux-headers musl-dev postgresql-dev \
    && pip install -r requirements.txt \
    && apk del build-dependencies

I am using --virtual to give a label to the pacakages installed on that instance and then when pip install is done, I am deleting them.

Step 4: Remove cache

Cache can take up lots of un-needed space. So always run apk add with --no-cache parameter.

RUN apk add --no-cache package1 package2

If you are using npm for manaing project dependencies and bower for managing frontend dependencies, it is recommended to clear their cache too.

RUN npm cache clean && bower cache clean

Step 5: Learn from the experts

Each and every image on Docker Hub is open source, meaning that it’s Dockerfile is freely available. Since the official images are made as efficient as possible, it’s easy to find great tricks on how to achieve optimum performance and compact size in them. So when viewing an image on DockerHub, don’t forget to peek into its Dockerfile, it helps more than you can imagine.

Conclusion

That’s all I have for now. I will keep you updated on new tips if I find any. In my personal experience, I found AlpineLinux to be worth using. I tried deploying Open Event Server on Alpine but faced some issues so ended up creating a Dockerfile using debain:jessie. But for small projects, I would recommend Alpine. On large and complex projects however, you may face issues with Alpine at times. That maybe due to lack of packages, lack of library support or some other thing. But it’s not impossible to overcome those issues so if you try hard enough, you can get your app running on Alpine.


{{ Repost from my personal blog http://aviaryan.in/blog/gsoc/docker-using-alpine.html }}

Continue ReadingSmall Docker images using Alpine Linux

Writing your first Dockerfile

In this tutorial, I will show you how to write your first Dockerfile. I got to learn Docker because I had to implement a Docker deployment for our GSoC project Open Event Server.

First up, what is Docker ? Basically saying, Docker is an open platform for people to build, ship and run applications anytime and anywhere. Using Docker, your app will be able to run on any platform that supports Docker. And the best part is, it will run in the same way on different platforms i.e. no cross-platform issues. So you build your app for the platform you are most comfortable with and then deploy it anywhere. This is the fundamental advantage of Docker and why it was created.

So let’s start our dive into Docker.

Docker works using Dockerfile (example), a file which specifies how Docker is supposed to build your application. It contains the steps Docker is supposed to follow to package your app. Once that is done, you can send this packaged app to anyone and they can run it on their system with no problems.

Let’s start with the project structure. You will have to keep Dockerfile at the root of your project. A basic project will look as follows –

- app.py
- Dockerfile
- requirements.txt
- some_app_folder/
-   some_file
-   some_file

Dockerfile starts with a base image that decides on which image your app should be built upon. Basically “Images” are nothing but apps. So for example you want your run your application in Ubuntu 14.04 VM, you use ubuntu:14.04 as the base image.

FROM ubuntu:14.04
MAINTAINER Your Name <your@email.com>

These are usually the first two lines of a Dockerfile and they specify the base image and Dockerfile maintainer respectively. You can look into Docker Hub for more base images.

Now that we have started our Dockerfile, it’s time to do something. Now think, if you are trying to run your app on a new system of Ubuntu, what will be the first step you will do… You update the package lists.

RUN apt-get update

You may possibly want to update the packages too.

RUN apt-get update
RUN apt-get upgrade -y

Let’s explain what’s happening. RUN is a Docker command which instructs to run something on the shell. Here we are running apt-get update followed by apt-get upgrade -y on the shell. There is no need for sudo as Docker already runs commands with root user previledges.

The next thing you will want to do now is to put your application inside the container (your Ubuntu VM). COPY command is just for that.

RUN mkdir -p /myapp
WORKDIR /myapp
COPY . .

Right now we were at the root of the ubuntu instance i.e. in parallel with /var, /home, /root etc. You surely don’t want to copy your files there. So we create a ‘myapp’ directory and set it as WORKDIR (project’s directory). From now on, all commands will run inside it.

Now that copying the app has been done, you may want to install it’s requirements.

RUN apt-get install -y python python-setuptools python-pip
RUN pip install -r requirements.txt

You might be thinking why am I installing Python here. Isn’t it present by default !? Well let me tell you that base image ‘ubuntu’ is not the Ubuntu you are used with. It just contains the bare essentials, not stuff like python, gcc, ruby etc. So you will have to install it on your own.

Similarly if you are installing some Python package that requires gcc, it will not work. When you are struck in a issue like that, try googling the error message and most likely you will find an answer. :grinning:

The last thing remaining now is to run your app. With this, your Dockerfile is complete.

CMD python app.py

Building the app

To build the app run the following command.

docker build -t myapp .

Then to run the app, execute docker run myapp.

Where to go next

Refer to the official Dockerfile reference to learn more Dockerfile commands. Also you may find my post on using Travis to test Docker applications interesting if you want to automate testing of your Docker application.

I will write more blog posts on Docker as I learn more. I hope you found this one useful.


{{ Repost from my personal blog http://aviaryan.in/blog/gsoc/dockerfile-basic.html }}

Continue ReadingWriting your first Dockerfile

Testing Docker Deployment using Travis

Hello. This post is about how to setup automated tests to check if your application’s docker deployment is working or not. I used it extensively while working on the Docker deployment of the Open Event Server. In this tutorial, we will use Travis CI as the testing service.

To start testing your github project for Docker deployment, first add the repo to Travis. Then create a.travis.yml in the project’s root directory.

In that file, add docker to services.

services:
  - docker

The above will enable docker in the testing environment. It will also include docker-compose by default.

Next step is to build your app and run it. Since this is a pre-testing step, we will add it in the install directive.

install:
  - docker build -t myapp .
  - docker run -d -p 127.0.0.1:80:4000 --name myapp myapp

The 4000 in the above text is assuming your app runs on port 4000 inside the container. Also it is assumed that Dockerfile is in the root of the repo.

So now that the docker app is running, it’s time to test it.

script:
  - docker ps | grep -i myapp

The above will test if our app is in one of the running docker processes. It is a basic test to see if the app is running or not.

We can go ahead and test the app’s functionality with some sample requests. Create a file test.py with the following contents.

import requests

r = requests.get('http://127.0.0.1/')
assert 'HomePage' in r.content, 'No homepage loaded'

Then run it as a test.

script:
  - docker ps | grep -i myapp
  - python test.py

You can make use of the unittest module in Python to bundle and create more organized tests. The limit is the sky here.

In the end, the .travis.yml will look something like the following

language: python
python:
  - "2.7"

install:
  - docker build -t myapp .
  - docker run -d -p 127.0.0.1:80:4000 --name myapp myapp

script:
  - docker ps | grep -i myapp
  - python test.py

So this is it. A basic tutorial on testing Docker deployments using the awesome Travis CI service.

Feel free to share it and comment your views.


{{ Repost from my personal blog http://aviaryan.in/blog/gsoc/docker-test.html }}

Continue ReadingTesting Docker Deployment using Travis

Dockerizing PHP and Mysql application

Docker Introduction

Docker is based on the concept of building images which contain the necessary software and configuration for applications. We can also build distributable images that contain pre-configured software like an Apache server, Caching server, MySQL server, etc. We can share our final image on the Docker HUB to make it accessible to everyone.

First we need to install docker on our local machine. Steps to install docker for ubuntu

Prerequisites

  • Docker requires a 64-bit installation regardless of your Ubuntu version.
  • Your kernel must be 3.10 at minimum. The latest 3.10 minor version or a newer maintained version are also acceptable.

To check your current kernel version, open a terminal and use uname -r to display your kernel version:

$ uname -r
3.11.0-15-generic

Update your apt sources

Docker’s APT repository contains Docker 1.7.1 and higher. To set APT to use packages from the new repository:

  1. Log into your machine as a user with sudo or root privileges.
  2. Open a terminal window.
  3. Update package information, ensure that APT works with the https method, and that CA certificates are installed.
     $ sudo apt-get update
     $ sudo apt-get install apt-transport-https ca-certificates
    
  4. Add the new GPG key.
    $ sudo apt-key adv --keyserver hkp://p80.pool.sks-keyservers.net:80 --recv-keys 58118E89F3A912897C070ADBF76221572C52609D
    
  5. Open the /etc/apt/sources.list.d/docker.list file in your favorite editor.If the file doesn’t exist, create it.
  6. Remove any existing entries.
  7. Add an entry for your Ubuntu operating system
  8. On Ubuntu Trusty 14.04 (LTS)
    deb https://apt.dockerproject.org/repo ubuntu-trusty main
    
  • Save and close the /etc/apt/sources.list.d/docker.list file.
  • Update the APT package index.
    $ sudo apt-get update

For Ubuntu Trusty, Wily, and Xenial, it’s recommended to install the linux-image-extra kernel package. The linux-image-extra package allows you use the aufs storage driver.

Install both the required and optional packages.

$ sudo apt-get install linux-image-generic-lts-trusty

INSTALL

Log into your Ubuntu installation as a user with sudo privileges.

  1. Update your APT package index.
    $ sudo apt-get update
    
  2. Install Docker.
    $ sudo apt-get install docker-engine
    
  3. Start the docker daemon.
    $ sudo service docker start
    
  4. Verify docker is installed correctly.
    $ sudo docker run hello-world
    

    This command downloads a test image and runs it in a container. When the container runs, it prints an informational message. If it runs successfully then docker is installed.

Docker Images

Docker images are the basis of containers. An image can be considered a class definition. We define its properties and behavior. To browse the available images, we can visit the Docker HUB and run docker pull <image> to download them to the host machine.

Listing images on the host

$ docker images

REPOSITORY          TAG                 IMAGE ID            CREATED             SIZE
ubuntu              14.04               1d073211c498        3 days ago          187.9 MB
busybox             latest              2c5ac3f849df        5 days ago          1.113 MB
training/webapp     latest              54bb4e8718e8        5 months ago        348.7 MB

Working with Dockerfile

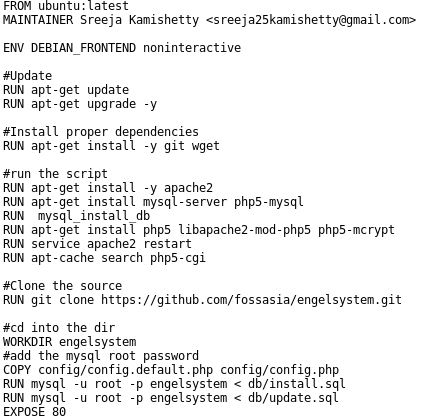
Create a Dockerfile in your PHP project. This is the docker file for engelsystem.

Our Dockerfile is now complete and ready to be built:

Screenshot from 2016-07-18 09:08:52

Building the Image

The docker build . command will build the Dockerfile inside the current directory:

Our image is now labeled and tagged. The final step is to push it to the Docker HUB. This step is optional, but it’s still useful if we’re planning on sharing the image and and helping others with their development environment.

Continue ReadingDockerizing PHP and Mysql application