Using SUSI as your dictionary

SUSI can be taught to give responses from APIs as well. I made use of an API called Datamuse which is a premier search engine for English words, indexing 10 million unique words and phrases in more than 1000 dictionaries and glossaries.

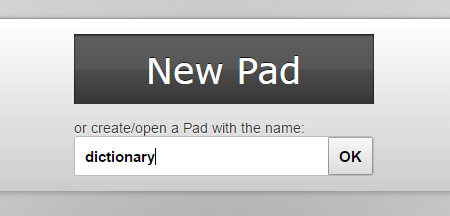
1. First, we head towards creating our dream pad for creating rules for the skill. To do this we need to create a dream at dream.susi.ai and give it a name, say dictionary.

2. After that one needs to go to the API and check the response generated.

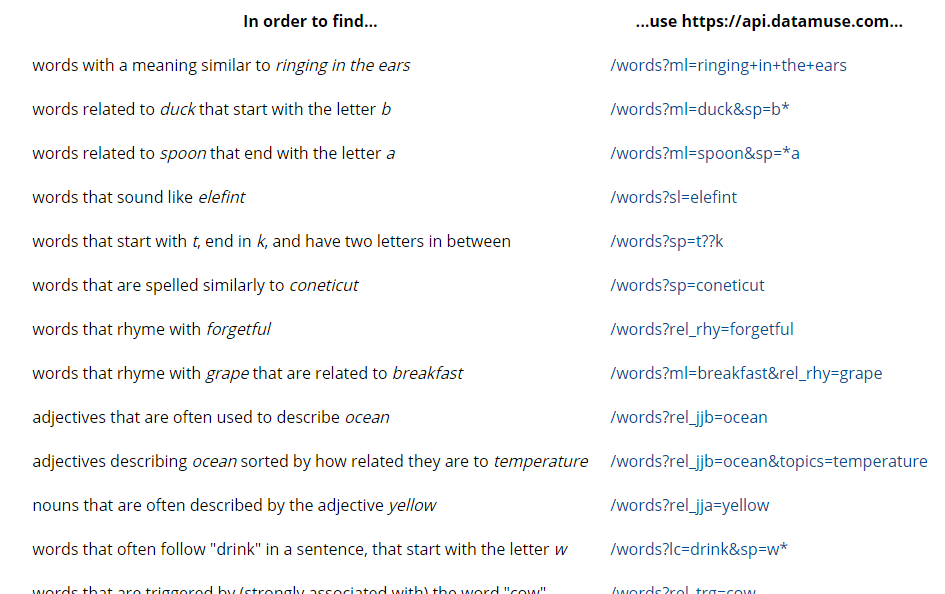
3. Going through the docs of the API, one can create various queries to produce informative responses as follows –

  • Word with a similar meaning.

define *| Meaning of *| one word for *

!console: $word$
{
"url":"https://api.datamuse.com/words?ml=$1$",
"path":"$.[0]"
}
eol
  • Word related to something that start with a given letter.

word related to * that start with the letter *

!console: $word$
{
"url":"https://api.datamuse.com/words?ml=$1$&sp=$2$*",
"path":"$.[0]"
}
eol

  • Word that sound like a given word..

word that sound like *|sounding like *

!console: $word$
{
"url":"https://api.datamuse.com/words?sl=$1$",
"path":"$.[0]"
}
eol

  • Words that are spelled similarly to a given word.

words that are spelled similarly to *| similar spelling to *| spelling of *

!console: $word$
{
"url":"https://api.datamuse.com/words?sp=$1$",
"path":"$.[0]"
}
eol

  • Word that rhyme with a given word.

rhyme *| word rhyming with *

!console: $word$
{
"url":"https://api.datamuse.com/words?rel_rhy=$1$",
"path":"$.[0]"
}
eol

  • Adjectives that are often used to describe a given word.

adjective to describe *|show adjective for *|adjective for *

!console: $word$
{
"url":"https://api.datamuse.com/words?rel_jjb=$1$",
"path":"$.[0]"
}
eol

  • Suggestions for a given word.

suggestions for *| show words like *| similar words to * | words like *

!console: $word$
{
"url":"https://api.datamuse.com/sug?s=$1$",
"path":"$.[0]"
}
eol

This is a sample query response for define *

To create more dictionary skills go to http://dream.susi.ai/p/dictionary and add skills from the API. To contribute by adding more skills, send a pull request to the susi_skill_data.  To test the skills, you can go to chat.susi.ai

Continue ReadingUsing SUSI as your dictionary

20 Amazing Things SUSI can do for You

SUSI.AI has a collection of varied skills in numerous fields such as knowledge, entertainment, problem solving, small-talk, assistants etc. Here’s a list of top skills which SUSI possesses.

Knowledge Based

  1. Ask SUSI to describe anything.

Sample Queries describe *

  1. Ask SUSI the distance between any two cities.

Sample queries – distance between * and *|What is distance between * and * ?| What is distance between * and *         

  1. Ask SUSI about your site’s rank.

Sample Query – site rank of *                

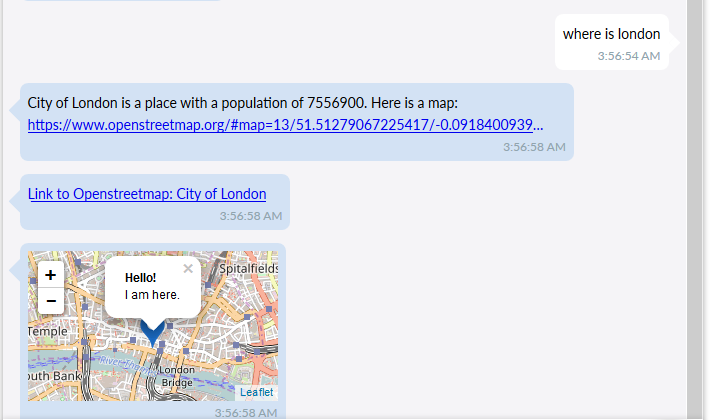
  1. Ask SUSI to know the location of any place.

Sample Queries – where is *


  1. Ask SUSI the time in any city.

 Sample Query – current time in *


  1. Ask SUSI the weather information of any city.

Sample Queries – temperature in * , hashtags * *, mentions * *, weather in *, Tell me about humidity in *|What is humidity in *|Humidity in *|* Humidity, Tell me tomorrow’s weather in *|Weather forecast of *


  1. Ask SUSI to wiki about anything.

Sample Query – wiki *


  1. Ask SUSI about any word, words etc.

Sample Queries – define *| Meaning of *| one word for *, word related to * that start with the letter *, word that sound like *|sounding like *, words that are spelled similarly to *| similar spelling to *| spelling of *, rhyme *| word rhyming with *, adjective to describe *|show adjective for *|adjective for *, suggestions for *| show words like *| similar words to * | words like *

  1. Ask SUSI about a day in the calendar.

Sample Queries – Date * ?, Day * ?, Day on year * month * date *?


  1. Ask to convert a currency to USD for you. 

Sample Queries –  convert * to USD


Problem Solving Based

  1. Ask SUSI to solve a problem for you in Mathematics.

  Sample Queries – compute *| Compute *| Calculate *| calculate *


Entertainment Based

  1. Ask SUSI to draw a card for you.

Sample Query – draw a card


  1. Ask SUSI to toss a coin for you.

Sample Query – flip a coin


  1. Ask SUSI to tell you a Big Bang Theory Joke.

Sample Query – * big bang theory| tell me about big bang theory|geek jokes|geek joke|big bang theory *

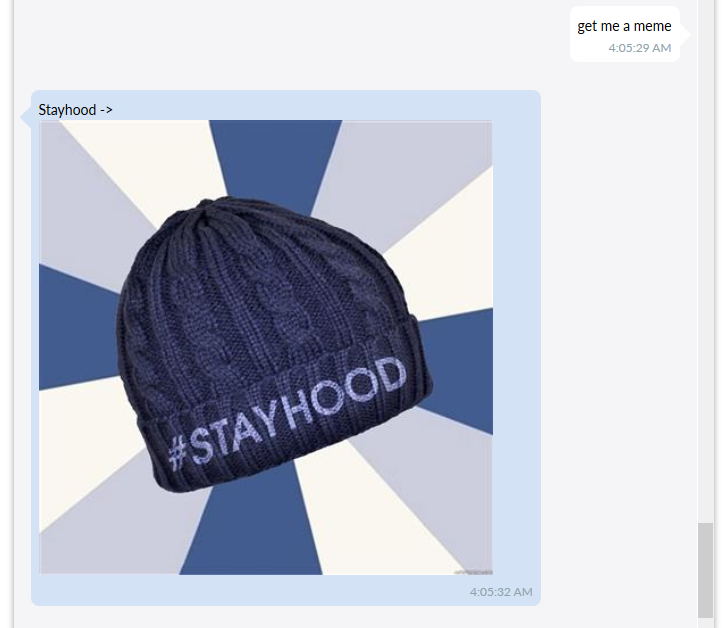
  1. Ask SUSI to generate a meme for you.

 Sample Query – get me a meme


  1. Ask SUSI to give you a recipe. 

Sample Queries – * cook *, cook *|how to cook *|recipe for


  1. Ask SUSI to tell you a random joke.

Sample Queries – tell me a joke|recite me a joke|entertain me

  1. Ask SUSI to give you a random gif.

Sample Query – random gif


Assistants

  1. Ask SUSI to translate something for you

Sample Queries – What is * in french|french for * , What is * in german|german for *, What is * in spanish|spanish for *,  What is * in hindi|hindi for *

  1. Ask SUSI to search anything for you.

Sample Queries – search *|query *|duckduckgo *


To contribute to the above skills you can follow the tutorial here. To test or chat with SUSI you can go to chat.susi.ai

Continue Reading20 Amazing Things SUSI can do for You

Using Flux to embed SUSI’s API Service in a Chat System.

To embed SUSI’s API Service in a chat-like system, I needed a view which could populate the content dynamically and maintain the state of the Application at the same time. Flux follows a unidirectional data flow path and I used this feature to the advantage of the Chat Application to maintain the real time state of the Chat View.

A Flowchart model of Flux looks like

flux flowchart


src: https://github.com/facebook/flux

Flux uses a dispatcher service to render its views, thus making the data flow in a unidirectional path. When a user reacts with a React view (here through the TextArea in the chat system), the view propagates an action through the dispatcher service, to the various stores that hold the application’s data and finally update the views that are affected. Here’s another flowchart model from the website which helps one understand the model in a better way.

flux flow

For the current Chat Application, I used a single Message Store which contained all the event listeners to detect any change in the view. For example, when I send a “Hey” to SUSI, an action is called to Dispatch this message to the Message Store with an ActionType  “CREATE_MESSAGE”. This store then renders the message in the Message Section View.

Here is an example snippet from the Actions.js file which performs an action of type CREATE_MESSAGE and dispatches the messages to the MessageStore.js.

export function createMessage(text, currentThreadID) {
let message = ChatMessageUtils.getCreatedMessageData(text, currentThreadID);
ChatAppDispatcher.dispatch({
type: ActionTypes.CREATE_MESSAGE,
message
});
ChatWebAPIUtils.createMessage(message);
};

The response from the message is generated as soon as another ActionType named

“CREATE_SUSI_MESSAGE” is dispatched to the store, thereby rendering the SUSI’s response generated in the view.

The file ChatConstants.js which declares all the ActionTypes.

import keyMirror from 'keymirror';

export default {

  ActionTypes: keyMirror({
    CREATE_MESSAGE: null,
    RECEIVE_RAW_CREATED_MESSAGE: null,
    CREATE_SUSI_MESSAGE: null,
    RECEIVE_SUSI_MESSAGE: null,
    RECEIVE_RAW_MESSAGES: null
  })

};

To get the message up on the view, I have used the following utils to call the API, render the messages to the view and call the different actions. Here’s a code snippet from ChatMessageUtils.js

export function createMessage(message) {
  ChatExampleDataServer.postMessage(message, createdMessage => {
    Actions.receiveCreatedMessage(createdMessage, message.id);
  });
  ChatExampleDataServer.postSUSIMessage(message, createdMessage => {
    Actions.createSUSIMessage(createdMessage, message.threadID);
  });
};

To know more about the project join us on Gitter at gitter.im/fossasia/susi_webchat, or to contribute go to https://github.com/fossasia/chat.susi.ai/.

A demo application can be found running at http://chat.susi.ai.

Resources –

To know more about Flux you can visit the following websites.

Continue ReadingUsing Flux to embed SUSI’s API Service in a Chat System.

Using Picasso library in SUSI Android

SUSI is an artificial intelligence for chatbots which have the ability to reply in most intuitive way through different types of answers such as images, charts, maps and text. Hence for the image displays in the SUSI Android client we need an image loading library which can help us to cache the images in the app. There are a few options available which include Glide and Picasso. Both of these libraries are open sourced. After some research we finally came up to use Picasso as it provides more additional features in comparison to Glide.

Picasso is an image downloading library. It is an open source library. It is published and maintained by Square. It allows the developer to display an image from the external URL of the image. It provides caching of image in just a few lines of code. Previously without this library it was very difficult to download and display the image and required a lot more lines of code. But with the help of Picasso this task is reduced to just a few lines of code.

How to use Picasso?

To use Picasso in our project we must add the dependency of the library in build.gradle file.

dependencies {
  ...
  compile "com.squareup.picasso:picasso:2.4.0"
  ...
}

Let us define an imageView in which we want to load the image with the help of Picasso Library.

<ImageView
   android:layout_width="wrap_content"
   android:layout_height="wrap_content"
   android:id="@+id/imageView"
   android:layout_alignParentTop="true"
   android:layout_centerHorizontal="true">
</ImageView>


Now we are all set to download the image with the help of Picasso library in the following way:-

//Initialize ImageView
ImageView imageView = (ImageView) findViewById(R.id.imageView);

//Loading image from below url into imageView

Picasso.with(this)
  .load("IMAGE URL")
  .into(imageView);

Picasso also provide the function for setting placeholders and error images to be shown if there is any problem in the downloading of the image.

Picasso.with(this)
   .load("YOUR IMAGE URL HERE")
   .placeholder(R.drawable.ic_placeholder) 
   .error(R.drawable.ic_error_fallback)         
   .into(imageView);

Now let us see the implementation of Picasso in Susi Android

In the Susi app we are storing the link of images coming from response in the imageList.

if (imageList == null || imageList.size() == 0) {

  holder.linkPreviewImageView.setVisibility(View.GONE);

} else {

  Picasso.with(context).load(imageList.get(0))

          .fit().centerCrop()

          .into(holder.linkPreviewImageView);
  }

Here we are passing the activity context to the Picasso library. We can use additional features like fit() and centerCrop() method the way we are using in the Susi app. These methods are fit the image at the center of the imageView.

Screenshots from the Susi App

Picasso Library also provides some additional functions as well like:-

Picasso.with(this)
    .load("YOUR IMAGE URL HERE")        
    .placeholder(R.drawable.ic_placeholder)   // optional        
    .error(R.drawable.ic_error_fallback)      // optional        
    .resize(250, 200)                        // optional        
    .rotate(90)                             // optional        
    .into(imageView);

You can find more about Picasso from this link.

Continue ReadingUsing Picasso library in SUSI Android

Routing in Loklak Search SPA Hosted on GitHub-Pages

Single page applications like Loklak Search, are the ones which only have a single physical HTML page but has many different logical pages. This is achieved with the help of JavaScript, and angular provides strong abstraction to help the developers write the logical pages and Angular Router manages which page to display when a particular view is demanded. The Angular Router manages the URL state and the state of corresponding components.

Overview:

Now it’s important to understand how the routing works. In every web application structure, there is an index.html file, for SPA this is the only one single physical HTML page. This page is served when the base url is requested, ie. the web server gives this file to the client when the client requests for the base url of the application, in our case http://loklak.net/, This index.html page contains all the JS and CSS required by the application to work, which are loaded, as normal HTTP requests. When the javascript is loaded, the control of the application is governed by Angular which manages all the components, views and routes. When a user demands some route, the angular updates the view with the required components that are required to show the contents of that route.


It’s important to note here that no further simple requests are made by the client for any resource, angular is the one which controls all such requests. When we define routes in angular, say /search, we tell it what is the component which should be shown to the user when the route is /search, whenever the user navigates to such route angular shows the appropriate component, there is no request made by the client to the server for any such routes.


In Fact, the server doesn’t even know of such route, as they are defined in angular itself not, on the server side. The important fact is now what happens when the client refreshes the page when route /search is the URL, now the request is sent to the server which doesn’t know which page to serve when such request comes, so it will throw a 404: Page Not Found error.

Solution:

The solution to this situation is pretty straight forward, the server instead of throwing the 404 page, returns with the same index.html page. This makes the problem go away entirely, the server responds with the same page always, this page has the javascript to load and give control to angular, which when loaded, resolves which page to show according to the URL. This is a clean simple solution to the SPA routing problem. But this only works when you have access to Server Code, and you can request the server to respond with the same page whatever be the URL.

The problem with gh-pages:

But Loklak Search is deployed on gh-pages, and thus we don’t have any access to the server side code, to display the page of our requirements. GitHub pages just serve the HTML file which matches the corresponding URL, plain simple server. Now if on gh-pages we request for /search route it will respond with a 404 Error, as it is unable to find the search.html file in the directory.

How it is achieved in Loklak Search?

Loklak search is also deployed on gh-pages, to have a workaround to this problem we take advantage of the page served by gh-pages when the requested page is not found. When 404 error occur gh-pages responds with the 404.html file if it exists in the repository, else it responds with a default 404 page. We use this 404.html page to be able to load our main index.html page.


Here we have our 404.html file which is served by gh-pages whenever some url which is not unknown is requested

  • Here we first store the actual location which was requested by the user in the session storage.
  • Then we do a Redirective Refresh using the meta tag, to the root page ie. to load index.html which is known to gh-pages and is served.

https://gist.github.com/hemantjadon/9581dd0b4907c567b2a90eb949c5cbbc.js

<!-- 404.html -->
<!doctype html>
<html>
   <head>
  <!-- This stores the URL the user was attempting to go to in sessionStorage, and then redirects all 404 responses to the app’s index.html page -->
      <scrpt>
         sessionStorage.redirect = location.href;
      </scrpt>
         <meta http-equiv="refresh" content="0;URL='http://loklak.net/'">
      </meta>
   </head>
   <body>
   </body>
</html>

And then in our index.html after loading the angular and all the resources, we run a function, it takes out the redirect key stored in session storage, and compare it to the current location.

If the locations don’t match, we replace the history state with the with the redirect and this time as angular is already loaded it knows which page to show to the user.

<!-- index.html -->

...

...

<scrpt>

   (function(){
     var redirect = sessionStorage.redirect;
     delete sessionStorage.redirect;
     if (redirect && redirect != location.href) {
        history.replaceState(null, null, redirect);
     }
   })();

</scrpt>

...

...

Resources and links

Continue ReadingRouting in Loklak Search SPA Hosted on GitHub-Pages

Implementing DuckDuckGo Api in SUSI Android

As we know that Susi is an open source intelligent chatbot, it must be able to reply with user’s query on any topic. Therefore we have implemented DuckDuckGo API in Susi Android(https://github.com/fossasia/susi_android) which will help us to generate search result for the query asked by the user.


DuckDuckGo is an API which provides instant search results. This basically works as a search engine having information about various things. The most important thing about DuckDuckGo is that it is non tracking. It does not track its users and show results based on their search history. Thus the search results remain uniform across all the clients irrespective of their search history. The information inside the API is fed from more than 120 different independent sources. This is what makes it different from other search engines. The response in the form of answers include different types of links, description, categories, and definition about various stuffs.

For more details about the Api please check this link.


API endpoints:

http://api.duckduckgo.com/?q=DuckDuckGo&format=json

This is one of the links generated to test the api. Here we can see different parameters, the parameter q is the query parameter where we write our question/query to get the response from the API. The format here defines the format in which we want the response to be. Here in this case we are obtaining the response in the form of JSON which can be parsed to obtain the desired result in the client.

The response obtained by the following query is as follow:-

{  

  "DefinitionSource":"",

  "Heading":"DuckDuckGo",

  "ImageWidth":340,

  "RelatedTopics":[  

     {  

        "Result":"<a href=\"https://duckduckgo.com/Names_Database\">Names Database</a> - The Names Database is a partially defunct social network, owned and operated by Classmates.com, a wholly owned subsidiary of United Online. The site does not appear to be significantly updated since 2008, and has many broken links and display issues.",

        "Icon":{  

           "URL":"",

           "Height":"",

           "Width":""

        },

        "FirstURL":"https://duckduckgo.com/Names_Database",

        "Text":"Names Database - The Names Database is a partially defunct social network, owned and operated by Classmates.com, a wholly owned subsidiary of United Online. The site does not appear to be significantly updated since 2008, and has many broken links and display issues."

     }

}


Implementation in Susi android

In Susi Android we are using Retrofit library by Square for API calling. Retrofit is one of the best libraries present for the network calling. It helps the developer to migrate from the old way of using AsyncTask in the Android app which creates a lot of mess and ugly code.

For the implementation in Susi Android, we have made a WebSearchClient class that stores the base address for the API calling.

public class WebSearchClient {

  public static final String BASE_URL = "http://api.duckduckgo.com";

  private static Retrofit retrofit = null;


  public static Retrofit getClient() {

      if (retrofit==null) {

          retrofit = new Retrofit.Builder()

                  .baseUrl(BASE_URL)

                  .addConverterFactory(GsonConverterFactory.create())

                  .build();

      }

      return retrofit;

  }

}

To get the response we call the API with get method passing the query and format parameter in the following way.


public interface WebSearchService {


  @GET("/?format=json&pretty=1")

  Call<WebSearch> getresult(@Query("q") String query);

}


The results obtained from the server in the form of JSON is parsed in the form of objects in this way:-


public class WebSearch{


  @SerializedName("Heading")

  @Expose

  private String heading;


  @SerializedName("RelatedTopics")

  @Expose

  private List<RelatedTopics> relatedTopics;


  public WebSearch(String heading, List<RelatedTopics> relatedTopics) {

      this.heading = heading;

      this.relatedTopics = relatedTopics;

  }


public class RelatedTopics {


  @SerializedName("FirstURL")

  @Expose

  private String url;


  @SerializedName("Text")

  @Expose

  private String text;


  @SerializedName("Icon")

  @Expose

  private WebIcon icon;


  @SerializedName("Result")

  @Expose

  private String result;


  public RelatedTopics(String url, String text, WebIcon icon) {

      this.url = url;

      this.text = text;

      this.icon = icon;

  }


At the end after setting up all the above things, we call the API and store the result in the realm or local storage.

final WebSearchService apiService = WebSearchClient.getClient().create(WebSearchService.class);


Call<WebSearch> call = apiService.getresult(webquery);


call.enqueue(new Callback<WebSearch>() {

  @Override

  public void onResponse(Call<WebSearch> call, Response<WebSearch> response) {

      Log.e(TAG, response.toString());

      if (response.body() != null ) {

          realm.beginTransaction();

          RealmList<WebSearchModel> searchResults = new RealmList<>();


    }
}

This completes the calling of DuckDuckGo API and storing the results in the database.

To know more about API calling using Retrofit you can refer to this link.

Continue ReadingImplementing DuckDuckGo Api in SUSI Android

Using HTTMock to mock Third Party APIs for Development of Open Event API server

In the process of implementing the connected social media in Open Event API server, there was a situation where we need to mock third party API services like Google OAuth, Facebook Graph API. In mocking, we try to run our tests on APIs Simulation instead of Original API such that it responds with dummy data similar to original APIs.

To implement this first we need the library support in our Orga Server to mock APIs, so the library that was used for this purpose is the httmock library for Python. One of my mentors @hongquan helped me to understand the approach that we will follow to get this implemented. So according to implementation, when we make a HTTP request to any API through tests then our implementation with httmock will be such that it

  • stands in the middle of the request,
  • Stops the request from going to the original API,
  • and returns a dummy response as if the response is from original API.

The content of this response is written by us in the test case. We have to make sure that it is same type of object as we receive from original API.

Steps to follow ( on mocking Google OAuth API )

  1. Look for response object on two requests (OAuth and profile details).
  2. Create the dummy response using the sample response object.
  3. Creating endpoints using the httpmock library.
  4. During test run, calling the specific method with HTTMock

Sample object of OAuth Response from Google is:

{
"access_token":"2YotnFZFEjr1zCsicMWpAA",
"token_type":"Bearer",
"expires_in":3600,
"refresh_token":"tGzv3JOkF0XG5Qx2TlKWIA",
"example_parameter":"example_value"
}

and from the sample object of Google Profile API we needed the link of profile for our API-server:

{'link':'http://google.com/some_id'}


Creating the dummy response

Creating dummy response was easy. All I had to do is provide proper header and content in response and use @urlmatch decorator

# response for getting userinfo from google

@urlmatch(netloc='https://www.googleapis.com/userinfo/v2/me')
def google_profile_mock(url, request):
   headers = {'content-type': 'application/json'}
   content = {'link':'http://google.com/some_id'}
   return response(200, content, headers, None, 5, request)

@urlmatch(netloc=r'(.*\.)?google\.com$')
def google_auth_mock(url, request):
   headers = {'content-type': 'application/json'}
   content = {
       "access_token":"2YotnFZFEjr1zCsicMWpAA",
       "token_type":"Bearer",
       "expires_in":3600,
       "refresh_token":"tGzv3JOkF0XG5Qx2TlKWIA",
       "example_parameter":"example_value"
   }
   return response(200, content, headers, None, 5, request)


So now we have the end points to mock the response. All we need to do is to use HTTMock inside the test case.

To use this setup all we need to do is:

with HTTMock(google_auth_mock, google_profile_mock):
                self.assertTrue('Open Event' in self.app.get('/gCallback/?state=dummy_state&code=dummy_code',
                                                          follow_redirects=True).data) 
            self.assertEqual(self.app.get('/gCallback/?state=dummy_state&code=dummy_code').status_code, 302)
            self.assertEqual(self.app.get('/gCallback/?state=dummy_state&code=dummy_code').status_code, 302)

And we were able to mock the Google APIs in our test case. Complete implementation in FOSSASIA API-Server can be seen here


Continue ReadingUsing HTTMock to mock Third Party APIs for Development of Open Event API server

Visualising Data acquired by loklak Aggregation API

Data is always more interesting to look at when it is visualised by means of graphs and various plots rather than just viewing data as raw json or xml. There are various open source libraries available for visualising data. The one which I will be using today is called morris.js. Although it does not provide a lot of plots but it is extremely simple to use and can be of great help when quick data visualisation is required.

This blog shows one of the many ways in which data obtained from loklak service can be visualised using morris.js. This is same library which I am using presently to build MultiLinePlotter app whicch will soon be displayed on Loklak app store.

What is morris.js?

It is an open source library for drawing graphs using javascript. Presently it provides APIs to draw line charts, area charts, bar charts and donut charts. To know more about morris.js please visit this link.

Loklak aggregation service

A loklak search result can also contain field aggregations if they are requested in the api call. Fields to be aggregated must be listed in the fields attribute in the api request. The following url is an example for requesting aggregation on hashtags and mentions:

http://api.loklak.org/api/search.json?q=spacex%20since:2015-04-01%20until:2015-04-06&source=cache&count=0&fields=mentions,hashtags&limit=6

‘created_at’ is a special field which will return a date histogram if mentioned in the fields attribute. To know more about the loklak aggregation service and the loklak project in general please visit this link.

Getting started

An example of morris.js can be found here. Feel free to browse this code to see morris.js in working.

So what we will be doing today is plotting a simple bar chart using morris.js and the data returned by loklak aggregation service. For this we will be using the following api call :

https://api.loklak.org/api/search.json?callback=JSON_CALLBACK&q=fossasia%20since:2015-12-10&source=cache&count=0&fields=created_at

The above request will return an date histogram for the query fossasia, that is, date vs number of tweets containing the term ‘fossasia’.

So the first thing that we need to do is create a directory for this project and create a file named index.html in it. This is the only file we will be requiring.

Next we need to add morris.js and its dependencies:

<link rel="stylesheet" href="//cdnjs.cloudflare.com/ajax/libs/morris.js/0.5.1/morris.css">
    <script type="text/javascript" src="//ajax.googleapis.com/ajax/libs/jquery/1.9.0/jquery.min.js"></script>
    <script type="text/javascript" src="//cdnjs.cloudflare.com/ajax/libs/raphael/2.1.0/raphael-min.js"></script>
    <script type="text/javascript" src="//cdnjs.cloudflare.com/ajax/libs/morris.js/0.5.1/morris.min.js"></script>

This will add the css and js script files for morris.js and its dependencies : Jquery and Raphael.
Next we need to add the div element that will contain our chart.

<div id="myfirstchart" style="height: 380px;margin-top:50px;overflow-x: auto;"></div>

The most important thing to note over here is that the div must have an id so that we can refer it later from our js code.

Next comes the most important and interesting part : adding the js code that will fetch the data and plot the bar chart.
The first thing that the script will do is make an ajax call to the above mentioned url and get the data.This is done using the following code :

$.ajax({
          url: "https://api.loklak.org/api/search.json?callback=JSON_CALLBACK&q=fossasia%20since:2015-12-10&source=cache&count=0&fields=created_at",
          jsonp: "callback",
          dataType: "jsonp",
          success: function( response ) {
              data=[];
              for (var date in response.aggregations.created_at) {
                  data.push({day: date, tweets: response.aggregations.created_at[date]});
              }
              console.log(data);
              plotData(data);
          }
      });

It is to be noted here that a callback function is provided in the url and data type is set to jsonp and not json.This is done to avoid cross origin resource sharing (CORS) issue so that our browser does not block the ajax request.
Once our request is successful we populate the data array from the response returned to us.
We iterate over all the key value pairs present in the created_at object and add them as individual objects in the data array. This will be required in the next part.

Next we have to plot the data acquired by us. For this we will be using plotData(data) function as written below:

function plotData(data) {
          Morris.Bar({
              element: 'myfirstchart',
            data: data,
            xkey: 'day',
       ykeys: ['tweets'],
            labels: ['tweets']
          });
      }

We send this function the data array we created earlier. Inside this function we create a Morris.Bar object which takes an object as parameter. The object has the following properties:

‘element’ : This takes the id of the div where we want to load the chart.

‘data’ : This is the data array we created earlier and passed to this function. It is the data to plot.It is an array of objects containing the x and y  attributes.

xkey’ : A string containing the name of the attribute that contains X labels.

‘ykeys’ : A list of strings containing names of attributes that contain Y values (one for each series of data to be plotted).

‘labels’ : A list of strings containing labels for the data series to be plotted (corresponding to the values in the ykeys option).

That’s it. These are the basic parameters required to plot a bar chart using morris.js. Simple enough, isn’t it!!

Here is the complete js code:

<script type="text/javascript">
      $.ajax({
          url: "https://api.loklak.org/api/search.json?callback=JSON_CALLBACK&q=fossasia%20since:2015-12-10&source=cache&count=0&fields=created_at",
          jsonp: "callback",
          dataType: "jsonp",
          success: function( response ) {
              data=[];
              for (var date in response.aggregations.created_at) {
                  data.push({day: date, tweets: response.aggregations.created_at[date]});
              }
              console.log(data);
              plotData(data);
          }
      });
      function plotData(data) {
          Morris.Bar({
              element: 'myfirstchart',
              data: data,
              xkey: 'day',
              ykeys: ['tweets'],
              labels: ['tweets']
          });
      }
    </script>

Next, open terminal and navigate to your project directory containing the index.html file, then execute the following command:

Python -m SimpleHTTPServer

As the command suggests, it starts a simple HTTP server at port 8000.

So next ,as you might have already guessed, fire up your favourite browser and visit http://127.0.0.1:8000 and you will be able to see the chart present below.

Python’s simple HTTP server comes in handy if you are developing a frontend app and you want to test it on real small screen devices. For example if you want to test it on your mobile then just connect your computer and your mobile to your router, start python http server on your computer, find out your computer’s ip address (ifconfig) and visit http://<computer’s ip address>:8000 on your mobile. You will be able to view your app on your mobile. If you don’t use a router then create_ap may help.

Important Resources

  • Find more information on morris.js here
  • Visit Loklak apps GitHub page here
  • You can find a similar implementation of the above tutorial here
Continue ReadingVisualising Data acquired by loklak Aggregation API

Custom Views in Susi Android App

Android provides us with the ability to have different views for your App. These views help in the formation of the UI element of the application. These includes imageView, textView and layouts such as LinearLayout and FrameLayout etc. The view hierarchy of Android looks something like this.

The problem with these views is that we cannot modify them according to our own need inside the application. This is what we faced during the making of chat bubble layout for Susi Android App (https://github.com/fossasia/susi_android). We wanted to implement the chat bubble similar to Whatsapp that resizes and position the time textView according to size of the response coming from the server ie something like this as shown in the screenshot. Therefore we finally came up the solution of using Custom views inside the app that allowed us to modify the view the way we wanted.


So now lets us understand how we can make custom views by extending existing views

So first question that comes in our mind is why are we extending existing views if we want to make our own. The reason behind this is that extending an existing view provides us with ability to have all the features that are there in an existing view.

On top of that we can add our own functionality into it. Now see below how we can implement it.

It’s time for some actual code.

As we can see in the code below that here we made our own custom class called ValueSelector. This class is extending the existing layout which is RelativeLayout. The first constructor used in the above class which takes context as the parameter is used to create an instance of the view programmatically. The second constructor used which takes context and AttributeSet as parameters is used to inflate the view from the XML.

While the third constructor is used to define the base classes.

public class ValueSelector extends RelativeLayout {

   View rootView;
   TextView valueTextView;
   View minusButton;
   View plusButton;

   public ValueSelector(Context context) {
       super(context);
       init(context);
   }

   public ValueSelector(Context context, AttributeSet attrs) {
       super(context, attrs);
       init(context);
   }

   private void init(Context context) {
       //do setup work here
   }

The init method used here is to inflate the views and to get the reference of all the child view.

private void init(Context context) {
   rootView = inflate(context, R.layout.value_selector, this);
   valueTextView = (TextView) rootView.findViewById(R.id.valueTextView);

   minusButton = rootView.findViewById(R.id.minusButton);
   plusButton = rootView.findViewById(R.id.plusButton);

   minusButton.setOnClickListener(new View.OnClickListener() {
       @Override
       public void onClick(View v) {
           decrementValue(); //we'll define this method later
       }
   });

   plusButton.setOnClickListener(new View.OnClickListener() {
       @Override
       public void onClick(View v) {
           incrementValue(); //we'll define this method later        }
   });
}

Let’s now see the implementation of CustomViews in Susi Android.


public class ChatBubbleLayout extends FrameLayout {


  public ChatBubbleLayout(Context context) {

      super(context);

  }


  public ChatBubbleLayout(Context context, AttributeSet attrs) {

      super(context, attrs);

  }


  public ChatBubbleLayout(Context context, AttributeSet attrs, int defStyleAttr) {

      super(context, attrs, defStyleAttr);

  }


  @TargetApi(21)

  public ChatBubbleLayout(Context context, AttributeSet attrs, int defStyleAttr, int defStyleRes) {

      super(context, attrs, defStyleAttr, defStyleRes);

  }


  @Override

  protected void onMeasure(int widthMeasureSpec, int heightMeasureSpec) {

      super.onMeasure(widthMeasureSpec, heightMeasureSpec);

  }


In Susi Android app we are making our own custom view for the chat bubble layout, the view is extending the FrameLayout. Here we are overriding onMeasure method. This method is used for defining the constraint of the layout relative to that of the parent view. With the help of this we can set how big or small our layout will be.

Now lets us see the design of the custom view in Susi app.


      You can learn more about the custom views from this link.

Continue ReadingCustom Views in Susi Android App

Using wrapper div around HTML buttons to add extra functionality in Open Event Server

Open Event server had a bug wherein clicking on the notification of an invitation caused a server error. When invitations for a role in an event were sent, they showed up in the notifications header. Clicking on the notification there took the user to the notification page where there were options to Accept or Decline the invitation. The bug was that when the user clicked on either of the Accept/Decline button, the notification was not being marked read which semantically it should have been. Since the invite link expires after acceptance/decline, due to the persistence of the invitation in the notifications page, when the user clicked on the Accept/Decline button, it ran into a 404 error.

The Accept/Decline buttons already have a href attached to each one of them which triggered functions of invitation manager class. The aim here was to add one other thing to happen when any of these buttons was clicked. This bug was resolved by adding a wrapper around these buttons and adding the same functionality to this as that of the ‘Mark as Read’ button.

Adding a class to both the buttons

<a href='{accept_link}' class='btn btn-success btn-sm invite'>Accept</a>
<a href='{decline_link}' class='btn btn-danger btn-sm invite'>Decline</a>


Adding JavaScript to the invite button

if ($(e.target).is('.invite')) {
            var read_button = $(e.target).parents(".notification").find('a.read-btn');
            $.getJSON(read_button.attr('href'), function (data) {
                       read_button.parents('.notification').removeClass('info'); // show notification as read
                read_button.remove(); // delete mark as read button
});
Using parseInt() with Radix

Another error [comment] in the same issue was that sometimes the notification count went in negatives. This was resolved by adding a simple clause to check when notification count is greater than 0.

notif_count = ((notif_count - 1) > 0 ) ? (notif_count - 1) : 0;


To set count as the innerHTML of a div, which in this case was the notification count bubble, one uses parseInt();

div.innerHTML = parseInt(notif_count);

This might work but codacy gives an error. The error here is because of a radix not being passed to the parseInt() function.

What is a radix?
Radix simply denotes the integer value of the base of the numeration system. It is basically the value of a single digit in a given number.

For example, numbers written in binary notation have radix 2 while those written in octal notation have radix 8.

Passing radix to the parseInt() function specifies the number system in which the input is to be parsed. Though the radix can be hinted at by other means too, it is always a good practice to pass the radix explicitly.

// leading 0 => radix 8 (octal) 
var number = parseInt('0101');
// leading ‘0x’ => radix 16 (hexadecimal) 
var number = parseInt('0x0101');
// Numbers starting with anything else assumes a radix of 10 
var number = parseInt('101');
// specifying the radix explicitly, here radix of 2 => (binary) 
var number = parseInt('0101', 2);


If you ignore this argument, parseInt() will try to choose the most proper numeral system, but this can back-fire due to browser inconsistencies. For example:

parseInt("023");  // 23 in one browser (radix = 10)
parseInt("023");  // 19 in other browser (radix = 8)


Providing the radix is vital if you are to guarantee accuracy with variable input (basic range, binary, etc). This can be ensured by using a JavaScript linter for your code, which will throw an error for unintended results.

Issues :
Error on clicking on notification

Pull Request :
Fix error on clicking on notification

Additional Resources:

Continue ReadingUsing wrapper div around HTML buttons to add extra functionality in Open Event Server