Adding JSONAPI Support in Open Event Android App

The Open Event API Server exposes a well documented JSONAPI compliant REST API that can be used in The Open Even App Generator and Frontend to access and manipulate data. So it is also needed to add support of JSONAPI in external services like The Open Even App Generator and Frontend. In this post I explain how to add JSONAPI support in Android.

There are many client libraries to implement JSONAPI support in Android or Java like moshi-jsonapi, morpheus etc. You can find the list here. The main problem is most of the libraries require to inherit attributes from Resource model but in the Open Event Android App we already inherit from a RealmObject class and in Java we can’t inherit from more than one model or class. So we will be using the jsonapi-converter library which uses annotation processing to add JSONAPI support.

1. Add dependency

In order to use jsonapi-converter in your app add following dependencies in your app module’s build.gradle file.

dependencies {
	compile 'com.github.jasminb:jsonapi-converter:0.7'
}

2.  Write model class

Models will be used to represent requests and responses. To support JSONAPI we need to take care of followings when writing the models.

  • Each model class must be annotated with com.github.jasminb.jsonapi.annotations.Type annotation
  • Each class must contain a String attribute annotated with com.github.jasminb.jsonapi.annotations.Id annotation
  • All relationships must be annotated with com.github.jasminb.jsonapi.annotations.Relationship annotation

In the Open Event Android we have so many models like event, session, track, microlocation, speaker etc. Here I am only defining track model because of its simplicity and less complexity.

@Type("track")
public class Track extends RealmObject {

        	@Id(IntegerIdHandler.class)
        	private int id;
        	private String name;
        	private String description;
        	private String color;
        	private String fontColor;
        	@Relationship("sessions")
        	private RealmList<Session> sessions;

        	//getters and setters
}

Jsonapi-converter uses Jackson for data parsing. To know how to use Jackson for parsing follow my previous blog.

Type annotation is used to instruct the serialization/deserialization library on how to process given model class. Each resource must have the id attribute. Id annotation is used to flag an attribute of a class as an id attribute. In above class the id attribute is int so we need to specify IntegerIdHandler class which is ResourceHandler in the annotation. Relationship annotation is used to designate other resource types as a relationship. The value in the Relationship annotation should be as per JSONAPI specification of the server. In the Open Event Project each track has the sessions so we need to add a Relationship annotation for it.

3.  Setup API service and retrofit

After defining models, define API service interface as you would usually do with standard JSON APIs.

public interface OpenEventAPI {
    @GET("tracks?include=sessions&fields[session]=title")
    Call<List<Track>> getTracks();
}

Now create an ObjectMapper & a retrofit object and initialize them.

ObjectMapper objectMapper = OpenEventApp.getObjectMapper();
Class[] classes = {Track.class, Session.class};

OpenEventAPI openEventAPI = new Retrofit.Builder()
                    .client(okHttpClient)
                    .baseUrl(Urls.BASE_URL)
                    .addConverterFactory(new JSONAPIConverterFactory(objectMapper, classes))
                    .build()
                    .create(OpenEventAPI.class);


The classes array instance contains a list of all the model classes which will be supported by this retrofit builder and API service. Here the main task is to add a JSONAPIConverterFactory which will be used to serialize and deserialize data according to JSONAPI specification. The JSONAPIConverterFactory constructor takes two parameters ObjectMapper and list of classes.

4.  Use API service  

Now after setting up all the things according to above steps, you can use the openEventAPI instance to fetch data from the server.

openEventAPI.getTracks();

Conclusion

JSON API is designed to minimize both the number of requests and the amount of data transmitted between clients and servers

Continue ReadingAdding JSONAPI Support in Open Event Android App

Keep updating Build status in Meilix Generator

One of the problems we faced while working Meilix Generator was to provide user with the status of the custom ISO build in the Meilix Generator web app so we came up with the idea of checking the status of the link generated by the web app. If the link is available the status code would be 200 otherwise it would be 404.

We have used python script for checking the status of URL. For generating URL, we use the tag name which will be used as a variable to generate the URL of the unique event user wants the ISO for and the date will help in generation of link rest of the link remains the same.

tag = os.environ["TRAVIS_TAG"]
date = datetime.datetime.now().strftime('%Y%m%d')
url=https://github.com/xeon-zolt/meilix/releases/download/"+tag+"/meilix-zesty-"+date+"-i386.iso"


Now we will use urllib for monitoring the status of link.

req = Request(url)
    try:
        response = urlopen(req)
    except HTTPError as e:
        return('Building Your Iso')
    except URLError as e:
        return('We failed to reach the server.')
    else:
        return('Build Sucessful : ' + url)


After monitoring the status the next step was to update the status dynamically on the status page.

So we’llll use a status function in the flask app which is used by JavaScript to get status of the link after intervals of time.

Flask :

@app.route('/now')
def status_url():
    return (status())


Javascript:

<script type ="text/javascript">
let url ="/now"
function getstatus(url)
{
    fetch(url).then(function(response){
        return response.text()
    }).then(function(text){
        console.log("status",text)
        document.querySelector("div#status")
        .innerHTML = text
    })
    }
window.onload = function(){
    fetch(url).then(function(response){
        return response.text()
    }).then(function(text){
        console.log("status",text)
        document.querySelector("div#status")
        .innerHTML = text
    })
    window.setInterval(getstatus.bind(null,url),30*1000)
}
/*setInterval(function,interval in millsecs)*/
</script>


This covers various steps to prompt user whether the build is ready or not.

Resource

Continue ReadingKeep updating Build status in Meilix Generator

Implementing Intelligence Feature in Susper

Susper gives answers to your questions using SUSI AI. We want to give users best experience while they are searching for solutions to their questions. To achieve this, we have incorporated with features like infobox and intelligence using SUSI.

Google has this feature where users can ask questions like ‘Who is president of USA?’ and get answers directly without encouraging the users to deep-dive into the search results to know the answer.

Similarly Susper gives answer to the user:

It also gives answer to question which is related to real time data like temperature.


How we have implemented this feature?

We used the API Endpoint of SUSI at http://api.asksusi.com/

Using SUSI API is as simple as sending query as a URL parameter in GET request http://api.susi.ai/susi/chat.json?q=YOUR_QUERY

You can also get various action types in the response. Eg: An anwser type response for http://api.susi.ai/susi/chat.json?q=hey%20susi is:

actions: [
  {
    type: "answer",
    expression: "Hi, I'm Susi"
  }
],


Documentation regarding SUSI is available at here.

Implementation in Susper:

We have created an Intelligence component to display answer related to a question. You can check it here: https://github.com/fossasia/susper.com/tree/master/src/app/intelligence

It takes care about rendering the information and styling of the rendered data received from SUSI API.

The intelligence.component.ts makes a call to Intelligence Service with the required query and the intelligence service makes a GETrequest to the SUSI API and retrieves the results.

Intelligence.component.ts

this.intelligence.getintelligentresponse(data.query).subscribe(res => {
  if (res && res.answers && res.answers[0].actions) {
     this.actions = res.answers[0].actions;
       for (let action of this.actions) {
         if (action.type === 'answer' && action.mood !== 'sabta') {
           this.answer = action.expression;
         } else {
             this.answer = '';
         }
      }
   } else {
       this.answer = '';
   }
});


Intelligence.service.ts

export class IntelligenceService {
 server = 'http://api.susi.ai';
 searchURL = 'http://' + this.server + '/susi/chat.json';
 constructor(private http: Http, private jsonp: Jsonp, private store: Store<fromRoot.State>) {
 }
 getintelligentresponse(searchquery) {
   let params = new URLSearchParams();
   params.set('q', searchquery);
   params.set('callback', 'JSONP_CALLBACK');
   return this.jsonp
     .get('http://api.asksusi.com/susi/chat.json', {search: params}).map(res =>
       res.json()

     );
 }

Whenever the getintelligenceresponse of intelligenceService is called, it creates a URLSearchParams() object and set required parameters in it and send them in jsonp.get request. We also set callback to ‘JSONP_CALLBACK’ to inform the API to send us data in JSONP.

Thereby, the intelligence component retrieves the answer and displays it with search resultson Susper.

Source code for this implementation could be found in this pull:

https://github.com/fossasia/susper.com/pull/569

Resources:

Continue ReadingImplementing Intelligence Feature in Susper

Registering Organizations’ Repositories for Continuous Integration with Yaydoc

Among various features implemented in Yaydoc was the introduction of a modal in the Web Interface used for Continuous Deployment. The modal was used to register user’s repositories to Yaydoc. All the registered repositories then had their documentation updated continuously at each commit made to the repository. This functionality is achieved using Github Webhooks.

The implementation was able to perform the continuous deployment successfully. However, there was a limitation that only the public repositories owned by a user could be registered. Repositories owned by some organisations, which the user either owned or had admin access to couldn’t be registered to Yaydoc.

In order to perform this enhancement, a select tag was added which contains all the organizations the user have authorized Yaydoc to access. These organizations were received from Github’s Organization API using the user’s access token.

/**
 * Retrieve a list of organization the user has access to
 * @param accessToken: Access Token of the user
 * @param callback: Returning the list of organizations
 */
exports.retrieveOrgs = function (accessToken, callback) {
  request({
    url: ‘https://api.github.com/user/orgs’,
    headers: {
      ‘User-Agent’: ‘request’,
      ‘Authorization’: ‘token ’ + accessToken
    }
  }, function (error, response, body) {
    var organizations = [];
    var bodyJSON = JSON.parse(body);
    bodyJSON.forEach(function (organization) {
      organizations.push(organization.login);
    });
    return callback(organizations);
  });
};

On selecting a particular organization from the select tag, the list of repositories is updated. The user then inputs a query in a search input which on submitting shows a list of repositories that matches the tag. An AJAX get request is sent to Github’s Search API in order to retrieve all the repositories matching the keyword.

$(function () {
  ....
$.get(`https://api.github.com/search/repositories?q=user:${username}+fork:true+${searchBarInput.val()}`, function (result) {
    ....
    result.items.forEach(function (repository) {
      options +=<option>+ repo.full_name +</option>’;
    });
    ....
  });
  ....
});

The selected repository is then submitted to the backend where the repository is registered in Yaydoc’s database and a hook is setup to Yaydoc’s CI, as it was happening with user’s repositories. After a successful registration, every commit on the user’s or organization’s repository sends a webhook on receiving which, Yaydoc performs the documentation generation and deployment process.

Resources:

  1. Github’s Organization API: https://developer.github.com/v3/orgs/
  2. Github’s Search API: https://developer.github.com/v3/search/
  3. Simplified HTTP Request Client: https://github.com/request/request
Continue ReadingRegistering Organizations’ Repositories for Continuous Integration with Yaydoc

Customizing Results Count in Susper Angular Front-end

Problem: Earlier users were not having any option to customise results count in Susper.

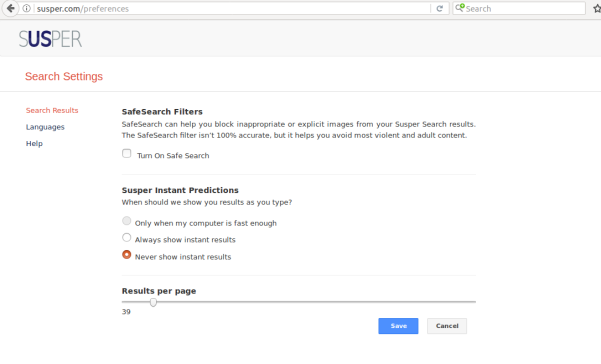
Susper is a Frontend for Peer to Peer Search Engine Yacy built using Angular. So, we implemented ‘results count’ feature and used to have a strict restriction of only 10 results per page. Now, users can customise search results in Susper when instant results are turned off. By default, Susper shows only 10 results per page. If the user requires more results per page he can modify the count of results in Susper. To customise the result count visit http://susper.com/preferences and you will find a range bar to customise the results. Change the value of the range bar to the desired value and save it. (Right now we support only results till maximum size of 100)

How did we implement this feature?

searchsettings.component.html:

<div>
 <h4><strong>Results per page</strong></h4>
 <div class="range-slider">
   <input class="range-slider__range" type="range" [disabled]="instantresults" [(ngModel)]="resultCount" value="100" min="0" max="100">
   <span class="range-slider__value">{{resultCount}}</span>
 </div>

</div>

The user is displayed with a range slider, that could slide between 0 and 100. The value of the range slider is stored in a resultscount variable in search settings component using ngModel.

searchsettings.component.ts: Later when user clicks on save button, it triggers onSave() function.The resultscount is stored into localStorage of the browser and an action is triggered to inform all other components about the change in the value of resultscount.


onSave() {
 if (this.instantresults) {
   localStorage.setItem('instantsearch', JSON.stringify({value: true}));
   localStorage.setItem('resultscount', JSON.stringify({ value: 10 }));
   this.store.dispatch(new queryactions.QueryServerAction({'query': '', start: 0, rows: 10, search: false}));

 } else {
   localStorage.removeItem('instantsearch');
   localStorage.setItem('resultscount', JSON.stringify({ value: this.resultCount }));
   this.store.dispatch(new queryactions.QueryServerAction({'query': '', start: 0, rows: this.resultCount, search: false}));
 }
 this.router.navigate(['/']);
}

app.component.ts

Later new resultscount value is used in other components to request the server for search results with new resultscount.

if (localStorage.getItem('resultscount')) {
 this.store.dispatch(new queryactions.QueryServerAction({'query': '', start: 0, rows: this.resultscount, search: false}));
}

The complete working of Susper’s result count could be seen in this gif


Source code can be found here: https://github.com/fossasia/susper.com/pull/546 .

References

Continue ReadingCustomizing Results Count in Susper Angular Front-end

How to make changes in Meilix Without rebuilding the ISO

We were building Meilix from build scripts from webapp which was taking 20 minutes approx. So to reduce that time we had an idea of using a pre built ISO as it requires fewer resources and less time as compared to the building the ISO from build script and makes modifications in it which would take less time after testing it took approx 8 minutes. The following steps were followed to edit Meilix ISO.

We require following packages for unpacking and repacking the ISO.

  • squashfs-tools
  • Genisoimage

Let’s start by unpacking the ISO. For that, we first mount the ISO.

sudo mount -o loop meilix-zesty-20170611-i386.iso mnt/


Now we extract the content of the ISO into a directory extract-cd and extract the squash file system and move it to edit folder to prepare chroot.

sudo rsync --exclude=/casper/filesystem.squashfs -a mnt/ extract-cd
sudo unsquashfs mnt/casper/filesystem.squashfs
sudo mv squashfs-root edit


Now we can chroot and do the editing we require to do in the ISO.

sudo mount -o bind /run/ edit/run
sudo cp /etc/hosts edit/etc/
sudo mount --bind /dev/ edit/dev
sudo chroot edit


After doing the changes in chroot. For doing changes we can make a separate script to be executed inside the chroot.

exit
EOF
sudo umount edit/dev


After completing all the changes we required in the ISO the important part comes that is repacking the ISO with the applied changes.

Regenerate the manifest.

sudo chmod +w extract-cd/casper/filesystem.manifest
sudo su <<HERE
chroot edit dpkg-query -W --showformat='${Package} ${Version}\n' > extract-cd/casper/filesystem.manifest <<EOF
exit
EOF
HERE
sudo cp extract-cd/casper/filesystem.manifest extract-cd/casper/filesystem.manifest-desktop
sudo sed -i '/ubiquity/d' extract-cd/casper/filesystem.manifest-desktop
sudo sed -i '/casper/d' extract-cd/casper/filesystem.manifest-desktop


Now we compress the file system we have just edited.
For higher compression we can increase the block size or use xz but that will increase the cost of compression time so we didn’t choose it for Meilix as we required a faster method.

sudo mksquashfs edit extract-cd/casper/filesystem.squashfs -noappend


Now we are going to calculate the MD5 sums again for the changes and replace them with the older MD5 sums.

cd extract-cd/ && find . -type f -not -name md5sum.txt -not -path '*/isolinux/*' -print0 | xargs -0 -- md5sum > md5sum.txt


Last step is to go in the edit directory and generate the ISO.

mkisofs \
    -V "Custom Meilix" \
    -r -cache-inodes -J -l \
    -b isolinux/isolinux.bin \
    -c isolinux/boot.cat \
    -no-emul-boot -boot-load-size 4 -boot-info-table \
    -o ../meilix-i386-custom.iso .


This covers all the steps need to make changes in Meilix without rebuilding ISO.

Resources:

Continue ReadingHow to make changes in Meilix Without rebuilding the ISO

Generating Real-Time Graphs in PSLab Android App

In PSLab Android App, we need to log data from the sensors and correspondingly generate real-time graphs. Real-time graphs mean a data streaming chart that automatically updates itself after every n second. This was different from what we did in Oscilloscope’s graph, here we need to determine the relative time at which the data is recorded from the sensor by the PSLab.

Another thing we need to take care of was the range of x axis. Since the data to be streamed is ever growing, setting a large range of the x axis will only make reading sensor data tedious for the user. For this, the solution was to make real time rolling window graph. It’s like when the graph exceeds the maximum range of x axis, the graph doesn’t show the initial plots. For example, if I set that graph should show the data only for the 10-second window when the 11th-second data would be plot, the 1st-second data won’t be shown by the graph and maintains the difference between the maximum and the minimum range of the graph. The graph library we are going to use is MPAndroidChart. Let’s break-down the implementation step by step.

First, we create a long variable, startTime which records the time at which the entire process starts. This would be the reference time. Flags make sure when to reset this time.

if (flag == 0) {
   startTime = System.currentTimeMillis();
   flag = 1;
}


We used Async Tasks approach in which the data is from the sensors is acquired in the background thread and the graph is updated in the UI thread. Here we consider an example of the HMC5883L sensor, which is actually Magnetometer. We are calculating time elapsed by subtracting current time with the sartTime and the result is taken as the x coordinate.

private class SensorDataFetch extends AsyncTask<Void, Void, Void> {
   ArrayList<Double> dataHMC5883L = new ArrayList<Double>();
   long timeElapsed;

   @Override
   protected Void doInBackground(Void... params) {
       
     timeElapsed = (System.currentTimeMillis() - startTime) / 1000;

     entriesbx.add(new Entry((float) timeElapsed, dataHMC5883L.get(0).floatValue()));
     entriesby.add(new Entry((float) timeElapsed, dataHMC5883L.get(1).floatValue()));
     entriesbz.add(new Entry((float) timeElapsed, dataHMC5883L.get(2).floatValue()));
       
     return null;
   }


As we need to create a rolling window graph we require to add few lines of code with the standard implementation of the graph using MPAndroidChart. This entire code is placed under onPostExecute method of AsyncTasks. The following code sets data set for the Line Chart and tells the Line Chart that a new data is acquired. It’s very important to call notifyDataSetChanged, without this the things won’t work.

mChart.setData(data);
mChart.notifyDataSetChanged();


Now, we will set the visible range of x axis. This means that the graph window of the graph won’t change until and unless the range set by this method is not achieved. Here we are setting it to be 10 as we need a 10-second window.

mChart.setVisibleXRangeMaximum(10);

Then we will call moveViewToX method to move the view to the latest entry of the graph. Here, we have passed data.getEntryCount method which returns the no. of data points in the data set.

mChart.moveViewToX(data.getEntryCount());


We will get following results

To see the entire code visit this link.

Resources

Continue ReadingGenerating Real-Time Graphs in PSLab Android App

Flask App to Upload Wallpaper On the Server for Meilix Generator

We had a problem of getting a wallpaper from the user using Meilix Generator and use the wallpaper with the Meilix build scripts to generate the ISO. So, we were required to host the wallpaper on the server and downloaded by Travis CI during the build to include it in the ISO.

A solution is to render HTML templates and access data sent by POST using the request object from the flask. Redirect and url_for will be used to redirect the user once the upload is done and send_from_directory will help us to host the file under the /uploads that the user just uploaded which will be downloaded by the Travis for building the ISO.

We start by creating the HTML form marked with enctype=multipart/form-data.

<form action="upload" method="post" enctype="multipart/form-data">
        <input type="file" name="file"><br /><br />
        <input type="submit" value="Upload">
 </form>


First, we need imports of modules required. Most important is werkzeug.secure_filename().

import os
from flask import Flask, render_template, request, redirect, url_for, send_from_directory
from werkzeug import secure_file


Now, we’ll define where to upload and the type of file allowed for uploading. The path to upload directory on the server is defined by the extensions in app.config which is uploads/ here.

app.config['UPLOAD_FOLDER'] = 'uploads/'
app.config['ALLOWED_EXTENSIONS'] = set(['png', 'jpg', 'jpeg'])


This functions will check for valid extension for the wallpaper which are png, jpg and jpeg in this case defined above in app.config.

def allowed_file(filename):
    return '.' in filename and \
           filename.rsplit('.', 1)[1] in app.config['ALLOWED_EXTENSIONS']


After, getting the name of uploaded file from the user then using above function check if there are allowed file type and store it in a variable filename after that it move the files to the upload folder to save it.

Upload function check if the file name is safe and remove unsupported characters (line 3) after that moves it from a temporal folder to the upload folder. After moving, it renames the file as wallpaper so that the download link is same always which we have used in Meilix build script to download from server.

def upload():
    file = request.files['file']
    if file and allowed_file(file.filename):
        filename = secure_filename(file.filename)
        file.save(os.path.join(app.config['UPLOAD_FOLDER'], filename))
         os.rename(UPLOAD_FOLDER + filename, UPLOAD_FOLDER+'wallpaper')
         filename = 'wallpaper'


At this point, we have only uploaded the wallpaper and renamed the uploaded file to ‘wallpaper’ only. We cannot access the file outside the server it will result in 403 error so to make it available, the uploaded file need to be registered and then hosted using below code snippet.

We can also register uploaded_file as build_only rule and use the SharedDataMiddleware.

@app.route('/uploads/<filename>')
def uploaded_file(filename):
    return send_from_directory(app.config['UPLOAD_FOLDER'],filename)

The hosted wallpaper is used by Meilix in Travis CI to generate ISO using the download link which remains same for the uploaded wallpaper.

Why should we use secure secure_filename() function?

just imagine someone sends the following information as the filename to your app.

filename = "../../../../home/username/.sh"


If the number of ../ is correct and you would join this with your UPLOAD_FOLDER the hacker might have the ability to modify a file on the server’s filesystem that he or she should not modify.

Now, let’s look how the function works.

secure_filename('../../../../home/username/.sh')
'home_username_.sh'

Improving the uploads

We can add validation to the size of the file to be uploaded so that in case a user tries to upload a file too much big that may increase load on the server.

from flask import Flask, Request
app = Flask(__name__)
app.config['MAX_CONTENT_LENGTH'] = 16 * 1024 * 1024

Resources

Continue ReadingFlask App to Upload Wallpaper On the Server for Meilix Generator

Sending Data between components of SUSI MagicMirror Module

SUSI MagicMirror module is a module to add SUSI assistant right on your MagicMirror. The software for MagicMirror constitutes of an Electron app to which modules can be added easily. Since there are many modules, there might be functionalities that need interaction between various modules by transfer of information. MagicMirror also provides a node_helper script that facilitates a module to perform some background tasks. Therefore, a mechanism to transfer information from node_helper to various components of module is also needed.

MagicMirror provides an inbuilt module notification system that can be used to send notification across the modules and a socket notification system to send information between node_helper and various components of the system.

Our codebase for SUSI MagicMirror is divided mainly into two parts. A Main module that handles all the process of hotword detection, speech recognition, calling SUSI API and saving audio after Text to Speech and a Renderer module which performs the task of managing the display of content on the Mirror Screen and playing back the file obtained by Speech Synthesis. Plainly put, Main module mainly handles the backend logic of the application and the Renderer handles the frontend. Main and Renderer module work on different layers of the application and to facilitate communication between them, we need to make a mechanism. A schematic of flow that is needed to be maintained can be highlighted as:

As you can see in the above diagram, we need to transfer a lot of information between the components. We display animation and text based on the current state of recognition in the  module, thus we need to transfer this information frequently. This task is accomplished by utilizing the inbuilt socket notification system in the MagicMirror. For every event like when system enters into listening , busy or recognized speech state, we need to pass message to renderer. To achieve this, we made a rendererSend function to send notification to renderer.

const rendererSend =  (event: NotificationType , payload: any) => {
   this.sendSocketNotification(event, payload);
}

This function takes an event and a payload as arguments. Event tells which event occurred and payload is any data that we wish to send. This method in turn calls the method provided by MagicMirror module to send socket notifications within the module.

When certain events occur like when system enters busy state or listening state, we trigger the rendererSend call to send a socket notification to the module. The rendererSend method is supplied in the State Machine Components available to every state. The task of sending notifications can be done using the code snippet as follows:

// system enters busy state
this.components.rendererSend("busy", {});
// send speech recognition hypothesis text to renderer
this.components.rendererSend("recognized", {text: recognizedText});
// send susi api output json to renderer to display interactive results while Speech Output is performed
this.components.rendererSend("speak", {data: susiResponse});

The socket notification sent via the above method is received in SUSI Module via a callback called socketNotificationReceived . We need to define this callback with implementation while registering module to MagicMirror. So, we register the MMM-SUSI-AI module by adding the definition for socketNotificationReceived method.

Module.register("MMM-SUSI-AI", {
//other function definitions
***
   // define socketNotificationReceived function
   socketNotificationReceived: function (notification, payload) {
       susiMirror.receivedNotification(notification, payload);
   },
***
});

In this way, we send all the notification received to susiMirror object in the renderer module by calling the receivedNotification method of susiMirror object

We can now receive all the notifications in the SusiMirror and update UI. To handle notifications, we define receivedNotification method as follows:

public receivedNotification(type: NotificationType, payload: any): void {

   this.visualizer.setMode(type);
   switch (type) {
       case "idle":
            // handle idle state
           break;
       case "listening":
           // handle listening state
           break;
       case "busy":
           // handle busy state
         break;
       case "recognized":
           // handle recognized state. This notification also contains a payload about the hypothesis text           
           break;
       case "speak":
           // handle speaking state. We need to play back audio file and display text on screen for SUSI Output. Notification Payload contains SUSI Response
           break;
   }
}

In this way, we utilize the Socket Notification System provided by the MagicMirror Electron Application to send data across the components of Magic Mirror module for SUSI AI.

Resources

Continue ReadingSending Data between components of SUSI MagicMirror Module

Shifting from Java to Kotlin in SUSI Android

SUSI Android (https://github.com/fossasia/susi_android) is written in Java. After the announcement of Google to officially support Kotlin as a first class language for Android development we decided to shift to Kotlin as it is more robust and code friendly than Java.

Advantages of Kotlin over Java

  1. Kotlin is a null safe language. It changes all the instances used in the code to non nullable type thus it ensures that the developer don’t get any nullPointerException.
  2. Kotlin provides the way to declare Extensive function similar to that of C#. We can use this function in the same way as we use the member functions of our class.
  3. Kotlin also provides support for Lambda function and other high order functions.

For more details refer to this link.

After seeing the above points it is now clear that Kotlin is much more effective than Java and there is harm in switching the code from Java to Kotlin. Lets now see the implementation in Susi Android.

Implementation in Susi Android

In the Susi Android App we are implementing the MVP design with Kotlin. We are converting the code by one activity each time from java to Kotlin. The advantage here with Kotlin is that it is totally compatible with java at any time. Thus allowing the developer to change the code bit by bit instead of all at once.Let’s now look at SignUp Activity implementation in Susi Android.

The SignUpView interface contains all the function related to the view.

interface ISignUpView {


  fun alertSuccess()

  fun alertFailure()

  fun alertError(message: String)

  fun setErrorEmail()

  fun setErrorPass()

  fun setErrorConpass(msg: String)

  fun setErrorUrl()

  fun enableSignUp(bool: Boolean)

  fun clearField()

  fun showProgress()

  fun hideProgress()

  fun passwordInvalid()

  fun emptyEmailError()

  fun emptyPasswordError()

  fun emptyConPassError()


}

The SignUpActivity implements the view interface in the following way. The view is responsible for all the interaction of user with the UI elements of the app. It does not contain any business logic related to the app.

class SignUpActivity : AppCompatActivity(), ISignUpView {


  var signUpPresenter: ISignUpPresenter? = null

  var progressDialog: ProgressDialog? = null


  override fun onCreate(savedInstanceState: Bundle?) {

      super.onCreate(savedInstanceState)

      setContentView(R.layout.activity_sign_up)

      addListeners()

      setupPasswordWatcher()


      progressDialog = ProgressDialog(this@SignUpActivity)

      progressDialog?.setCancelable(false)

      progressDialog?.setMessage(this.getString(R.string.signing_up))


      signUpPresenter = SignUpPresenter()

      signUpPresenter?.onAttach(this)

  }


  fun addListeners() {

      showURL()

      hideURL()

      signUp()

  }


  override fun onOptionsItemSelected(item: MenuItem): Boolean {

      if (item.itemId == android.R.id.home) {

          finish()

          return true

      }

      return super.onOptionsItemSelected(item)

  }

Now we will see the implementation of models in Susi Android in Kotlin and compare it with Java.

Lets First see the implementation in Java

public class WebSearchModel extends RealmObject {

  private String url;

  private String headline;

  private String body;

  private String imageURL;


  public WebSearchModel() {

  }


  public WebSearchModel(String url, String headline, String body, String imageUrl) {

      this.url = url;

      this.headline = headline;

      this.body = body;

      this.imageURL = imageUrl;

  }


  public void setUrl(String url) {

      this.url = url;

  }


  public void setHeadline(String headline) {

      this.headline = headline;

  }


  public void setBody(String body) {

      this.body = body;

  }


  public void setImageURL(String imageURL) {

      this.imageURL = imageURL;

  }


  public String getUrl() {

      return url;

  }


  public String getHeadline() {

      return headline;

  }


  public String getBody() {

      return body;

  }


  public String getImageURL() {

      return imageURL;

  }

}
open class WebSearchModel : RealmObject {


  var url: String? = null


  var headline: String? = null


  var body: String? = null


  var imageURL: String? = null


  constructor() {}


  constructor(url: String, headline: String, body: String, imageUrl: String) {

      this.url = url

      this.headline = headline

      this.body = body

      this.imageURL = imageUrl

  }

}

You can yourself see the difference and how easily with the help of Kotlin we can reduce the code drastically.

For diving more into the code, we can refer to the GitHub repo of Susi Android (https://github.com/fossasia/susi_android).

Resources

Continue ReadingShifting from Java to Kotlin in SUSI Android