20 Amazing Things SUSI can do for You

SUSI.AI has a collection of varied skills in numerous fields such as knowledge, entertainment, problem solving, small-talk, assistants etc. Here’s a list of top skills which SUSI possesses.

Knowledge Based

  1. Ask SUSI to describe anything.

Sample Queries describe *

  1. Ask SUSI the distance between any two cities.

Sample queries – distance between * and *|What is distance between * and * ?| What is distance between * and *         

  1. Ask SUSI about your site’s rank.

Sample Query – site rank of *                

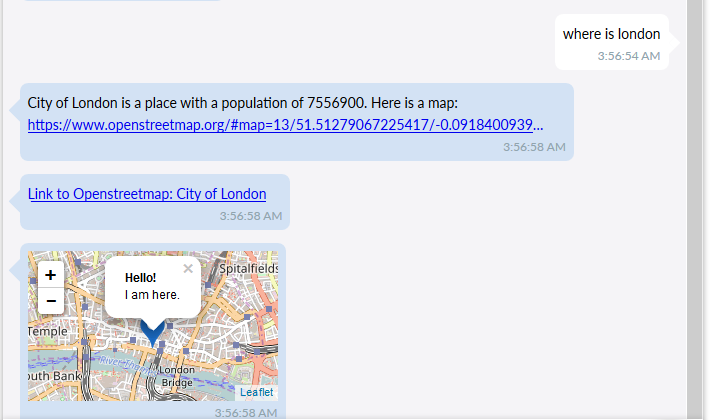
  1. Ask SUSI to know the location of any place.

Sample Queries – where is *


  1. Ask SUSI the time in any city.

 Sample Query – current time in *


  1. Ask SUSI the weather information of any city.

Sample Queries – temperature in * , hashtags * *, mentions * *, weather in *, Tell me about humidity in *|What is humidity in *|Humidity in *|* Humidity, Tell me tomorrow’s weather in *|Weather forecast of *
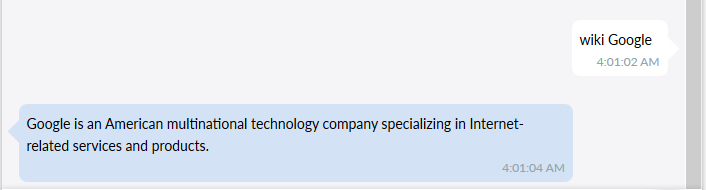
        

  1. Ask SUSI to wiki about anything.

Sample Query – wiki *


  1. Ask SUSI about any word, words etc.

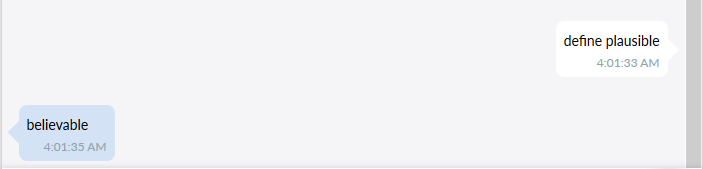
Sample Queries – define *| Meaning of *| one word for *, word related to * that start with the letter *, word that sound like *|sounding like *, words that are spelled similarly to *| similar spelling to *| spelling of *, rhyme *| word rhyming with *, adjective to describe *|show adjective for *|adjective for *, suggestions for *| show words like *| similar words to * | words like *

  1. Ask SUSI about a day in the calendar.

Sample Queries – Date * ?, Day * ?, Day on year * month * date *?


  1. Ask to convert a currency to USD for you. 

Sample Queries –  convert * to USD


Problem Solving Based

  1. Ask SUSI to solve a problem for you in Mathematics.

  Sample Queries – compute *| Compute *| Calculate *| calculate *
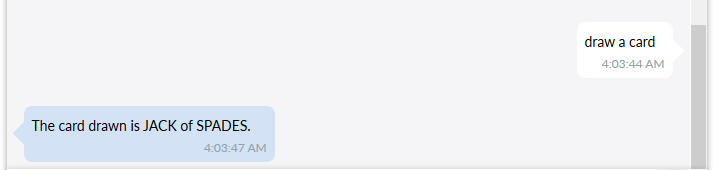
        

Entertainment Based

  1. Ask SUSI to draw a card for you.

Sample Query – draw a card


  1. Ask SUSI to toss a coin for you.

Sample Query – flip a coin


  1. Ask SUSI to tell you a Big Bang Theory Joke.

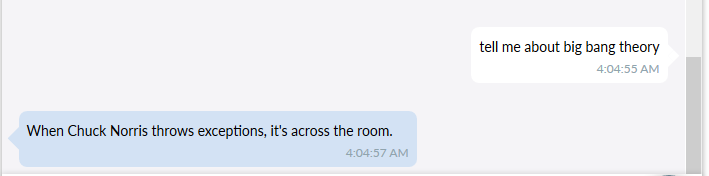
Sample Query – * big bang theory| tell me about big bang theory|geek jokes|geek joke|big bang theory *

  1. Ask SUSI to generate a meme for you.

 Sample Query – get me a meme


  1. Ask SUSI to give you a recipe. 

Sample Queries – * cook *, cook *|how to cook *|recipe for


  1. Ask SUSI to tell you a random joke.

Sample Queries – tell me a joke|recite me a joke|entertain me

  1. Ask SUSI to give you a random gif.

Sample Query – random gif


Assistants

  1. Ask SUSI to translate something for you

Sample Queries – What is * in french|french for * , What is * in german|german for *, What is * in spanish|spanish for *,  What is * in hindi|hindi for *

  1. Ask SUSI to search anything for you.

Sample Queries – search *|query *|duckduckgo *


To contribute to the above skills you can follow the tutorial here. To test or chat with SUSI you can go to chat.susi.ai

Continue Reading20 Amazing Things SUSI can do for You

Using Flux to embed SUSI’s API Service in a Chat System.

To embed SUSI’s API Service in a chat-like system, I needed a view which could populate the content dynamically and maintain the state of the Application at the same time. Flux follows a unidirectional data flow path and I used this feature to the advantage of the Chat Application to maintain the real time state of the Chat View.

A Flowchart model of Flux looks like

flux flowchart


src: https://github.com/facebook/flux

Flux uses a dispatcher service to render its views, thus making the data flow in a unidirectional path. When a user reacts with a React view (here through the TextArea in the chat system), the view propagates an action through the dispatcher service, to the various stores that hold the application’s data and finally update the views that are affected. Here’s another flowchart model from the website which helps one understand the model in a better way.

flux flow

For the current Chat Application, I used a single Message Store which contained all the event listeners to detect any change in the view. For example, when I send a “Hey” to SUSI, an action is called to Dispatch this message to the Message Store with an ActionType  “CREATE_MESSAGE”. This store then renders the message in the Message Section View.

Here is an example snippet from the Actions.js file which performs an action of type CREATE_MESSAGE and dispatches the messages to the MessageStore.js.

export function createMessage(text, currentThreadID) {
let message = ChatMessageUtils.getCreatedMessageData(text, currentThreadID);
ChatAppDispatcher.dispatch({
type: ActionTypes.CREATE_MESSAGE,
message
});
ChatWebAPIUtils.createMessage(message);
};

The response from the message is generated as soon as another ActionType named

“CREATE_SUSI_MESSAGE” is dispatched to the store, thereby rendering the SUSI’s response generated in the view.

The file ChatConstants.js which declares all the ActionTypes.

import keyMirror from 'keymirror';

export default {

  ActionTypes: keyMirror({
    CREATE_MESSAGE: null,
    RECEIVE_RAW_CREATED_MESSAGE: null,
    CREATE_SUSI_MESSAGE: null,
    RECEIVE_SUSI_MESSAGE: null,
    RECEIVE_RAW_MESSAGES: null
  })

};

To get the message up on the view, I have used the following utils to call the API, render the messages to the view and call the different actions. Here’s a code snippet from ChatMessageUtils.js

export function createMessage(message) {
  ChatExampleDataServer.postMessage(message, createdMessage => {
    Actions.receiveCreatedMessage(createdMessage, message.id);
  });
  ChatExampleDataServer.postSUSIMessage(message, createdMessage => {
    Actions.createSUSIMessage(createdMessage, message.threadID);
  });
};

To know more about the project join us on Gitter at gitter.im/fossasia/susi_webchat, or to contribute go to https://github.com/fossasia/chat.susi.ai/.

A demo application can be found running at http://chat.susi.ai.

Resources –

To know more about Flux you can visit the following websites.

Continue ReadingUsing Flux to embed SUSI’s API Service in a Chat System.

Auto Deploying accounts.susi.ai on gh-pages

While migrating web apps from susi server repository to accounts.susi.ai repository. Our team autodeployed accounts.susi.ai on gh-pages branch i.e., each time changes are made to code, it gets auto deployed on gh-pages branch. And changes are automatically live and visible on site.

To do this we have to setup travis in our repository. Travis can be easily set in github repository just by adding .travis.yml file into root directory your repo. Depending on type of repository you are dealing with, the configuration of travis changes. For accounts.susi.ai, It is a written on top of ReactJs framework. So we used the following code.

sudo: required
dist: trusty
language: node_js
node_js:
  - 6
script:
  - npm test
deploy:
  provider: script
  script: "./deploy.sh"
  env:
  global:
  - ENCRYPTION_LABEL: "<.... encryption label from previous step ....>"
  - COMMIT_AUTHOR_EMAIL: "you@example.com"
cache:
  directories:
    - node_modules
branches:
  only:
    - master


The above travis configuration file, After every commit checks whether the build is passing or not by running npm test command. After checking the commit, next script deploy.sh is run on the commit. The last line tells us to only execute this script for commits in master branch. deploy.sh can be placed anywhere, we jus need to modify its path in .tavis.yml file. Here is code of deploy.sh :

#!/bin/bash
set -e 

SOURCE_BRANCH="master"
TARGET_BRANCH="gh-pages"

if [ "$TRAVIS_PULL_REQUEST" != "false" -o "$TRAVIS_BRANCH" != "$SOURCE_BRANCH" ]; then
    echo "Skipping deploy; just doing a build."
    doCompile
    exit 0
fi
# Save some useful information
REPO=`git config remote.origin.url`
SSH_REPO=${REPO}
SHA=`git rev-parse --verify HEAD`

git clone $REPO out
cd out
git checkout $TARGET_BRANCH || git checkout --orphan $TARGET_BRANCH
cd ..
git config user.name "Travis CI"
git config user.email "travis-ci@github.com"

if git diff --quiet; then
    echo "No changes to the output on this push; exiting."
    exit 0
fi

# Commit the "changes", i.e. the new version.
# The delta will show diffs between new and old versions.
git add -A .
git commit -m "Deploy to GitHub Pages: ${SHA}"

# Get the deploy key by using Travis's stored variables to decrypt deploy_key.enc
ENCRYPTED_KEY_VAR="encrypted_${ENCRYPTION_LABEL}_key"
ENCRYPTED_IV_VAR="encrypted_${ENCRYPTION_LABEL}_iv"
ENCRYPTED_KEY=${!ENCRYPTED_KEY_VAR}
ENCRYPTED_IV=${!ENCRYPTED_IV_VAR}
openssl aes-256-cbc -K $ENCRYPTED_KEY -iv $ENCRYPTED_IV -in ../deploy_key.enc -out ../deploy_key -d
chmod 600 ../deploy_key
eval `ssh-agent -s`
ssh-add deploy_key

# Now that we're all set up, we can push.
git push $SSH_REPO $TARGET_BRANCH


deploy.sh is automatically deploying master on gh pages branch. To perform this task, it needs admin authorisation of github repo. We do this authentication by encrypted keys.
To create encrypted keys we need to generate a new SSH key, SSH keys can be generated by running following command in terminal.

ssh-keygen -t rsa -b 4096 -C "your_email@example.com"


Then add this key to your project’s git repository at the github repo of project.

https://github.com/<your name>/<your repo>/settings/keys

Now, We can generate encrypted keys by running following command.

travis encrypt-file deploy_key


This command generates deploy_key.enc file, which shall be placed in the repo. Its location needs to be updated in the placeholders of .travis.yml and deploy.sh.

Hence, we achieved the task of auto deployment to gh-pages in accounts.susi.ai. Please ensure that account through which encrypted keys are created, always have admin access to repository for continued deployment.

Continue ReadingAuto Deploying accounts.susi.ai on gh-pages

Adding Custom Scrollbar to SUSI AI Web Chat

Scrollbar represents the depth of content on your current screen. It appears when the content has overflown the depth of screen and cannot fit it anymore. We see scrollbars everywhere. By default, the scrollbar provided by the browser is not very attractive but efficient in doing its job.

We decided that as our SUSI.AI Web App is improving in both UI and functionality, let’s add a custom scrollbar to it.

Earlier we had a standard  scrollbar in our SUSI.AI webchat:

For adding a custom scrollbar to our web chat we decided to use react-custom-scrollbars npm-package.

Our reasons to choose this package were:

  • Auto Hide feature in the scrollbar, after a specific period of time, which we can modify too.
  • No requirement for extra CSS styles to style our scrollbar.
  • It is well tested and trusted by many developers in open source

To install this npm package:

npm install -S react-custom-scrollbars 

Now comes the usage part, we need to import this into our JavaScript file:

 import { Scrollbars } from 'react-custom-scrollbars';

After importing, wrap it around the data where you want to show a custom scrollbar. In our case it was messageListItems, the code snippet looked like:

<Scrollbars>
 {messageListItems}
</Scrollbars>

This made our scrollbar look much better than the default one:

Now to add Auto Hide functionality to our scrollbar we need to add some attributes to our <Scrollbars>  tag.

    1. autoHide: It allows the auto-hide feature to our scrollbar.
    2. autoHideTimeout: It allows us to set custom time of hiding delay of a scrollbar in milli-seconds.
    3. autoHideDuration: it allows us to set the duration of hiding animation in milliseconds.

After adding the above-mentioned attributes our code changes to:

<Scrollbars
 autoHide
 autoHideTimeout={1000}
 autoHideDuration={200}>
 {messageListItems}
</Scrollbars>

Resources:

A lot more of custom attributes can be found in the documentation of Malte Wessel here.

Testing Link:

Now we had a much better scrollbar for our web chat which can be tested here.

Continue ReadingAdding Custom Scrollbar to SUSI AI Web Chat

How SUSI AI Searches the Web For You

SUSI is now capable of performing web search to answer your queries. When SUSI doesn’t know how to answer your queries, it performs a web search on the client side and displays all the results as horizontally swipeable tiles with each tile giving a brief description and also providing a link to the relevant source.

Lets visit SUSI WebChat and try it out.

Query : Search for Google
Response : <Web Search Results>

How does SUSI know when to perform a websearch?

It uses action types to identify if a web search is to be performed or not. The API Response is parsed to check for the action types and if a websearch action type is present, then an API call is made using the duckduckgo api with the relevant query and the results are displayed as tiles with :

  • Category : The Topic related to the given query
  • Text : The result from the websearch
  • Image : Image related to the query if present
  • Link : A url redirecting to the relevant source

Parsing the actions :

Let us look at the API response for a query.

Sample Query: search for google

Response: <API Response>

"actions": [
  {
    "type": "answer",
    "expression": "Here is a web search result:"
  },
  {
    "type": "websearch",
    "query": "google"
  }
]

Note: The API Response has been trimmed to show only the relevant content

We find a websearch type action and the query to be searched as google . So we now make a API call using duckduckgo api to get our websearch results.

API Call Format : api.duckduckgo.com/?q={query}&format=json

API Call for query google : http://api.duckduckgo.com/?q=google&format=json

And from the duckduckgo API response we generate our websearch tiles showing relevant data using the fields present in each object.

This is the sample object from duckduckgo API response under the RelatedTopics , which we use to create our websearch result tiles.

{
  "Result": "<a href=\"https:\/\/duckduckgo.com\/Google\">Google<\/a> An American multinational technology company specializing in Internet-related services and...",
  "Icon": {
    "URL": "https:\/\/duckduckgo.com\/i\/8f85c93f.png",
    "Height": "",
    "Width": ""
  },
  "FirstURL": "https:\/\/duckduckgo.com\/Google",
  "Text": "Google An American multinational technology company specializing in Internet-related services and..."
},

Let us look at the code for querying data from the API

if (actions.indexOf('websearch')>=0) {

  let actionIndex = actions.indexOf('websearch');
  let query = response.answers[0].actions[actionIndex].query;

  $.ajax({
    url: 'http://api.duckduckgo.com/?format=json&q='+query,
    dataType: 'jsonp',
    crossDomain: true,
    timeout: 3000,
    async: false,

    success: function (data) {
      receivedMessage.websearchresults = data.RelatedTopics;

      if(data.AbstractText){
        let abstractTile = {
          Text:'',
          FirstURL:'',
          Icon:{URL:''},
        }
        abstractTile.Text = data.AbstractText;
        abstractTile.FirstURL = data.AbstractURL;
        abstractTile.Icon.URL = data.Image;
        receivedMessage.websearchresults.unshift(abstractTile);
    }

    let message =  ChatMessageUtils.getSUSIMessageData(
receivedMessage, currentThreadID);

    ChatAppDispatcher.dispatch({
      type: ActionTypes.CREATE_SUSI_MESSAGE,
      message
    });
  },

    error: function(errorThrown) {
      console.log(errorThrown);
      receivedMessage.text = 'Please check your internet connection';
    }

  });

}

Here, from the actions object, we get the query needed to search the web. We then make a ajax call using that query to the duckduckgo API. If the API call succeeds then we collect the required data to create tiles as array of objects and store it as websearchresults. and dispatch the message with the websearchresults which gets reflected in the message store and when passed to the components we use it to create the result tiles.

<MuiThemeProvider>
  <Paper zDepth={0} className='tile'>
    <a rel='noopener noreferrer'
    href={tile.link} target='_blank'
    className='tile-anchor'>
    {tile.icon &&
    (<Paper className='tile-img-container'>
      <img src={tile.icon}
      className='tile-img' alt=''/>
     </Paper>
    )}
  <Paper className='tile-text'>
    <p className='tile-title'>
      <strong>
        {processText(tile.title,'websearch-rss')}
      </strong>
    </p>
    {processText(tile.description,'websearch-rss')}
  </Paper>
  }
  </a>
  </Paper>
</MuiThemeProvider>

We then display the tiles as horizontally swipeable carousel ensuring a good and interactive UX.

React-Slick module was used to implement the horizontal swiping feature.

function renderTiles(tiles){

if(tiles.length === 0){
  let noResultFound = 'NO Results Found';
  return(<center>{noResultFound}</center>);
}

let resultTiles = drawTiles(tiles);

var settings = {
  speed: 500,
  slidesToShow: 3,
  slidesToScroll: 1,
  swipeToSlide:true,
  swipe:true,
  arrows:false
};

return(
    <Slider {...settings}>
      {resultTiles}
    </Slider>
);

}

Here we are handling the corner case when there are no results to display by rendering `NO Results found`. We then have our web search results displayed as swipeable tiles with a image, title, description and link to the source.

This is how SUSI performs web search to respond to user queries ensuring that no query goes unanswered! Don’t forget to swipe left and go through all the results displayed!

Resources

Continue ReadingHow SUSI AI Searches the Web For You

React Routes to Deploy 404 page on gh-pages and surge

Web applications need 404 page to handle broken urls. If we can have a productive 404 page we can keep users with our application. This is how we made 404 page to SUSI.AI web chat application.
React routes ?
We use react routes to navigate throughout the application.we have to define which page to go from each and every route. If user is trying to go to broken Link application should show 404 page.
In the SUSI Web Chat application we have setuped routes in index.js file which is on the root of the application.

<Router history={hashHistory}>
        <MuiThemeProvider>
            <Switch>
                <Route exact path="/" component={ChatApp} />
                <Route exact path="/signup" component={SignUp} />
                <Route exact path="/logout" component={Logout} />
                <Route exact path="/forgotpwd" component={ForgotPassword} />
                <Route exact path="*" component={NotFound} />
            </Switch>
        </MuiThemeProvider>
    </Router>


“<Route exact path=”*” component={NotFound} />”  This line defines the 404 page route . this should be defined after all other routes. Because application should first search for defined routes.If the requested route is not defined, Application should show the 404 route.
To use these JSX elements we have to import this dependency on top of the index.js

import {
    BrowserRouter as Router,
    Route,
    Switch,
    hashHistory
} from 'react-router-dom';


After you define like this It will work correctly on your localhost after you deployed it on gh-pages or surge it will not be work there as we wish.
When we try to access URL directly or when we try to access wrong URL it will redirect to default github 404 page.

After we built our application we get static index.html file and another set of files.when we try to access chat.susi.ai it will load index.html file. If we access another url it will automatically loads default github pages 404 page.
So we can do a little hack for use direct URLs like this .
We can add same copy of index.html file as 404.html then user tries to go to different URL instead of chat.susi.ai It loads our 404.html file since it contains all other routes it redirects to the correct route.if there is no matching route it shows our 404 page instead of default github pages 404 page.
Since all our deployment tasks are handle by we have to add this actions into deploy.sh file like this.

rm -rf node_modules/	 
mv ../build/* .
cp index.html 404.html   <--- this part


Then it will create 404.html file with the content of index.html file after each and every commit.
If you need to do the same thing on surge.sh (we use surge for show previews of every PR ) we have to add a copy of index.html file as 200.html .
You can do this after you run the

npm run deploy


Just before giving the deployment URL you need to create a copy of index.html file on build folder and it should be renamed as 200.html and continue.now it will work as we wish. This is all for today.

Resources

  • Read More – Adding a 200 page for client-side routing : https://surge.sh/help/adding-a-200-page-for-client-side-routing
Continue ReadingReact Routes to Deploy 404 page on gh-pages and surge

How SUSI AI Tabulates Answers For You

SUSI is an artificial intelligence chat bot that responds to all kinds of user queries. It isn’t any regular chat bot replying in just plain text. It supports various response types which we refer to as ‘actions’. One such action is the “table” type. When the response to a user query contains a list of answers which can be grouped, it is better visualised as a table rather than plain text.

Lets visit SUSI WebChat and try it out. In our example we ask SUSI for the 2009 race statistics of British Formula 1 racing driver Lewis Hamilton.

Query: race stats of hamilton in f1 season 2009

Response: <table> (API response)


How does SUSI do that? Let us look at the skill teaching SUSI to give table responses.

# Returns race stats as a table

race summary of  * in f1 season *|race stats of  * in f1 season *
!console:
{
  "url":"http://ergast.com/api/f1/$2$/drivers/$1$/status.json",
  "path":"$.MRData.StatusTable.Status",
  "actions":[{
     "type":"table",
     "columns":{"status":"Race Status","count":"Number Of Races"}
   }]
}
eol

Here, we are telling SUSI that the data type is a table through type attribute in actions and also defining column names and under which column each value must be put using their respective keys. Using this information SUSI generates a response accordingly with the table schema and data points.

How do we know when to render a table?

We know it through the type attribute in the actions from the API response.

"actions": [{
  "type": "table",
  "columns": {
    "status": "Race Status",
    "count": "Number Of Races"
  },
  "count": -1
  }]
}],

We can see that the type is table so we now know that we have to render a table.

But what is the table schema? What do we fill it with?

There is a columns key under actions and from the value of the columns key we get a object whose key value pairs give us column names and what data to put under each column.

Here, we have two columns – Race Status and Number Of Races

And the data to put under each column is found in answers[0].data with same keys as those for each column name i.e ‘status’ and ‘count’.

Sample data object from the API response:

{
  "statusId": "2",
  "count": "1",
  "status": "Disqualified"
}

The value under ‘status’ key is ‘Disqualified’ and the column name for ‘status’ key is ‘Race Status’, so Disqualified is entered under Race Status column in the table. Similarly 1  is entered under Number Of Races column. We thus have a row of our table. We populate the table for each object in the data array using the same procedure.

let coloumns = data.answers[0].actions[index].columns;
let count = data.answers[0].actions[index].count;
let table = drawTable(coloumns,data.answers[0].data,count);

We also have a ’count’ attribute in the API response . This is used to denote how many rows to populate in the table. If count = -1 , then it means infinite or to display all the results.

function drawTable(coloumns,tableData,count){

let parseKeys;
let showColName = true;

if(coloumns.constructor === Array){
  parseKeys = coloumns;
  showColName = false;
}
else{
  parseKeys = Object.keys(coloumns);
}

let tableheader = parseKeys.map((key,i) =>{
return(<TableHeaderColumn key={i}>{coloumns[key]}</TableHeaderColumn>);
});

let rowCount = tableData.length;

if(count > -1){
  rowCount = Math.min(count,tableData.length);
}

let rows = [];

for (var j=0; j < rowCount; j++) {

  let eachrow = tableData[j];

  let rowcols = parseKeys.map((key,i) =>{
    return(
        <TableRowColumn key={i}>
          <Linkify properties={{target:'_blank'}}>
            {eachrow[key]}
          </Linkify>
        </TableRowColumn>
      );
  });

  rows.push(
      <TableRow key={j}>{rowcols}</TableRow>
  );

}

const table =
  <MuiThemeProvider>
    <Table selectable={false}>
      <TableHeader displaySelectAll={false} adjustForCheckbox={false}>
        { showColName && <TableRow>{tableheader}</TableRow>}
      </TableHeader>
      <TableBody displayRowCheckbox={false}>{rows}</TableBody>
    </Table>
  </MuiThemeProvider>

return table;

}

Here we first determine how many rows to populate using the count attribute and then parse the columns to get the column names and keys. We then loop through the data and populate each row.

This is how SUSI responds with tabulated data!

You can create your own table skill and SUSI will give the tabulated response you need. Check out this tutorial to know more about SUSI and the various other action types it supports.

Resources

Continue ReadingHow SUSI AI Tabulates Answers For You

How to Make SUSI AI Slack Bot

To make SUSI slack bot we will use real time messaging api of slack which will allow users to receive messages from bot in real time. To make SUSI slack bot you have to follow following steps:

Steps:

  1. First of all you have to create a team on slack in where your bot will be running. To create a team go to https://slack.com/ and create a new team.
  2. After creating sign in to your team and got to apps and integration option by clicking on left corner.
  3. Click manage on top right corner and go to custom integrations to add configuration to Bots.
  4. After adding configuration data,bot username and copying API Token now we have to write code for setting bot in slack. To set up code see below steps: 
  5. Install Node.js from the link below on your computer if you haven’t installed it already. https://nodejs.org/en/
  6. Create a folder with any name and open shell and change your current directory to the new folder you created.
  7. Type npm init in command line and enter details like name, version and entry point.
  8. Create a file with the same name that you wrote in entry point in above given step. i.e index.js and it should be in same folder you created.
  9. Type following commands in command line  npm install –save @slack/client. After slack/client is installed type npm install –save express after express is installed type npm install –save request and then npm install –save http when all the modules are installed check your package.json modules will be included within dependencies portion.
  10. Your package.json file should look like this.
    {
    "name": "slack-bot",
    "version": "1.0.0",
    "description": "SUSI Slack Bot",
    "main": "index.js",
    "dependencies": {
           "express": "^4.15.3",
           "http": "0.0.0",
           "request": "^2.81.0"
    },
    "scripts": {
           "test": "echo \"Error: no test specified\" && exit 1",
           "start": "node index.js"
    }
    }
    
  11. Copy following code into file you created i.e index.js.
    var Slack = require('@slack/client');
    var request = require('request');
    var express = require('express');
    var http = require('http');
    var app = express();
    var RtmClient = Slack.RtmClient; 
    var RTM_EVENTS = Slack.RTM_EVENTS;
    var token = process.env.APIToken;
    
    var rtm = new RtmClient(token, { logLevel: 'info' }); 
    rtm.start();
    
    //to ping heorku app after 20 minutes to keep it active
    
    setInterval(function() {
            http.get(process.env.HerokuUrl);
        }, 1200000);
    
    rtm.on(RTM_EVENTS.MESSAGE, function(message) { 
    var channel = message.channel;
    
    var options = {
           method: 'GET',
           url: 'http://api.asksusi.com/susi/chat.json',
           qs: {
               timezoneOffset: '-330',
               q: message.text
           }
       };
    
    //sending request to SUSI API for response
       request(options, function(error, response, body) {
           if (error) throw new Error(error);
           var ans = (JSON.parse(body)).answers[0].actions[0].expression;
           rtm.sendMessage(ans, channel);
       })
    });
    
    const port = process.env.PORT || 3000;
    app.listen(port, () => {
       console.log(`listening on ${port}`);
    });


  12. Now we have to deploy this code to heroku.
  13. Before deploying we have to make a github repository for chatbot to make github repository follow these steps:

    In command line change current directory to folder we created above and write

    git init
    git add .
    git commit -m”initial”
    git remote add origin <URL for remote repository>
    git remote -v
    git push -u origin master

    You will get URL for remote repository by making repository on your github and copying this link of your repository.

  14. To deploy your bot to heroku you need an account on Heroku and after making an account make an app.
  15. Deploy app using github deployment method.
  16. Select Automatic deployment method.
  17. Add APIToken and HerokuUrl variable to heroku app in settings options.
  18. Your SUSI Slack bot is ready enjoy chatting with it.If you want to learn more about slack API refer to https://api.slack.com
Continue ReadingHow to Make SUSI AI Slack Bot

Tray Icon for SUSI Desktop Client

Susi is an AI which replies smartly to anything that you put. Popular Assistants like Siri and Cortana, have their own tray icons that run on top of all apps. So, I thought to add a tray icon to SUSI AI as well.

A tray is an icon in an OS’s notification area usually attached with a context menu.

Platform limitations:

  • On Linux, app indicator is used if it is supported else GtkStatusIcon is used
  • App indicator is only shown when it has a context menu.
  • When app indicator is used all click events are ignored.

Starting Up:

You should have Node and ElectronJS installed

To create a tray I made two methods. One is for creating a tray and other is for creating a window when a tray icon is clicked.

app.on('ready', () => {
 createTray()
 createWindow()
 })

app.on(‘ready’,() => {}) is called when the electron is ready to run. It’s just like the main function.

Then we create the Tray.

const createTray = () => {
 tray = new Tray(path.join(__dirname, 'static/icons/png/tray.png'))
 tray.on('right-click', toggleWindow)
 tray.on('double-click', toggleWindow)
 tray.on('click', function (event) {
 toggleWindow()
 

When some developer is using SUSI he might // Show devtools when command clicked if 

(window.isVisible() && process.defaultApp && event.metaKey) {
 window.openDevTools({mode: 'detach'}) }}) }
Tray = new Tray(ICON HERE) // this creates a new tray with the icon specified.

Since there are 2 themes for the notification bar in OSX, I used a BLUE icon that looks good on both the themes.

I Used the icon above as a tray icon for SUSI.

Then next lines are for opening the tray with right-click or double-click. We can also change these functionalities like on right-click we can open some settings or give user an option to close the app.

const createWindow = () => {
  window = new BrowserWindow({
    width: 300,
    height: 450,
    show: false,
    frame: false,
    fullscreenable: false,
    resizable: false,
    transparent: true,
    webPreferences: {
      // Prevents renderer process code from not running when window is
      // hidden
      backgroundThrottling: false
    }
  })
  window.loadURL(`file://${path.join(__dirname, '/static/index.html')}`)
  // show inspect element in the window
  // window.openDevTools();
  // set window to always be on the top of other windows
  window.setAlwaysOnTop(true);
  // Hide the window when it loses focus
  window.on('blur', () => {
    if (!window.webContents.isDevToolsOpened()) {
      window.hide()
    }
  })
}


When we call createWindow it creates a Window with the HTML File specified in loadURL

window.loadURL(`file://${path.join(__dirname, '/static/index.html')}`)

In this we created a SUSI Chat Client in HTML and named it as index.html and passed that HTML to be loaded as the application window.

Sometimes when we a running a full screen, Especially in macOS then all apps are launched behind the fullscreen app. To run our tray icon we used another function that set the window to be always on top of all other windows.

 window.setAlwaysOnTop(true);

So if someone is reading a news article and wants to find a meaning of a word he need not open SUSI again, because SUSI is running on top of all the applications.

toggleWindow is called when we click the Tray Icon. The work of this function is fairly simple. On click of the tray icon, it makes hides or shows the SUSI application window.

const toggleWindow = () => {
  if (window.isVisible()) {
    window.hide()
  } else {
    showWindow()
  }
}

showWindow is the function that shows the windows and brings it to focus.

This function brings the SUSI Window to focus and shows it to the user.

const showWindow = () => {
 const position = getWindowPosition()
 window.setPosition(position.x, position.y, false)
 window.show()
 window.focus()
}

Running

Navigate to the project directory and run:

electron . 

SUSI icon will be visible in your notification tray.

Resources:

SUSI Desktop App: https://github.com/fossasia/susi_desktop/ 

Electron Documentation: https://electron.atom.io/

Electron Packager: https://github.com/electron-userland/electron-packager

Continue ReadingTray Icon for SUSI Desktop Client

SUSI Desktop App in Electron


Electron allows you to get a cross-platform desktop application up and running very quickly. An electron app is built using the node.js framework and is brought to us by Github. Apps built with Electron are just web sites which are opened in an embedded Chromium web browser.

Setting Up.

First things first, we need NodeJS installed. So go to https://nodejs.org/en/download/ and follow the instructions as per your Operating System.

Now we need Electron. We can install it globally and use it as a CLI, or install it locally in our application’s path. I recommend installing it globally, so that every app does not need to install it every time.

Open terminal and write:

$ npm install -g electron-prebuilt
$ npm install -g bower


Bower is used for managing front end components like HTML, CSS, JS etc.

To test the installation, type electron -h and it should show the version of Electron CLI.

Getting the project ready.

The main idea behind making desktop apps with JS is that you build one codebase and package it for each operating system separately. This abstracts away the knowledge needed to make native desktop apps and makes maintenance a lot easier.

First clone the SUSI Desktop app repository on your computer.

$ git clone https://github.com/fossasia/susi_desktop.git

Next step is to change directory to susi_desktop.

$ cd susi_desktop

Now we need to install dependencies which are used by our app.

$ npm install
$ bower install

Now we have the code and the dependencies setup. To run the Application write

$ npm start

Or

$ electron .

Any of the two commands can be used to run a electron application.

Screenshot:

Folder Structure.

In the Project folder or the root of the app we will keep the package.json file, which have all the dependencies to run the application.Also the main.js file and any other application-wide files we need are kept int the root of the app..

The “app” folder will house our HTML files of various types within folders like css, js and img.

Judging by the file structure, you can never guess this is a desktop app and not just a simple website. This project follows the AirBNB Style guide to code.

Purely starting the main process doesn’t give the users of your application any UI windows.

Conclusion

Overall Electron is an exciting way to build desktop web applications using web technologies.

SUSI Desktop app is built on it. Single code can be used to make native apps for Windows / Linux and Mac OS X.

Continue ReadingSUSI Desktop App in Electron