Using The Dark and Light Theme in SUSI iOS

SUSI being an AI for interactive chat bots, provides answers to the users in the intelligent way. So, to make the SUSI iOS app more user friendly, the option of switching between themes was introduced. This also enables the user switch between themes based on the environment around. Any user can switch between the light and dark themes easily from the settings.

We start by declaring an enum called `theme` which contains two strings namely, dark and light.

enum theme: String {
    case light
    case dark
}

We can update the color scheme based on the theme selected very easily by checking the currently active theme and based on that check, we update the color scheme. To check the currently active theme, we define a variable in the `AppDelegate` which holds the value.

var activeTheme: String?

Below is the way the color scheme of the LoginViewController is set.

var activeTheme: String?func setupTheme() {
  let image = UIImage(named: ControllerConstants.susi)?.withRenderingMode(.alwaysTemplate)
  susiLogo.image = image
  susiLogo.tintColor = .white
  UIApplication.shared.statusBarStyle = .lightContent
  let activeTheme = AppDelegate().activeTheme
  if activeTheme == theme.light.rawValue {
    view.backgroundColor = UIColor.lightThemeBackground()
  } else if activeTheme == theme.dark.rawValue {
    view.backgroundColor = UIColor.darkThemeBackground()
  }
}

Here, we first get the image and set the rendering mode to `alwaysTemplate` so that we can change the tint color of the image. Next, we assign the image to the `IBOutlet` and change the tint color to `white`. We also change the status bar style to `lightContent`. Next, we check the active theme and change the view’s background color accordingly. For this method to execute, we call it inside, `viewDidLoad` so that the theme loads up as the view loads.

Next, lets add this option of switching between themes inside the `SettingsViewController`. We add a cell with `titleLabel` as `Change Theme` and use the collectionView’s delegate method of `didSelect` to show an alert. This alert contains three options, Dark theme, Light Theme and Cancel. Let’s code that method which presents the alert.

func themeToggleAlert() {
  let imageDialog = UIAlertController(title: ControllerConstants.toggleTheme, message: nil, preferredStyle: UIAlertControllerStyle.alert)
  imageDialog.addAction(UIAlertAction(title: theme.dark.rawValue.capitalized, style: .default, handler: { (_: UIAlertAction!) in
    imageDialog.dismiss(animated: true, completion: nil)
    AppDelegate().activeTheme = theme.dark.rawValue
    self.settingChanged(sender: self.imagePicker)
    self.setupTheme()
  }))
  imageDialog.addAction(UIAlertAction(title: theme.light.rawValue.capitalized, style: .default, handler: { (_: UIAlertAction!) in
    imageDialog.dismiss(animated: true, completion: nil)
    AppDelegate().activeTheme = theme.light.rawValue
    self.settingChanged(sender: self.imagePicker)
    self.setupTheme()
  }))
  imageDialog.addAction(UIAlertAction(title: ControllerConstants.dialogCancelAction, style: .cancel, handler: { (_: UIAlertAction!) in
    imageDialog.dismiss(animated: true, completion: nil)
  }))
  self.present(imageDialog, animated: true, completion: nil)
}

Here, we assign the alert view’s title and add 3 actions and their respective completion handlers. If we see inside these completion handlers, we can notice that we first dismiss the alert followed by updating the activeTheme variable in AppDelegate and call the `settingChanged` function which updates the user’s settings on the server. Finally, we update the color scheme.

Now, if we build and run the app and change the theme from the settings, we will notice that on returning to the chat view, the color scheme is not updated. The reason here is that we are setting up the theme on viewDidLoad which loads only once and is not executed until the controller is presented again. Here, we make use of the `viewDidAppear` method which executes every time the view appears.

override func viewDidAppear(_ animated: Bool) {
  super.viewDidAppear(animated)
  setupTheme()
}

To persist the selected theme, we used the UserDefaults to save the theme which got assigned everytime to the `activeTheme` variable when the app loads up.

UserDefaults.standard.set(AppDelegate().activeTheme, forKey: ControllerConstants.UserDefaultsKeys.theme)

On app launch, we assigned this User Default the value of the light theme as a default.

Below is the final output:

References:

Continue ReadingUsing The Dark and Light Theme in SUSI iOS

Implementation of SUSI Web Chat Auto Sizing Message Composer

While we are using SUSI Web Chat Application we may have to send lengthy messages. Existing application’s Message composer supports for lengthy messages but it manages a constant value for every user input. While we were developing the application we got a requirement to build a growing message composer.

Final output of this implementation produces a message composer that grows when user completes a new line until user completes 5 lines and after 5 lines it maintains a fixed size and enables scrolling.

So we tried several packages to get this done. And finally we did this  using react-textarea-autosize  it gives all these features and it gives user to customize the elements furthermore.

First we have to install the npm package:

npm install --save react-textarea-autosize

After the installation we have to import the package on top of the “MessageComposer.react.js”

import TextareaAutosize from 'react-textarea-autosize';

Next we need to use this package like this,

         <TextareaAutosize
           className='scroll'
           id='scroll'
           minRows={1}
           maxRows={5}
           placeholder="Type a message..."
           value={this.state.text}
           onChange={this._onChange.bind(this)}
           onKeyDown={this._onKeyDown.bind(this)}
           ref={(textarea) => { this.nameInput = textarea; }}
           style={{ background: this.props.textarea}}
         />


This package provides “minRows” and “maxRows”  attributes and we can define minimum height of the text area and maximum height it can grow. If you need to know more about auto growing text areas and to get examples refer this.

Next we wanted to hide the scrollbar which is displaying when the textarea height is exceeding.

How we hide the scrollbars  on chrome browsers.

.scroll::-webkit-scrollbar {
 	 display: none;
}

This is how we hide the scrollbar on firefox browser.

.scroll {
 	overflow: -moz-scrollbars-none;
}

Now we have to style up the textarea because it comes with default styles. We wrapped up the textarea with the div and applied our styles to that. In my case we wrapped up my textarea with  <div className=“textBack”>

This is how we styled the textarea using the wrapper div.

.textBack{
 background: #fff;
 width: 83%;
 border-radius: 40px;
 padding: 5px 20px;
 display: block;
 position: relative;
 top: 12%;
 box-sizing: content-box;
 margin: 0px 0 10px 0;
}

Our textarea is like this.

It expands when user exceeds the width of textarea.

This is how we implemented the SUSI Web Chat’s growing message composer. If you would like to contribute please fork our repository on github  

Resources:

Continue ReadingImplementation of SUSI Web Chat Auto Sizing Message Composer

Auto Deployment of SUSI Server using Kubernetes on Google Cloud Platform

Recently, we auto deployed SUSI Server on Google Cloud Platform using Kubernetes and Docker Images after each commit in the GitHub repo with the help of Travis Continuous Integration. So, basically, whenever a new commit is added to the repo, during the Travis build, we build the docker image of the server and then use it to deploy the server on Google Cloud Platform. We use Kubernetes for deployment since it is very easy to scale up the Project when traffic on the server is increased and Docker because using it we can easily build docker images which then can be used to update the deployment. This schematic will make things more clear what exactly is the procedure.

Prerequisites

  1. You must be signed in to your Google Cloud Console and have enabled billing and must have credits left in your account.
  2. You must have a docker account and a repo in it. If you don’t have one, make it now.
  3. You should have enabled Travis on your repo and have a Travis.yml file in your repo.
  4. You must already have a project in Google Cloud Console. Make a new one if you don’t have.

Pre Deployment Steps

You will be needed to do some work on Google Cloud Platform before actually starting the auto deployment process. Those are:

  1. Creating a new Cluster.
  2. Adding and Formatting Persistence Disk
  3. Adding a Persistent Volume CLaim (PVC)
  4. Labeling a node as primary.

Check out this documentation on how to do that. It may help.

Implementation

Img src: https://cloud.google.com/solutions/continuous-delivery-with-travis-ci

1. The first step is simply to add this line in Travis.yml file and create an empty deploy.sh, file mentioned below.

after_success:
- bash kubernetes/travis/deploy.sh

Now we’ll be moving line by line and adding commands in the empty deploy.sh file that we created in the previous step.

2. Next step is to remove obsolete Google Cloud files and install Google Cloud SDK and kubectl command. Use following lines to do that.

echo ">>> Removing obsolete gcoud files"
sudo rm -f /usr/bin/git-credential-gcloud.sh
sudo rm -f /usr/bin/bq
sudo rm -f /usr/bin/gsutil
sudo rm -f /usr/bin/gcloud

echo ">>> Installing new files"
curl https://sdk.cloud.google.com | bash;
source ~/.bashrc
gcloud components install kubectl

3. In this step you will be needed to download a JSON file which contains your Google Cloud Credentials, then copy that file to your repo and encrypt it using Travis encryption keys. Follow https://youtu.be/7U4jjRw_AJk this video to see how to do that.

4. So, now you have added your encrypted credentials.json files in your repo and now you need to use those credentials to login into your google cloud account. So, use below lines to do that.

echo ">>> Decrypting credentials and authenticating gcloud account"
# Decrypt the credentials we added to the repo using the key we added with the Travis command line tool
openssl aes-256-cbc -K $encrypted_YOUR_key -iv $encrypted_YOUR_iv -in ./kubernetes/travis/Credentials.json.enc -out Credentials.json -d
gcloud auth activate-service-account --key-file Credentials.json
export GOOGLE_APPLICATION_CREDENTIALS=$(pwd)/Credentials.json
#add gcoud project id
gcloud config set project YOUR_PROJECT_ID
gcloud container clusters get-credentials YOUR_CONTAINER

The above lines of code first decrypt your credentials, then login into your account and set the project you already created earlier.

5. Now, we have logged into Google Cloud, we need to build docker image from a dockerfile. Follow official docker docs to see how to write a dockerfile. Here is an example of dockerfile. You will need to add “$DOCKER_USERNAME” and “$DOCKER_PASSWORD” as environment variables in Travis settings of your repo.

echo ">>> Building Docker image"
cd kubernetes/images

docker build --no-cache -t YOUR_DOCKER_USERNAME/YOUR_DOCKER_REPO:$TRAVIS_COMMIT .
docker login -u="$DOCKER_USERNAME" -p="$DOCKER_PASSWORD"
docker tag YOUR_DOCKER_USERNAME/YOUR_DOCKER_REPO:$TRAVIS_COMMIT YOUR_DOCKER_USERNAME/YOUR_DOCKER_REPO:latest

6. Now, just push the docker image created in previous step and update the deployment.

echo ">>> Pushing docker image"
docker push YOUR_DOCKER_USERNAME/YOUR_DOCKER_REPO

echo ">>> Updating deployment"
kubectl set image deployment/YOUR_CONTAINER_NAME --namespace=default YOUR_CONTAINER_NAME=YOUR_DOCKER_USERNAME/YOUR_DOCKER_REPO:$TRAVIS_COMMIT

Summary

This blog was about how we have configured travis build and auto deployed SUSI Server on Google Cloud Platform using Kubernetes and Docker. You can do the same with your server too or if you are looking to contribute to SUSI Server, this may help you a little in understanding the code of the repo.

Resources

  1. The documentation for setting up your project on Google CLoud Console before starting auto deployment https://github.com/fossasia/susi_server/blob/afb00cd9c421876f5d640ce87941e502aa52e004/docs/installation/installation_kubernetes_gcloud.md
  2. The documentation for encrypting your google cloud credentials and adding them to your repo https://cloud.google.com/solutions/continuous-delivery-with-travis-ci
  3. Docs for Docker to get you started with Docker https://docs.docker.com/
  4. Travis Documentation on how to secure your credentials https://docs.travis-ci.com/user/encryption-keys/
  5. Travis Documentation on how to add environment variables in your repo settings https://docs.travis-ci.com/user/environment-variables/
Continue ReadingAuto Deployment of SUSI Server using Kubernetes on Google Cloud Platform

Adding Description to the Susi AI Skills

Susi skill CMS is an editor to write and edit skill easily. It follows an API-centric approach where the Susi server acts as API server and a web front-end act as the client for the API and provides the user interface. A skill is a set of intents. One text file represents one skill, it may contain several intents which all belong together. All the skills are stored in Susi Skill Data repository and the schema is as following.

Using this, one can access any skill based on four tuples parameters model, group, language, skill. To know what a skill is about we needed to add a !description operator which identifies the text as a description for the skill. Let’s check out how to achieve it.Susi Skill class provides parser methods for the set of intents, given as text files.

 public static JSONObject readEzDSkill(BufferedReader br) throws JSONException {}
if (line.startsWith("!") && (thenpos = line.indexOf(':')) > 0) {
        String head = line.substring(1, thenpos).trim().toLowerCase();
       String tail = line.substring(thenpos + 1).trim();
if (head.equals("description")) {
   description =tail;
    }
}
 if (description.length() > 0) intent.put("description", description); 

The method readEzDSkill parses the skill txt file, it checks if a line starts with ‘!description’ (‘bang operator with description’) it then stores the content in string variable description.
If a description is found in a skill, it is recorded and put into Json Array of intents.

private final Map<String, Set<String>> skillDescriptions; 
 if (intent.getDescription() !=null) {
  Set<String> descriptions = this.skillDescriptions.get(intent.getSkill());
  if (descriptions == null) {
     descriptions = new LinkedHashSet<>();
     this.skillDescriptions.put(intent.getSkill(), descriptions);
   }
   descriptions.add(intent.getDescription());
}

SusiMind class  process this json and stores the description in a map of skill path and description. This map is used by DescriptionSkillService to list descriptions for all the skills given its model, group and language. For adding the description servlet we need to inherit the service class from AbstractAPIHandler and implement APIhandler interface.In Susi Server, an abstract class AbstractAPIHandler extending HttpServelets and implementing API handler interface is provided.

 @Override
    public BaseUserRole getMinimalBaseUserRole() { return BaseUserRole.ANONYMOUS; }

    @Override
    public JSONObject getDefaultPermissions(BaseUserRole baseUserRole) {
        return null;
    }

    @Override
    public String getAPIPath() {
        return "/cms/getDescriptionSkill.json";
    }

The getAPIPath() methods sets the API endpoint path, it gets appended to base path which is 127.0.0.1:4000/cms/getDescriptionSkill.json for local host. The getMinimalBaseRole method tells the minimum Userrole required to access this servlet it can also be ADMIN, USER. In our case it is Anonymous. A User need not log in to access this endpoint.
Next, we implement serviceimpl method which gives us the desired response in JSON format.

@Override
    public ServiceResponse serviceImpl(Query call, HttpServletResponse response, Authorization rights, final JsonObjectWithDefault permissions) {
        String model = call.get("model", "");
        String group = call.get("group", "");
        String language = call.get("language", "");
        JSONObject descriptions = new JSONObject(true);
            for (Map.Entry<String, Set<String>> entry : DAO.susi.getSkillDescriptions().entrySet()) {
                String path = entry.getKey();
  if ((model.length() == 0 || path.indexOf("/" + model + "/") > 0) &&(group.length() == 0 || path.indexOf("/" + group + "/") > 0) &&(language.length() == 0 || path.indexOf("/" + language + "/") > 0)) {
      descriptions.put(path, entry.getValue());
   }
            }
            JSONObject json = new JSONObject(true)
                    .put("model", model)
                    .put("group", group)
                    .put("language", language)
                    .put("descriptions", descriptions);
        return new ServiceResponse(json);
    }

We can get the required parameters through a call.get() method where the first parameter is the key for which we want to get the value and second parameter is the default value. If the path contains the desired language, group and model, we return it as a response otherwise an error message is displayed. To check the response go to http://api.susi.ai/cms/getDescriptionSkill.json?model=general&group=knowledge&language=en or http://127.0.0.1:4000/cms/getDescriptionSkill.json.

This is how getDescriptionSkill service works. To add a description to the skill visit susi_skill_data, the storage place for susi skills. For more information and complete code take a look at Susi server and join gitter chat channel for discussions.

Resources

Continue ReadingAdding Description to the Susi AI Skills

Use of Flux Architecture to Switch between Themes in SUSI Web Chat

While we were developing the SUSI Web Chat we got a requirement to build a dark theme. And to build a way that user can switch between dark and light theme.

SUSI Web Chat application is made according to the Flux architecture, So we had to build sub components according to that architecture.

What is flux:

Flux is not a framework. It is an Architecture/pattern that we can use to build applications using react and some other frameworks. Below figure shows the way how that architecture works and how it communicate.

How flux works:

Flux has four types of components. Those are views, actions, dispatcher and stores. We use JSX to build and integrate views into our JavaScript code.

When someone triggers an event from view, it triggers an action and that action sends particular action details  such as Actiontype, action name  and data to dispatcher. Dispatcher broadcasts those details to every store which are registered with the particular dispatcher. That means every store gets all the action details and data which are broadcasting from dispatchers which they are registered.

Let’s say we have triggered an action from view that is going to change the value of the store. Those action details are coming to dispatcher. Then dispatcher broadcasts those data to every store that registered with it. Matching action will trigger and update its value. If there is any change happened in store, view automatically updates corresponding view.

How themes are changing:

We have a store called “SettingStore.js”. This “SettingStore” contains theme values like current theme. We store other settings of the application such as: Mic input settings, Custom server details, Speech Output details, Default Language, etc.it is responsible to provide these details to corresponding view.

let CHANGE_EVENT = 'change';
class SettingStore extends EventEmitter {
   constructor() {
       super();
       this.theme = true; 
   }

We use “this.theme = true” in constructor to switch light theme as the default theme.

getTheme() { //provides current value of theme
       return this.theme;
   }

This method returns the value of the current theme when it triggers.

   changeTheme(themeChanges) {
       this.theme = !this.theme;
       this.emit(CHANGE_EVENT);
   }

We use “changeTheme” method to change the selected theme.

   handleActions(action) {
       switch (action.type) {
           case ActionTypes.THEME_CHANGED: {
               this.changeTheme(action.theme);
               break;
           }
           default: {
               // do nothing
           }
       }
   }
}

This switch case is the place that store gets actions distributed from the dispatcher and executes relevant method.

const settingStore = new SettingStore();
ChatAppDispatcher.register(settingStore.handleActions.bind(settingStore));
export default settingStore;

Here we registered our store(SettingStore) to “ChatAppDispatcher” .

This is how Store works.
Now we need to get the default light theme to the view. For that we have to call ”getTheme()” function. We can use the value it returns to update the state of the application.
Now we are going to change the theme. To do that we have to trigger “changeTheme” method of “Settingstrore” from view ( MessageSection.react.js ).
We trigger below method on click of the “Change Theme” button. It triggers the action called “themeChanged”.

 themeChanger(event) {
   Actions.themeChanged(!this.state.darkTheme);
 }

Previous method executes “themeChanged()” function of the actions.js file.

export function themeChanged(theme) {
 ChatAppDispatcher.dispatch({
   type: ActionTypes.THEME_CHANGED,
   theme //data came from parameter
 });
};

In above function we collect data from the view and send those data, method details to dispatcher.
Dispatcher sends those details to each and every registered store. In our case we have “SettingStore” and update the state to new dark theme.
This is how themes are changing in SUSI AI Web Chat application. Check this link to see the preview.

Resources:

  • Read About Flux: https://facebook.github.io/flux/
  • GitHub repository: https://github.com/fossasia/chat.susi.ai
  • Live Web Chat: http://chat.susi.ai/
Continue ReadingUse of Flux Architecture to Switch between Themes in SUSI Web Chat

Encoding and Saving Images as Strings in Preferences in SUSI Android App

In this blog post, I’ll be telling about how to store images in preferences by encoding them into Strings and also how to retrieve them back. Many a times, you need to store an image in preferences for various purposes and then need to retrieve it back when required. In SUSI Android App, we need to store an image in preference to set the chat background. We just simply select image from gallery, convert image to a byte array, then do a Base 64 encoding to string, store it in preferences and later decode it and set the chat background.

Base64 Encoding-Decoding in Java

You may already know what Base 64 is but still here is a link to Wikipedia article explaining it. So, how to do a Base64 encoding-decoding in java? For that java has a class with all such methods already present. https://docs.oracle.com/javase/8/docs/api/java/util/Base64.html

According to the docs:

This class consists exclusively of static methods for obtaining encoders and decoders for the Base64 encoding scheme. The implementation of this class supports the following types of Base64 as specified in RFC 4648 and RFC 2045.

  • Basic
  • URL and Filename safe
  • MIME

So, you may just use Base64.encode to encode a byte array and Base64.decode to decode a byte array.

Implementation

1. Selecting image from gallery


Start Image Picker Intent and pick an image from gallery. After selecting you may also start a Crop Intent to crop image also. After selecting and cropping image, you will get a URI of the image.

override fun openImagePickerActivity() {
   val i = Intent(Intent.ACTION_PICK, android.provider.MediaStore.Images.Media.EXTERNAL_CONTENT_URI)
   startActivityForResult(i, SELECT_PICTURE)
}
val thePic = data.extras.getParcelable<Bitmap>("data")
val encodedImage = ImageUtils.Companion.cropImage(thePic)
chatPresenter.cropPicture(encodedImage)

2. Getting image from the URI using inputstream

Next step is to get the image from file using URI from the previous step and InputStream class and store it in a BitMap variable.

val imageStream: InputStream = context.contentResolver.openInputStream(selectedImageUri)
   val selectedImage: Bitmap
   val filePathColumn = arrayOf(MediaStore.Images.Media.DATA)
   val cursor = context.contentResolver.query(getImageUrl(context.applicationContext, selectedImageUri), filePathColumn, null, null, null)
   cursor?.moveToFirst()
   selectedImage = BitmapFactory.decodeStream(imageStream)

3. Converting the bitmap to ByteArray

Now, just convert the Bitmap thus obtained to a ByteArray using below code.

val baos = ByteArrayOutputStream()
   selectedImage.compress(Bitmap.CompressFormat.JPEG, 100, baos)
   val b = baos.toByteArray()

4. Base64 encode the ByteArray and store in preference

Encode the the byte array obtained in last step to a String and store it in preferences.

 val encodedImage = Base64.encodeToString(b, Base64.DEFAULT)
//now you have a string. You can store it in preferences

5. Decoding the String to image

Now whenever you want, you can just decode the stored Base64 encoded string to a byte array and then from byte array to a bitmap and use wherever you want.

fun decodeImage(context: Context, previouslyChatImage: String): Drawable {
   val b = Base64.decode(previouslyChatImage, Base64.DEFAULT)
   val bitmap = BitmapFactory.decodeByteArray(b, 0, b.size)
   return BitmapDrawable(context.resources, bitmap)
}

Summary

So, the main aim of this blog was to give an idea about how can you store images in preferences. There is no way to store them directly. So, you have to convert them to String by encoding them in Base64 format and then decoding it to use it. You also have other ways to store images like storing it in database etc but this one is simpler and fast.

Resources

  1. Stackoverflow answer to “How to save image as String” https://stackoverflow.com/questions/31502566/save-image-as-string-with-sharedpreferences
  2. Other Stackoverflow answer about “Saving Images in preferences” https://stackoverflow.com/questions/18072448/how-to-save-image-in-shared-preference-in-android-shared-preference-issue-in-a
  3. Official docs of Base64 class https://docs.oracle.com/javase/8/docs/api/java/util/Base64.html
  4. Wikipedia link for learning about Base64 https://en.wikipedia.org/wiki/Base64
  5. Stackoverflow answer for “What is Base64 encoding used for?” https://stackoverflow.com/questions/201479/what-is-base-64-encoding-used-for
Continue ReadingEncoding and Saving Images as Strings in Preferences in SUSI Android App

Adding IBM Watson TTS Support in Susi Assistant on Raspberry Pi

Susi Hardware project aims at creating a smart assistant for your home that you can run on your Raspberry Pi or similar Development Boards.
I previously wrote a blog on choosing a perfect Text to Speech engine for Susi AI and had used Flite as the solution for it. While Flite is an Open Source solution that can run locally on a client, it does not provide the same quality of voice and speed as cloud providers. We always crave for a more natural voice for better interaction with our assistant. It is always good to have more options. We, therefore, added IBM Watson Text to Speech API in SUSI Hardware project.

IBM Watson TTS can be added to a Python Project easily using the IBM Watson Developer SDK.

For using the IBM Watson Developer SDK for Text to Speech, first of all, we need to sign up for Bluemix
https://console.bluemix.net/registration/

After that, we will get the empty dashboard without any service added currently. We need to create a Text to Speech Service. To do so, click on Create Watson Service button


Select Watson on the left pane and then select Text to Speech service from the list.

Select the standard plan from the options and then click on create button.

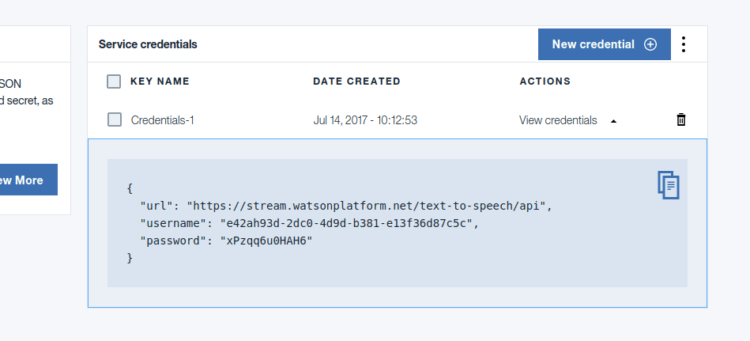
You will get service credentials for your newly created text to speech service. Save it for future reference.

After that, we need to add Watson developer cloud python package.

sudo pip3 install watson-developer-cloud

On Ubuntu with Python 3.5 watson-developer-cloud has some extra dependencies. Install them using the following command.

sudo apt install libssl-dev

Now we can add Text to Speech to our project. For that, we need to first import TextToSpeechV1 library. It can be added using following import statement.

from watson_developer_cloud import TextToSpeechV1

Now we need to create a new TextToSpeechV1 object using the Service Credentials we created earlier.

text_to_speech = TextToSpeechV1(
   username='API_USERNAME',
   password='API_PASSWORD')

We can now perform synthesis of a text input and write the incoming speech stream from IBM Watson API to a file.

with open('output.wav', 'wb') as audio_file:
   audio_file.write(
       text_to_speech.synthesize(text, accept='audio/wav’, voice='en-US_AllisonVoice'))

In the above code snippet,  we are opening an output file ‘output.wav’ for writing. We then write the binary audio data returned by text_to_speech.synthesize method. IBM Watson provides many free voices. We supply an argument specifying which voice we need to use. We are using English female ‘en-US_AllisonVoice’. You may test out more voices in the online demo here and select the voice that you find best.

We can play the ‘output.wav’ file using the play command from SoX. To do so, we need to install SoX binary.

sudo apt install sox libsox-fmt-all

We can play the file easily now using the following code.

import os
os.system('play output.wav')

The above code invokes the ‘play’ command from the SoX package to play the audio file. We can also use PyAudio to play the audio file but it would require us to manage the audio thread separately. Thus, SoX is a better solution.

Resources:

Continue ReadingAdding IBM Watson TTS Support in Susi Assistant on Raspberry Pi

Setup SUSI Assistant on Raspberry Pi in under 30 minutes

With our ever growing list of list of platforms supported by Susi AI, we now have a client that can run on Raspberry Pi and you can access it hands-free!! Here is a video that you can refer for its working.

But it might have left you wondering how you can replicate such a setup yourself? It is fairly easy and will be done fairly easy. Just follow the following instructions.

You need to have following hardware in order to have your own SUSI Assistant running on Raspberry Pi.

  • A Raspberry Pi (prefer 2 or 3) with Raspbian Jessie OS.
  • A stable internet connection.  ( Recommended 4 Mbps )
  • A USB Microphone /  USB Webcam with Microphone. You may buy one like this.
  • A Speaker that connects through 3.5mm jack. You may buy one like this.

After you get all the above items in order, you need to get access to a terminal of your Raspberry Pi. You can have that by either connecting a monitor to Raspberry Pi temporarily or by connecting to Raspberry Pi over SSH.

Once this is done, next step is the installation of the dependencies. The installation of the SUSI on Raspberry is automated after dependencies are installed. Run the following command on Raspberry Pi terminal.

sudo apt install git swig3.0 portaudio19-dev pulseaudio libpulse-dev unzip sox libatlas-dev libatlas-base-dev libsox-fmt-all python3

After this, you may check if your output and input devices are working alright. For this, run rec recording.wav . It will start recording audio and saving it to a file named recording.wav. Play back the file using play recording.wav If you hear your audio clearly, setup is done right else you need to configure your Audio Devices correctly.  Most of the time the configuration of Audio works out the box and devices are plug and play so you would not encounter any errors. If you are successful in configuring your devices, install extra dependencies for SUSI Hardware by running the automated install script. In your terminal run,

$ git clone https://github.com/fossasia/susi_hardware.git
$ cd susi_hardware
$ ./install.sh 

This will install all the remaining dependencies. After the above step is complete, you may run configuration file generator script to choose the Text to Speech and Speech to Text service according to your wish. For doing so, you need to run

$ python3 config_generator.py

Follow the instructions in the script. It will ask you to configure the default service for Text to Speech and Speech to Text and other options. After the configuration is complete, you can simply run the following command to start SUSI.

$ python3 main.py

This will start SUSI in a continuously listening mode. You may invoke SUSI anytime, just by saying SUSI followed by a query. The query will be answered by SUSI subsequently.

Since configurations for different hardware devices may vary, you may encounter some problems. In such a scenario, you may refer to the following resources to solve the issues.

Resources:

Continue ReadingSetup SUSI Assistant on Raspberry Pi in under 30 minutes

How to Store and Retrieve User Settings from SUSI Server in SUSI iOS

Any user using the SUSI iOS client can set preferences like enabling or disabling the hot word recognition or enabling input from the microphone. These settings need to be stored, in order to be used across all platforms such as web, Android or iOS. Now, in order to store these settings and maintain a synchronization between all the clients, we make use of the SUSI server. The server provides an endpoint to retrieve these settings when the user logs in.

First, we will focus on storing settings on the server followed by retrieving settings from the server. The endpoint to store settings is as follows:

http://api.susi.ai/aaa/changeUserSettings.json?key=key&value=value&access_token=ACCESS_TOKEN

This takes the key value pair for storing a settings and an access token to identify the user as parameters in the GET request. Let’s start by creating the method that takes input the params, calls the API to store settings and returns a status specifying if the executed successfully or not.

 let url = getApiUrl(UserDefaults.standard.object(forKey: ControllerConstants.UserDefaultsKeys.ipAddress) as! String, Methods.UserSettings)

        _ = makeRequest(url, .get, [:], parameters: params, completion: { (results, message) in
            if let _ = message {
                completion(false, ResponseMessages.ServerError)
            } else if let results = results {
                guard let response = results as? [String : AnyObject] else {
                    completion(false, ResponseMessages.ServerError)
                    return
                }
                if let accepted = response[ControllerConstants.accepted] as? Bool, let message = response[Client.UserKeys.Message] as? String {
                    if accepted {
                        completion(true, message)
                        return
                    }
                    completion(false, message)
                    return
                }
            }
        })

Let’s understand this function line by line. First we generate the URL by supplying the server address and the method. Then, we pass the URL and the params in the `makeRequest` method which has a completion handler returning a results object and an error object. Inside the completion handler, check for any error, if it exists mark the request completed with an error else check for the results object to be a dictionary and a key `accepted`, if this key is `true` our request executed successfully and we mark the request to be executed successfully and finally return the method. After making this method, it needs to be called in the view controller, we do so by the following code.

Client.sharedInstance.changeUserSettings(params) { (_, message) in
  DispatchQueue.global().async {
    self.view.makeToast(message)
  }
}

The code above takes input params containing the user token and key-value pair for the setting that needs to be stored. This request runs on a background thread and displays a toast message with the result of the request.

Now that the settings have been stored on the server, we need to retrieve these settings every time the user logs in the app. Below is the endpoint for the same:

http://api.susi.ai/aaa/listUserSettings.json?access_token=ACCESS_TOKEN

This endpoint accepts the user token which is generated when the user logs in which is used to uniquely identify the user and his/her settings are returned. Let’s create the method that would call this endpoint and parse and save the settings data in the iOS app’s User Defaults.

if let _ = message {
  completion(false, ResponseMessages.ServerError)
} else if let results = results {
  guard let response = results as? [String : AnyObject] else {
    completion(false, ResponseMessages.ServerError)
    return
  }
  guard let settings = 
response[ControllerConstants.Settings.settings.lowercased()] as? [String:String] else {
    completion(false, ResponseMessages.ServerError)
    return
  }
  for (key, value) in settings {
    if value.toBool() != nil {
      UserDefaults.standard.set(value.toBool()!, forKey: key)
    } else {
      UserDefaults.standard.set(value, forKey: key)
    }
  }
  completion(true, response[Client.UserKeys.Message] as? String ?? "error")
}

Here, the creation of the URL is same as we created above the only difference being the method passed. We parse the settings key value into a dictionary followed by a loop which loop’s through all the keys and stores the value in the User Defaults for that key. We simply call this method just after user log in as follows:

Client.sharedInstance.fetchUserSettings(params as [String : AnyObject]) { (success, message) in
  DispatchQueue.global().async {
    print("User settings fetch status: \(success) : \(message)")
  }
}

That’s all for this tutorial where we learned how to store and retrieve settings on the SUSI Server.

References

Continue ReadingHow to Store and Retrieve User Settings from SUSI Server in SUSI iOS

Save Chat Messages using Realm in SUSI iOS

Fetching data from the server each time causes a network load which makes the app depend on the server and the network in order to display data. We use an offline database to store chat messages so that we can show messages to the user even if network is not present which makes the user experience better. Realm is used as a data storage solution due to its ease of usability and also, since it’s faster and more efficient to use. So in order to save messages received from the server locally in a database in SUSI iOS, we are using Realm and the reasons for using the same are mentioned below.

The major upsides of Realm are:

  • It’s absolutely free of charge,
  • Fast, and easy to use.
  • Unlimited use.
  • Work on its own persistence engine for speed and performance

Below are the steps to install and use Realm in the iOS Client:

Installation:

  • Install Cocoapods
  • Run `pod repo update` in the root folder
  • In your Podfile, add use_frameworks! and pod ‘RealmSwift’ to your main and test targets.
  • From the command line run `pod install`
  • Use the `.xcworkspace` file generated by Cocoapods in the project folder alongside `.xcodeproj` file

After installation we start by importing `Realm` in the `AppDelegate` file and start configuring Realm as below:

func initializeRealm() {
        var config = Realm.Configuration(schemaVersion: 1,
            migrationBlock: { _, oldSchemaVersion in
                if (oldSchemaVersion < 0) {
                    // Nothing to do!
                }
        })
        config.fileURL = config.fileURL?.deletingLastPathComponent().appendingPathComponent("susi.realm")
        Realm.Configuration.defaultConfiguration = config
}

Next, let’s head over to creating a few models which will be used to save the data to the DB as well as help retrieving that data so that it can be easily used. Since Susi server has a number of action types, we will cover some of the action types, their model and how they are used to store and retrieve data. Below are the currently available data types, that the server supports.

enum ActionType: String {
  case answer
  case websearch
  case rss
  case table
  case map 
  case anchor
}

Let’s start with the creation of the base model called `Message`. To make it a RealmObject, we import `RealmSwift` and inherit from `Object`

class Message: Object {
  dynamic var queryDate = NSDate()
  dynamic var answerDate = NSDate()
  dynamic var message: String = ""
  dynamic var fromUser = true
  dynamic var actionType = ActionType.answer.rawValue
  dynamic var answerData: AnswerAction?
  dynamic var mapData: MapAction?
  dynamic var anchorData: AnchorAction?
}

Let’s study these properties of the message one by one.

  • `queryDate`: saves the date-time the query was made
  • `answerDate`: saves the date-time the query response was received
  • `message`: stores the query/message that was sent to the server
  • `fromUser`: a boolean which keeps track who created the message
  • `actionType`: stores the action type
  • `answerData`, `rssData`, `mapData`, `anchorData` are the data objects that actually store the respective action’s data

To initialize this object, we need to create a method that takes input the data received from the server.

// saves query and answer date
if let queryDate = data[Client.ChatKeys.QueryDate] as? String,
let answerDate = data[Client.ChatKeys.AnswerDate] as? String {
  message.queryDate = dateFormatter.date(from: queryDate)! as NSDate
  message.answerDate = dateFormatter.date(from: answerDate)! as NSDate}if let type = action[Client.ChatKeys.ResponseType] as? String,
  let data = answers[0][Client.ChatKeys.Data] as? [[String : AnyObject]] {
  if type == ActionType.answer.rawValue {
     message.message = action[Client.ChatKeys.Expression] as! String
     message.actionType = ActionType.answer.rawValue
    message.answerData = AnswerAction(action: action)
  } else if type == ActionType.map.rawValue {
    message.actionType = ActionType.map.rawValue
    message.mapData = MapAction(action: action)
  } else if type == ActionType.anchor.rawValue {
    message.actionType = ActionType.anchor.rawValue
    message.anchorData = AnchorAction(action: action)
    message.message = message.anchorData!.text
  }
}

Since, the response from the server for a particular query might contain numerous action types, we create loop inside a method to capture all those action types and save each one of them. Since, there are multiple action types thus we need a list containing all the messages created for the action types. For each action in the loop, corresponding data is saved into their specific objects.

Let’s discuss the individual action objects now.

  • AnswerAction
class AnswerAction: Object {
  dynamic var expression: String = ""
  convenience init(action: [String : AnyObject]) {
    self.init()
    if let expression = action[Client.ChatKeys.Expression] as? String {
      self.expression = expression
    }
  }
}

 This is the simplest action type implementation. It contains a single property `expression` which is a string type. For initializing it, we take the action object and extract the expression key-value and save it.

if type == ActionType.answer.rawValue {
  message.message = action[Client.ChatKeys.Expression] as! String
  message.actionType = ActionType.answer.rawValue
  // pass action object and save data in `answerData`
  message.answerData = AnswerAction(action: action)
}

Above is the way an answer action is checked and data saved inside the `answerData` variable.

2)   MapAction

class MapAction: Object {
  dynamic var latitude: Double = 0.0
  dynamic var longitude: Double = 0.0
  dynamic var zoom: Int = 13

  convenience init(action: [String : AnyObject]) {
    self.init()
    if let latitude = action[Client.ChatKeys.Latitude] as? String,
    let longitude = action[Client.ChatKeys.Longitude] as? String,
    let zoom = action[Client.ChatKeys.Zoom] as? String {
      self.longitude = Double(longitude)!
      self.latitude = Double(latitude)!
      self.zoom = Int(zoom)!
    }
  }
}

This action implementation contains three properties, `latitude` `longitude` `zoom`. Since the server responds the values inside a string, each of them need to be converted to their respective type using force-casting. Default values are provided for each property in case some illegal value comes from the server.

3)   AnchorAction

class AnchorAction: Object {
  dynamic var link: String = ""
  dynamic var text: String = ""

  convenience init(action: [String : AnyObject]) {
    self.init()if let link = action[Client.ChatKeys.Link] as? String,
    let text = action[Client.ChatKeys.Text] as? String {
      self.link = link
      self.text = text
    }
  }
}

Here, the link to the openstreetmap website is saved in order to retrieve the image for displaying.

Finally, we need to call the API and create the message object and use the `write` clock of a realm instance to save it into the DB.

if success {
  self.collectionView?.performBatchUpdates({
    for message in messages! {
    // real write block
      try! self.realm.write {
        self.realm.add(message)
        self.messages.append(message)
        let indexPath = IndexPath(item: self.messages.count - 1, section: 0)
        self.collectionView?.insertItems(at: [indexPath])
      }
   }
}, completion: { (_) in
    self.scrollToLast()
  })
}

list of message items and inserted into the collection view.Below is the output of the Realm Browser which is a UI for viewing the database.

References:

Continue ReadingSave Chat Messages using Realm in SUSI iOS