The Open Event Organizer App provides the users with its one of the core features of the ability to create or update an event. To add this feature, we will use HTML and android’s WebView in order to aid us integrate support for rich text in the app.
The first step is adding the Wasabeef RichText library to your project. Open your build.gradle file and add the support library to the dependency section.
Adding the dependency in build.gradle(app-level) in the project:
dependencies { //Other dependencies //Rich text editor implementation “jp.wasabeef:richeditor-android:1.2.2” }
What we need is an activity accessible throughout the project for any element that needs to input rich text, which means that this activity goes in the utils package.
Let’s start with building this activity:
We need to first set a hint text or a placeholder text for the editor in case there’s no saved text for the concerned field.
The above listener is using a linkDialog, which is initialized in the method below, as follows:
We are first dynamically creating a LinearLayout, and then 2 EditTextViews, and then adding those views to the LinearLayout. Finally we build the AlertDialog as usual and set the Dialog’s view to the LinearLayout we created.
privatevoid createLinkDialog() { LinearLayout layout = new LinearLayout(this); layout.setOrientation(LinearLayout.VERTICAL); final EditText text = new EditText(this); text.setHint(getString(R.string.text)); layout.addView(text); final EditText link = new EditText(this); link.setHint(getString(R.string.insert_url)); layout.addView(link);
linkDialog = new AlertDialog.Builder(this) .setPositiveButton(getString(R.string.create), (dialog, which) -> { binding.editor.insertLink(link.getText().toString(), text.getText().toString()); }) .setNegativeButton(getString(R.string.cancel), (dialog, which) -> { dialog.dismiss(); }) .setView(layout) .create(); }
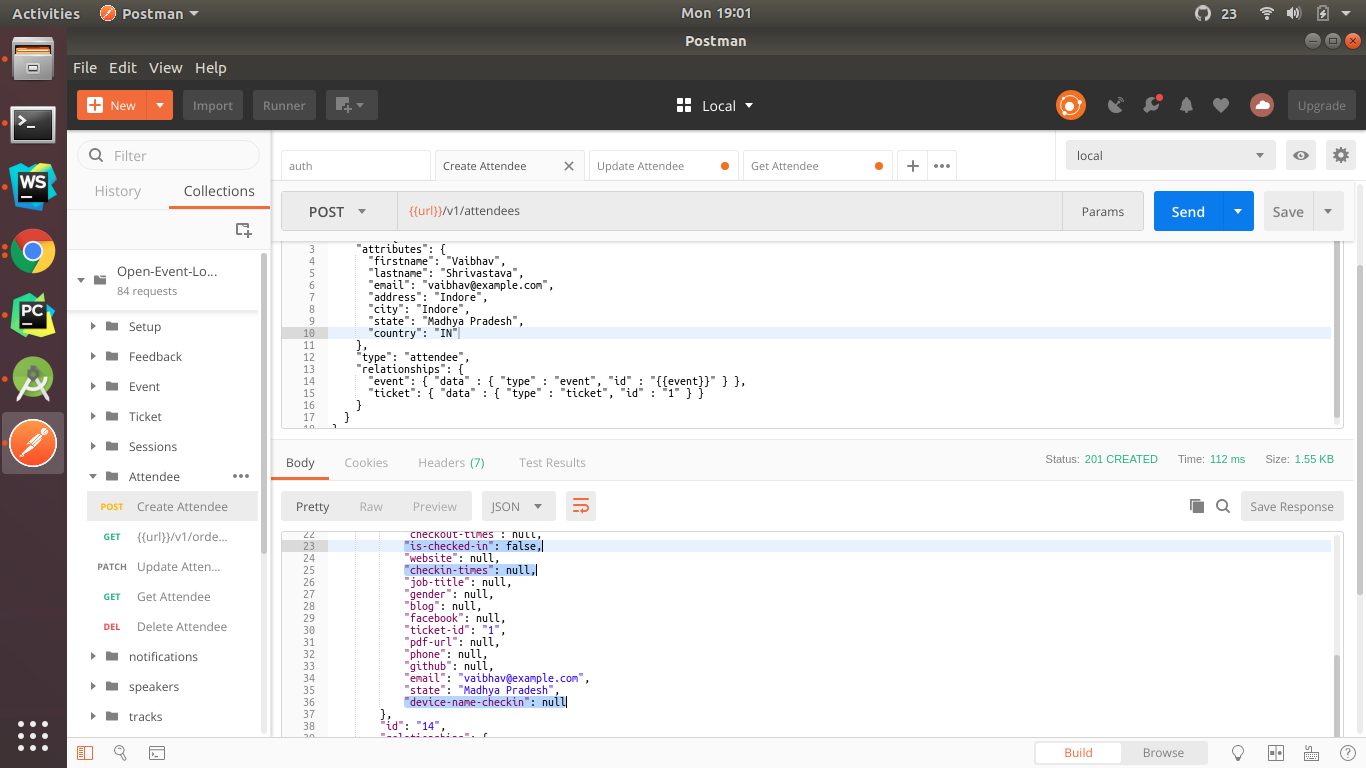
The Open Event Server provides backend support to Open Event Organizer Android App which is used to check-in attendees in an event. When checking in attendees, it is important for any event organizer to keep track of the device that was used to check someone in. For this, we provide an option in the Organizer App settings to set the device name. But this device name should have support in the server as well.
The problem is to be able to add device name data corresponding to each check-in time. Currently attendees model has an attribute called `checkin-times`, which is a csv of time strings. For each value in the csv, there has to be a corresponding device name value. This could be achieved by providing a similar csv key-value pair for “device-name-checkin”.
The constraints that we need to check for while handling device names are as follows:
If there’s `device_name_checkin` in the request, there must be `is_checked_in` and `checkin_times` in the data as well.
Number of items in checkin_times csv in data should be equal to the length of the device_name_checkin csv.
If there’s checkin_times in data, and device-name-checkin is absent, it must be set to `-` indicating no set device name.
if‘device_name_checkin’in data and data[‘device_name_checkin’] isnotNone: if‘is_checked_in’notin data ornot data[‘is_checked_in’]: raise UnprocessableEntity( {‘pointer’: ‘/data/attributes/device_name_checkin’}, “Attendee needs to be checked in first” ) elif‘checkin_times’notin data or data[‘checkin_times’] isNone: raise UnprocessableEntity( {‘pointer’: ‘/data/attributes/device_name_checkin’}, “Check in Times missing” ) elif len(data[‘checkin_times’].split(“,”)) != len(data[‘device_name_checkin’].split(“,”)): raise UnprocessableEntity( {‘pointer’: ‘/data/attributes/device_name_checkin’}, “Check in Times missing for the corresponding device name” ) if‘checkin_times’in data: if‘device_name_checkin’notin data or data[‘device_name_checkin’] isNone: data[‘device_name_checkin’] = ‘-‘
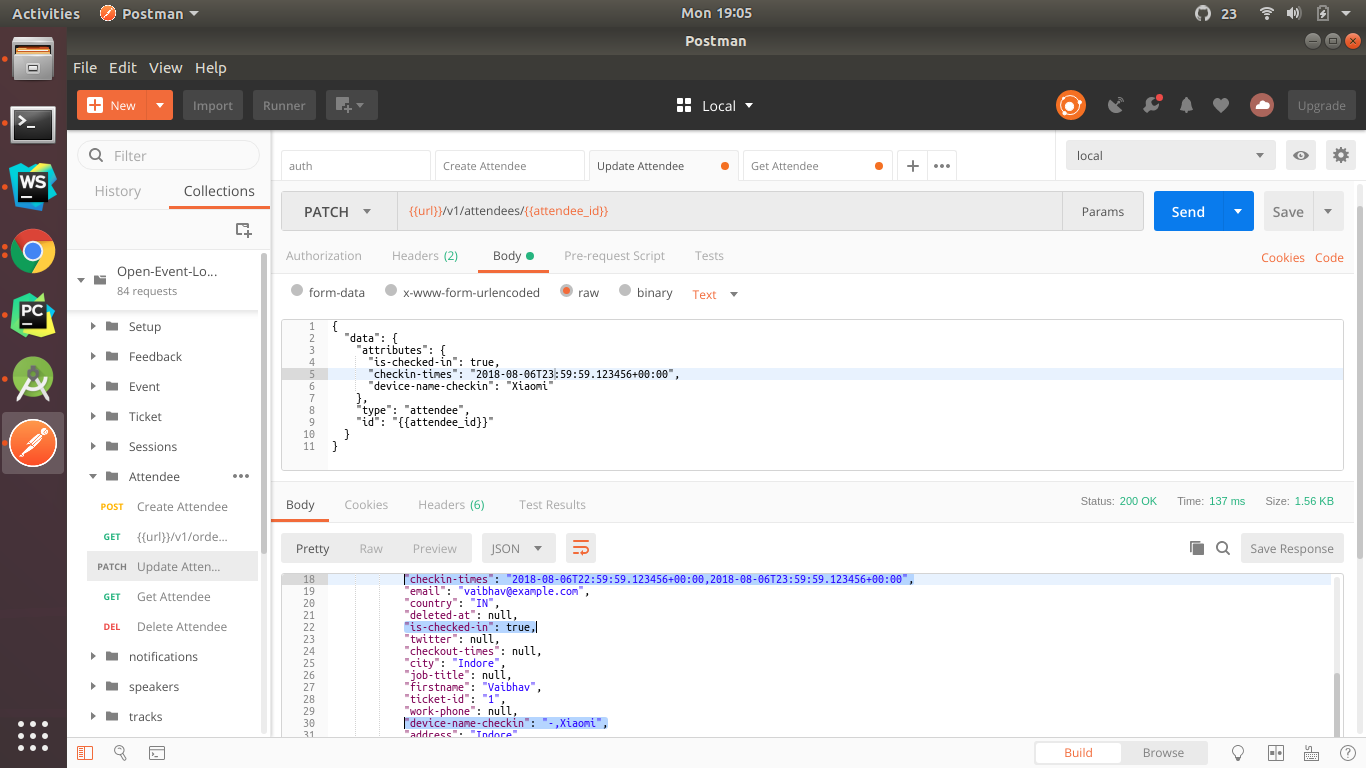
The case is a little different for a PATCH request since we need to check for the number of items differently like this:
if‘device_name_checkin’indata and data[‘device_name_checkin’] is not None: if obj.device_name_checkin is not None: data[‘device_name_checkin’] = ‘{},{}’.format(obj.device_name_checkin, data[‘device_name_checkin’]) if len(data[‘checkin_times’].split(“,”)) != len(data[‘device_name_checkin’].split(“,”)): raise UnprocessableEntity( {‘pointer’: ‘/data/attributes/device_name_checkin’}, “Check in Time missing for the corresponding device name”)
Since we expect only the latest value to be present in a PATCH request, we first add it to the object by formatting using:
and then compare the length of the obtained CSVs for check in times and device names, so that corresponding to each check in time, we have either a device name or the default fill in value ‘-’.
The Open Event Organizer Android App allows creating events from the app itself. But organizers had to enter the payment information every time. To solve this problem, the PR#1058 was opened which saves the Organizers’ payment preferences in Event Settings.
The Open Event project offers 5 types of payment options:
Online:
1. Paypal 2. Stripe
Offline:
3. Cash payment
4. Bank Transfer
5. Cheques
Each of the above need the payment specific details to be saved. And stuffing all of them into a single Event Settings screen isn’t a good option. Therefore the following navigation was desired:
Event Settings -> Payment Preferences -> All options with their preferences
Android Developer guide references a simple method to achieve the above, which is by using nested preference screens. But unfortunately, there’s a bug in the support library and it cannot be implemented with PreferenceFragmentCompat
So we had to apply a hack to the UI. We set an OnPreferenceClickListener as follows:
Once the preference item “Payment Preferences” is clicked, we initiate a fragment transaction opening the Payment Preferences screen, and add it to the fragment back stack.
For each payment option, we have two things to consider:
Is that payment option supported by the organizer?
If yes, we need to store the necessary details in order to direct the payment to the organizer.
We are also keeping track of whether the organizer wants to keep using the same payment preferences for future events as well. This way we save the organizer’s effort of entering payment details for each new event.
Now the only thing remaining is to set payment preferences once the Event Creation form is opened. Hence the following method is called in CreateEventPresenter sets the payment details for each option that the organizer has already saved the information for. It does this by using constants named like PREF… all declared in the Constants.java file.
using a custom Preference class which abstracts away some boilerplate code for us.
The Open Event Android app has a lot of fragments where the BottomNavigationView bar is not required. Hiding the bar is quite a clever task to handle as it can’t be simply hidden by changing its visibility (It’s not an activity). So, this blog will illustrate about how the BottomNavigationView bar is indirectly hidden in some Fragments.
We will basically change the layout to be replaced. Let us start by making the bar invisible in EventDetailsFragment. Let us observe our initial code. Below is the previous code of changing the fragments using supportFragmentManager. The below code actually represents an RecyclerViewClickListener listener of a RecyclerView. In this case it represents the RecyclerView showing all the events in the Main Page.
val recyclerViewClickListener = object : RecyclerViewClickListener {
The above code clearly mentions that the incoming fragment will replace the view with id frameContainer. Let us look at the previous xml code of activity_main.xml.
Here we can clearly see that the Fragment will be inserted directly into the FrameLayout. The BottomNavigationView bar will always be present. There is only one way to prevent this and that is by replacing the whole layout! Below lies the latest code.
val recyclerViewClickListener = object : RecyclerViewClickListener {
We clearly observe that frameContainer has been replaced by rootLayout. Our major problem has been solved. But by doing this, we now face an error of overlapping contents. The previous fragments contents are always visible. For example, The Events page is visible whenever the EventDetailsFragment is opened for any event. This clearly shows that the incoming page lacks a background color or an image. This is because the previous fragment is only visible but not clickable!
So we clearly observe that we have set the background to a white colour, thus not letting previous fragments contents to be visible. This is how the BottomNavigationView bar is simply hidden in some Fragments in the app.
In this blog, we will use the data stored in the Realm to display a list of recorded experiments in the form of well defining card view items so that it is easier for the user to understand.
For showing the list we will make use of RecyclerView widget provided by Android which is a more advanced version of the List view and is used to display large data sets in a vertical list, horizontal list, grid, staggered grid etc.
RecyclerView works in accordance with RecyclerView Adapter which is core engine that is responsible of inflating the layout of list items, populating the items with data, recycling of list item views when they go out of viewing screen and much more.
For this blog, we are going to use a special RecyclerView Adapter provided by Realm itself because it integrates properly with the Realm Database and handles modifying, addition, deletion or updating of Realm data automatically and efficiently.
Step 1 Adding the dependencies
As always first we need to add the following code in our build.gradle file to add the dependency of Realm database and RealmRecyclerViewAdapter.
Step 2 Adding RecyclerView widget in our Activity layout file
First, we need to create an activity and name it as “DataLoggerActivity”, inside the layout of the Activity add the <RecyclerView> widget. This RecyclerView will act as a container of our list item.
Step 3 Creating the layout and View holder for the list item
We have to create the layout of the list item which will be inflated by the Adapter. So for this create an XML file in res folder and name it “data_list_item.xml”. For the list of the experiments, we want to show Name of the experiment, recording time, recording date for every list item. For this we will make use of <CardView> and <TextView>. This gist shows the code of xml file.
The layout of the list item created is shown in Figure 2
Figure 1 Layout of list item showing mock information
Now we need to create a view holder for this layout which we need to pass to the Adapter, the following code shows the implementation of View Holder for above list item layout.
In this step, we will start by creating a class called “SensorLoggedListAdpater” and for using use the RecyclerView adapter provided by Realm we need to make this class extend the RealmRecyclerViewAdpater class.
But for that we need to pass two generic parameter:
Model Class : This is class which define a Realm model, for this, we will pass a reference of “SensorLogged.class” which is defined in the previous blog as we want to show the list experiments which are stored using “SensorLogged” model class.
ViewHolder : For this, we will pass the ViewHolder that we have created in Step 3.
As every RecyclerView Adapter needs a arraylist which contains the list of object containing information which we have to populate on the list item, the RealmRecyclerViewAdpater needs data in form of RealmResult to operate on, so we will create a constructor and pass in the RealmResult list in the super() method which we need to provide when we initialize this adapter in our “DataLoggerActivity” class.
Now we need to override two methods provided by RealmRecyclerViewAdapter class that are:
public ViewHolder onCreateViewHolder(@NonNull ViewGroup parent, int viewType): In which we will inflate the layout of list item “dta_list_tem.xml” which we have created in Step 3.
public void onBindViewHolder(@NonNull final ViewHolder holder, int position): In which we will populate the list item view using references stored in the ViewHolder with the data which we have provided while initializing the adapter.
@NonNull@Override
public ViewHolder onCreateViewHolder(@NonNull ViewGroup parent, int viewType) {
View itemView = LayoutInflater.from(parent.getContext()).inflate(R.layout.logger_data_item, parent, false);
return new ViewHolder(itemView);
}
@Override
public void onBindViewHolder(@NonNull final ViewHolder holder, int position) {
SensorLogged temp = getItem(position);
holder.sensor.setText(temp.getSensor());
Date date = new Date(temp.getDateTimeStart());
holder.dateTime.setText(String.valueOf(sdf.format(date)));
}
Step 5 Initializing the Adapter in Data Logger Activity and connecting with RecyclerView
Now we head to our Data Logger Activity, here in OnCreate() method first we will create a object of RecyclerView, then we will initialize our adapter by passing the RealmResult<SensorLogged> list which we have queried from the Realm Database.
Then we will set the LinearLayoutManager and finally, we will connect the the Adapter with the RecyclerView.
PSLab android app provides various new features like accessing data from the sensors that are either inbuilt into the Android phone or common I2C sensors which are connected to the PSLab device through PIC microcontroller. But the problem is that if the user records the data one time he/she may not be able to view that data in the future as there was no way to save that data somewhere. Saved data can be used for school experiments, preparing reports, research purposes etc.
So, now we have integrated Realm database with the Sensor Data Logger module which is a mobile database that can be used to store real-time data in fast and flawless manner. It is a object oriented database so it stores data in the form of objects which makes it usage with object oriented programming language like Java much easier.
In this blog we will demonstrate the process of storing data from one instrument i.e., Lux Meter which records illuminance with respect to time to understand the process.
First, we have defined a model class “SensorLogged” which contains information pertaining to all one experiment performed by the user. It will have fields like time of start of recording, the time of the end of the recording, date of recording, sensor name etc.
Whenever a user performs an experiment we will store a object of the SensorLogged model class in realm database containing info for that experiment.
We will use the object of this class for every reading of one measurement and provide them with the same Foreign Key which will be Primary key uniqueRef of “SensorLogged” model class.
In this way, we can query all the reading belonging to one measurement from the database containing all the LuxData entries.
For storing the data in Realm database we will follow these steps:
Begin the Realm transaction.
realm.beginTransaction();
Create a object of “SensorLogged” model class for every measurement with the unique Ref as the primary key and store the information like time of start, date of start, sensor name etc. copy it to the Realm Database.
For every sensor, reading create a object of LuxData and store the reading in it with the time elapsed and set all the object to same Foreign Key which is same as the Primary key stored in “SensorLogged.class” for this experiment in the previous step and copy it to Realm Database.
for (int i = 0; i < luxRealmData.size(); i++) {
   LuxData tempObject = luxRealmData.get(i);
   tempObject.setForeignKey(uniqueRef);
   realm.copyToRealm(tempObject);
   }
Commit the transaction
realm.commitTransaction();
Therefore now the data fetched for each sensor for every experiment is now being saved to the Realm database which we can easily query by using the following code.
Below code will query all the SensorLogged object in the form of RealmResult<SensorLogged> list which we can use to show to the user the list of all experiments.
And the code below will query all the LuxData object that contains reading belonging to one experiment whose uniqueRef has been provided as the ForeignKey.
This blog post shows how the avatar image of the user is displayed in the feedback section using the Gravatar service on SUSI.AI Android app. A Gravatar is a Globally Recognized Avatar. Your Gravatar is an image that follows you from site to site appearing beside your name when you do things like comment or post on a blog. So, it was decided to integrate the service to SUSI.AI, so that it helps to identify the user via the avatar image too.
Implementation
The aim is to use the user’s email address to get his/her avatar. For this purpose, Gravatar exposes a publicly available avatar of the user, which can be accessed via following steps :
Creating the Hash of the email
Sending the image request to Gravatar
For the purpose of creating the MD5 hash of the email, use the MessageDigest class. The function takes an algorithm such as SHA-1, MD5, etc. as input and returns a MessageDigest object that implements the specified digest algorithm.
Perform a final update on the digest using the specified array of bytes, which then completes the digest computation. That is, this method first calls update(input), passing the input array to the update method, then calls digest().
Convert the byte array to String, which is the requires MD5 hash of the email string.
funbyteArrayToString(array: Array<Byte>): String {
val result = StringBuilder(array.size * 2)
for (byte: Byte in array) {
val toAppend: String = String.format("%x", byte).replace(" ", "0")
result.append(toAppend)
}
return result.toString()
}
Now, a URL is generated using the hash. This is the URL that will be used to fetch the avatar.
The URL format is https://www.gravatar.com/avatar/HASH, where HASH is the hash of the email of the user. In case, the hash is invalid, Gravatar returns a placeholder avatar.
Also, append ‘.jpg’ to the URL to maintain image format consistency in the app.
Finally, load this URL using Picasso and set it in the appropriate view holder.
There are multiple instances where there is a need to make an API call to the SUSI.AI server to send or fetch data. The Android client uses Retrofit to make this process easier and more convenient. While making a GET or POST request, there are often multiple query parameters that need to sent along with the base url. Here is an example how this is done:
It can be seen that the list of params can be very long indeed. A long list of params would lead to more risks of incorrect key value pairs and typos. This blog would talk about replacing such multiple params with objects. The entire process would be explained with the help of an example of the API call being made to the getSkillFeedback.json API.
Step – 1 : Replace multiple params with a query map.
Step – 2 : Make a data class to hold query param values.
data classFetchFeedbackQuery(
val model: String,
val group: String,
val language: String,
val skill: String
)
Step – 3 : Instead of passing all different strings for different query params, pass an object of the data class. Hence, add the following code to the ISkillDetailsModel.kt interface.
Step – 4 : Add a function in the singleton file (ClientBuilder.java) to get SUSI client. This method should return a call.
...
public static Call<GetSkillFeedbackResponse> fetchFeedbackCall(FetchFeedbackQuery queryObject){
Map<String, String> queryMap = new HashMap<String, String>();
queryMap.put("model", queryObject.getModel());
queryMap.put("group", queryObject.getGroup());
queryMap.put("language", queryObject.getLanguage());
queryMap.put("skill", queryObject.getSkill());
//Similarly add other params that might be neededreturn susiService.fetchFeedback(queryMap);
}
...
Step – 5 : Send a request to the getSkillFeedback.json API by passing an object of FetchFeedbackQuery data class to the fetchFeedbackCall method of the ClientBuilder.java file which in turn would return a call to the aforementioned API.
No other major changes are needed except that instead of passing individual strings for each query param as params to different methods and creating maps at different places like in a view, create an object of FetchFeedbackQuery class and use it to pass data throughout the project. This ensures type safety. Also, data classes reduce the code length significantly and hence are more convenient to use in practice.
This blog post talks about the implementation of the checkRegistration.json API on the SUSI.AI server, which is a part of the AAA system. The API endpoint to check if an email address has been registered for SUSI is https://api.susi.ai/aaa/checkRegistration.json
It accepts one compulsory url parameter –
check_email – It is the parameter that contains the string type email address which the user enters in the email address field of the login screen.
The minimalUserRole is set to ANONYMOUS for this API, as initially the registration status of the email address is unknown.
API Development
The parameter is first extracted via the post object that is passed to the serviceImpl function. The parameter is then stored in a variable. If the parameter is absent, then it is set to the default value null.
There is a check if the email is null. If null, an exception is thrown.
This code snippet discusses the above two points –
@Override
public ServiceResponse serviceImpl(Query post, HttpServletResponse
response, Authorization auth, final JsonObjectWithDefault permissions)
throws APIException {
String checkEmail = post.get("check_email", null);
JSONObject result = new JSONObject();
if (checkEmail == null) {
thrownewAPIException(422, "Email not provided.");
}
.
.
.
Set the credential variable of type ClientCredential by passing the parameters passwd_login and checkEmail to the ClientCredential constructor.
Finally pass this credential variable to the getAuthentication method defined in the DAO to return the authentication object.
The authentication object then invokes the authentication.getIdentity() method. If the result is null, it means the email address has not been registered yet and vice-versa.
Internally, the entire checking procedure is done from the authentication.json file that is stored in data/settings/ directory of the server.
The response object is then sent with three key values mainly, apart from the session object. They are –
accepted – true – It tells that the API call has been successful.
exists – It tells that the email address has already been registered.
check_email – It is the same email address that was sent as a query parameter.
Here are the important code snippets –
Continuation of the first code snippet –
.
.
.
// check if id exists already
ClientCredential credential = new
ClientCredential(ClientCredential.Type.passwd_login, checkEmail);
Authentication authentication =DAO.getAuthentication(credential);
if (authentication.getIdentity() != null) {
result.put("exists", true);
} else {
result.put("exists", false);
}
result.put("accepted", true);
result.put("check_email", checkEmail);
returnnewServiceResponse(result);
}
Sample response of checkRegistration.json API endpoint –
The API development was done in the above explained way. This API will be used in improving the authentication flow in the Android client, where, if an email address has already been registered, then the user would be taken to the ‘Enter Password Screen’ otherwise he/she would be directed to the Signup screen.
SUSI.AI had a thumbs up/down rating system till now, which has now been replaced by a five star skill rating system. Now, the user is allowed to rate the skill based on a five star rating system. The UI components include a rating bar and below the rating bar is a section that displays the skill rating statistics – total number of ratings, average rating and a graph showing the percentage of users who rated the skill with five stars, four stars and so on.
SUSI.AI Skills are rules that are defined in SUSI Skill Data repo which are basically the processed responses that SUSI returns to the user queries. When a user queries something from the SUSI Android app, a query to SUSI Server is made which in turn fetches data from SUSI Skill Data and returns a JSON response to the app. Similarly, to get skill ratings, a call to the ‘/cms/getSkillList.json’ API is made. In this API, the server checks the SUSI Skill Data repo for the skills and returns a JSON response consisting of all the required information like skill name, author name, description, ratings, etc. to the app. Then, this JSON response is parsed to extract individual fields to display the appropriate information in the skill details screen of the app.
API Information
The endpoint to fetch skills is ‘/cms/getSkillList.json’ The endpoints takes three parameters as input –
model – It tells the model to which the skill belongs. The default value is set to general.
group – It tells the group(category) to which the skill belongs. The default value is set to All.
language – It tells the language to which the skill belongs. The default value is set to en.
Since all skills have to be fetched, this API is called for every group individually. For instance, call “https://api.susi.ai/cms/getSkillList.json?group=Knowledge” to get all skills in group “Knowledge”. Similarly, call for other groups.
Here is a sample response of a skill named ‘Capital’ from the group Knowledge :
"capital": {
      "model": "general",
      "group": "Knowledge",
      "language": "en",
      "developer_privacy_policy": null,
      "descriptions": "A skill to tell user about capital of any country.",
      "image": "images/capital.png",
      "author": "chashmeet singh",
      "author_url": "https://github.com/chashmeetsingh",
      "skill_name": "Capital",
      "terms_of_use": null,
      "dynamic_content": true,
      "examples": ["What is the capital of India?"],
      "skill_rating": {
        "negative": "0",
        "positive": "4",
        "feedback_count" : 0,
        "stars": {
          "one_star": 0,
          "four_star": 1,
          "five_star": 0,
          "total_star": 1,
          "three_star": 0,
          "avg_star": 4,
          "two_star": 0
        }
      },
      "creationTime": "2018-03-17T17:11:59Z",
      "lastAccessTime": "2018-06-06T00:46:22Z",
      "lastModifiedTime": "2018-03-17T17:11:59Z"
    },
It consists of all details about the skill called ‘Capital’:
From among all this information, the information of interest for this blog is Skill Rating. This blog mainly deals with showing how to parse the JSON response to get the skill rating star values, so as to display the actual data in the skill rating graph.
A request to the getSkillList API is made for each group using the GET method.
It returns a JSON response consisting of all the aforementioned information. Now, to parse the JSON response, do the following :
Add a response for the response received as a result of API call. ListSkillsResponse contains two objects – group and skills. This blog is about getting the skill rating, so let us proceed with parsing the required response. The skills object contains the skill data that we need. Hence, next a SkillData class is created.
Now, add the SkillData class. This class defines the response that we saw for ‘Capital’ skill above. It contains skill name, author, skill rating and so on.
classSkillData : Serializable {
var image: String = ""
@SerializedName("author_url")
@Expose
var authorUrl: String = ""var examples: List<String> = ArrayList()
@SerializedName("developer_privacy_policy")
@Expose
var developerPrivacyPolicy: String = ""var author: String = ""
@SerializedName("skill_name")
@Expose
var skillName: String = ""
@SerializedName("dynamic_content")
@Expose
var dynamicContent: Boolean? = null
@SerializedName("terms_of_use")
@Expose
var termsOfUse: String = ""var descriptions: String = ""
@SerializedName("skill_rating")
@Expose
var skillRating: SkillRating? = null
}
Now, add the SkillRating class. As what is required is the skill rating, narrowing down to the skill_rating object. The skill_rating object contains the actual rating for each skill i.e. the stars values. So, this files defines the response for the skill_rating object.
classSkillRating : Serializable {
var stars: Stars? = null
}
Further, add a Stars class. Ultimately, the values that are needed are the number of users who rated a skill at five stars, four stars and so on and also the total number of users and the average rating. Thus, this file contains the values inside the ‘stars’ object.
classStars : Serializable {
@SerializedName("one_star")
@Expose
var oneStar: String? = null
@SerializedName("two_star")
@Expose
var twoStar: String? = null
@SerializedName("three_star")
@Expose
var threeStar: String? = null
@SerializedName("four_star")
@Expose
var fourStar: String? = null
@SerializedName("five_star")
@Expose
var fiveStar: String? = null
@SerializedName("total_star")
@Expose
var totalStar: String? = null
@SerializedName("avg_star")
@Expose
var averageStar: String? = null
}
Now, the parsing is all done. It is time to use these values to plot the skill rating graph and complete the section displaying the five star skill rating.
To plot these values on the skill rating graph refer to the blog on plotting horizontal bar graph using MPAndroid Chart library. In step 5 of the linked blog, replace the second parameter to the BarEntry constructor by the actual values obtained by parsing.
Here is how we do it.
To get the total number of ratings
val totalNumberofRatings: Int = skillData.skillRating?.stars?.totalStars
To get the average rating
val averageRating: Float = skillData.skillRating?.stars?.averageStars
To get number of users who rated the skill at five stars
val fiveStarUsers: Int = skillData.skillRating?.stars?.fiveStar
Similarly, get the number of users for fourStar, threeStar, twoStar and oneStar.
Note : If the totalNumberOfRatings equals to zero, then the skill is unrated. In this case, display a message informing the user that the skill is unrated instead of plotting the graph.
Now, as the graph shows the percentage of users who rated the skill at a particular number of stars, calculate the percentage of users corresponding to each rating, parse the result to Float and place it as the second parameter to the BarEntry constructor as follows :
Similarly, replace the values for all five entries. Finally, add the total ratings and average rating section and display the detailed skill rating statistics for each skill, as in the following figure.


You must be logged in to post a comment.