Making SUSI Alexa skill as an express app

Previously SUSI Alexa skill was deployed using AWS Lambda service (Refer to this blog). Each SUSI.AI Bot should be deployed on Google cloud using Kubernetes. To accomplish that, we need to remove the dependency of the SUSI Alexa skill from AWS Lambda service. We need to make it an express app, to be able to deploy it to Google cloud. Let’s start with on how to achieve it:

SUSI Alexa skill:

We require three files to make the skill as an express app. The main entry point for the skill would be server.js file, which will serve the incoming request using two helper files alexa.js and handlers.js.

Server.js:

This file acts as the main entry point for the incoming request. We handle two type of requests using it, that are:

  1. Launch request
  2. Intent request

Launch request is triggered when a person utters “Alexa, open susi chat” , “Alexa, start susi chat”, “Alexa, launch susi chat” etc. This request is responded with an introductory phrase about SUSI.AI. To catch this request:

if (type === "LaunchRequest") {
        var endpoint = "http://api.susi.ai/susi/chat.json?q="+"Welcome"; // ENDPOINT GOES HERE
        
        http.get(endpoint, (response1) => {
            var body = "";
            response1.on("data", (chunk) => { body += chunk; });
            response1.on("end", () => {
                var viewCount;
                viewCount = JSON.parse(body).answers[0].actions[0].expression;
                endpoint = "http://api.susi.ai/susi/chat.json?q="+"Get+started"; // ENDPOINT GOES HERE
                body = "";
                http.get(endpoint, (response2) => {
                    response2.on("data", (chunk) => { body += chunk; });
                    response2.on("end", () => {
                        viewCount += JSON.parse(body);.answers[0].actions[0].expression;
                        response.say(viewCount,false);
                    });
                });
            });
        });
    }

Intent request gets triggered, when any other phrase is uttered by the user except Launch related phrases. We check if the intent triggered has a corresponding handler to handle the request. If the handler is found in handlers.js file, we call it passing the required arguments to the handler function. Let’s see how handlers make this step possible.

Handler.js:

This file decides on what function to run when a particular type of intent is triggered. As we have just one intent for our SUSI Alexa skill i.e. callSusiApi, we have just one function in our handlers.js file. During its execution, the first step we do is extract the query value:

let query = slots.query.value;

Depending upon the query value, we run its corresponding code. For example, in case of a generic query (i.e. any query except stop, cancel and help):

var endpoint = "http://api.susi.ai/susi/chat.json?q="+query; // ENDPOINT GOES HERE

http.get(endpoint, (response1) => {
    var body = "";
    response1.on("data", (chunk) => { body += chunk; });
    response1.on("end", () => {
        var data = JSON.parse(body);
        if(data.answers[0].actions[1]){
            // handle rss and table type results
        }
        else
        {
            viewCount = data.answers[0].actions[0].expression;
        }
        response.say(viewCount,true);
    });
});

At the end of the function we respond to the user with an answer to his/her query using:

response.say(viewCount,true);

Alexa.js:

When we get a request from the user, we pass that request and response object to this file. This file helps us wrap the required request properties into an object and return that back to the server file, which was the entry point for the request. Now, we can easily extract the properties in server file and work with those:

We extract the properties like this:

let session = req.body.session,
        intent,
        slots;
session.attributes = session.attributes || {};

if (req.body.request.intent) {
    intent = req.body.request.intent.name;
    slots = req.body.request.intent.slots;
}

Then we return the object back at the end:

return {
        type: req.body.request.type,
        intent: intent,
        slots: slots,
        session: session,
        response: {
            say: (text, shouldEndSession) => say(text, shouldEndSession),
            ask: (text, shouldEndSession) => say(text, shouldEndSession)
        }
    };

Great, we have made the SUSI Alexa skill as an express app. The next step is to do some changes in the configuration tab of our skill:

  1. Instead of Amazon resource number, we fill our webhook address here: 

  2. A new property shows up that is SSL certificate. As we are using Heroku for webhook services, we select the second option as shown below: 

  3. It’s time to test the skill: 

    This repository by Salesforce helped me a lot in making the SUSI skill as an express app.

    Resources:

    1. Developing Alexa Skills Locally with Node.js by Josh Skeen from Bignerdranch.
    2. Amazon Alexa Skills: Create a Custom Skill by Simon Coope from SJCNET.
Continue ReadingMaking SUSI Alexa skill as an express app

How Switch Case improve performance in PSLab Saved Experiments

PSLab android application contains nearly 70 experiments one can experiment on using the PSLab device and the other necessary circuit components and devices. These experiments span over areas such as Electronics, Electrical, Physical and High school level. All these experiments are accessible via an android adapter in the repository named “PerformExperimentAdapter”. This adapter houses a tab view with two different tabs; one for the experiment details and the other for actual experiment and resultant graphs.

The adapter extends an inbuilt class FragmentPagerAdapter;

public class PerformExperimentAdapter extends FragmentPagerAdapter

This class displays every page attached to its viewpager as a fragment. The good thing about using fragments is that they have a recyclable life cycle. Rather than creating new views for every instance of an experiment, the similar views can be recycled to use once again saving resources and improving performance. FragmentPagerAdapter needs to override a method to display the correct view on the tab select by user.

@Override
public Fragment getItem(int position) {

}

Depending on the value of position, relevant experiment documentation and the experiment implementation fragments are displayed determined using the experiment title. Performance can be critical in this place as if it takes too long to process and render a fragment, user will feel a lag.

The previous implementation was using consecutive if statements.

@Override
public Fragment getItem(int position) {
   switch (position) {
       case 0:
           if (experimentTitle.equals(context.getString(R.string.diode_iv)))
               return ExperimentDocFragment.newInstance("D_diodeIV.html");
           if (experimentTitle.equals(context.getString(R.string.zener_iv)))
               return ExperimentDocFragment.newInstance("D_ZenerIV.html");
           ...
       case 1:
           if (experimentTitle.equals(context.getString(R.string.diode_iv)))
               return ZenerSetupFragment.newInstance();
           if (experimentTitle.equals(context.getString(R.string.zener_iv)))
               return DiodeExperiment.newInstance(context.getString(R.string.half_wave_rectifier));
           ...
       default:
           return ExperimentDocFragment.newInstance("astable-multivibrator.html");
   }
}

This setup was suitable for applications where there is less than around 5 choices to chose between. As the list grows, the elements in the end of the if layers will take more time to load as each of the previous if statements need to be evaluated false in order to reach the bottom statements.

This is when this implementation was replaced using switch case statements instead of consecutive if statements. The theory behind the performance improvement involves algorithm structures; Hash Tables

Hash Tables

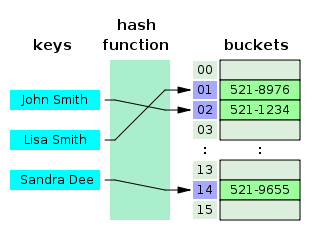
Hash tables use a hash function to calculate the index of the destination cell. This operation on average has a complexity of O(1) which means it will take the same time to access any two elements which are randomly positioned.

This is possible because java uses the hash code of the string to determine the index where the target is situated at. This way it is much faster than consecutive if statement calls where in the worst case it will take O(n) time to reach the statement causing a lag in the application.

Current application uses switch cases in the PerformExperimentAdapter;

@Override
public Fragment getItem(int position) {
   switch (position) {
       case 0:
           switch (experimentTitle) {
               case "Diode IV Characteristics":
                   return ExperimentDocFragment.newInstance("D_diodeIV.html");
               case "Zener IV Characteristics":
                   return ExperimentDocFragment.newInstance("D_ZenerIV.html");
               case "Half Wave Rectifier":
                   return ExperimentDocFragment.newInstance("L_halfWave.html");
           }
       case 1:
           switch (experimentTitle) {
               case "Diode IV Characteristics":
                   return ZenerSetupFragment.newInstance();
               case "Zener IV Characteristics":
                   return ZenerSetupFragment.newInstance();
               case "Half Wave Rectifier":
                   return DiodeExperiment.newInstance(context.getString(R.string.half_wave_rectifier));
           }
       default:
           return ExperimentDocFragment.newInstance("astable-multivibrator.html");
   }
}

There is one downfall in using switch case in the context. That is the inability to use string resources directly as Java requires a constant literals in the evaluation statement of a case.

Resources:

Continue ReadingHow Switch Case improve performance in PSLab Saved Experiments

Coloring Waveforms in PSLab Charts

Charts are used to display set of data in an analytical manner such that an observer can easily come to a conclusion by just looking at it without having to go through all the numerical data sets. Legends are used to differentiate a set of data set from another set. Generally, different colors and different names are used to form a legend in a chart.

MPAndroidChart is an amazing library with the capability of generating different types of graphs in an Android device. In PSLab several user interfaces are implemented using LineCharts to display different waveforms such as readings from channels attached to PSLab device, logic levels etc.

When several data sets are being plotted on the same graph area, legends are used. In PSLab Android application, Oscilloscope supports four different type of waveforms to be plotted on the same graph. Logic Analyzer implements one to four different types of logic level waveforms on the same plot. To identify which is which, legends with different colors can be used rather than just the names. For the legends to have different colors, it should be explicitly set which color should be held by which data set. Otherwise it will use the default color to all the legends making it hard to differentiate data lines when there are more than one data set is plotted.

Assume a data set is generated from a reading taken from a probe attached to PSLab device. The set will be added as an Entry to an array list as follows;

ArrayList<Entry> dataSet = new ArrayList<Entry>();

The next step will be to create a Line Data Set

LineDataSet lineData = new LineDataSet(dataSet, "DataSet 1");

This LineDataSet will contain sample values of the waveform captured by the microprocessor. A LineDataSet object support many methods to alter its look and feel. In order to set a color for the legend, setColor() method will be useful. This method accepts an integer as the color. This method can be accessed as follows;

lineData.setColor(Color.YELLOW);

MPAndroidChart provides different sets of colors under ColorTemplate. This class has several predefined colors with five colors in each color palette are added by the developers of the library and they can be accessed using the following line of code by simply calling the index value of the palette array list.

set1.setColor(ColorTemplate.JOYFUL_COLORS[0]);

Set of color palettes available in the ColorTemplate class are;

  1. LIBERTY_COLORS
  2. JOYFUL_COLORS
  3. PASTEL_COLORS
  4. COLORFUL_COLORS
  5. VORDIPLOM_COLORS
  6. MATERIAL_COLORS

The following demonstrates how the above activities produce a line chart with three different data sets with different colored legends.

This implementation can be used to enhance the readability of the waveforms letting user being able to differentiate between one waveform from another in PSLab Android application.

Resources:

PSLab official web site: https://pslab.fossasia.org/

Continue ReadingColoring Waveforms in PSLab Charts

How to Parse HTML Tags and Anchor Clickable Links in SUSI Android App

Html tags are used to define how contents of a webpage should be formatted and displayed. Sometimes the SUSI answer type response contains some html tags but showing these html tags without parsing would distort the normal text flow in SUSI Android.

For the query ‘Ask me something’ SUSI’s reply is

“data”: [
     {
      “question”: “Which soccer team won the Copa Am&eacute;rica 2015 Championship ? “,                                          
     }]

In SUSI Android this message looks like

As you can see that showing html tags without parsing distort the normal text flow. So we need to parse html tags properly. We use Html class for this purpose. Html class is present in android.text package and you can import it in the class where you want to use it.

import android.text.Html

fromHtml method of Html class is used to parse html tags. But for API level less than 24 and equal to or greater than 24 we use different parameters in fromHtml method.

For API level less than 24 we used

Html.fromHtml(model.getContent())

But for API level equal to or greater than 24 we have to use

Html.fromHtml(model.getContent(), Html.FROM_HTML_MODE_COMPACT)

Here the second parameter is legacy flags which decides how text inside a tag will be shown after parsing.

In case of Html.fromHtml(String string) legacy flag is by default FROM_HTML_MODE_LEGACY. It indicates that separate block-level elements with blank lines.

So after parsing html tags using fromHtml

But return type of fromHtml method is Spanned so if you need String then you have to convert it into string using toString() method.

Anchor action type in susi response contains link and text.

       “link”: “https://www.openstreetmap.org/#map=13/1.2896698812440377/103.85006683126556”,
       “text”: “Link to Openstreetmap: Singapore”

Here the text is the text we show in textview and link is used to show web content in the browser when user click on text. So first link and text are attached together like

“<a href=\”” +susiResponse.getAnswers().get(0).getActions().get(i).getAnchorLink() + “\”>”
+ susiResponse.getAnswers().get(0).getActions().get(1).getAnchorText() + “</a>”

Here text between the tag is description of link and after parsing we show this text in textview. It can be parsed using fromHtml method of Html class and textview is made clickable by

chatTextView.setMovementMethod(LinkMovementMethod.getInstance());

Resources

Continue ReadingHow to Parse HTML Tags and Anchor Clickable Links in SUSI Android App

Reset Password Option in SUSI Android App

Login and signup are an important feature for some android apps like chat apps because the user will want to save and secure personal messages from others. In SUSI Android app we provide a token to a logged-in user for a limit period of time so that once the user logs in and someone else gets access to the device, then he/she can’t use the user account for a long period of time. It is a security provided from our side but the user also has to maintain some security. Cyber security risks have increased and hacking technologies have improved a lot in the past 10 years. So, using the same password for a long period of time absolutely puts your account security at risk. So to keep your account secure you should change/reset your password regularly. In this blog post, I will show you how reset password option is implemented in SUSI Android app.

Layout design for reset password

Reset password option is added in the setting. When the user clicks on reset password option a dialog box pops up. There are three textinputlayout boxes – each for the current password, new password and confirm password. I have used textinputlayout instead of simple edittext box because it helps user to show first “hint” and when user taps on, hint will come up with text over it as floating label so that the user can understand what to add in that box and also in case of error we can show that error to user.

Reset Password implementation

On clicking reset password option a dialog box appears in which user inserts the current password, new password and confirm password to confirm the new password. Before sending new password to the server we perform two checks

  1. New password should not be empty and length of new password should be at least six.
  2. New password and confirm password must be same.
if (!CredentialHelper.isPasswordValid(newPassword)) {

settingView?.passwordInvalid(Constant.NEW_PASSWORD)

return

}

if (newPassword != conPassword) {

settingView?.invalidCredentials(false, Constant.NEW_PASSWORD)

return

}

And when these two checks are passed we send “new password” to server.

Endpoint use to reset password is

http://api.susi.ai/aaa/changepassword.json?changepassword=your mail id&password=current password&newpassword=newpassword

As you can see it needed three parameters

  • changepassword: Your email id
  • password : Your current password
  • newpassword: Your new password

When user logs in, we save user’s email id so that the user doesn’t have to provide it again and again when the user wants to change the password.

utilModel.saveEmail(email)

The user provides current password and new password through dialog box. We used resetPassword method to reset the password. We send these three parameters to the server using resetPassword method and if the password changed successfully then server sends a message.

override fun resetPassword(password: String, newPassword: String, listener: ISettingModel.onSettingFinishListener) {

  val email = PrefManager.getString(Constant.SAVE_EMAIL, null)

  resetPasswordResponseCall = ClientBuilder().susiApi

          .resetPasswordResponse(email,password,newPassword)

  resetPasswordResponseCall.enqueue(object : Callback<ResetPasswordResponse> {

  } )

}

We used retrofit library for network call and resetPasswordResponse is a model class using which we are retrieving server response.

Reference

Continue ReadingReset Password Option in SUSI Android App

Displaying essential features when the Phimpme Application starts

In this blog, I will explain how I implemented showcase View to display all the essential features of the Phimpme Android application when the application starts first. In this, the users will know which activity is used for what purpose.  

Importing material design Showcase View

I used material design showcase in Phimpme  Android application to take the benefit of the latest Android design and to add more text on the screen which is easily visible by the users. We need to add the following to our gradle.

compile 'com.github.deano2390:MaterialShowcaseView:1.1.0'

There is a very good repository in Github for material design Showcase view which we have used here.

Implementing Material design showcaseView on the desired activity

In Phimpme Android application we have three main activity on the home screen. Namely:

  • Camera
  • Gallery
  • Accounts Activity

Camera Activity and Gallery Activity is used to take pictures and select the picture respectively. Accounts Activity contains more than 10 accounts of various social media platforms and storage platform. When the application starts my aim is to display the function of all three activities in a showcase View. it is implemented in the following Steps:

Step 1

Import all the module from the Material showcase view we have used in the gradle.

import uk.co.deanwild.materialshowcaseview.MaterialShowcaseSequence;
import uk.co.deanwild.materialshowcaseview.MaterialShowcaseView;
import uk.co.deanwild.materialshowcaseview.ShowcaseConfig;

Step 2

Get the reference all the buttons you want to show the features. These buttons will be highlighted when the showcase View is displayed.

nav_home = (BottomNavigationItemView) findViewById(R.id.navigation_home);
nav_cam = (BottomNavigationItemView) findViewById(R.id.navigation_camera);
nav_acc = (BottomNavigationItemView) findViewById(R.id.navigation_accounts);

Step 3

In Phimpme Android application I have used to display the features of three navigation buttons. So, to display the features of more than one button or View we have to use MaterialShowcaseSequence class to display the features of the buttons in a sequence, that is one after the other.

In the onCreate activity, I am calling presentShowcaseSequence function. This function has a delay time. This delay time is required to wait for four seconds until the splash screen activity is over and the activity is started.

private void presentShowcaseSequence() {
   ShowcaseConfig config = new ShowcaseConfig();
   config.setDelay(4000); // half second between each showcase view
   MaterialShowcaseSequence sequence = new MaterialShowcaseSequence(this, SHOWCASE_ID);
   sequence.setOnItemShownListener(new MaterialShowcaseSequence.OnSequenceItemShownListener() {
       @Override
       public void onShow(MaterialShowcaseView itemView, int position) {
       }
   });
   sequence.setConfig(config);

Step 4

Set the initial target Button. This target button will be pointed first when the app is launched for the first time.

sequence.addSequenceItem(nav_home, getResources().getString(R.string.home_button), getResources().getString(R.string.ok_button));


Step 5

Add subsequent target buttons to display the features of that buttons. To add more subsequent target buttons we will use function addSequenceitem. To set the target we have specify the button which we want to focus in setTarget(Button). We need to display the text which will show the important features in regarding that activity in setContentText(text to be displayed). For a dismiss button we need to specify the a string in setDismissText(Dismiss button string)

sequence.addSequenceItem(
       new MaterialShowcaseView.Builder(this)
               .setTarget(nav_cam)
               .setDismissText(getResources().getString(R.string.ok_button))
               .setContentText(getResources().getString(R.string.camera_button))
               .build()
);
sequence.addSequenceItem(
       new MaterialShowcaseView.Builder(this)
               .setTarget(nav_acc)
               .setDismissText(getResources().getString(R.string.ok_button))
               .setContentText(getResources().getString(R.string.accounts_button))
               .build()
);
sequence.start();

Sequence.start is used to display the showcase.

Conclusion

Using this method users can easily have the knowledge of the functionality of the application and can navigate through the activities without wasting a lot of time in figuring out the functionality of the application.

Github

Resources


Continue ReadingDisplaying essential features when the Phimpme Application starts

Adding download feature to LoklakWordCloud app on Loklak apps site

One of the most important and useful feature that has recently been added to LoklakWordCloud app is enabling the user to download the generated word cloud as a png/jpeg image. This feature will allow the user to actually use this app as a tool to generate a word cloud using twitter data and save it on their disks for future use.

All that the user needs to do is generate the word cloud, choose an image type (png or jpeg) and click on export as image, a preview of the image to be downloaded will be displayed. Just hit enter and the word cloud will be saved on your disk. Thus users will not have to use any alternative process like taking a screenshot of the word cloud generated, etc.

Presently the complete app is hosted on Loklak apps site.

How does it work?

What we are doing is, we are exporting a part of the page (a div) as image and saving it. Apparently it might seem that we are taking a screenshot of a particular portion of a page and generating a download link. But actually it is not like that. The word cloud that is being generated by this app via Jqcloud is actually a collection of HTML nodes. Each node contains a word (part of the cloud) as a text content with some CSS styles to specify the size and color of that word. As user clicks on export to image option, the app traverses the div containing the cloud. It collects information about all the HTML nodes present under that div and creates a canvas representation of the entire div. So rather than taking a screenshot of the div, the app recreates the entire div and presents it to us. This entire process is accomplished by a lightweight JS library called html2canvas.

Let us have a look into the code that implements the download feature. At first we need to create the UI for the export and download option. User should be able to choose between png and jpeg before exporting to image. For this we have provided a dropdown containing the two options.

<div class="dropdown type" ng-if="download">
                <div class="dropdown-toggle select-type" data-toggle="dropdown">
                  {{imageType}}
                <span class="caret"></span></div>
                <ul class="dropdown-menu">
                  <li ng-click="changeType('png', 'png')"><a href="">png</a></li>
                  <li ng-click="changeType('jpeg', 'jpg')"><a href="">jpeg</a></li>
                </ul>
              </div>
              <a class="export" ng-click="export()" ng-if="download">Export as image</a>

In the above code snippet, firstly we create a dropdown menu with two list items, png and jpeg. With each each list item we attach a ng-click event which calls changeType function and passes two parameters, image type and extension.

The changeType function simply updates the current image type and extension with the selected ones.

$scope.changeType = function(type, ext) {
        $scope.imageType = type;
        $scope.imageExt = ext;
    }

The ‘export as image’ on clicking calls the export function. The export function uses html2canvas library’s interface to generate the canvas representation of the word cloud and also generates the download link and attaches it to the modal’s save button (described below). After everything is done it finally opens a modal with preview image and save option.

$scope.export = function() {
        html2canvas($(".wordcloud"), {
          onrendered: function(canvas) {
            var imgageData = canvas.toDataURL("image/" + $scope.imageType);
            var regex = /^data:image\/jpeg/;
            if ($scope.imageType === "png") {
                regex = /^data:image\/png/;
            }
            var newData = imgageData.replace(regex, "data:application/octet-stream");
            canvas.style.width = "80%";
            $(".wordcloud-canvas").html(canvas);
            $(".save-btn").attr("download", "Wordcloud." + $scope.imageExt).attr("href", newData);
            $("#preview").modal('show');
          },
          background: "#ffffff"
        });
    }

At the very beginning of this function, a call is made to html2canvas module and the div containing the word cloud is passed as a parameter. An object is also passed which contains a callback function defined for onrendered key. Inside the callback function we check the current image type and generate the corresponding url from the canvas. We display this canvas in the modal and set this download url as the href value of the modal’s save button.

Finally we display the modal.

The modal simply contains the preview image and a button to save the image on disk.

A sample image produced by the app is shown below.

Important resources

  • Know more about html2canvas here.
  • Know more about Jqcloud here.
  • View the app source here.
  • View loklak apps site source here.
  • View Loklak API documentation here
  • Learn more about AngularJS here.
Continue ReadingAdding download feature to LoklakWordCloud app on Loklak apps site

Implementing Feedback Feature in SUSI Android App

Recently, on SUSI Server, a new servlet was added which is used to rate SUSI Skills either positive or negative. The server stores the rating of a particular skill in a JSON file. These ratings help in improving answers provided by SUSI. So, the server part is done and it was required to implement this in the SUSI Android App. In this blog, I will cover the topic of implementation of the Rating or Feedback feature in SUSI Android App. This will including all the cases when feedback should be sent, when it should not be sent, when to send positive feedback, when to send negative feedback, etc.

API Information

For rating a SUSI Skill, we have to call on  /cms/rateSkill.json providing 5 parameters which are:

  1. model: The model of SUSI Skill. (String)
  2. group: The Group under the model in which that particular skill resides. (String)
  3. language: The language of skill. (String)
  4. skill: This is skill name. (String)
  5. rating: This can be two strings, either “positive” or “negative”. String)

Basically, in the SUSI Skill Data repo (in which all the skills are stored), models, groups language etc are part of folder structure.

So, if a skill is located here

https://github.com/fossasia/susi_skill_data/blob/master/models/general/Knowledge/en/news.txt

This would mean

model = general

group = Knowledge

language = en

skill = news

rating = positive/negative

Implementation in SUSI Android App


So, when the like button on a particular skill is clicked, a positive call is made and when the dislike button is clicked, a negative call is made.

Let’s see example when the thumbs up button or like button is clicked.

There can be three cases possible:

  1. None of Like button or dislike button is clicked already: In this case, initially, both like and dislike button will be transparent/hollow. So, when like button is clicked, the like button will be colored blue and a call will be made with positive feedback.
  2. Like button is already clicked: In this case, like button is already clicked. So, it will already be blue. So, when user clicks again on positive button, it should get back to normal/hollow indicating rating which was sent is cancelled and a a call will be made with negative feedback thus cancelling or neutralizing the earlier, positive feedback.
  3. Dislike button is already clicked: In this case, the dislike button is already blue, indicating a negative call is already made. So, now when the like button is clicked, we need to cancel the earlier negative feedback call and sending another negative feedback call. Thus, sending two negative feedback calls. And after that coloring dislike button as blue.

Look at the code below. It is self explanatory. There are three if-else conditions covering all the above mentioned three cases.

thumbsUp.setOnClickListener(new View.OnClickListener() {
   @Override
   public void onClick(View view) {
       thumbsUp.setImageResource(R.drawable.thumbs_up_solid);
       if(!model.isPositiveRated() && !model.isNegativeRated()) {
           rateSusiSkill(Constant.POSITIVE, model.getSkillLocation(), context);
           setRating(true, true);
       } else if(!model.isPositiveRated() && model.isNegativeRated()) {
           setRating(false, false);
           thumbsDown.setImageResource(R.drawable.thumbs_down_outline);
           rateSusiSkill(Constant.POSITIVE, model.getSkillLocation(), context);
           sleep(500);
           rateSusiSkill(Constant.POSITIVE, model.getSkillLocation(), context);
           setRating(true, true);
       } else if (model.isPositiveRated() && !model.isNegativeRated()) {
           rateSusiSkill(Constant.NEGATIVE, model.getSkillLocation(), context);
           setRating(false, true);
           thumbsUp.setImageResource(R.drawable.thumbs_up_outline);
       }
   }
});

Similarly for when dislike button is clicked, the above three mentioned cases still hold resulting in this code snippet.

thumbsDown.setOnClickListener(new View.OnClickListener() {
   @Override
   public void onClick(View view) {
       thumbsDown.setImageResource(R.drawable.thumbs_down_solid);
       if(!model.isPositiveRated() && !model.isNegativeRated()) {
           rateSusiSkill(Constant.NEGATIVE, model.getSkillLocation(), context);
           setRating(true, false);
       } else if(model.isPositiveRated() && !model.isNegativeRated()) {
           setRating(false, true);
           thumbsUp.setImageResource(R.drawable.thumbs_up_outline);
           rateSusiSkill(Constant.NEGATIVE, model.getSkillLocation(), context);
           sleep(500);
           rateSusiSkill(Constant.NEGATIVE, model.getSkillLocation(), context);
           setRating(true, false);
       } else if (!model.isPositiveRated() && model.isNegativeRated()) {
           rateSusiSkill(Constant.POSITIVE, model.getSkillLocation(), context);
           setRating(false, false);
           thumbsDown.setImageResource(R.drawable.thumbs_down_outline);
       }
   }
});

Summary

So, this blog talked about how the Feedback feature in SUSI Android App is implemented. This included how a network call is made, logic for sending positive/negative feedback, logic to withdraw feedback etc. So, If you are looking forward to contribute to SUSI Android App, this can help you a little. But if not so, this may also help you in understanding and how rating mechanism in social media websites like Facebook, Twitter, Quora, Reddit, etc work.

References

  1. To know about servlets https://en.wikipedia.org/wiki/Java_servlet
  2. To see how to implement one https://www.javatpoint.com/servlet-tutorial
  3. To see how to make network calls in android using Retrofit https://guides.codepath.com/android/Consuming-APIs-with-Retrofit
  4. To see how to implement click listeners on button https://developer.android.com/reference/android/view/View.OnClickListener.html
Continue ReadingImplementing Feedback Feature in SUSI Android App