Adding Github buttons to Generated Documentation with Yaydoc

Many times repository owners would want to link to their github source code, issue tracker etc. from the documentation. This would also help to direct some users to become a potential contributor to the repository. As a step towards this feature, we added the ability to add automatically generated GitHub buttons to the top of the docs with Yaydoc.

To do so we created a custom sphinx extension which makes use of http://buttons.github.io/ which is an excellent service to embed GitHub buttons to any website. The extension takes multiple config values and using them generates the `html` which it adds to the top of the internal docutils tree using a raw node.

GITHUB_BUTTON_SPEC = {
    'watch': ('eye', 'https://github.com/{user}/{repo}/subscription'),
    'star': ('star', 'https://github.com/{user}/{repo}'),
    'fork': ('repo-forked', 'https://github.com/{user}/{repo}/fork'),
    'follow': ('', 'https://github.com/{user}'),
    'issues': ('issue-opened', 'https://github.com/{user}/{repo}/issues'),
}

def get_button_tag(user, repo, btn_type, show_count, size):
    spec = GITHUB_BUTTON_SPEC[btn_type]
    icon, href = spec[0], spec[1].format(user=user, repo=repo)
    tag_fmt = '<a class="github-button" href="{href}" data-size="{size}"'
    if icon:
        tag_fmt += ' data-icon="octicon-{icon}"'
    tag_fmt += ' data-show-count="{show_count}">{text}</a>'
    return tag_fmt.format(href=href,
                          icon=icon,
                          size=size,
                          show_count=show_count,
                          text=btn_type.title())

The above snippet shows how it takes various parameters such as the user name, name of the repository, the button type which can be one of fork, issues, watch, follow and star, whether to display counts beside the buttons and whether a large button should be used. Another method named get_button_tags is used to read the various configs and call the above method with appropriate parameters to generate each button.

The extension makes use of the doctree-resolved event emitted by sphinx to hook into the internal doctree. The following snippet shows how it is done.

def on_doctree_resolved(app, doctree, docname):
    if not app.config.github_user_name or not app.config.github_repo:
        return
    buttons = nodes.raw('', get_button_tags(app.config), format='html')
    doctree.insert(0, buttons)

Finally we add the custom javascript using the add_javascript method.

app.add_javascript('https://buttons.github.io/buttons.js')

To use this with yaydoc, users would just need to add the following to their .yaydoc.yml file.

build:
  github_button:
    buttons:
      watch: true
      star: true
      issues: true
      fork: true
      follow: true
    show_count: true
    large: true

Resources

  1.  Homepage of Github:buttons – http://buttons.github.io/
  2. Sphinx extension Tutorial – http://www.sphinx-doc.org/en/stable/extdev/tutorial.html
Continue ReadingAdding Github buttons to Generated Documentation with Yaydoc

Generate Requirement File for Python App for Meilix-Generator

Meilix-Generator is based upon Flask (a Python framework) which has several dependencies to fulfill before actually running the app properly. This article will guide you through the way I used it to automatically generate the requirement file for Meilix Generator app so that one doesn’t have to manually type all the requirements.

An app powered by Python always has several dependencies to fulfill to run the app successfully. The app root directory contains a file named as requirements.txt which contains the name of the dependency and their version. There are features ways to generate the requirement file for an app but the one which I will demonstrate is the best one. So I used this idea to generate the requirement file for webapp Meilix Generator.

Ways to get the requirement.txt

The internet has a featured way through which one has just to run a command to get a list of all the different dependencies within an app.

pip freeze > requirements.txt

This way will generate a bunch of dependencies that we not even required.

Why do we really require to generate a requirement file?

Yes, one may even ask that we can even write the dependency in the requirements.txt file. Why do we need a command to generate it?

Since because it will take care of two important things:
1. It will ensure that all the dependencies have been included, from user input one may forget to find some of the dependency and to include that.

  1. It will also take care of the Python Package Version Pinning which is really important. People use to version pinning for Python requirements as “>=” style. It’s important to follow “==” style because If we want to install the program in one year in the future, the required packages should be pinned to assure that the API changes in the installed packages do not break the program. Please read here for more info.

The way mentioned below will ensure to provide both these features.

How I generated it for Meilix Generator?

Meilix Generator run on Flask that require a requirement.txt file to fulfill the dependencies. Let’s get straight to the way to generate it for the project.

First we will simply create a requirements.in file in which we will simply mention all the dependencies in a simple way:

Flask
gunicorn
Werkzeug

Now we will use a command to latest packages:

pip install --upgrade -r requirements.in

#Note that if you would like to change the requirements, please edit the requirements.in file and run this command to update the dependencies

Then type this command to generate the requirements.txt file from requirements.in

pip-compile --output-file requirements.txt requirements.in

#fix the versions that definitely work for an eternity.
This will generate a file something as:

click==6.7                # via flask
Flask==0.12.2
gunicorn==19.7.1
itsdangerous==0.24        # via flask
Jinja2==2.9.6             # via flask
MarkupSafe==1.0           # via jinja2
Werkzeug==0.12.2          # via flask

Now you generated a perfect requirements.txt file with all the dependencies satisfied with proper python package pinning.

The meilix-generator repo which uses this:
https://github.com/fossasia/meilix-generator

Continue ReadingGenerate Requirement File for Python App for Meilix-Generator

Designing a Remote Laboratory with PSLab using Python Flask Framework

In the introductory post about remote laboratories, a general set of tools to create a framework and handle its various aspects was also introduced. In this blog post, we will explore the implementation of several aspects of the backend app designed with python-flask, and the frontend based on EmberJS. A clear separation of the frontend and backend facilitates minimal disruption of either sections due to the other.

Implementing API methods in Python-Flask

In the Flask web server, page requests are handled via ‘routes’ , which are essentially URLs linked to a python function. Routes are also capable of handling payloads such as POST data, and various return types are also supported.

We shall use an example to demonstrate how a Sign-Up request sent from the sign-up form in the remote lab frontend for PSLab is handled.

@app.route('/signUp',methods=['POST'])
def signUp():
	"""Sign Up for Virtual Lab

	POST: Submit sign-up parameters. The following must be present:
	 inputName : The name of your account. does not need to be unique
	 inputEmail : e-mail ID used for login . must be unique.
	 inputPassword: password .
	Returns HTTP 404 when data does not exist.
	"""
	# read the posted values from the UI
	_name = request.form['inputName']
	_email = request.form['inputEmail']
	_password = request.form['inputPassword']

	# validate the received values
	if _name and _email and _password:
		_hashed_password = generate_password_hash(_password)
		newUser = User(_email, _name,_hashed_password)
		try:
			db.session.add(newUser)
			db.session.commit()
			return json.dumps({'status':True,'message':'User %s created successfully. e-mail:%s !'%(_name,_email)})
		except Exception as exc:
			reason = str(exc)
			return json.dumps({'status':False,'message':str(reason)})


In this example, the first line indicates that all URL requests made to <domain:port>/signUp will be handled by the function signUp . During development, we host the server on localhost, and use the default PORT number 8000, so sign-up forms must be submitted to 127.0.0.1:8000/signUp .

For deployment on a globally accessible server, a machine with a static IP, and a DNS record must be used. An example for such a deployment would be the heroku subdomain where pslab-remote is automatically deployed ; https://pslab-stage.herokuapp.com/signUp

A closer look at the above example will tell you that POST data can be accessed via the request.form dictionary, and that the sign-up routine requires inputName,inputEmail, and inputPassword. A password hash is generated before writing the parameters to the database.

Testing API methods using the Postman chrome extension

The route described in the above example requires form data to be submitted along with the URL, and we will use a rather handy developer tool called Postman to help us do this. In the frontend apps , AJAX methods are usually employed to do such tasks as well as handle the response from the server.


The above screenshot shows Postman being used to submit form data to /signUp on our API server running at localhost:8000 . The fields inputName, inputDescription, and inputPassword are also posted along with it.

In the bottom section, one can see that the server returned a positive status variable, as well as a descriptive message.

Submitting the sign up form via an Ember controller.
  • Setting up a template
    We first need to set up a template that we shall call sign-up.hbs , and add the following form to it. This form contains the details essential for signing up , and its submit action is linked to an action called `signMeUp` . This action will be defined in the controller which we shall explore shortly

<form class="form-signin" {{action "signMeUp" on="submit"}} >
        <label for="inputName" class="sr-only">Your Name</label>
        {{input value=inputName type="text" name="inputName" id="inputName" class="form-control" placeholder="name" required=true autofocus=true}}
        <label for="inputEmail" class="sr-only">Email address</label>
        {{input value=inputEmail type="email" name="inputEmail" id="inputEmail" class="form-control" placeholder="Email address" required=true autofocus=true}}
        <label for="inputPassword" class="sr-only">Password</label>
        {{input value=inputPassword type="password" name="inputPassword" id="inputPassword" class="form-control" placeholder="Password" required=true autofocus=true}}
         
        <button class="btn btn-lg btn-primary btn-block" type="submit">Sign Up</button>
</form>


  • Defining the controller
    The controller contains the actions and variables that the template links to. In this case, we require an action called signMeUp. The success, failure, and error handlers are hidden for clarity.

import Ember from 'ember';
export default Ember.Controller.extend({
  actions:{
    signMeUp() {
        var request = Ember.$.post("/signUp",
 this.getProperties("inputName","inputEmail","inputPassword"),this,'json');
        request.then(this.success.bind(this), this.failure.bind(this),
this.error.bind(this));
    },
  },
});

The signMeUp action submits the contents of the form to the signUp route on the API server, and the results are handled by functions called success, failure, or error depending on the type of response from the backend server.

Resources:


Continue ReadingDesigning a Remote Laboratory with PSLab using Python Flask Framework

Implementing an Interface for Reading Configuration from a YAML File for Yaydoc

Yaydoc reads configuration specified in a YAML file to set various options during the build process. This allows users to customize various properties of the build process. The current implementation for this was very basic. Basically it uses a pyYAML, a yaml parser for python to read the file and convert it to a python dictionary. From the dictionary we extracted values for various properties and converting them to strings using various heuristics such as converting True to ”true”, False to ”false”, a list to comma separated string and None to an empty string. Finally, we exported variables with those values.

Recently the entire code for this was rewritten using object-oriented paradigm. The motivation for this came from the fact that the implementation lacked certain features and also required some refactoring for long term readability. In the following paragraph, I have discussed the new implementation.

Firstly a Configuration class was created which basically wraps around a dictionary and provide certain utility methods. The primary difference is that the Configuration class allows dotted key access. This means that you can use the following syntax to access nested keys.

theme = conf[‘build.theme.name’]

The class provides another method connect which is used to connect environment variables with configuration values. This method also takes a dotted key but provides an extension on top of that to handle the case when a certain option can take multiple values. For example,

option: my_option

Or,

option:
  - my_option1
  - my_option2

To indicate that a certain config is of this type, you can specify a “@” character at the end of the key. Anything after the “@” character is assumed to be an attribute of each element within the list. Let’s see an example of this whole process.

build:
  subproject:
    - url: <url1>
  source: “doc”
    - url: <url2>

Now to extract all urls from the above file, we’d need to do the following

config.connect(‘SUBPROJECT_URLS’, ‘build.subproject@url’)

To extract sources, we’ll also use the default parameter as the source option is optional.

config.connect(‘SUBPROJECT_SOURCES’, build.subproject@source’, default=’docs’)

Finally, The Configuration object also provides a getenv method which reads all connection and serializes values to string according to the previously described heuristics. It then returns a dictionary of all environment variables which must be set.

Resources

Continue ReadingImplementing an Interface for Reading Configuration from a YAML File for Yaydoc

I2C Communication in PSLab

PSLab supports communication using the I2C protocol and both the Desktop App and the Android App have the framework set-up to use the I2C protocol. I2C protocol is mainly used by sensors which can be connected to PSLab. For supporting I2C communication, PSLab board has a separate block for I2C communication and has pins named 3.3V, GND, SCL and SDA. A brief overview of how I2C communication works and its advantages & limitations compared to SPI communication can be found here.

The PSLab Python and Java communication libraries have a class dedicated for I2C communication with numerous methods defined in them. The methods required for a particular I2C sensor may differ, however, in general most sensors utilise a certain common set of methods. The set of methods that are commonly used are listed below with their functions. For utilising the methods, the I2C bus is first notified using the HEADER byte (it is common to all the methods) and then a byte to uniquely determine the method in use.

The send method is used to send the data over the I2C bus. First the I2C bus is initialised and set to the correct slave address using I2C.start(address) followed by this method. The method takes the data to be sent as the argument.

def send(self, data):
    try:
        self.H.__sendByte__(CP.I2C_HEADER)
        self.H.__sendByte__(CP.I2C_SEND)
        self.H.__sendByte__(data)  # data byte
        return self.H.__get_ack__() >> 4
    except Exception as ex:
        self.raiseException(ex, "Communication Error , Function : " + inspect.currentframe().f_code.co_name)


The read method reads a fixed number of bytes from the I2C slave. One can also use I2C.simpleRead(address,  numbytes) instead to read from the I2C slave. This method takes the length of the data to be read as argument.  It fetches length-1 bytes with acknowledge bits for each.

def read(self, length):
     data = []
     try:
        for a in range(length - 1):
             self.H.__sendByte__(CP.I2C_HEADER)
             self.H.__sendByte__(CP.I2C_READ_MORE)
             data.append(self.H.__getByte__())
             self.H.__get_ack__()
       self.H.__sendByte__(CP.I2C_HEADER)
       self.H.__sendByte__(CP.I2C_READ_END)
       data.append(self.H.__getByte__())
       self.H.__get_ack__()
    except Exception as ex:
       self.raiseException(ex, "Communication Error , Function : " + inspect.currentframe().f_code.co_name)
   return data


The readBulk method reads the data from the I2C slave. This takes the I2C slave device address, the address of the device from which the data is to be read and the length of the data to be read as argument and the returns the bytes read in the form of a list.

def readBulk(self, device_address, register_address, bytes_to_read):
        try:
            self.H.__sendByte__(CP.I2C_HEADER)
            self.H.__sendByte__(CP.I2C_READ_BULK)
            self.H.__sendByte__(device_address)
            self.H.__sendByte__(register_address)
            self.H.__sendByte__(bytes_to_read)
            data = self.H.fd.read(bytes_to_read)
            self.H.__get_ack__()
            try:
                return [ord(a) for a in data]
            except:
                print('Transaction failed')
                return False
        except Exception as ex:
           self.raiseException(ex, "Communication Error , Function : " + inspect.currentframe().f_code.co_name)


The writeBulk method writes the data to the I2C slave. It takes address of the particular I2C slave for which the data is to be written and the data to be written as arguments.

def writeBulk(self, device_address, bytestream):
        try:
            self.H.__sendByte__(CP.I2C_HEADER)
            self.H.__sendByte__(CP.I2C_WRITE_BULK)
            self.H.__sendByte__(device_address)
            self.H.__sendByte__(len(bytestream))
            for a in bytestream:
                self.H.__sendByte__(a)
            self.H.__get_ack__()
        except Exception as ex:
  self.raiseException(ex, "Communication Error , Function : " + inspect.currentframe().f_code.co_name)


The scan method scans the I2C port for connected devices which utilise I2C as a communication mode. It takes frequency as an argument to set the frequency of the communication and is by default set to 100000. An array containing the addresses of the connected devices (which are integers) is returned.

def scan(self, frequency=100000, verbose=False):
        self.config(frequency, verbose)
        addrs = []
        n = 0
        if verbose:
            print('Scanning addresses 0-127...')
            print('Address', '\t', 'Possible Devices')
        for a in range(0, 128):
            x = self.start(a, 0)
            if x & 1 == 0:  # ACK received
                addrs.append(a)
                if verbose: print(hex(a), '\t\t', self.SENSORS.get(a, 'None'))
                n += 1
            self.stop()
       return addrs


Additional Sources

  1. Learn more about the principles behind i2c communication https://learn.sparkfun.com/tutorials/i2c
  2. A simple experiment to demonstrate use of i2c communication with Arduino http://howtomechatronics.com/tutorials/arduino/how-i2c-communication-works-and-how-to-use-it-with-arduino/
  3. Java counterpart of the PSLab I2C library https://github.com/fossasia/pslab-android/blob/master/app/src/main/java/org/fossasia/pslab/communication/peripherals/I2C.java
Continue ReadingI2C Communication in PSLab

Adding Build Type option in the Apk Generator of the Open Event Android App

The apk-generator provided ability to the event organiser to build an apk from a single click by providing the necessary json/binary files. However it gave only one type of apk where on the other hand the Open Event Android was available with apk of different build versions.

Recently the functionality of the apk generator of the Open Event Android App was enhanced where the user is asked to select an option for build type either Google Play or FDroid which generates the apk according to that selected type.

The main difference in the googleplay apk and fdroid apk is the inclusion of googleplay libraries which aren’t included in the app/build.gradle file in case of fdroid build.

To include support for build type the following files for the apk-generator had to be changed:

  1. app/views/__init__.py
  2. app/tasks/__init__.py
  3. app/static/js/main.js
  4. app/generator/generator.py
  5. scripts/build.sh
  6. app/templates/index.html

Changes to the files

  • app/templates/index.html

This file was where the changes to the UI of the apk-generator showing build type option to the user were made. With this the user was presented with an option to choose build type among googleplay and fdroid apart from the rest of the essential information.

  • scripts/build.sh

The android app supported two different flavours one for google play and the other for fdroid. This required the build script to be modified according to the build type selected by the user during the filling of form.

If user selected “Google Play” or “Fdroid”, the script would look something like this:

#!/bin/bash
./gradlew assemblegoogleplayRelease --info
echo "signing"
jarsigner -keystore ${KEYSTORE_PATH} -storepass ${KEYSTORE_PASSWORD} app/build/outputs/apk/app-googleplay-release-unsigned.apk ${KEY_ALIAS}
echo "zipaligning"
${1}/zipalign -v 4 app/build/outputs/apk/app-$2-release-unsigned.apk release.apk
echo "done"

Where $2 is googleplay or fdroid depending on what build type the user has selected while building the apk from the apk generator.

  • app/views/__init__.py and app/tasks/__init__.py

These files were modified by adding another parameter for supporting the two build type options in the desired functions.

  • app/static/js/main.js

This is where the option selected by the user was taken and accordingly the apk corresponding to the build type option selected was made available to the user. The code for it was shown as follows:

$buildTypeRadio.change(
   function () {
       if (this.checked) {
           enableGenerateButton(true);
           buildType = $(this).val();
       }
  }
);

This was how the option to display build type option to the user was incorporated. This gave the user the ability to install different build versions of an apk, thus making it more useful from the user point of view.

Related Links:

Continue ReadingAdding Build Type option in the Apk Generator of the Open Event Android App

Running Dredd Hooks as a Flask App in the Open Event Server

The Open Event Server is based on the micro-framework Flask from its initial phases. After implementing API documentation, we decided to implement the Dredd testing in the Open Event API.

After isolating each request in Dredd testing, the real challenge is now to bind the database engine to the Dredd Hooks. And as we have been using Flask-SQLAlchemy db.Model Baseclass for building all the models and Flask, being a micro framework itself, came to our rescue as we could easily bind the database engine to the Flask app. Conventionally dredd hooks are written in pure Python, but we will running them as a self contained Flask app itself.

How to initialise this flask app in our dredd hooks. The Flask app can be initialised in the before_all hook easily as shown below:

def before_all(transaction):
    app = Flask(__name__)
    app.config.from_object('config.TestingConfig')


The database can be binded to the app as follows:

def before_all(transaction):
app = Flask(__name__)
app.config.from_object('config.TestingConfig')
db.init_app(app)
Migrate(app, db)


The challenge now is how to bind the application context when applying the database fixtures. In a normal Flask application this can be done as following:

with app.app_context():
#perform your operation


While for unit tests in python:

with app.test_request_context():
#perform tests


But as all the hooks are separate from each other, Dredd-hooks-python supports idea of a single stash list where you can store all the desired variables(a list or the name stash is not necessary).

The app and db can be added to stash as shown below:

@hooks.before_all
def before_all(transaction):
app = Flask(__name__)
app.config.from_object('config.TestingConfig')
db.init_app(app)
Migrate(app, db)
stash['app'] = app
stash['db'] = db


These variables stored in the stash can be used efficiently as below:

@hooks.before_each
def before_each(transaction):
with stash['app'].app_context():
db.engine.execute("drop schema if exists public cascade")
db.engine.execute("create schema public")
db.create_all()


and many other such examples.

Related Links:
1. Testing Your API Documentation With Dredd: https://matthewdaly.co.uk/blog/2016/08/08/testing-your-api-documentation-with-dredd/
2. Dredd Tutorial: https://help.apiary.io/api_101/dredd-tutorial/
3. Dredd Docs: http://dredd.readthedocs.io/

Continue ReadingRunning Dredd Hooks as a Flask App in the Open Event Server

Adding IBM Watson TTS Support in Susi Assistant on Raspberry Pi

Susi Hardware project aims at creating a smart assistant for your home that you can run on your Raspberry Pi or similar Development Boards.
I previously wrote a blog on choosing a perfect Text to Speech engine for Susi AI and had used Flite as the solution for it. While Flite is an Open Source solution that can run locally on a client, it does not provide the same quality of voice and speed as cloud providers. We always crave for a more natural voice for better interaction with our assistant. It is always good to have more options. We, therefore, added IBM Watson Text to Speech API in SUSI Hardware project.

IBM Watson TTS can be added to a Python Project easily using the IBM Watson Developer SDK.

For using the IBM Watson Developer SDK for Text to Speech, first of all, we need to sign up for Bluemix
https://console.bluemix.net/registration/

After that, we will get the empty dashboard without any service added currently. We need to create a Text to Speech Service. To do so, click on Create Watson Service button


Select Watson on the left pane and then select Text to Speech service from the list.

Select the standard plan from the options and then click on create button.

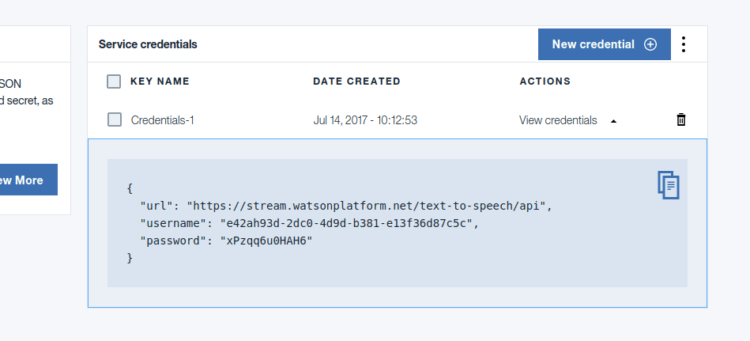
You will get service credentials for your newly created text to speech service. Save it for future reference.

After that, we need to add Watson developer cloud python package.

sudo pip3 install watson-developer-cloud

On Ubuntu with Python 3.5 watson-developer-cloud has some extra dependencies. Install them using the following command.

sudo apt install libssl-dev

Now we can add Text to Speech to our project. For that, we need to first import TextToSpeechV1 library. It can be added using following import statement.

from watson_developer_cloud import TextToSpeechV1

Now we need to create a new TextToSpeechV1 object using the Service Credentials we created earlier.

text_to_speech = TextToSpeechV1(
   username='API_USERNAME',
   password='API_PASSWORD')

We can now perform synthesis of a text input and write the incoming speech stream from IBM Watson API to a file.

with open('output.wav', 'wb') as audio_file:
   audio_file.write(
       text_to_speech.synthesize(text, accept='audio/wav’, voice='en-US_AllisonVoice'))

In the above code snippet,  we are opening an output file ‘output.wav’ for writing. We then write the binary audio data returned by text_to_speech.synthesize method. IBM Watson provides many free voices. We supply an argument specifying which voice we need to use. We are using English female ‘en-US_AllisonVoice’. You may test out more voices in the online demo here and select the voice that you find best.

We can play the ‘output.wav’ file using the play command from SoX. To do so, we need to install SoX binary.

sudo apt install sox libsox-fmt-all

We can play the file easily now using the following code.

import os
os.system('play output.wav')

The above code invokes the ‘play’ command from the SoX package to play the audio file. We can also use PyAudio to play the audio file but it would require us to manage the audio thread separately. Thus, SoX is a better solution.

Resources:

Continue ReadingAdding IBM Watson TTS Support in Susi Assistant on Raspberry Pi

Setup SUSI Assistant on Raspberry Pi in under 30 minutes

With our ever growing list of list of platforms supported by Susi AI, we now have a client that can run on Raspberry Pi and you can access it hands-free!! Here is a video that you can refer for its working.

But it might have left you wondering how you can replicate such a setup yourself? It is fairly easy and will be done fairly easy. Just follow the following instructions.

You need to have following hardware in order to have your own SUSI Assistant running on Raspberry Pi.

  • A Raspberry Pi (prefer 2 or 3) with Raspbian Jessie OS.
  • A stable internet connection.  ( Recommended 4 Mbps )
  • A USB Microphone /  USB Webcam with Microphone. You may buy one like this.
  • A Speaker that connects through 3.5mm jack. You may buy one like this.

After you get all the above items in order, you need to get access to a terminal of your Raspberry Pi. You can have that by either connecting a monitor to Raspberry Pi temporarily or by connecting to Raspberry Pi over SSH.

Once this is done, next step is the installation of the dependencies. The installation of the SUSI on Raspberry is automated after dependencies are installed. Run the following command on Raspberry Pi terminal.

sudo apt install git swig3.0 portaudio19-dev pulseaudio libpulse-dev unzip sox libatlas-dev libatlas-base-dev libsox-fmt-all python3

After this, you may check if your output and input devices are working alright. For this, run rec recording.wav . It will start recording audio and saving it to a file named recording.wav. Play back the file using play recording.wav If you hear your audio clearly, setup is done right else you need to configure your Audio Devices correctly.  Most of the time the configuration of Audio works out the box and devices are plug and play so you would not encounter any errors. If you are successful in configuring your devices, install extra dependencies for SUSI Hardware by running the automated install script. In your terminal run,

$ git clone https://github.com/fossasia/susi_hardware.git
$ cd susi_hardware
$ ./install.sh 

This will install all the remaining dependencies. After the above step is complete, you may run configuration file generator script to choose the Text to Speech and Speech to Text service according to your wish. For doing so, you need to run

$ python3 config_generator.py

Follow the instructions in the script. It will ask you to configure the default service for Text to Speech and Speech to Text and other options. After the configuration is complete, you can simply run the following command to start SUSI.

$ python3 main.py

This will start SUSI in a continuously listening mode. You may invoke SUSI anytime, just by saying SUSI followed by a query. The query will be answered by SUSI subsequently.

Since configurations for different hardware devices may vary, you may encounter some problems. In such a scenario, you may refer to the following resources to solve the issues.

Resources:

Continue ReadingSetup SUSI Assistant on Raspberry Pi in under 30 minutes

Building the Meilix Generator with Flask

Meilix Generator is a webapp which is used to trigger the Travis build of Meilix and mail the user the link of the iso. Meilix Generator webapp is based on Flask. This blog shows that how easy is to build a webapp and take the HTML files to render it into the webapp as well as to call and pass various function. Here I used Flask, the Python framework to render the HTML templates and send requests for various purposes (mentioned later in the article) without coding everything from scratch because of import facility of the Flask.

What is Flask?

Flask is a Python micro web framework based on Werkzeug, Jinja 2 template engine. It is used as the backbone of the webapp. It features us with a whole set of Python from which we can easily generate webapp. It is micro as it has no tools and no library itself. It come up with minimum requirements and one who needs can import different library and use it. And I used several import function for Meilix Generator like render_template, send_from_directory, etc.

Implementation (The use case in Meilix Generator)

First of all, the installation process: We will do the installation in a virtual environment. We prefer virtual environment to differentiate the Python working environment since few programs are there which require different Python versions to work.
Install virtual environment 

sudo pip install virtualenv

Now go to the folder (project) and activate it using

. venv/bin/activate

Now install Flask

pip install flask
Creating your project

Now it’s time to create a simple project in the directory.
Let’s use HTML as the frontend. In the folder create styles.css for styling and index.html template for the frontend of the page.We will make one app.py file which would look similar to this: 

from flask import Flask, render_template
app = Flask(__name__)
@app.route('/')
def index():
	"""Index page"""
	return render_template("index.html")
if __name__ == '__main__':
    app.run()

Flask looks for the / (root) path and here the root return the main template (index.html) which is the main function.

Compiling it to view the page:

export FLASK_DEBUG=1 FLASK_APP=app.py
flask run

You will find your page at http://127.0.0.1:5000

More options (how more it can help you)

  • Add more HTML template options and refer it in app.py
  • Easily use Github API  from a different .py file (this file should get import to app.py) to fetch data like: https://api.github.com/users/user_name : It will fetch user name, repos, followers and many more important information.

How I used this idea for FOSSASIA (Meilix Generator)

I used Flask for the backbone of project Meilix Generator. First, I used from function to import various library needed for the project and then made several functions for the same. Let’s understand the concept using few example:

from flask import Flask, render_template
@app.route('/about')
def about():
		#About page
		return render_template("about.html")

or

from flask import Flask, send_from_directory
@app.route('/uploads/<filename>')
def uploaded_file(filename):
		return send_from_directory(app.config['UPLOAD_FOLDER'],filename)

For more details file app.py can be found here of the Meilix Generator repository where we used the above idea.

Important Links and Repositories:

Continue ReadingBuilding the Meilix Generator with Flask