Integrating Forgot Password feature within Login Screen in SUSI Android App

For a user’s point of view the interface and the flow of the app is of great importance, the UI of the app should be simple and sufficient so that it does not confuse the user and provides all the necessary information to the user with the first look. In all the  apps it is the user interface that engages the user and makes the user want to use the app. So, in SUSI Android app UI flow was improved by removing the Forgot Password activity altogether.

What SUSI.AI android app previously had ?

Previously the SUSI.AI android app used to have three different screens for the user’s account related support :

  1. Login Screen
  2. Forgot Password Screen
  3. SignUp Screen    

The login screen had a Forgot Password? Option that takes the user to a new screen where the details entered in the login activity had to be entered again and only then can the user request a new password.

What are the drawbacks of this ?

Separately, providing a new activity for the specific purpose of resetting the password does not contribute towards an efficient use of UI items of the screen. A scenario where this will be annoying to the user is for eg :  when a user tries to login to the app and is unable to do so because of the incorrect credentials, user simply clicks on the Forgot Password option and on opening the Forgot Password activity to the user’s surprise all the fields entered in the login screen are to be entered again and this is really fuzzy and sometimes frustrating to the user.

A simple solution implemented for this purpose was to automatically reflect the credentials entered by the user in the login screen on the forgot password screen so  that user did not had to enter all the details again.

What better could be done and the solution?

The simplest UI for the purpose of resetting a password is to just click the Forgot Password? and user receives an email to reset the password.

Using this approach several changes were made to the app’s code.

The first change to be made was to implement the ForgotPasswordPresenter.kt functions in the LoginPresenter.kt and similarly implement the IForgotPasswordView.kt functions in the LoginActivity.kt.

The two major functions in the  IForgotPasswordPresenter.kt were :

fun requestPassword(email: String, url: String, isPersonalServerChecked: Boolean)

fun cancelSignup()

Along with these functions in the LoginPresenter.kt the view functions to reflect the view actions of the ForgotPasswordActivity.kt had to be implemented in the LoginActivity.kt file, so the functions added to the ILoginView.kt file were :

fun showForgotPasswordProgress(boolean: Boolean)

fun resetPasswordSuccess()

fun resetPasswordFailure(title: String?, message: String?, button: String?, color: Int)

Now, the two functions above which were earlier present in the ForgotPasswordPresenter.kt file were implemented in the LoginPresenter.kt file and along with the requestPassword() method the listener IForgotPasswordModel.OnFinishListener had to be implemented in the Login Presenter too. So, on implementing this listener we implement a method :

override fun onForgotPasswordModelSuccess(response: Response<ForgotPasswordResponse>) {
  loginView?.showForgotPasswordProgress(false)
  if (response.isSuccessful && response.body() != null) {
      loginView?.resetPasswordSuccess()
  } else if (response.code() == 422) {
      loginView?.resetPasswordFailure(utilModel.getString(R.string.email_invalid_title), utilModel.getString(R.string.email_invalid), utilModel.getString(R.string.retry), Color.RED)
  } else {
      loginView?.resetPasswordFailure(“${response.code()} “ + utilModel.getString(R.string.error), response.message(), utilModel.getString(R.string.ok), Color.BLUE)
  }

}

Now after implementing these methods in Presenter file we have to implement the methods. The function resetPasswordSuccess() works as :

override fun resetPasswordSuccess() {
  startActivity(Intent(this@LoginActivity, ForgotPass::class.java))
}

On successful request for the password from the server the above method in the activity is called and so it takes us to the new activity. The new activity  only contains a simple screen with a default message :

The above screen is the final output once we click on Forgot Password? on the login screen.

References :

Trying to Build Android MVP App in Kotlin – Eminarti Sianturi https://android.jlelse.eu/trying-to-build-android-mvp-app-in-kotlin-afdff9da2f28

Build a Responsive UI with constraint layout

https://developer.android.com/training/constraint-layout/


How the presenter and view interact in the MVP pattern

https://softwareengineering.stackexchange.com/questions/284356/how-can-the-presenter-or-view-interact-with-the-model-in-the-mvp-pattern


Continue ReadingIntegrating Forgot Password feature within Login Screen in SUSI Android App

Implementation of Sponsors API in Open Event Organizer Android App

New contributors to this project are sometimes not experienced with the set of libraries and MVP pattern which this app uses. This blog post is an attempt to walk a new contributor through some parts of the code of the app by implementing an operation for an endpoint of the API. We’ll be implementing the sponsor endpoint.

Open Event Organizer Android app uses a robust architecture. It is presently using the MVP (Model-View-Presenter) architecture. Therefore, this blog post aims at giving some brief insights to the app architecture through the implementation Sponsor endpoint. This blog post will focus only on one operation of the endpoint – the list operation – so as to make the post short enough.

This blog post relates to Pull Request #901 of Open Event Organizer App.

Project structure:
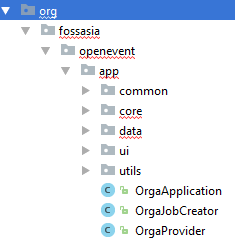
These are the parts of the project structure where major updates will be made for the implementation of Sponsor endpoint:

core

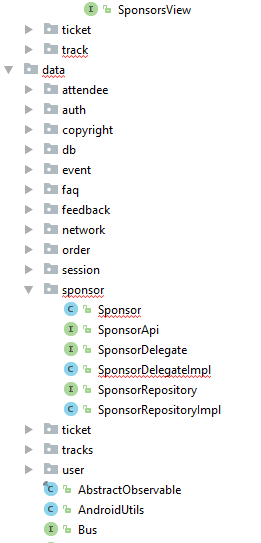
data

Setting up elements in the data module for the respective endpoint

Sponsor.java

@Data
@Builder
@Type(“sponsor”)
@AllArgsConstructor
@JsonNaming(PropertyNamingStrategy.KebabCaseStrategy.class)
@EqualsAndHashCode(callSuper = false, exclude = { “sponsorDelegate”, “checking” })
@Table(database = OrgaDatabase.class)
public class Sponsor extends AbstractItem<Sponsor, SponsorsViewHolder> implements Comparable<Sponsor>, HeaderProvider {

   @Delegate(types = SponsorDelegate.class)
   private final SponsorDelegateImpl sponsorDelegate = new         SponsorDelegateImpl(this);

This class uses Lombok, Jackson, RaizLabs-DbFlow, extends AbstractItem class (from Fast Adapter) and implements Comparable and HeaderProvider.

All the annotations processor help us reduce boilerplate code.

From the Lombok plugin, we are using:

Lombok has annotations to generate Getters, Setters, Constructors, toString(), Equal() and hashCode() methods. Thus, it is very efficient in reducing boilerplate code

@Getter,  @Setter, @ToString, @EqualsAndHashCode

@Data is a shortcut annotation that bundles the features of @Getter, @Setter, @ToString and @EqualsAndHashCode

The @Delegate is used for direct calls to the methods that are annotated with it, to the specified delegate. It basically separates the model class from other methods which do not pertain to data.

Jackson

@JsonNaming – used to choose the naming strategies for properties in serialization, overriding the default. For eg:  KEBAB_CASE, LOWER_CASE, SNAKE_CASE, UPPER_CAMEL_CASE

@JsonNaming(PropertyNamingStrategy.KebabCaseStrategy.class)

@JsonProperty – used to store the variable from JSON schema as the given variable name. So, “type” from JSON will be stored as sponsorType.

@JsonProperty(“type”)
public String sponsorType;

RaizLabs-DbFlow

DbFlow uses model classes which must be annotated using the annotations provided by the library. The basic annotations are – @Table, @PrimaryKey, @Column, @ForeignKey etc.

These will create a table named attendee with the columns and the relationships annotated.

SponsorDelegate.java and SponsorDelegateImpl.java

The above are required only for method declarations of the classes and interfaces that Sponsor.java extends or implements. These basically separate the required method overrides from the base item class.

public class SponsorDelegateImpl extends AbstractItem<Sponsor, SponsorsViewHolder> implements SponsorDelegate {

SponsorRepository.java and SponsorRepositoryImpl.java

A Repository mediates between the domain and data mapping layers, acting like an in-memory domain object collection. Client objects construct query specifications declaratively and submit them to Repository for satisfaction. Objects can be added to and removed from the Repository, as they can from a simple collection of objects, and the mapping code encapsulated by the Repository will carry out the appropriate operations behind the scenes.

public interface SponsorRepository {
  @NonNull
  Observable<Sponsor> getSponsors(long eventId, boolean reload);
}

Presently the app uses MVP architecture and the core package contains respective Views and their Presenters, whereas the data package contains the Model implementation.

To understand Observable, one will need to dive in RxJava. This video of a presentation by Jake Wharton can be a great start.

So, basically Observables represent sources of data, and whenever there is a change in our observable, i.e. our data, it fires an event and we get to know about it only if we have subscribed to it.

Setting up elements in core module (views and presenters)

Presently the app uses MVP architecture and the core package contains respective Views and Presenters for different properties of an event.

SponsorView.java

public interface SponsorsView extends Progressive, Erroneous, Refreshable, Emptiable<Sponsor> {
}

SponsorsFragment.java

This is a simple Fragment that extends BaseFragment (a generic fragment class predefined in the project) and implements SponsorView interface.

SponsorsListAdapter.java

A simple adapter for a RecyclerView.

SponsorsPresenter.java

The presenter is the middle-man between model and view. All your presentation logic belongs to it. A Presenter in a MVP architecture is responsible for querying the model and updating the view, reacting to user interactions and updating the model.

In this Presenter we have used the @Inject annotation and some RxJava code:

@Inject
public SponsorsPresenter(SponsorRepository sponsorRepository, DatabaseChangeListener<Sponsor> sponsorChangeListener) {
  this.sponsorRepository = sponsorRepository;
  this.sponsorChangeListener = sponsorChangeListener;
}

The @Inject annotation is used to request dependencies. It can be used on a constructor, a field, or a method. If you annotate a constructor with @Inject, Dagger 2 can also use an instance of this object to fulfill dependencies. Note that we are not instantiating any object here ourselves.

Some RxJava part, which is not in the scope of this blog.

private void listenChanges() {
  sponsorChangeListener.startListening();
  sponsorChangeListener.getNotifier()
      .compose(dispose(getDisposable()))
      .map(DbFlowDatabaseChangeListener.ModelChange::getAction)
      .filter(action -> action.equals(BaseModel.Action.INSERT))
      .subscribeOn(Schedulers.io())
      .subscribe(sponsorModelChange -> loadSponsors(false), Logger::logError);
}


public void loadSponsors(boolean forceReload) {
  getSponsorSource(forceReload)
      .compose(dispose(getDisposable()))
      .compose(progressiveErroneousRefresh(getView(), forceReload))
      .toList()
      .compose(emptiable(getView(), sponsors))
      .subscribe(Logger::logSuccess, Logger::logError);
}

Make changes to Dependency Injection modules

We are using Dagger for Dependency Injection, and therefore we need to update the modules that provide endpoint specific objects.

This video and this blog are a great start to learn about dependency injection using dagger.

Dependency injection is a technique whereby one object supplies the dependencies of another object. A dependency is an object that can be used (a service). An injection is the passing of a dependency to a dependent object (a client) that would use it. The service is made part of the client’s state. Passing the service to the client, rather than allowing a client to build or find the service, is the fundamental requirement of the pattern.(source)

Dependency Injection in built upon the concept of Inversion of Control. Which says that a class should get its dependencies from outside. In simple words, no class should instantiate another class but should get the instances from a configuration class.

Dagger 2 analyzes the dependencies for you and generates code to help wire them together.  It relies purely on using Java annotation processors and compile-time checks to analyze and verify dependencies. It is considered to be one of the most efficient dependency injection frameworks built to date.

@Provides is basically required to specify that the annotated method returns an object that should be available for injection to dependencies using @Inject

@Singleton annotation signals to the Dagger compiler that the instance should be created only once in the application.

@Binds annotation is a replacement for @Provides methods that simply returns an injected parameter. Its generated implementation is likely to be more efficient. A method annotated with @Binds must be: abstract.

ApiModule.java

@Provides
@Singleton
SponsorApi providesSponsorApi(Retrofit retrofit) {    return retrofit.create(SponsorApi.class);
}    

ChangeListenerModule.java

@Provides
DatabaseChangeListener<Sponsor> providesSponsorChangeListener() {
   return new DbFlowDatabaseChangeListener<>(Sponsor.class);
}

NetworkModule.java

@Provides
Class[] providesMappedClasses() {
   return new Class[]{Event.class, Attendee.class, Ticket.class, User.class,
   EventStatistics.class, Faq.class, Copyright.class, Feedback.class,           Track.class, Session.class, Sponsor.class};
   }

RepoModule.java

@Binds
@Singleton
abstract SponsorRepository bindsSponsorRepository(SponsorRepositoryImpl sponsorRepositoryImpl);

MainFragmentBuilderModule.java

@ContributesAndroidInjector
abstract SponsorsFragment contributeSponsorsFragment();

Also remember to make this change to FragmentNavigator.java

case R.id.nav_sponsor:
fragment = SponsorsFragment.newInstance(eventId);
break;

XML resources to be added:

  1. sponsors_item.xml
  2. sponsors_fragment.xml
  3. Make changes to activity_main_drawer.xml to include “sponsors” option.

Here’s what the result looks like:

References:

Lombok Plugin: https://blog.fossasia.org/using-lombok-to-reduce-boilerplate-code-in-open-event-android-app/

Jackson: https://blog.fossasia.org/shrinking-model-classes-boilerplate-in-open-event-android-projects/

RaizLabs DbFlow: https://blog.fossasia.org/persistence-layer-in-open-event-organizer-android-app/

Dependency Injection:
https://medium.com/@harivigneshjayapalan/dagger-2-for-android-beginners-di-part-i-f5cc4e5ad878

Continue ReadingImplementation of Sponsors API in Open Event Organizer Android App

MVP in Loklak Wok Android using Dagger2

MVP stands for Model-View-Presenter, one of the most popular and commonly used design pattern in android apps. Where “Model” refers to data source, it can be a SharedPreference, Database or data from a Network call. Going by the word, “View” is the user interface and finally “Presenter”, it’s a mediator between model and view. Whatever events occur in a view are passed to presenter and the presenter fetches the data from the model and finally passes it back to the view, where the data is populated in ViewGroups. Now, the main question, why it is so widely used? One of the obvious reason is the simplicity to implement it and it completely separates the business logic, so, easy to write unit-tests. Though it is easy to implement, its implementation requires a lot of boilerplate code, which is one of its downpoints. But, using Dagger2 the boilerplate code can be reduced to a great extent. Let’s see how Dagger2 is used in Loklak Wok Android to implement MVP architecture.

Adding Dagger2 to the project

In app/build.gradle file

dependencies {
   ...
   compile 'com.google.dagger:dagger:2.11'
    annotationProcessor 'com.google.dagger:dagger-compiler:2.11'
}


Implementation

First a contract is created which defines the behaviour or say the functionality of View and Presenter. Like showing a progress bar when data is being fetched, or the view when the network request is successful or it failed. The contract should be easy to read and going by the names of the method one should be able to know the functionality of methods. For tweet search suggestions, the contract is defined in SuggestContract interface.

public interface SuggestContract {

   interface View {

       void showProgressBar(boolean show);

       void onSuggestionFetchSuccessful(List<Query> queries);

       void onSuggestionFetchError(Throwable throwable);
   }

   interface Presenter {

       void attachView(View view);

       void createCompositeDisposable();

       void loadSuggestionsFromAPI(String query, boolean showProgressBar);

       void loadSuggestionsFromDatabase();

       void saveSuggestions(List<Query> queries);

       void suggestionQueryChanged(Observable<CharSequence> observable);

       void detachView();
   }
}


A SuggestPresenter class is created which implements the SuggestContract.Presenter interface. I will not be explaining how each methods in SuggestPresenter class is implemented as this blog solely deals with implementing MVP. If you are interested you can go through the source code of SuggestPresenter. Similarly, the view i.e. SuggestFragment implements SuggestContract.View interface.

So, till this point we have our presenter and view ready. The presenter needs to access the model and the view requires to have an instance of presenter. One way could be instantiating an instance of model inside presenter and an instance of presenter inside view. But, this way model, view and presenter would be coupled and that defeats our purpose. So, we just INJECT model into presenter and presenter into view using Dagger2. Injecting here means Dagger2 instantiates model and presenter and provides wherever they are requested.

ApplicationModule provides the required dependencies for accessing the “Model” i.e. a Loklak API client and realm database instance. When we want Dagger2 to provide a dependency we create a method annotated with @Provides as providesLoklakAPI and providesRealm.

@Provides
LoklakAPI providesLoklakAPI(Retrofit retrofit) {
   return retrofit.create(LoklakAPI.class);
}

@Provides
Realm providesRealm() {
   return Realm.getDefaultInstance();
}


If we look closely providesLoklakAPI method requires a Retrofit instance i.e. a to create an instance of LoklakAPI the required dependency is Retrofit, which is fulfilled by providesRetrofit method. Always remember that whenever a dependency is required, it should not be instantiated at the required place, rather it should be injected by Dagger2.

@Provides
Retrofit providesRetrofit() {
   Gson gson = Utility.getGsonForPrivateVariableClass();
   return new Retrofit.Builder()
           .baseUrl(mBaseUrl)
           .addCallAdapterFactory(RxJava2CallAdapterFactory.create())
           .addConverterFactory(GsonConverterFactory.create(gson))
           .build();
}


As the ApplicationModule class provides these dependencies the class is annotated with @Module.

@Module
public class ApplicationModule {

   private String mBaseUrl;

   public ApplicationModule(String baseUrl) {
       this.mBaseUrl = baseUrl;
   }
   
   
   // retrofit, LoklakAPI, realm @Provides methods
}


After preparing the source to provide the dependencies, it’s time we request the dependencies.

Dependencies are requested simply by using @Inject annotation e.g. in the constructor of SuggestPresenter @Inject is used, due to which Dagger2 provides instance of LoklakAPI and Realm for constructing an object of SuggestPresenter.

public class SuggestPresenter implements SuggestContract.Presenter {

   private final Realm mRealm;
   private LoklakAPI mLoklakAPI;
   private SuggestContract.View mView;
   ...

   @Inject
   public SuggestPresenter(LoklakAPI loklakAPI, Realm realm) {
       this.mLoklakAPI = loklakAPI;
       this.mRealm = realm;
       ...
   }
   
   // implementation of methods defined in contract
}


@Inject can be used on the fields also. When @Inject is used with a constructor the class also becomes a dependency provider, this way creating a method with @Provides is not required in a Module class.

Now, it’s time to connect the dependency providers and dependency requesters. This is done by creating a Component interface, here ApplicationComponent. The component interface defines where are the dependencies required. This is only for those cases where dependencies are injected by using @Inject for the member variables. So, we define a method inject with a single parameter of type SuggestFragment, as the Presenter needs to be injected in SuggestFragment.

@Component(modules = ApplicationModule.class)
public interface ApplicationComponent {


   void inject(SuggestFragment suggestFragment);

}


The component interface is instantiated in onCreate method of LoklakWokApplication class, so that it is accessible all over the project.

public class LoklakWokApplication extends Application {

   private ApplicationComponent mApplicationComponent;

   @Override
   public void onCreate() {
       super.onCreate();
      ...
       mApplicationComponent = DaggerApplicationComponent.builder()
               .applicationModule(new ApplicationModule(Constants.BASE_URL_LOKLAK))
               .build();
   }

   public ApplicationComponent getApplicationComponent() {
       return mApplicationComponent;
   }
   
   ...
}


NOTE: DaggerApplicationComponent is created after building the project. So, AndroidStudio will show “Cannot resolve symbol …”, thus build the project : Build > Make Module ‘app’.

Finally, in the onCreateView callback of SuggestFragment we call inject method of DaggerApplicationComponent to tell Dagger2 that SuggestFragment is requesting dependencies.

@Override
public View onCreateView(LayoutInflater inflater, ViewGroup container,
                        Bundle savedInstanceState) {
...   
   LoklakWokApplication application = (LoklakWokApplication) getActivity().getApplication();
   application.getApplicationComponent().inject(this);
   suggestPresenter.attachView(this);

   return rootView;
}

Resources:

Continue ReadingMVP in Loklak Wok Android using Dagger2
Read more about the article Automatic handling of view/data interactions in Open Event Orga App
Abstract 3d white geometric background. White seamless texture with shadow. Simple clean white background texture. 3D Vector interior wall panel pattern.

Automatic handling of view/data interactions in Open Event Orga App

During the development of Open Event Orga Application (Github Repo), we have strived to minimize duplicate code wherever possible and make the wrappers and containers around data and views intelligent and generic. When it comes to loading the data into views, there are several common interactions and behaviours that need to be replicated in each controller (or presenter in case of MVP architecture as used in our project). These interactions involve common ceremony around data loading and setting patterns and should be considered as boilerplate code. Let’s look at some of the common interactions on views:

Loading Data

While loading data, there are 3 scenarios to be considered:

  • Data loading succeeded – Pass the data to view
  • Data loading failed – Show appropriate error message
  • Show progress bar on starting of the data loading and hide when completed

If instead of loading a single object, we load a list of them, then the view may be emptiable, meaning you’ll have to show the empty view if there are no items.

Additionally, there may be a success message too, and if we are refreshing the data, there will be a refresh complete message as well.

These use cases present in each of the presenter cause a lot of duplication and can be easily handled by using Transformers from RxJava to compose common scenarios on views. Let’s see how we achieved it.

Generify the Views

The first step in reducing repetition in code is to use Generic classes. And as the views used in Presenters can be any class such as Activity or Fragment, we need to create some interfaces which will be implemented by these classes so that the functionality can be implementation agnostic. We broke these scenarios into common uses and created disjoint interfaces such that there is little to no dependency between each one of these contracts. This ensures that they can be extended to more contracts in future and can be used in any View without the need to break them down further. When designing contracts, we should always try to achieve fundamental blocks of building an API rather than making a big complete contract to be filled by classes. The latter pattern makes it hard for this contract to be generally used in all classes as people will refrain from implementing all its methods for a small functionality and just write their own function for it. If there is a need for a class to make use of a huge contract, we can still break it into components and require their composition using Java Generics, which we have done in our Transformers.

First, let’s see our contracts. Remember that the names of these Contracts are opinionated and up to the developer. There is no rule in naming interfaces, although adjectives are preferred as they clearly denote that it is an interface describing a particular behavior and not a concrete class:

Emptiable

A view which contains a list of items and thus can be empty

public interface Emptiable<T> {
   void showResults(List<T> items);
   void showEmptyView(boolean show);
}

Erroneous

A view that can show an error message on failure of loading data

public interface Erroneous {
   void showError(String error);
}

ItemResult

A view that contains a single object as data

public interface ItemResult<T> {
   void showResult(T item);
}

Progressive

A view that can show and hide a progress bar while loading data

public interface Progressive {
   void showProgress(boolean show);
}

Note that even though Progressive view can only be the one which is either ItemResult or Emptiable as they are the ones containing any data, but we have decoupled it, making it possible for a view to load data without progress or show progress for any other implementation other than loading data.

Refreshable

A view that can be refreshed and show the refresh complete message

public interface Refreshable {
   void onRefreshComplete();
}

There should also be a method for refresh failure, but the app is under development and will be added soon

Successful

A view that can show a success message

public interface Successful {
   void onSuccess(String message);
}

Implementation

Now, we will implement the Observable Transformers for these contracts

Erroneous

public static <T, V extends Erroneous> ObservableTransformer<T, T> erroneous(V view) {
   return observable ->  observable
             .doOnError(throwable -> view.showError(throwable.getMessage()));
}

We simply call showError on a view implementing Erroneous on the call of doOnError of the Observable

Progressive

private static <T, V extends Progressive> ObservableTransformer<T, T> progressive(V view) {
   return observable -> observable
           .doOnSubscribe(disposable -> view.showProgress(true))
           .doFinally(() -> view.showProgress(false));
}

Here we show the progress when the observable is subscribed and finally, we hide it whether it succeeded or failed

ItemResult

public static <T, V extends ItemResult<T>> ObservableTransformer<T, T> result(V view) {
   return observable -> observable.doOnNext(view::showResult);
}

We call showResult on call of onNext


Refreshable

private static <T, V extends Refreshable> ObservableTransformer<T, T> refreshable(V view, boolean forceReload) {
   return observable ->
       observable.doFinally(() -> {
           if (forceReload) view.onRefreshComplete();
       });
}

As we only refresh a view if it is a forceReload, so we check it before calling onRefreshComplete


Emptiable

public static <T, V extends Emptiable<T>> SingleTransformer<List<T>, List<T>> emptiable(V view, List<T> items) {
   return observable -> observable
       .doOnSubscribe(disposable -> view.showEmptyView(false))
       .doOnSuccess(list -> {
           items.clear();
           items.addAll(list);
           view.showResults(items);
       })
       .doFinally(() -> view.showEmptyView(items.isEmpty()));
}

Here we hide the empty view on start of the loading of data and finally we show it if the items are empty. Also, since we keep only one copy of a final list variable which is also used in view along with the presenter, we clear and add all items in that variable and call showResults on the view

Bonus: You can also merge the functions for composite usage as mentioned above like this

public static <T, V extends Progressive & Erroneous> ObservableTransformer<T, T> progressiveErroneous(V view) {
   return observable -> observable
       .compose(progressive(view))
       .compose(erroneous(view));
}

public static <T, V extends Progressive & Erroneous & ItemResult<T>> ObservableTransformer<T, T> progressiveErroneousResult(V view) {
   return observable -> observable
       .compose(progressiveErroneous(view))
       .compose(result(view));
}

Usage

Finally we use the above transformers

eventsDataRepository
   .getEvents(forceReload)
   .compose(dispose(getDisposable()))
   .compose(progressiveErroneousRefresh(getView(), forceReload))
   .toSortedList()
   .compose(emptiable(getView(), events))
   .subscribe(Logger::logSuccess, Logger::logError);

To give you an idea of what we have accomplished here, this is how we did the same before adding transformers

eventsView.showProgressBar(true);
eventsView.showEmptyView(false);

getDisposable().add(eventsDataRepository
   .getEvents(forceReload)
   .toSortedList()
   .subscribeOn(Schedulers.computation())
   .subscribe(events -> {
       if(eventsView == null)
           return;
       eventsView.showEvents(events);
       isListEmpty = events.size() == 0;
       hideProgress(forceReload);
   }, throwable -> {
       if(eventsView == null)
           return;

       eventsView.showEventError(throwable.getMessage());
       hideProgress(forceReload);
   }));

Sure looks ugly as compared to the current solution.

Note that if you don’t provide the error handler in subscribe method of the observable, it will throw an onErrorNotImplemented exception even if you have added a doOnError side effect

Here are some resources related to RxJava Transformers:

Continue ReadingAutomatic handling of view/data interactions in Open Event Orga App

Updating Settings Activity With MVP Architecture in SUSI Android

SUSI Android app includes settings that allow users to modify app features and behaviours. For example, SUSI Android allows users to specify whether they want voice output i.e text to speech irrespective of input type.

Currently different settings available in SUSI Android are:

Settings                                          Use
Enter As Send It allows users to specify whether they want to use action button of soft keyboard as carriage return or send message
Mic Input It allows users to specify whether they want to use speech for input type or not. User can also use keyboard to provide input.
Speech Always It allows users to specify whether they want speech output i.e text to speech irrespective of input type
Speech Output It allows users to specify whether they want speech output in case of speech input or not.
Select Server It allows user to specify whether they want to use default susi_server or their own server.
Language It allows users to select text to speech engine language.

Android’s standard architecture isn’t always sufficient, especially in the case of complex applications that need to be tested regularly. So we need an architecture that can improve the app’s testability and MVP(Model View Presenter) architecture is one of the best options for that.

Working with MVP architecture to show settings

MVP architecture creates three layers: Model, View and Presenter. Use of each layer is described below

  • Model: The Model holds the business logic of the application. It controls how data can be created, stored, and modified.
  • View: The View is a UI that displays data and routes user actions to the Presenter.
  • Presenter: Presenter is a mediator between View and Model. It retrieves data from the Model and shows it in the View. It also processes user actions forwarded to it by the View.

Steps followed to implement MVP architecture are:

1. I first created three interfaces: ISettingsView, ISettingModel and  ISettingsPresenter. These classes contain all the important functions we needed in model, presenter and view. Presenter’s interaction with model is handled by  ISettingModel and presenter’s interaction with view is handled by ISettingsPresenter and ISettingView.

  1. I created model, view and presenter class i.e SettingModel, SettingsPresenter and SettingsActivity and implemented ISettingModel, ISettingsPresenter and ISettingsView in SettingModel, SettingPresenter and SettingsActivity respectively so that presenter can communicate with both model and view.
class SettingsPresenter(fragmentActivity: FragmentActivity): ISettingsPresenter, ISettingModel.onSettingFinishListener
class SettingsActivity : AppCompatActivity(), ISettingsView
class SettingModel: ISettingModel
  1. After that, I created ChatSettingsFragment class. It is a PreferenceFragment class which resides in SettingsActivity and contains all settings.
class ChatSettingsFragment : PreferenceFragmentCompat() 

How Presenter communicates with Model and View

As already mentioned presenter’s interaction with view is handled by ISettingsView and ISettingsPresenter. So first I created object of ISettingsPresenter in ChatSettingsFragment, which is part of view, as shown below

lateinit var settingsPresenter: ISettingsPresenter
settingsPresenter = SettingsPresenter(activity)

And used it to call method of presenter, SettingsPresenter

settingsPresenter.sendSetting(Constant.ENTER_SEND, newValue.toString())

After that, I created an object of ISettingsView in SettingsPresenter, so that it can communicate with view, SettingsActivity.

Presenter’s interaction with model is handled by ISettingModel. So first I created an object of SettingModel class which implemented ISettingModel and then used it to call methods of SettingModel.

var settingModel: SettingModel = SettingModel()
settingModel.sendSetting(key, value, this)

Here the third parameter in the sendSetting method is ISettingModel.onSettingFinishListener which is part of ISettingModel. SettingModel used it to communicate with SettingsPresenter as shown below

override fun sendSetting(key: String, value: String, listener: ISettingModel.onSettingFinishListener) {

settingResponseCall.enqueue(object : Callback<ChangeSettingResponse> {

 override fun onResponse(call: Call<ChangeSettingResponse>?, response:

Response<ChangeSettingResponse>) {

          listener.onSuccess(response)

      }

  })

}

onSuccess method present in SettingsPresenter.

Reference

Continue ReadingUpdating Settings Activity With MVP Architecture in SUSI Android

Presenter Abstraction Layer in Open Event Organizer Android App

Open Event Organizer App design follows Model View Presenter (MVP) architecture which enables heavy unit testing. MVP is a trending architecture design followed these days. If you are not aware of MVP architecture, then please refer any of the tutorial (few links are given at the end of this blog) about it before reading this. In the design, the code becomes little repetitive as the application size increases due to so many presenters and views, which degrades the code readability. So to avoid this and keep the functionality code clean in the App, we have created a Presenter Abstraction Layer which contains the repetitive code and the layer is extended wherever required in the app. I will be talking about the Presenter Abstraction Layer implementation through the App in this blog.

First of all, create a base interface. The base interface contains methods which every presenter will have. The base interface for presenter in the App looks like:

public interface IBasePresenter {
   void start();
   void detach();
}


In the method start, presenter loads all the required data from the model and sends it to the view. And releases all the resources in detach. These two methods are required in all the presenters. This interface is extended by other two interfaces which will be actually used by the views. The relevant code is:

public interface IPresenter<V> extends IBasePresenter {
   void attach(V view);
}

public interface IDetailPresenter<K, V> extends IBasePresenter {
   void attach(K key, V view);
}


Method attach is used to attach view and the data id (if required) to the presenter. In the app, most of the presenters require an extra data which is used in loading data from the model. Hence two interfaces are extended from the base interface. Now comes the implementation part.

public abstract class BasePresenter<V> implements IPresenter<V> {
   private V view;
   private CompositeDisposable compositeDisposable;

   @Override
   @CallSuper
   public void attach(V view) {
       this.view = view;
       this.compositeDisposable = new CompositeDisposable();
   }

   @Override
   @CallSuper
   public void detach() {
       view = null;
       compositeDisposable.dispose();
   }

   protected V getView() {
       return view;
   }

   protected CompositeDisposable getDisposable() {
       return compositeDisposable;
   }
}


The App uses ReactiveX Observables for async operations which contain fragment/activity context hence these need to be disposed at some lifecycle of fragment/activity. detach nulls the view and disposes the compositeDisposable. This method is called at the onStop lifecycle of fragment/activity. The observable subscriptions are one of the major reasons for memory leaks if not disposed at correct lifecycle in Android. So the detach method is called at onStop lifecycle when activity goes into background or fragment is switched by FragmentTransaction. Another base presenter class looks like:

public  abstract class BaseDetailPresenter<K, V> extends BasePresenter<V> implements IDetailPresenter<K, V> {
   private K id;

   @Override
   @CallSuper
   public void attach(K id, V view) {
       super.attach(view);
       this.id = id;
   }

   protected K getId() {
       return id;
   }
}


This class extends the previous one except for the attach method. As the presenters extending this, require an extra data id which is passed through this method. So the id can be used in the presenter extending this class using getId. The presenters in the app extend one of these two classes. This helps in making a firm app structure and the development process easier. Abstraction layer should be used wherever same code is repeated. This increases code readability and decreases the chances of creating bugs especially when a team is working on the same project.

Links:
1. MVP for Android: how to organize the presentation layer, by Antonio Leiva
2. Android Code That Scales, With MVP, by Nathan Barraille
3. Ted Mosby – Software Architect, by Hannes Dorfmann

Continue ReadingPresenter Abstraction Layer in Open Event Organizer Android App

Shifting from Java to Kotlin in SUSI Android

SUSI Android (https://github.com/fossasia/susi_android) is written in Java. After the announcement of Google to officially support Kotlin as a first class language for Android development we decided to shift to Kotlin as it is more robust and code friendly than Java.

Advantages of Kotlin over Java

  1. Kotlin is a null safe language. It changes all the instances used in the code to non nullable type thus it ensures that the developer don’t get any nullPointerException.
  2. Kotlin provides the way to declare Extensive function similar to that of C#. We can use this function in the same way as we use the member functions of our class.
  3. Kotlin also provides support for Lambda function and other high order functions.

For more details refer to this link.

After seeing the above points it is now clear that Kotlin is much more effective than Java and there is harm in switching the code from Java to Kotlin. Lets now see the implementation in Susi Android.

Implementation in Susi Android

In the Susi Android App we are implementing the MVP design with Kotlin. We are converting the code by one activity each time from java to Kotlin. The advantage here with Kotlin is that it is totally compatible with java at any time. Thus allowing the developer to change the code bit by bit instead of all at once.Let’s now look at SignUp Activity implementation in Susi Android.

The SignUpView interface contains all the function related to the view.

interface ISignUpView {


  fun alertSuccess()

  fun alertFailure()

  fun alertError(message: String)

  fun setErrorEmail()

  fun setErrorPass()

  fun setErrorConpass(msg: String)

  fun setErrorUrl()

  fun enableSignUp(bool: Boolean)

  fun clearField()

  fun showProgress()

  fun hideProgress()

  fun passwordInvalid()

  fun emptyEmailError()

  fun emptyPasswordError()

  fun emptyConPassError()


}

The SignUpActivity implements the view interface in the following way. The view is responsible for all the interaction of user with the UI elements of the app. It does not contain any business logic related to the app.

class SignUpActivity : AppCompatActivity(), ISignUpView {


  var signUpPresenter: ISignUpPresenter? = null

  var progressDialog: ProgressDialog? = null


  override fun onCreate(savedInstanceState: Bundle?) {

      super.onCreate(savedInstanceState)

      setContentView(R.layout.activity_sign_up)

      addListeners()

      setupPasswordWatcher()


      progressDialog = ProgressDialog(this@SignUpActivity)

      progressDialog?.setCancelable(false)

      progressDialog?.setMessage(this.getString(R.string.signing_up))


      signUpPresenter = SignUpPresenter()

      signUpPresenter?.onAttach(this)

  }


  fun addListeners() {

      showURL()

      hideURL()

      signUp()

  }


  override fun onOptionsItemSelected(item: MenuItem): Boolean {

      if (item.itemId == android.R.id.home) {

          finish()

          return true

      }

      return super.onOptionsItemSelected(item)

  }

Now we will see the implementation of models in Susi Android in Kotlin and compare it with Java.

Lets First see the implementation in Java

public class WebSearchModel extends RealmObject {

  private String url;

  private String headline;

  private String body;

  private String imageURL;


  public WebSearchModel() {

  }


  public WebSearchModel(String url, String headline, String body, String imageUrl) {

      this.url = url;

      this.headline = headline;

      this.body = body;

      this.imageURL = imageUrl;

  }


  public void setUrl(String url) {

      this.url = url;

  }


  public void setHeadline(String headline) {

      this.headline = headline;

  }


  public void setBody(String body) {

      this.body = body;

  }


  public void setImageURL(String imageURL) {

      this.imageURL = imageURL;

  }


  public String getUrl() {

      return url;

  }


  public String getHeadline() {

      return headline;

  }


  public String getBody() {

      return body;

  }


  public String getImageURL() {

      return imageURL;

  }

}
open class WebSearchModel : RealmObject {


  var url: String? = null


  var headline: String? = null


  var body: String? = null


  var imageURL: String? = null


  constructor() {}


  constructor(url: String, headline: String, body: String, imageUrl: String) {

      this.url = url

      this.headline = headline

      this.body = body

      this.imageURL = imageUrl

  }

}

You can yourself see the difference and how easily with the help of Kotlin we can reduce the code drastically.

For diving more into the code, we can refer to the GitHub repo of Susi Android (https://github.com/fossasia/susi_android).

Resources

Continue ReadingShifting from Java to Kotlin in SUSI Android

Invalidating user login using JWT in Open Event Orga App

User authentication is an essential part of Open Event Orga App (Github Repo), which allows an organizer to log in and perform actions on the event he/she organizes. Backend for the application, Open Event Orga Server sends an authentication token on successful login, and all subsequent privileged API requests must include this token. The token is a JWT (Javascript Web Token) which includes certain information about the user, such as identifier and information about from when will the token be valid, when will it expire and a signature to verify if it was tampered.

Parsing the Token

Our job was to parse the token to find two fields:

  • Identifier of user
  • Expiry time of the token

We stored the token in our shared preference file and loaded it from there for any subsequent requests. But, the token expires after 24 hours and we needed our login model to clear it once it has expired and shown the login activity instead.

To do this, we needed to parse the JWT and compare the timestamp stored in the exp field with the current timestamp and determine if the token is expired. The first step in the process was to parse the token, which is essentially a Base 64 encoded JSON string with sections separated by periods. The sections are as follows:

  • Header ( Contains information about algorithm used to encode JWT, etc )
  • Payload ( The data in JWT – exp. Iar, nbf, identity, etc )
  • Signature ( Verification signature of JWT )

We were interested in payload and for getting the JSON string from the token, we could have used Android’s Base64 class to decode the token, but we wanted to unit test all the util functions and that is why we opted for a custom Base64 class for only decoding our token.

So, first we split the token by the period and decoded each part and stored it in a SparseArrayCompat

public static SparseArrayCompat<String> decode(String token) {
   SparseArrayCompat<String> decoded = new SparseArrayCompat<>(2);

   String[] split = token.split("\\.");
   decoded.append(0, getJson(split[0]));
   decoded.append(1, getJson(split[1]));

   return decoded;
}


The getJson function is primarily decoding the Base64 string

private static String getJson(String strEncoded) {
   byte[] decodedBytes = Base64Utils.decode(strEncoded);
   return new String(decodedBytes);
}

The decoded information was stored in this way

0={"alg":"HS256","typ":"JWT"},  1={"nbf":1495745400,"iat":1495745400,"exp":1495745800,"identity":344}

Extracting Information

Next, we create a function to get the expiry timestamp from the token. We could use GSON or Jackson for the task, but we did not want to map fields into any object. So we simply used JSONObject class which Android provides. It took 5 ms on average to parse the JSON instead of 150 ms by GSON

public static long getExpiry(String token) throws JSONException {
   SparseArrayCompat<String> decoded = decode(token);

   // We are using JSONObject instead of GSON as it takes about 5 ms instead of 150 ms taken by GSON
   return Long.parseLong(new JSONObject(decoded.get(1)).get("exp").toString());
}


Next, we wanted to get the ID of user from token to determine if a new user is logging in or an old one, so that we can clear the database for new user.

public static int getIdentity(String token) throws JSONException {
   SparseArrayCompat<String> decoded = decode(token);

   return Integer.parseInt(new JSONObject(decoded.get(1)).get("identity").toString());
}

Validating the token

After this, we needed to create a function that tells if a stored token is expired or not. With all the right functions in place, it was just a matter of comparing current time with the stored timestamp

public static boolean isExpired(String token) {
   long expiry;

   try {
       expiry = getExpiry(token);
   } catch (JSONException jse) {
       return true;
   }

   return System.currentTimeMillis()/1000 >= expiry;
}


Since the token provides timestamp from epoch in terms of seconds, we needed to divide the current time in milliseconds by 1000 and the function returned true if current timestamp was greater than the expiry time of token.

After writing a few unit tests for both functions, we just needed to plug them in our login model at the time of authentication.

At the time of starting of the application, we use this function to check if a user is logged in or not:

public boolean isLoggedIn() {
   String token = utilModel.getToken();

   return token != null && !JWTUtils.isExpired(token);
}


So, if there is no token or the token is expired, we do not automatically login the user and show the login screen.

Implementing login

The next task were

  • Sequest the server to login
  • Store the acquired token
  • Delete database if it is a new user

Before implementing the above logic, we needed to implement a function to determine if the person logging in is previous user, or new one. For doing so, we first loaded the saved user from our database, if the query is empty, surely it is a new user logging in. So we return false, and if there is a user in the database, we match its ID with the logged in user’s ID:

public Single<Boolean> isPreviousUser(String token) {
   return databaseRepository.getAllItems(User.class)
       .first(EMPTY)
       .map(user -> !user.equals(EMPTY) && user.getId() == JWTUtils.getIdentity(token));
}


We have added a default user EMPTY in the first operator so that RxJava returns it if there are no users in the database and then we simply map the user to a boolean denoting if they are same or different using the EMPTY user and getIdentity method from JWTUtils

Finally, we use all this information to implement our self contained login request:

eventService
   .login(new Login(username, password))
   .flatMapSingle(loginResponse -> {
       String token = loginResponse.getAccessToken();
       utilModel.saveToken(token);

       return isPreviousUser(token);
   })
   .flatMapCompletable(isPrevious -> {
       if (!isPrevious)
           return utilModel.deleteDatabase();

       return Completable.complete();
   });


Let’s see what is happening here. A request using username and password is made to the server which returns a login response containing a JWT, which we store for future use. Next, we flatMapSingle to the Single returned by the isPreviousUser method. And we finally clear the database if it is not a previous user.

Creating these self contained models help reduce complexity in presenter or view layer and all data is handled in one layer making presenter layer model agnostic.

To learn more about JWT and some of the Rx operators I mentioned here, please visit these links:

Continue ReadingInvalidating user login using JWT in Open Event Orga App

Presenters via Loaders in Open Event Organizer Android App

Open Event Organizer‘s App design follows Model View Presenter (MVP) architecture which facilitates heavy unit testing of the app. In this design pattern, each fragment/activity implements a view interface which uses a presenter interface to interact with a model interface. The presenter contains most of the data of the view. So it is very important to restore presenters after configuration changes like rotation. As on rotation, the complete activity is re-created hence all the fields are destroyed and as a result, everything is re-generated resulting in state loss on configuration change which is unexpected. Open Event Organizer App uses the loader to store/provide presenters to the activity/fragment. Loader survives configuration changes. The idea of using the loader to provide presenter is taken from Antonio Gutierrez’s blog on “Presenters surviving orientation changes with loaders“.

The first thing to do is make a PresenterLoader<T> class extending Loader<T> where T is your presenter’s base interface. The PresenterLoader class in the app looks like:

public class PresenterLoader<T extends IBasePresenter> extends Loader<T> {

   private T presenter;

   ...

   @Override
   protected void onStartLoading() {
       super.onStartLoading();
       deliverResult(presenter);
   }

   @Override
   protected void onReset() {
       super.onReset();
       presenter.detach();
       presenter = null;
   }

   public T getPresenter() {
       return presenter;
   }
}


The methods are pretty clear from the names itself. Once this is done, now you are ready to use this loader in for your fragment/activity. Creating a BaseFragment or BaseActivity will be clever as then you don’t have to add same logic everywhere. We will take a use case of an activity. A loader has a unique id by which it is saved in the app. Use unique id for each fragment/activity. Using the id, the loader is obtained in the app.

Loader<P> loader = getSupportLoaderManager().getLoader(getLoaderId());


When creating for the first time, the loader is set up with the loader callbacks where we actually set a presenter logic. In the Organizer App, we are using dagger dependency injection for injecting presenter in the app for the first time. If you are not using the dagger, you should create PresenterFactory class containing create method for the presenter. And pass the PresenterFactory object to the PresenterLoader in onCreateLoader. In this case, we are using dagger so it simplifies to this:

getSupportLoaderManager().initLoader(getLoaderId(), null, new LoaderManager.LoaderCallbacks<P>() {
   @Override
   public Loader<P> onCreateLoader(int id, Bundle args) {
       return new PresenterLoader<>(BaseActivity.this, getPresenterProvider().get());
   }

   @Override
   public void onLoadFinished(Loader<P> loader, P presenter) {
       BaseActivity.this.presenter = presenter;
   }

   @Override
   public void onLoaderReset(Loader<P> loader) {
       BaseActivity.this.presenter = null;
   }
});


getPresenterProvider method returns Lazy<Presenter> provider to ensure single presenter creation in the activity/fragment. The lifecycle to setup PresenterLoader in activity is onCreate and in the fragment is onActivityCreated. Use presenter field from next lifecycle that is start. If the presenter is used before the start, it creates null pointer exception. For example, if implementing with the BaseFragment, setup loader in onActivityCreated method.

@Override
   protected void onCreate(@Nullable Bundle savedInstanceState) {
       super.onCreate(savedInstanceState);
       Loader<P> loader = getSupportLoaderManager().getLoader(getLoaderId());
       if (loader == null) {
           initLoader();
       } else {
           presenter = ((PresenterLoader<P>) loader).getPresenter();
       }
   }


Make sure that your base interface implements some of the basic methods. For example, onDetach, onAttach etc. getLoaderId method must be implemented in each fragment/activity using loaders. The method returns unique id for each fragment/activity. In Organizer App, the method returns layout id of the fragment/activity as a unique id.

Using the loader approach to store/restore presenters helps in surviving their instances in configuration changes in the app. Hence improves the performance.

Links:
Antonio Gutierrez’s blog post about Presenter surviving orientation changes with Loaders in Android
Android Documentation for Loaders

Continue ReadingPresenters via Loaders in Open Event Organizer Android App