Auto Deployment of SUSI Web Chat on gh-pages with Travis-CI

SUSI Web Chat uses Travis CI with a custom build script to deploy itself on gh-pages after every pull request is merged into the project. The build system auto updates the latest changes hosted on chat.susi.ai. In this blog, we will see how to automatically deploy the repository on gh pages.

To proceed with auto deploy on gh-pages branch,

  1. We first need to setup Travis for the project.
  2. Register on https://travis-ci.org/ and turn on the Travis for this repository.

Next, we add .travis.yml in the root directory of the project.

# Set system config
sudo: required
dist: trusty
language: node_js

# Specifying node version
node_js:
  - 6

# Running the test script for the project
script:
  - npm test

# Running the deploy script by specifying the location of the script, here ‘deploy.sh’ 

deploy:
  provider: script
  script: "./deploy.sh"


# We proceed with the cache if there are no changes in the node_modules
cache:
  directories:
    - node_modules

branches:
  only:
    - master

To find the code go to https://github.com/fossasia/chat.susi.ai/blob/master/.travis.yml

The Travis configuration files will ensure that the project is building for every change made, using npm test command, in our case, it will only consider changes made on the master branch.

If one wants to watch other branches one can add the respective branch name in travis configurations. After checking for build passing we need to automatically push the changes made for which we will use a bash script.

#!/bin/bash

SOURCE_BRANCH="master"
TARGET_BRANCH="gh-pages"

# Pull requests and commits to other branches shouldn't try to deploy.
if [ "$TRAVIS_PULL_REQUEST" != "false" -o "$TRAVIS_BRANCH" != "$SOURCE_BRANCH" ]; then
    echo "Skipping deploy; The request or commit is not on master"
    exit 0
fi

# Save some useful information
REPO=`git config remote.origin.url`
SSH_REPO=${REPO/https:\/\/github.com\//git@github.com:}
SHA=`git rev-parse --verify HEAD`

ENCRYPTED_KEY_VAR="encrypted_${ENCRYPTION_LABEL}_key"
ENCRYPTED_IV_VAR="encrypted_${ENCRYPTION_LABEL}_iv"
ENCRYPTED_KEY=${!ENCRYPTED_KEY_VAR}
ENCRYPTED_IV=${!ENCRYPTED_IV_VAR}
openssl aes-256-cbc -K $ENCRYPTED_KEY -iv $ENCRYPTED_IV -in deploy_key.enc -out ../deploy_key -d

chmod 600 ../deploy_key
eval `ssh-agent -s`
ssh-add ../deploy_key

# Cloning the repository to repo/ directory,
# Creating gh-pages branch if it doesn't exists else moving to that branch
git clone $REPO repo
cd repo
git checkout $TARGET_BRANCH || git checkout --orphan $TARGET_BRANCH
cd ..

# Setting up the username and email.
git config user.name "Travis CI"
git config user.email "$COMMIT_AUTHOR_EMAIL"

# Cleaning up the old repo's gh-pages branch except CNAME file and 404.html
find repo/* ! -name "CNAME" ! -name "404.html" -maxdepth 1  -exec rm -rf {} \; 2> /dev/null
cd repo

git add --all
git commit -m "Travis CI Clean Deploy : ${SHA}"

git checkout $SOURCE_BRANCH

# Actual building and setup of current push or PR.
npm install
npm run build
mv build ../build/

git checkout $TARGET_BRANCH
rm -rf node_modules/
mv ../build/* .
cp index.html 404.html

# Staging the new build for commit; and then committing the latest build
git add -A
git commit --amend --no-edit --allow-empty

# Deploying only if the build has changed
if [ -z `git diff --name-only HEAD HEAD~1` ]; then

  echo "No Changes in the Build; exiting"
  exit 0

else
  # There are changes in the Build; push the changes to gh-pages
  echo "There are changes in the Build; pushing the changes to gh-pages"

  # Actual push to gh-pages branch via Travis
  git push --force $SSH_REPO $TARGET_BRANCH
fi

This bash script will enable Travis CI user to push changes to gh pages, for this we need to store the credentials of the repository in encrypted form.

1. To get the public/private rsa keys we use the following command

ssh-keygen -t rsa -b 4096 -C "your_email@example.com"

2.  It will generate keys in .ssh/id_rsa folder in your home repository.
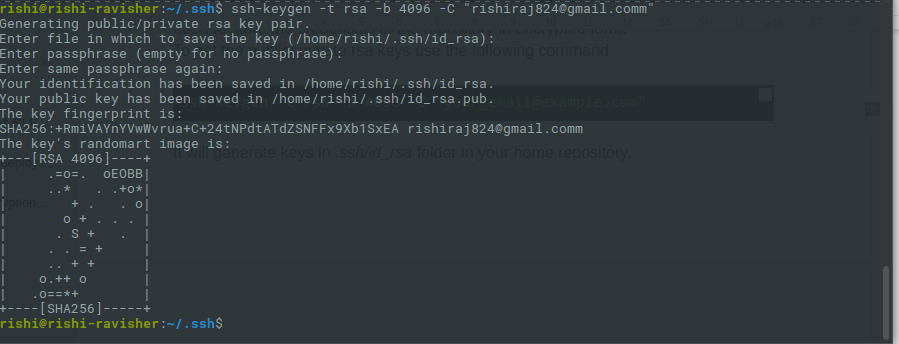
  1. Make sure you do not enter any passphrase while generating credentials otherwise Travis will get stuck at the time of decryption of the keys.
  2. Copy the public key and deploy the key to repository by visiting  
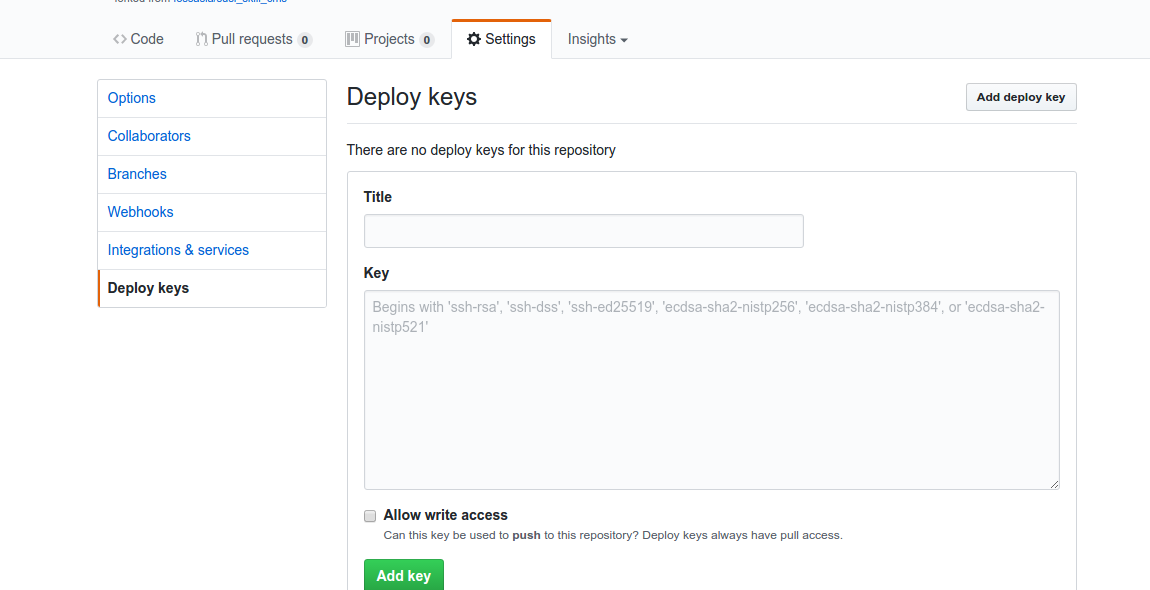
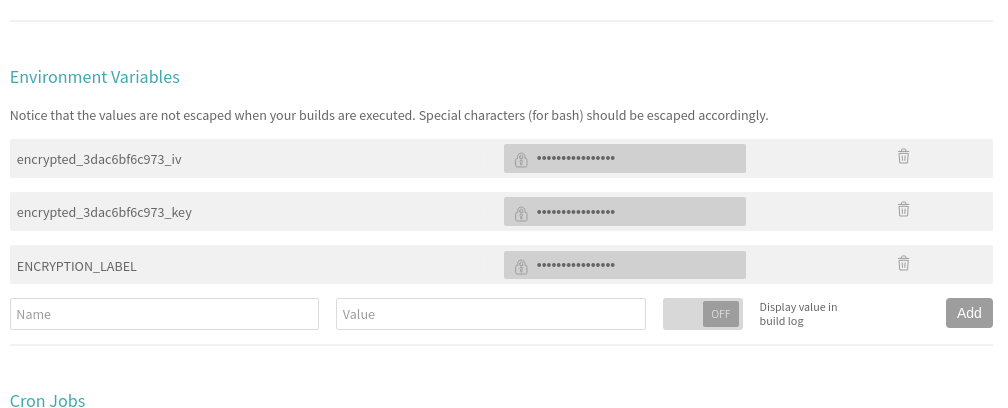
5. We also need to set the environment variable ENCRYPTED_KEY in Travis. Here’s a screenshot where to set it in the Travis repository dashboard.
6. Next, install Travis for encryption of keys.

sudo apt install ruby ruby-dev
sudo gem install travis

7. Make sure you are logged in to Travis, to login use the following command.

travis login

8. Make sure you have copied the ssh to deploy_key and then encrypt your private deploy_key and add it to root of your repository, use command –

travis encrypt-file deploy_key

9. After successful encryption, you will see a message

Please add the following to your build script (before_install stage in your .travis.yml, for instance):

openssl aes-256-cbc -K $encrypted_3dac6bf6c973_key -iv $encrypted_3dac6bf6c973_iv -in deploy_key.enc -out ../deploy_key -d
  1. Add the above-generated deploy_key in Travis and push the changes on your master branch. Do not push the deploy_key only the encryption file i.e., deploy_key.enc
  1. Finally, push the changes and create a Pull request and merge it to test the deployment. Visit Travis logs for more details and debugging.

Resources

Continue ReadingAuto Deployment of SUSI Web Chat on gh-pages with Travis-CI

Building a showcase site to display sample events and auto deploying them on each PR merge in Open Event Webapp

Open Event Webapp generates static websites of the event fed to it in the form of JSON data. Earlier, we used to automatically deploy the FOSSASIA Summit event website on the Github pages of the repository on every merge of a pull request.  The presence of it helped in showcasing and testing purposes. But a single event was not enough. Events are diverse, taking place in a large number of rooms, h a variety of sessions and extending over several days. So, having multiple events on the showcase site and continuously showcasing and testing them was a really great idea.

Here is the feature request for it. I will be explaining the major portions of it. The whole code can be found here

First of all, we need to build the main index page which we will showcase our sample events. It will contain the small images of the event and on clicking them, the selected event will be opened. For displaying features and capability of the generator,  we have two separate sections of events: one having the single session page and the other having the expandable sessions page. There will be links to the other components of the Open Event Ecosystem like Android App generator,  Web App generatorOrganizer App, and Eventyay.

The contents of that page are kept in the overviewSite folder. It contains the event background images of the events and the main index file. The basic structure of the file is shown below. The whole file can be viewed here

<div class="container-fluid bg-3 text-center">
 <div class="row margin">
   <div class="col-md-6 col-sm-12 col-xs-12">
     <div class="row">
       <h2 class="margin"> Apps with expandable sessions page </h2>
       <div class="col-md-6 col-sm-6 col-xs-12 margin">
         <p><strong>Open Tech Summit 2017</strong></p>
         <a href='./OpenTechSummit/index.html' target='_blank'>
           <img src="./otssmall.jpg" class=""  alt="Image">
         </a>
       </div>
      </div>
    </div>
   <div class="col-md-6 col-sm-12 col-xs-12">
     <div class="row">
       <h2 class="margin"> Apps with single sessions page </h2>
       <div class="col-md-6 col-sm-6 col-xs-12 margin">
         <p><strong>Mozilla All Hands 2017</strong></p>
         <a href='./MozillaAllHands2017/index.html' target='_blank'>
           <img src="./mozilla_banner.jpg" class=""  alt="Image">
         </a>
       </div>
     </div>
   </div>
 </div>
</div>

But, this is just the front end of the page. We haven’t generated the sample events yet and neither have we made any changes to make them auto deploy on each PR merge. The test script of the app which contains unit, acceptance and selenium tests runs on each PR made against the repo when Travis CI build is triggered. So, it makes sense to write code for generating the event there itself. When the test script has finished executing, all of the events would have been generated and present inside a single folder named a@a.com (We needed something short and easy to remember and the name doesn’t really matter). We then copy the contents of the overviewSite folder into the above folder. It already contains the folder of different sample events.

Here is the related code. The full test script file can be found here

describe('generate', function() {
 describe('.create different event sites and copy assets of overview site', function() {
   // Sample events are generated inside the a@a.com folder
   it('should generate the Mozilla All Hands 2017', function(done) {
     var data = {};
     // API endpoint configuration of the All Hands 2017 event and the session style set to single pages
     data.body = {
       "email": "a@a.com",
       "name": "Open Event",
       "apiendpoint":    "https://raw.githubusercontent.com/fossasia/open-event/master/sample/MozillaAllHands17",
       "sessionMode": "single",
       "datasource": "eventapi",
       "assetmode" : "download"
     };
     generator.createDistDir(data, 'Socket', function(appFolder) {
       assert.equal(appFolder, "a@a.com/MozillaAllHands2017");
       done();
     });
   });
   // For copying the static files required for the showcase site
   it('should copy all the static files', function(done) {
     var staticPath = __dirname + '/../src/backend/overviewSite/';
     function copyStatic(fileName) {
       // Copy the static files in the overviewSite folder to the a@a.com folder
     }
   });
 });
});

Everything is almost done now. We then just make some changes in the deploy script to publish the whole folder containing the different event samples instead of a particular sample and everything works fine.

We navigate to the a@a.com folder inside the dist directory and initialize a git repository there. We then set the username and email and fetch the contents of the gh-pages branch of the official repo (using the Github token. It is defined in the Travis Settings as a private environment variable) and reset it. We then add all the files present in the current directory to the staging area, commit them and push it to the upstream repository. Here is the relevant code. The whole github deploy script file can be viewed here

eval cd dist/a@a.com/
git init
git config --global user.name "Travis CI"
git config --global user.email "noreply+travis@fossasia.org"
git remote add upstream "https://$GH_TOKEN@github.com/"${TRAVIS_REPO_SLUG}".git"
git fetch upstream
git reset upstream/gh-pages
touch .
git add -A .
git commit -m "rebuild pages at ${rev}"
git push -q upstream HEAD:gh-pages

Here is the screenshot showing the successful deployment of the sample events. You can view the whole log here. A screenshot of it is below. You can view the higher quality image by clicking on it.

29e53dc0-8841-4329-8a37-8d2e9f08756c.png

After all the work, this is how the showcase page looks like. Samples are re-generated and the site is auto-deployed on every Pull Request merged in the repository.

66804d19-6862-494f-80b6-e1749493e780.png

On clicking on any of the listed events, we jump to the index page of that particular event. Like, If we click on the Facebook Developer Conference, a new tab is opened and we are taken to the front page of that event!

6a47f623-82c6-49e2-af1c-4d152aaaf9b7.png

References

Continue ReadingBuilding a showcase site to display sample events and auto deploying them on each PR merge in Open Event Webapp