Structure of Open Event Frontend

In Open Event Frontend, new contributors always fall into a dilemma of identifying the proper files where they have to make changes if they want to contribute. The project structure is quite complex and which is obvious because it is a large project. So, in this blog, we will walk through the structure of Open Event Frontend.

Following are the different folders of the project explained:

Root:
The root of the project contains folders like app, config, kubernetes, tests, scripts. Our main project is in the app folder where all the files are present. The config folder in the root has files related to the deployment of the app in development, production, etc. It also has the environment setup such as host, api keys, etc. Other files such as package.json, bower.json, etc are basically to store the current versions of the packages and to ease the installation of the project.

App:
The app folder has all the files and is mainly classified into the following folder:
adapters
components
controllers
helpers
Initializers
mixins
models
routes
serializers
services
styles
templates
transforms
utils

The folders with their significance are listed below:

Adapters: This folder contains the files for building URLs for our endpoints. Sometimes it happens to have a somewhat customised URL for an endpoint which we pass through adapter to modify it.
Components: This folder contains different components which we reuse in our app. For example, the image uploader component can be used at multiple places in our app, so we keep such elements in our components. This folder basically contains the js files of all the components(since when we generate a component, a js file and a hbs template is generated).
Controllers: This folder contains the controller associated with each route. Since the main principle of ember js is DDAU i.e data down actions up, all the actions are written in the files of this folder.
Helpers: Many a time it happens that, we want to format date, time, encode URL etc. There are some predefined helpers but sometimes custom helpers are also needed. All of them have been written in helpers folder.
Initializers: This folder has a file for now called ‘blanket.js’ which basically injects the services into our routes, components. So if you want to write any service and want to inject it into routes/components, it should go in here.
Mixins: In EmberJS the Mixin class can create objects whose properties and functions can be shared amongst other classes and instances. This allows for an easy way to share behavior between objects as well as design objects that may need multiple inheritance. All of them used for the application are in the mixins folder.
Models: This folder contains the schema’s for our data. Since we are using ember data, we need to have proper skeleton of the data. All of this goes it this folder. Observing this folder will show you some models like user, event, etc.
Routes: This folder contains the js files of the routes created. Routes handle which template to render and what to return from the model, etc.
Serializers: We use serializers to modify the data that ember sends automatically in a request. Consider we want to get a user with the help of user model, and don’t want to get the password attribute present in it. We can thus omit that by defining it in a serializer.
Services: Services are the ember objects which are available throughout the running time of the application. These are used to perform tasks like getting current user model, making third party API calls etc. All such services go in this folder.
Styles: As the name infers, all the style sheets go in here.
Templates: A template is generated with generation of each route and component. All of them go here. Thus, the markup will be written over here.
Transforms: Ember Data has a feature called transforms that allow you to transform values before they are set on a model or sent back to the server. In our case, we have a transform called moment.
Utils: This folder contains some functions exported as modules which are reusable. There is some JSON data as well.

References: Ember JS official guide: https://guides.emberjs.com/v2.17.0/
Blog posts: https://spin.atomicobject.com/2015/09/17/ember-js-clean/
http://www.programwitherik.com/ember-pods/

Continue ReadingStructure of Open Event Frontend

Autolinker Component in Loklak Search

In Loklak Search the post items contain links, which are either internal or external. These links include the hashtags, mentions, and URLs. From the backend server we just received the message in the plain text format, and thus there is need to parse the plain text and render it as clickable links. These clickable links can be either internal or external. Thus we need an auto-linker component, which takes the text and render it as links.

The API of the Component

The component takes as the input the plain text, then four arrays of strings. Each containing the text to be linked. These are hashtags, mentions, links and the unshorten attribute which is used to unshorten the shortened URLs in the post. These attributes are used by the component to render the text in the appropriate format.

export class FeedLinkerComponent implements OnInit {
@Input() text: string;
@Input() hashtags: string[] = new Array<string>();
@Input() mentions: string[] = new Array<string>();
@Input() links: string[] = new Array<string>();
@Input() unshorten: Object = {};
}

The Logic of the Component

The basic logic of the component works as the following, we divide the text into chunks known as shards, we have three basic data structures for the component to work

  • The ShardType which is the type of the chunk it specifies whether it is plain, hashtags, mentions, and links.
  • The Shard which is the simple object containing the text to show, its type and the link it refers to

The StringIndexdChunks, they are utilized to index the chunks in the order in which they appear in the text.

const enum ShardType {
plain, // 0
link, // 1
hashtag, // 2
mention // 3
}

class Shard {
constructor (
public type: ShardType = ShardType.plain,
public text: String = '',
public linkTo: any = null,
public queryParams: any = null
) { }
}

interface StringIndexedChunks {
index: number;
str: string;
type: ShardType;
}

First we have a private method of the component which searches for all the elements (strings) in the text. Here we have an array which maintains the index of those chunks in the text.

private generateShards() {
const indexedChunks: StringIndexedChunks[] = [];

this.hashtags.forEach(hashtag => {
const indices = getIndicesOf(this.text, `#${hashtag}`, false);
indices.forEach(idx => {
indexedChunks.push({index: idx, str: `#${hashtag}`, type: ShardType.hashtag});
});
});

this.mentions.forEach(mention => {
const indices = getIndicesOf(this.text, `@${mention}`, false);
indices.forEach(idx => {
indexedChunks.push({index: idx, str: `@${mention}`, type: ShardType.mention});
});
});
}

Then we sort the chunks according to their indexes in the text. This gives us sorted array which consists of all the chunks sorted according to the indexes as they appear in the text.

indexedChunks.sort((a, b) => { return (a.index > b.index) ? 1 : (a.index < b.index) ? -1 : 0; });

The next part of the logic is to generate the shard array, an array which contains each chunk, once. To do this we iterate over the Sorted Indexed array created in the previous step and use it split the text into chunks. We iterate over the text and take substrings using the indexes of each element.

let startIndex = 0;
const endIndex = this.text.length;

indexedChunks.forEach(element => {
if (startIndex !== element.index) {
const shard = new Shard(ShardType.plain, this.text.substring(startIndex, element.index));
this.shardArray.push(shard);
startIndex = element.index;
}
if (startIndex === element.index) {
const str = this.text.substring(startIndex, element.index + element.str.length);
const shard = new Shard(element.type, str);
switch (element.type) {
case ShardType.link: {
if (this.unshorten[element.str]) {
shard.linkTo = str;
shard.text = this.unshorten[element.str];
}
else {
shard.linkTo = str;
}
break;
}

case ShardType.hashtag: {
shard.linkTo = ['/search'];
shard.queryParams = { query : str };
break;
}

case ShardType.mention: {
shard.linkTo = ['/search'];
shard.queryParams = { query : `from:${str.substring(1)}` };
break;
}
}
this.shardArray.push(shard);
startIndex += element.str.length;
}
});

if (startIndex !== endIndex) {
const shard = new Shard(ShardType.plain, this.text.substring(startIndex));
this.shardArray.push(shard);
}

After this we have generated the chunks of the text, now the only task is to write the view of the component which uses this Shard Array to render the linked elements.

<div class="textWrapper">
<span *ngFor="let shard of shardArray">
<span *ngIf="shard.type === 0"> <!-- Plain -->
{{shard.text}}
</span>
<span *ngIf="shard.type === 1"> <!-- URL Links -->
<a>{{shard.text}}</a>
</span>
<span *ngIf="shard.type === 2"> <!-- Hashtag -->
<a [routerLink]="shard.linkTo" [queryParams]="shard.queryParams">{{shard.text}}</a>
</span>
<span *ngIf="shard.type === 3"> <!-- Mention -->
<a [routerLink]="shard.linkTo" [queryParams]="shard.queryParams">{{shard.text}}</a>
</span>
</span>
</div>
  • This renders the chunks and handles the links of both internal and external type.
  • It also also makes sure that the links get unshortened properly using the unshorten API property.
  • Uses routerLink, angular property to link in application URLs, for asynchronous reloading while clicking links.

Resources and Links

This component is inspired from the two main open source libraries.

Earlier these libraries were used in the project, but as the need of unshortening and asynchronous linking appeared in the application, a custom implementation was needed to be implemented.

Continue ReadingAutolinker Component in Loklak Search

Making Autocomplete Box Compatible with the Search Bar using Angular in Susper

A major problem in Susper was that we were using the same components on different pages, with different styling properties. A major issue was that the Autocomplete box was not properly aligned in the index page and looked like this:

This was happening because the autocomplete box width was set for 634 px, a width perfect for the search bar in the results page. The index page had a search bar of width 534 px, and the autocomplete box was too large for that.
Here is how the issue was solved:

  1. Changing the suggestion box html code:

id=“sug-box” class=“suggestion-box” *ngIf=”results.length0”>

</div>

The code uses *ngIf which is why setting the autocomplete box width using the typescript files becomes impossible. *ngIf does not load the component into the DOM until there are results, hence we didnot have the autocomplete box in the DOM until after the query was typed in the search bar. That was why we could not set its width, hence it was decided to remove this attribute. Using the ‘hidecomponent emitter’ is a better option here (used in the typescript file).

@Output() hidecomponent: EventEmitter<any> = new EventEmitter<any>();
if (this.results.length === 0) {
this.hidecomponent.emit(1);
} else {
this.hidecomponent.emit(0);
}

See autocomplete.component.ts for the complete code.

  1. It is now required to dynamically change the id of the suggestion-box depending on the page it is on, and apply the correct CSS.

Here is the html code:

<div [id]=”getID()” class=“suggestion-box” *ngIf=“results”>

The id of the suggestion box will now depend on the value returned from the function getID(), defined as follows:

getID() {
if ( this.route.url.toString() === ‘/’) {
  return ‘index-sug-box’;
} else {
  return ‘sug-box’
}
}
  • We first check if the route url is simply ‘/’ (which implies it is in the index page).
  • If yes the id is set to index-sug-box otherwise to sug-box.

Now we can write extra CSS properties for the index-sug-box id as follows:

#index-sug-box{
width: 586px;
}

References:

  1. For basic javascript functions: https://www.w3schools.com/js/js_functions.asp
  2. To understand components in Angular: https://angular.io/api/core/Component


Continue ReadingMaking Autocomplete Box Compatible with the Search Bar using Angular in Susper

Reducing Initial Load Time Of Susper

Susper used to take long time to load the initial page. So, there was a discussion on how to decrease the initial loading time of Susper.

Later on going through issues raised in official Angular repository regarding the time takento load angular applications, we found some of the solutions. Those include:

  • Migrating from development to production during build:
    • This shrinks vendor.js and main.js by minimising them and also removing all packages that are not required on production.
    • Enables inline html and extracting CSS.
    • Disables source maps.
  • Enable Ahead of Time (AoT) compilation.
  • Enable service workers.

After these changes we found the following changes in Susper:

File Name Before (content-length) After
vendor.js 709752 216764
main.js 56412 138361

LOADING TIMES GRAPHS:

After:

Vendor file:

Main.js

Before:

Vendor file:

Main.js

Also we could see that all files are now initiated by service worker:

More about Service Workers could be read at Mozilla and Service Workers in Angular.

Implementation:

While deploying our application, we have added –prod and –aot as extra attributes to ng build .This enables angular to use production mode and ahead of time compilation.

For service workers we have to install @angular/service-worker module. One can install it by using:

npm install @angular/service-worker --save
ng set apps.0.serviceWorker=true

The whole implementation of this is available at this pull:

https://github.com/fossasia/susper.com/pull/597/files

Resources:


Continue ReadingReducing Initial Load Time Of Susper

Implementing Intelligence Feature in Susper

Susper gives answers to your questions using SUSI AI. We want to give users best experience while they are searching for solutions to their questions. To achieve this, we have incorporated with features like infobox and intelligence using SUSI.

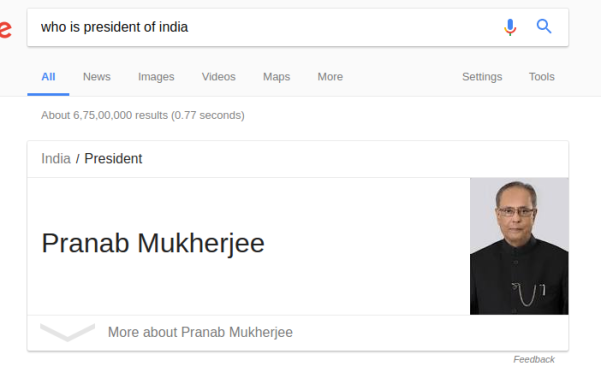
Google has this feature where users can ask questions like ‘Who is president of USA?’ and get answers directly without encouraging the users to deep-dive into the search results to know the answer.

Similarly Susper gives answer to the user:

It also gives answer to question which is related to real time data like temperature.


How we have implemented this feature?

We used the API Endpoint of SUSI at http://api.asksusi.com/

Using SUSI API is as simple as sending query as a URL parameter in GET request http://api.susi.ai/susi/chat.json?q=YOUR_QUERY

You can also get various action types in the response. Eg: An anwser type response for http://api.susi.ai/susi/chat.json?q=hey%20susi is:

actions: [
  {
    type: "answer",
    expression: "Hi, I'm Susi"
  }
],


Documentation regarding SUSI is available at here.

Implementation in Susper:

We have created an Intelligence component to display answer related to a question. You can check it here: https://github.com/fossasia/susper.com/tree/master/src/app/intelligence

It takes care about rendering the information and styling of the rendered data received from SUSI API.

The intelligence.component.ts makes a call to Intelligence Service with the required query and the intelligence service makes a GETrequest to the SUSI API and retrieves the results.

Intelligence.component.ts

this.intelligence.getintelligentresponse(data.query).subscribe(res => {
  if (res && res.answers && res.answers[0].actions) {
     this.actions = res.answers[0].actions;
       for (let action of this.actions) {
         if (action.type === 'answer' && action.mood !== 'sabta') {
           this.answer = action.expression;
         } else {
             this.answer = '';
         }
      }
   } else {
       this.answer = '';
   }
});


Intelligence.service.ts

export class IntelligenceService {
 server = 'http://api.susi.ai';
 searchURL = 'http://' + this.server + '/susi/chat.json';
 constructor(private http: Http, private jsonp: Jsonp, private store: Store<fromRoot.State>) {
 }
 getintelligentresponse(searchquery) {
   let params = new URLSearchParams();
   params.set('q', searchquery);
   params.set('callback', 'JSONP_CALLBACK');
   return this.jsonp
     .get('http://api.asksusi.com/susi/chat.json', {search: params}).map(res =>
       res.json()

     );
 }

Whenever the getintelligenceresponse of intelligenceService is called, it creates a URLSearchParams() object and set required parameters in it and send them in jsonp.get request. We also set callback to ‘JSONP_CALLBACK’ to inform the API to send us data in JSONP.

Thereby, the intelligence component retrieves the answer and displays it with search resultson Susper.

Source code for this implementation could be found in this pull:

https://github.com/fossasia/susper.com/pull/569

Resources:

Continue ReadingImplementing Intelligence Feature in Susper