New contributors to this project are sometimes not experienced with the set of libraries and MVP pattern which this app uses. This blog post is an attempt to walk a new contributor through some parts of the code of the app by implementing an operation for an endpoint of the API. We’ll be implementing the sponsor endpoint.
Open Event Organizer Android app uses a robust architecture. It is presently using the MVP (Model-View-Presenter) architecture. Therefore, this blog post aims at giving some brief insights to the app architecture through the implementation Sponsor endpoint. This blog post will focus only on one operation of the endpoint – the list operation – so as to make the post short enough.
This blog post relates to Pull Request #901 of Open Event Organizer App.
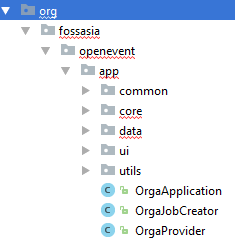
Project structure:

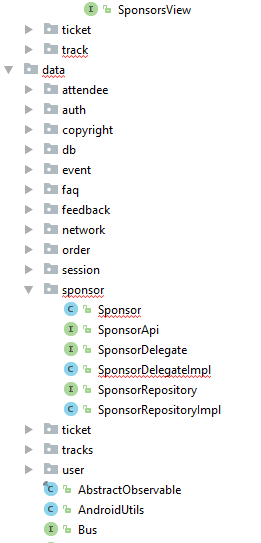
These are the parts of the project structure where major updates will be made for the implementation of Sponsor endpoint:
| core

|
data

|
Setting up elements in the data module for the respective endpoint
Sponsor.java
@Data
@Builder
@Type(“sponsor”)
@AllArgsConstructor
@JsonNaming(PropertyNamingStrategy.KebabCaseStrategy.class)
@EqualsAndHashCode(callSuper = false, exclude = { “sponsorDelegate”, “checking” })
@Table(database = OrgaDatabase.class)
public class Sponsor extends AbstractItem<Sponsor, SponsorsViewHolder> implements Comparable<Sponsor>, HeaderProvider {
@Delegate(types = SponsorDelegate.class)
private final SponsorDelegateImpl sponsorDelegate = new SponsorDelegateImpl(this); |
This class uses Lombok, Jackson, RaizLabs-DbFlow, extends AbstractItem class (from Fast Adapter) and implements Comparable and HeaderProvider.
All the annotations processor help us reduce boilerplate code.
From the Lombok plugin, we are using:
Lombok has annotations to generate Getters, Setters, Constructors, toString(), Equal() and hashCode() methods. Thus, it is very efficient in reducing boilerplate code
@Getter, @Setter, @ToString, @EqualsAndHashCode
@Data is a shortcut annotation that bundles the features of @Getter, @Setter, @ToString and @EqualsAndHashCode
The @Delegate is used for direct calls to the methods that are annotated with it, to the specified delegate. It basically separates the model class from other methods which do not pertain to data.
Jackson
@JsonNaming – used to choose the naming strategies for properties in serialization, overriding the default. For eg: KEBAB_CASE, LOWER_CASE, SNAKE_CASE, UPPER_CAMEL_CASE
| @JsonNaming(PropertyNamingStrategy.KebabCaseStrategy.class) |
@JsonProperty – used to store the variable from JSON schema as the given variable name. So, “type” from JSON will be stored as sponsorType.
@JsonProperty(“type”)
public String sponsorType; |
RaizLabs-DbFlow
DbFlow uses model classes which must be annotated using the annotations provided by the library. The basic annotations are – @Table, @PrimaryKey, @Column, @ForeignKey etc.
These will create a table named attendee with the columns and the relationships annotated.
SponsorDelegate.java and SponsorDelegateImpl.java
The above are required only for method declarations of the classes and interfaces that Sponsor.java extends or implements. These basically separate the required method overrides from the base item class.
| public class SponsorDelegateImpl extends AbstractItem<Sponsor, SponsorsViewHolder> implements SponsorDelegate { |
SponsorRepository.java and SponsorRepositoryImpl.java
A Repository mediates between the domain and data mapping layers, acting like an in-memory domain object collection. Client objects construct query specifications declaratively and submit them to Repository for satisfaction. Objects can be added to and removed from the Repository, as they can from a simple collection of objects, and the mapping code encapsulated by the Repository will carry out the appropriate operations behind the scenes.
public interface SponsorRepository {
@NonNull
Observable<Sponsor> getSponsors(long eventId, boolean reload);
} |
Presently the app uses MVP architecture and the core package contains respective Views and their Presenters, whereas the data package contains the Model implementation.
To understand Observable, one will need to dive in RxJava. This video of a presentation by Jake Wharton can be a great start.
So, basically Observables represent sources of data, and whenever there is a change in our observable, i.e. our data, it fires an event and we get to know about it only if we have subscribed to it.
Setting up elements in core module (views and presenters)
Presently the app uses MVP architecture and the core package contains respective Views and Presenters for different properties of an event.
SponsorView.java
public interface SponsorsView extends Progressive, Erroneous, Refreshable, Emptiable<Sponsor> {
} |
SponsorsFragment.java
This is a simple Fragment that extends BaseFragment (a generic fragment class predefined in the project) and implements SponsorView interface.
SponsorsListAdapter.java
A simple adapter for a RecyclerView.
SponsorsPresenter.java
The presenter is the middle-man between model and view. All your presentation logic belongs to it. A Presenter in a MVP architecture is responsible for querying the model and updating the view, reacting to user interactions and updating the model.
In this Presenter we have used the @Inject annotation and some RxJava code:
@Inject
public SponsorsPresenter(SponsorRepository sponsorRepository, DatabaseChangeListener<Sponsor> sponsorChangeListener) {
this.sponsorRepository = sponsorRepository;
this.sponsorChangeListener = sponsorChangeListener;
} |
The @Inject annotation is used to request dependencies. It can be used on a constructor, a field, or a method. If you annotate a constructor with @Inject, Dagger 2 can also use an instance of this object to fulfill dependencies. Note that we are not instantiating any object here ourselves.
Some RxJava part, which is not in the scope of this blog.
private void listenChanges() {
sponsorChangeListener.startListening();
sponsorChangeListener.getNotifier()
.compose(dispose(getDisposable()))
.map(DbFlowDatabaseChangeListener.ModelChange::getAction)
.filter(action -> action.equals(BaseModel.Action.INSERT))
.subscribeOn(Schedulers.io())
.subscribe(sponsorModelChange -> loadSponsors(false), Logger::logError);
} |
public void loadSponsors(boolean forceReload) {
getSponsorSource(forceReload)
.compose(dispose(getDisposable()))
.compose(progressiveErroneousRefresh(getView(), forceReload))
.toList()
.compose(emptiable(getView(), sponsors))
.subscribe(Logger::logSuccess, Logger::logError);
} |
Make changes to Dependency Injection modules
We are using Dagger for Dependency Injection, and therefore we need to update the modules that provide endpoint specific objects.
This video and this blog are a great start to learn about dependency injection using dagger.
Dependency injection is a technique whereby one object supplies the dependencies of another object. A dependency is an object that can be used (a service). An injection is the passing of a dependency to a dependent object (a client) that would use it. The service is made part of the client’s state. Passing the service to the client, rather than allowing a client to build or find the service, is the fundamental requirement of the pattern.(source)
Dependency Injection in built upon the concept of Inversion of Control. Which says that a class should get its dependencies from outside. In simple words, no class should instantiate another class but should get the instances from a configuration class.
Dagger 2 analyzes the dependencies for you and generates code to help wire them together. It relies purely on using Java annotation processors and compile-time checks to analyze and verify dependencies. It is considered to be one of the most efficient dependency injection frameworks built to date.
@Provides is basically required to specify that the annotated method returns an object that should be available for injection to dependencies using @Inject
@Singleton annotation signals to the Dagger compiler that the instance should be created only once in the application.
@Binds annotation is a replacement for @Provides methods that simply returns an injected parameter. Its generated implementation is likely to be more efficient. A method annotated with @Binds must be: abstract.
ApiModule.java
@Provides
@Singleton
SponsorApi providesSponsorApi(Retrofit retrofit) { return retrofit.create(SponsorApi.class);
} |
ChangeListenerModule.java
@Provides
DatabaseChangeListener<Sponsor> providesSponsorChangeListener() {
return new DbFlowDatabaseChangeListener<>(Sponsor.class);
} |
NetworkModule.java
@Provides
Class[] providesMappedClasses() {
return new Class[]{Event.class, Attendee.class, Ticket.class, User.class,
EventStatistics.class, Faq.class, Copyright.class, Feedback.class, Track.class, Session.class, Sponsor.class};
} |
RepoModule.java
@Binds
@Singleton
abstract SponsorRepository bindsSponsorRepository(SponsorRepositoryImpl sponsorRepositoryImpl); |
MainFragmentBuilderModule.java
@ContributesAndroidInjector
abstract SponsorsFragment contributeSponsorsFragment(); |
Also remember to make this change to FragmentNavigator.java
|
case R.id.nav_sponsor:
fragment = SponsorsFragment.newInstance(eventId);
break;
|
XML resources to be added:
- sponsors_item.xml
- sponsors_fragment.xml
- Make changes to activity_main_drawer.xml to include “sponsors” option.
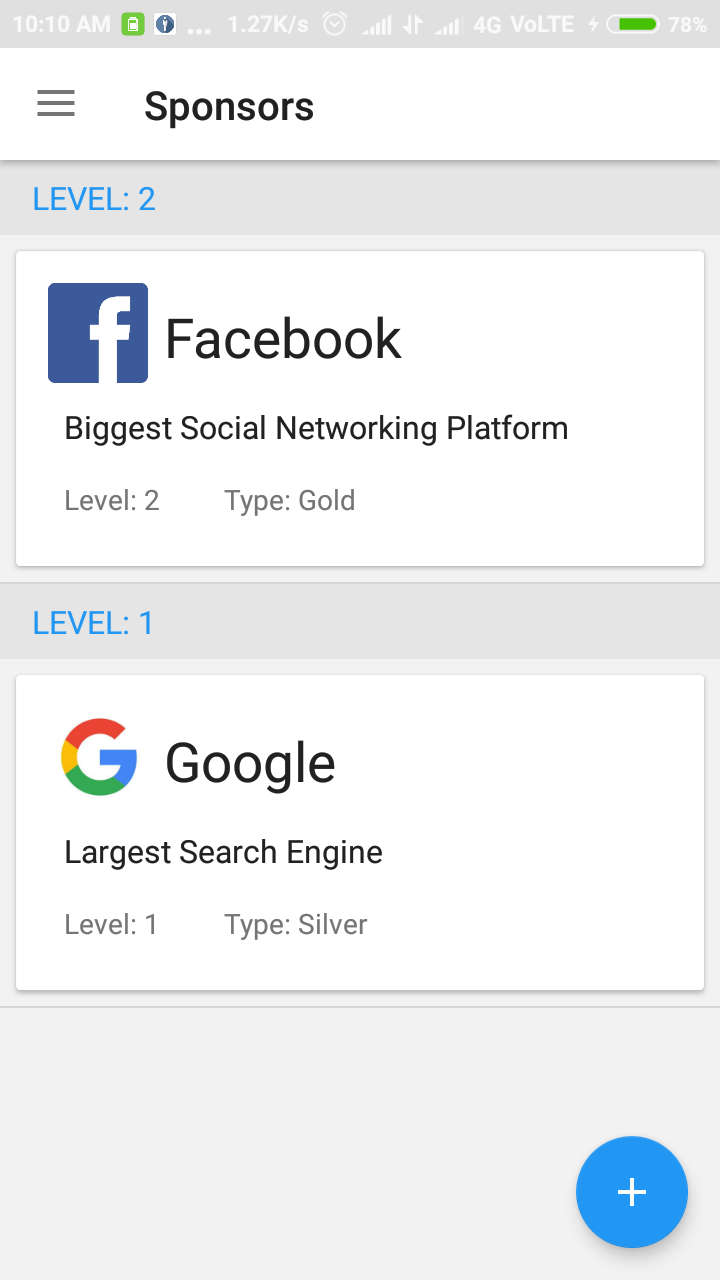
Here’s what the result looks like:

References:
Lombok Plugin: https://blog.fossasia.org/using-lombok-to-reduce-boilerplate-code-in-open-event-android-app/
Jackson: https://blog.fossasia.org/shrinking-model-classes-boilerplate-in-open-event-android-projects/
RaizLabs DbFlow: https://blog.fossasia.org/persistence-layer-in-open-event-organizer-android-app/
Dependency Injection:
https://medium.com/@harivigneshjayapalan/dagger-2-for-android-beginners-di-part-i-f5cc4e5ad878


