

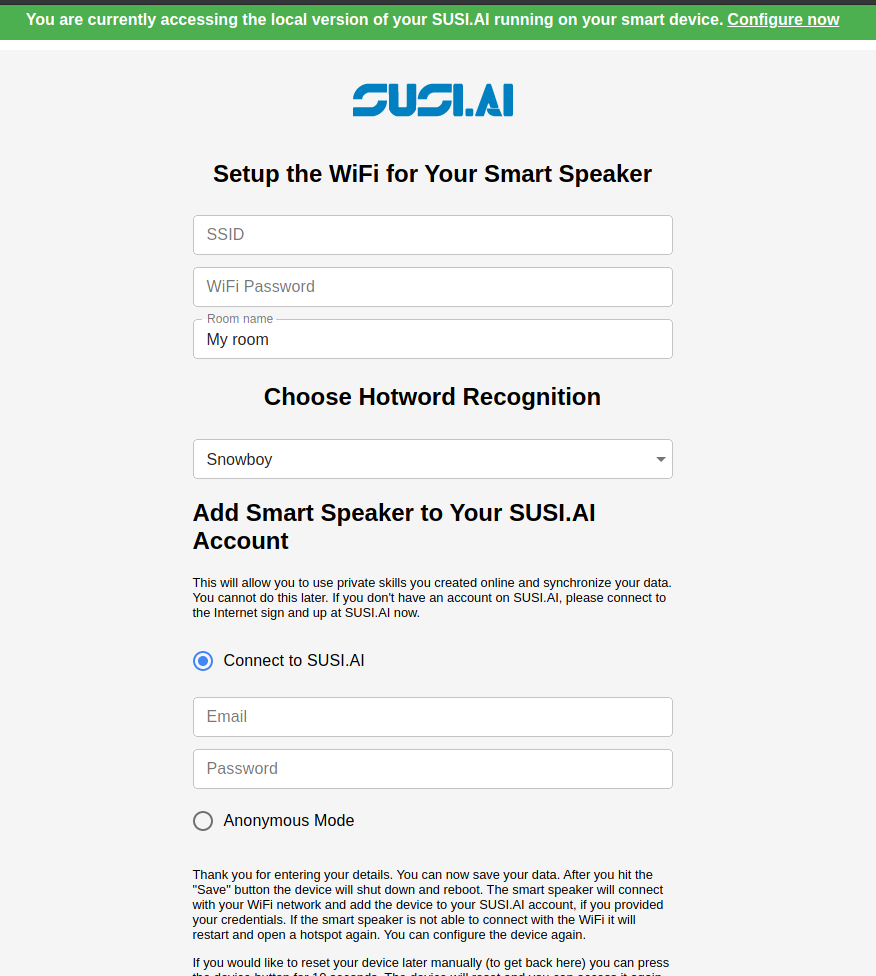
Handling Planned Actions for the SUSI Smart Speaker
Handling Planned Actions for the SUSI Smart Speaker
Planned action is the latest feature added to the SUSI Smart Speaker, The user now has the option to set timed actions such as- settings alarms, countdown timer etc. So the user now can say “SUSI, Set an alarm in one minute” and after one minute the smart speaker will notify you.
The following flowchart represents the workflow for the working of a planned action:

Planned Action Response
The SUSI Server accepts the planned action query and sends a multi-action response which looks like this:
| “actions”: [ { “language”: “en”, “type”: “answer”, “expression”: “alarm set for in 1 minute” }, { “expression”: “ALARM”, “language”: “en”, “type”: “answer”, “plan_delay”: 60003, “plan_date”: “2019-08-19T22:28:44.283Z” } ] |
Here we can see that we have two actions in the server response. The first action is of the type “answer” and is executed by the SUSI Linux client immediately, the other response has the `plan_date` and `plan_delay` keys which tells the BUSY State of the SUSI Linux client that this is a planned action and is then sent to the scheduler.
Parsing Planned Action Response From The Server
The SUSI python wrapper is responsible for parsing the response from the server and making it understandable to the SUSI Linux client. In SUSI Python we have classes which represent the different types of actions possible. The SUSI Python takes all the actions sent by the server and parses them into objects of different action types. To enable handling planned actions we add two more attributes to the base action class – `planned_date` and `planned_delay`.
| class BaseAction: def __init__(self, plan_delay = None, plan_date = None): self.plan_delay = plan_delay self.plan_date = plan_date class AnswerAction(BaseAction): def __init__(self, expression, plan_delay = None, plan_date = None): super().__init__(plan_delay,plan_date) self.expression = expression |
Here we can see, All the action types which can be planned actions call the base class’ constructor to set the value for planned_delay and planned_date attributes.
The next step is to parse the different action type object and generate the final result
| def generate_result(response): result = dict() actions = response.answer.actions data = response.answer.data result[“planned_actions”] = [] for action in actions: data = dict() if isinstance(action, AnswerAction): if action.plan_delay != None and action.plan_date != None: data[‘answer’] = action.expression data[‘plan_delay’] = action.plan_delay data[‘plan_date’] = action.plan_date else: result[‘answer’] = action.expression if data != {}: result[“planned_actions”].append(data) |
Here if the action object has a non none value for the planned attributes, the action object’s values are added to a planned actions list.
Listening to Planned Actions in the SUSI Linux Client
In the busy state, we see if the payload coming from the IDLE state is a query or a planned response coming from the scheduler. If the payload is a query, the query is sent to the server, otherwise the payload is executed directly
| if isinstance(payload, str): logger.debug(“Sending payload to susi server: %s”, payload) reply = self.components.susi.ask(payload) else : logger.debug(“Executing planned action response”, payload) reply = payload |
If the payload was a query and the server replies with a planned action response, then
The server response is sent to the scheduler.
| if ‘planned_actions’ in reply.keys(): for plan in reply[‘planned_actions’]: self.components.action_schduler.add_event(int(plan[‘plan_delay’])/1000,plan) |
The scheduler then schedules the event and send the payload to the IDLE state with the required delay. To trigger planned actions we implemented an event based observer using RxPy. The listener resides in the idle state of the SUSI State Machine.
| if self.components.action_schduler is not None: self.components.action_schduler.subject.subscribe( on_next=lambda x: self.transition_busy(x)) |
The observer in the IDLE state on receiving an event sends the payload to the busy state where it is processed. This is done by the transition_busy method which uses the allowedStateTransitions method.
| def transition_busy(self,reply): self.transition(self.allowedStateTransitions.get( ‘busy’), payload=reply) |
Resources
Understanding the SUSI State Machine – https://blog.fossasia.org/implementing-susi-linux-app-as-a-finite-state-machine/
Audio Structure of SUSI Smart Speaker – https://blog.fossasia.org/audio-structure-of-susi-smart-speaker/
Reactive Python Documentation – https://rxpy.readthedocs.io/en/latest/
Tags
SUSI Smart Speaker, SUSI.AI, FOSSASIA, GSoC19


You must be logged in to post a comment.