Implementing multiselect dropdown


select2 is one of the nicest jQuery libraries available for web site development. It gives the web developer a lot of power in creating select boxes.

In this post I would like to discuss how to implement a multiselect dropdown in PHP using select2

When we need to select multiple options from a list of many options. Multi checkbox will also work, but the UI of it will not be as neat as multiselect dropdown.

Initial UI of shifts page
227d62ea-2bf5-11e6-8159-7bfe52680de0

In the above image. We can see all the rooms. It becomes tough for the user to select and go through each one of them and the UI also looks clumsy. After implementing multi select dropdown UI looks like the below image.

After implementing multiselect dropdown UI looks likes this.

5ea7d648-3d15-11e6-9901-3341dbc49a91

Once we select rooms/Angel type/Occupancy. The list of options will be visible as a drop-down.

Implementation

Library used for implementing multiselect dropdown is select2 we can download the select2 Library from here Download

CODE

Cdn links for js and css files should be added

<link href="https://cdnjs.cloudflare.com/ajax/libs/select2/4.0.3/css/select2.min.css" rel="stylesheet"/>
<script src="https://cdnjs.cloudflare.com/ajax/libs/select2/4.0.3/js/select2.min.js"></script>

We need to call this function whenever we need to implement a multi select drop containing the $items in its list.

// $items = items for multiselect dropdown

function multiple_select($items, $selected, $name, $title = null){ 
  $html_items = array();
  if (isset($title))
      $html .= '<h4>' . $title . '</h4>' . "\n";
  // assigning the items to multiple
  $html .= '<select multiple id="selection_' . $name . '"  class="selection ' . $name . '" style="width:200px">';

  foreach ($items as $i)
    $html_items[] = '<option  value="' . $i['id'] . '"' . '>' . $i['name'] . '</option>';
  $html .= implode("\n", $html_items);
  $html .= '</select>';
  $html .= '<input type="checkbox" id="checkboxall_' . $name . '"  >All' . '<br>';
  $html .= '<input type="checkbox" id="checkboxnone_' . $name . '"  >None';
  // javascript for multiselect
  $html .= '$("#' . "selection_" . $name . '").select2({
  placeholder: "Select",
    });
  });
  ';
    return $html;
}

Englesystem

Development: https://github.com/fossasia/engelsystem

Issues/Bugs: Issues


Continue ReadingImplementing multiselect dropdown

Deploying PHP and Mysql Apps on Heroku

This tutorial will help you deploying a PHP and Mysql app.

Prerequisites

  1. a free Heroku account.
  2. PHP installed locally.
  3. Composer installed locally.

Set up

In this step you will install the Heroku Toolbelt. This provides you access to the Heroku Command Line Interface (CLI), which can be used for managing and scaling your applications and add-ons.

To install the Toolbelt for ubuntu/Debian

 wget -O- https://toolbelt.heroku.com/install-ubuntu.sh | sh

After installing Toolbelt you can use the heroku command from your command shell.

$ heroku login
Enter your Heroku credentials.
Email: dz@example.com
Password:
...

Authenticating is required to allow both the heroku and git commands to operate.

Prepare the app

In this step, you will prepare a fossasia/engelsystem application that can be deployed.

To clone the sample application so that you have a local version of the code that you can then deploy to Heroku, execute the following commands in your local command shell or terminal:

$ git clone --recursive https://github.com/fossasia/engelsystem.git
$ cd engelsystem/

If it is not a git repository you follow these steps

$ cd engelsystem/
$ git init

You now have a functioning git repository that contains a simple application now we need to add a composer.json file. Make sure you’ve installed Composer.

The Heroku PHP Support will be applied to applications only when the application has a file named composer.json in the root directory. Even if an application has no Composer dependencies, it must include at least an empty ({}) composer.json in order to be recognized as a PHP application.

When Heroku recognizes a PHP application, it will respond accordingly during a push:

$ git push heroku master
-----> PHP app detected

Define a Procfile

A Procfile is a text file in the root directory of your application that defines process types and explicitly declares what command should be executed to start your app. Your Procfile will look something like this for engelsystem:

web: vendor/bin/heroku-php-apache2 public/

Since our folder named public that contains your JavaScript, CSS, images and index.php file, your Procfile would define the Apache web server with that directory used as document root.

Create the app

In this step you will create the app to Heroku.

Create an app on Heroku, which prepares Heroku to receive your source code:

$ heroku create
Creating sharp-rain-871... done, stack is cedar-14
http://sharp-rain-871.herokuapp.com/ | https://git.heroku.com/sharp-rain-871.git
Git remote heroku added

When you create an app, a git remote (called heroku) is also created and associated with your local git repository.

Heroku generates a random name (in this case sharp-rain-871) for your app, or you can pass a parameter to specify your own app name.

But Once you open http://sharp-rain-871.herokuapp.com/ we will not be able to view the site if there are database connections. We need to migrate the database using Cleardb

ClearDB MySQL

Migrating database

Creating your ClearDB database

To create your ClearDB database, simply type the following Heroku command:

$ heroku addons:create cleardb:ignite
-----> Adding cleardb to sharp-mountain-4005... done, v18 (free)

This will automatically provision your new ClearDB database for you and will return the database URL to access it.

You can retrieve your new ClearDB database URL by issuing the following command:

$ heroku config | grep CLEARDB_DATABASE_URL
CLEARDB_DATABASE_URL: mysql://bda37eff166954:69445d28@us-cdbr-iron-east-04.cleardb.net/heroku_3c94174e0cc6cd8?reconnect=true

After getting the cleardb database url we can import the tables by following command:

$mysql -u bda37eff166954 -h us-cdbr-iron-east-04.cleardb.net -p heroku_3c94174e0cc6cd8

than you well get a mysql prompt with connection to the database. Than you can import the tables using the following commands

mysql> source [path to engelsystem]/engelsystem/db/install.sql;
mysql> source [path to engelsystem]/engelsystem/db/update.sql;
mysql> exit;

Now the tables are migrated successfully.

Declare app dependencies

Since we have added the mysql database we need to add the dependencies also.

{
  "require": {
    "ext-mysql": "*"
  },
   "require": {
      "ext-gettext": "*"
    },
   "require-dev": {
      "heroku/heroku-buildpack-php": "*"
   }
}

The composer.json file specifies the dependencies that should be installed with your application. When an app is deployed, Heroku reads this file and installs the appropriate dependencies into the vendor directory.

Run the following command to install the dependencies, preparing your system for running the app locally:

$ composer update
Loading composer repositories with package information
Updating dependencies (including require-dev)
  - Installing psr/log (1.0.0)
    Loading from cache
...
Writing lock file
Generating autoload files

You should always check composer.json and composer.lock into your git repo. The vendor directory should be included in your .gitignore file.

Using ClearDB with PHP

Connecting to ClearDB from PHP merely requires the parsing of the CLEARDB_DATABASE_URL environment variable and passing the extracted connection information to your MySQL library of choice, e.g. MySQLi:

we need to modify it in the config/config.php file

$url = parse_url(getenv("CLEARDB_DATABASE_URL"));
$server = $url["host"];
$username = $url["user"];
$password = $url["pass"];
$db = substr($url["path"], 1);

$config = array(
    'host' => $server ,
    'user' => $username ,
    'pw' => $password,
    'db' => $db 
);

Deploy the app

All the steps are completed now we need to deploy it. Push the code to Heroku. For pushing pushing development branch we need to follow these commands.

$ git add -A
$ git commit -m "heroku deploy"
$ git push heroku development:master
Initializing repository, done.
Counting objects: 7, done.
Delta compression using up to 4 threads.
Compressing objects: 100% (4/4), done.
Writing objects: 100% (7/7), 1.66 KiB | 0 bytes/s, done.
Total 7 (delta 0), reused 0 (delta 0)

-----> PHP app detected
-----> Setting up runtime environment...
       - PHP 5.5.12
       - Apache 2.4.9
       - Nginx 1.4.6
-----> Installing PHP extensions:
       - opcache (automatic; bundled, using 'ext-opcache.ini')
-----> Installing dependencies...
       Composer version 64ac32fca9e64eb38e50abfadc6eb6f2d0470039 2014-05-24 20:57:50
       Loading composer repositories with package information
       Installing dependencies from lock file
...
         - Installing monolog/monolog (1.9.1)
       Generating optimized autoload files
-----> Building runtime environment...
-----> Discovering process types
       Procfile declares types -> web
-----> Compressing... done, 57.4MB
-----> Launching... done, v3
       http://sharp-rain-871.herokuapp.com/ deployed to Heroku

To git@heroku.com:sharp-rain-871.git
 * [new branch]      development -> master

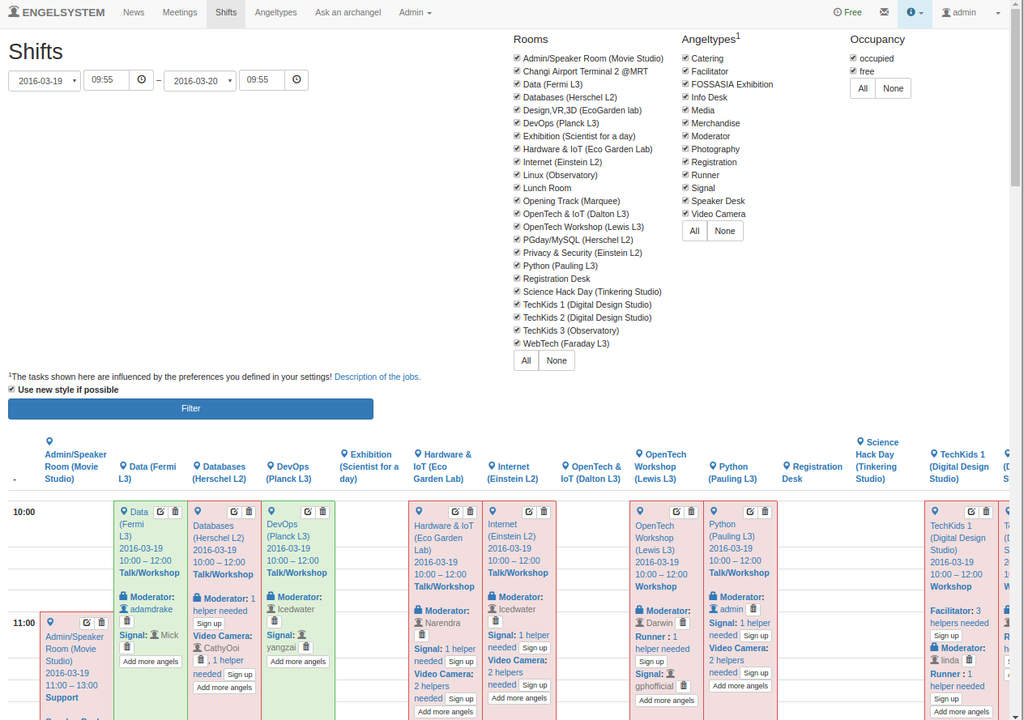
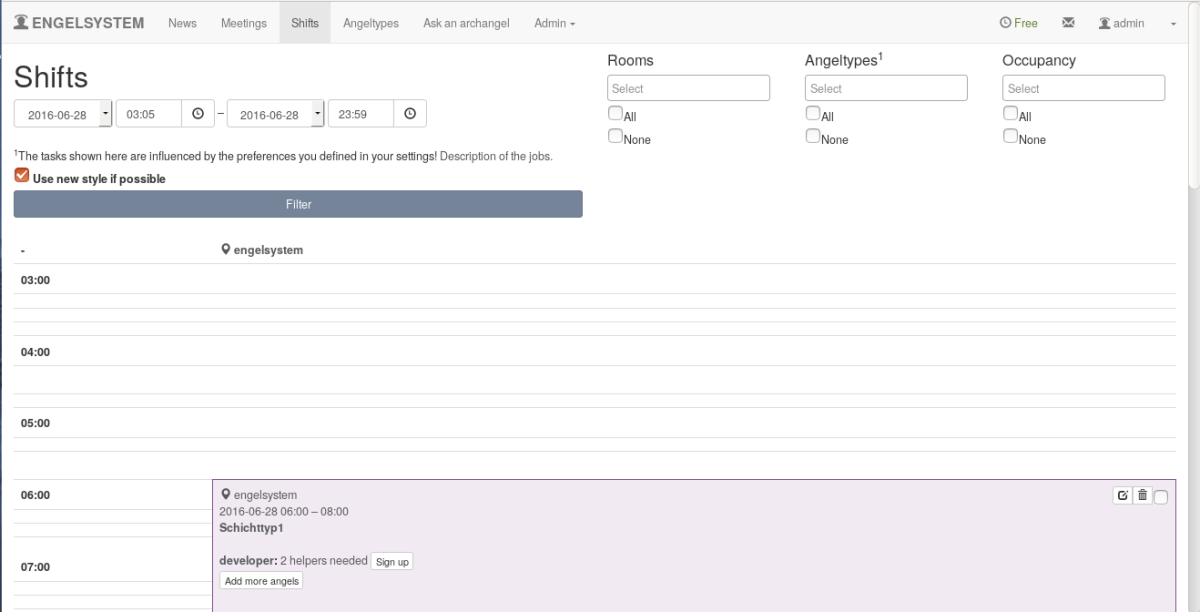
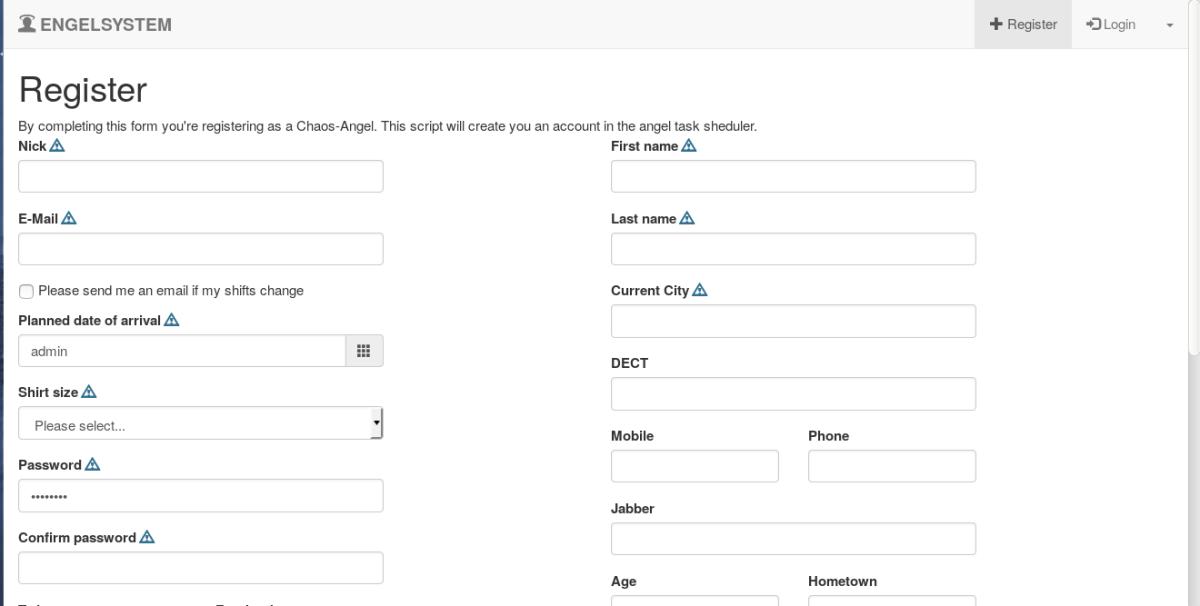
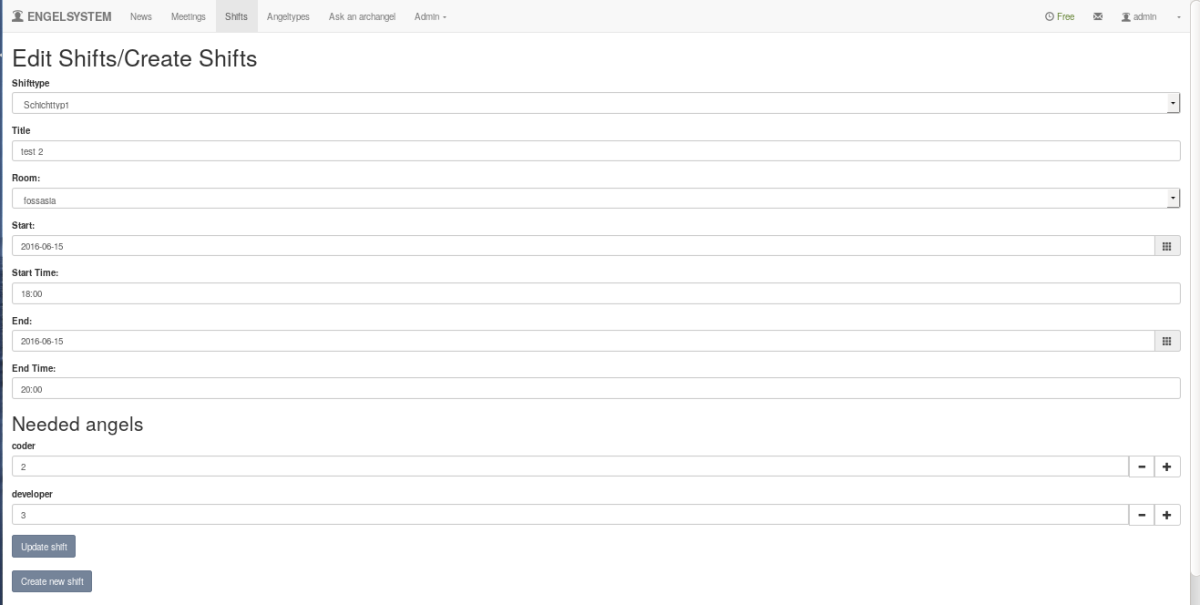
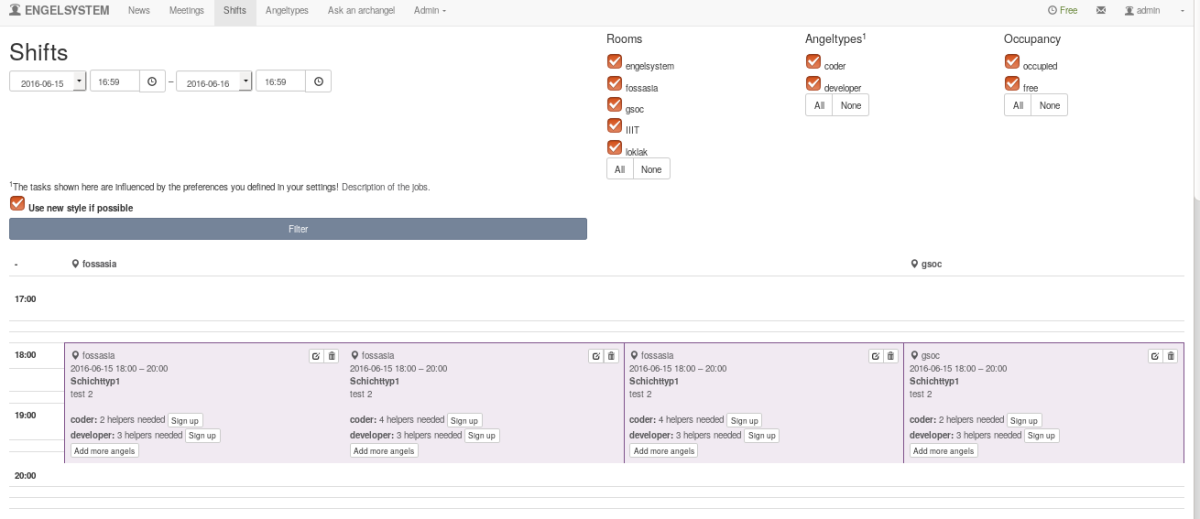
Now your app is successfully deployed you can view it here http://sharp-rain-871.herokuapp.com/

Englesystem

Development: https://github.com/fossasia/engelsystem

Issues/Bugs: Issues


Continue ReadingDeploying PHP and Mysql Apps on Heroku

Engelsytem – Sending messages to users or groups with PHP

In this post I will be discussing on how to send messages to other users and members of groups in PHP.

Implementation

We need to create a table for Message where we can store sender’s id and receiver id, text which are required while sending and receiving messages.

MYSQL Syntax of Messages Table

DROP TABLE IF EXISTS `Messages`;
CREATE TABLE IF NOT EXISTS `Messages` (
  `id` int(11) NOT NULL AUTO_INCREMENT,
  `Datum` int(11) NOT NULL,
  `SUID` int(11) NOT NULL DEFAULT '0',
  `RUID` int(11) NOT NULL DEFAULT '0',
  `isRead` char(1) NOT NULL DEFAULT 'N',
  `Text` text NOT NULL,
  PRIMARY KEY (`id`),
  KEY `Datum` (`Datum`),
  KEY `SUID` (`SUID`),
  KEY `RUID` (`RUID`)
) ENGINE=InnoDB DEFAULT CHARSET=utf8 COMMENT='Fuers interen Communikationssystem' AUTO_INCREMENT=1 ;

After initializing the table. we need to create a Page for sending and receiving messages which looks like this

messages

      $messages_table_entry = array(
      'new' => $message['isRead'] == 'N' ? '<span class="glyphicon  glyphicon-envelope"></span>' : '',
          'timestamp' => date("Y-m-d H:i", $message['Datum']),
          'from' => User_Nick_render($sender_user_source),
          'to' => User_Nick_render($receiver_user_source),
          'text' => str_replace("\n", '<br />', $message['Text']) 
      );

The message table looks something like this.

we need to store the sender and receiver id and update the message table .The function for sending messages looks something like this.

function Message_send($id, $text) {
  global $user;
  $text = preg_replace("/([^\p{L}\p{P}\p{Z}\p{N}\n]{1,})/ui", '', strip_tags($text));
  $to = preg_replace("/([^0-9]{1,})/ui", '', strip_tags($id));

  if (($text != "" && is_numeric($to)) && (sql_num_query("SELECT * FROM `User` WHERE `UID`='" . sql_escape($to) . "' AND NOT `UID`='" . sql_escape($user['UID']) . "' LIMIT 1") > 0)) {
    sql_query("INSERT INTO `Messages` SET `Datum`='" . sql_escape(time()) . "', `SUID`='" . sql_escape($user['UID']) . "', `RUID`='" . sql_escape($to) . "', `Text`='" . sql_escape($text) . "'");
    return true;
  } else {
    return false;
  }
}

this function is to send message $id is the id of receiver and $text is the text message.

To delete messages

        
 $message = sql_select("SELECT * FROM `Messages` WHERE `id`='" . sql_escape($id) . "' LIMIT 1");
 if (count($message) > 0 && $message[0]['SUID'] == $user['UID']) {
          sql_query("DELETE FROM `Messages` WHERE `id`='" . sql_escape($id) . "' LIMIT 1");
          redirect(page_link_to("user_messages"));
        } else
          return error(_("No Message found."), true);

Development: https://github.com/fossasia/engelsystem

Issues/Bugs:Issues

Continue ReadingEngelsytem – Sending messages to users or groups with PHP

Adding Notifications, Volunteer Shifts and DB Export in Engelsystem

Admin can change the display message in registration form

The present system doesn’t allow to change the display message in register form. When the system is used for different events it would be useful if the admin is able to change the display message in registration form . I have added feature were admin can change the display message

settings page

By changing the message in the message box admin can change the display message.Now the message looks like this.

register page

Implementation of changing display message.

Adding display_msg field to User Table so that the display_msg can be accessed through the database any where through the code and can be changed easily

ALTER TABLE `User` 
   ADD `display_msg` varchar(255) DEFAULT "By completing this form you're registering as a Chaos-Angel. This script will create you an account in the angel task scheduler.";

Next step is to update the field whenever it is changed by admin

sql_query("UPDATE `User` SET `display_msg`='" . sql_escape($display_message) . "' WHERE  `UID`='" . sql_escape($user['UID']) . "'");

Copy/ Duplicate function for creating new shifts from existing shifts

The present system doesn’t allow admin to edit an existing shift and create a new shift from the existing data of already created shifts . I have created a copy shift option where admin can edit the shift and create a new shift

create new shifts

In this page admin can create new shift or update the existing shift . Admin can change the date , time , no of angels etc as admin used to create shifts.

Implementation of copy shifts function

Once the admin selects create new shifts button , we need to use the same data so we need to store the values in variables. once admin selects the option we need to do all the error handling and create new shifts .

    if (isset($_REQUEST['shifttype_id'])) {
      $shifttype = ShiftType($_REQUEST['shifttype_id']);
      if ($shifttype === false)
        engelsystem_error('Unable to load shift type.');
      if ($shifttype == null) {
        $ok = false;
        error(_('Please select a shift type.'));
      } else
        $shifttype_id = $_REQUEST['shifttype_id'];
    } else {
      $ok = false;
      error(_('Please select a shift type.'));
    }
    
    $title = strip_request_item('title');
    // check for errors
    if (isset($_REQUEST['rid']) && preg_match("/^[0-9]+$/", 
    $_REQUEST['rid']) && isset($room_array[$_REQUEST['rid']]))
      $rid = $_REQUEST['rid'];
    else {
      $ok = false;
      $rid = $rooms[0]['RID'];
      error(_('Please select a location.'));
    }
    
    if (isset($_REQUEST['start']) && $tmp = 
    DateTime::createFromFormat("Y-m-d", trim($_REQUEST['start'])))
      $start = $tmp->getTimestamp();
    else {
      $ok = false;
      error(_('Please select a start date.'));
    }
    
    if (isset($_REQUEST['end']) && 
    $tmp = DateTime::createFromFormat("Y-m-d", trim($_REQUEST['end'])))
      $end = $tmp->getTimestamp();
    else {
      $ok = false;
      error(_('Please select an end date.'));
    }

    if (isset($_REQUEST['start_time']) &&
  $tmp = DateTime::createFromFormat("H:i", trim($_REQUEST['start_time'])))
      $start_time = $tmp->getTimestamp();
    else {
      $ok = false;
      error(_('Please select an start time.'));
    }

    if (isset($_REQUEST['end_time']) && 
    $tmp = DateTime::createFromFormat("H:i", trim($_REQUEST['end_time'])))
      $end_time = $tmp->getTimestamp();
    else {
      $ok = false;
      error(_('Please select an end time.'));
    }
    
    if (strtotime($_REQUEST['start']) > strtotime($_REQUEST['end'])) {
      $ok = false;
      error(_('The shifts end has to be after its start.'));
    }
    if (strtotime($_REQUEST['start']) == strtotime($_REQUEST['end'])) {
      if (strtotime($_REQUEST['start_time']) > 
                                     strtotime($_REQUEST['end_time'])) {
        $ok = false;
        error(_('The shifts end time  has to be after its start time.'));
      }
    }
    if (strtotime($_REQUEST['start']) == strtotime($_REQUEST['end'])) {
      if (strtotime($_REQUEST['start_time']) == 
                                 strtotime($_REQUEST['end_time'])) {
        $ok = false;
        error(_('The shifts start and end at same time.'));
      }
    }
    $angelmode = 'manually';
    foreach ($types as $type) {
      if (isset($_REQUEST['type_' . $type['id']]) && 
      preg_match("/^[0-9]+$/", trim($_REQUEST['type_' . $type['id']]))) {
        $needed_angel_types[$type['id']] = 
                       trim($_REQUEST['type_' . $type['id']]);
      } else {
        $ok = false;
        error(sprintf(_('Please check the needed angels for team %s.'), 
                                              $type['name']));
      }
    }
    if (array_sum($needed_angel_types) == 0) {
      $ok = false;
      error(_('There are 0 angels needed. 
                         Please enter the amounts of needed angels.'));
    }
    if (isset($_REQUEST['back']))
      $ok = false;

    if ($ok) {
      $shifts = array();
      $start = DateTime::createFromFormat("Y-m-d H:i",
                    date("Y-m-d", $start) . date("H:i", $start_time));
      $start = $start->getTimestamp();
      $end = DateTime::createFromFormat("Y-m-d H:i", 
                        date("Y-m-d", $end) . date("H:i", $end_time));
      $end = $end->getTimestamp();  
      $shifts[] = array(
          'start' => $start,
          'end' => $end,
          'RID' => $rid,
          'title' => $title,
          'shifttype_id' => $shifttype_id   
        );
      $shifts_table = array();
      foreach ($shifts as $shift) {
      $shifts_table_entry = [
          'timeslot' => '<span class="glyphicon glyphicon-time"></span> ' . 
date("Y-m-d H:i", $shift['start']) . ' - ' . date("H:i", $shift['end']) . 
'<br />' . Room_name_render(Room($shift['RID'])),
          'title' => ShiftType_name_render(ShiftType($shifttype_id)) . 
           ($shift['title'] ? '<br />' . $shift['title'] : ''),
            'needed_angels' => '' 
        ];
        foreach ($types as $type)
          if (isset($needed_angel_types[$type['id']]) 
          && $needed_angel_types[$type['id']] > 0)
            $shifts_table_entry['needed_angels'] .= '<b>' . 
AngelType_name_render($type) . ':</b> ' . $needed_angel_types[$type['id']]. '<br />';
        
        $shifts_table[] = $shifts_table_entry;
      }

Display shifts in map view .

Map view makes the user/admin easy to view the shifts and easy to sign-up for shifts.Initially was not able to view the shifts but now the shifts can be viewed in both map view and normal view

shifts view

Implementation of map view .

Map view is very nice way of representing events with dates on Y – axis and rooms on X-axis. We need to make blocks and map the key

$_SESSION['user_shifts'][$key] = array_map('get_ids_from_array', $$key);

Here we map the ids and keys and then we need to print the keys against the id’s

Exporting database of user

In a system like this . It would be better if we could get all the user data who want to volunteer so that they can be contacted for other events also.

export database

Here is the code which can be useful for exporting database of any mysql database

function export_xls(){
// filename
$xls_filename = 'export_'.date('Y-m-d').'.xls'; // Define Excel (.xls) file name
// selecting the table user
$sql = "SELECT * FROM `User`";
//enter your mysql root password here
$Connect = @mysql_connect("localhost", "root", "") or die("Failed to connect to MySQL.You need to enter the password:<br />" . mysql_error() . "<br />" . mysql_errno());
// Select database
$Db = @mysql_select_db($databasename, $Connect) or die("Failed to select database:<br />" . mysql_error(). "<br />" . mysql_errno());
// Execute query
$result = @mysql_query($sql,$Connect) or die("Failed to execute query:<br />" . mysql_error(). "<br />" . mysql_errno());

// Header info settings
header("Content-Type: application/xls");
header("Content-Disposition: attachment; filename=$xls_filename");
header("Pragma: no-cache");
header("Expires: 0");
 
// Define separator (defines columns in excel &amp; tabs in word)
$separator = "\t";
 
// Start of printing column names as names of MySQL fields
for ($i = 0 ; $i < mysql_num_fields($result) ; $i++) {
  echo mysql_field_name($result, $i) . "\t";
}
print("\n");
 
// Start while loop to get data
while($row = mysql_fetch_row($result))
{
  $schema= "";
  for( $j=0 ; $j < mysql_num_fields($result) ; $j++)
  {
    
    if(!isset($row[$j])) {
      $schema .= "NULL".$separator;
    }
    elseif ($row[$j] != "") {
      $schema .= "$row[$j]".$separator;
    }
    else {
      $schema .= "".$separator;
    }
  }
  $schema = str_replace($seperator."$", "", $schema);
  $schema = preg_replace("/\r\n|\n\r|\n|\r/", " ", $schema);
  $schema.= "\t";
  print(trim($schema));
  print "\n";
}
}

Coding standards

Coding standards are a set of guidelines, best practices, programming styles and conventions that developers adhere to when writing source code for a project. All big software companies have them.

For our system we use drupal coding standards.

Development: https://github.com/fossasia/engelsystem

Issues/Bugs:Issues

Continue ReadingAdding Notifications, Volunteer Shifts and DB Export in Engelsystem

Engelsystem – Implementing Localization

This post is on how to make your website available in different languages.The main reason of localization is that it can be used by different people knowing different languages across the world and help them to understand the system better .

The tools used in implementing localization are poedit where we create the .po files .

Steps to download poedit and Run it.

sudo apt-get install poedit

On ubuntu/linux this can be used

On Mac/Windows

The executable can be downloaded at https://poedit.net/download

Steps to run poedit in Linux/Windows/Mac

choose File → New Catalog.Enter the details in Translation properties like your email . Source code charset should be selected as UTF-8.Now the source path should be selected as (.) dot to tell Poedit to search for PHP files in the same folder.

Screenshot from 2016-06-04 17:23:39

In the source keywords there are three options ‘_’ , ‘gettext’ and ‘gettext_noop’.Make sure all necessary functions are added and press OK.

Now we can see list of strings and their translated strings comes like this.we need to install the necessary dictionary for this.

Screenshot from 2016-06-04 17:44:25

If we save it we get a .po and .mo files if it passing all the validation.which can be used to implement localization in the project.

How to Use .po and .mo files

In our engelsystem.we need to add the list of languages we would like to implement in the file internationalization_helper.php

$locales = array(
     'de_DE.UTF-8' => "Deutsch",
     'hi_IN.UTF-8' => "Hindi", 
     'sp_EU.UTF-8' => "Spanish",
     'en_US.UTF-8' => "English" 
 );

these are list of languages currently implemented.

function make_langselect() {
   global $locales;
   $URL = $_SERVER["REQUEST_URI"] . (strpos($_SERVER["REQUEST_URI"], "?") > 0 ? '&' : '?') . "set_locale=";
   
   $items = array();
   foreach ($locales as $locale => $name)
     $items[] = toolbar_item_link(htmlspecialchars($URL) . $locale, '', '<img src="pic/flag/' . $locale . '.png" alt="' . $name . '" title="' . $name . '"> ' . $name);
   return $items;
 }

This function renders a language selection.

Development: https://github.com/fossasia/engelsystem

Issues/Bugs:Issues

Continue ReadingEngelsystem – Implementing Localization