Implementation of Shimmer Effect in Layouts in SUSI.AI Android App

The shimmer effect was created by Facebook to indicate the loading of data in pages where data is being loaded from the internet. This was created as an alternative for the existing ProgressBar and the usual loader to give better user experience with UI.

Let’s get started to see how we can implement it. Here, I am going to use SUSI.AI (a smart assistant app) as a reference app to show a code demonstration. I am working on this project in my GSoC period and while working I found the need to implement this feature in many places. So, I am writing this blog to share my experience with how, I implemented it in the app.

First of all, we need to add the shimmer dependency in the app level Gradle file.

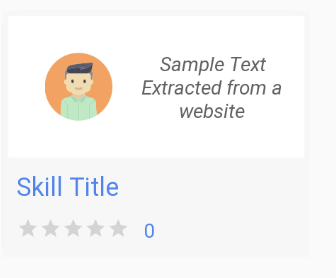
Now, we need to create a placeholder layout simply by using views. This placeholder should resemble the actual layout. Usually, grey-colored is preferred in the placeholder background. A placeholder should not have any text written. It should be viewed only. Let’s consider the placeholder used in susi.

Now let’s have a glance at the actual items whose placeholders we have made.

Now, after the creation of the placeholder, we need to add this placeholder in the main layout file. It is done in the following way:

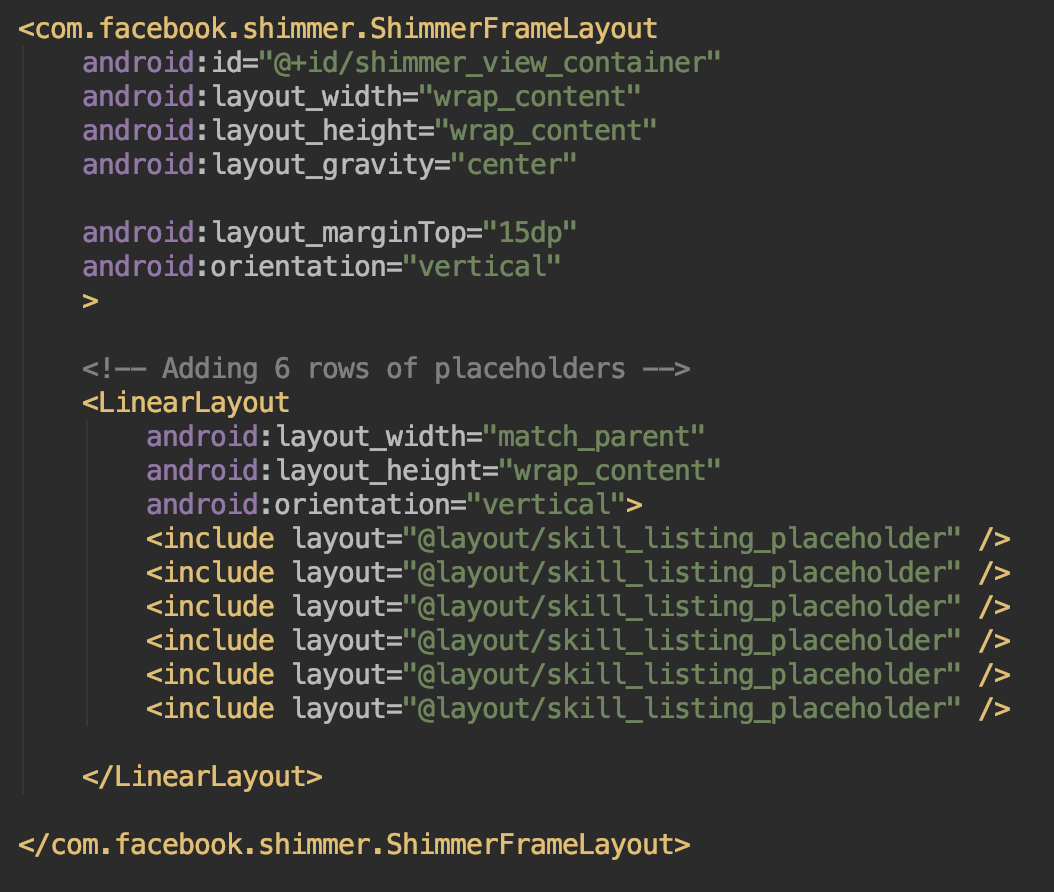
Here, I have added the placeholders 6 times so that the entire screen gets covered up. You can add it as many times as you want.

The next and the final task is to start and stop the shimmer effect according to the logic of the code. Here, the shimmer starts as soon as the fragment is created and stops when the data is successfully loaded from the server. Have a look at how to create the reference.

First of all, we need to create a reference to the shimmer. Then we use this reference to start/stop the shimmer effect. Here, in Kotlin we can directly use the id used in layout without creating any reference.

We start the shimmer effect simply by using startShimmer() function in the shimmer reference.

Similarly, we can stop it using stopShimmer() function in the reference.

Resources: 

Framework: Shimmer in Android

Documentation: ShimmerAndroid Design

SUSI.AI Android App: PlayStore GitHub

Tags:

SUSI.AI Android App, Kotlin, SUSI.AI, FOSSASIA, GSoC, Android, Shimmer

Continue ReadingImplementation of Shimmer Effect in Layouts in SUSI.AI Android App

Gestures in SUSI.AI Android

Gestures have become one of the most widely used features by a user. The user usually, expects that some tasks should be performed by the app when he or she executes some gestures on the screen.

A “touch gesture” occurs when a user places one or more fingers on the touch screen, and your application interprets that pattern of touches as a particular gesture. There are correspondingly two phases to gesture detection:

  1. Gather data about touch events.
  2. Interpret the data to see if it meets the criteria for any of the gestures your app supports.

There are various kinds of gestures supported by android. Some of them are:

  • Tap
  • Double Tap
  • 2-finger Tap
  • 2-finger-double tap
  • 3-finger tap
  • Pinch

In this post, we will go through the SUSI.AI android app (a smart assistant app) which has the “Right to left swipe” gesture detector in use. When such kind of gesture is detected inside the Chat Activity, it opens the Skill’s Activity. This makes the app very user-friendly. Before we start implementing the code,  go through the steps mentioned above in detail.

1st Step “Gather Data”: 

When a user places one or more fingers on the screen, this triggers the callback onTouchEvent() on the View that received the touch events. For each sequence of touch events (position, pressure, size, the addition of another finger, etc.) that is ultimately identified as a gesture, onTouchEvent() is fired several times.

The gesture starts when the user first touches the screen, continues as the system tracks the position of the user’s finger(s), and ends by capturing the final event of the user’s fingers leaving the screen. Throughout this interaction, the MotionEvent delivered to onTouchEvent() provides the details of every interaction. Your app can use the data provided by the MotionEvent to determine if a gesture it cares about happened.

2nd Step “Data Interpretation”:

The data received needs to be properly interpreted. The gestures should be properly recognized and processed to perform further actions. Like an app might have different gestures integrated into the same page live “Swipe-to-refresh”, “Double-tap”, “Single tap”, etc. Upon successfully differentiating this kind of gesture, further functions/tasks should be executed.

Let’s go through the code present in SUSI now.

First of all, a new class is created here “CustomGestureListener”. This class extends the “SimpleOnGestureListener” which is a part of the “GestureDetector” library of android. This class contains a function “onFling”. This function determines the gestures across the horizontal axis. event1.getX(), and event2.getX() functions says about the gesture values across the horizontal axis of the device. Here, when the value of X becomes getter than 0, it actually indicates that the user has swiped from right to left. This becomes active even in very minor change, which users might have presses accidentally, or has just touched the screen. So to avoid such minor impulses, we set a value that we will execute our task only when the value of X lies between 100 and 1000. This avoids minor gestures.

Inside the onCreate method, a new CustomGestureListener instance is created, passing through a reference to the enclosing activity and an instance of our new CustomGestureListener class as arguments. Finally, an onTouchEvent() callback method is implemented for the activity, which simply calls the corresponding onTouchEvent() method of the ScaleGestureDetector object, passing through the MotionEvent object as an argument.

Summary:

Gestures are usually implemented to enhance the user experience while using the application. Though there are some predefined gestures in Android, we can also create gestures of our own and use them in our application.

Resources: 

Documentation: Gestures

Reference: Gesture

SUSI.AI Android App: PlayStore GitHub

Tags:

SUSI.AI Android App, Kotlin, SUSI.AI, FOSSASIA,GSoC, Android, Gestures

Continue ReadingGestures in SUSI.AI Android

API’s in SUSI.AI BotBuilder

In this blog, I’ll explain the different API’s involved in the SUSI.AI Bot Builder and its working. Now if you are wondering how the SUSI.AI bot builder works or how drafts are saved, then this is the perfect blog. I’ll be explaining the different API’s grouped by different API endpoints.

API Implementation

fetchChatBots

export function fetchChatBots() {
 const url = `${API_URL}/${CMS_API_PREFIX}/getSkillList.json`;
 return ajax.get(url, {
   private: 1,
 });
}

This API is used to fetch all your saved chatbots, which are displayed on the BotBuilder Page. The API endpoint is getSkillList.json. Same endpoint is used when a user creates a skill, the difference is query parameter private is passed which then returns your chatbots. Now if you are wondering why we have same endpoint for skills and chatbots, the simple plain reason for this is chatbots are your private skills.

fetchBotDetails

export function fetchBotDetails(payload) {
 const { model, group, language, skill } = payload;
 const url = `${API_URL}/${CMS_API_PREFIX}/getSkill.json`;
 return ajax.get(url, {
   model,
   group,
   language,
   skill,
   private: 1,
 });
}

This API is used to fetch details of bot/skill respectively from the API endpoint getSkill.json. Group name, language, skill name, private and model are passed as query parameters.

fetchBotImages

export function fetchBotImages(payload) {
 const { name: skill, language, group } = payload;
 const url = `${API_URL}/${CMS_API_PREFIX}/getSkill.json`;
 return ajax.get(url, {
   group,
   language,
   skill,
   private: 1,
 });
}

This API is used to fetch skill and bot images from the API endpoint getSkill.json. Group name, language, skill name and private are passed as query parameters.

uploadBotImage

export function uploadBotImage(payload) {
 const url = `${API_URL}/${CMS_API_PREFIX}/uploadImage.json`;
 return ajax.post(url, payload, {
   headers: { 'Content-Type': 'multipart/form-data' },
   isTokenRequired: false,
 });
}

This API is used to upload the Bot image to the API endpoint uploadImage.json.The Content-Type entity header is used to indicate the media type of the resource. multipart/form-data means no characters will be encoded. This is used when a form requires a binary data like the contents of a file or image to be uploaded.

deleteChatBot

export function deleteChatBot(payload) {
 const { group, language, skill } = payload;
 const url = `${API_URL}/${CMS_API_PREFIX}/deleteSkill.json`;
 return ajax.get(url, {
   private: 1,
   group,
   language,
   skill,
 });
}

This API is used to delete Skill and Bot from the API endpoint deleteSkill.json.

storeDraft

export function storeDraft(payload) {
 const { object } = payload;
 const url = `${API_URL}/${CMS_API_PREFIX}/storeDraft.json`;
 return ajax.get(url, { object });
}

This API is used to store draft Bot to the API endpoint storeDraft.json. The object passed as parameter has the properties given by the user such as skill name,group etc., while saving the draft.

readDraft

export function readDraft(payload) {
 const url = `${API_URL}/${CMS_API_PREFIX}/readDraft.json`;
 return ajax.get(url, { ...payload });
}

This API is used to fetch draft from the API endpoint readDraft.json. This API is called on the BotBuilder Page where all the saved drafts are shown.

deleteDraft

export function deleteDraft(payload) {
 const { id } = payload;
 const url = `${API_URL}/${CMS_API_PREFIX}/deleteDraft.json`;
 return ajax.get(url, { id });
}

This API is used to delete the saved Draft from the API endpoint deleteDraft.json. It only needs one query parameter i.e. the draft ID.

In conclusion, the above API’s are the backbone of the SUSI.AI Bot Builder. API endpoints in server ensure the user has the same experience across the clients. Do checkout implementation of different API endpoints in server here.

Resources

Continue ReadingAPI’s in SUSI.AI BotBuilder

Implementing a Chat Bubble in SUSI.AI

SUSI.AI now has a chat bubble on the bottom right of every page to assist you. Chat Bubble allows you to connect with susi.ai on just a click. You can now directly play test examples of skill on chatbot. It can also be viewed on full screen mode.

Redux Code

Redux Action associated with chat bubble is handleChatBubble. Redux state chatBubble can have 3 states:

  • minimised – chat bubble is not visible. This set state is set when the chat is viewed in full screen mode.
  • bubble – only the chat bubble is visible. This state is set when close icon is clicked and on toggle.
  • full – the chat bubble along with message section is visible. This state is set when minimize icon is clicked on full screen mode and on toggle.
const defaultState = {
chatBubble: 'bubble',
};
export default handleActions(
 {
  [actionTypes.HANDLE_CHAT_BUBBLE](state, { payload }) {
     return {
       ...state,
       chatBubble: payload.chatBubble,
     };
   },
 },
 defaultState,
);

Speech box for skill example

The user can click on the speech box for skill example and immediately view the answer for the skill on the chatbot. When a speech bubble is clicked a query parameter testExample is added to the URL. The value of this query parameter is resolved and answered by Message Composer. To be able to generate an answer bubble again and again for the same query, we have a reducer state testSkillExampleKey which is updated when the user clicks on the speech box. This is passed as key parameter to messageSection.

Chat Bubble Code

The functions involved in the working of chatBubble code are:

  • openFullScreen – This function is called when the full screen icon is clicked in the tab and laptop view and also when chat bubble is clicked in mobile view. This opens up a full screen dialog with message section. It dispatches handleChatBubble action which sets the chatBubble reducer state as minimised.
  • closeFullScreen – This function is called when the exit full screen icon is clicked. It dispatches a handleChatBubble action which sets the chatBubble reducer state as full.
  • toggleChat –  This function is called when the user clicks on the chat bubble. It dispatches handleChatBubble action which toggles the chatBubble reducer state between full and bubble.
  • handleClose – This function is called when the user clicks on the close icon. It dispatches handleChatBubble action which sets the chatBubble reducer state to bubble.
openFullScreen = () => {
   const { actions } = this.props;
   actions.handleChatBubble({
     chatBubble: 'minimised',
   });
   actions.openModal({
     modalType: 'chatBubble',
     fullScreenChat: true,
   });
 };

 closeFullScreen = () => {
   const { actions } = this.props;
   actions.handleChatBubble({
     chatBubble: 'full',
   });
   actions.closeModal();
 };

 toggleChat = () => {
   const { actions, chatBubble } = this.props;
   actions.handleChatBubble({
     chatBubble: chatBubble === 'bubble' ? 'full' : 'bubble',
   });
 };

 handleClose = () => {
   const { actions } = this.props;
   actions.handleChatBubble({ chatBubble: 'bubble' });
   actions.closeModal();
 };

Message Section Code (Reduced)

The message section comprises of three parts the actionBar, messageSection and the message Composer.

Action Bar

The actionBar consists of the action buttons – search, full screen, exit full screen and close button. Clicking on the search button expands and opens up a search bar. On clicking the full screen icon openFullScreen function is called which open up the chat dialog. On clicking the exit icon the handleClose function is called, which set chatBubble reducer state to bubble. On full screen view, clicking on the exit full screen icon calls the closeFullScreen functions which sets the reducer state chatBubble to full.

   const actionBar = (
     <ActionBar fullScreenChat={fullScreenChat}>
       {fullScreenChat !== undefined ? (
         <FullScreenExit onClick={this.closeFullScreen} width={width} />
       ) : (
         <FullScreen onClick={this.openFullScreen} width={width} />
       )}
       <Close onClick={fullScreenChat ? this.handleClose : this.toggleChat}/>
     </ActionBar>
   );

Message Section

The message section has two parts MessageList and Message Composer. Message List is where the messages are viewed and the Message composer allows you to interact with the bot through text and speech. ScrollBar is imported from the npm library react-custom-scrollbars. When the scroll bar is moved it sets the state of showScrollTop and showScrollBottom in the chat. messageListItems consists of all the messages between the user and the bot.


   const messageSection = (
     <MessageSectionContainer showChatBubble={showChatBubble} height={height}>
       {loadingHistory ? (
         <CircularLoader height={38} />
       ) : (
         <Fragment>
           {fullScreenChat ? null : actionBar}
           <MessageList
             ref={c => {
               this.messageList = c;
             }}
             pane={pane}
             messageBackgroundImage={messageBackgroundImage}
             showChatBubble={showChatBubble}
             height={height}>
             <Scrollbars
               renderThumbHorizontal={this.renderThumb}
               renderThumbVertical={this.renderThumb}
               ref={ref => {
                 this.scrollarea = ref;
               }}
               onScroll={this.onScroll}
               autoHide={false}>
               {messageListItems}
               {!search && loadingReply && this.getLoadingGIF()}
             </Scrollbars>
           </MessageList>
           {showScrollTop && (
             <ScrollTopFab
               size="small"
               backgroundcolor={body}
               color={theme === 'light' ? 'inherit' : 'secondary'}
               onClick={this.scrollToTop}
             >
               <NavigateUp />
             </ScrollTopFab>
           )}
           {showScrollBottom && (
             <ScrollBottomContainer>
               <ScrollBottomFab
                 size="small"
                 backgroundcolor={body}
                 color={theme === 'light' ? 'inherit' : 'secondary'}
                 onClick={this.scrollToBottom}>
                 <NavigateDown />
               </ScrollBottomFab>
             </ScrollBottomContainer>
           )}
         </Fragment>
       )}
       <MessageComposeContainer
         backgroundColor={composer}
         theme={theme}
         showChatBubble={showChatBubble}>
         <MessageComposer
           focus={!search}
           dream={dream}
           speechOutput={speechOutput}
           speechOutputAlways={speechOutputAlways}
           micColor={button}
           textarea={textarea}
           exitSearch={this.exitSearch}
           showChatBubble={showChatBubble}
         />
       </MessageComposeContainer>
     </MessageSectionContainer>
   );

 const Chat = (
     <ChatBubbleContainer className="chatbubble" height={height} width={width}>
       {chatBubble === 'full' ? messageSection : null}
       {chatBubble !== 'minimised' ? (
         <SUSILauncherContainer>
           <SUSILauncherWrapper
             onClick={width < 500 ? this.openFullscreen : this.toggleChat}>
             <SUSILauncherButton data-tip="Toggle Launcher" />
           </SUSILauncherWrapper>
         </SUSILauncherContainer>
       ) : null}
     </ChatBubbleContainer>
   );

Resources

Continue ReadingImplementing a Chat Bubble in SUSI.AI

List SUSI.AI Devices in Admin Panel

In this blog I’ll be explaining about the Devices Tab in SUSI.AI Admin Panel. Admins can now view the connected devices of the users with view, edit and delete actions. Also the admins can directly view the location of the device on the map by clicking on the device location of that user.

Implementation

List Devices

Admin device Tab

Devices tab displays device name, macId, room, email Id, date added, last active, last login IP and location of the device. loadDevices function is called on componentDidMount which calls the fetchDevices API which fetches the list of devices from /aaa/getDeviceList.json endpoint. List of all devices is stored in devices array. Each device in the array is an object with the above properties. Clicking on the device location opens a popup displaying the device location on the map.

loadDevices = () => {
   fetchDevices()
     .then(payload => {
       const { devices } = payload;
       let devicesArray = [];
       devices.forEach(device => {
         const email = device.name;
         const devices = device.devices;
         const macIdArray = Object.keys(devices);
         const lastLoginIP =
           device.lastLoginIP !== undefined ? device.lastLoginIP : '-';
         const lastActive =
           device.lastActive !== undefined
             ? new Date(device.lastActive).toDateString()
             : '-';
         macIdArray.forEach(macId => {
           const device = devices[macId];
           let deviceName = device.name !== undefined ? device.name : '-';
           deviceName =
             deviceName.length > 20
               ? deviceName.substr(0, 20) + '...'
               : deviceName;
           let location = 'Location not given';
           if (device.geolocation) {
             location = (
               
                 {device.geolocation.latitude},{device.geolocation.longitude}
               
             );
           }
           const dateAdded =
             device.deviceAddTime !== undefined
               ? new Date(device.deviceAddTime).toDateString()
               : '-';
 
           const deviceObj = {
             deviceName,
             macId,
             email,
             room: device.room,
             location,
             latitude:
               device.geolocation !== undefined
                 ? device.geolocation.latitude
                 : '-',
             longitude:
               device.geolocation !== undefined
                 ? device.geolocation.longitude
                 : '-',
             dateAdded,
             lastActive,
             lastLoginIP,
           };
           devicesArray.push(deviceObj);
         });
       });
       this.setState({
         loadingDevices: false,
         devices: devicesArray,
       });
     })
     .catch(error => {
       console.log(error);
     });
 };

View Device

User Device Page

View action redirects to users /mydevices?email<email>&macid=<macid>. This allows admin to have full control of the My devices section of the user. Admin can change device details and delete device. Also admin can see all the devices of the user from the ALL tab. To edit a device click on edit icon in the table, update the details and click on check icon. To delete a device click on the delete device which then asks for confirmation of device name and on confirmation deletes the device.

Edit Device

Edit Device Dialog

Edit actions opens up a dialog modal which allows the admin to update the device name and room. Clicking on the edit button calls the modifyUserDevices API which takes in email Id, macId, device name and room name as parameters. This calls the API endpoint /aaa/modifyUserDevices.json.

 handleChange = event => {
   this.setState({ [event.target.name]: event.target.value });
 };

 render() {
   const { macId, email, handleConfirm, handleClose } = this.props;
   const { room, deviceName } = this.state;
   return (
     <React.Fragment>
       <DialogTitle>Edit Device Details for {macId}</DialogTitle>
       <DialogContent>
         <OutlinedTextField
           value={deviceName}
           label="Device Name"
           name="deviceName"
           variant="outlined"
           onChange={this.handleChange}
           style={{ marginRight: '20px' }}
         />
         <OutlinedTextField
           value={room}
           label="Room"
           name="room"
           variant="outlined"
           onChange={this.handleChange}
         />
       </DialogContent>
       <DialogActions>
         <Button
           key={1}
           color="primary"
           onClick={() => handleConfirm(email, macId, room, deviceName)}>
           Change
         </Button>
         <Button key={2} color="primary" onClick={handleClose}>
           Cancel
         </Button>
       </DialogActions>
     </React.Fragment>
   );
 }

Delete Device

Delete Device Dialog

Delete action opens up a confirm delete dialog modal. To delete a device enter the device name and click on delete. This calls the confirmDelete function which calls the removeUserDevice API which takes in email Id and macId as parameters. This API hits the endpoint /aaa/removeUserDevices.json.

confirmDelete = () => {
   const { actions } = this.props;
   const { macId, email } = this.state;
   removeUserDevice({ macId, email })
     .then(payload => {
       actions.openSnackBar({
         snackBarMessage: payload.message,
         snackBarDuration: 2000,
       });
       actions.closeModal();
       this.setState({
         loadingDevices: true,
       });
       this.loadDevices();
     })
     .catch(error => {
       actions.openSnackBar({
         snackBarMessage: `Unable to delete device with macID ${macId}. Please try again.`,
         snackBarDuration: 2000,
       });
     });
 };

To conclude, admin can now view all the connected SUSI.AI devices along with the user details and location. They can also access users My Devices tab in Dashboard and update and delete devices.

Resources

Continue ReadingList SUSI.AI Devices in Admin Panel

Displaying Private Skills and Drafts on SUSI.AI

The ListPrivateSkillService and ListPrivateDraftSkillService endpoint was implemented on SUSI.AI Server for SUSI.AI Admins to view the bots and drafts created by users respectively. This allows admins to monitor the bots and drafts created by users, and delete the ones which violate the guidelines. Also admins can see the sites where the bot is being used.

The endpoint of both ListPrivateSkillService and ListPrivateDraftSkillService is of GET type. Both of them have a compulsory access_token parameter but ListPrivateSkillService has an extra optional search parameter.

  • access_token(necessary): It is the access_token of the logged in user. It means this endpoint cannot be accessed in anonymous mode. 
  • search: It fetches a bot with the searched name.

The minimum user role is set to OPERATOR.

API Development

ListPrivateSkillService

For creating a list, we need to access each property of botDetailsObject, in the following manner:

Key → Group  → Language → Bot Name  → BotList

The below code iterates over the uuid of all the users having a bot, then over different groupNames,languageNames, and finally over the botNames. If search parameter is passed then it searches for the bot_name in the language object. Each botDetails object consists of bot name, language, group and key i.e uuid of the user which is then added to the botList array.

       JsonTray chatbot = DAO.chatbot;
       JSONObject botDetailsObject = chatbot.toJSON();
       JSONObject keysObject = new JSONObject();
       JSONObject groupObject = new JSONObject();
       JSONObject languageObject = new JSONObject();
       List botList = new ArrayList();
       JSONObject result = new JSONObject();

       Iterator Key = botDetailsObject.keys();
       List keysList = new ArrayList();

       while (Key.hasNext()) {
           String key = (String) Key.next();
           keysList.add(key);
       }

       for (String key_name : keysList) {
           keysObject = botDetailsObject.getJSONObject(key_name);
           Iterator groupNames = keysObject.keys();
           List groupnameKeysList = new ArrayList();

           while (groupNames.hasNext()) {
               String key = (String) groupNames.next();
               groupnameKeysList.add(key);
           }

           for (String group_name : groupnameKeysList) {
               groupObject = keysObject.getJSONObject(group_name);
               Iterator languageNames = groupObject.keys();
               List languagenamesKeysList = new ArrayList();

               while (languageNames.hasNext()) {
                   String key = (String) languageNames.next();
                   languagenamesKeysList.add(key);
               }

               for (String language_name : languagenamesKeysList) {
                   languageObject = groupObject.getJSONObject(language_name);

If search parameter is passed, then search for a bot with the given name and add the bot to the botList if it exists. It will return all bots which have bot name as the searched name.

                   if (call.get("search", null) != null) {
                       String bot_name = call.get("search", null);
                       if(languageObject.has(bot_name)){
                           JSONObject botDetails = languageObject.getJSONObject(bot_name);
                           botDetails.put("name", bot_name);
                           botDetails.put("language", language_name);
                           botDetails.put("group", group_name);
                           botDetails.put("key", key_name);
                           botList.add(botDetails);
                       }
                   }

If search parameter is not passed, then it will return all the bots created by the users.

                    else {
                       Iterator botNames = languageObject.keys();
                       List botnamesKeysList = new ArrayList();

                       while (botNames.hasNext()) {
                           String key = (String) botNames.next();
                           botnamesKeysList.add(key);
                       }

                       for (String bot_name : botnamesKeysList) {
                           JSONObject botDetails = languageObject.getJSONObject(bot_name);
                           botDetails.put("name", bot_name);
                           botDetails.put("language", language_name);
                           botDetails.put("group", group_name);
                           botDetails.put("key", key_name);
                           botList.add(botDetails);
                       }
                   }
               }
           }
       }

List of all bots, botList is return as server response.

ListPrivateDraftSkillService

For creating a list we need to iterate over each user and check whether the user has a draft bot. We get all the authorized clients from DAO.getAuthorizedClients(). We then iterate over each client and get their identity and authorization. We get the drafts of the client from DAO.readDrafts(userAuthorization.getIdentity()). We then iterate over each draft and add it to the drafts object. Each draft object consists of date created,date modified, object which contains draft bot information such as name,language,etc provided by the user while saving the draft, email Id and uuid of the user.

       JSONObject result = new JSONObject();
       List draftBotList = new ArrayList();
       Collection authorized = DAO.getAuthorizedClients();

       for (Client client : authorized) {
         String email = client.toString().substring(6);
         JSONObject json = client.toJSON();
         ClientIdentity identity = new ClientIdentity(ClientIdentity.Type.email, client.getName());
         Authorization userAuthorization = DAO.getAuthorization(identity);
         Map map = DAO.readDrafts(userAuthorization.getIdentity());
         JSONObject drafts = new JSONObject();

         for (Map.Entry entry: map.entrySet()) {
           JSONObject val = new JSONObject();
           val.put("object", entry.getValue().getObject());
           val.put("created", DateParser.iso8601Format.format(entry.getValue().getCreated()));
           val.put("modified", DateParser.iso8601Format.format(entry.getValue().getModified()));
           drafts.put(entry.getKey(), val);
         }
         Iterator keys = drafts.keySet().iterator();
         while(keys.hasNext()) {
           String key = (String)keys.next();
           if (drafts.get(key) instanceof JSONObject) {
             JSONObject draft = new JSONObject(drafts.get(key).toString());
             draft.put("id", key);
             draft.put("email", email);
             draftBotList.add(draft);
           }
         }
       }
       result.put("draftBots", draftBotList);

List of all drafts, draftBotList is returned as server response.

In conclusion, the admins can now see the bots and drafts created by the user and monitor where they are being used.

Resources

Continue ReadingDisplaying Private Skills and Drafts on SUSI.AI

CRUD operations on Config Keys in Admin Panel of SUSI.AI

SUSI.AI Admin Panel now allows the Admin to create, read, update and delete config keys present in system settings. Config keys are API keys which are used to link the application to third party services like Google Maps, Google ReCaptcha, Google Analytics, Matomo, etc. The API key is a unique identifier that is used to authenticate requests associated with the project for usage and billing purposes.

CRUD Operations

Create Config Key

To create a config key click on “Add Config Key” Button, a dialog opens up which has two field Key Name and Key Value. this.props.actions.openModal opens up the shared Dialog Modal. On clicking on “Create”, the createApiKey is called which takes in the two parameters.

handleCreate = () => {
   this.props.actions.openModal({
     modalType: 'createSystemSettings',
     type: 'Create',
     handleConfirm: this.confirmUpdate,
     keyName: this.state.keyName,
     keyValue: this.state.keyValue,
     handleClose: this.props.actions.closeModal,
   });
 };
 handleSave = () => {
   const { keyName, keyValue } = this.state;
   const { handleConfirm } = this.props;
   createApiKey({ keyName, keyValue })
     .then(() => handleConfirm())
     .catch(error => {
       console.log(error);
     });
 }; 

Read Config Key

API endpoint fetchApiKeys is called on componentDidMount and when Config Key is created, updated or deleted.

 fetchApiKeys = () => {
   fetchApiKeys()
     .then(payload => {
       let apiKeys = [];
       let i = 1;
       let keys = Object.keys(payload.keys);
       keys.forEach(j => {
         const apiKey = {
           serialNum: i,
           keyName: j,
           value: payload.keys[j],
         };
         ++i;
         apiKeys.push(apiKey);
       });
       this.setState({
         apiKeys: apiKeys,
         loading: false,
       });
     })
     .catch(error => {
       console.log(error);
     });
 };

Update Config Key

To Update a config key click on edit from the actions column, Update Config Key dialog opens up which allows you to edit the key value. On clicking on update, the createApiKey API is called.

 handleUpdate = row => {
   this.props.actions.openModal({
     modalType: 'updateSystemSettings',
     type: 'Update',
     keyName: row.keyName,
     keyValue: row.value,
     handleConfirm: this.confirmUpdate,
     handleClose: this.props.actions.closeModal,
   });
 };

Delete Config Key

To delete a config key click on delete from actions column, delete config key confirmation dialog opens up. On clicking on Delete, the deleteApiKey is called which takes in key name as parameter.

 handleDelete = row => {
   this.setState({ keyName: row.keyName });
   this.props.actions.openModal({
     modalType: 'deleteSystemSettings',
     keyName: row.keyName,
     handleConfirm: this.confirmDelete,
     handleClose: this.props.actions.closeModal,
   });
 };
 confirmDelete = () => {
   const { keyName } = this.state;
   deleteApiKey({ keyName })
     .then(this.fetchApiKeys)
     .catch(error => {
       console.log(error);
     });
   this.props.actions.closeModal();
 };

In conclusion, CRUD operations of Config Keys help admins to manage third party services. With these operations the admin can manage the API keys of various services without having to look for them in the backend.

Resources

Continue ReadingCRUD operations on Config Keys in Admin Panel of SUSI.AI

Dialog Component in SUSI.AI

Dialog Component in SUSI.AI is rendered in App.js to remove code redundancy. Redux is integrated in the Dialog component which allows us to open/close the dialog from any component by altering the modal states. This implementation allows us to get rid of the need of having dialog component in different components.

Redux Code

There are two actions and reducers which control the dialog component. Default state of isModalOpen is false and modalType is an empty string. To open a dialog modal the action openModal is dispatched, which sets isModalOpen to true and the modalType. To close a dialog modal the action closeModal is dispatched, which sets isModalOpen to default state i.e. false.

import { handleActions } from 'redux-actions';
import actionTypes from '../actionTypes';

const defaultState = {
 modalProps: {
   isModalOpen: false,
   modalType: '',
 },
};

export default handleActions(
 {
   [actionTypes.UI_OPEN_MODAL](state, { payload }) {
     return {
       ...state,
       modalProps: {
         isModalOpen: true,
         ...payload,
       },
     };
   },
   [actionTypes.UI_CLOSE_MODAL](state) {
     return {
       ...state,
       modalProps: defaultState.modalProps,
     };
   },
 }
 defaultState,
);

Shared Dialog Component

Dialog Modal can be opened from any component by dispatching an action. 

To open a Dialog Modal: this.props.actions.openModal({modalType: [modal name]});

To close a Dialog Modal: this.props.actions.closeModal();

Shared Dialog Component has a DialogData object which contains objects with two main properties : Dialog component and Dialog size. Other props can also be passed along with these two properties such as fullScreen. Dialog Content of different Dialogs are present in their respective folders. Each Dialog Content has a Title, Content and Actions.Different Dialog types present are:

  1. Confirm Delete with Input: This dialog modal is used when a user deletes account, device and skill. 
  2. Confirm Dialog: This dialog modal is used where confirmation is required from the user/admin such as on changing skill status, on password reset,etc.
  3. Share Dialog: This dialog modal opens up when the share icon is clicked in the chat.
  4. Standard Action Dialog: This dialog modal opens up on restore skill, delete feedback, system settings and bot.
  5. Tour Dialog: This dialog modal opens up SUSI.AI tour.

To add a new Dialog to DialogSection, the steps are:

  1. Import the Dialog Content Component
  2. Add the Dialog Component to DialogData object in the following manner:
const DialogData = {
[dialog componet name]: { Component : [imported dialog component name], size : [size of the Dialog Component]},
}

Code (Reduced)

const DialogData = {
  login: { Component: Login, size: 'sm' },
}
const DialogSection = props => {
 const {
   actions,
   modalProps: { isModalOpen, modalType, ...otherProps },
   visited,
 } = props;

 const getDialog = () => {
   if (isModalOpen) {
     return DialogData[modalType];
   }
   return DialogData.noComponent;
 };

 const { size, Component, fullScreen = false } = getDialog();

return (
   <Dialog
      maxWidth={size}
      fullWidth={true}
      open={isModalOpen || !visited}
      onClose={isModalOpen ? actions.closeModal : actions.setVisited}
      fullScreen={fullScreen}
    >
     <DialogContainer>
       {Component ? <Component {...otherProps} /> : null}
     </DialogContainer>
  </Dialog>
)
};

In conclusion, having a shared dialog component reduces redundant code and allows to have a similar Dialog UI across the repo. Also having one component managing all the dialogs removes the possibility of  two dialogs being fired up at once.

Resources

Continue ReadingDialog Component in SUSI.AI

My Devices in SUSI.AI

In this blog I’ll be explaining how to view, edit and delete connected devices from SUSI.AI webclient. To connect a device open up the SUSI.AI android app, and fill the details accordingly. Device can also be connected by logging in to your raspberry pi. Once the devices is connected you can edit, delete and access specific features for the device from the web client.

My Devices

All the connected devices can be viewed in My Devices tab in the Dashboard. In this tab all the devices connected to your account are listed in a table along with their locations on the map. Each device table row has three action buttons – view, edit and delete. Clicking on the view button takes to device specific page. Clicking on the edit button makes the fields name and room editable in table row. Clicking on the delete button opens a confirm with input dialog. Device can be deleted by entering the device name and clicking on delete.

To fetch all the device getUserDevices action is dispatched on component mounting which sets the reducer state devices in settings reducer. initialiseDevices function is called after all the devices are fetched from the server. This function creates an array of objects of devices with name, room, macId, latitude, longitude and location.

 componentDidMount() {
   const { accessToken, actions } = this.props;
   if (accessToken) {
     actions
       .getUserDevices()
       .then(({ payload }) => {
         this.initialiseDevices();
         this.setState({
           loading: false,
           emptyText: 'You do not have any devices connected yet!',
         });
       })
       .catch(error => {
         this.setState({
           loading: false,
           emptyText: 'Some error occurred while fetching the devices!',
         });
         console.log(error);
       });
   }
   document.title =
     'My Devices - SUSI.AI - Open Source Artificial Intelligence for Personal  Assistants, Robots, Help Desks and Chatbots';
 }
 initialiseDevices = () => {
   const { devices } = this.props;
 
   if (devices) {
     let devicesData = [];
     let deviceIds = Object.keys(devices);
     let invalidLocationDevices = 0;
 
     deviceIds.forEach(eachDevice => {
       const {
         name,
         room,
         geolocation: { latitude, longitude },
       } = devices[eachDevice];
 
       let deviceObj = {
         macId: eachDevice,
         deviceName: name,
         room,
         latitude,
         longitude,
         location: `${latitude}, ${longitude}`,
       };
 
       if (
         deviceObj.latitude === 'Latitude not available.' ||
         deviceObj.longitude === 'Longitude not available.'
       ) {
         deviceObj.location = 'Not found';
         invalidLocationDevices++;
       } else {
         deviceObj.latitude = parseFloat(latitude);
         deviceObj.longitude = parseFloat(longitude);
       }
       devicesData.push(deviceObj);
     });
 
     this.setState({
       devicesData,
       invalidLocationDevices,
     });
   }
 };

Device Page

Clicking on the view icon button in my devices redirects to mydevices/:macId. This page consists of device information in tabular format, local configuration settings and location of the device on the map. User can edit and delete the device from actions present in table. Local configuration settings can be accessed only if the user is logged in the local server.

Edit Device

To edit a device click on the edit icon button in the actions column of the table. The name and room field become editable.On changing the values handleChange function is called which updates the devicesData state. Clicking on the tick icon saves the new details by calling the onDeviceSave function. This function class the addUserDevice api which takes in the new device details.

startEditing = rowIndex => {
   this.setState({ editIdx: rowIndex });
 };
 
 handleChange = (e, fieldName, rowIndex) => {
   const value = e.target.value;
   let data = this.state.devicesData;
   this.setState({
     devicesData: data.map((row, index) =>
       index === rowIndex ? { ...row, [fieldName]: value } : row,
     ),
   });
 };

 handleDeviceSave = rowIndex => {
   this.setState({
     editIdx: -1,
   });
   const deviceData = this.state.devicesData[rowIndex];
 
   addUserDevice({ ...deviceData })
     .then(payload => {})
     .catch(error => {
       console.log(error);
     });
 };

Delete Device

To delete a device click on the delete icon button under the actions column in the table. Clicking on the delete device button opens up the confirm with input dialog modal. Type in the name of the device and click on delete. Clicking on delete calls the handeRemoveDevice function which calls the removeUserDevice api which takes in the macId. On deleting the device user is redirected to the My Devices in Dashboard.

 handleRemoveConfirmation = () => {
   this.props.actions.openModal({
     modalType: 'deleteDevice',
     name: this.state.devicesData[0].deviceName,
     handleConfirm: this.handleRemoveDevice,
     handleClose: this.props.actions.closeModal,
   });
 };
 handleRemoveDevice = () => {
   const macId = this.macId;
   removeUserDevice({ macId })
     .then(payload => {
       this.props.actions.closeModal();
       window.location.replace('/mydevices);
     })
     .catch(error => {
       console.log(error);
     });
 };

In conclusion, My Devices tab in dashboard helps you manage the devices connected with your account along with specific device configuration. Now the users can edit, view and delete their connected devices.

Resources

Continue ReadingMy Devices in SUSI.AI

Integrating Redux with SUSI.AI Web Clients

In this blog post, we are going to go through the implementation of the Redux integration on the SUSI.AI web clients. The existing SUSI.AI WebChat codebase has Flux integrated into it, but integrating Redux would make it a lot easier to manage the app state in a single store. And would result in a more maintainable and performant application. Let us go through the implementation in the blog –

The key steps involved the following –

  • Restructuring the directory structure of the repository to enable better maintenance.
  • Creating a Redux store and configuring the middlewares.
  • Standardizing the format for writing actions and make API calls on dispatching an action.
  • Standardizing the format for writing reducers.
  • Hook the components to the Redux store.

Restructuring the directory structure

DIrectory structure for https://chat.susi.ai
  • All the redux related files and utils are put into the redux directory, to avoid any sort of confusion, better maintenance and enhanced discoverability. The prime reason for it also because the integration was done side-by-side the existing Flux implementation.
  • The actions and reducers directory each has a index.js, which exports all the actions and reducers respectively, so as to maintain a single import path for the components and this also helped to easily split out different types of actions/reducers.

Creating Redux store and configure middlewares

import { createStore as _createStore, applyMiddleware } from 'redux';
import { routerMiddleware } from 'react-router-redux';
import reduxPromise from 'redux-promise';
import reducers from './reducers';

export default function createStore(history) {
 // Sync dispatched route actions to the history
 const reduxRouterMiddleware = routerMiddleware(history);
 const middleware = [reduxRouterMiddleware, reduxPromise];

 let finalCreateStore;
 finalCreateStore = applyMiddleware(...middleware)(_createStore);

 const store = finalCreateStore(
   reducers,
   {},
   window.__REDUX_DEVTOOLS_EXTENSION__ &&
     window.__REDUX_DEVTOOLS_EXTENSION__(),
 );

 return store;
}
  • The function createStore takes in the browserHistory (provided by React Router) and returns a single store object that is passed on to the entry point component of the App.
  • The store is passed to the application via the <Provider> component, provided by the react-redux. It is wrapped to the <App> component as follows –

ReactDOM.render(
 <Provider store={store} key="provider">
   <App />
 </Provider>,
 document.getElementById('root'),
);
  • The 2 middlewares used are routerMiddleware provided by the react-router-redux and the reduxPromise provided by redux-promise.
  • The routerMiddleware enhances a history instance to allow it to synchronize any changes it receives into application state.
  • The reduxPromise returns a promise to the caller so that it can wait for the operation to finish before continuing. This is useful to assist the application to tackle async behaviour.

Standardizing the actions and making API calls on action dispatch

  • The actions file contains the following –

import { createAction } from 'redux-actions';
import actionTypes from '../actionTypes';
import * as apis from '../../apis';

const returnArgumentsFn = function(payload) {
 return Promise.resolve(payload);
};

export default {
// API call on action dispatch
 getApiKeys: createAction(actionTypes.APP_GET_API_KEYS, apis.fetchApiKeys),
// Returns a promise for actions not requiring API calls
 logout: createAction(actionTypes.APP_LOGOUT, returnArgumentsFn),
};

  • As new actions are added, it can be added to the actionTypes file and can be added in the export statement of the above snippet. This enables very standard and easy to manage actions.
  • This approach allows to handle both types of action dispatch – with and without API call. In case of API call on dispatch, the action resolves with the payload of the API.
  • The APIs are called via the AJAX helper (Check out this blog – https://blog.fossasia.org/make-a-helper-for-ajax-requests-using-axios/ ).

Standardizing the reducers and combining them

  • The reducers file contains the following –

import { handleActions } from 'redux-actions';
import actionTypes from '../actionTypes';

const defaultState = {
 ...
 apiKeys: {},
 ...
};

export default handleActions({
  [actionTypes.APP_GET_API_KEYS](state, { payload }) {
     const { keys } = payload;
     return {
       ...state,
       apiKeys: { ...keys },
     };
  },
  ...
},defaultState);
  • The default application state is defined and the reducer corresponding to each action type returns an immutable object which is the new application state,
  • In the above example, the payload from the getApiKeys API call is received in the reducer, which then updated the store.
  • The reducers/index.js  combines all the reducers using combineReducers provided by redux and exports a single object of reducers.

import { combineReducers } from 'redux';
import { routerReducer } from 'react-router-redux';
import app from './app';
import settings from './settings';
import messages from './messages';

export default combineReducers({
 routing: routerReducer,
 app,
 settings,
 messages,
});

Hook the components to the Redux store

  • After Redux integration and standardization of the reducers, actions, any of the component can be hooked to the store as follows –

import React, { Component } from 'react';
import { connect } from 'react-redux';
import { bindActionCreators } from 'redux';

class MyComponent extends Component {
 componentDidMount() {
    // Dispatch an action
    this.props.actions.getApiKeys();
 }
 render() {
   const { apiKeys } = this.props;
   return (
     <div>
        /* JSX */
     </div>     
   );
 }
}

function mapStateToProps(store) {
 const { apiKeys } = store.app;
 return {
   apiKeys
 };
}

function mapDispatchToProps(dispatch) {
 return {
   actions: bindActionCreators(actions, dispatch),
 };
}

export default connect(mapStateToProps, mapDispatchToProps)(MyComponent);
  • The mapStateToProps is a function that is used to provide the store data to the component via props, whereas mapDispatchToProps is used to provide the action creators as props to the component.

The above was the implementation of Redux in the SUSI.AI Web Clients. I hope the blog provided a detailed insight of how Redux was integrated and the standards that were followed.

References

Continue ReadingIntegrating Redux with SUSI.AI Web Clients