Using OpenCV for Native Image Processing in Phimpme Android

OpenCV is very widely used open-source image processing library. After the integration of OpenCV Android SDK in the Phimpme Android application, the image processing functions can be written in Java part or native part. Taking runtime of the functions into consideration we used native functions for image processing in the Phimpme application.

We didn’t have the whole application written in native code, we just called the native functions on the Java OpenCV Mat object. Mat is short for the matrix in OpenCV. The image on which we perform image processing operations in the Phimpme Android application is stored as Mat object in OpenCV.

Creating a Java OpenCV Mat object

Mat object of OpenCV is same whether we use it in Java or C++. We have common OpenCV object in Phimpme for accessing from both Java part and native part of the application. We have a Java bitmap object on which we have to perform image processing operations using OpenCV. For doing that we need to create a Java Mat object and pass its address to native. Mat object of OpenCV can be created using the bitmap2Mat() function present in the OpenCV library. The implementation is shown below.

Mat inputMat = new Mat(bitmap.getWidth(), bitmap.getHeight(), CvType.CV_8UC3);
Utils.bitmapToMat(bitmap, inputMat);

“bitmap” is the Java bitmap object which has the image to be processed. The third argument in the Mat function indicates that the Mat should be of type 8UC3 i.e. three color channels with 8-bit depth. With the second line above, the bitmap gets saved as the OpenCV Mat object.

Passing Mat Object to Native

We have the OpenCV Mat object in the memory. If we pass the whole object again to native, the same object gets copied from one memory location to another. In Phimpme application, instead of doing all that we can just get the memory location of the current OpenCV Mat object and pass it to native. As we have the address of the Mat, we can access it directly from native functions. Implementation of this is shown below.

Native Function Definition:

private static native void nativeApplyFilter(long inpAddr);

Native Function call:

nativeApplyFilter(inputMat.getNativeObjAddr());

Getting Native Mat Object to Java

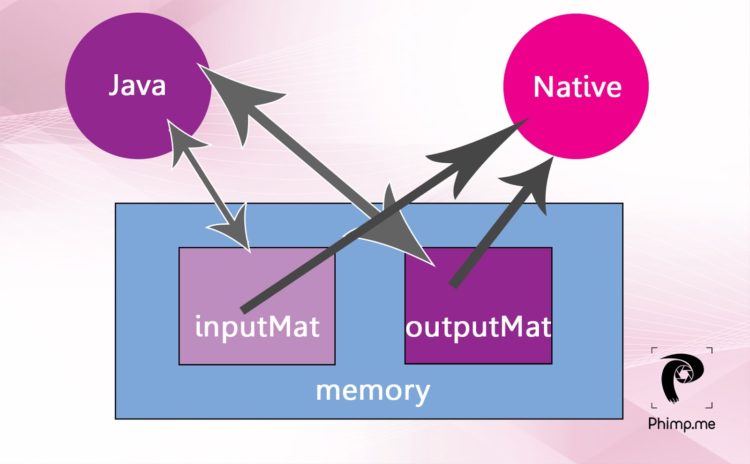
We can follow the similar steps for getting the Mat from the native part after processing. In the Java part of Phimpme, we created an OpenCV Mat object before we pass the inputMat OpenCV Mat object to native for processing. So we have inputMat and outputMat in the memory before we send them to native. We get the memory locations of both the Mat objects and pass those addresses to native part. After the processing is done, the data gets written to the same memory location and can be accessed in Java. The above functions can be modified and rewritten for this purpose as shown below

Native Function Definition:

private static native void nativeApplyFilter(long inpAddr, long outAddr );

Native Function call:

nativeApplyFilter(inputMat.getNativeObjAddr(),outputMat.getNativeObjAddr());
inputMat.release();

if (outputMat !=null){
   Bitmap outbit = Bitmap.createBitmap(bitmap.getWidth(),bitmap.getHeight(),bitmap.getConfig());
   Utils.matToBitmap(outputMat,outbit);
   outputMat.release();
   return outbit;
}

Native operations on Mat using OpenCV

The JNI function in the native part of Phimpme application receives the memory locations of both the OpenCV Mat objects. As we have the addresses, we can create Mat object pointing that memory location and can be passed to processing functions for performing native operations just like all OpenCV functions. This implementation is shown below.

#include <jni.h>
#include <opencv2/core/core.hpp>
#include <opencv2/imgproc/imgproc.hpp>
#include "enhance.h"
using namespace std;
using namespace cv;

JNIEXPORT void JNICALL
Java_org_fossasia_phimpme_editor_editimage_filter_PhotoProcessing_nativeApplyFilter(JNIEnv *env, jclass type, jlong inpAddr,jlong outAddr) {
       Mat &src = *(Mat*)inpAddr;
       Mat &dst = *(Mat*)outAddr;
       applyFilter(src, dst);
}

applyFilter() function can have any image processing operation. The implementation of edge detection function using OpenCV in the Phimpme Android is shown below. We were able to do this in very few lines which otherwise would have needed an extremely large code.  

Mat grey,detected_edges;
cvtColor( src, grey, CV_BGR2GRAY );
blur( grey, detected_edges, Size(3,3) );
dst.create( grey.size(), grey.type() );
Canny( detected_edges, detected_edges, 70, 200, 3 );
dst = Scalar::all(0);
detected_edges.copyTo( dst, detected_edges);


The general structure of an OpenCV function which is necessary for implementing custom image processing operations can be understood by referring this below-mentioned brightness adjustment function.  

int x,y,bright;
cvtColor(src,src,CV_BGRA2BGR);
dst = Mat::zeros( src.size(), src.type() );
for (y = 0; y < src.rows; y++) {
   for (x = 0; x < src.cols; x++) {
       dst.at<Vec3b>(y, x)[0] =
                  saturate_cast<uchar>((src.at<Vec3b>(y, x)[0]) + bright);
       dst.at<Vec3b>(y, x)[1] =
               saturate_cast<uchar>((src.at<Vec3b>(y, x)[1]) + bright);
       dst.at<Vec3b>(y, x)[2] =
               saturate_cast<uchar>((src.at<Vec3b>(y, x)[2]) + bright);
   }
}


Resources:

Continue ReadingUsing OpenCV for Native Image Processing in Phimpme Android

Passing Java Bitmap Object to Native for Image Processing and Getting it back in Phimpme Android

To perform any image processing operations on an image, we must have an image object in native part like we have a Bitmap object in Java. We cannot just pass the image bitmap object directly as an argument to native function because ‘Bitmap’ is a java object and C/C++ cannot interpret it directly as an image. So, here I’ll discuss a method to send java Bitmap object to Native part for performing image processing operations on it, which we implemented in the image editor of Phimpme Android Image Application.

C/C++ cannot interpret java bitmap object. So, we have to find the pixels of the java bitmap object and send them to native part to create a native bitmap over there.

In Phimpme, we used a “struct” data structure in C to represent native bitmap. An image has three color channels red, green, blue. We consider alpha channel(transparency) for an argb8888 type image. But in Phimpme, we considered only three channels as it is enough to manipulate these channels to implement the edit functions, which we used in the Editor of Phimpme.

We defined a struct, type-defined as NativeBitmap with attributes corresponding to all the three channels. We defined this in the nativebitmap.h header file in the jni/ folder of Phimpme so that we can include this header file in c files in which we needed to use a NativeBitmap struct.

#ifndef NATIVEBITMAP
#define NATIVEBITMAP
#endif
typedef struct {
  unsigned int width;
  unsigned int height;
  unsigned int redWidth;
  unsigned int redHeight;
  unsigned int greenWidth;
  unsigned int greenHeight;
  unsigned int blueWidth;
  unsigned int blueHeight;
  unsigned char* red;
  unsigned char* green;
  unsigned char* blue;
} NativeBitmap;

void deleteBitmap(NativeBitmap* bitmap);
int initBitmapMemory(NativeBitmap* bitmap, int width, int height);

As I explained in my previous post here on introduction to flow of native functions in Phimpme-Android, we defined the native functions with necessary arguments in Java part of Phimpme. We needed the image bitmap to be sent to the native part of the Phimpme application. So the argument in the function should have been java Bitmap object. But as mentioned earlier, the C code cannot interpret this java bitmap object directly as an image. So we created a function for getting pixels from a bitmap object in the Java class of Phimpme application. This function returns an array of unsigned integers which correspond to the pixels of a particular row of the image bitmap. The array of integers can be interpreted by C, so we can send this array of integers to native part and create a receiving native function to create NativeBitmap.

We performed image processing operations like enhancing and applying filters on this NativeBitmap and after the processing is done, we sent the array of integers corresponding to a row of the image bitmap and constructed the Java Bitmap Object using those received arrays in java.

The integers present in the array correspond to the color value of a particular pixel of the image bitmap. We used this color value to get red, green and blue values in native part of the Phimpme application.

Java Implementation for getting pixels from the bitmap, sending to and receiving from native is shown below.

private static void sendBitmapToNative(NativeBitmap bitmap) {
   int width = bitmap.getWidth();
   int height = bitmap.getHeight();
   nativeInitBitmap(width, height);
   int[] pixels = new int[width];
   for (int y = 0; y < height; y++) {
       bitmap.getPixels(pixels, 0, width, 0, y, width, 1); 
                    //gets pixels of the y’th row
       nativeSetBitmapRow(y, pixels);
   }
}
private static Bitmap getBitmapFromNative(NativeBitmap bitmap) {
   bitmap = Bitmap.createBitmap(srcBitmap.getWidth(), srcBitmap.getHeight(), srcBitmap.getConfig());
   int[] pixels = new int[width];
   for (int y = 0; y < height; y++) {
       nativeGetBitmapRow(y, pixels);
       bitmap.setPixels(pixels, 0, width, 0, y, width, 1);
   }
   return bitmap;
}

The native functions which are defined in Java part have to be linked to native functions. So they have to be created with proper function name in main.c (JNI) file of the Phimpme application. We included nativebitmap.h in main.c so that we can use NativeBitmap struct which is defined in nativebitmap.h.
The main functions which do the actual work related to converting integer array received from java part to NativeBitmap and converting back to an integer array of color values of pixels in rows of image bitmap are present in nativebitamp.c. The main.c file acts as Java Native Interface which helps in linking native functions and java functions in Phimpme Android.

After adding all the JNI functions, the main.c function looks as below.

main.c

static NativeBitmap bitmap;
int Java_org_fossasia_phimpme_PhotoProcessing_nativeInitBitmap(JNIEnv* env, jobject thiz, jint width, jint height) {
  return initBitmapMemory(&bitmap, width, height);  //function present
                                                    // in nativebitmap.c
}

void Java_org_fossasia_phimpme_PhotoProcessing_nativeSetBitmapRow(JNIEnv* env, jobject thiz, jint y, jintArray pixels) {
  int cpixels[bitmap.width];
  (*env)->GetIntArrayRegion(env, pixels, 0, bitmap.width, cpixels);
  setBitmapRowFromIntegers(&bitmap, (int)y, &cpixels);
}

void Java_org_fossasia_phimpme_PhotoProcessing_nativeGetBitmapRow(JNIEnv* env, jobject thiz, jint y, jintArray pixels) {
  int cpixels[bitmap.width];
  getBitmapRowAsIntegers(&bitmap, (int)y, &cpixels);
  (*env)->SetIntArrayRegion(env, pixels, 0, bitmap.width, cpixels);
                    //sending bitmap row as output
}

We now reached the main part of the implementation where we created the functions for storing integer array of color values of pixels in the NativeBitmap struct, which we created in nativebitmap.h of Phimpme Application. The definition of all the functions is present in nativebitmap.h, so we included that header file in the nativebitmap.c for using NativeBitmap struct in the functions. We implemented the functions defined in main.c i.e. initializing bitmap memory, setting bitmap row using integer array, getting bitmap row and a method for deleting native bitmap from memory after completion of processing the image in nativebitmap.c.

The implementation of nativebitmap.c after adding all functions is shown below. A proper explanation is added as comments wherever necessary.

void setBitmapRowFromIntegers(NativeBitmap* bitmap, int y, int* pixels) {
  //y is the number of the row (yth row)
  //pixels is the pointer to integer array which contains color value of a pixel
  unsigned int width = (*bitmap).width;
  register unsigned int i = (width*y) + width - 1;
                                //this represent the absolute                                 //index of the pixel in the image bitmap  
  register unsigned int x;      //this represent the index of the pixel 
                                //in the particular row of image bitmap
  for (x = width; x--; i--) {
          //functions defined above
     (*bitmap).red[i] = red(pixels[x]);
     (*bitmap).green[i] = green(pixels[x]);
     (*bitmap).blue[i] = blue(pixels[x]);
  }
}

void getBitmapRowAsIntegers(NativeBitmap* bitmap, int y, int* pixels) {
  unsigned int width = (*bitmap).width;
  register unsigned int i = (width*y) + width - 1; 
  register unsigned int x;              
  for (x = width; x--; i--) {
          //function defined above
     pixels[x] = rgb((int)(*bitmap).red[i], (int)(*bitmap).green[i], (int)(*bitmap).blue[i]);
  }
}

The native bitmap has to be initialized first before we set pixel values to it and has to be deleted from memory after completion of the processing. The functions for doing these tasks are given below. These functions should be added to nativebitmap.c file.

void deleteBitmap(NativeBitmap* bitmap) {
//free up memory
  freeUnsignedCharArray(&(*bitmap).red);//do same for green and blue
}

int initBitmapMemory(NativeBitmap* bitmap, int width, int height) {
  deleteBitmap(bitmap); 
             //if nativebitmap already has some value it gets removed
  (*bitmap).width = width;
  (*bitmap).height = height;
  int size = width*height;
  (*bitmap).redWidth = width;
  (*bitmap).redHeight = height;
            //assigning memory to the red,green and blue arrays and
            //checking if it succeeded for each step.
  int resultCode = newUnsignedCharArray(size, &(*bitmap).red);
  if (resultCode != MEMORY_OK) return resultCode;
            //repeat the code given above for green and blue colors
}

You can find the values of different color components of the RGB color value and RGB color values from the values of color components using the below functions. Add these functions to the top of the nativebitmap.c file.

int rgb(int red, int green, int blue) {
  return (0xFF << 24) | (red << 16) | (green << 8) | blue;
//Find the color value(int) from the red, green, blue values of a particular //pixel.
}

unsigned char red(int color) {
  return (unsigned char)((color >> 16) & 0xFF);
//Getting the red value form the color value of a particular pixel
}

//for green return this ((color >> 8) & 0xFF)
//for blue return this (color & 0xFF);

Do not forget to define native functions in Java part. As now everything got set up, we can use this in PhotoProcessing.java in the following manner to send Bitmap object to native.

Bitmap input = somebitmap;
if  (bitmap != null) {
    sendBitmapToNative(bitmap);
}

////Do some native processing on native bitmap struct
////Discussed in the next post

Bitmap output = getBitmapFromNative(input);
nativeDeleteBitmap();

Performing image processing operations on the NativeBitmap in the image editor of Phimpme like enhancing the image, applying filters are discussed in next posts.

Resources

Continue ReadingPassing Java Bitmap Object to Native for Image Processing and Getting it back in Phimpme Android

Applying Filters on Images using Native Functions in Phimpme Android

In the Phimpme application, the user can apply multiple colorful filters on images captured from application’s camera or already available images on the device. This application of filters on images is performed using native image processing functions. We implemented many filters for enhancing the image. Implementation of few of the filter functions is shown below.

Filters are applied to an image by modifying the color values of pixels in the Phimpme application. This is similar to the implementation of image enhancing functions in the editor of Phimpme. My post on that is available here.

Black and White filter:

Black and white filter can be called as gray scaling the image. In a gray scale image, there will only be a single color channel. If multiple channels are present, the corresponding pixel values in all channels will be same. Here in Phimpme, we have an RGB image. It has 3 color channels. Every pixel has three values. Black and white filter can be implemented by replacing those three different values with the average of those values. The implementation of the function and the resultant image with the comparison is shown below.

void applyBlackAndWhiteFilter(Bitmap* bitmap) {
  register unsigned int i;
  unsigned int length = (*bitmap).width * (*bitmap).height;
  register unsigned char grey;
  unsigned char* red = (*bitmap).red;
  unsigned char* green = (*bitmap).green;
  unsigned char* blue = (*bitmap).blue;
  for (i = length; i--;) {
     grey = (red[i] + green[i] + blue[i]) / 3;
     red[i] = truncate((int) grey);
     green[i] = truncate((int) grey);
     blue[i] = truncate((int) grey);
  }
}


Ansel Filter

This Ansel Filter is a monotone filter present in Phimpme which is similar to black and white. Here in this filter, the contrast will be little high and gives the image artistic look. This is achieved in Phimpme by hard overlaying the gray pixel components of the image. The rest is same as the black and white filter. The implementation of hard overlay blending and the Ansel function is shown below with the resultant images.

static unsigned char hardLightLayerPixelComponents(unsigned char maskComponent, unsigned char imageComponent) {

  return (maskComponent > 128) ? 255 - (( (255 - (2 * (maskComponent-128)) ) * (255-imageComponent) )/256) : (2*maskComponent*imageComponent)/256;
}

void applyAnselFilter(Bitmap* bitmap) {
/*initializations*/
  unsigned char br,bg,bb;
  for (i = length; i--; ) {
       grey = (red[i] + green[i] + blue[i]) / 3;
       int eff = hardLightLayerPixelComponents(grey, grey);
       red[i] = truncate(eff);
       green[i] = truncate(eff);
       blue[i] = truncate(eff);
  }
}


Sepia Filter

The Sepia Filter in Phimpme results in a monotone image with orangish yellow tone. Its implementation uses pre-defined look up tables(LUTs) for all the three channels. The luminosity of a particular pixel is found out and then the red, green, blue values are found out from the look up tables(LUTs) corresponding to that luminosity. The look up table arrays we used for the sepia effect in Phimpme are given below and the implementation is also shown below.

const unsigned char sepiaRedLut[256] = {24, 24, 25, 26, 27, 28, 29, 30, 30, 30, 31, 32, 33, 34, 35, 36, 37, 37, 38, 38, 39, 40, 41, 42, 43, 43, 44, 45, 46, 47, 47, 48, 49, 50, 50, 51, 52, 53, 54, 55, 56, 57, 57, 58, 58, 59, 60, 61, 62, 63, 64, 64, 65, 66, 67, 68, 69, 70, 71, 71, 72, 72, 73, 74, 75, 76, 77, 78, 78, 79, 80, 81, 82, 83, 84, 85, 85, 86, 87, 88, 89, 89, 90, 91, 92, 93, 93, 94, 95, 96, 97, 97, 98, 99, 100, 101, 102, 102, 103, 104, 105, 106, 107, 108, 109, 109, 110, 111, 112, 113, 114, 115, 116, 117, 118, 118, 119, 120, 121, 122, 123, 124, 125, 126, 127, 128, 129, 129, 130, 131, 132, 133, 134, 135, 136, 137, 138, 139, 140, 141, 142, 143, 144, 145, 146, 146, 147, 148, 149, 150, 151, 152, 153, 153, 154, 155, 156, 157, 158, 159, 160, 161, 162, 163, 164, 165, 166, 167, 168, 169, 170, 171, 172, 173, 174, 175, 176, 177, 178, 178, 180, 181, 182, 183, 184, 185, 186, 186, 187, 188, 189, 190, 191, 193, 194, 195, 195, 196, 197, 198, 199, 200, 201, 202, 203, 204, 205, 206, 207, 208, 209, 210, 211, 212, 213, 214, 215, 216, 217, 218, 219, 220, 221, 222, 223, 224, 225, 226, 227, 228, 229, 230, 231, 232, 233, 234, 235, 236, 237, 238, 239, 240, 241, 242, 243, 244, 245, 246, 247, 248, 249, 250, 251, 252, 253, 255};

const unsigned char sepiaGreenLut[256] = {16, 16, 16, 17, 18, 18, 19, 20, 20, 20, 21, 22, 22, 23, 24, 24, 25, 25, 26, 26, 27, 28, 28, 29, 30, 30, 31, 31, 32, 33, 33, 34, 35, 36, 36, 36, 37, 38, 39, 39, 40, 41, 42, 43, 43, 44, 45, 46, 47, 47, 48, 48, 49, 50, 51, 51, 52, 53, 54, 54, 55, 55, 56, 57, 58, 59, 60, 61, 61, 61, 62, 63, 64, 65, 66, 67, 67, 68, 68, 69, 70, 72, 73, 74, 75, 75, 76, 77, 78, 78, 79, 80, 81, 81, 82, 83, 84, 85, 86, 87, 88, 90, 90, 91, 92, 93, 94, 95, 96, 97, 97, 98, 99, 100, 101, 103, 104, 105, 106, 106, 107, 108, 109, 110, 111, 112, 113, 114, 115, 116, 117, 118, 119, 120, 122, 123, 123, 124, 125, 127, 128, 129, 130, 131, 132, 132, 134, 135, 136, 137, 138, 139, 141, 141, 142, 144, 145, 146, 147, 148, 149, 150, 151, 152, 154, 155, 156, 157, 158, 160, 160, 161, 162, 163, 165, 166, 167, 168, 169, 170, 171, 173, 174, 175, 176, 177, 178, 179, 180, 182, 183, 184, 185, 187, 188, 189, 189, 191, 192, 193, 194, 196, 197, 198, 198, 200, 201, 202, 203, 205, 206, 207, 208, 209, 210, 211, 212, 213, 215, 216, 217, 218, 219, 220, 221, 223, 224, 225, 226, 227, 228, 229, 230, 231, 232, 233, 235, 236, 237, 238, 239, 240, 241, 242, 243, 244, 245, 246, 247, 248, 249, 250, 251, 252, 253, 255};

const unsigned char sepiaBlueLut[256] = {5, 5, 5, 5, 5, 6, 6, 7, 7, 8, 8, 9, 9, 9, 10, 10, 11, 11, 11, 11, 12, 12, 13, 13, 14, 14, 14, 14, 15, 15, 16, 16, 17, 17, 17, 18, 18, 19, 20, 20, 21, 21, 21, 22, 22, 23, 23, 24, 25, 25, 26, 27, 28, 28, 29, 29, 30, 31, 31, 31, 32, 33, 33, 34, 35, 36, 37, 38, 38, 39, 39, 40, 41, 42, 43, 43, 44, 45, 46, 47, 47, 48, 49, 50, 51, 52, 53, 53, 54, 55, 56, 57, 58, 59, 60, 60, 61, 62, 63, 65, 66, 67, 67, 68, 69, 70, 72, 73, 74, 75, 75, 76, 78, 79, 80, 81, 82, 83, 84, 85, 86, 87, 88, 90, 91, 92, 93, 93, 95, 97, 98, 99, 100, 101, 102, 104, 104, 106, 107, 108, 109, 111, 112, 114, 115, 115, 117, 118, 120, 121, 122, 123, 124, 125, 127, 128, 129, 131, 132, 133, 135, 136, 137, 138, 139, 141, 142, 144, 145, 147, 147, 149, 150, 151, 153, 154, 156, 157, 159, 159, 161, 162, 164, 165, 167, 168, 169, 170, 172, 173, 174, 176, 177, 178, 180, 181, 182, 184, 185, 186, 188, 189, 191, 192, 193, 194, 196, 197, 198, 200, 201, 203, 204, 205, 206, 207, 209, 210, 211, 213, 214, 215, 216, 218, 219, 220, 221, 223, 224, 225, 226, 227, 229, 230, 231, 232, 234, 235, 236, 237, 238, 239, 241, 242, 243, 244, 245, 246, 247, 248, 249, 250, 251, 252, 253, 255};
void applySepia(Bitmap* bitmap){
/*bitmap initializations*/
for (i = length; i--; ) {
  register float r = (float) red[i] / 255;
  register float g = (float) green[i] / 255;
  register float b = (float) blue[i] / 255;
  register float luminosity =  (0.21f * r + 0.72f * g + 0.07 * b) * 255;
      red[i] = truncate((int)( sepiaRedLut[(int)luminosity]));
      green[i] = truncate((int)(sepiaGreenLut[(int)luminosity]));
      blue[i] = truncate((int)(sepiaBlueLut[(int)luminosity]));
  }
}


Cyano Filter

As the name suggests this filter adds a cyan tone to the image. For implementing this cyano filter, we first found the black and white value of the pixel and then the ceilingComponent value of the pixels of three color channels. Then the ceilingComponent Values and the gray values are overlayed to give the resultant image. Finding the ceilComponent Values and the filter implementation is shown below.

#define componentCeiling(x) ((x > 255) ? 255 : x)

static unsigned char overlayPixelComponents(unsigned int overlayComponent, unsigned char underlayComponent, float alpha) {
  float underlay = underlayComponent * alpha;
  return (unsigned char)((underlay / 255) * (underlay + ((2.0f * overlayComponent) / 255) * (255 - underlay)));

}

void applyCyano(Bitmap* bitmapl) {
  //Cache to local variables
//Bitamp initialization
  register unsigned int i;
  register unsigned char grey, r, g, b;
  for (i = length; i--;) {
     grey = ((red[i] * 0.222f) + (green[i] * 0.222f) + (blue[i] * 0.222f));
     r = componentCeiling(61.0f + grey);
     g = componentCeiling(87.0f + grey);
     b = componentCeiling(136.0f + grey);
     grey = (red[i] + green[i] + blue[i]) / 3;
     red[i] = truncate((int)(overlayPixelComponents(grey, r, 0.9f)));
     green[i] = truncate((int)(overlayPixelComponents(grey, g, 0.9f)));
     blue[i] = truncate((int)(overlayPixelComponents(grey, b, 0.9f)));
  }
}


Grain Filter

It is clear from the name that this filter adds grain to the image giving an artistic effect. It can be implemented in a very simple manner by assigning gray values to random pixels of an image. The condition inside the main for loop of the below implementation controls the proportion of added grain with respect to the whole image. For generating a random value, the timer has to be initialized first. The whole implementation of the function is shown below.

void applyGrain(Bitmap* bitmap) {
/*initializations*/
   time_t t;
   srand((unsigned) time(&t));
  for (i = length; i--;) {
       int rval = rand()%255;
       if (rand()%100 < 15)){
           int grey = (red[i] + green[i] + blue[i]) / 3;
           red[i] = truncate(rval);
           green[i] = truncate(rval);
           blue[i] = truncate(rval);
       }
  }
}


Threshold Filter

Thresholding an image gives a binary image i.e the pixels of the image will have only two values. One for a value less than the threshold and other for values greater than the threshold. The threshold value is adjusted by seek bar in Phimpme. An image looks very artistic for a particular value on the seek bar. Its implementation is shown below.

void applyThreshold(Bitmap* bitmap, int val) {
/*bitmap initializations*/
  unsigned char grey, color;
  int thres = 220 - (int)((val/100.0) * 190);
  for (i = length; i--;) {
       grey = (red[i] + green[i] + blue[i]) / 3;
       if (grey < thres) color = 0;
       else color = 255;
       red[i] = truncate((int)(color));
       green[i] = truncate((int)(color));
       blue[i] = truncate((int)(color));
  }
}


Resources:

Continue ReadingApplying Filters on Images using Native Functions in Phimpme Android

Enhancing Images using Native functions in Phimpme Android

Enhancing the image can be performed by adjusting the brightness, contrast, saturation etc. of that image. In the Phimpme Android Image Application, we implemented many enhancement operations. All these image enhancement operations are performed by the native image processing functions.

An image is made up of color channels. A gray-scale image has a single channel, colored opaque image has three channels and colored image with transparency has four channels. Each color channel of an image represents a two dimensional matrix of integer values. An image of resolution 1920×1080 has 1920 elements in its row and 1080 such rows. The integer values present in the matrices will be ranging from 0 to 255. For a grayscale image there will be a single channel. So, for that image, 0 corresponds to black color and 255 corresponds to white color. By changing the value present in the matrices, the image can be modified.

The implementation of the enhancement functions in Phimpme Application are given below.

Brightness

Brightness adjustment is the easiest of the image processing functions in Phimpme. Brightness can be adjusted by increasing or decreasing the values of all elements in all color channel matrices. Its implementation is given below.

void tuneBrightness(Bitmap* bitmap, int val) {
  register unsigned int i;
  unsigned int length = (*bitmap).width * (*bitmap).height;
  unsigned char* red = (*bitmap).red;
  unsigned char* green = (*bitmap).green;
  unsigned char* blue = (*bitmap).blue;
  signed char bright = (signed char)(((float)(val-50)/100)*127);
  for (i = length; i--; ) {
       red[i] =  truncate(red[i]+bright);
       green[i] = truncate(green[i]+bright);
       blue[i] = truncate(blue[i]+bright);
  }
}


low brightness, normal, high brightness(in the order) images are shown above

For the above function, the argument val is given by the seekbar implemented in java activity. Its value ranges from 0 – 100, so a new variable is introduced to change the range of the input argument in the function. You can see that in the for loop there is function named truncate. As the name suggests it truncates the input argument’s value to accepted range. It is added to the top of the c file as below

#define truncate(x) ((x > 255) ? 255 : (x < 0) ? 0 : x)

Contrast

Contrast of an image is adjusted in Phimpme application by increasing the brightness of the brighter pixel and decreasing value of the darker pixel. This is achieved by using the following formula for the adjustment contrast in editor of phimpme application.

pixel[i] = {(259 x (C + 255))/(255 x (259 - C))} x (pixel[i] - 128)

In the above formula, C is the contrast value and pixel[i] is the value of the element in the image matrix that we are modifying for changing the contrast.


low contrast, normal, high contrast(in the order) images are shown above

So, after this formula for modifying every pixel value, the function looks like below

void tuneContrast(Bitmap* bitmap, int val) {
  register unsigned int i;
  unsigned int length = (*bitmap).width * (*bitmap).height;
  unsigned char* red = (*bitmap).red;
  unsigned char* green = (*bitmap).green;
  unsigned char* blue = (*bitmap).blue;
  int contrast = (int)(((float)(val-50)/100)*255);
  float factor = (float)(259*(contrast + 255))/(255*(259-contrast));

  for (i = length; i--; ) {
       red[i] = truncate((int)(factor*(red[i]-128))+128);
       green[i] = truncate((int)(factor*(green[i]-128))+128);
       blue[i] = truncate((int)(factor*(blue[i]-128))+128);
  }
}

Hue

The below image explains hue shift by showing what happens when shift in hue takes place over time. The image with hue 0 looks identical with image with hue 360. Hue shift is cyclic. The definition and formulae corresponding hue is found in wikipedia page here. Using that formulae and converting them back, i.e we got rgb values from hue in Phimpme application. Its implementation is shown below.

[img source:wikipedia]

void tuneHue(Bitmap* bitmap, int val) {
  register unsigned int i;
  unsigned int length = (*bitmap).width * (*bitmap).height;
  unsigned char* red = (*bitmap).red;
  unsigned char* green = (*bitmap).green;
  unsigned char* blue = (*bitmap).blue;
  double H = 3.6*val;
  double h_cos = cos(H*PI/180);
  double h_sin = sin(H*PI/180);
  double r,g,b;

  for (i = length; i--; ) {
       r = (double)red[i]/255;
       g = (double)green[i]/255;
       b = (double)blue[i]/255;
       red[i] = truncate((int)(255*((.299+.701*h_cos+.168*h_sin)*r +  (.587-.587*h_cos+.330*h_sin)*g + (.114-.114*h_cos-.497*h_sin)*b)));

       green[i] = truncate((int)(255*((.299-.299*h_cos-.328*h_sin)*r + (.587+.413*h_cos+.035*h_sin)*g + (.114-.114*h_cos+.292*h_sin)*b)));

       blue[i] = truncate((int)(255*((.299-.3*h_cos+1.25*h_sin)*r +  (.587-.588*h_cos-1.05*h_sin)*g + (.114+.886*h_cos-.203*h_sin)*b)));
  }
}

Saturation

Saturation is the colorfulness of the image. You can see the below null saturation, unmodified and high saturated images in the respective order. The technical definition and formulae for getting the saturation value from the rgb value is given in the wikipedia page here. In Phimpme application we used those formulae to get the rgb values from the saturation value.

Its implementation is given below.


low saturation, normal, high saturation(in the order) images are shown above

void tuneSaturation(Bitmap* bitmap, int val) {
  register unsigned int i;
  unsigned int length = (*bitmap).width * (*bitmap).height;
  unsigned char* red = (*bitmap).red;
  unsigned char* green = (*bitmap).green
  unsigned char* blue = (*bitmap).blue;
  double sat = 2*((double)val/100);
  double temp;
  double r_val = 0.299, g_val = 0.587, b_val = 0.114;
  double r,g,b;
  for (i = length; i--; ) {
      r = (double)red[i]/255;
      g = (double)green[i]/255;
      b = (double)blue[i]/255;
      temp = sqrt( r * r * r_val +
                     g * g * g_val +
                       b * b * b_val );
      red[i] = truncate((int)(255*(temp + (r - temp) * sat)));
      green[i] = truncate((int)(255*(temp + (g - temp) * sat)));
      blue[i] = truncate((int)(255*(temp + (b - temp) * sat)));
  }
}

Temperature

If the color temperature of the image is high, i.e the image with the warm temperature will be having more reds and less blues. For a cool temperature image reds are less and blues are more. So In Phimpme Application, we implemented this simply by adjusting the brightness of the red channel matrix and blue channel matrix as we did in brightness adjustment. We didn’t modify the green channel here.


low temperature, normal, high temperature(in the order) images are shown above

void tuneTemperature(Bitmap* bitmap, int val) {
  register unsigned int i;
  unsigned int length = (*bitmap).width * (*bitmap).height;
  unsigned char* red = (*bitmap).red;
  unsigned char* green = (*bitmap).green;
  unsigned char* blue = (*bitmap).blue;
  int temperature = (int)1.5*(val-50);
  for (i = length; i--; ) {
       red[i] = truncate(red[i] + temperature);
       blue[i] = truncate(blue[i] - temperature);
  }
}

Tint

In Phimpme application, we adjusted the tint of an image in the same way of adjusting the temperature. But in this instead of modifying the red and blue channels, we modified the green channel of the image. An image with more tint will have a tone of magenta color and if it is decreased the image will have a greenish tone. The below shown code shows how we implemented this function in image editor of Phimpme application.


low tint, normal, high tint(in the order) images are shown above

void tuneTint(Bitmap* bitmap, int val) {
  register unsigned int i;
  unsigned int length = (*bitmap).width * (*bitmap).height;
  unsigned char* red = (*bitmap).red;
  unsigned char* green = (*bitmap).green;
  unsigned char* blue = (*bitmap).blue;
  int tint = (int)(1.5*(val-50));

  for (i = length; i--; ) {
       green[i] = truncate(green[i] - tint);
  }
}

Vignette

Vignetting is the reduciton in the brightness of the image towards the edges than the center. It is applied to draw the attention of the viewer to the center of the image.


normal and vignetted images are shown above

For implementing vignette in Phimpme application, we reduced the brightness of the pixel corresponding to a radial gradient value which is generated based on the pixel’s distance from the corner and center. It’s function in Phimpme as is shown below.

double dist(int ax, int ay,int bx, int by){
   return sqrt(pow((double) (ax - bx), 2) + pow((double) (ay - by), 2));
}

void tuneVignette(Bitmap* bitmap, int val) {
  register unsigned int i,x,y;
  unsigned int width = (*bitmap).width, height = (*bitmap).height;
  unsigned int length = width * height;
  unsigned char* red = (*bitmap).red;
  unsigned char* green = (*bitmap).green;
  unsigned char* blue = (*bitmap).blue;
  double radius = 1.5-((double)val/100), power = 0.8;
  double cx = (double)width/2, cy = (double)height/2;
  double maxDis = radius * dist(0,0,cx,cy);
  double temp,temp_s;
   for (y = 0; y < height; y++){
       for (x = 0; x < width; x++ ) {
           temp = dist(cx, cy, x, y) / maxDis;
           temp = temp * power;
           temp_s = pow(cos(temp), 4);
           red[x+y*width] = truncate((int)(red[x+y*width]*temp_s));
           green[x+y*width] = truncate((int)(green[x+y*width]*temp_s));
           blue[x+y*width] = truncate((int)(blue[x+y*width]*temp_s));
       }
   }
}

All these above mentioned functions are called from main.c file by creating JNI functions corresponding to each. These JNI functions are further defined with proper name in Java and arguments are passed to it. If you are not clear with JNI, refer my previous posts.

Resources

Continue ReadingEnhancing Images using Native functions in Phimpme Android