Implementation of Paid Route for Event Invoice in Open Event Frontend

The implementation of event invoice tables is already explained in the blog post Implementation of Event Invoice view using Ember Tables. This blog post is an extension which will showcase the implementation of paid route for event invoice in Open Event Frontend. Event invoices can be explained as the monthly fee given by the organizer to the platform for hosting their event.

We begin by defining a route for displaying the paid event invoice. We chose event-invoice/paid route in router.js

this.route('event-invoice', function() {
   ...
   this.route('paid', { path: '/:invoice_identifier/paid' });
 });

Now, we need to finalize the paid route. The route is divided in three sections – 

  • titleToken :  To display title in the tab of the browser.
  • model :  To fetch event-invoice with the given identifier.
  • afterModel : To check if the status of the fetched event -invoice is paid or due. If it is due, it is redirected to review page otherwise it is redirected to paid page.
import Route from '@ember/routing/route';
 
export default class extends Route {
 
 titleToken(model) {
   return this.l10n.tVar(`Paid Event Invoice - ${model.get('identifier')}`);
 }
 
 model(params) {
   return this.store.findRecord('event-invoice', params.invoice_identifier, 
     {
         include : 'event,user',
         reload  : true
     }
   );
 }
 
 afterModel(model) {
   if (model.get('status') === 'due') {
     this.transitionTo('event-invoice.review', model.get('identifier'));
   } else if (model.get('status') === 'paid') {
     this.transitionTo('event-invoice.paid', model.get('identifier'));
   }
 }
}

Now, we need to design the template for paid route. It includes various elements –

  1. Invoice Summary
<div class="ten wide column print">      
    {{event-invoice/invoice-summary data=model                             
        event=model.event                               
        eventCurrency=model.event.paymentCurrency}} 
</div>

The invoice summary contains some of the details of the event invoice. It contains the event name, date of issue, date of completion and amount payable of the event invoice. The snippet for invoice summary can be viewed here

      2.  Event Info :

<div class="mobile hidden six wide column">
  {{event-invoice/event-info event=model.event}}
</div>

The event info section of the paid page contains the description of the event to which the invoice is associated. It contains event location, start date and end date of the event. The snippet for event info can be viewed here
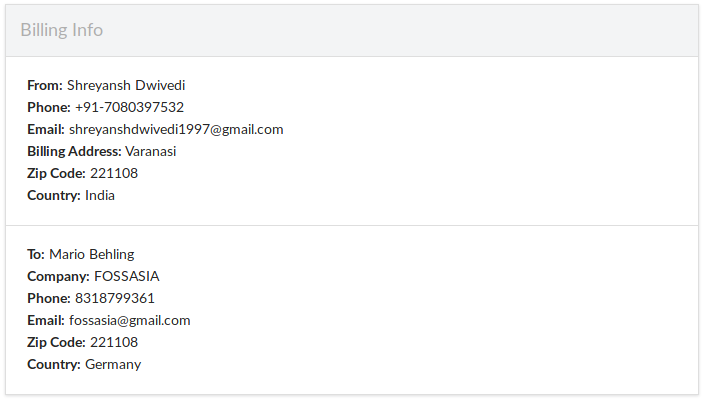
      3.  Billing Info :

<div class="ten wide column">
  {{event-invoice/billing-info user=model.user}}
</div>

The billing info section of the event invoice paid page contains the billing info of the user to which the event is associated and that of the admin. The billing info includes name, email, phone, zip code and country of the user and the admin. The snippet for billing info can be viewed here

      4.  Payee Info :

<div class="mobile hidden row">
   {{event-invoice/payee-info data=model payer=model.user}}
</div>

The payee information displays the name and email of the user who pays for the invoice and also the method of the payment along with relevant information. The snippet for payee info can be viewed here

We can download the invoice of the payment made for the event invoice. This is triggered when the Print Invoice button is clicked. 

Code snippet to trigger the download of the invoice –

 <div class="row">
   <div class="column right aligned">
     <button {{action 'downloadEventInvoice' model.event.name model.identifier }} class="ui labeled icon blue {{if isLoadingInvoice 'loading'}} button">
        <i class="print alternate icon"></i>
        {{t 'Print Invoice'}}
     </button>
   </div>
 </div>

The function downloadEventInvoice is called when the button Print Invoice is clicked. The event name and order ID is passed as parameters to the function. When the invoice pdf generation is successful, message Here is your Event Invoice is displayed on the screen whereas if there is an error, the message Unexpected error occurred is displayed.

@action
 async downloadEventInvoice(eventName, orderId) {
   this.set('isLoading', true);
   try {
     const result = this.loader.downloadFile(`/events/invoices/${this.orderId}`);
     const anchor = document.createElement('a');
     anchor.style.display = 'none';
     anchor.href = URL.createObjectURL(new Blob([result], { type: 'application/pdf' }));
     anchor.download = `${eventName} - EventInvoice-${orderId}.pdf`;
     document.body.appendChild(anchor);
     anchor.click();
     this.notify.success(this.l10n.t('Here is your Event Invoice'));
     document.body.removeChild(anchor);
   } catch (e) {
     console.warn(e);
     this.notify.error(this.l10n.t('Unexpected error occurred.'));
   }
   this.set('isLoading', false);
 }

Resources:

Related work and code repo:

Continue ReadingImplementation of Paid Route for Event Invoice in Open Event Frontend

Introduction of event owner role in Open Event

This blog post will showcase introduction of new owner role for users in Open Event Frontend. Now a user associated with organizing of an event can have any of the following roles:

  1. Owner
  2. Organizer
  3. Co-organizer
  4. Track-organizer
  5. Moderator
  6. Registrar

Till now, the user creating the event had organizer role which was not exclusive. An organizer can invite other users to be organizer. So, later we couldn’t give exclusive rights to the event creator due to this.

But there can only be a single owner of an event. So, the introduction of new owner role will help us distinguish the owner and give him/her exclusive rights for the event.
This refactor involved a lot of changes. Let’s go step by step:

  • I updated the role of the user creating the event to be owner by default. For this, we query the user and owner role and use it to create a new UserEventRoles object and save it to database. Then we create a role invite object using the user email, role title, event id and role id.
def after_create_object(self, event, data, view_kwargs):
  ...
       user = User.query.filter_by(id=view_kwargs['user_id']).first()
       role = Role.query.filter_by(name=OWNER).first()
       uer = UsersEventsRoles(user, event, role)
       save_to_db(uer, 'Event Saved')
       role_invite = RoleInvite(user.email, role.title_name, event.id,
                     role.id, datetime.now(pytz.utc), status='accepted')
       save_to_db(role_invite, 'Owner Role Invite Added')
  • We included a new function is_owner to permission_manager helper which checks if the current_user is owner of the event passed in kwargs. If the user is not the owner, ForbiddenError is returned.
@jwt_required
def is_owner(view, view_args, view_kwargs, *args, **kwargs):
   user = current_user
   if user.is_staff:
       return view(*view_args, **view_kwargs)
   if not user.is_owner(kwargs['event_id']):
       return ForbiddenError({'source': ''}, 'Owner access is required').respond()
   return view(*view_args, **view_kwargs)
  • Updated event schema to add new owner fields and relationship. We updated the fields –
  1. organizer_name             -> owner_name
  2. has_organizer_info        -> has_owner_info
  3. organizer_description    -> owner_description

We also included owner relationship in the EventSchemaPublic

@use_defaults()
class EventSchemaPublic(SoftDeletionSchema):
   ...
   owner_name = fields.Str(allow_none=True)
   has_owner_info = fields.Bool(default=False)
   owner_description = fields.Str(allow_none=True)

   ...
   owner = Relationship(attribute='owner',
                        self_view='v1.event_owner',
                        self_view_kwargs={'id': '<id>'},
                        related_view='v1.user_detail',
                        schema='UserSchemaPublic',
                        related_view_kwargs={'event_id': '<id>'},
                        type_='user')
  • To accommodate the introduction of owner role, we have to introduce a new boolean field is_user_owner and a new relationship owner_events to the UserSchema. The relationship owner_events can be used to fetch lit of events of which a given user is the owner.
class UserSchema(UserSchemaPublic):
   ...
   is_user_owner = fields.Boolean(dump_only=True)
   ...
   owner_events = Relationship(
       self_view='v1.user_owner_event',
       self_view_kwargs={'id': '<id>'},
       related_view='v1.event_list',
       schema='EventSchema',
       many=True,
       type_='event')
  • Similarly, we need to update Event model too. A new owner relationship is introduced to the event model which is related to User. It basically stores the owner of the event.
    We then introduce a new function get_owner( ) to the model which iterates through all the roles and return the user if the role is the owner.
class Event(SoftDeletionModel):
   ...
   owner = db.relationship('User',
             viewonly=True,
             secondary='join(UsersEventsRoles, Role, and_(Role.id ==
                        UsersEventsRoles.role_id, Role.name == "owner"))',
             primaryjoin='UsersEventsRoles.event_id == Event.id',
             secondaryjoin='User.id == UsersEventsRoles.user_id',
             backref='owner_events',
             uselist=False)

Resources:

Related work and code repo:

Continue ReadingIntroduction of event owner role in Open Event

Refactoring Order Status in Open Event

This blog post will showcase the introduction of new Initializing status for orders in Open Event Frontend. So, now we have a total of six status. Let’s take a closer look and understand what exactly these order status means:

StatusDescriptionColor Code
InitializingWhen a user selects tickets and clicks on Order Now button on public event page, the user will get 15 minutes to fill up the order form. The status for order till the form is submitted is – initializingYellow
PlacedIf only offline paid tickets are present in order i.e. paymentMode belongs to one of the following – bank, cheque, onsite; then the status of order is placedBlue
PendingIf the order contains online paid tickets, the status for such order is pending. User gets 30 minutes to complete payment for such pending orders.         
If user completes the payment in this timespan of 30 minutes, the status of order is updated to completed.However if user fails to complete payment in 30 minutes, the status of the order is updated to expired.
Orange
CompletedThere are two cases when the status of order is completed –
1. If the ordered tickets are free tickets, the status of order is completed.
2. If the online payment for pending tickets is completed in timespan of 30 minutes, the status is updated to completed. 
Green
ExpiredThere are two cases when status of order is updated to expired.
1. If the user fails to fill up the order form in the 15 minutes allotted to the user, the status changes from initializing to expired.
2. If the user fails to complete the payment for online paid orders in timeframe of 30 minutes allotted, the status is updated from pending to expired. 
Red
CancelledWhen an organizer cancels an order, the order is given status of cancelled.Grey
  Placed Order
Completed Order

Pending Order
Expired Order

So, basically the status of code is set based on the value of paymentMode attribute. 

If the paymentMode is free, the status is set to completed.
If the paymentMode is bank or cheque or onsite, the status is set to placed.
Otherwise, the status is set to pending.

if (paymentMode === 'free') {
    order.set('status', 'completed');
} else if (paymentMode === 'bank' || paymentMode ===  'cheque' || paymentMode === 'onsite') {
    order.set('status', 'placed');
} else {
    order.set('status', 'pending');
}

We render the status of order at many places in the frontend, so we introduced a new helper order-color which returns the color code depending on the status of the order.

import { helper } from '@ember/component/helper';

export function orderColor(params) {
 switch (params[0]) {
   case 'completed':
     return 'green';
   case 'placed':
     return 'blue';
   case 'initializing':
     return 'yellow';
   case 'pending':
     return 'orange';
   case 'expired':
     return 'red';
   default:
     return 'grey';
 }
}

export default helper(orderColor);

This refactor was followed up on server also to accommodate changes:

  • Ensuring that the default status is always initializing. For this, we place a condition in before_post hook to mark the status as initializing.
  • Till now, the email and notification were sent out only for completed orders but as we now use placed status for offline paid orders so we send out email and notification for placed orders too. For this, I updated the condition in after_create_object hook
class OrdersListPost(ResourceList):
    ...
    def before_post(self, args, kwargs, data=None):
        ...
        if not has_access('is_coorganizer', event_id=data['event']):
           data['status'] = 'initializing'

    def after_create_object(self, order, data, view_kwargs):
       ...
       # send e-mail and notifications if the order status is completed
       if order.status == 'completed' or order.status ==  'placed':
           # fetch tickets attachment
           order_identifier = order.identifier
       ...
  • To ensure that orders with status as initializing and pending are updatable only, we introduced a check in before_update_object hook.
class OrderDetail(ResourceDetail):
    ...
    def before_update_object(self, order, data, view_kwargs):
               ...
        elif current_user.id == order.user_id:
           if order.status != 'initializing' and order.status != 'pending':
               raise ForbiddenException({'pointer': ''},  "You cannot update a non-initialized or non-pending order")
  • To allow a new status initializing for the orders, we needed to include it as a valid choice for status in order schema. 
class OrderSchema(SoftDeletionSchema):
     ...
     status = fields.Str(
       validate=validate.OneOf(
           choices=["initializing", "pending", "cancelled",
                    "completed", "placed", "expired"]
     ))

Resources:

Related work and code repo:

Continue ReadingRefactoring Order Status in Open Event

Deleting a user’s own account in Open Event

This blog post will showcase an option using which a user can delete his/her account in Open Event Frontend. In Open Event we allow a user who is not associated with any event and/or orders to delete his/her own account. User can create a new account with same email later if they want. 

It is a 2-step process just to ensure that user doesn’t deletes the account accidentally.

The user needs to get to the Account section where he/she is required to select Danger Zone tab. If user is not associated with any event and/or order, he/she will get an option to delete his/her account along with the following text :

All user data will be deleted. Your user data will be entirely erased and any data that will stay in the system for accounting purposes will be anonymized and there will be no link to any of your personal information. Once you delete this account, you will no longer have access to the system.
Option to delete account in Open Event Frontend

If the user is associated with any event and/or order, the option to delete the account is disabled along with the following text :

Your account currently cannot be deleted as active events and/or orders are associated with it. Before you can delete your account you must transfer the ownership of your event(s) to another organizer or cancel your event(s). If you have tickets orders stored in the system, please cancel your orders first too.
Disabled option to delete account in Open Event Frontend

For above toggle we need to check if a user is deletable or not. For that we must check if a user is associated with any event and/or order. The code snippet which checks this is given below :

     isUserDeletable: computed('data.events', 
       'data.orders', function() {
         if (this.get('data.events').length || this.get('data.orders').length) {
             return false;
         }
         return true;
     })

When a user clicks on the option to delete his/her account, a modal pops up asking the user to confirm his/her email. Once user fills in correct email ID the Proceed button becomes active.

Modal to confirm email ID

The code snippet which triggers the action to open the modal deleteUserModal is given below:

<button {{action 'openDeleteUserModal' data.user.id data.user.email}} class='ui red button'>     
    {{t 'Delete Your Account'}} 
</button>
   openDeleteUserModal(id, email) {     
     this.setProperties({
       'isUserDeleteModalOpen' : true,
       'confirmEmail'          : '',
       'userEmail'             : email,
       'userId'                : id
     });
   }

The code snippet which deals with the email confirmation:

isEmailDifferent : computed('confirmEmail', function() {
   return this.userEmail ? this.confirmEmail !== this.userEmail : true;
 })

When user confirms his/her email and hits Proceed button, a new modal appears which asks the user to confirm his/her action to delete account.

Final confirmation to delete account

The code snippet which triggers the action to open the modal confirmDeleteUserModal is given below: 

<button {{action openConfirmDeleteUserModal}} class="ui red button {{if isEmailDifferent 'disabled'}}">
   {{t 'Proceed'}}
</button>
   openConfirmDeleteUserModal() {
     this.setProperties({
       'isUserDeleteModalOpen'        : false,
       'confirmEmail'                 : '',
       'isConfirmUserDeleteModalOpen' : true,
       'checked'                      : false
     });
   }

When user clicks the Delete button, it triggers deleteUser function, which finally deletes the user’s account and redirect him/her to index page. 

The code snippet for deleteUser function:

  deleteUser(user) {
     this.set('isLoading', true);
     user.destroyRecord()
       .then(() => {
         this.authManager.logout();
         this.routing.transitionTo('index');
         this.notify.success(this.l10n.t('Your account has been deleted successfully.'));
       })
       .catch(() => {
         this.notify.error(this.l10n.t('An unexpected error has occurred.'));
       })
       .finally(() => {
         this.setProperties({
           'isLoading'                    : false,
           'isConfirmUserDeleteModalOpen' : false,
           'checked'                      : false
         });
       });
   }

To ensure that a user cannot delete his/her account via API call, if he/she is associated with event and/or orders, there is a check on server. 

The code snippet for this check:

if data.get('deleted_at') != user.deleted_at:
    if has_access('is_user_itself', user_id=user.id) or  has_access('is_admin'):
        if data.get('deleted_at'):
             if len(user.events) != 0:
                 raise ForbiddenException({'source': ''},  "Users associated with events cannot  be deleted")
             elif len(user.orders) != 0:
                 raise ForbiddenException({'source': ''}, "Users associated with orders cannot be deleted")
             else:
                 modify_email_for_user_to_be_deleted(user)
        else:
             modify_email_for_user_to_be_restored(user)
             data['email'] = user.email
        user.deleted_at = data.get('deleted_at')
else:
     raise ForbiddenException({'source': ''}, "You are not authorized to update this information.")

The helpers modify_email_for_user_to_be_deleted and modify_email_for_user_to_be_restored used in the above code snippet are responsible to update the email of user before deleting him/her or before restoring him/her respectively.

The helper modify_email_for_user_to_be_deleted updates the email ID of user which is to be deleted. It adds ‘.deleted’ substring to email of a user to be deleted.

The helper modify_email_for_user_to_be_restored updates the email ID of user to be restored. It removes ‘.deleted’ substring from a user to be restored. If the email ID obtained after removing ‘.deleted’ from the email ID, we get an email ID which already exists in the system then an error is raised – This email is already registered! Manually edit and then try restoring

We understand that in today’s era, everyone is a bit sceptical about their data and so we now provide freedom to our user to delete their account whenever they want. 

Resources:

Related work and code repo:

Continue ReadingDeleting a user’s own account in Open Event

Allowing Event Owner to Transfer an event in Eventyay

This blog post will showcase an option which can be used by an event owner to transfer his event to another user in Open Event Frontend. Till the invited user accepts the invitation, the previous owner will have all the rights but as soon as the invited user becomes the new owner of the event the previous owner will cease to have any control over the event.

It is a 2-step process just to ensure that user doesn’t transfers the event accidentally.

The user needs to go to Settings option of the event. The user will get an option to transfer event in the form of a red button along with the following text:

Transfer ownership of this event to another user. You’ll lose all the owner rights once they accept the ownership.
Option to transfer event in Open Event Frontend

When a user clicks on the option to transfer the event, a modal pops up asking the user to confirm the event name. Once user fills in correct event name the Proceed button becomes active.

Modal to confirm event name

The code snippet which triggers the action to open the modal event-transfer-modal is given below:

<button {{action 'openEventTransferModal' model.event.id
model.event.name}} class='ui red button'>
   {{t 'Transfer Ownership'}}
</button>
openEventTransferModal(id, name) {    
    this.setProperties({
       'isEventTransferModalOpen' : true,
       'confirmEventName'         : '',
       'eventId'                  : id,
       'eventName'                : name
     });
 }

The code snippet which takes care of event name confirmation to make Proceed button active:

isNameDifferent  : computed('confirmEventName',  
      'eventName', function() {   
           return this.eventName ? 
           this.confirmEventName.toLowerCase() !==
           this.eventName.toLowerCase() : true;
       })

When user confirms the event name and hits Proceed button, a new modal appears which asks users to fill in the email of the user to whom the event is to be transferred. Also, the user needs to check a checkbox to ensure that he/she agrees to the terms of event transferring.

Final confirmation to transfer the event

The code snippet which triggers the action to open the modal confirm-event-transfer-modal is given below:

<button {{action openConfirmEventTransferModal}} class="ui red button {{if isNameDifferent 'disabled'}}">   
    {{t 'Proceed'}}
</button>
openConfirmEventTransferModal() {     
     const currentInvite =
             this.model.roleInvites.createRecord({});
     let { roles } = this.model;
     for (const role of roles ? roles.toArray() : [])    
     {
         if (role.name === 'owner') {
             currentInvite.set('role', role);
         }
     }
     this.setProperties({
         'isEventTransferModalOpen'        : false,
         'isConfirmEventTransferModalOpen' : true,
         'checked'                         : false,
         currentInvite
     });
   }

When the confirm-event-transfer-modal is to be opened, a new role invite is created and passed to the modal so that when the user fills in the email of the new owner, the role invite is simply updated by a PATCH request. 

When the user fills in email ID and enters Transfer button, the transferEvent() function is called.

async transferEvent() {
     try {
       this.set('isLoading', true);
       this.currentInvite.set('roleName', 'owner');
       await this.currentInvite.save();
       this.setProperties({
         'isConfirmEventTransferModalOpen' : false,
         'checked'                         : false
       });
       this.notify.success(this.l10n.t('Owner Role Invite sent
       successfully.'));
     } catch (error) {
       this.notify.error(this.l10n.t(error.message));
     }
     this.set('isLoading', false);
   }
 }

The transferEvent() function updates the role invited created while opening of confirm-event-transfer-modal and then save() function is called upon the role invite. All the modals are then closed and role invite mail is sent to the new owner. When the new owner clicks on the link in the mail and accepts the invite, event is transferred to him/her and the previous owner is deprived of any control over the event.

Resources:

Related work and code repo:

Continue ReadingAllowing Event Owner to Transfer an event in Eventyay

Rating session in Open Event Frontend

This blog post will showcase an option which can be used by organizers to rate a session in Open Event Frontend. Let’s start by understanding why this feature is important for organizers.

Consider a situation where an event can have hundreds of session submissions. It’ll be hard for organizers/co-organizers to keep track of the session they have already evaluated and which session is better than other. Here, session rating comes to the rescue. After evaluating a particular session, the organizer/co-organizer can simply rate the session out of 5 stars. We have a column Average Rating and No. of ratings which can be used to pick up the top rated sessions and so the organizer/co-organizers need not worry to keep track of evaluated sessions.

We start by adding the three columns – Rating, Average Rating and No. of ratings to session controller along with actions createRating and updateRating to create and update session rating respectively.

Code snippet to add the three mentioned columns to session controller –

@computed()
 get columns() {
   return [
     {
       ...
     },
     {
       name            : 'Rating',
       valuePath       : 'id',
       extraValuePaths : ['rating', 'feedbacks'],
       cellComponent   : 'ui-table/cell/events/view/sessions/cell-rating',
       options         : {
         ratedSessions: this.ratedSessions
       },
       actions: {
         updateRating : this.updateRating.bind(this),
         addRating    : this.addRating.bind(this)
       }
     },
     {
       name            : 'Avg Rating',
       valuePath       : 'averageRating',
       isSortable      : true,
       headerComponent : 'tables/headers/sort'
     },
     {
       name            : 'No. of ratings',
       valuePath       : 'feedbacks.length',
       isSortable      : true,
       headerComponent : 'tables/headers/sort'
     },
     {
       ...
     }
   ];
 }

The code snippet to add the two actions createRating and updateRating to the session controller –

@action
 async updateRating(rating, feedback) {
   try {
     this.set('isLoading', true);
     if (rating) {
       feedback.set('rating', rating);
       await feedback.save();
     } else {
       await feedback.destroyRecord();
     }
     this.notify.success(this.l10n.t('Session feedback has been updated 
                                      successfully.'));
   } catch (error) {
     this.notify.error(this.l10n.t(error.message));
   }
   this.send('refreshRoute');
   this.set('isLoading', false);
 }

The action updateRating in the above code snippet takes rating and the feedback to be updated as parameters. If rating param is 0, the feedback is simply destroyed because it means that user removes his/her feedback from the session.

@action
 async addRating(rating, session_id) {
   try {
     let session =  this.store.peekRecord('session', session_id, { 
                                          backgroundReload: false });
     this.set('isLoading', true);
     let feedback = await this.store.createRecord('feedback', {
       rating,
       session,
       comment : '',
       user    : this.authManager.currentUser
     });
     await feedback.save();
     this.notify.success(this.l10n.t('Session feedback has been created 
                                      successfully.'));
   } catch (error) {
     this.notify.error(this.l10n.t(error.message));
   }
   this.send('refreshRoute');
   this.set('isLoading', false);
 }

And the action addRating takes rating and the id of the session being rated as an input and then create a new feedback record with the info.

Now the main challenge was to retrieve rating corresponding to a session and display it on the frontend. I tackled this by fetching all the feedback related to any session which is itself related to the event. Then I mapped the feedback to the id of the session they were related to.

Code snippet fetching the feedback and mapping them to session id –

let queryObject = {
     include : 'session',
     filter  : [
       {
         name : 'session',
         op   : 'has',
         val  : {
           name : 'event',
           op   : 'has',
           val  : {
             name : 'identifier',
             op   : 'eq',
             val  : store.id
           }
         }
       }
     ]
   };
let feedbacks = await this.authManager.currentUser.query('feedbacks',queryObject);
@mapBy('model.feedbacks', 'session.id') ratedSessions;

Once I got the mapped data as ratedSessions all I needed to do was to check if the id of the session being rendered is in the array ratedSessions or not. If the id was present in the array, it clearly depicts that the session was rated by the user and we can simply display the block of rating to the user.

Code snippet which executed the logic explained above – 

{{#if (includes props.options.ratedSessions record)}}
 {{#each extraRecords.feedbacks as |feedback|}}
   {{#if (eq feedback.user.email authManager.currentUser.email)}}
     {{ui-rating
       initialRating=feedback.rating
       rating=feedback.rating
       maxRating=5
       onRate=(pipe-action (action (mut feedback.rating)) (action 
               props.actions.updateRating feedback.rating feedback))
       clearable=true}}
   {{/if}}
 {{/each}}
{{else}}
 {{ui-rating
   initialRating=0
   rating=extraRecords.rating
   maxRating=5
   onRate=(pipe-action (action (mut extraRecords.rating)) (action 
           props.actions.addRating extraRecords.rating record))
   clearable=true}}
{{/if}}

The helper includes simply tells us if the first parameter passed contains the second parameter or not and pipe-action helps us to perform multiple action on a single click.

I used ui-rating module of semantic UI for implementing this feature. Whenever user added/updated the rating, at first the feedback.rating is mutated and then the relevant action is called. To ensure that duplicate entries of feedback doesn’t exist in the db I added unique constraint for the table feedback on user_id and session_id columns.

Resources:

Related work and code repo:

Continue ReadingRating session in Open Event Frontend

Allow organizers to lock/unlock a session in Open Event Frontend

This blog post will showcase an option which can be used by organizers to lock/unlock a session in Open Event Frontend. Let’s start by understanding what this feature means and why is it important for organizers. If a session is locked by an organizer, it cannot be edited by the session creator. 

Suppose an event organizer wants final session submission by a particular date so that he/she can shortlist the sessions based on final submission, but the user goes on editing the session event after final date of submission. This is a situation where this feature will help the organizer to prohibit the user from further modification of session.

If a session is unlocked, then unlock icon is shown:

Unlocked Session

However, if a session is locked, lock icon is shown:

Locked Session

Snippet to toggle locked/unlocked icon:

{{#if record.isLocked}}
  {{#ui-popup content=(t 'Unlock Session') class='ui basic Button' click=(action unlockSession record) position='left center'}}
    <i class="lock icon"></i>   
  {{/ui-popup}}
{{else}}
  {{#ui-popup content=(t 'Lock Session') class='ui basic Button' click=(action lockSession record) position='left center'}}
    <i class="unlock icon"></i>   
  {{/ui-popup}}
{{/if}}

On clicking these icon buttons, corresponding action is triggered which updates the status of is-locked attribute of the session. When an organizer clicks on lock icon button, unlockSession action is triggered which sets is-locked property of session to false. However if unlock icon button is clicked, lockSession action is triggered which sets the is-locked property of session to true.

Snippet to lock a session:

lockSession(session) {
     session.set('isLocked', true);
     this.set('isLoading', true);
     session.save()
       .then(() => {
         this.notify.success(this.l10n.t('Session has been locked successfully.'));
         this.send('refreshRoute');
       })
       .catch(() => {
         this.notify.error(this.l10n.t('An unexpected error has occurred.'));
       })
       .finally(() => {
         this.set('isLoading', false);
       });
   }

Snippet to unlock a session:

unlockSession(session) {
     session.set('isLocked', false);
     this.set('isLoading', true);
     session.save()
       .then(() => {
         this.notify.success(this.l10n.t('Session has been unlocked successfully.'));
         this.send('refreshRoute');
       })
       .catch(() => {
         this.notify.error(this.l10n.t('An unexpected error has occurred.'));
       })
       .finally(() => {
         this.set('isLoading', false);
       });
   }

These changes required few server checks so that only a person with admin or organizer access can update the value of is-locked attribute of session. Also, any try to edit a locked session via API call must be rejected.

Server checks related to locking/unlocking a session:

def before_update_object(self, session, data, view_kwargs):
       """
       before update method to verify if session is locked before updating
       session object
       :param event:
       :param data:
       :param view_kwargs:
       :return:
       """
       if data.get('is_locked') != session.is_locked:
           if not (has_access('is_admin') or has_access('is_organizer')):
               raise ForbiddenException({'source': '/data/attributes/is-locked'}, "You don't have enough permissions to change this property")

       if session.is_locked and data.get('is_locked') == session.is_locked:
           raise ForbiddenException({'source': '/data/attributes/is-locked'}, "Locked sessions cannot be edited")

Resources:

Related work and code repo:

Continue ReadingAllow organizers to lock/unlock a session in Open Event Frontend