Implementing Render Route & Security Checks for Attendee Tickets

This blog post explains the requirements & implementation details of a secure route over which the tickets could be served in the Open Event Project (Eventyay). Eventyay is the Open Event management solution using standardized event formats developed at FOSSASIA. Sometimes, tickets of a user can be utilized in the process of fraudulent actions. To prevent this, security is of the utmost importance. Prior to this feature, anonymous/unauthorized users were able to access the tickets which belonged to another user with a simple link. There was no provision of any authentication check.  An additional problem with the tickets were the storage methodology where the tickets were stored in a top-level folder which was not protected. Therefore, there was a necessity to implement a flask route which could check if the user was authenticated, the ticket belonged to the authorized user/admin/organizer of the event and provide proper exceptions in other cases.  
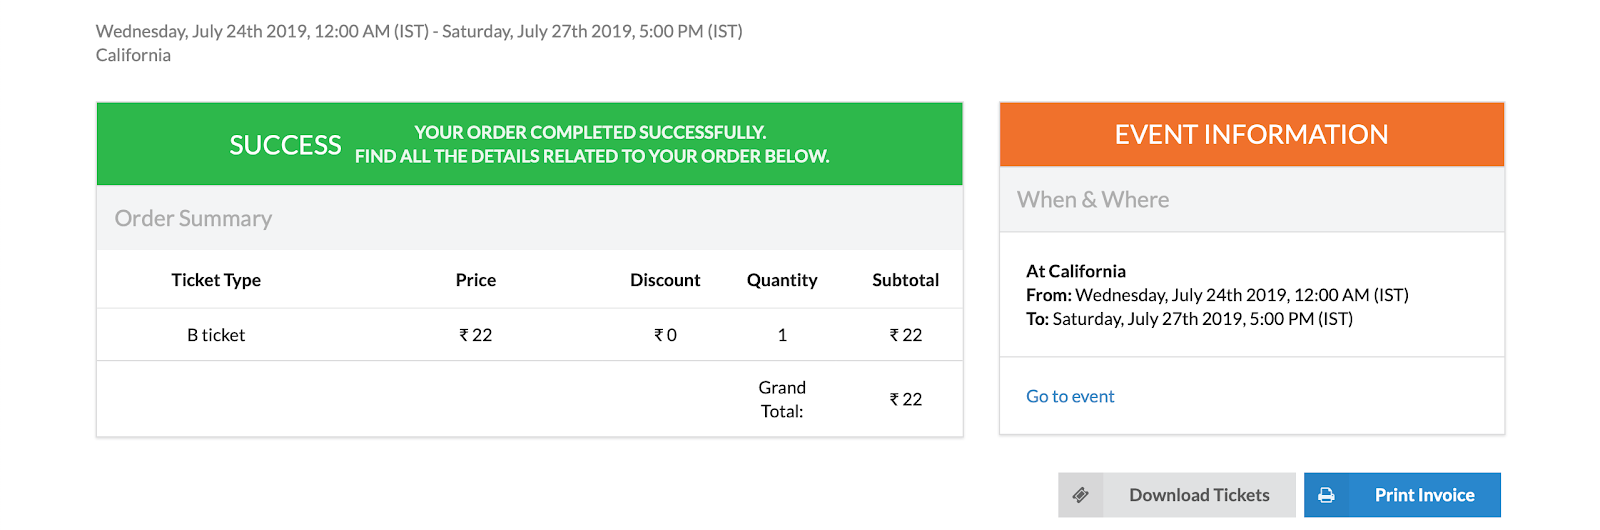
Ticket completion page with option to download tickets When the user places an order and it goes through successfully,the ticket is generated, stored in a protected folder and the user is redirected to the order completion page where they would be able to download their tickets. When the user clicks on the Download Tickets Button, the ticket_blueprint route is triggered. @ticket_blueprint.route('/tickets/<string:order_identifier>') @jwt_required def ticket_attendee_authorized(order_identifier): if current_user: try: order = Order.query.filter_by(identifier=order_identifier).first() except NoResultFound: return NotFoundError({'source': ''}, 'This ticket is not associated with any order').respond() if current_user.can_download_tickets(order): key = UPLOAD_PATHS['pdf']['tickets_all'].format(identifier=order_identifier) file_path = '../generated/tickets/{}/{}/'.format(key, generate_hash(key)) + order_identifier + '.pdf' try: return return_file('ticket', file_path, order_identifier) except FileNotFoundError: create_pdf_tickets_for_holder(order) return return_file('ticket', file_path, order_identifier) else: return ForbiddenError({'source': ''}, 'Unauthorized Access').respond() else: return ForbiddenError({'source': ''}, 'Authentication Required to access ticket').respond()                          tickets_route - the logic pertaining to security module for attendee tickets The function associated with the ticket downloads queries the Order model using the order identifier as a key. Then, it checks if the current authenticated user is either a staff member, the owner of the ticket or the organizer of the ticket. If it passes this check, the file path is generated and tickets are downloaded using the return_tickets function. In the return_tickets function, we utilize the send_file function imported from Flask and wrap it with flask’s make_response function. In addition to that, we attach headers to specify that it is an attachment and add an appropriate name to it. def return_file(file_name_prefix, file_path, identifier): response = make_response(send_file(file_path)) response.headers['Content-Disposition'] = 'attachment; filename=%s-%s.pdf' % (file_name_prefix, identifier) return response return_tickets function - sends the file as a make_response with appropriate headers When it comes to exception handling, at each stage whenever a ticket is not to be found while querying or the authentication check fails, a proper exception is thrown to the user. For example, at the step where an attempt is made to return the file using file path after authentication, if the tickets are NotFound, the tickets are generated on the fly.  def can_download_tickets(self, order): permissible_users = [holder.id for holder in order.ticket_holders] + [order.user.id] if self.is_staff or self.has_event_access(order.event.id) or self.id in permissible_users: return True return False can_download_tickets…

Continue ReadingImplementing Render Route & Security Checks for Attendee Tickets

Creating SMTP as a Fallback Function to Ensure Emails Work

This blog post explains the solution to scenarios pertaining to failure/ unavailability of Sendgrid service when an attempt is made to send emails in Eventyay. Eventyay is the outstanding Open Event management solution using standardized event formats developed at FOSSASIA. Currently, the Open Event Project utilizes 2 protocols namely, SendGrid and SMTP. Previously, they could be configured only be configured individually. If either protocol failed, there was no provision for a backup and the task to send the email would fail.  Therefore, there was a necessity to develop a feature where the SMTP protocol, which is usually more reliable than 3rd party services, could act as a backup when sendgrid server is unavailable or the allotted quota has been exceeded. def check_smtp_config(smtp_encryption): """ Checks config of SMTP """ config = { 'host': get_settings()['smtp_host'], 'username': get_settings()['smtp_username'], 'password': get_settings()['smtp_password'], 'encryption': smtp_encryption, 'port': get_settings()['smtp_port'], } for field in config: if field is None: return False return True   Function to check if SMTP has been properly configured The main principle which was followed to implement this feature was to prevent sending emails when SMTP is not configured. Ergo, a function was implemented to check if the host, username, password, encryption and port was present in the model before proceeding. If this was configured properly, we move on to determining the protocol which was enabled. For this, we have 2 separate celery tasks, one for SMTP and the other for Sendgrid.  @celery.task(name='send.email.post.sendgrid') def send_email_task_sendgrid(payload, headers, smtp_config): try: message = Mail(from_email=From(payload['from'], payload['fromname']), to_emails=payload['to'], subject=payload['subject'], html_content=payload["html"]) if payload['attachments'] is not None: for attachment in payload['attachments']: with open(attachment, 'rb') as f: file_data = f.read() f.close() encoded = base64.b64encode(file_data).decode() attachment = Attachment() attachment.file_content = FileContent(encoded) attachment.file_type = FileType('application/pdf') attachment.file_name = FileName(payload['to']) attachment.disposition = Disposition('attachment') message.add_attachment(attachment) sendgrid_client = SendGridAPIClient(get_settings()['sendgrid_key']) logging.info('Sending an email regarding {} on behalf of {}'.format(payload["subject"], payload["from"])) sendgrid_client.send(message) logging.info('Email sent successfully') except urllib.error.HTTPError as e: if e.code == 429: logging.warning("Sendgrid quota has exceeded") send_email_task_smtp.delay(payload=payload, headers=None, smtp_config=smtp_config) elif e.code == 554: empty_attachments_send(sendgrid_client, message) else: logging.exception("The following error has occurred with sendgrid-{}".format(str(e))) @celery.task(name='send.email.post.smtp') def send_email_task_smtp(payload, smtp_config, headers=None): mailer_config = { 'transport': { 'use': 'smtp', 'host': smtp_config['host'], 'username': smtp_config['username'], 'password': smtp_config['password'], 'tls': smtp_config['encryption'], 'port': smtp_config['port'] } } try: mailer = Mailer(mailer_config) mailer.start() message = Message(author=payload['from'], to=payload['to']) message.subject = payload['subject'] message.plain = strip_tags(payload['html']) message.rich = payload['html'] if payload['attachments'] is not None: for attachment in payload['attachments']: message.attach(name=attachment) mailer.send(message) logging.info('Message sent via SMTP') except urllib.error.HTTPError as e: if e.code == 554: empty_attachments_send(mailer, message) mailer.stop() Falling back to SMTP when the system has exceeded the sendgrid quota Consider the function associated with the sendgrid task. The logic which sends the emails along with the payload is present in a try/catch block. When an exception occurs while attempting to send the email, it is caught via the requests library and checks for the HTTP code. If the code is determined as 429, this implies that there were TOO_MANY_REQUESTS going through or otherwise in sendgrid lingo, it means that you’ve exceeded your quota. In this case, we will not stop sending the email, rather, we would alternate…

Continue ReadingCreating SMTP as a Fallback Function to Ensure Emails Work

Workflow of Admin Translations downloads as ZIP

This blog post emphasizes on the feature of translation archiving and download routes. The Open Event Project, popularly known as Eventyay is an event management solution which provides a robust platform to manage events, schedules multi-track sessions and supports many other features. Prior to the actual implementation of this feature, a blueprint had to be registered in the flask app which handles the archiving and downloads logic for the translations. In addition, as this is only specific for administrators, the route had to be secured with access control. The access is controlled with the help of the is_admin decorator which checks if the user attempting to access the route is an admin.  from flask import send_file, Blueprint import shutil import uuid import tempfile import os from app.api.helpers.permissions import is_admin admin_blueprint = Blueprint('admin_blueprint', __name__, url_prefix='/v1/admin/content/translations/all') temp_dir = tempfile.gettempdir() translations_dir = 'app/translations' @admin_blueprint.route('/', methods=['GET']) @is_admin def download_translations(): """Admin Translations Downloads""" uuid_literal = uuid.uuid4() zip_file = "translations{}".format(uuid_literal) zip_file_ext = zip_file+'.zip' shutil.make_archive(zip_file, "zip", translations_dir) shutil.move(zip_file_ext, temp_dir) path_to_zip = os.path.join(temp_dir, zip_file_ext) from .helpers.tasks import delete_translations delete_translations.apply_async(kwargs={'zip_file_path': path_to_zip}, countdown=600) return send_file(path_to_zip, mimetype='application/zip', as_attachment=True, attachment_filename='translations.zip')                                                          Code Snippet - Translations archiving We utilize the shutil library to create archives of the specified directory which is the translations directory here. The directory file path which is to be archived must point to the folder with sub-directories of various language translations. We append a unique name generated by the UUID(Universally Unique Identifier) to the generated translations zip file. Also observe that the translations archive is saved to the temp folder. This is because the zip archive needs to be deleted after a certain amount of time. This time window mustn’t be too bounded as there might be multiple admins who might want to access these translations at the same time. Therefore, it is saved in the temp folder for 10 mins. import Controller from '@ember/controller'; import { action } from '@ember/object'; export default class extends Controller { isLoading = false; @action async translationsDownload() { this.set('isLoading', true); try { const result = this.loader.downloadFile('/admin/content/translations/all/'); const anchor = document.createElement('a'); anchor.style.display = 'none'; anchor.href = URL.createObjectURL(new Blob([result], { type: 'octet/stream' })); anchor.download = 'Translations.zip'; anchor.click(); this.notify.success(this.l10n.t('Translations Zip generated successfully.')); } catch (e) { console.warn(e); this.notify.error(this.l10n.t('Unexpected error occurred.')); } this.set('isLoading', false); } }                                            Code Snippet - Frontend logic for anchor downloads To make this work on all browsers, the frontend part handles the downloads via an action in the controller. The action translationsDownload is linked to the download button which uses the download method in the loader service to hit the specific route and fetch the resource intuitively. This is stored in a constant result. After this, an HTML anchor is created explicitly and its attribute values are updated. The href of the anchor is set to the result of the resource fetched using the loader service with a Blob.  Then a click action is triggered to download this file. As the loader service returns a Promise, we use an async function as the action to resolve it. In cases of failures, the notify service…

Continue ReadingWorkflow of Admin Translations downloads as ZIP

Implementation of Organizer Invoicing in Open Event

This blog post emphasizes on the workflow of event invoicing for organizers in Open Event. The Open Event Project, popularly known as Eventyay is an event management solution which provides a robust platform to manage events, schedules multi-track sessions and supports many other features. Organizer invoicing in layman terms is the fee paid by an organizer for hosting an event on the platform. This is calculated every month and respective emails/notifications are sent to the user. An event invoice in the form a PDF is generated monthly based on the sales generated. The organizer can pay the invoice via a credit/debit card through PayPal. This feature was divided into a set of sub-features namely: Integration of ember tables for event invoicesImplementing the review route & corresponding logicCreating a compatible paypal component to work with invoice workflowCreation of a payment completion page on successful invoice payments Navigating to Account > Billing Info > Invoices, we are presented with a table of all the invoices which are due, paid & upcoming. You can review your due invoices and pay them. Adding to that, you can also view any past invoices which were paid or the upcoming ones which would have a draft status with the information about the current sales.                                                           Event Invoice Overview - Organizers For an invoice which is due, an organizer will be able to navigate to the review route by clicking on the Review Payment Action. In this route, details pertaining to Admin billing details, User billing details, total number of tickets sold and total invoice amount will be depicted. The Organizer can have a look at the total invoice amount here.                                               Review Route - Invoice Payment The Invoice details and Billing Info components were built using ui segments.  After reviewing the information, the organizer can click on pay via PayPal to initiate the transaction process via PayPal. The challenge here was the lack of proper API routing(sandbox/live) present in the system. To overcome this, the env variable in the PayPal component was given the value of the current environment enabled. def send_monthly_event_invoice(): from app import current_app as app with app.app_context(): events = Event.query.filter_by(deleted_at=None, state='published').all() for event in events: # calculate net & gross revenues user = event.owner admin_info = get_settings() currency = event.payment_currency ticket_fee_object = db.session.query(TicketFees).filter_by(currency=currency).one() ticket_fee_percentage = ticket_fee_object.service_fee ticket_fee_maximum = ticket_fee_object.maximum_fee orders = Order.query.filter_by(event=event).all() gross_revenue = event.calc_monthly_revenue() ticket_fees = event.tickets_sold * (ticket_fee_percentage / 100) if ticket_fees > ticket_fee_maximum: ticket_fees = ticket_fee_maximum net_revenue = gross_revenue - ticket_fees payment_details = { 'tickets_sold': event.tickets_sold, 'gross_revenue': gross_revenue, 'net_revenue': net_revenue, 'amount_payable': ticket_fees } # save invoice as pdf pdf = create_save_pdf(render_template('pdf/event_invoice.html', orders=orders, user=user, admin_info=admin_info, currency=currency, event=event, ticket_fee_object=ticket_fee_object, payment_details=payment_details, net_revenue=net_revenue), UPLOAD_PATHS['pdf']['event_invoice'], dir_path='/static/uploads/pdf/event_invoices/', identifier=event.identifier) # save event_invoice info to DB event_invoice = EventInvoice(amount=net_revenue, invoice_pdf_url=pdf, event_id=event.id) save_to_db(event_invoice)                                 Invoice generation and calculation logic as a cron job The event invoice PDFs along with the amount calculation was done on the server side by taking the product of the number of tickets multiplied by eventyay fees. The invoice generation, amount calculation and the task of marking invoices…

Continue ReadingImplementation of Organizer Invoicing in Open Event

Implementation of Event Invoice view using Ember Tables

This blog post emphasizes the power of ember tables and how it was leveraged to implement the event invoice view for eventyay. Event Invoices can be defined as the fee given by the organizer for hosting the event on the platform.  Eventyay is the outstanding Open Event management solution using standardized event formats developed at FOSSASIA. Porting from v1 to v2, event invoices are an integral part in the process.  Initially, throughout the whole project, plain HTML tables were utilized to render data pertaining to sales, tickets info etc. This in turn made the task of rendering data a cumbersome one. To implement clean & ubiquitous tables with in-built search & pagination functionalities, the ember addon ember-table has been used in Eventyay v2. To integrate ember tables, the HTML tables had to be replaced with the ember-table component which was created in the Open Event Project.  To utilize this component, column names for upcoming, paid and due invoices are required. These are stored in Plain Old Javascript Objects (POJOs) in the controller logic passed to the appropriate ember-table component. In the template logic, we check for the params i.e invoice status in this case and render the ember table through a component. Certain parameters such as the searchQuery, metaData, filterOptions etc. were to be passed in for total control of the table. @computed() get columns() { let columns = []; if (this.model.params.invoice_status === 'upcoming') { columns = [ { name : 'Invoice ID', valuePath : 'identifier' }, { name : 'Event Name', valuePath : 'event', cellComponent : 'ui-table/cell/events/cell-event-invoice' }, { name : 'Date Issued', valuePath : 'createdAt' }, { name : 'Outstanding Amount', valuePath : 'amount', extraValuePaths : ['event'], cellComponent : 'ui-table/cell/events/cell-amount' }, { name : 'View Invoice', valuePath : 'invoicePdfUrl' } ]; } else if (this.model.params.invoice_status === 'paid') { columns = [ { name : 'Invoice ID', valuePath : 'identifier' }, { name : 'Event Name', valuePath : 'event', cellComponent : 'ui-table/cell/events/cell-event-invoice' }, { name : 'Date Issued', valuePath : 'createdAt' }, { name : 'Amount', valuePath : 'amount', extraValuePaths : ['event'], cellComponent : 'ui-table/cell/events/cell-amount' }, { name : 'Date Paid', valuePath : 'completedAt' }, { name : 'View Invoice', valuePath : 'invoicePdfUrl' }, { name : 'Action', valuePath : 'identifier', extraValuePaths : ['status'], cellComponent : 'ui-table/cell/events/cell-action' } ]; } else if (this.model.params.invoice_status === 'due') { columns = [ { name : 'Invoice ID', valuePath : 'identifier' }, { name : 'Event Name', valuePath : 'event', cellComponent : 'ui-table/cell/events/cell-event-invoice' }, { name : 'Date Issued', valuePath : 'createdAt' }, { name : 'Amount Due', valuePath : 'amount', extraValuePaths : ['event'], cellComponent : 'ui-table/cell/events/cell-amount' }, { name : 'View Invoice', valuePath : 'invoicePdfUrl' }, { name : 'Action', valuePath : 'identifier', extraValuePaths : ['status'], cellComponent : 'ui-table/cell/events/cell-action' } ]; } else if (this.model.params.invoice_status === 'all') { columns = [ { name : 'Invoice ID', valuePath : 'identifier' }, { name : 'Event Name', valuePath : 'event', cellComponent : 'ui-table/cell/events/cell-event-invoice' }, { name : 'Amount', valuePath : 'amount', extraValuePaths : ['event'],…

Continue ReadingImplementation of Event Invoice view using Ember Tables

Implementation of Donation Tickets in Open Event

Implementation of donation tickets in Open Event Project This blog post explains the implementation details of donation tickets in the Open Event Project (Eventyay). Eventyay is the Open Event management solution which allows users to buy & sell tickets, organize events & promote their brand. This was developed at FOSSASIA.  Prior to the integration of this feature, the organizer had the option to provide only paid and free tickets. These tickets had a fixed price and therefore, imbibing and integrating this into the system was relatively easier. The biggest challenge in the implementation of donation tickets was variable prices. The subtotal, total and validation checks had to updated dynamically and shouldn’t be breaking any of the previous features.   The organizer requires an option to add donation tickets when they create/edit an event by specifying the appropriate minimum price, maximum price and quantity.                          Organizer View - Donation Tickets To integrate these features pertaining to donation tickets, fields for minimum and maximum prices had to be introduced into the tickets model. The maximum & minimum prices for free and paid tickets would be the same as the normal price but it’s variant for donations. isDonationPriceValid: computed('donationTickets.@each.orderQuantity', 'donationTickets.@each.price', function() { for (const donationTicket of this.donationTickets) { if (donationTicket.orderQuantity > 0) { if (donationTicket.price < donationTicket.minPrice || donationTicket.price > donationTicket.maxPrice) { return false; } } } return true; }) Check for valid donation price To validate the minimum and maximum prices, ember validations have been implemented which checks whether the min price is lesser than or equal to the max  price to ensure a proper flow. Also, in addition to front-end validations, server side checks have also been implemented to ensure that incorrect data does now propagate through the server. In addition to that, these checks also had to be integrated in the pre-existing shouldDisableOrderButton computed property. Therefore, if the order has invalid donation tickets, the order button would be disabled. For the public event page, the donation tickets segment have a section which specifies the price range in which the price must lie in. If the user enters a price out of the valid range, a validation error occurs. The way in which these validation rules have been implemented was the biggest challenge in this feature as multiple sets of donation tickets might be present. As each set of donation tickets have a different price range, these validation rules had to be generated dynamically using semantic ui validations donationTicketsValidation: computed('donationTickets.@each.id', 'donationTickets.@each.minPrice', 'donationTickets.@each.maxPrice', function() { const validationRules = {}; for (let donationTicket of this.donationTickets) { validationRules[donationTicket.id] = { identifier : donationTicket.id, optional : true, rules : [ { type : `integer[${donationTicket.minPrice}..${donationTicket.maxPrice}]`, prompt : this.l10n.t(`Please enter a donation amount between ${donationTicket.minPrice} and ${donationTicket.maxPrice}`) } ] }; } return validationRules; }) Dynamic validation rule generation for donation tickets Each donation ticket had to be looped through to add a validation rule corresponding to the donation ticket’s ID. These rules were then returned from a computed property. Resources: Semantic UI forms docsEmber guides Related work…

Continue ReadingImplementation of Donation Tickets in Open Event

Integration of AliPay Payment Gateway using Stripe Sources

Integration of AliPay Payment Gateway using Stripe Sources This blog post explains the process of how Stripe Sources has been leveraged to integrate AliPay to extend the payment options in China. Stripe provides a plethora of payment options configurable with Sources.  Source objects allow you to accept a variety of payment methods with a single API. A source represents a customer’s payment instrument, and can be used with the Stripe API to create payments. Sources can be charged directly, or attached to customers for later reuse. Alipay is a push-based, single-use and synchronous method of payment. This means that your customer takes action to authorize the push of funds through a redirect. There is immediate confirmation about the success or failure of a payment.    Workflow of Alipay on the backend During the payment process, a Source API object is created and your customer is redirected to AliPay for authorization. Payment Flow Create a Source Object with the parameters currency, redirect_url and amount.Create a page for completion of customer authorization by specifying the redirect_url.Change the source status from pending to chargeable.Confirm the payment by redirecting to the confirmation page and process the refund for any unsuccessful payments(if deducted) Configuration Manager Initially, we define a class named as AliPayPaymentsManager which handles the configuration of API keys and has methods to create source objects and make them chargeable. class AliPayPaymentsManager(object): """ Class to manage AliPay Payments """ @staticmethod def create_source(amount, currency, redirect_return_uri): stripe.api_key = get_settings()['alipay_publishable_key'] response = stripe.Source.create(type='alipay', currency=currency, amount=amount, redirect={ 'return_url': redirect_return_uri } ) return response @staticmethod def charge_source(order_identifier): order = safe_query(db, Order, 'identifier', order_identifier, 'identifier') stripe.api_key = get_settings()['alipay_secret_key'] charge = stripe.Charge.create( amount=int(order.amount), currency=order.event.payment_currency, source=order.order_notes, ) return charge                 Methods to create & charge the source The challenge of charging the source & redirection After creating the source object, we need to make the source object chargeable. For this purpose, the user must be redirected to the external AliPay payment gateway page where the source object is authorized and its status is changed to chargeable. The main challenge to overcome here was the method in which the redirect link was attached to the object. The parameter _external is really crucial for this process as Flask would only recognize the url as an external url if this parameter is passed to url_for. @alipay_blueprint.route('/create_source/<string:order_identifier>', methods=['GET', 'POST']) def create_source(order_identifier): """ Create a source object for alipay payments. :param order_identifier: :return: The alipay redirection link. """ try: order = safe_query(db, Order, 'identifier', order_identifier, 'identifier') source_object = AliPayPaymentsManager.create_source(amount=int(order.amount), currency='usd', redirect_return_uri=url_for('alipay_blueprint.alipay_return_uri', order_identifier=order.identifier, _external=True)) order.order_notes = source_object.id save_to_db(order) return jsonify(link=source_object.redirect['url']) except TypeError: return BadRequestError({'source': ''}, 'Source creation error').respond() Route which creates the source and returns external redirection url After the source object is created, the status changes to pending. To charge the user, the source object must become chargeable. For this, we need to redirect the user to an external page where the payment can be authorized and the source object can become chargeable. External Authorization Page for AliPay After authorizing…

Continue ReadingIntegration of AliPay Payment Gateway using Stripe Sources