Writing Installation Script for Github Projects

I would like to discuss how to write a bash script to setup any github project and in particular PHP and mysql project. I would like take the example of engelsystem for this post.

First, we need to make a list of all environments and dependencies for our github project. For PHP and mysql project we need to install LAMP server.

The script to install all the dependencies for engelsystem are

echo "Update your package manager"
apt-get update

echo "Installing LAMP"
echo "Install Apache"
apt-get install apache2

echo "Install MySQL"
apt-get install mysql-server php5-mysql

echo "Install PHP"
apt-get install php5 libapache2-mod-php5 php5-mcrypt

echo "Install php cgi"
apt-cache search php5-cgi

We can even add echo statements with instructions.

Once we have installed LAMP. We need to clone the project from github. We need to install git and clone the repository. Script for installing git and cloning github repository are

echo "Install git"
apt-get install git
cd /var/www/html
echo "Cloning the github repository"
git clone --recursive https://github.com/fossasia/engelsystem.git
cd engelsystem

Now we are in the project directory. Now we need to set up the database and migrate the tables. We are creating a database engelsystem and migrating the tables in install.sql and update.sql.

echo "enter mysql root password"
# creating new database engelsystem
echo "create database engelsystem" | mysql -u root -p
echo "migrate the table to engelsystem database"
mysql -u root -p engelsystem < db/install.sql
mysql -u root -p engelsystem < db/update.sql

Once we are done with it. We need to copy config-sample.default.php to config.php and add the database and password for mysql.

echo "enter the database name username and password"
cp config/config-sample.default.php config/config.php

Now edit the config.php file. Once we have done this we need to restart apache then we can view the login page at localhost/engelsystem/public

echo "Restarting Apache"
service apache2 restart
echo "Engelsystem is successfully installed and can be viewed on local server localhost/engelsystem/public"

We need to add all these instructions in install.sh file.

Now steps to execute a bash file.

Change the permissions of install.sh file

$ chmod +x install.sh

Now run the file from your terminal by executing the following command

$ ./install.sh

Developers who are interested in contributing can work with us.

Development: https://github.com/fossasia/engelsystem

Issues/Bugs:https://github.com/fossasia/engelsystem/issues

Continue ReadingWriting Installation Script for Github Projects

Implementing MVC on Engelsystem

Engelsystem is an MVC based PHP application, but there was a 4th ties, Pages, introduced with the traditional MVC pattern. It seems to have everything an event manager could want.

The Model-View-Control (MVC) pattern, originally formulated in the late 1970s, is a software architecture pattern built on the basis of keeping the presentation of data separate from the methods that interact with the data. In theory, a well-developed MVC system should allow a front-end developer and a back-end developer to work on the same system without interfering, sharing, or editing files either party is working on.

Like everything else in software engineering, it seems, the concept of Model-View-Controller was originally invented bySmalltalk programmers. More specifically, it was invented by one Smalltalk programmer, Trygve Reenskaug. Trygve maintains a page that explains the history of MVC in his own words.

Block Diagram for MVC
                                                                  Block Diagram for MVC


The components of an MVC pattern are explained as follows:

  1. MODEL: The Model is the name given to the permanent storage of the data used in the overall design.
    Models represent knowledge. A model could be a single object (rather uninteresting), or it could be some structure of objects.
  2. VIEW: The View is where data, requested from the Model, is viewed and its final output is determined. A view is a (visual) representation of its model. It would ordinarily highlight certain attributes of the model and suppress others. It is thus acting as a presentation filter.
    Traditionally in web apps built using MVC, the View is the part of the system where the HTML is generated and displayed. The View also ignites reactions from the user, who then goes on to interact with the Controller.
  3. CONTROLLER: The final component of the triad is the Controller.A controller is the link between a user and the system. It provides the user with input by arranging for relevant views to present themselves in appropriate places on the screen.
    Its job is to handle data that the user inputs or submits, and update the Model accordingly. The Controller’s life blood is the user; without user interactions, the Controller has no purpose.


Even though MVC was originally designed for personal computing, it has been adapted and is widely being used by web developers due to its emphasis on separation of concerns, and thus indirectly, reusable code. The pattern encourages the development of modular systems, allowing developers to quickly update, add, or even remove functionality.

layercake


Initially, in Engelsystem there were files distributed in 4 tiers, Model, View, Controller, Pages, which are mentioned as follows:

Pages:

admin_active.php
admin_arrive.php
admin_export.php
admin_free.php
admin_groups.php
admin_import.php
admin_log.php
admin_news.php
admin_questions.php
admin_rooms.php
admin_settings.php
admin_shifts.php
admin_user.php
guest_credits.php
guest_login.php
guest_start.php
guest_stats.php
user_atom.php
user_ical.php
user_messages.php
user_myshifts.php
user_news.php
user_questions.php
user_settings.php
user_shifts.php

Model:

AngelType_model.php
LogEntries_model.php
Message_model.php
NeededAngelTypes_model.php
Room_model.php
Settings_model.php
ShiftEntry_model.php
ShiftTypes_model.php
Shifts_model.php
UserAngelTypes_model.php
UserDriverLicenses.model.php
User_model.php

Controller

angeltype_controller.php
rooms_controller.php
shifts_controller.php
shifttypes_controller.php
user_angeltypes_controller.php
user_driver_licenses_controller.php
user_controller.php

View

AngelTypes_view.php
Questions_view.php
Rooms_view.php
ShiftEntry_view.php
ShiftTypes_view.php
Shifts_view.php
UserAngelTypes_view.php
UserDriverLicenses_view.php
User_view.php


There were 26 Pages files, in which there were both sql queries along with the controller code. All these files were refactured into Controller and Model(which contains sql queries) files seperately to implement proper MVC pattern in Engelsystem.


We are developing new feature for Engelsystem and we will be applying this WordPress like update system toEngelsystem in the upcoming weeks. Developers who are interested in contributing can work with us.

Development: https://github.com/fossasia/engelsystem             Issues/Bugs:https://github.com/fossasia/engelsystem/issues

Continue ReadingImplementing MVC on Engelsystem

Read and Understand Codacy Reports

To begin understanding reports, let’s start with what Codacy is.

So. What is Codacy?

Codacy is an automated code review tool that helps developers to save time in code reviews and to tackle technical debt. It centralises customizable code patterns and enforces them within engineering teams. Codacy tracks new issues by severity level for every commit and pull request.

It can be integrated with the GitHub repository to review every commit and pull request in terms of quality and errors. It checks code style, security, duplication, complexity and coverage on every change while tracking code quality throughout your sprints.

You can integrate Codacy in your private/public repository by going here. Sign up with your Github account and follow the steps mentioned. More information regarding GitHub integration can be found here.

Features of Codacy:

  • SAVE TIME IN CODE REVIEWS
  • INTEGRATED IN YOUR WORKFLOW
  • TRACK YOUR PROJECT QUALITY EVOLUTION

Now we get to understanding Codacy reports.

Below shows and image of how a Codacy dashboard looks like, to evaluate a project. To evaluate a project we should know what are the Software Metrics”.

download

A software metric is a standard of measure of a degree to which a software system or process possesses some property. Even if a metric is not a measurement (metrics are functions, while measurements are the numbers obtained by the application of metrics), often the two terms are used as synonymous. Since quantitative measurements are essential in all sciences, there is a continuous effort by computer science practitioners and theoreticians to bring similar approaches to software development. The goal is obtaining objective, reproducible and quantifiable measurements, which may have numerous valuable applications in the schedule and budget planning, cost estimation, quality assurance testing, software debugging, software performance optimization, and optimal personnel task assignments. You can learn about software metrics by visiting here.

A Codacy Dashboard provides answer to the following 3 main things:

  • What is the state of your projects code quality?
  • How is it evolving throughout time?
  • What are the hotspots in your code?

Component of the Dashboard:

  • Introduction: The Dashboard is the central screen of any project on Codacy.
  • Project Certification: After running a complete on the project or the GitHub repository, Codacy provides an overall grade to the project from A-F. The grade depends on the following parameters.
    • Error Prone
    • Code Complexity
    • Code Style
    • Unused Code
    • Security
    • Compatibility
    • Documentation
    • Performancedashboard-certification
  • Issues Breakdown: Issues breakdown represents the different issues from different areas in a pictorial representation. It provides a quick overview of the total number of issues in the repository and the breakdown per category.
    Issues Brakedown
    Users can click on the specific category for more details.
  • Code Coverage: If you setup the code coverage on your repository, you will be able to see the overall covered percentage on the dashboard. It will also show the files with the worst code coverage allowing you to directly jump to the file to see the details.
    Coverage
  • Goals: Users can define individual goals to remove errors and get better grades for their projects.
  • Historic data: Codacy dashboard also provides an analysis of the Historic data, so as to keep a track of the progress on improving the code, milestones covered in reaching the goal.
    dashboard-historic-issues

Codacy provides a nice dashboard showing the metrics. Codacy saves hours in code review and code quality monitoring, from small teams to big companies. And as the Codacy team itself says “LOVED BY DEVELOPERS”, being a developer I wouldn’t deny this statement. It helped a lot in improving the code quality of my project Engelsystem.

Development: https://github.com/fossasia/engelsystem Issues/Bugs:https://github.com/fossasia/engelsystem/issues

Continue ReadingRead and Understand Codacy Reports

Continuous Integration and Automated Testing for Engelsystem

Every software development group tests its products, yet delivered software always has defects. Test engineers strive to catch them before the product is released but they always creep in and they often reappear, even with the best manual testing processes. Using automated testing is the best way to increase the effectiveness, efficiency and coverage of your software testing.

Manual software testing is performed by a human sitting in front of a computer carefully going through application screens, trying various usage and input combinations, comparing the results to the expected behavior and recording their observations. Manual tests are repeated often during development cycles for source code changes and other situations like multiple operating environments and hardware configurations.

Continuous integration (CI) has emerged as one of the most efficient ways to develop code. But testing has not always been a major part of the CI conversation.

In some respects, that’s not surprising. Traditionally, CI has been all about speeding up the coding, building, and release process. Instead of having each programmer write code separately, integrate it manually, and then wait until the next daily or weekly build to see if the changes broke anything, CI lets developers code and compile on a virtually continuous basis. It also means developers and admins can work together seamlessly since the programming and build processes are always in sync.

Continuous Integration (CI) is a development practice that requires developers to integrate code into a shared repository several times a day. Each check-in is then verified by an automated build, allowing teams to detect problems early.

By integrating regularly, you can detect errors quickly, and locate them more easily.

Solve problems quickly

Because you’re integrating so frequently, there is significantly less back-tracking to discover where things went wrong, so you can spend more time building features.

Continuous Integration is cheap. Not continuously integrating is costly. If you don’t follow a continuous approach, you’ll have longer periods between integrations. This makes it exponentially more difficult to find and fix problems. Such integration problems can easily knock a project off-schedule, or cause it to fail altogether.

Continuous Integration brings multiple benefits to your organization:

  • Say goodbye to long and tense integrations
  • Increase visibility which enables greater communication
  • Catch issues fast and nip them in the bud
  • Spend less time debugging and more time adding features
  • Proceed with the confidence you’re building on a solid foundation
  • Stop waiting to find out if your code’s going to work
  • Reduce integration problems allowing you to deliver software more rapidly

“Continuous Integration doesn’t get rid of bugs, but it does make them dramatically easier to find and remove.”

– Martin Fowler, Chief Scientist, ThoughtWorks

Continuous Integration is backed by several important principles and practices.

Practices in Continuous Integration:

  • Maintain a single source repository
  • Automate the build
  • Make your build self-testing
  • Every commit should build on an integration machine
  • Keep the build fast
  • Test in a clone of the production environment
  • Make it easy for anyone to get the latest executable
  • Everyone can see what’s happening
  • Automate deployment

How to do Continuous Integration:

  • Developers check out code into their private workspaces.
  • When done, commit the changes to the repository.
  • The CI server monitors the repository and checks out changes when they occur.
  • The CI server builds the system and runs unit and integration tests.
  • The CI server releases deployable artifacts for testing.
  • The CI server assigns a build label to the version of the code it just built.
  • The CI server informs the team of the successful build.
  • If the build or tests fail, the CI server alerts the team.
  • The team fixes the issue at the earliest opportunity.
  • Continue to continually integrate and test throughout the project.

The CI implemented in Engelsystem are as follows:

  • Travis-CITravis CI is a hosted, distributed continuous integration service used to build and test software projects hosted on GitHub. It is integrated using the .travis.yml file in the root folder.
    language: php
    php:
    - '5.4'
    - '5.5'
    - '5.6'
    - '7.0'
    script: cd test && phpunit
  • Nitpick-CI:Automatic comments on PSR-2 violations in one click, so your team can focus on better code review. It requires one click for integratting with the repository.
  • Circle-CI: CircleCI was founded in 2011 with the mission of giving every developer state-of-the-art automated testing and continuous integration tools. It is integrated using a circle.yml file in the root folder of the repository.
    machine:
    php:
    version: 5.4.5
    deployment:
    master:
    branch: master
    owner: fossasia
    commands:
    - ./deploy_master.sh
    dependencies:
    pre:
    - curl -s http://getcomposer.org/installer | php
    - php composer.phar install -n
    - sed -i 's/^;//' ~/.phpenv/versions/$(phpenv global)/etc/conf.d/xdebug.ini
    
    test:
    post:
    - php test/
    - bash <(curl -s https://codecov.io/bash)
  • Codacy: Check code style, security, duplication, complexity and coverage on every change while tracking code quality throughout your sprints.

Development: https://github.com/fossasia/engelsystem Issues/Bugs:https://github.com/fossasia/engelsystem/issues

Continue ReadingContinuous Integration and Automated Testing for Engelsystem

Deploying PHP and Mysql Apps on Heroku

This tutorial will help you deploying a PHP and Mysql app.

Prerequisites

  1. a free Heroku account.
  2. PHP installed locally.
  3. Composer installed locally.

Set up

In this step you will install the Heroku Toolbelt. This provides you access to the Heroku Command Line Interface (CLI), which can be used for managing and scaling your applications and add-ons.

To install the Toolbelt for ubuntu/Debian

 wget -O- https://toolbelt.heroku.com/install-ubuntu.sh | sh

After installing Toolbelt you can use the heroku command from your command shell.

$ heroku login
Enter your Heroku credentials.
Email: dz@example.com
Password:
...

Authenticating is required to allow both the heroku and git commands to operate.

Prepare the app

In this step, you will prepare a fossasia/engelsystem application that can be deployed.

To clone the sample application so that you have a local version of the code that you can then deploy to Heroku, execute the following commands in your local command shell or terminal:

$ git clone --recursive https://github.com/fossasia/engelsystem.git
$ cd engelsystem/

If it is not a git repository you follow these steps

$ cd engelsystem/
$ git init

You now have a functioning git repository that contains a simple application now we need to add a composer.json file. Make sure you’ve installed Composer.

The Heroku PHP Support will be applied to applications only when the application has a file named composer.json in the root directory. Even if an application has no Composer dependencies, it must include at least an empty ({}) composer.json in order to be recognized as a PHP application.

When Heroku recognizes a PHP application, it will respond accordingly during a push:

$ git push heroku master
-----> PHP app detected

Define a Procfile

A Procfile is a text file in the root directory of your application that defines process types and explicitly declares what command should be executed to start your app. Your Procfile will look something like this for engelsystem:

web: vendor/bin/heroku-php-apache2 public/

Since our folder named public that contains your JavaScript, CSS, images and index.php file, your Procfile would define the Apache web server with that directory used as document root.

Create the app

In this step you will create the app to Heroku.

Create an app on Heroku, which prepares Heroku to receive your source code:

$ heroku create
Creating sharp-rain-871... done, stack is cedar-14
http://sharp-rain-871.herokuapp.com/ | https://git.heroku.com/sharp-rain-871.git
Git remote heroku added

When you create an app, a git remote (called heroku) is also created and associated with your local git repository.

Heroku generates a random name (in this case sharp-rain-871) for your app, or you can pass a parameter to specify your own app name.

But Once you open http://sharp-rain-871.herokuapp.com/ we will not be able to view the site if there are database connections. We need to migrate the database using Cleardb

ClearDB MySQL

Migrating database

Creating your ClearDB database

To create your ClearDB database, simply type the following Heroku command:

$ heroku addons:create cleardb:ignite
-----> Adding cleardb to sharp-mountain-4005... done, v18 (free)

This will automatically provision your new ClearDB database for you and will return the database URL to access it.

You can retrieve your new ClearDB database URL by issuing the following command:

$ heroku config | grep CLEARDB_DATABASE_URL
CLEARDB_DATABASE_URL: mysql://bda37eff166954:69445d28@us-cdbr-iron-east-04.cleardb.net/heroku_3c94174e0cc6cd8?reconnect=true

After getting the cleardb database url we can import the tables by following command:

$mysql -u bda37eff166954 -h us-cdbr-iron-east-04.cleardb.net -p heroku_3c94174e0cc6cd8

than you well get a mysql prompt with connection to the database. Than you can import the tables using the following commands

mysql> source [path to engelsystem]/engelsystem/db/install.sql;
mysql> source [path to engelsystem]/engelsystem/db/update.sql;
mysql> exit;

Now the tables are migrated successfully.

Declare app dependencies

Since we have added the mysql database we need to add the dependencies also.

{
  "require": {
    "ext-mysql": "*"
  },
   "require": {
      "ext-gettext": "*"
    },
   "require-dev": {
      "heroku/heroku-buildpack-php": "*"
   }
}

The composer.json file specifies the dependencies that should be installed with your application. When an app is deployed, Heroku reads this file and installs the appropriate dependencies into the vendor directory.

Run the following command to install the dependencies, preparing your system for running the app locally:

$ composer update
Loading composer repositories with package information
Updating dependencies (including require-dev)
  - Installing psr/log (1.0.0)
    Loading from cache
...
Writing lock file
Generating autoload files

You should always check composer.json and composer.lock into your git repo. The vendor directory should be included in your .gitignore file.

Using ClearDB with PHP

Connecting to ClearDB from PHP merely requires the parsing of the CLEARDB_DATABASE_URL environment variable and passing the extracted connection information to your MySQL library of choice, e.g. MySQLi:

we need to modify it in the config/config.php file

$url = parse_url(getenv("CLEARDB_DATABASE_URL"));
$server = $url["host"];
$username = $url["user"];
$password = $url["pass"];
$db = substr($url["path"], 1);

$config = array(
    'host' => $server ,
    'user' => $username ,
    'pw' => $password,
    'db' => $db 
);

Deploy the app

All the steps are completed now we need to deploy it. Push the code to Heroku. For pushing pushing development branch we need to follow these commands.

$ git add -A
$ git commit -m "heroku deploy"
$ git push heroku development:master
Initializing repository, done.
Counting objects: 7, done.
Delta compression using up to 4 threads.
Compressing objects: 100% (4/4), done.
Writing objects: 100% (7/7), 1.66 KiB | 0 bytes/s, done.
Total 7 (delta 0), reused 0 (delta 0)

-----> PHP app detected
-----> Setting up runtime environment...
       - PHP 5.5.12
       - Apache 2.4.9
       - Nginx 1.4.6
-----> Installing PHP extensions:
       - opcache (automatic; bundled, using 'ext-opcache.ini')
-----> Installing dependencies...
       Composer version 64ac32fca9e64eb38e50abfadc6eb6f2d0470039 2014-05-24 20:57:50
       Loading composer repositories with package information
       Installing dependencies from lock file
...
         - Installing monolog/monolog (1.9.1)
       Generating optimized autoload files
-----> Building runtime environment...
-----> Discovering process types
       Procfile declares types -> web
-----> Compressing... done, 57.4MB
-----> Launching... done, v3
       http://sharp-rain-871.herokuapp.com/ deployed to Heroku

To git@heroku.com:sharp-rain-871.git
 * [new branch]      development -> master

Now your app is successfully deployed you can view it here http://sharp-rain-871.herokuapp.com/

Englesystem

Development: https://github.com/fossasia/engelsystem

Issues/Bugs: Issues


Continue ReadingDeploying PHP and Mysql Apps on Heroku

Implementing Captcha for Engelsystem

Knock, knock. Who’s there? A spam bot.

If you’re a web administrator or website owner, then you are bound to know the ugly truth that is the Spam Bot. Someone, somewhere in the world must have made a deal with the Devil in hopes of a larger payout that didn’t exactly pan out the way they.

The goal of the volunteer system (Engelsystem) is to facilitate the work of event organizers and event volunteers. It would be creating problems if bots signup for shifts and fill all the vacancies.

Thanks to the mastermind behind them, those pesky little underlings crawl the web ready to cause mischief at every turn. This means more work and more time eaten up for the honest web admin/event organizer who is left to clean up the mess left in their wake.

What Is CAPTCHA?

CAPTCHAs are nothing new to the experienced web surfer. Sites/web apps, both large and small, use the system for one reason or another.

But, ever wonder where in the world the people who coined the phrase, CAPTCHA, came up with that nonsensical name? Well, you may find it interesting to know that the strange word is actually a clever acronym meaning the following:

Completely Automated Public Test to tell Computers and Humans Apart.

What a mouthful! Now aren’t you happy that they shortened it?

The actual meaning of the word essentially explains exactly what its purpose is: keeping pesky bots out and letting in well-meaning humans (or at least that is the hope).

We worked on implementing Google reCaptcha to the registration form and to the shifts signup page.

10

On websites using this new API, a significant number of users will be able to securely and easily verify they’re human without actually having to solve a CAPTCHA. Instead, with just a single click, they’ll confirm they are not a robot.11

Client-side integration:

if (isset($_REQUEST['g-recaptcha-response']) && !empty($_REQUEST['g-recaptcha-response'])) {
      $curl = curl_init();
      curl_setopt_array($curl, [
        CURLOPT_RETURNTRANSFER => 1,
        CURLOPT_URL => 'hppts://www.google.com/recaptcha/api/siteverify',
        CURLOPT_POST => 1,
        CURLOPT_POSTFIELDS => [
          'secret' => '', // Enter your private key here.
          'response' => $_REQUEST['g-recaptcha-response'],
        ]
      ]);
      
      $response = json_decode(curl_exec($curl));
      $msg .= error(sprintf(_(print_r($response)), $nick), true);
    }
    else {
      $ok = false;
      $msg .= error(_("You are a Robot."), true);
    }
  }

Captcha Shifts Signup Page
                                                     Captcha Shifts Signup Page

If the System is hosted on an online server, the user needs to register and get the API keys for implementing Google reCaptcha here.

Final Thoughts

Spam is a big issue for all websites, including sites ran on WordPress. Although CAPTCHA forms don’t completely eliminate spam mongers, when you use it with other popular spam blocking plugins like Akismet, you really do have the advantage on the spam bot battlefield.

Development: https://github.com/fossasia/engelsystem                                           Issues/Bugs:https://github.com/fossasia/engelsystem/issues

Continue ReadingImplementing Captcha for Engelsystem

Engelsytem – Sending messages to users or groups with PHP

In this post I will be discussing on how to send messages to other users and members of groups in PHP.

Implementation

We need to create a table for Message where we can store sender’s id and receiver id, text which are required while sending and receiving messages.

MYSQL Syntax of Messages Table

DROP TABLE IF EXISTS `Messages`;
CREATE TABLE IF NOT EXISTS `Messages` (
  `id` int(11) NOT NULL AUTO_INCREMENT,
  `Datum` int(11) NOT NULL,
  `SUID` int(11) NOT NULL DEFAULT '0',
  `RUID` int(11) NOT NULL DEFAULT '0',
  `isRead` char(1) NOT NULL DEFAULT 'N',
  `Text` text NOT NULL,
  PRIMARY KEY (`id`),
  KEY `Datum` (`Datum`),
  KEY `SUID` (`SUID`),
  KEY `RUID` (`RUID`)
) ENGINE=InnoDB DEFAULT CHARSET=utf8 COMMENT='Fuers interen Communikationssystem' AUTO_INCREMENT=1 ;

After initializing the table. we need to create a Page for sending and receiving messages which looks like this

messages

      $messages_table_entry = array(
      'new' => $message['isRead'] == 'N' ? '<span class="glyphicon  glyphicon-envelope"></span>' : '',
          'timestamp' => date("Y-m-d H:i", $message['Datum']),
          'from' => User_Nick_render($sender_user_source),
          'to' => User_Nick_render($receiver_user_source),
          'text' => str_replace("\n", '<br />', $message['Text']) 
      );

The message table looks something like this.

we need to store the sender and receiver id and update the message table .The function for sending messages looks something like this.

function Message_send($id, $text) {
  global $user;
  $text = preg_replace("/([^\p{L}\p{P}\p{Z}\p{N}\n]{1,})/ui", '', strip_tags($text));
  $to = preg_replace("/([^0-9]{1,})/ui", '', strip_tags($id));

  if (($text != "" && is_numeric($to)) && (sql_num_query("SELECT * FROM `User` WHERE `UID`='" . sql_escape($to) . "' AND NOT `UID`='" . sql_escape($user['UID']) . "' LIMIT 1") > 0)) {
    sql_query("INSERT INTO `Messages` SET `Datum`='" . sql_escape(time()) . "', `SUID`='" . sql_escape($user['UID']) . "', `RUID`='" . sql_escape($to) . "', `Text`='" . sql_escape($text) . "'");
    return true;
  } else {
    return false;
  }
}

this function is to send message $id is the id of receiver and $text is the text message.

To delete messages

        
 $message = sql_select("SELECT * FROM `Messages` WHERE `id`='" . sql_escape($id) . "' LIMIT 1");
 if (count($message) > 0 && $message[0]['SUID'] == $user['UID']) {
          sql_query("DELETE FROM `Messages` WHERE `id`='" . sql_escape($id) . "' LIMIT 1");
          redirect(page_link_to("user_messages"));
        } else
          return error(_("No Message found."), true);

Development: https://github.com/fossasia/engelsystem

Issues/Bugs:Issues

Continue ReadingEngelsytem – Sending messages to users or groups with PHP

Adding Notifications, Volunteer Shifts and DB Export in Engelsystem

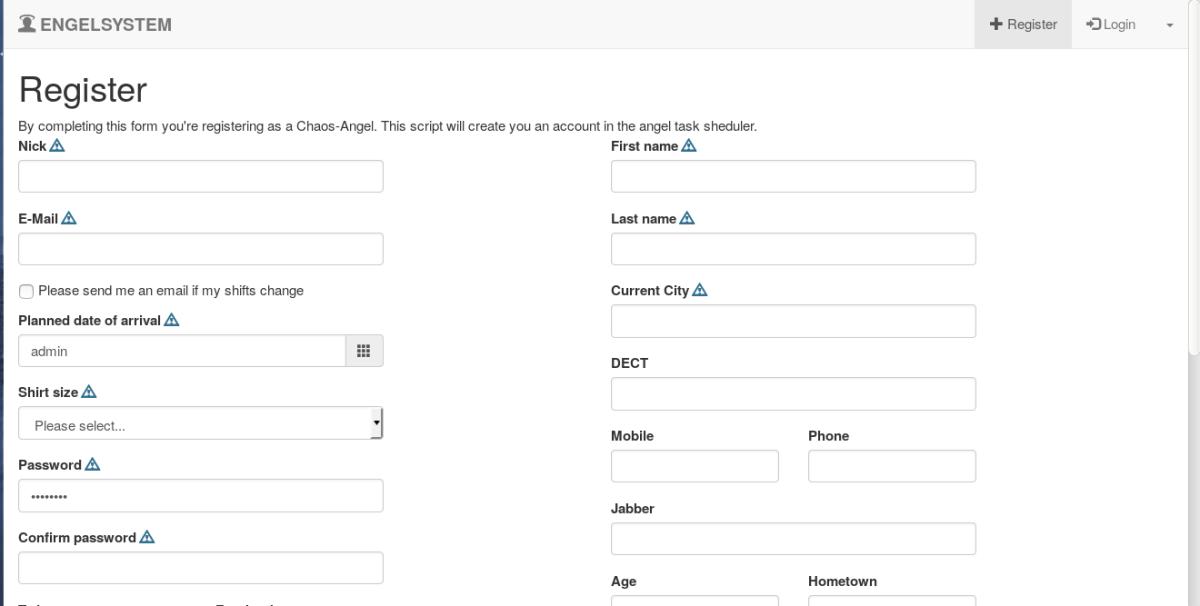
Admin can change the display message in registration form

The present system doesn’t allow to change the display message in register form. When the system is used for different events it would be useful if the admin is able to change the display message in registration form . I have added feature were admin can change the display message

settings page

By changing the message in the message box admin can change the display message.Now the message looks like this.

register page

Implementation of changing display message.

Adding display_msg field to User Table so that the display_msg can be accessed through the database any where through the code and can be changed easily

ALTER TABLE `User` 
   ADD `display_msg` varchar(255) DEFAULT "By completing this form you're registering as a Chaos-Angel. This script will create you an account in the angel task scheduler.";

Next step is to update the field whenever it is changed by admin

sql_query("UPDATE `User` SET `display_msg`='" . sql_escape($display_message) . "' WHERE  `UID`='" . sql_escape($user['UID']) . "'");

Copy/ Duplicate function for creating new shifts from existing shifts

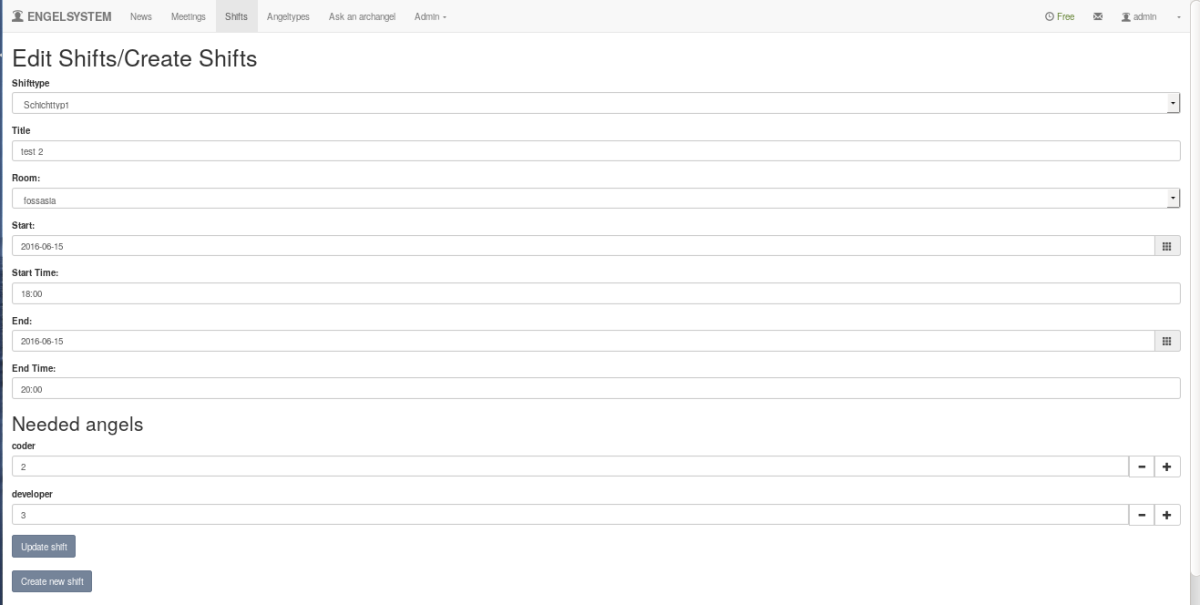
The present system doesn’t allow admin to edit an existing shift and create a new shift from the existing data of already created shifts . I have created a copy shift option where admin can edit the shift and create a new shift

create new shifts

In this page admin can create new shift or update the existing shift . Admin can change the date , time , no of angels etc as admin used to create shifts.

Implementation of copy shifts function

Once the admin selects create new shifts button , we need to use the same data so we need to store the values in variables. once admin selects the option we need to do all the error handling and create new shifts .

    if (isset($_REQUEST['shifttype_id'])) {
      $shifttype = ShiftType($_REQUEST['shifttype_id']);
      if ($shifttype === false)
        engelsystem_error('Unable to load shift type.');
      if ($shifttype == null) {
        $ok = false;
        error(_('Please select a shift type.'));
      } else
        $shifttype_id = $_REQUEST['shifttype_id'];
    } else {
      $ok = false;
      error(_('Please select a shift type.'));
    }
    
    $title = strip_request_item('title');
    // check for errors
    if (isset($_REQUEST['rid']) && preg_match("/^[0-9]+$/", 
    $_REQUEST['rid']) && isset($room_array[$_REQUEST['rid']]))
      $rid = $_REQUEST['rid'];
    else {
      $ok = false;
      $rid = $rooms[0]['RID'];
      error(_('Please select a location.'));
    }
    
    if (isset($_REQUEST['start']) && $tmp = 
    DateTime::createFromFormat("Y-m-d", trim($_REQUEST['start'])))
      $start = $tmp->getTimestamp();
    else {
      $ok = false;
      error(_('Please select a start date.'));
    }
    
    if (isset($_REQUEST['end']) && 
    $tmp = DateTime::createFromFormat("Y-m-d", trim($_REQUEST['end'])))
      $end = $tmp->getTimestamp();
    else {
      $ok = false;
      error(_('Please select an end date.'));
    }

    if (isset($_REQUEST['start_time']) &&
  $tmp = DateTime::createFromFormat("H:i", trim($_REQUEST['start_time'])))
      $start_time = $tmp->getTimestamp();
    else {
      $ok = false;
      error(_('Please select an start time.'));
    }

    if (isset($_REQUEST['end_time']) && 
    $tmp = DateTime::createFromFormat("H:i", trim($_REQUEST['end_time'])))
      $end_time = $tmp->getTimestamp();
    else {
      $ok = false;
      error(_('Please select an end time.'));
    }
    
    if (strtotime($_REQUEST['start']) > strtotime($_REQUEST['end'])) {
      $ok = false;
      error(_('The shifts end has to be after its start.'));
    }
    if (strtotime($_REQUEST['start']) == strtotime($_REQUEST['end'])) {
      if (strtotime($_REQUEST['start_time']) > 
                                     strtotime($_REQUEST['end_time'])) {
        $ok = false;
        error(_('The shifts end time  has to be after its start time.'));
      }
    }
    if (strtotime($_REQUEST['start']) == strtotime($_REQUEST['end'])) {
      if (strtotime($_REQUEST['start_time']) == 
                                 strtotime($_REQUEST['end_time'])) {
        $ok = false;
        error(_('The shifts start and end at same time.'));
      }
    }
    $angelmode = 'manually';
    foreach ($types as $type) {
      if (isset($_REQUEST['type_' . $type['id']]) && 
      preg_match("/^[0-9]+$/", trim($_REQUEST['type_' . $type['id']]))) {
        $needed_angel_types[$type['id']] = 
                       trim($_REQUEST['type_' . $type['id']]);
      } else {
        $ok = false;
        error(sprintf(_('Please check the needed angels for team %s.'), 
                                              $type['name']));
      }
    }
    if (array_sum($needed_angel_types) == 0) {
      $ok = false;
      error(_('There are 0 angels needed. 
                         Please enter the amounts of needed angels.'));
    }
    if (isset($_REQUEST['back']))
      $ok = false;

    if ($ok) {
      $shifts = array();
      $start = DateTime::createFromFormat("Y-m-d H:i",
                    date("Y-m-d", $start) . date("H:i", $start_time));
      $start = $start->getTimestamp();
      $end = DateTime::createFromFormat("Y-m-d H:i", 
                        date("Y-m-d", $end) . date("H:i", $end_time));
      $end = $end->getTimestamp();  
      $shifts[] = array(
          'start' => $start,
          'end' => $end,
          'RID' => $rid,
          'title' => $title,
          'shifttype_id' => $shifttype_id   
        );
      $shifts_table = array();
      foreach ($shifts as $shift) {
      $shifts_table_entry = [
          'timeslot' => '<span class="glyphicon glyphicon-time"></span> ' . 
date("Y-m-d H:i", $shift['start']) . ' - ' . date("H:i", $shift['end']) . 
'<br />' . Room_name_render(Room($shift['RID'])),
          'title' => ShiftType_name_render(ShiftType($shifttype_id)) . 
           ($shift['title'] ? '<br />' . $shift['title'] : ''),
            'needed_angels' => '' 
        ];
        foreach ($types as $type)
          if (isset($needed_angel_types[$type['id']]) 
          && $needed_angel_types[$type['id']] > 0)
            $shifts_table_entry['needed_angels'] .= '<b>' . 
AngelType_name_render($type) . ':</b> ' . $needed_angel_types[$type['id']]. '<br />';
        
        $shifts_table[] = $shifts_table_entry;
      }

Display shifts in map view .

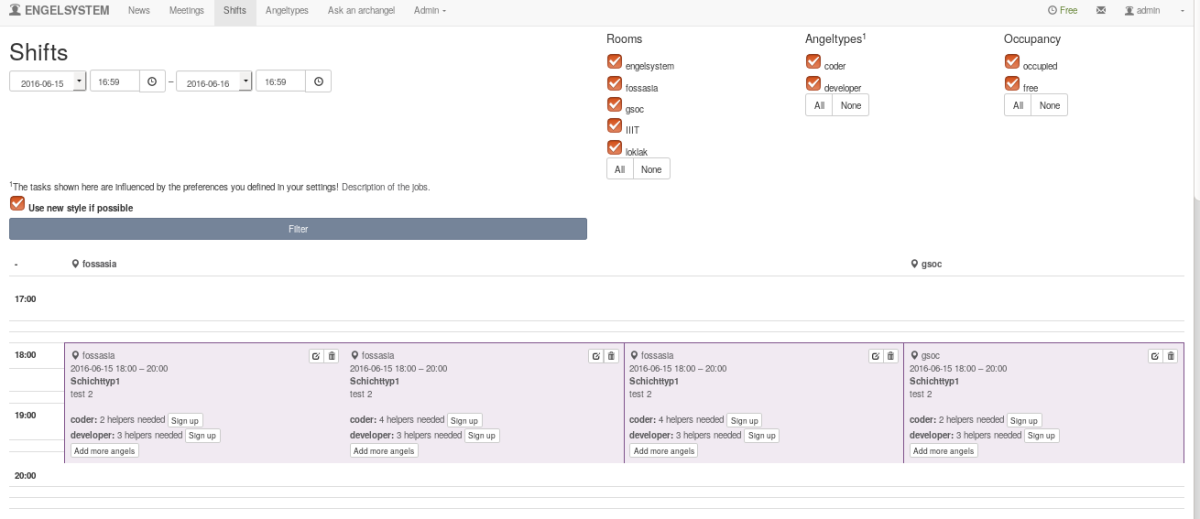
Map view makes the user/admin easy to view the shifts and easy to sign-up for shifts.Initially was not able to view the shifts but now the shifts can be viewed in both map view and normal view

shifts view

Implementation of map view .

Map view is very nice way of representing events with dates on Y – axis and rooms on X-axis. We need to make blocks and map the key

$_SESSION['user_shifts'][$key] = array_map('get_ids_from_array', $$key);

Here we map the ids and keys and then we need to print the keys against the id’s

Exporting database of user

In a system like this . It would be better if we could get all the user data who want to volunteer so that they can be contacted for other events also.

export database

Here is the code which can be useful for exporting database of any mysql database

function export_xls(){
// filename
$xls_filename = 'export_'.date('Y-m-d').'.xls'; // Define Excel (.xls) file name
// selecting the table user
$sql = "SELECT * FROM `User`";
//enter your mysql root password here
$Connect = @mysql_connect("localhost", "root", "") or die("Failed to connect to MySQL.You need to enter the password:<br />" . mysql_error() . "<br />" . mysql_errno());
// Select database
$Db = @mysql_select_db($databasename, $Connect) or die("Failed to select database:<br />" . mysql_error(). "<br />" . mysql_errno());
// Execute query
$result = @mysql_query($sql,$Connect) or die("Failed to execute query:<br />" . mysql_error(). "<br />" . mysql_errno());

// Header info settings
header("Content-Type: application/xls");
header("Content-Disposition: attachment; filename=$xls_filename");
header("Pragma: no-cache");
header("Expires: 0");
 
// Define separator (defines columns in excel &amp; tabs in word)
$separator = "\t";
 
// Start of printing column names as names of MySQL fields
for ($i = 0 ; $i < mysql_num_fields($result) ; $i++) {
  echo mysql_field_name($result, $i) . "\t";
}
print("\n");
 
// Start while loop to get data
while($row = mysql_fetch_row($result))
{
  $schema= "";
  for( $j=0 ; $j < mysql_num_fields($result) ; $j++)
  {
    
    if(!isset($row[$j])) {
      $schema .= "NULL".$separator;
    }
    elseif ($row[$j] != "") {
      $schema .= "$row[$j]".$separator;
    }
    else {
      $schema .= "".$separator;
    }
  }
  $schema = str_replace($seperator."$", "", $schema);
  $schema = preg_replace("/\r\n|\n\r|\n|\r/", " ", $schema);
  $schema.= "\t";
  print(trim($schema));
  print "\n";
}
}

Coding standards

Coding standards are a set of guidelines, best practices, programming styles and conventions that developers adhere to when writing source code for a project. All big software companies have them.

For our system we use drupal coding standards.

Development: https://github.com/fossasia/engelsystem

Issues/Bugs:Issues

Continue ReadingAdding Notifications, Volunteer Shifts and DB Export in Engelsystem

Why Coding Standards Matter

Coding standards are a set of guidelines, best practices, programming styles and conventions that developers adhere to when writing source code for a project. All big software companies have them.

A coding standards document tells developers how they must write their code. Instead of each developer coding in their own preferred style, they will write all code to the standards outlined in the document. This makes sure that a large project is coded in a consistent style — parts are not written differently by different programmers. Not only does this solution make the code easier to understand, it also ensures that any developer who looks at the code will know what to expect throughout the entire application.

When you start sharing code or start reading code shared by others, you begin to realize that not everybody writes their code they way you do. You see that other, ugly coding style, and think “everybody needs to write in the same style so that things are easier for me to understand.”

Thus, it is natural that everybody wants their own habits turned into the standard, so they don’t have to change their habits. They’re used to reading code a certain way (their own way) and get irritated when they see the code in a different format. The thing about defining a coding style standard is that there are no objective means by which to judge one style as “better” or “more-right” than another. Sure, we can talk about “readability” and “consistency” but what is readable is different for each coder (depending on what they’re used to) and consistency follows automatically because, well, why would you use another style?

Other than in the broadest outlines, defining a coding standard is an exercise in arbitrariness. Who says that a 75 character line is better than 72, or 80? Who says putting braces in one place is better than putting them elsewhere? And who are they to say; by what standard do they judge?

The point of a coding style standard is not to say one style is objectively better than another in the sense of the specific details (75 characters and one-true-brace convention, for example). Instead, the point is to set up known expectations on how code is going to look.

For example, my project Engelsystem,it is a project written by more than one person. If you examine some Script A and see one coding style, then examine Script B and see another, the effect is very jarring; they don’t look like they belong to the same project. Similarly, when I, a Developer, (who uses one coding style) attempts to patch or add to a separate project from other Developer (who uses another coding style) the mix-and-match result in the same project (or even the same file!) is doubly jarring.

Another example that I can think of: a manager who insisted on being part of every major code review. During the reviews, he would flag formatting issues, that were almost always a matter of his own preference, as “errors”. The worst part of the story is that he hadn’t written down his coding standards anywhere! I guess he thought developers would learn his style through osmosis. Sometimes, it felt as if he made up rules on the fly. As I mentioned in my post on conducting effective code reviews, it is useless arguing over formatting issues if you don’t have coding standards.

As Open Source PHP developers, we need to define and adhere to a coding style not because one is better than another but because we need a standard by which to collaborate/contribute. In that sense, coding style is very important; not for itself, but for the social effects generated by adherence to defined standards.

It is for this reason that I abandoned “my” coding style to adopt the Drupal coding standard for my Google Summer of Code project (Engelsystem). Sometimes you need to give up a small thing to gain a greater thing; by giving up my coding style, I had to change my habits; but now, anybody familiar with the Drupal standard can read my code and add to it in a recognizable way.

Why Designers Should Care About Coding Standards

For many web designers, matters of code standards and style are often left in the hands of their fellow developers. You give developers their deserved space to wield their magic to turn your designs into functional products that people love to use. The team’s coding standards are often the last thing on your mind. So why should you and other designers care?

Tech debt steals time away from new features and enhancements

The next time you are ready to go with a newly designed feature, you might find its development gets stuck behind a mountain of tech debt. Addressing tech debt at a reasonable pace throughout the life of a product can prevent it from piling up to a point where feature work gets put on hold. Better yet, if these issues are caught during initial development, that tech debt might be avoided in the first place.

It can be in your best interest to encourage developers to address issues in the code as they arise, rather than focusing only on design. Failing to fix these issues will cost you in future sprints.

Get better at your own craft

Understanding what it takes to build great software ultimately makes you a better designer. Whether you want to improve how you write your own front-end code if that’s your thing or gain a better appreciation of the time and effort it takes to build products, your practical experience will allow you gauge future work and effort.

A lot of similarities exist between coding standards and design standards. Just as you wouldn’t want a designer to go off-brand, developers have the same standards they want to maintain their code.

Code should look good too

Steve Jobs was famously renowned for being picky about both the externals as well as the internals of Apple products. Your beautiful UI work can only go so far if it isn’t built on a solid foundation of code. Pushing through a feature without appreciating the work to build it properly can lead to bugs later. The right amount of time and attention at the initial development cycle can reduce these mistakes.

Designers can be champions for well-written code. Just as you appreciate the details in designing great user interfaces and experiences, appreciation of the time and effort it takes to build those properly goes a long way.

In the later weeks, other developers and I would be working on adding more features to the system(Engelsystem), following the coding standard, as mentioned above. Anyone who would like to work in the project is welcome. Developers can feel free to take up any issues they would like to work on just like any other open source projects.

Development: https://github.com/fossasia/engelsystem                                           Issues/Bugs:https://github.com/fossasia/engelsystem/issues

Continue ReadingWhy Coding Standards Matter

Language Localization on Engelsystem

During the 3rd  week of my Summer of Code, I worked on implementing Localization of different languages on the system and creating a different settings page for user and admin.

One of our goals is for Engelsystem to be a great experience for users worldwide. To achieve this goal we need to make some significant changes. The main reason of localization is that it can be used by different people with different native languages across the world and help them to understand the system better .

First, a little background.

Right now, Engelsystem has two localization systems available:

  • Deutsch
  • English

All of the current translations will be updated. We are also expanding the list of supported languages to as many as we can. Currently, I’ve implemented:

  • Bulgarian
  • Chinese- simplified
  • English UK
  • French
  • Hindi-IN
  • Hungarian
  • Irish
  • Punjabi-IN
  • Spanish
  • Tamil-IN

The tools used in implementing localization are poedit where we create the .po files .

For installing Poedit on Linux distro’s, users can use the following command in the terminal,

sudo apt-get install poedit

For Windows and Mac users, they can download the executable file here.

Steps to run Poedit in Linux/Windows/Mac:

  1. choose File → New Catalog.Enter the details in Translation properties like your email. Source code charset should be selected as UTF-8.Now the source path should be selected as (.) dot to tell Poedit to search for PHP files in the same folder.
    06
  2. In the source, there are three options ‘_’ , ‘gettext’ and  ‘gettext_noop’.Make sure all necessary functions are added and press OK.
  3. Now we can see the list of strings on left and their translated strings on the right.we need to install the necessary dictionary for this.
    07
  4. Save the file  with an extension ‘.po’ . 

    In Engelsystem, to implement the translated localization file we need to make the changes in the file,internationalization_helper.php

    $locales = array(
    ‘de_DE.UTF-8’ => “Deutsch”,
    ‘hi_IN.UTF-8’ => “Hindi”,
    ‘sp_EU.UTF-8’ => “Spanish”,
    ‘en_US.UTF-8’ => “English”
    );

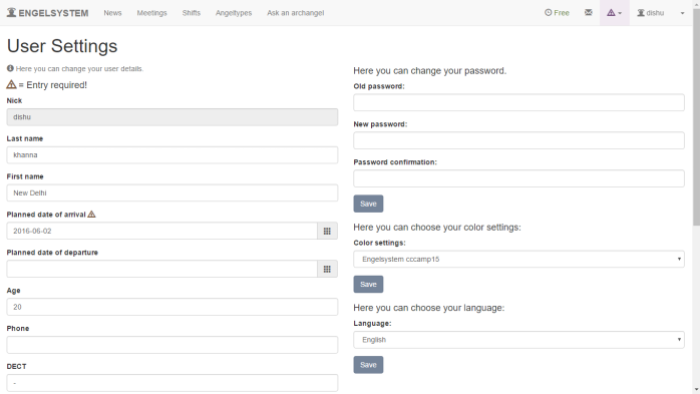
    During the week 3 of my Summer of Code I also worked on creating different settings page for user and Admin. Earlier settings page for user and admin were same, providing same privileges to both of them. Now we have separate pages for both.

                                                                             User Settings
    Admin Settings
                                                                        Admin Settings

    In the later weeks, other developers and I would be working on adding more languages to the system. Anyone who would like to work in the project are welcome. Developers can feel free to take up any issues they would like to work on just like any other open source projects.

    Development: https://github.com/fossasia/engelsystem                                           Issues/Bugs:https://github.com/fossasia/engelsystem/issues

Continue ReadingLanguage Localization on Engelsystem