Adding Push Wake Button to SUSI on Raspberry PI

SUSI Linux for Raspberry Pi provides the ability to call SUSI with the help of a Hotword ‘Susi’. Calling via Hotword is a natural way of interaction but it is even handier to invoke SUSI listening mode with the help of a Push button. It enables to call SUSI in a noisy environment where detection of Hotword is not that accurate.

To enable Push Wake button is Susi, we need access to Hardware Pins. Devices like Raspberry PI provides GPIO (General Purpose Input Output) Pins for interacting with Hardware Devices.

In this tutorial, we are adding support for Push Wake Button in Raspberry PI, though similar procedure can be extended to add Wake Button to Orange Pi, Beaglebone Black, and other devices. For adding push wake button, we require:

We now need to do wiring to connect button to Raspberry Pi. The button can be connected to Raspberry Pi following the connection diagram. 

After this, we need to install the Raspberry Pi GPIO Python Library. Install it using:

$ pip3 install RPi.GPIO

Now, we may detect the press of the button in our code. We declare an abstract class for implementing Wake Button. In this way, we can later extend our code to include Wake Buttons for more platforms.

import os
from abc import ABC, abstractclassmethod
from queue import Queue
from threading import Thread

from utils.susi_config import config


class WakeButton(ABC, Thread):
   def __init__(self, detection_callback, callback_queue: Queue):
       super().__init__()
       self.detection_callback = detection_callback
       self.callback_queue = callback_queue
       self.is_active = False

   @abstractclassmethod
   def run(self):
       pass

   def on_detected(self):
       if self.is_active:
           self.callback_queue.put(self.detection_callback)
           os.system('play {0} &'.format(config['detection_bell_sound']))
           self.is_active = False

We defined WakeButton class as a Thread. This is done to ensure that listening to Wake Buttons is done in background thread and it does not disturb the main thread. The callback to be executed on main thread after button press is detected is added to callback queue. Main Thread listens on the callback queue and executes any pending functions from other threads.

We also play an Audio File additionally on detection of a button press to confirm the activation of detection to the user.

Now, we define Raspberry Pi Wake Button class. This class extends from abstract WakeButton declared above.

from queue import Queue

import RPi.GPIO as GPIO
import time
from .wake_button import WakeButton


class RaspberryPiWakeButton(WakeButton):
   def __init__(self, detection_callback, callback_queue: Queue):
       super().__init__(detection_callback, callback_queue)
       GPIO.setmode(GPIO.BCM)
       GPIO.setup(18, GPIO.IN, pull_up_down=GPIO.PUD_UP)

   def run(self):
       while True:
           input_state = GPIO.input(18)
           if not input_state:
               self.on_detected()
               self.is_active = False
               time.sleep(0.2)

This class defines the Wake Button for Raspberry Pi. We continuously poll for the input value of GPIO Pin number 18 on which button is connected. If value is negative, it indicated that button was pressed.

Now, we need to add an option if configuration script to give users a choice to enable or disable wake button. We first need to check, if device is Raspberry Pi, since feature is available on Raspberry PI only. To do this, we try to import RPi.GPIO module. If module loading fails, it indicates that device does not support Raspberry Pi GPIO modes. We set the configuration parameters according to it.

def setup_wake_button():
   try:
       import RPi.GPIO
       print("Device supports RPi.GPIO")
       choice = input("Do you wish to enable hardware wake button? (y/n)")
       if choice == 'y':
           config['WakeButton'] = 'enabled'
           config['Device'] = 'RaspberryPi'
       else:
           config['WakeButton'] = 'disabled'
   except ImportError:
       print("This device does not support RPi.GPIO")
       config['WakeButton'] = 'not available'

Now, we simply use the Raspberry Pi wake button detector in our code.

if config['wake_button'] == 'enabled':
   if config['device'] == 'RaspberryPi':
       from hardware_components import RaspberryPiWakeButton

       wake_button = RaspberryPiWakeButton(callback_queue=callback_queue, detection_callback=start_speech_recognition)
       wake_button.start()

Now, when you need to invoke SUSI Listening Mode, instead of saying ‘SUSI’ as Hotword, you may also press the push button. Ask your query after hearing a small bell and get instant reply from SUSI.

Resources:

Continue ReadingAdding Push Wake Button to SUSI on Raspberry PI

Adding IBM Watson TTS Support in Susi Assistant on Raspberry Pi

Susi Hardware project aims at creating a smart assistant for your home that you can run on your Raspberry Pi or similar Development Boards.
I previously wrote a blog on choosing a perfect Text to Speech engine for Susi AI and had used Flite as the solution for it. While Flite is an Open Source solution that can run locally on a client, it does not provide the same quality of voice and speed as cloud providers. We always crave for a more natural voice for better interaction with our assistant. It is always good to have more options. We, therefore, added IBM Watson Text to Speech API in SUSI Hardware project.

IBM Watson TTS can be added to a Python Project easily using the IBM Watson Developer SDK.

For using the IBM Watson Developer SDK for Text to Speech, first of all, we need to sign up for Bluemix
https://console.bluemix.net/registration/

After that, we will get the empty dashboard without any service added currently. We need to create a Text to Speech Service. To do so, click on Create Watson Service button


Select Watson on the left pane and then select Text to Speech service from the list.

Select the standard plan from the options and then click on create button.

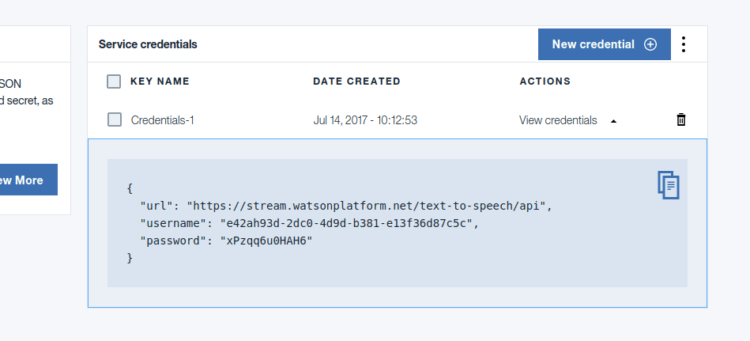
You will get service credentials for your newly created text to speech service. Save it for future reference.

After that, we need to add Watson developer cloud python package.

sudo pip3 install watson-developer-cloud

On Ubuntu with Python 3.5 watson-developer-cloud has some extra dependencies. Install them using the following command.

sudo apt install libssl-dev

Now we can add Text to Speech to our project. For that, we need to first import TextToSpeechV1 library. It can be added using following import statement.

from watson_developer_cloud import TextToSpeechV1

Now we need to create a new TextToSpeechV1 object using the Service Credentials we created earlier.

text_to_speech = TextToSpeechV1(
   username='API_USERNAME',
   password='API_PASSWORD')

We can now perform synthesis of a text input and write the incoming speech stream from IBM Watson API to a file.

with open('output.wav', 'wb') as audio_file:
   audio_file.write(
       text_to_speech.synthesize(text, accept='audio/wav’, voice='en-US_AllisonVoice'))

In the above code snippet,  we are opening an output file ‘output.wav’ for writing. We then write the binary audio data returned by text_to_speech.synthesize method. IBM Watson provides many free voices. We supply an argument specifying which voice we need to use. We are using English female ‘en-US_AllisonVoice’. You may test out more voices in the online demo here and select the voice that you find best.

We can play the ‘output.wav’ file using the play command from SoX. To do so, we need to install SoX binary.

sudo apt install sox libsox-fmt-all

We can play the file easily now using the following code.

import os
os.system('play output.wav')

The above code invokes the ‘play’ command from the SoX package to play the audio file. We can also use PyAudio to play the audio file but it would require us to manage the audio thread separately. Thus, SoX is a better solution.

Resources:

Continue ReadingAdding IBM Watson TTS Support in Susi Assistant on Raspberry Pi

Setup SUSI Assistant on Raspberry Pi in under 30 minutes

With our ever growing list of list of platforms supported by Susi AI, we now have a client that can run on Raspberry Pi and you can access it hands-free!! Here is a video that you can refer for its working.

But it might have left you wondering how you can replicate such a setup yourself? It is fairly easy and will be done fairly easy. Just follow the following instructions.

You need to have following hardware in order to have your own SUSI Assistant running on Raspberry Pi.

  • A Raspberry Pi (prefer 2 or 3) with Raspbian Jessie OS.
  • A stable internet connection.  ( Recommended 4 Mbps )
  • A USB Microphone /  USB Webcam with Microphone. You may buy one like this.
  • A Speaker that connects through 3.5mm jack. You may buy one like this.

After you get all the above items in order, you need to get access to a terminal of your Raspberry Pi. You can have that by either connecting a monitor to Raspberry Pi temporarily or by connecting to Raspberry Pi over SSH.

Once this is done, next step is the installation of the dependencies. The installation of the SUSI on Raspberry is automated after dependencies are installed. Run the following command on Raspberry Pi terminal.

sudo apt install git swig3.0 portaudio19-dev pulseaudio libpulse-dev unzip sox libatlas-dev libatlas-base-dev libsox-fmt-all python3

After this, you may check if your output and input devices are working alright. For this, run rec recording.wav . It will start recording audio and saving it to a file named recording.wav. Play back the file using play recording.wav If you hear your audio clearly, setup is done right else you need to configure your Audio Devices correctly.  Most of the time the configuration of Audio works out the box and devices are plug and play so you would not encounter any errors. If you are successful in configuring your devices, install extra dependencies for SUSI Hardware by running the automated install script. In your terminal run,

$ git clone https://github.com/fossasia/susi_hardware.git
$ cd susi_hardware
$ ./install.sh 

This will install all the remaining dependencies. After the above step is complete, you may run configuration file generator script to choose the Text to Speech and Speech to Text service according to your wish. For doing so, you need to run

$ python3 config_generator.py

Follow the instructions in the script. It will ask you to configure the default service for Text to Speech and Speech to Text and other options. After the configuration is complete, you can simply run the following command to start SUSI.

$ python3 main.py

This will start SUSI in a continuously listening mode. You may invoke SUSI anytime, just by saying SUSI followed by a query. The query will be answered by SUSI subsequently.

Since configurations for different hardware devices may vary, you may encounter some problems. In such a scenario, you may refer to the following resources to solve the issues.

Resources:

Continue ReadingSetup SUSI Assistant on Raspberry Pi in under 30 minutes

Hotword Detection on SUSI MagicMirror with Snowboy

Magic Mirror in the story “Snow White and the Seven Dwarfs” had one cool feature. The Queen in the story could call Mirror just by saying “Mirror” and then ask it questions. MagicMirror project helps you develop a Mirror quite close to the one in the fable but how cool it would be to have the same feature? Hotword Detection on SUSI MagicMirror Module helps us achieve that.

The hotword detection on SUSI MagicMirror Module was accomplished with the help of Snowboy Hotword Detection Library. Snowboy is a cross platform hotword detection library. We are using the same library for Android, iOS as well as in MagicMirror Module (nodejs).

Snowboy can be added to a Javascript/Typescript project with Node Package Manager (npm) by:

$ npm install --save snowboy

For detecting hotword, we need to record audio continuously from the Microphone. To accomplish the task of recording, we have another npm package node-record-lpcm16. It used SoX binary to record audio. First we need to install SoX using

Linux (Debian based distributions)

$ sudo apt-get install sox libsox-fmt-all

Then, you can install node-record-lpcm16 package using npm using

$ npm install node-record-lpcm16

Then, we need to import it in the needed file using

import * as record from "node-record-lpcm16";

You may then create a new microphone stream using,

const mic = record.start({
   threshold: 0,
   sampleRate: 16000,
   verbose: true,
});

The mic constant here is a NodeJS Readable Stream. So, we can read the incoming data from the Microphone and process it.

We can now process this stream using Detector class of Snowboy. We declare a child class extending Snowboy Hotword Decoder to suit our needs.

import { Detector, Models } from "snowboy";

export class HotwordDetector extends Detector {
  
  1 constructor(models: Models) {
       super({
           resource: `${process.env.CWD}/resources/common.res`,
           models: models,
           audioGain: 2.0,
       });
       this.setUp();
   }

   // other methods
}

First, we create a Snowboy Detector by calling the parent constructor with resource file as common.res and a Snowboy model as argument. Snowboy model is a file which tells the detector which Hotword to listen for. Currently, the module supports hotword Susi but it can be extended to support other hotwords like Mirror too. You can train the hotword for SUSI for your voice and get the latest model file at https://snowboy.kitt.ai/hotword/7915 . You may then replace the susi.pmdl file in resources folder with our own susi.pmdl file for a better experience.

Now, we need to delegate the callback methods of Detector class to know about the current state of detector and take an action on its basis. This is done in the setUp() method.

private setUp(): void {
   this.on("silence", () => {
      // handle silent state
   });

   this.on("sound", () => {
      // handle sound detected state
   });

   this.on("error", (error) => {
      // handle error
   });

   this.on("hotword", (index, hotword) => {
      // hotword detected 
   });
}

If you go into the implementation of Detector class of Snowboy, it extends from NodeJS.WritableStream. So, we can pipe our microphone input read stream to Detector class and it handles all the states. This can be done using

mic.pipe(detector as any);

So, now all the input from Microphone will be processed by Snowboy detector class and we can know when the user has spoken the word “SUSI”. We can start speech recognition and do other changes in User Interface based on the different states.

After this, we can simply say “Susi” followed by our query to ask SUSI on the MagicMirror. A video implementation of the same can be seen here: 

Resources:

Continue ReadingHotword Detection on SUSI MagicMirror with Snowboy