Using OpenCV for Native Image Processing in Phimpme Android

OpenCV is very widely used open-source image processing library. After the integration of OpenCV Android SDK in the Phimpme Android application, the image processing functions can be written in Java part or native part. Taking runtime of the functions into consideration we used native functions for image processing in the Phimpme application.

We didn’t have the whole application written in native code, we just called the native functions on the Java OpenCV Mat object. Mat is short for the matrix in OpenCV. The image on which we perform image processing operations in the Phimpme Android application is stored as Mat object in OpenCV.

Creating a Java OpenCV Mat object

Mat object of OpenCV is same whether we use it in Java or C++. We have common OpenCV object in Phimpme for accessing from both Java part and native part of the application. We have a Java bitmap object on which we have to perform image processing operations using OpenCV. For doing that we need to create a Java Mat object and pass its address to native. Mat object of OpenCV can be created using the bitmap2Mat() function present in the OpenCV library. The implementation is shown below.

Mat inputMat = new Mat(bitmap.getWidth(), bitmap.getHeight(), CvType.CV_8UC3);
Utils.bitmapToMat(bitmap, inputMat);

“bitmap” is the Java bitmap object which has the image to be processed. The third argument in the Mat function indicates that the Mat should be of type 8UC3 i.e. three color channels with 8-bit depth. With the second line above, the bitmap gets saved as the OpenCV Mat object.

Passing Mat Object to Native

We have the OpenCV Mat object in the memory. If we pass the whole object again to native, the same object gets copied from one memory location to another. In Phimpme application, instead of doing all that we can just get the memory location of the current OpenCV Mat object and pass it to native. As we have the address of the Mat, we can access it directly from native functions. Implementation of this is shown below.

Native Function Definition:

private static native void nativeApplyFilter(long inpAddr);

Native Function call:

nativeApplyFilter(inputMat.getNativeObjAddr());

Getting Native Mat Object to Java

We can follow the similar steps for getting the Mat from the native part after processing. In the Java part of Phimpme, we created an OpenCV Mat object before we pass the inputMat OpenCV Mat object to native for processing. So we have inputMat and outputMat in the memory before we send them to native. We get the memory locations of both the Mat objects and pass those addresses to native part. After the processing is done, the data gets written to the same memory location and can be accessed in Java. The above functions can be modified and rewritten for this purpose as shown below
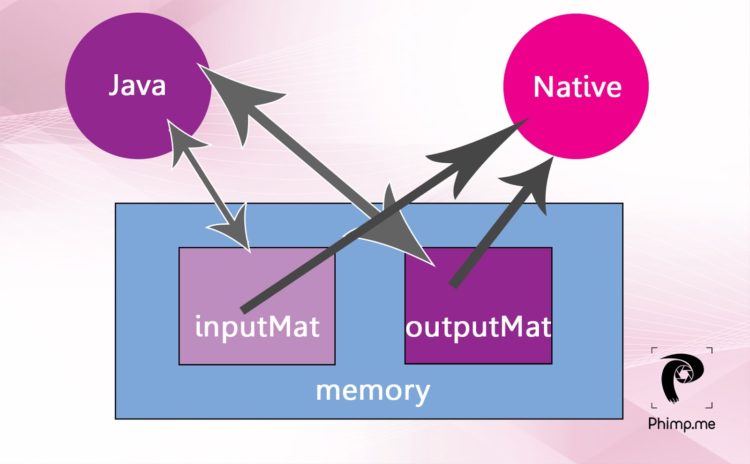
Native Function Definition:

private static native void nativeApplyFilter(long inpAddr, long outAddr );

Native Function call:

nativeApplyFilter(inputMat.getNativeObjAddr(),outputMat.getNativeObjAddr());
inputMat.release();

if (outputMat !=null){
   Bitmap outbit = Bitmap.createBitmap(bitmap.getWidth(),bitmap.getHeight(),bitmap.getConfig());
   Utils.matToBitmap(outputMat,outbit);
   outputMat.release();
   return outbit;
}

Native operations on Mat using OpenCV

The JNI function in the native part of Phimpme application receives the memory locations of both the OpenCV Mat objects. As we have the addresses, we can create Mat object pointing that memory location and can be passed to processing functions for performing native operations just like all OpenCV functions. This implementation is shown below.

#include <jni.h>
#include <opencv2/core/core.hpp>
#include <opencv2/imgproc/imgproc.hpp>
#include "enhance.h"
using namespace std;
using namespace cv;

JNIEXPORT void JNICALL
Java_org_fossasia_phimpme_editor_editimage_filter_PhotoProcessing_nativeApplyFilter(JNIEnv *env, jclass type, jlong inpAddr,jlong outAddr) {
       Mat &src = *(Mat*)inpAddr;
       Mat &dst = *(Mat*)outAddr;
       applyFilter(src, dst);
}

applyFilter() function can have any image processing operation. The implementation of edge detection function using OpenCV in the Phimpme Android is shown below. We were able to do this in very few lines which otherwise would have needed an extremely large code.  

Mat grey,detected_edges;
cvtColor( src, grey, CV_BGR2GRAY );
blur( grey, detected_edges, Size(3,3) );
dst.create( grey.size(), grey.type() );
Canny( detected_edges, detected_edges, 70, 200, 3 );
dst = Scalar::all(0);
detected_edges.copyTo( dst, detected_edges);


The general structure of an OpenCV function which is necessary for implementing custom image processing operations can be understood by referring this below-mentioned brightness adjustment function.  

int x,y,bright;
cvtColor(src,src,CV_BGRA2BGR);
dst = Mat::zeros( src.size(), src.type() );
for (y = 0; y < src.rows; y++) {
   for (x = 0; x < src.cols; x++) {
       dst.at<Vec3b>(y, x)[0] =
                  saturate_cast<uchar>((src.at<Vec3b>(y, x)[0]) + bright);
       dst.at<Vec3b>(y, x)[1] =
               saturate_cast<uchar>((src.at<Vec3b>(y, x)[1]) + bright);
       dst.at<Vec3b>(y, x)[2] =
               saturate_cast<uchar>((src.at<Vec3b>(y, x)[2]) + bright);
   }
}


Resources:

Continue ReadingUsing OpenCV for Native Image Processing in Phimpme Android

Passing Java Bitmap Object to Native for Image Processing and Getting it back in Phimpme Android

To perform any image processing operations on an image, we must have an image object in native part like we have a Bitmap object in Java. We cannot just pass the image bitmap object directly as an argument to native function because ‘Bitmap’ is a java object and C/C++ cannot interpret it directly as an image. So, here I’ll discuss a method to send java Bitmap object to Native part for performing image processing operations on it, which we implemented in the image editor of Phimpme Android Image Application.

C/C++ cannot interpret java bitmap object. So, we have to find the pixels of the java bitmap object and send them to native part to create a native bitmap over there.

In Phimpme, we used a “struct” data structure in C to represent native bitmap. An image has three color channels red, green, blue. We consider alpha channel(transparency) for an argb8888 type image. But in Phimpme, we considered only three channels as it is enough to manipulate these channels to implement the edit functions, which we used in the Editor of Phimpme.

We defined a struct, type-defined as NativeBitmap with attributes corresponding to all the three channels. We defined this in the nativebitmap.h header file in the jni/ folder of Phimpme so that we can include this header file in c files in which we needed to use a NativeBitmap struct.

#ifndef NATIVEBITMAP
#define NATIVEBITMAP
#endif
typedef struct {
  unsigned int width;
  unsigned int height;
  unsigned int redWidth;
  unsigned int redHeight;
  unsigned int greenWidth;
  unsigned int greenHeight;
  unsigned int blueWidth;
  unsigned int blueHeight;
  unsigned char* red;
  unsigned char* green;
  unsigned char* blue;
} NativeBitmap;

void deleteBitmap(NativeBitmap* bitmap);
int initBitmapMemory(NativeBitmap* bitmap, int width, int height);

As I explained in my previous post here on introduction to flow of native functions in Phimpme-Android, we defined the native functions with necessary arguments in Java part of Phimpme. We needed the image bitmap to be sent to the native part of the Phimpme application. So the argument in the function should have been java Bitmap object. But as mentioned earlier, the C code cannot interpret this java bitmap object directly as an image. So we created a function for getting pixels from a bitmap object in the Java class of Phimpme application. This function returns an array of unsigned integers which correspond to the pixels of a particular row of the image bitmap. The array of integers can be interpreted by C, so we can send this array of integers to native part and create a receiving native function to create NativeBitmap.

We performed image processing operations like enhancing and applying filters on this NativeBitmap and after the processing is done, we sent the array of integers corresponding to a row of the image bitmap and constructed the Java Bitmap Object using those received arrays in java.

The integers present in the array correspond to the color value of a particular pixel of the image bitmap. We used this color value to get red, green and blue values in native part of the Phimpme application.

Java Implementation for getting pixels from the bitmap, sending to and receiving from native is shown below.

private static void sendBitmapToNative(NativeBitmap bitmap) {
   int width = bitmap.getWidth();
   int height = bitmap.getHeight();
   nativeInitBitmap(width, height);
   int[] pixels = new int[width];
   for (int y = 0; y < height; y++) {
       bitmap.getPixels(pixels, 0, width, 0, y, width, 1); 
                    //gets pixels of the y’th row
       nativeSetBitmapRow(y, pixels);
   }
}
private static Bitmap getBitmapFromNative(NativeBitmap bitmap) {
   bitmap = Bitmap.createBitmap(srcBitmap.getWidth(), srcBitmap.getHeight(), srcBitmap.getConfig());
   int[] pixels = new int[width];
   for (int y = 0; y < height; y++) {
       nativeGetBitmapRow(y, pixels);
       bitmap.setPixels(pixels, 0, width, 0, y, width, 1);
   }
   return bitmap;
}

The native functions which are defined in Java part have to be linked to native functions. So they have to be created with proper function name in main.c (JNI) file of the Phimpme application. We included nativebitmap.h in main.c so that we can use NativeBitmap struct which is defined in nativebitmap.h.
The main functions which do the actual work related to converting integer array received from java part to NativeBitmap and converting back to an integer array of color values of pixels in rows of image bitmap are present in nativebitamp.c. The main.c file acts as Java Native Interface which helps in linking native functions and java functions in Phimpme Android.

After adding all the JNI functions, the main.c function looks as below.

main.c

static NativeBitmap bitmap;
int Java_org_fossasia_phimpme_PhotoProcessing_nativeInitBitmap(JNIEnv* env, jobject thiz, jint width, jint height) {
  return initBitmapMemory(&bitmap, width, height);  //function present
                                                    // in nativebitmap.c
}

void Java_org_fossasia_phimpme_PhotoProcessing_nativeSetBitmapRow(JNIEnv* env, jobject thiz, jint y, jintArray pixels) {
  int cpixels[bitmap.width];
  (*env)->GetIntArrayRegion(env, pixels, 0, bitmap.width, cpixels);
  setBitmapRowFromIntegers(&bitmap, (int)y, &cpixels);
}

void Java_org_fossasia_phimpme_PhotoProcessing_nativeGetBitmapRow(JNIEnv* env, jobject thiz, jint y, jintArray pixels) {
  int cpixels[bitmap.width];
  getBitmapRowAsIntegers(&bitmap, (int)y, &cpixels);
  (*env)->SetIntArrayRegion(env, pixels, 0, bitmap.width, cpixels);
                    //sending bitmap row as output
}

We now reached the main part of the implementation where we created the functions for storing integer array of color values of pixels in the NativeBitmap struct, which we created in nativebitmap.h of Phimpme Application. The definition of all the functions is present in nativebitmap.h, so we included that header file in the nativebitmap.c for using NativeBitmap struct in the functions. We implemented the functions defined in main.c i.e. initializing bitmap memory, setting bitmap row using integer array, getting bitmap row and a method for deleting native bitmap from memory after completion of processing the image in nativebitmap.c.

The implementation of nativebitmap.c after adding all functions is shown below. A proper explanation is added as comments wherever necessary.

void setBitmapRowFromIntegers(NativeBitmap* bitmap, int y, int* pixels) {
  //y is the number of the row (yth row)
  //pixels is the pointer to integer array which contains color value of a pixel
  unsigned int width = (*bitmap).width;
  register unsigned int i = (width*y) + width - 1;
                                //this represent the absolute                                 //index of the pixel in the image bitmap  
  register unsigned int x;      //this represent the index of the pixel 
                                //in the particular row of image bitmap
  for (x = width; x--; i--) {
          //functions defined above
     (*bitmap).red[i] = red(pixels[x]);
     (*bitmap).green[i] = green(pixels[x]);
     (*bitmap).blue[i] = blue(pixels[x]);
  }
}

void getBitmapRowAsIntegers(NativeBitmap* bitmap, int y, int* pixels) {
  unsigned int width = (*bitmap).width;
  register unsigned int i = (width*y) + width - 1; 
  register unsigned int x;              
  for (x = width; x--; i--) {
          //function defined above
     pixels[x] = rgb((int)(*bitmap).red[i], (int)(*bitmap).green[i], (int)(*bitmap).blue[i]);
  }
}

The native bitmap has to be initialized first before we set pixel values to it and has to be deleted from memory after completion of the processing. The functions for doing these tasks are given below. These functions should be added to nativebitmap.c file.

void deleteBitmap(NativeBitmap* bitmap) {
//free up memory
  freeUnsignedCharArray(&(*bitmap).red);//do same for green and blue
}

int initBitmapMemory(NativeBitmap* bitmap, int width, int height) {
  deleteBitmap(bitmap); 
             //if nativebitmap already has some value it gets removed
  (*bitmap).width = width;
  (*bitmap).height = height;
  int size = width*height;
  (*bitmap).redWidth = width;
  (*bitmap).redHeight = height;
            //assigning memory to the red,green and blue arrays and
            //checking if it succeeded for each step.
  int resultCode = newUnsignedCharArray(size, &(*bitmap).red);
  if (resultCode != MEMORY_OK) return resultCode;
            //repeat the code given above for green and blue colors
}

You can find the values of different color components of the RGB color value and RGB color values from the values of color components using the below functions. Add these functions to the top of the nativebitmap.c file.

int rgb(int red, int green, int blue) {
  return (0xFF << 24) | (red << 16) | (green << 8) | blue;
//Find the color value(int) from the red, green, blue values of a particular //pixel.
}

unsigned char red(int color) {
  return (unsigned char)((color >> 16) & 0xFF);
//Getting the red value form the color value of a particular pixel
}

//for green return this ((color >> 8) & 0xFF)
//for blue return this (color & 0xFF);

Do not forget to define native functions in Java part. As now everything got set up, we can use this in PhotoProcessing.java in the following manner to send Bitmap object to native.

Bitmap input = somebitmap;
if  (bitmap != null) {
    sendBitmapToNative(bitmap);
}

////Do some native processing on native bitmap struct
////Discussed in the next post

Bitmap output = getBitmapFromNative(input);
nativeDeleteBitmap();

Performing image processing operations on the NativeBitmap in the image editor of Phimpme like enhancing the image, applying filters are discussed in next posts.

Resources

Continue ReadingPassing Java Bitmap Object to Native for Image Processing and Getting it back in Phimpme Android