Auto deployment of SUSI Skill CMS on gh pages

Susi Skill CMS is a web application framework to edit susi skills. It is currently in development stage, hosted on http://skills.susi.ai. It is built using ReactJS . In this blogpost we will see how to automatically deploy the repository on gh pages.
Setting up the project
Fork susi_skill_cms repository and clone it to your desktop, make sure you have node and npm versions greater than 6 and 3 respectively. Next go to cloned folder and install all the dependencies by running :

:$ npm install

Next run on http://localhost:3000 by running the command

:$ npm run start

To auto deploy changes on gh-pages branch, we need to setup Travis for the project. Register yourself on https://travis-ci.org/ and turn on the Travis for this repository. Next add .travis.yml in the root directory of the source folder.  

sudo: required
dist: trusty
language: node_js
node_js:
  - 6

before_install:
  - export CHROME_BIN=chromium-browser
  - export DISPLAY=:99.0
  - sh -e /etc/init.d/xvfb start

before_script:
  - npm run build

script:
  - npm run test

after_success:
  - bash ./deploy.sh

cache:
  directories: node_modules

# safelist
branches:
  only:
  - master 

Source: https://github.com/fossasia/susi_skill_cms/blob/master/.travis.yml

The travis configuration files will ensure that the project is building for every changes made, using npm run test command, in our case it will only consider changes made on master branch , if you want to watch other branches to add the respective branch name in travis configurations. After checking for build passing we need to automatically push the changes made for which we will use a bash script.

#!/bin/bash

SOURCE_BRANCH="master"
TARGET_BRANCH="gh-pages"

# Pull requests and commits to other branches shouldn't try to deploy.
if [ "$TRAVIS_PULL_REQUEST" != "false" -o "$TRAVIS_BRANCH" != "$SOURCE_BRANCH" ]; then
    echo "Skipping deploy; The request or commit is not on master"
    exit 0
fi

# Save some useful information
REPO=`git config remote.origin.url`
SSH_REPO=${REPO/https:\/\/github.com\//git@github.com:}
SHA=`git rev-parse --verify HEAD`

ENCRYPTED_KEY_VAR="encrypted_${ENCRYPTION_LABEL}_key"
ENCRYPTED_IV_VAR="encrypted_${ENCRYPTION_LABEL}_iv"
ENCRYPTED_KEY=${!ENCRYPTED_KEY_VAR}
ENCRYPTED_IV=${!ENCRYPTED_IV_VAR}
openssl aes-256-cbc -K $encrypted_2662bc12c918_key -iv $encrypted_2662bc12c918_iv -in deploy_key.enc -out ../deploy_key -d
chmod 600 ../deploy_key
eval `ssh-agent -s`
ssh-add ../deploy_key

# Cloning the repository to repo/ directory,
# Creating gh-pages branch if it doesn't exists else moving to that branch
git clone $REPO repo
cd repo
git checkout $TARGET_BRANCH || git checkout --orphan $TARGET_BRANCH
cd ..

# Setting up the username and email.
git config user.name "Travis CI"
git config user.email "$COMMIT_AUTHOR_EMAIL"

# Cleaning up the old repo's gh-pages branch except CNAME file and 404.html
find repo/* ! -name "CNAME" ! -name "404.html" -maxdepth 1  -exec rm -rf {} \; 2> /dev/null
cd repo

git add --all
git commit -m "Travis CI Clean Deploy : ${SHA}"

git checkout $SOURCE_BRANCH

# Actual building and setup of current push or PR.
npm install
npm run build
mv build ../build/

git checkout $TARGET_BRANCH
rm -rf node_modules/
mv ../build/* .
cp index.html 404.html

# Staging the new build for commit; and then committing the latest build
git add -A
git commit --amend --no-edit --allow-empty

# Deploying only if the build has changed
if [ -z `git diff --name-only HEAD HEAD~1` ]; then

  echo "No Changes in the Build; exiting"
  exit 0

else
  # There are changes in the Build; push the changes to gh-pages
  echo "There are changes in the Build; pushing the changes to gh-pages"

  # Actual push to gh-pages branch via Travis
  git push --force $SSH_REPO $TARGET_BRANCH
fi

Source : Bash script for automatic deployment

This bash script will enable travis ci user to push changes to gh pages, for this we need to store the credentials of the repository in encrypted form. To get the public/ private rsa keys use the following command

ssh-keygen -t rsa -b 4096 -C "your_email@example.com"

It will generate keys in .ssh/id_rsa folder in your home repository.

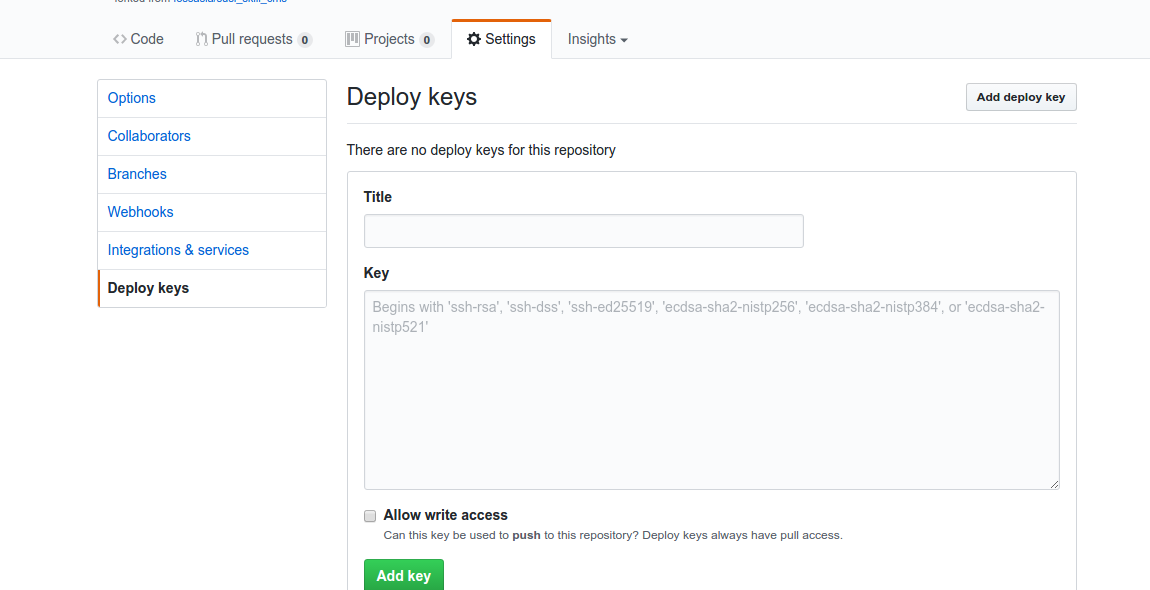
Make sure you do not enter any passphrase while generating credentials otherwise travis will get stuck at time of decrypting the keys. Copy the public key and deploy the key to repository by visiting  https://github.com/<your name>/<your repo>/settings/keys


Next install travis for encryption of keys.

sudo apt install ruby ruby-dev
sudo gem install travis

Encrypt your private deploy_key and add it to root of your repository using command

travis encrypt-file deploy_key

After successful encryption, you will see a message

Please add the following to your build script (before_install stage in your .travis.yml, for instance):

openssl aes-256-cbc -K $encrypted_2662bc12c918_key -iv $encrypted_2662bc12c918_iv -in deploy_key.enc -out ../deploy_key -d

Add the above generated script in travis and push the changes on your master branch. Do not push the deploy_key only the encryption file deploy_key.enc
Finally, add the deploy link of gh pages in package.json of your using key “homepage”.

 "homepage": "http://skills.susi.ai/"

And in scripts of package.json add

"deploy": "gh-pages -d build",

Commit and push your changes and from now onward all your changes will be automatically pushed to gh pages branch. For contribution visit Susi_Skill_CMS.

Resources

Continue ReadingAuto deployment of SUSI Skill CMS on gh pages

How SUSI Analyzes A Given Response

Ever wondered where SUSI’s answers come from? Now Susi has ability to do an answer analysis. To get that analysis, just ask susi “analysis”. This will set susi into an analysis mode, will tell where the latest answer came from and will give you the link for improving the skill.

Let’s check out how Susi analysis work. The skill for analysis is defined  en_0001_foundation.txt  as following

analysis|analyse|analyze|* analysis|* analyse|* analyze|analysis *|analyse *|analyze *
My previous answer is defined in the skill $skill$. You can help to improve this skill and <a href="$skill_link$" target="_blank"> edit it in the code repository here.</a>

$skill$ and $skill_link$ are the variable compiled using

public static final Pattern variable_pattern = Pattern.compile("\\$.*?\\$");

These variables are memorized in Susi cognition. A cognition is the combination of a query of a user with the response of susi.

SusiThought dispute = new SusiThought();
List<String> skills = clonedThought.getSkills();
 if (skills.size() > 0) {
    dispute.addObservation("skill", skills.get(0));
    dispute.addObservation("skill_link",getSkillLink(skills.get(0)));
   }

Susi Thought is a piece of data that can be remembered. The structure of the thought is modeled as a table in which information contained in it is organized in rows and columns.

 public SusiThought addObservation(String featureName, String observation) ;

One can memorize using addObservation() method.  It takes two parameter featureName the object key and observation the object value. It is a table of information pieces as a set of rows which all have the same column names. It inserts the new data always in front of existing similar data rather than overwriting them.

 public String getSkillLink(String skillPath) {
       String link=skillPath;
        if(skillPath.startsWith("/susi_server")) {
            link ="https://github.com/fossasia/susi_server/blob/development" + skillPath.substring("/susi_server".length());
        } else if (skillPath.startsWith("/susi_skill_data")) {
            link = "https://github.com/fossasia/susi_skill_data/blob/master" + skillPath.substring("/susi_skill_data".length());
        }
        return link;
    }

The getSkillLink is a utitlity method to return the link of the skill source github repository based on skillPath.

private String skill;
SusiThought recall;
final SusiArgument flow = new SusiArgument().think(recall);
this.skill = origin.getAbsolutePath();
 if (this.skill != null && this.skill.length() > 0) flow.addSkill(this.skill);

The source of the skill gets added in SusiIntent.java using getAbsolutePath() method which resolves the skill path in the filesystem. Intent  considers the key from the user query, matches the intent tokens to get the optimum result and produces json like

 "data": [
      {
        "object": "If you spend too much time thinking about a thing, you'll never get it done.",
        "0": "tell me a quote",
        "token_original": "quote",
        "token_canonical": "quote",
        "token_categorized": "quote",
        "timezoneOffset": "-330",
        "answer": "When you discover your mission, you will feel its demand. It will fill you with enthusiasm and a burning desire to get to work on it. ",
        "skill_link": "https://github.com/fossasia/susi_skill_data/blob/master/models/general/entertainment/en/quotes.txt",
        "query": "tell me a quote",
        "skill": "/susi_skill_data/models/general/entertainment/en/quotes.txt"
      },

The getskills() method returns list of skill from json which are later added for memorization.

    public List<String> getSkills() {
        List<String> skills = new ArrayList<>();
        getSkillsJSON().forEach(skill -> skills.add((String) skill));
        return skills;
    }

This is how Susi is able to fetch  where the answer came from. Next time when you have a chat with susi do check skill analysis and add your ideas to improve the skill. Take a look at Susi_skill_data for more skills and  read this tutorial  for creating skills for susi.

Resources

Continue ReadingHow SUSI Analyzes A Given Response

Using SUSI AI Accounting Object to Write User Settings

SUSI Server uses DAO in which accounting object is stored as JSONTray. SUSI clients are using this accounting object for user settings data. In this blogpost we will focus on how to use accounting JSONTray to write the user settings, so that a client can use such endpoint to store the user related settings in Susi server. The Susi server provides the required API endpoints to its web and mobile clients. Before starting with the implementation of servlet let’s take a look at Accounting.java file, to check how Susi server stores the accounting data.

public class Accounting {

        private JsonTray parent;
        private JSONObject json;
        private UserRequests requests;
        private ClientIdentity identity;
    ...
}


The JsonTray is class to hold the volume as <String,JsonObject> pairs as a Json file. The UserRequests  class holds all the user activities. The ClientIdentity class extend the base class Client and provides an Identification String for authentication of users. Now that we have understood about accounting in SUSI server let’s proceed for making an API endpoint to Store Webclient User settings. To make an endpoint we will use the HttpServlet class which provides methods, such as doGet and doPost, for handling HTTP-specific services. We will inherit our ChangeUserSettings class from AbstractAPIHandler yand implement APIhandler interface. In Susi Server the AbsrtactAPI handler extends a HTTPServlet which implements doGet and doPost ,all servlet in SUSI Server extends this class to increase code reusability.  

Since a User has to store its setting, set the minimum base role to access this endpoint to User. Apart from ‘User’ there are Admin and Anonymous roles too.

   @Override
    public BaseUserRole getMinimalBaseUserRole() {
        return BaseUserRole.USER;
    }

Next set the path for using this endpoint, by overriding getAPIPath method().

 @Override
    public String getAPIPath() {
        return "/aaa/changeUserSettings.json";
    }

We won’t be dealing with getdefault permissions so null can be return.

  @Override
    public JSONObject getDefaultPermissions(BaseUserRole baseUserRole) {
        return null;
    }

Next we implement serviceImpl method which takes four parameters the query, response, authorization and default permissions.

@Override
    public ServiceResponse serviceImpl(Query query, HttpServletResponse response, Authorization authorization, JsonObjectWithDefault permissions) throws APIException {
       String key = query.get("key", null);
       String value =query.get("value", null);
       if (key == null || value == null ) {
           throw new APIException(400, "Bad Service call, key or value parameters not provided");
       } else {
           if (authorization.getIdentity() == null) {
               throw new APIException(400, "Specified User Setting not found, ensure you are logged in");
           } else {
               Accounting accounting = DAO.getAccounting(authorization.getIdentity());
               JSONObject jsonObject = new JSONObject();
               jsonObject.put(key, value);
               if (accounting.getJSON().has("settings")) {
                   accounting.getJSON().getJSONObject("settings").put(key, value);
               } else {
                   accounting.getJSON().put("settings", jsonObject);
               }
               JSONObject result = new JSONObject();
               result.put("message", "You successfully changed settings to your account!");
               return new ServiceResponse(result);
           }
       }

    }

We will be storing the setting in Json object using key, value pairs. Take the values from user using query.get(“param”,”default value”) and set the default value to null. So that in case the parameters are not present the servlet can return “Bad service call”. To get the accounting object user identity string given by authorization.getIdentity() method is used. Now check if the same user settings is already present, if yes, overwrite it and if not append a new Json object with received key and value. And return the success message through ServiceResponse method.

Proceed to test the working of endpoint at http://127.0.0.1:4000/aaa/changeUserSettings.json?key=theme&value=dark and see if it’s stored using   http://127.0.0.1:4000/aaa/listUserSettings.json.

You have successfully created an endpoint to store user settings and  enhanced Susi Server, take a look and contribute to Susi Server.

Resources

Continue ReadingUsing SUSI AI Accounting Object to Write User Settings

Adding a new Servlet/API to SUSI Server for Skill Wiki

Susi skill wiki is an editor to write and edit skill easily. It follows an API-centric approach where the Susi server acts as API server and a web front-end  act as the client for the API and provides the user interface. A skill is a set of intents. One text file represents one skill, it may contain several intents which all belong together.

The schema for storing a skill is as following:

Using this, one can access any skill based on four tuples parameters model, group, language, skill.  To achieve this on server side let’s create an API endpoint to list all skills based on given model, groups and languages. To check the source for this endpoint clone the susi_server repository from here.

git clone https://github.com/fossasia/susi_server.git

Have a look at documentation for more information about Susi Server.

The Servlet java file is placed in susi_server/ai/susi/server/api/cms/ListSkillService. To implement the endpoint we will use the HttpServlet class which provides methods, such as doGet and doPost, for handling HTTP-specific services.

In Susi Server an abstract class AbstractAPIHandler extending HttpServelets and implementing API handler interface is provided.  Next we will inherit our ListSkillService class from AbstractAPIHandler and implement APIhandler interface.

To implement our servlet we will be overriding 4 methods namely

  • Minimal Base User role 

public BaseUserRole getMinimalBaseUserRole() {
return BaseUserRole.ANONYMOUS;
}

This method tells the minimum Userrole required to access this servlet it can also be ADMIN, USER. In our case it is Anonymous. A User need not to log in to access this endpoint.

  • Default Permissions  

public JSONObject getDefaultPermissions(BaseUserRole baseUserRole) {
return null;
}

This method returns the default permission attached with base user role, our servlets has nothing to do with it, therefore we can simply return null for this case.

  • The API Path 

public String getAPIPath() {
return "/cms/getSkillList.json";
}

This methods sets the API endpoint path, it gets appended to base path which is 127.0.0.1:4000/cms/getSkillList.json for the local host and http://api.susi.ai/cms/getSkillList.json for the server.

  • The ServiceImpl method 

public ServiceResponse serviceImpl(Query call, HttpServletResponse response, Authorization rights, final JsonObjectWithDefault permissions) {

        String model_name = call.get("model", "general");
        File model = new File(DAO.model_watch_dir, model_name);
        String group_name = call.get("group", "knowledge");
        File group = new File(model, group_name);
        String language_name = call.get("language", "en");
        File language = new File(group, language_name);

        ArrayList fileList = new ArrayList();
        fileList =  listFilesForFolder(language, fileList);
        JSONArray jsArray = new JSONArray(fileList);

        JSONObject json = new JSONObject(true)
                .put("model", model_name)
                .put("group", group_name)
                .put("language", language_name)
                .put("skills", jsArray);
        return new ServiceResponse(json);

    }

    ArrayList listFilesForFolder(final File folder,  ArrayList fileList) {

        File[] filesInFolder = folder.listFiles();
        if (filesInFolder != null) {
            for (final File fileEntry : filesInFolder) {
                if (!fileEntry.isDirectory()) {
                    fileList.add(fileEntry.getName()+"");
                }
            }
        }
        return  fileList;
    }

To access any skill we need parameters model, group, language. We get this through call.get method where first parameter is the key for which we want to get the value and second parameter is the default value. Based on received model, group and language browse files in that folder and put them in Json array to return the Service Json response.
That’s all you have successfully implemented the API endpoint to list all the skills in given model group and language. Move on and test it.

And see the resultsTo access any skill we need  parameters model, group, language. We get this through call.get method where first parameter is the key for which we want to get the value and second parameter is the default value. Based on received model, group and language browse files in that folder and put them in Json array to return the Service Json response.

 You have  successfully implemented the API endpoint to list all the skills in given model group and language. Move on and test it.

It’s easy isn’t it you have learnt how to add an endpoint in the server, it’s time to go ahead and create more endpoints to enhance Susi Server, take a look and contribute to Susi Server.

Continue ReadingAdding a new Servlet/API to SUSI Server for Skill Wiki

Skills for SUSI

Susi is an open source personal assistant can do a lot of amazing things for you apart from just answering queries in the text. Susi supports many action type such as answer, table, pie chart, RSS, web search, map. Actions contain a list of objects each with type attribute, there can be more than one actions in the object list. For example

curl http://api.susi.ai/susi/chat.json?timezoneOffset=-330&q=Who+are+you

We get a json response similar to

{
"query": "Who are you",
"answers": [{
"data": [],
"metadata": {"count": 0},
"actions": [{
"type": "answer",
"expression": "I was told that I am a Social Universal Super Intelligence. What do you think?"
}]
}],
}

The above query is an example of action type ‘answer’, for developing more skills on action type answer refer to the Fossasia  blog : How to teach Susi skills.  In this blog we will see how to teach a table skill to susi and how susi interprets the skill .So let’s add a skill to display football teams and its players using service Football-Data.org .

For writing rules Open a new etherpad with a desired name <etherpad name> at http://dream.susi.ai/

  1. Next let’s set some query for which we want Susi to answer.

Example queries:

tell me the teams in premier league | Premier league teams

To get answer we define the following rule

!console:
{
"url":"http://api.football-data.org/v1/competitions/398/teams",
"path":"$.teams",
"actions":[{
"type":"table",
"columns":{"name":"Name","code":"Code","shortName":"Short Name","crestUrl":Logo},
"count": -1
}]
}
eol

Expalanation:

The JSON response for above URL look like this:

{
"_links": {
"self": {
"href": "http://api.football-data.org/v1/competitions/398/teams"
},
"competition": {
"href": "http://api.football-data.org/v1/competitions/398"
}
},
"count": 20,
"teams": [{
"_links": {
"self": {
"href": "http://api.football-data.org/v1/teams/66"
},
"fixtures": {
"href": "http://api.football-data.org/v1/teams/66/fixtures"
},
"players": {
"href": "http://api.football-data.org/v1/teams/66/players"
}
},
"name": "Manchester United FC",
"code": "MUFC",
"shortName": "ManU",
"squadMarketValue": null,
"crestUrl": "http://upload.wikimedia.org/wikipedia/de/d/da/Manchester_United_FC.svg"
},
{
"_links": {
"self": {
"href": "http://api.football-data.org/v1/teams/65"
},
"fixtures": {
"href": "http://api.football-data.org/v1/teams/65/fixtures"
},
"players": {
"href": "http://api.football-data.org/v1/teams/65/players"
}
},
"name": "Manchester City FC",
"code": "MCFC",
"shortName": "ManCity",
"squadMarketValue": null,
"crestUrl": "https://upload.wikimedia.org/wikipedia/en/e/eb/Manchester_City_FC_badge.svg"
}]
}

The attribute ‘path’  statuses object contains a list of objects for which we want to show the table. The table is defined with the action type “table” and a columns object which provides a mapping from the column value names to the descriptive names that will be rendered in the client’s output. In our case, there are  4 columns  Name of the team, Team Code, Short Name of the team, and the Team logo’s URL.

The count attribute is used to denote how many rows to populate the table. If count = -1 , then it means as many as possible or displays all the results.It’s easy, isn’t it? We have successfully created table skill for SUSI. Let’s try it out

Go to http://chat.susi.ai/ and type: dream < your dream name>. And type your queries like  “tell me the teams in premier league” in our case  and see how SUSI presents you the results


Next, want to create some more skills. Let’s teach SUSI to play a game Rock, Paper, Scissors, Lizard, Spock. SUSI can give random answers to your queries for example

What is your favorite dish
Potatoes|Vegetables|Fish

SUSI will return any random answer “Potatoes, “Vegetables” or “Fish”. We would use this to create a game.
First form a general query like “I am getting bored let us play something” and the add an answer to it by adding the rules of the game something like

I am getting bored let us play something
Let's play the game Rock, Paper, Scissors, Lizard, Spock. It is an expansion to the game Rock, Paper, Scissors. We both will  pick a variable and reveal. The winner will be  one who defeats the others. It goes like Scissors cuts Paper,Paper covers Rock, Rock crushes Lizard, Lizard poisons Spock, Spock smashes Scissors, Scissors decapitates Lizard, Lizard eats Paper, Paper disproves Spock, Spock vaporizes Rock, (and as it always has) Rock crushes Scissors. Let's begin, choose something

Next since user would choose between any 5 of the Rock, Scissors, Lizard,Paper and spock add answers to each of them based on the rules.

Rock | I choose Rock
Paper, Paper covers Rock I won :) | Sccisors, Rock crushes Scissors , I lost :( | Lizard, Rock crushes Lizard , You won :-) | Spock, Spock vaporises Rock, You lost :) | Rock, Ahh It's a Tie :-D

Paper | I choose Paper
Rock, Paper covers Rock You won :( | Sccisors, Scissors cuts Paper I won :) | Lizard, Lizard eats Paper I won :) | Spock , Paper disproves Spock You won :( | Paper, Ahh It's a Tie :-D

Lizard | I choose Lizard
Rock, Rock crushes Lizard , I won :-) | Spock, Lizard poisons Spock You won :( | Sccisors, Scissors decapitates Lizard I won :) | Paper, Lizard eats Paper You won :( | Lizard, Ahh It's a Tie :-D

Scissors | I choose Scissors
Rock, Rock crushes Scissors , You lost :) | Paper , Scissors cuts Paper You won :( | Spock, Spock smashes Scissors I won :) | Lizard, Scissors decapitates Lizard You won :( | Scissors, Ahh It's a Tie :-D

Spock | I choose Spock
Rock, Spock vaporizes Rock, I lost :( | Lizard, Lizard poisons Spock You lost :) | Scissors, Spock smashes Scissors I lost :(| Paper, Paper disproves Spock I won :) | Spock, Ahh It's a Tie :-D

SUSI will return any random answer to the variable picked go and try to beat SUSI.

Have fun with SUSI and do create some other awesome skills for SUSI, read this tutorial  for more details.

Continue ReadingSkills for SUSI

Making SUSI’s login experience easy


Every app should provide a smooth and user-friendly login experience, as it is the first point of contact between app and user. To provide easy login in SUSI, auto-suggestion email address is used. With this feature, the user is able to select his email from autocomplete dropdown if he has successfully logged in earlier in the app just by typing first few letters of his email. Thus one need not write the whole email address each and every time for login.
Let’s see how to implement it.
AutoCompleteTextView is the subclass of EditText class, which displays a list of suggestions in a drop down menu from which user can select only one suggestion or value. To use AutoCompleteTextView the dependency of the latest version of design library to the Gradle build file should be added.

dependencies {
compile "com.android.support:design:$support_lib_version"
}

Next, in the susi_android/app/src/main/res/layout/activity_login.xml. The AutoCompleteTextView is wrapped inside TextInputLayout to provide an input field for email to the user.

<android.support.design.widget.TextInputLayout
android:id="@+id/email"
android:layout_width="match_parent"
android:layout_height="wrap_content"
app:errorEnabled="true">
<AutoCompleteTextView
android:layout_width="match_parent"
android:layout_height="wrap_content"
android:hint="@string/email"
android:id="@+id/email_input"
android:textColor="@color/edit_text_login_screen"
android:inputType="textEmailAddress"
android:textColorHint="@color/edit_text_login_screen" />
<android.support.design.widget.TextInputLayout/>

href=”https://github.com/fossasia/susi_android/blob/development/app/src/main/java/org/fossasia/susi/ai/activities/LoginActivity.java”>susi_android/app/src/main/java/org/fossasia/susi/ai/activities/LoginActivity.java following import statements is added to import the collections.

import android.widget.ArrayAdapter;
import android.widget.AutoCompleteTextView;
import java.util.ArrayList;
import java.util.HashSet;
import java.util.Set;

The following code binds the AutoCompleteTextView using ButterKnife.

@BindView(R.id.email_input)
AutoCompleteTextView autoCompleteEmail;

To store every successfully logged in email id, use Preference Manager in login response.

...
if (response.isSuccessful() &amp;&amp; response.body() != null) {
Toast.makeText(LoginActivity.this, response.body().getMessage(), Toast.LENGTH_SHORT).show();
// Save email for autocompletion
savedEmails.add(email.getEditText().getText().toString());
PrefManager.putStringSet(Constant.SAVED_EMAIL,savedEmails);
}
...

Here Constant.SAVED_EMAIL is a string defined in Constants.java as

public static final String SAVED_EMAIL="saved_email";

Next to specify the list of suggestions emails to be displayed the array adapter class is used. The setAdapter method is used to set the adapter of the autoCompleteTextView.

private Set savedEmails = new HashSet&lt;&gt;();
if (PrefManager.getStringSet(Constant.SAVED_EMAIL) != null) {
savedEmails.addAll(PrefManager.getStringSet(Constant.SAVED_EMAIL));
autoCompleteEmail.setAdapter(new ArrayAdapter&lt;&gt;(this, android.R.layout.simple_list_item_1, new ArrayList&lt;&gt;(savedEmails)));
}

Then just test it with first logging in and after that every time you log in, just type first few letters and see the email suggestions. So, next time when you make an app with login interface do include AutoCompleteview for hassle-free login.

Continue ReadingMaking SUSI’s login experience easy