Create custom theme for SUSI chatbot web plugin

SUSI web plugin bot provides the features of SUSI as a chat window which users can plugin to their websites. They just need to copy the generated javascript code into their website and the SUSI bot plugin will be enabled. The user can customize the theme of the chatbot. This blog explains how the feature of applying custom theme is implemented.

Accepting user’s input

The react component of our concern is BotBuilderPages/Design.js. We use material-ui-color-picker component to accept user’s choice of color.

<ColorPicker
  className='color-picker'
  style={{display:'inline-block',float:'left'}}
  name='color'
  defaultValue={ this.state[component.component] }
  onChange={(color)=>
   this.handleChangeColor(component.component,color) }
/>


Similarly, there is a text field which accepts the url of an image. The values are stored in the component’s state variables.

Storing settings in server

The design settings are stored in the text format:

This forms part of the skill’s text file. When the user clicks on “save and deploy” button, the complete skill gets send to the server through the following API:

let settings = {
      async: true,
      crossDomain: true,
      url:
        urls.API_URL +
        '/cms/' +
        (this.state.updateSkillNow ? 'modifySkill.json' : 'createSkill.json'),
      method: 'POST',
      processData: false,
      contentType: false,
      mimeType: 'multipart/form-data',
      data: form,
    };

    $.ajax(settings)
      .done(function(response) {
        // successfully saved in server
      });


In the server, the skill is saved in susi_private_skill_data directory. Also, the design and configuration settings are stored in chatbot.json file.

Applying the settings to the bot

Now, in the susi-chatbot.js file, the custom theme settings are applied to the bot. The function getTheme() fetches the theme settings from the server via an ajax request. Then the function applyTheme() is executed which applies the theme to the chatbot.

$(".susi-sheet-content-container").css("background-color",botbuilderBackgroundBody);
if(botbuilderBodyBackgroundImg){
$(".susi-sheet-content-container").css("background-image","url("+botbuilderBodyBackgroundImg+")");
}


Similarly, other theme variables are applied as well. Thus we have customised the theme of the SUSI chatbot plugin.
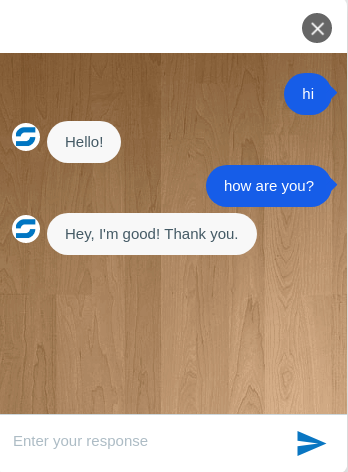
Result:

Resources


Continue ReadingCreate custom theme for SUSI chatbot web plugin

Checking and removing SUSI Username Mentions in SUSI Slackbot

The SUSI Slackbot is a custom integration bot in slack. It responds to the user’s queries in the slack channels. It makes use of Slack Real Time Messaging APIs. In the background, it takes result from SUSI Server and also have some more added features. When the user mentions susi bot in the slack channels (eg. @asksusi), we know that the message is intended for susi. So now we need to remove the susi mention part, extract the rest of the message and send it to susi server. This blog explains how the messages are received from slack real time messaging API and how to remove the SUSI username mention.

Storing the bot’s self id

Before we can detect the susi username mention, we need to actually know the self id of the bot, which is a unique id assigned by the slack to the bot. Later, we use this id to detect the mention of susi.

var Slack = require('@slack/client');
var RtmClient = Slack.RtmClient;
var RTM_EVENTS = Slack.RTM_EVENTS;

var appData={};
rtm.on(CLIENT_EVENTS.RTM.AUTHENTICATED, (connectData) => {
    // Cache the data necessary for this app in memory
    appData.selfId = connectData.self.id;
});

Receiving message and processing it

We will be receiving message from RTM API. The code for receiving the message is:

var Slack = require('@slack/client');
var RtmClient = Slack.RtmClient;
var RTM_EVENTS = Slack.RTM_EVENTS;

rtm.on(RTM_EVENTS.MESSAGE, function(message) {
var channel = message.channel;
var text=message.text;
//send reply only when mentioned or in direct message
if(text && message.user!==appData.selfId && (text.indexOf(appData.selfId)!==-1 || channel.startsWith('D'))){
    var susiMention='<@'+appData.selfId+'>';
    text=text.replace(susiMention,'');


The function passed as a callback executes only when we receive a new message. This message could be either a DM (Direct Message) or in a channel. We need to reply when the message mentions susi username or it is a DM. In the above code, we are checking if the message received is not from the bot itself, and is either from a DM or mentions susi username.
Here is a breakdown of the message object we receive in the function:

{ type: 'message',
  channel: 'C9CLRN4M7',
  user: 'U9D7JU15Y',
  text: '<@U9H78R274> hello!',
  ts: '1526413229.000321'}


  • Type: This tells the type of the message.
  • Channel: It contains the channel id of the slack channel where the message has been posted.
  • User: It contains the user id of the author.
  • Text: It contains the full text of the message, including mentions. We need to extract the mention part (<@U9H78R274>) and remove it.
  • Ts: ts is the unique (per-channel) timestamp.

Note: In case of DMs, the channel id will start with a “D”. In case of common channels, the channel id will start with “C”. That is how we can differentiate between a direct message and a message in a channel.

Thus we first store the bot’s self id. Then, upon receiving a message we check if the message is not from the bot itself, is a Direct Message or if it is from a channel, its mentions susi. Then only the susi bot replies to the message.

Result:

Resources


Continue ReadingChecking and removing SUSI Username Mentions in SUSI Slackbot

Adding typing animation and messages in SUSI Web bot plugin

SUSI web plugin bot provides the features of SUSI as a chat window which users can plugin to their websites. They just need to copy the generated javascript code into their website and the SUSI bot plugin will be enabled. This blog explains about the process of creating messages from both the user side and the bot side, and adding typing animation in the SUSI web chat plugin. A live demo of the bot can be found at susi-chatbotplugin-demo.surge.sh.

Creating User’s message

The main javascript file of our concern is skills.susi.ai/public/susi-chatbot.js. When the user types their message and press enter, setUserResponse() function is executed:

This function adds a message box to the chat window. The message box contains the message of the user.
Result:

Adding typing animation

After the user types the message and the message box is displayed, setUserResponse() function is executed. This function sets up a message box from the bot’s side and fills it with a loading gif. The important thing to note is msgNumber variable. For each user message, this variable is incremented by one. So it keeps count of the total number of message from the user or the bot. Each message box from the bot is assigned a unique id: “susiMsg-<msgNumber>”. Thus, when the response from the SUSI server is received, the loading gif is replaced by the message from the server. The corresponding message box is identified by the above id.

This function adds a message box to the chat window containing the loading gif.
Result:

On receiving the response from the server, the following function is executed:

function setBotResponse(val,msgNumber) {
    val = val.replace(new RegExp('\r?\n','g'), '<br />');
    $("#susiMsg-"+msgNumber+" .susi-msg-content-div").text(val);
    scrollToBottomOfResults();
}


This function replaces the above loading gif with the server’s response.

Final result:

Resources

Continue ReadingAdding typing animation and messages in SUSI Web bot plugin

Deploying SUSI Zulip bot

Zulip is a popular Real time messaging system, which combines the immediacy of Slack with an email threading model. The SUSI Zulipbot is a custom chatbot for zulip platform which fetches the response from the SUSI Server and will have some additional zulip platform specific features too. Users can install the bot into their zulip workspaces and then interact with the bot. They can either talk to the bot in private message or talk in group channels. This blog walks through the process of deploying SUSI Zulip bot into your workspace.

Cloning python-zulip-api

Python-zulip-api is where all the bots being developed for the Zulip platform can be found. The SUSI bot can be found in zulip_bots/bots/susi. susi.py is the main file where the bot’s code resides. test_susi.py is the file where the test cases for the bot are written. To clone and run the bot locally, make sure you have python3, pip and virtualenv installed. Then follow the below steps:

  1. git clone https://github.com/zulip/python-zulip-api.git  – clone the python-zulip-api repository.
  2. cd python-zulip-api  – navigate into your cloned repository.
  3. python3 ./tools/provision  – install all requirements in a Python virtualenv.
  4. The output of provision  will end with a command of the form source …/activate; run that command to enter the new virtualenv.
  5. Finished. You should now see the name of your venv preceding your prompt, e.g. (zulip-api-py3-venv)

For more information about installing the repository, refer https://zulipchat.com/api/writing-bots

Testing the bot’s output locally

For quick testing of your bot’s output, zulip-terminal is a very useful tool. It provides you a testing environment inside your terminal. After installing the above requirements, run  zulip-terminal susi in your terminal to enable testing the bot’s output:

Enter your message: hi
Reply from the bot is printed between the dotted lines:
——-
Hello!
——-
Enter your message: tell me a joke
Reply from the bot is printed between the dotted lines:
——-
It is said that looking into Chuck Norris’ eyes will reveal your future. Unfortunately, everybody’s future is always the same: death by a roundhouse-kick to the face.
——-
Enter your message: who created you?
Reply from the bot is printed between the dotted lines:
——-
The FOSSASIA community created me
——-
Enter your message: ^C
Ok, if you’re happy with your terminal-based testing, try it out with a Zulip server.
You can refer to https://zulipchat.com/api/running-bots#running-a-bot.

Deploying the bot in a Zulip workspace

Now you can deploy the bot in your own workspace or even in chat.zulip.org workspace. Follow these steps:

  1. After logging to your workspace, go to Settings () -> Your bots -> Add a new bot. Select Generic bot for bot type, fill out the form and click on Create bot.
  2. A new bot user should appear in the Active bots panel.
  3. Download the bot’s zuliprc configuration file to your computer.
  4. Run  zulip-run-bot susi –config-file ~/zuliprc-my-bot (using the path to the zuliprc file from above step).
  5. Congrats! Your bot should be running. Talk to your bot with mentioning @susi in a group channel or directly in a private channel.

Resources

Continue ReadingDeploying SUSI Zulip bot