Retrofit to make API calls in SUSI.AI Android Client

In the SUSI.AI app, I found the extensive use of “Retrofit” to make API calls to the server. While working on a part of the app, I faced some difficulty regarding the implementation of “Retrofit”.  Though I learned and overcame the problems, I realized that others would face a similar problem. So, today I am writing this blog explaining how to implement “Retrofit” using the help of “SUSI.AI” android client.

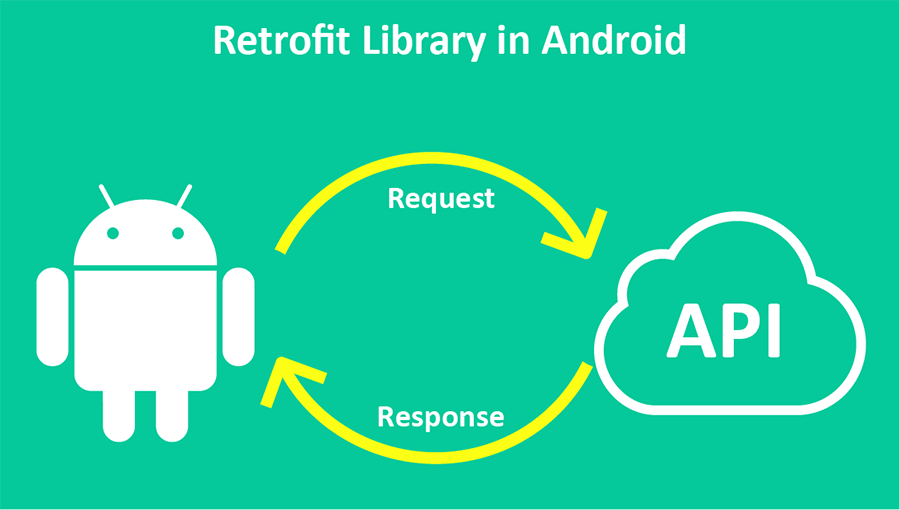
Working of API Calls:

Android networking or any networking works in the following way:

  • Request— An HTTP request is made to a certain URL, with all the supplied parameters.
  • Response — The request created returns a response, usually in the JSON format.
  • Parse & Store —The JSON returned is parsed and is being used accordingly.

In Android, we use —

  • Okhttp — For creating an HTTP request with all the proper headers
  • Retrofit — For making the request
  • Moshi / GSON — For parsing the JSON data
  • Kotlin Coroutines — For making non-blocking (main thread) network requests.
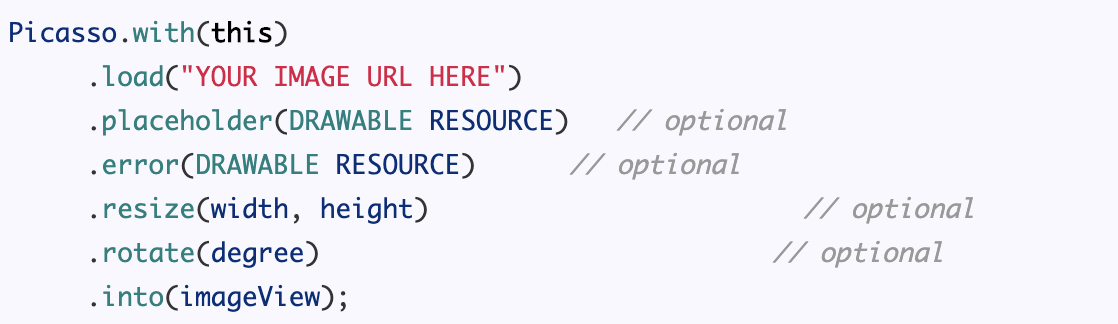
  • Picasso / Glide— For downloading an image from the internet and setting it into an ImageView.

Obviously, these are just some of the popular libraries but there are others too.

How to use Retrofit?

First of all we need to import certain libraries in the app level gradle file.

Don’t forget to add the following in the manifest file.

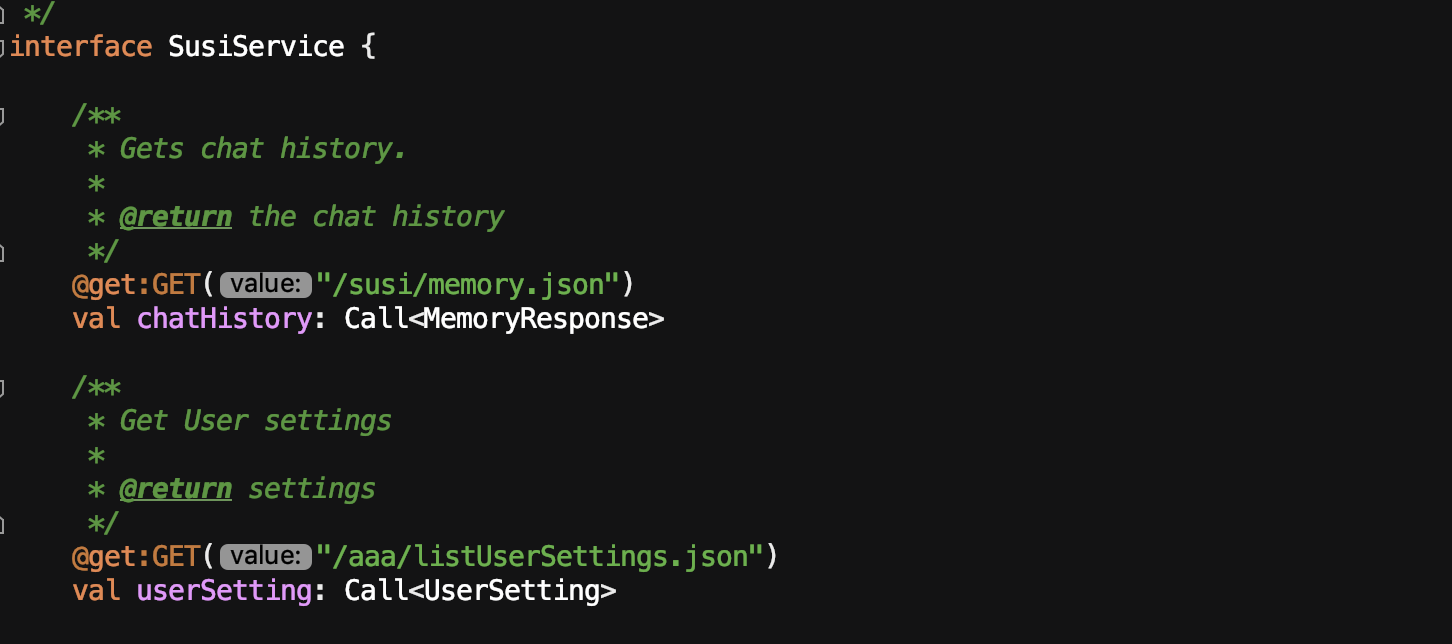
Now, create an interface. The API link mentioned in the interface would be used to fetch data from the server.

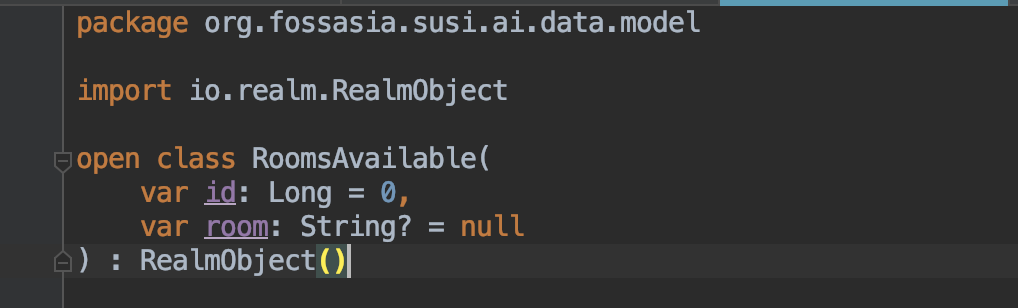
Now create a class to parse the JSON data.  Here, we have used a Gson Converter and so the JSON response is automatically converted to the respective.

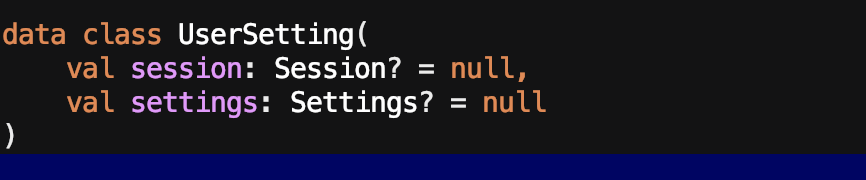
Here Session and Settings are also a data class. These data classes are framed according to the response that we receive.

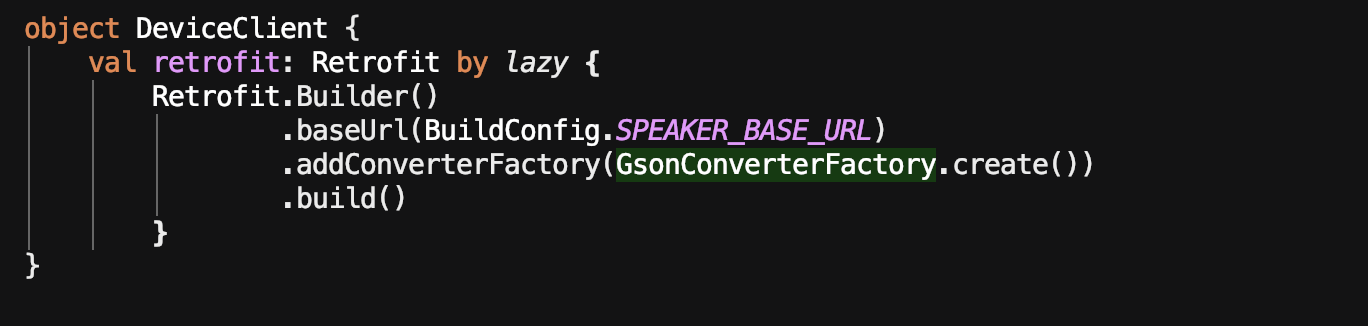
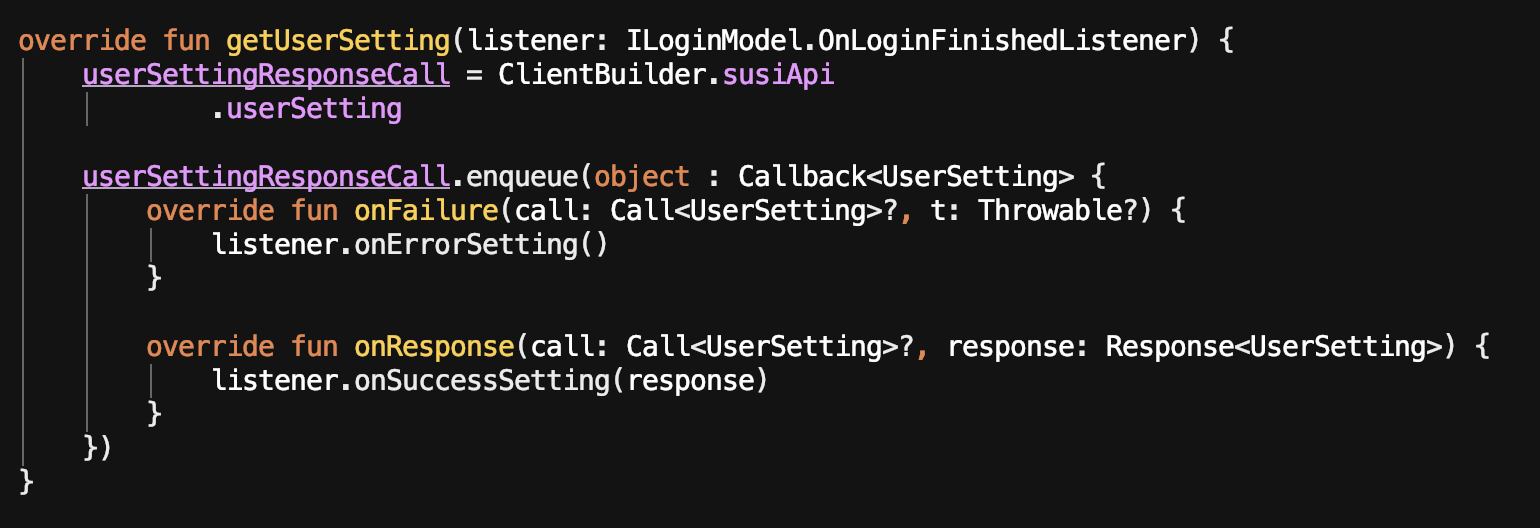
Now, create a Retrofit Builder with Base URL and GsonConverterFactory. This builder will be useful to make the API calls.

Create a service for Retrofit with your service interface. Then, create a queue which will be used to de-serialize the JSON. 

Resources: 

Documentation: Retrofit

Blog: Retrofit

Tutorial: Retrofit Video Tutorial

SUSI.AI Android App: PlayStore GitHub

Tags:

SUSI.AI Android App, Kotlin, SUSI.AI, FOSSASIA, GSoC, Android, Retrofit, API calls

Continue ReadingRetrofit to make API calls in SUSI.AI Android Client

Implementation of Planned Actions in SUSI.AI Android Client

What do you understand by “Planned Actions”? Is it something required to do something according to plan? Is it something that needs to be done at a particular time? Yes, it is. “Planned Actions” is a feature present in the SUSI.AI android app that helps to schedule tasks. Yes, you heard it right! It helps to schedule the task. We can schedule some events like “setting an alarm after one minute”, “playing music after one minute”, etc. Such events require scheduling of different events at different point of time.

SUSI.AI is a smart assistant. It answers the queries that the user asks for, play music, etc. Additionally, the project also has a smart speaker part, which is very similar to Google Home. A smart speaker often has the ability to perform certain task other than answering normal queries at a scheduled time. During my GSoC period, I got the opportunity to implement such a feature of scheduling task in the SUSI.AI android app.

What is the scheduling of task or planned action?

Scheduling of task or planned actions is nothing but performing some kind of task at a scheduled time. Let’s consider “set alarm in one minute”. This means an alarm should be set that should ring up after one minute. 

Let’s see how it has been implemented in SUSI.

First of all, we need to have a skill that would respond to the query asked. Consider, the skill “rocket launch”. The response for this skill is:

{
  “query”: “rocket launch”,
  “client_id”: “aG9zdF8xNzIuNjguMTQ2LjE5MF80YTk0OGY4OA==”,
  “query_date”: “2019-08-19T17:31:53.670Z”,
  “answers”: [{
    “data”: [
      {
        “0”: “rocket launch”,
        “token_original”: “rocket”,
        “token_canonical”: “rocket”,
        “token_categorized”: “rocket”,
        “timezoneOffset”: “-330”,
        “language”: “en”
      },
      {
        “0”: “rocket launch”,
        “token_original”: “rocket”,
        “token_canonical”: “rocket”,
        “token_categorized”: “rocket”,
        “timezoneOffset”: “-330”,
        “language”: “en”
      }
    ],
    “metadata”: {“count”: 2},
    “actions”: [
      {
        “language”: “en”,
        “type”: “answer”,
        “expression”: “starting countdown”
      },
      {
        “expression”: “twelve”,
        “language”: “en”,
        “type”: “answer”,
        “plan_delay”: 1000,
        “plan_date”: “2019-08-19T17:31:54.679Z”
      },
      {
        “expression”: “eleven”,
        “language”: “en”,
        “type”: “answer”,
        “plan_delay”: 2000,
        “plan_date”: “2019-08-19T17:31:55.681Z”
      },
      {
        “expression”: “ten”,
        “language”: “en”,
        “type”: “answer”,
        “plan_delay”: 3000,
        “plan_date”: “2019-08-19T17:31:56.681Z”
      },
      {
        “expression”: “nine”,
        “language”: “en”,
        “type”: “answer”,
        “plan_delay”: 4000,
        “plan_date”: “2019-08-19T17:31:57.682Z”
      },
      {
        “expression”: “ignition sequence starts”,
        “language”: “en”,
        “type”: “answer”,
        “plan_delay”: 5000,
        “plan_date”: “2019-08-19T17:31:58.682Z”
      },
      {
        “expression”: “six”,
        “language”: “en”,
        “type”: “answer”,
        “plan_delay”: 7000,
        “plan_date”: “2019-08-19T17:32:00.682Z”
      },
      {
        “expression”: “five”,
        “language”: “en”,
        “type”: “answer”,
        “plan_delay”: 8000,
        “plan_date”: “2019-08-19T17:32:01.683Z”
      },
      {
        “expression”: “four”,
        “language”: “en”,
        “type”: “answer”,
        “plan_delay”: 9000,
        “plan_date”: “2019-08-19T17:32:02.683Z”
      },
      {
        “expression”: “three”,
        “language”: “en”,
        “type”: “answer”,
        “plan_delay”: 10000,
        “plan_date”: “2019-08-19T17:32:03.683Z”
      },
      {
        “expression”: “two”,
        “language”: “en”,
        “type”: “answer”,
        “plan_delay”: 11000,
        “plan_date”: “2019-08-19T17:32:04.684Z”
      },
      {
        “expression”: “one”,
        “language”: “en”,
        “type”: “answer”,
        “plan_delay”: 12000,
        “plan_date”: “2019-08-19T17:32:05.684Z”
      },
      {
        “expression”: “zero”,
        “language”: “en”,
        “type”: “answer”,
        “plan_delay”: 13000,
        “plan_date”: “2019-08-19T17:32:06.684Z”
      },
      {
        “expression”: “all engines running”,
        “language”: “en”,
        “type”: “answer”,
        “plan_delay”: 14000,
        “plan_date”: “2019-08-19T17:32:07.685Z”
      },
      {
        “expression”: “liftoff, we have a liftoff!”,
        “language”: “en”,
        “type”: “answer”,
        “plan_delay”: 16000,
        “plan_date”: “2019-08-19T17:32:09.685Z”
      }
    ],
    “skills”: [“/susi_skill_data/models/general/Novelty and Humour/en/Apollo_Countdown.txt”],
    “persona”: {}
  }],
  “answer_date”: “2019-08-19T17:31:53.685Z”,
  “answer_time”: 15,
  “language”: “en”,
  “session”: {“identity”: {
    “type”: “host”,
    “name”: “172.68.146.190_4a948f88”,
    “anonymous”: true
  }}
}

The response for the above skill can be received by querying “rocket launch” at https://api.susi.ai/  or you can get it by going directly to the following link https://api.susi.ai/susi/chat.json?timezoneOffset=-330&q=Rocket+Launch

The skill acts as a count-down timer of rocket launch. Now, we have a skill, but how are we going to implement it in android app, so that the countdown timer works properly and the output appears at the proper scheduled time. Also, we need to take care that the other processes of the app doesn’t stop or hangs up when some events are scheduled. Going through all these problems and circumstances I came up with a solution. So, let’s have a look. I made use of Handler. 

Handler in Android helps to execute some tasks at a scheduled time. The tasks are executed in a different thread other than the Main UI thread. So, the other process in the app doesn’t stops and it runs smoothly.

Let’s have a look at the code:

for (i in 0 until actionSize) {

  if (susiResponse.answers[0].actions[i].plan_delay.toString().isNullOrEmpty()) {
      planDelay = 0L
  } else {
      planDelay = susiResponse.answers[0].actions[i].plan_delay
  }
  executeTask(planDelay, susiResponse, i, date)
  chatView?.hideWaitingDots()
}

The code above, loops through all the actions mentioned in the skill one by one. After parsing it, the data is passed to a function executeTask(). This function performs the task to schedule the events (plan actions).

handler = Handler()
try {
  handler.postDelayed({
      val parseSusiHelper = ParseSusiResponseHelper()
      parseSusiHelper.parseSusiResponse(susiResponse, i, utilModel.getString(R.string.error_occurred_try_again))
      var setMessage = parseSusiHelper.answer

      if (parseSusiHelper.actionType == Constant.TABLE) {
          tableItem = parseSusiHelper.tableData
      } else if (parseSusiHelper.actionType == Constant.VIDEOPLAY || parseSusiHelper.actionType == Constant.AUDIOPLAY) {
          // Play youtube video
          identifier = parseSusiHelper.identifier
          youtubeVid.playYoutubeVid(identifier)
      } else if (parseSusiHelper.actionType == Constant.ANSWER && (PrefManager.checkSpeechOutputPref() && check || PrefManager.checkSpeechAlwaysPref())) {
          setMessage = parseSusiHelper.answer
          try {
              var speechReply = setMessage
              Handler().post {
                  textToSpeech = TextToSpeech(context, TextToSpeech.OnInitListener { status ->
                      if (status != TextToSpeech.ERROR) {
                          val locale = textToSpeech?.language
                          textToSpeech?.language = locale
                          textToSpeech?.speak(speechReply, TextToSpeech.QUEUE_FLUSH, null)
                          PrefManager.putBoolean(R.string.used_voice, true)
                      }
                  })
              }
          } catch (e: Exception) {
              Timber.e(“Error occured while trying to start text to speech engine – ” + e)
          }
      } else if (parseSusiHelper.actionType == Constant.STOP) {
          setMessage = parseSusiHelper.stop
          removeCallBacks()
          chatView?.stopMic()
      }

      if (parseSusiHelper.answer == ALARM) {
          playRingTone()
      }

      try {
          databaseRepository.updateDatabase(ChatArgs(
                  prevId = id,
                  message = setMessage,
                  date = DateTimeHelper.getDate(date),
                  timeStamp = DateTimeHelper.getTime(date),
                  actionType = parseSusiHelper.actionType,
                  mapData = parseSusiHelper.mapData,
                  isHavingLink = parseSusiHelper.isHavingLink,
                  datumList = parseSusiHelper.datumList,
                  webSearch = parseSusiHelper.webSearch,
                  tableItem = tableItem,
                  identifier = identifier,
                  skillLocation = susiResponse.answers[0].skills[0]
          ), this)
      } catch (e: Exception) {
          Timber.e(“Error occured while updating the database – ” + e)
          databaseRepository.updateDatabase(ChatArgs(
                  prevId = id,
                  message = utilModel.getString(R.string.error_internet_connectivity),
                  date = DateTimeHelper.date,
                  timeStamp = DateTimeHelper.currentTime,
                  actionType = Constant.ANSWER
          ), this)
      }
  }, planDelay)
} catch (e: java.lang.Exception) {
  Timber.e(“Error while showing data – ” + e)
}

The variable planDelay determines the time after which the task needs to be executed. By default its value is 0, i.e, it gets executed at that moment only until any delay time is supplied by the skill.

In this way, planned actions have been implemented in SUSI.AI Android app.

Resources: 

Blogs: Handler, Handler Implementation

SUSI Skill: Rocket Launch

SUSI.AI Android App: PlayStore GitHub

Tags:SUSI.AI Android App, Kotlin, SUSI.AI, FOSSASIA, GSoC, Android, Handler, Planned Actions

Continue ReadingImplementation of Planned Actions in SUSI.AI Android Client

Displaying of Images using Picasso Library in SUSI.AI Android App

Displaying images is not so easy in an Android app without using a third-party library. Picasso is one of the most popularly used third-party libraries for android that is used to display images. It is a very simple and powerful library for image downloading and caching. SUSI.AI is a smart assistant app. We need the use of Picasso a lot to answer the queries put up by the users. Suppose if the user asks to show some pictures, we need to display it. In such a case we find Picasso very handy. So let’s know how to implement it, by going through the code base present in SUSI.AI android app.

Why use Picasso or another third-party library?

You might be thinking that why we should use a 3rd party library. You can achieve your task without using a 3rd party API as well. But if you will use the core method then it would take a larger amount of code. But if we will use a 3rd party library like Picasso then we will achieve our goal in fewer lines of code.  Also, we can easily cache the images using this libraries. Caching is really an important feature to speed up the application.

Adding Picasso Library to the Gradle file

Adding Picasso android library to your project is very easy. You just need to add the following line in the dependency block of your build.gradle file and replace ${rootConfiguration.picassoVersion} with the latest version of Picasso(for example 2.71828). Now sync your Gradle file. I am assuming that you have already added NETWORK permission in your project.

The simplest way of loading image is:

Picasso.with(this)
   .load("YOUR IMAGE URL HERE")
   .into(imageView);

Here, imageView is the reference to the imageView where you want to display the image.

This is how it is being implemented in the susi app. Here imageUrl is the URL of the image to be loaded. ImageView is the place where we need to display the loaded image. Now there is a chance that the imageUrl is actually not a URL of the image, or suppose Picasso fails to load the image due to some errors. In all such cases, a dummy image would be shown in the imageView. This dummy image is added by calling the error function of Picasso class and passing the reference of the image to it. The placeholder function displays a static image present inside the app until the actual image is being loaded.

Re-sizing and Rotating

We can also resize and rotate the image very easily.

Resources: 

Documentation: Picasso, Glide vs Picasso

Tutorial: Picasso Youtube Video

Library source code: Picasso Library source code

SUSI.AI Android App: PlayStore GitHub

Tags: SUSI.AI Android App, Kotlin, SUSI.AI, FOSSASIA, GSoC, Android, Picasso, Image loader..

Continue ReadingDisplaying of Images using Picasso Library in SUSI.AI Android App

Store data using Realm Database in SUSI.AI Android App

A large application always consists of some kinds of a database to keep a store of large chunks of data that it receives from the server. One such database is the Realm Database.

While working on SUSI.AI app (a smart assistant open-source app) I found the necessity to store room name in the database. These room names were used while configuring SUSI Smart Speaker using the app. Let me share how I implemented this in the app.

Before we proceed with the implementation, let’s go through the  prerequisites for using Realm with Android:

  • Android Studio version 1.5.1 or higher
  • JDK version 7.0 or higher
  • A recent version of the Android SDK
  • Android API Level 9 or higher (Android 2.3 and above)

First of all, you need to add the Gradle dependency at the app level.

Since we are going to do it in Kotlin, we need to add the following:

Since this is a database that is used throughout the application, we have to initialize the realm in the class that extends the Application class.

Once the realm is initialized, we set up a data model class. This model class contains the format of data to be stored. The model class should extend the RealmObject class. Also, the model class must use the keyword open. This makes it available for inheritance and allows it to be overridden. If we remove the open keyword here, we get an error stating: cannot inherit from the final model class. 

When the realm objects are initialized at the start, the default values of the variables are declared null (Concept of Function Default  Arguments in Kotlin).

Now to manipulate the database from the required files we need to create a reference to the Realm followed by getting the default instance of Realm.


To commit any operation with the database, the code must be written within beginTransaction and commitTransaction blocks. Below is an example where the room name is added to the database by using the model class mentioned above.

We use the above method to add data to the database. Now, if we can add data, we should be able to retrieve them too. Let’s go through the code snippet to retrieve data from the database.

The above snippet shows a function which extracts data from the database and stores them in an array list for displaying in a recycler view. 

Now, we all went through addition, display of data in the realm database. Is that sufficient?? No, if we can add data to the database, then there also should be a way to delete the data when needed. Clearing/removing data all at once from the database is very easy and can be simply done by :

Resources: 

Documentation: Realm

Reference: Realm Database

SUSI.AI Android App: PlayStore GitHub

Tags: SUSI.AI Android App, Kotlin, SUSI.AI, FOSSASIA, GSoC, Android, Realm, Database

Continue ReadingStore data using Realm Database in SUSI.AI Android App

Handler in Android

While working on SUSI.AI app (a smart assistant app), I found the necessity of handling UI components along with background data queue. While initializing a text to speech(TTS) engine inside a fragment that already had a speech to text (stt) engine implemented, there was a necessity to run the TTS engine to run using handler and later make it interact with the main UI thread. Let’s see how I handled this situation in the SUSI.AI app.

Android usually handles all the UI operations and input events from one single thread which is known as the Main or UI thread. Android collects all events in this thread in a queue and processes this queue. If one needs to perform some tasks in parallel with the main thread, then the main thread needs to be synchronized. Each handler is associated with a thread. A handler is a way to solve the asynchronous problem in Android.

A handler is widely used for:

  • Managing and inserting messages in the queue
  • Performing a task at a scheduled time in a different thread
  • Implementing runnable 

How Handlers work?

A handler is used to send and process Message and Runnable objects associated with a thread. Each handler is associated with a different single thread. This helps to perform the task asynchronously. The task, messages or runnable associated with that handlers are executed when it comes out of the message queue.

In Android, Handler is mainly used to update the main thread from background thread or other than the main thread. There are two methods in the handler:

  • Post() − it posts a message from background thread to the main thread using looper.
  • sendmessage() − if we want to organize what we have sent to UI (message from background thread) or UI functions. we should use sendMessage().

Construction of Handler:

First of all, we need to create and reference to Handler. After Handler is being created, we create some runnable objects. These runnable objects get executed inside the Handler.

Construction of Runnables that can be used in the handler:

Here, in this example, I have used the Post method to update the main thread.

Clearly, the post method is used in the handler object to execute the task mentioned in the runnable, by using its reference. Also, we can see the use of postDelayed function. This function executes the runnable after a specific span of time(mentioned in milliseconds in the parameter along with the runnable reference).

Lastly, it is very important to note that we should clear all the references to the handlers during the destruction of the view or the activity else there might be memory leaks. 

Resources: 

Documentation: Handler

Reference: Handler in Android

SUSI.AI Android App: PlayStore GitHub

Tags:SUSI.AI Android App, Kotlin, SUSI.AI, FOSSASIA, GSoC, Android, Handler

Continue ReadingHandler in Android

Implementation of Shimmer Effect in Layouts in SUSI.AI Android App

The shimmer effect was created by Facebook to indicate the loading of data in pages where data is being loaded from the internet. This was created as an alternative for the existing ProgressBar and the usual loader to give better user experience with UI.

Let’s get started to see how we can implement it. Here, I am going to use SUSI.AI (a smart assistant app) as a reference app to show a code demonstration. I am working on this project in my GSoC period and while working I found the need to implement this feature in many places. So, I am writing this blog to share my experience with how, I implemented it in the app.

First of all, we need to add the shimmer dependency in the app level Gradle file.

Now, we need to create a placeholder layout simply by using views. This placeholder should resemble the actual layout. Usually, grey-colored is preferred in the placeholder background. A placeholder should not have any text written. It should be viewed only. Let’s consider the placeholder used in susi.

Now let’s have a glance at the actual items whose placeholders we have made.

Now, after the creation of the placeholder, we need to add this placeholder in the main layout file. It is done in the following way:

Here, I have added the placeholders 6 times so that the entire screen gets covered up. You can add it as many times as you want.

The next and the final task is to start and stop the shimmer effect according to the logic of the code. Here, the shimmer starts as soon as the fragment is created and stops when the data is successfully loaded from the server. Have a look at how to create the reference.

First of all, we need to create a reference to the shimmer. Then we use this reference to start/stop the shimmer effect. Here, in Kotlin we can directly use the id used in layout without creating any reference.

We start the shimmer effect simply by using startShimmer() function in the shimmer reference.

Similarly, we can stop it using stopShimmer() function in the reference.

Resources: 

Framework: Shimmer in Android

Documentation: ShimmerAndroid Design

SUSI.AI Android App: PlayStore GitHub

Tags:

SUSI.AI Android App, Kotlin, SUSI.AI, FOSSASIA, GSoC, Android, Shimmer

Continue ReadingImplementation of Shimmer Effect in Layouts in SUSI.AI Android App

Gestures in SUSI.AI Android

Gestures have become one of the most widely used features by a user. The user usually, expects that some tasks should be performed by the app when he or she executes some gestures on the screen.

A “touch gesture” occurs when a user places one or more fingers on the touch screen, and your application interprets that pattern of touches as a particular gesture. There are correspondingly two phases to gesture detection:

  1. Gather data about touch events.
  2. Interpret the data to see if it meets the criteria for any of the gestures your app supports.

There are various kinds of gestures supported by android. Some of them are:

  • Tap
  • Double Tap
  • 2-finger Tap
  • 2-finger-double tap
  • 3-finger tap
  • Pinch

In this post, we will go through the SUSI.AI android app (a smart assistant app) which has the “Right to left swipe” gesture detector in use. When such kind of gesture is detected inside the Chat Activity, it opens the Skill’s Activity. This makes the app very user-friendly. Before we start implementing the code,  go through the steps mentioned above in detail.

1st Step “Gather Data”: 

When a user places one or more fingers on the screen, this triggers the callback onTouchEvent() on the View that received the touch events. For each sequence of touch events (position, pressure, size, the addition of another finger, etc.) that is ultimately identified as a gesture, onTouchEvent() is fired several times.

The gesture starts when the user first touches the screen, continues as the system tracks the position of the user’s finger(s), and ends by capturing the final event of the user’s fingers leaving the screen. Throughout this interaction, the MotionEvent delivered to onTouchEvent() provides the details of every interaction. Your app can use the data provided by the MotionEvent to determine if a gesture it cares about happened.

2nd Step “Data Interpretation”:

The data received needs to be properly interpreted. The gestures should be properly recognized and processed to perform further actions. Like an app might have different gestures integrated into the same page live “Swipe-to-refresh”, “Double-tap”, “Single tap”, etc. Upon successfully differentiating this kind of gesture, further functions/tasks should be executed.

Let’s go through the code present in SUSI now.

First of all, a new class is created here “CustomGestureListener”. This class extends the “SimpleOnGestureListener” which is a part of the “GestureDetector” library of android. This class contains a function “onFling”. This function determines the gestures across the horizontal axis. event1.getX(), and event2.getX() functions says about the gesture values across the horizontal axis of the device. Here, when the value of X becomes getter than 0, it actually indicates that the user has swiped from right to left. This becomes active even in very minor change, which users might have presses accidentally, or has just touched the screen. So to avoid such minor impulses, we set a value that we will execute our task only when the value of X lies between 100 and 1000. This avoids minor gestures.

Inside the onCreate method, a new CustomGestureListener instance is created, passing through a reference to the enclosing activity and an instance of our new CustomGestureListener class as arguments. Finally, an onTouchEvent() callback method is implemented for the activity, which simply calls the corresponding onTouchEvent() method of the ScaleGestureDetector object, passing through the MotionEvent object as an argument.

Summary:

Gestures are usually implemented to enhance the user experience while using the application. Though there are some predefined gestures in Android, we can also create gestures of our own and use them in our application.

Resources: 

Documentation: Gestures

Reference: Gesture

SUSI.AI Android App: PlayStore GitHub

Tags:

SUSI.AI Android App, Kotlin, SUSI.AI, FOSSASIA,GSoC, Android, Gestures

Continue ReadingGestures in SUSI.AI Android