Setting up YaCy Grid locally

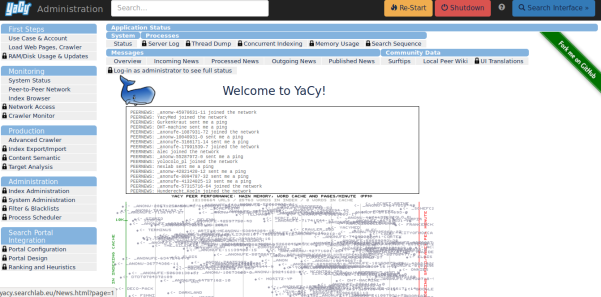
SUSPER is a search interface that uses P2P search engine YaCy . Search results are displayed using Solr server which is embedded into YaCy. The retrieval of search results is done using YaCy search API. When a search request is made in one of the search templates, an HTTP request is made to YaCy and the response is done in JSON. In this blog post I will show how to setup YaCy Grid locally.

What is YaCy Grid ?

The YaCy Grid is the second-generation implementation of YaCy, a peer-to-peer search engine. The required storage functions of the YaCy Grid are:

  1.  An asset storage, basically a file sharing environment for YaCy components,an ftp server is used for asset storage.
  2.  A message system providing an Enterprise Integration Framework using a message-oriented middleware,RabbitMQ message queues for the message system.
  3.  A database system providing search-engine related retrieval functions.It uses Elasticsearch for database operations.

How to setup YaCy Grid locally ?

YaCy Grid have 4 components MCP(Master Connect Program), Loader, Crawler and  Parser.

  1. Clone all the components using –recursive flag.

git clone --recursive https://github.com/yacy/yacy_grid_mcp.git
git clone --recursive https://github.com/yacy/yacy_grid_parser.git
git clone --recursive https://github.com/yacy/yacy_grid_crawler.git
git clone --recursive https://github.com/yacy/yacy_grid_loader.git
  1.  Now to starting YaCy Grid requires starting Elasticsearch, RabbitMQ with Username `anonymous` and Password `yacy` and an ftp server(it can be omitted as MCP can take over).
  2.  All the above steps can also be done in a single step by running a python script in `bin` folder `run_all.py`
  3.  Working of `run_all.py` in yacy_grid_mcp:

if not checkportopen(9200):
   print "Elasticsearch is not running"
   mkapps()
   elasticversion = 'elasticsearch-5.6.5'
   if not os.path.isfile(path_apphome + '/data/mcp-8100/apps/' + elasticversion + '.tar.gz'):
       print('Downloading ' + elasticversion)
       urllib.urlretrieve ('https://artifacts.elastic.co/downloads/elasticsearch/' + elasticversion + '.tar.gz', path_apphome + '/data/mcp-8100/apps/' + elasticversion + '.tar.gz')
   if not os.path.isdir(path_apphome + '/data/mcp-8100/apps/elasticsearch'):
       print('Decompressing' + elasticversion)
       os.system('tar xfz ' + path_apphome + '/data/mcp-8100/apps/' + elasticversion + '.tar.gz -C ' + path_apphome + '/data/mcp-8100/apps/')
       os.rename(path_apphome + '/data/mcp-8100/apps/' + elasticversion, path_apphome + '/data/mcp-8100/apps/elasticsearch')
   # run elasticsearch
   print('Running Elasticsearch')
   os.chdir(path_apphome + '/data/mcp-8100/apps/elasticsearch/bin')
   os.system('nohup ./elasticsearch &')


  • Checks whether Elasticsearch is running or not, if not then runs Elasticsearch.
if checkportopen(15672):
   print "RabbitMQ is Running"
   print "If you have configured it according to YaCy setup press N"
   print "If you have not configured it according to YaCy setup or Do not know what to do press Y"
   n=raw_input()
   if(n=='Y' or n=='y'):
       os.system('service rabbitmq-server stop')
       
if not checkportopen(15672):
   print "rabbitmq is not running"
   os.system('python bin/start_rabbitmq.py')
  • Checks whether RabbitMQ is running or not, if yes then asks user to configure it according to YaCy Grid setup by pressing Y or else ignore,if not then starts RabbitMQ according to required configuration.
subprocess.call('bin/update_all.sh')
  • .Updates all the Grid components including MCP.

if not checkportopen(2121):
   print "ftp server is not Running"
  • Checks for an ftp server and prints message accordingly.

def run_mcp():
   subprocess.call(['gnome-terminal', '-e', "gradle run"])

def run_loader():
   os.system('cd ../yacy_grid_loader')
   subprocess.call(['gnome-terminal', '-e', "gradle run"])

def run_crawler():
   os.system('cd ../yacy_grid_crawler')
   subprocess.call(['gnome-terminal', '-e', "gradle run"])

def run_parser():
   os.system('cd ../yacy_grid_parser')
   subprocess.call(['gnome-terminal', '-e', "gradle run"])


  • Runs all components of YaCy Grid in separate terminal.

Once user starts it, then he can start using YaCy Grid through terminal.

If a YaCy Grid service has used the MCP once, it learns from the MCP to connect to the infrastructure itself. For example:

  • a YaCy Grid service starts up and connects to the MCP
  • the Grid service pushes a message to the message queue using the MCP
  • the MCP fulfils the message send operation and response with the actual address of the message broker
  • the YaCy Grid service learns the direct connection information
  • whenever the YaCy Grid service wants to connect to the message broker again, it can do so using a direct broker connection. This process is done transparently, the Grid service does not need to handle such communication details itself. The routing is done automatically. To use the MCP inside other grid components the git submodule functionality is used.

Resources

Continue ReadingSetting up YaCy Grid locally

Creating A Dockerfile For Yacy Grid MCP

The YaCy Grid is the second-generation implementation of YaCy, a peer-to-peer search engine. A YaCy Grid installation consists of a set of micro-services which communicate with each other using a common infrastructure for data persistence. The task was to deploy the second-generation of YaCy Grid. To do so, we first had created a Dockerfile. This dockerfile should start the micro services such as rabbitmq, Apache ftp and elasticsearch in one docker instance along with MCP. The microservices perform following tasks:

  • Apache ftp server for asset storage.
  • RabbitMQ message queues for the message system.
  • Elasticsearch for database operations.

To launch these microservices using Dockerfile, we referred to following documentations regarding running these services locally: https://github.com/yacy/yacy_grid_mcp/blob/master/README.md

For creating a Dockerfile we proceeded as follows:

FROM ubuntu:latest
MAINTAINER Harshit Prasad# Update
RUN apt-get update
RUN apt-get upgrade -y# add packages
# install jdk package for java
RUN apt-get install -y git openjdk-8-jdk

#install gradle required for build
RUN apt-get update && apt-get install -y software-properties-common
RUN add-apt-repository ppa:cwchien/gradle
RUN apt-get update
RUN apt-get install -y wget
RUN wget https://services.gradle.org/distributions/gradle-3.4.1-bin.zip
RUN mkdir /opt/gradle
RUN apt-get install -y unzip
RUN unzip -d /opt/gradle gradle-3.4.1-bin.zip
RUN PATH=$PATH:/opt/gradle/gradle-3.4.1/bin
ENV GRADLE_HOME=/opt/gradle/gradle-3.4.1
ENV PATH=$PATH:$GRADLE_HOME/bin
RUN gradle -v

# install apache ftp server 1.1.0
RUN wget http://www-eu.apache.org/dist/mina/ftpserver/1.1.0/dist/apache-ftpserver-1.1.0.tar.gz
RUN tar xfz apache-ftpserver-1.1.0.tar.gz

# install RabbitMQ server
RUN wget https://www.rabbitmq.com/releases/rabbitmq-server/v3.6.6/rabbitmq-server-generic-unix-3.6.6.tar.xz
RUN tar xf rabbitmq-server-generic-unix-3.6.6.tar.xz

# install erlang language for RabbitMQ
RUN apt-get install -y erlang

# install elasticsearch
RUN wget https://artifacts.elastic.co/downloads/elasticsearch/elasticsearch-5.5.0.tar.gz
RUN sha1sum elasticsearch-5.5.0.tar.gz
RUN tar -xzf elasticsearch-5.5.0.tar.gz

# clone yacy_grid_mcp repository
RUN git clone https://github.com/nikhilrayaprolu/yacy_grid_mcp.git
WORKDIR /yacy_grid_mcp

RUN cat docker/configftp.properties > ../apacheftpserver1.1.0/res/conf/users.properties

# compile
RUN gradle build
RUN mkdir data/mcp-8100/conf/ -p
RUN cp docker/config-mcp.properties data/mcp-8100/conf/config.properties
RUN chmod +x ./docker/start.sh

# Expose web interface ports
# 2121: ftp, a FTP server to be used for mass data / file storage
# 5672: rabbitmq, a rabbitmq message queue server to be used for global messages, queues and stacks
# 9300: elastic, an elasticsearch server or main cluster address for global database storage
EXPOSE 2121 5672 9300 9200 15672 8100

# Define default command.
ENTRYPOINT [“/bin/bash”, “./docker/start.sh”]


We have created a start.sh file to start RabbitMQ and Apache FTP services. At the end, for compilation gradle run will be executed.

adduser –disabled-password –gecos ” r
adduser r sudo
echo ‘%sudo ALL=(ALL) NOPASSWD:ALL’ >> /etc/sudoers
chmod a+rwx /elasticsearch-5.5.0 -R
su -m r -c ‘/elasticsearch-5.5.0/bin/elasticsearch -Ecluster.name=yacygrid &’
cd /apacheftpserver1.1.0
./bin/ftpd.sh res/conf/ftpdtypical.xml &
/rabbitmq_server-3.6.6/sbin/rabbitmq-server -detached
sleep 5s;
/rabbitmq_server-3.6.6/sbin/rabbitmq-plugins enable rabbitmq_management
/rabbitmq_server3.6.6/sbin/rabbitmqctl add_user yacygrid password4account
echo [{rabbit, [{loopback_users, []}]}]. >> /rabbitmq_server-3.6.6/etc/rabbitmq/rabbitmq.config
/rabbitmq_server-3.6.6/sbin/rabbitmqctl set_permissions -p / yacygrid “.*” “.*” “.*”
cd /yacy_grid_mcp
sleep 5s;
gradle run


start.sh will first add username and then password. Then it will start RabbitMQ along with Apache FTP.  For username and password, we have created a separate files to configure their properties during Docker run which can be found here:

The logic behind running all the microservices in one docker instance was: creating each container for microservice and then link those containers with the help of docker-compose.yml file.

The Dockerfile which we have created was corresponding to one image. Another image was elasticsearch which was linked to this Dockerfile. The latest version of elasticsearch image was already available on their site: https://www.elastic.co/guide/en/elasticsearch/reference/current/docker.html

We configured the docker-compose.yml file according to the reference link provided above. The docker-compose file can be found here: https://github.com/yacy/yacy_grid_mcp/blob/master/docker/docker-compose.yml

The source code for the implementation of whole structure can be found here: https://github.com/yacy/yacy_grid_mcp/tree/master/docker

Resources


Continue ReadingCreating A Dockerfile For Yacy Grid MCP

Implementing Sort By Date Feature In Susper


Susper has been given ‘Sort By Date’ feature which provides the user with latest results with the latest date. This feature enhances the search experience and helps users to find desired results more accurately. The sorting of results date wise is done by yacy backend which uses Apache Solr technology.

The idea was to create a ‘Sort By Date’ feature similar to the market leader. For example, if a user searches for keyword ‘Jaipur’ then results appear to be like this:

If a user wishes to get latest results, they can use ‘Sort By Date’ feature provided under ‘Tools’.

The above screenshot shows the sorted results.

You may however notice that results are not arranged year wise. Currently, the backend work for this is being going on Yacy and soon will be implemented on the frontend as well once backend provide us this feature.

Under ‘Tools’ we created an option for ‘Sort By Date’ simply using <li> tag.

<ul class=dropdownmenu>
  <li (click)=filterByDate()>Sort By Date</li>
</ul>

When clicked, it calls filterByDate() function to perform the following task:

filterByDate() {
  let urldata = Object.assign({}, this.searchdata);
  urldata.query = urldata.query.replace(/date, “”);
  this.store.dispatch(new queryactions.QueryServerAction(urldata));
}
Earlier we were using ‘last_modified desc’ attribute provided by Solr for sorting out dates in descending order. In June 2017, this feature was deprecated with a new update of Solr. We are using /date attribute in query for sorting out results which is being provided by Solr.


Continue ReadingImplementing Sort By Date Feature In Susper

Adding tip to drop downs in Susper using CSS in Angular

To create simple drop downs using twitter bootstrap, it is fairly easy for developers. The issue faced in Susper, however, was to add a tip on the top over such dropdowns similar to Google:

This is how it looks finally, in Susper, with a tip over the standard rectangular drop-down:

This is how it was done:

  1. First, make sure you have designed your drop-down according to your requirements, added the desired height, width and padding. These were the specifications used in Susper’s drop-down.

.dropdown-menu{
height: 500px;
width: 327px;
padding: 28px;
}
  1. Next add the following code to your drop-down class css:

.dropdown-menu:before {
position: absolute;
top: -7px;
right: 19px;
display: inlineblock;
border-right: 7px solid transparent;
border-bottom: 7px solid #ccc;
border-left: 7px solid transparent;
border-bottom-color: rgba(0, 0, 0, 0.2);
content: ;
}
.dropdown-menu:after {
position: absolute;
top: -5px;
right: 20px;
display: inlineblock;
border-right: 6px solid transparent;
border-bottom: 6px solid #ffffff;
border-left: 6px solid transparent;
content: ;
}

In css, :before inserts the style before any other html, whereas :after inserts the style after the html is loaded. Some of the parameters are explained here:

  • Top: can be used to change the position of the menu tip vertically, according to the position of your button and menu.
  • Right: can be used to change the position of the menu tip horizontally, so that it can be positioned used below the menu icon.
  • Position : absolute is used to make sure all our values are absolute and not relative to the higher div hierarchically
  • Border: All border attributes are used to specify border thickness, color and transparency before and after, which collectively gives the effect of a tip for the drop down.
  • Content : This value is set to a blank string ‘’, because otherwise none of our changes will be visible, since the divs will have no space allocated to them.

Resources

Continue ReadingAdding tip to drop downs in Susper using CSS in Angular

Implementation of Customizable Instant Search on Susper using Local Storage

Results on Susper could be instantly displayed as user types in a query. This was a strict feature till some time before, where the user doesn’t have customizable option to choose. But now one could turn off and on this feature.

To turn on and off this feature visit ‘Search Settings’ on Susper. This will be the link to it: http://susper.com/preferences and you will find different options to choose from.

How did we implement this feature?

Searchsettings.component.html:

<div>
 <h4><strong>Susper Instant Predictions</strong></h4>
 <p>When should we show you results as you type?</p>
 <input name="options" [(ngModel)]="instantresults" disabled value="#" type="radio" id="op1"><label for="op1">Only when my computer is fast enough</label><br>
 <input name="options" [(ngModel)]="instantresults" [value]="true" type="radio" id="op2"><label for="op2">Always show instant results</label><br>
 <input name="options" [(ngModel)]="instantresults" [value]="false" type="radio" id="op3"><label for="op3">Never show instant results</label><br>
</div>

User is displayed with options to choose from regarding instant search.when the user selects a new option, his selection is stored in the instantresults variable in search settings component using ngModel.

Searchsettings.component.ts:

Later when user clicks on save button the instantresults object is stored into localStorage of the browser

onSave() {
 if (this.instantresults) {
   localStorage.setItem('instantsearch', JSON.stringify({value: true}));
 } else {
   localStorage.setItem('instantsearch', JSON.stringify({ value: false }));
   localStorage.setItem('resultscount', JSON.stringify({ value: this.resultCount }));
 }
 this.router.navigate(['/']);
}


Later this value is retrieved from the localStorage function whenever a user enters a query in search bar component and search is made according to user’s preference.

Searchbar.component.ts

Later this value is retrieved from the localStorage function whenever a user enters a query in search bar component and search is made according to user’s preference.

onquery(event: any) {
 this.store.dispatch(new query.QueryAction(event));
 let instantsearch = JSON.parse(localStorage.getItem('instantsearch'));

 if (instantsearch && instantsearch.value) {
   this.store.dispatch(new queryactions.QueryServerAction({'query': event, start: this.searchdata.start, rows: this.searchdata.rows}));
   this.displayStatus = 'showbox';
   this.hidebox(event);
 } else {
   if (event.which === 13) {
     this.store.dispatch(new queryactions.QueryServerAction({'query': event, start: this.searchdata.start, rows: this.searchdata.rows}));
     this.displayStatus = 'showbox';
     this.hidebox(event);
   }
 }
}


Interaction of different components here:

  1. First we set the instantresults object in Local Storage from search settings component.
  2. Later this value is retrieved and used by search bar component using localstorage.get() method to decide whether to display results instantly or not.

Below, Gif shows how you could use this feature in Susper to customise the instant results in your browser.

References:


Continue ReadingImplementation of Customizable Instant Search on Susper using Local Storage

Using Hidden Attribute for Angular in Susper

In Angular, we can use the hidden attribute, to hide and show different components of the page. This blog explains what the hidden attribute is, how it works and how to use it for some common tasks.
In Susper, we used the [hidden] attribute for two kinds of tasks.

  1. To hide components of the page until all the search results load.
  2. To hide components of the page, if they were meant to appear only in particular cases (say only the first page of the search results etc).

Let us now see how we apply this in a html file.
Use the [hidden] attribute for the component, to specify a flag variable responsible for hiding it.
When this variable is set to true or 1, the component is hidden otherwise it is shown.
Here is an example of how the [hidden] attribute is used:

<app-infobox [hidden]=”hidefooter class=“infobox col-md-4” *ngIf=“Display(‘all’)”></app-infobox>

Note that [hidden] in a way simply sets the css of the component as { display: none }, whereas in *ngIf, the component is not loaded in the DOM.
So, in this case unless Display(‘all’) returns true the component is not even loaded to the DOM but if [hidden] is set to true, then the component is still present, only not displayed.
In the typescript files, here is how the two tasks are performed:
To hide components of the page, until all the search results load.

this.querychange$ = store.select(fromRoot.getquery);
this.querychange$.subscribe(res => {
this.hidefooter = 1;

this.responseTime$ = store.select(fromRoot.getResponseTime);
this.responseTime$.subscribe(responsetime => {
this.hidefooter = 0;

The component is hidden when the query request is just sent. It is then kept hidden until the results for the previously sent query are available.

2. To hide components of the page, if they were meant to appear only in particular cases.
For example, if you wish to show a component like Autocorrect only when you are on the first page of the search results, here is how you can do it:

if (this.presentPage === 1) {
this.hideAutoCorrect = 0;
} else {
this.hideAutoCorrect = 1;
}

This should hopefully give you a good idea on how to use the hidden attribute. These resources can be referred to for more information.

Continue ReadingUsing Hidden Attribute for Angular in Susper

Crawl Job Feature For Susper To Index Websites

The Yacy backend provides search results for Susper using a web crawler (or) spider to crawl and index data from the internet. They also require some minimum input from the user.

As stated by Michael Christen (@Orbiter) “a web index is created by loading a lot of web pages first, then parsing the content and placing the result into a search index. The question is: how to get a large list of URLs? This is solved by a crawler: we start with a single web page, extract all links, then load these links and go on. The root of such a process is the ‘Crawl Start’.”

Yacy has a web crawler module that can be accessed from here: http://yacy.searchlab.eu/CrawlStartExpert.html. As we would like to have a fully supported front end for Yacy, we also introduced a crawler in Susper. Using crawler one could tell Yacy what process to do and how to crawl a URL to index search results on Yacy server. To support the indexing of web pages with the help of Yacy server, we had implemented a ‘Crawl Job’ feature in Susper.

1)Visit http://susper.com/crawlstartexpert and give information regarding the sites you want Susper to crawl.Currently, the crawler accepts an input of URLs or a file containing URLs. You could customise crawling process by tweaking crawl parameters like crawling depth, maximum pages per domain, filters, excluding media etc.

2) Once crawl parameters are set, click on ‘Start New Crawl Job’ to start the crawling process.

3) It will raise a basic authentication pop-up. After filling, the user will receive a success alert and will be redirected back to home page.

The process of crawl job on Yacy server will get started according to crawling parameters.

Implementation of Crawler on Susper:

We have created a separate component and service in Susper for Crawler

Source code can be found at:

When the user initiates the crawl job by pressing the start button, it calls startCrawlJob() function from the component and this indeed calls the CrawlStart service.We send crawlvalues to the service and subscribe, to the return object confirming whether the crawl job has started or not.

crawlstart.component.ts:-

startCrawlJob() {
 this.crawlstartservice.startCrawlJob(this.crawlvalues).subscribe(res => {
   alert('Started Crawl Job');
   this.router.navigate(['/']);
 }, (err) => {
   if (err === 'Unauthorized') {
     alert("Authentication Error");
   }
 });
};


After calling startCrawlJob() function from the service file, the service file creates a URLSearchParams object to create parameters for each key in input and send it to Yacy server through JSONP request.

crawlstart.service.ts

startCrawlJob(crawlvalues) {
 let params = new URLSearchParams();
 for (let key in crawlvalues) {
   if (crawlvalues.hasOwnProperty(key)) {
     params.set(key, crawlvalues[key]);
   }

 }
 params.set('callback', 'JSONP_CALLBACK');


 let options = new RequestOptions({ search: params });
 return this.jsonp
   .get('http://yacy.searchlab.eu/Crawler_p.json', options).map(res => {
     res.json();
   });

}

Resources:

Continue ReadingCrawl Job Feature For Susper To Index Websites

Using @Output EventEmitter to Hide Search Suggestions in Angular for Susper Web App

Problem: In Susper the suggestions box doesn’t hide when there are no suggestions. To fix this, we have used @Output to create interaction between the search bar and suggestions box.

Susper gives suggestions to the user when user types a query. These suggestions are retrieved from the suggest.json endpoint from Yacy server.

We have a separate component for searching a query and a separate component for showing suggestions (auto-complete.component.ts). The architectural link between the query box, suggestion box and the results page is a bit complicated.

The search bar and the auto-complete component doesn’t interact directly. Whenever a new query is entered, the search bar triggers an action with a payload including the query. On receiving the new query, auto-complete component calls Yacy server to get suggestions from the endpoint and display them inside the suggestion box. Whenever a user searches making a new query, the search bar implementation opens the suggestion box even if there are no results. So there should be a way to inform search bar component that suggestions box has received empty results and search bar could hide the suggestions box.

To achieve this we used @Output to emit an event

@Output() hidecomponent: EventEmitter<any> = new EventEmitter<any>();

autocomplete.component.ts:-

this.autocompleteservice.getsearchresults(query).subscribe(res => {
 if (res) {
   if (res[0]) {
     this.results = res[1];
     if (this.results.length === 0) {
       this.hidecomponent.emit(1);
     } else {
       this.hidecomponent.emit(0);
     }
}


Then in search bar component, this is binded to a function hidesuggestions() which takes care of hiding the suggestion box.

searchbar.component.html

<app-auto-complete (hidecomponent)="hidesuggestions($event)" id="auto-box" [hidden]="!ShowAuto()"></app-auto-complete>


searchbar.component.ts

hidesuggestions(data: number) {
 if (data === 1) {
   this.displayStatus = 'hidebox';
 } else {
   this.displayStatus = 'showbox';
 }
}
ShowAuto() {
 return (this.displayStatus === 'showbox');
}


Here you could see that the auto-complete component’s hidden attribute in searchbar.component.ts is binded with ShowAuto() function which takes care about the interaction and hides the suggestions box whenever there are no results.

Below a GIF shows how this suggestions feature is working on Susper

Source code related to this implementation is available at this pull

References:

Continue ReadingUsing @Output EventEmitter to Hide Search Suggestions in Angular for Susper Web App

Multiple Page Rendering on a Single Query in Susper Angular Front-end

Problem: Susper used to render a new results page for each new character input. It should render a single page for the final query as reported in issue 371. For instance, the browser’s back button shows five pages for each of the five characters entered as a query.

Solution: This problem was arising due to code:

this.router.navigate(['/search'], {queryParams: this.searchdata});

Before we have this one line in search-bar component which gets called on each character entry

Fix:To fix this issue we required calling router.navigate only when we receive results and not on each character input.

So, we first removed the line which was cause of this issue from search-bar component and replaced it with

this.store.dispatch(new queryactions.QueryServerAction(query));


This triggers a QueryServer action, and make a request to Yacy end point for search results.

Now in app.component.ts , we get subscribed to resultscomponentchange$ which gets called only when new search results are received and hence we navigate to a new page after the resultscomponentchange subscription is called.

this.resultscomponentchange$ = store.select(fromRoot.getItems);
this.resultscomponentchange$.subscribe(res => {
 if (this.searchdata.query.length > 0) {
   this.router.navigate(['/search'], {queryParams: this.searchdata});
 }

});
this.wholequery$ = store.select(fromRoot.getwholequery);
this.wholequery$.subscribe(data => {
 this.searchdata = data;
});
if (localStorage.getItem('resultscount')) {
 this.store.dispatch(new queryactions.QueryServerAction({'query': '', start: 0, rows: 10, search: false}));
}


Finally, this problem got fixed and now there is only one page being rendered for a valid search. Source code for this implementation is available in this pull.

Resources:

Continue ReadingMultiple Page Rendering on a Single Query in Susper Angular Front-end

Using RouterLink in the Susper Angular Frontend to Speed up the Loading Time

In Susper, whenever the user clicks on some links, the whole application used to load again, thereby taking more time to load the page. But in Single Page Applications (SPAs) we don’t need to load the whole application. In Fact, SPAs are known to load internal pages faster than traditional HTML web pages. To achieve this we have to inform the application that a link will redirect the user to an internal page. So that the application doesn’t reload completely and reinitializes itself. In angular, this can be done by replacing href with routerLink for the tag.

Routerlink when used with tag syntactically as

<a routerLink="/contact" routerLinkActive="active">Contact</a>

doesn’t load the whole page instead it asks the server for only the contact component and renders it in place of <router-outlet></router-outlet>

This happens through an ajax call to the server asking for only contact component, thereby reducing the time it takes and doesn’t show a whole complete reload of the page.

Below time graph shows requests made when a tag with href was clicked.

If you observe it takes more than 3 seconds to load the page.

But when you use [routerLink] as an attribute for navigation, you find the page being displayed in just a blink.

What we have done in Susper?

In Susper, on issue #167, @mariobehling has noticed that there are some links which are loading slowly. On looking at the issue and a test run of the issue, I found that the problem is with the loading of the whole page, thereby immediately checked with the tag and found that a “href” attribute was used instead of “[routerLink]” angular attribute. I made a pull changing href to “[routerLink]” thereby speeding up Susper to around 3x faster than before.

https://github.com/fossasia/susper.com/pull/234/files

References

Continue ReadingUsing RouterLink in the Susper Angular Frontend to Speed up the Loading Time