Implementation of Text-To-Speech Feature In Susper

Susper has been given a voice search feature through which it provides the user a better experience of search. We introduced to enhance the speech recognition by adding Speech Synthesis or Text-To-Speech feature. The speech synthesis feature should only work when a voice search is attempted.

The idea was to create speech synthesis similar to market leader. Here is the link to YouTube video showing the demo of the feature: Video link

In the video, it will show demo :

  • If a manual search is used then the feature should not work.
  • If voice search is used then the feature should work.

For implementing this feature, we used Speech Synthesis API which is provided with Google Chrome browser 33 and above versions.

window.speechSynthesis.speak(‘Hello world!’); can be used to check whether the browser supports this feature or not.

First, we created an interface:

interface IWindow extends Window {
  SpeechSynthesisUtterance: any;
  speechSynthesis: any;
};


Then under @Injectable we created a class for the SpeechSynthesisService.

export class SpeechSynthesisService {
  utterence: any;  constructor(private zone: NgZone) { }  speak(text: string): void {
  const { SpeechSynthesisUtterance }: IWindow = <IWindow>window;
  const { speechSynthesis }: IWindow = <IWindow>window;  this.utterence = new SpeechSynthesisUtterance();
  this.utterence.text = text; // utters text
  this.utterence.lang = ‘en-US’; // default language
  this.utterence.volume = 1; // it can be set between 0 and 1
  this.utterence.rate = 1; // it can be set between 0 and 1
  this.utterence.pitch = 1; // it can be set between 0 and 1  (window as any).speechSynthesis.speak(this.utterence);
}// to pause the queue of utterence
pause(): void {
  const { speechSynthesis }: IWindow = <IWindow>window;
const { SpeechSynthesisUtterance }: IWindow = <IWindow>window;
  this.utterence = new SpeechSynthesisUtterance();
  (window as any).speechSynthesis.pause();
 }
}


The above code will implement the feature Text-To-Speech.

The source code for the implementation can be found here: https://github.com/fossasia/susper.com/blob/master/src/app/speech-synthesis.service.ts

We call speech synthesis only when voice search mode is activated. Here we used redux to check whether the mode is ‘speech’ or not. When the mode is ‘speech’ then it should utter the description inside the infobox.

We did the following changes in infobox.component.ts:

import { SpeechSynthesisService } from ../speechsynthesis.service;

speechMode: any;

constructor(private synthesis: SpeechSynthesisService) { }

this.query$ = store.select(fromRoot.getwholequery);
this.query$.subscribe(query => {
  this.keyword = query.query;
  this.speechMode = query.mode;
});


And we added a conditional statement to check whether mode is ‘speech’ or not.

// conditional statement
// to check if mode is ‘speech’ or not
if (this.speechMode === speech) {
  this.startSpeaking(this.results[0].description);
}
startSpeaking(description) {
  this.synthesis.speak(description);
  this.synthesis.pause();
}


Continue ReadingImplementation of Text-To-Speech Feature In Susper

Deploying Yacy with Docker on Different Cloud Platforms

To make deploying of yacy easier we are now supporting Docker based installation.

Following the steps below one could successfully run Yacy on docker.

  1. You can pull the image of Yacy from https://hub.docker.com/r/nikhilrayaprolu/yacygridmcp/ or buid it on your own with the docker file present at https://github.com/yacy/yacy_grid_mcp/blob/master/docker/Dockerfile

One could pull the docker image using command:

docker pull nikhilrayaprolu/yacygridmcp


2) Once you have an image of yacygridmcp you can run it by typing

docker run <image_name>


You can access the yacygridmcp endpoint at localhost:8100

Installation of Yacy on cloud servers:

Installing Yacy and all microservices with just one command:

  • One can also download,build and run Yacy and all its microservices (presently supported are yacy_grid_crawler, yacy_grid_loader, yacy_grid_ui, yacy_grid_parser, and yacy_grid_mcp )
  • To build all these microservices in one command, run this bash script productiondeployment.sh
    • `bash productiondeployment.sh build` will install all required dependencies and build microservices by cloning them from github repositories.
    • `bash productiondeployment.sh run` will run all services and starts them.
    • Right now all repositories are cloned into ~/yacy and you can make customisations and your own changes to this code and build your own customised yacy.

The related PRs of this work are https://github.com/yacy/yacy_grid_mcp/pull/21 and https://github.com/yacy/yacy_grid_mcp/pull/20 and https://github.com/yacy/yacy_grid_mcp/pull/13

Resources:

Continue ReadingDeploying Yacy with Docker on Different Cloud Platforms

Implementation of Speech UI in Susper

Recently, we have implemented a speech recognition feature in Susper where user could search by voice but it does not have an attractive UI. Google has a good user experience while recording the voice. We have implemented a similar Speech UI in Susper,

How we have implemented this?

  1. First we made a component speechtotext. It takes care of all the styling and functional changes of the speech UI and rendering the speech and any instructions required for the user. https://github.com/fossasia/susper.com/tree/master/src/app/speechtotext
  2. Initially when user clicks on the microphone in the search bar, it triggers the speechRecognition()

searchbar.component.html

<div class="input-group-btn">
 <button class="btn btn-default" id="speech-button" type="submit">
   <img src="../../assets/images/microphone.png" class="microphone" (click)="speechRecognition()"/>
 </button>

searchbar.component.ts

speechRecognition() {
 this.store.dispatch(new speechactions.SearchAction(true));
}

3) This dispatches an action speechaction.SearchAction(true), the app.component.ts is subscribed to this action and whenever this action is triggered the app component will open the speechtotext component.

Speechtotext.component.ts

Speech to text component on getting initialised calls the speech service’s record function which activates standard browser’s speech API

constructor(private speech: SpeechService) {
 
 this.speechRecognition();
}
speechRecognition() {
 this.speech.record('en_US').subscribe(voice => this.onquery(voice));
}

On recording the user’s voice and converting it to text, the text is sent to the onquery method as input and the recognised text is sent to other components through ngrx store.

onquery(event: any) {
 this.resettimer();
 this.store.dispatch(new queryactions.QueryServerAction({ 'query': event, start: 0, rows: 10, search: true }));
 this.message = event;
}

We have some UI text transitions where the user is shown with messages like ‘Listening…’ ,‘Speak Now’ and ‘Please check your microphone’ which are handle by creating a timer observable in angular.

ngOnInit() {
 this.timer = Observable.timer(1500, 2000);
 this.subscription = this.timer.subscribe(t => {
   this.ticks = t;

   if (t === 1) {
     this.message = "Listening...";
   }
   if (t === 4) {
     this.message = "Please check your microphone and audio levels.";
     this.miccolor = '#C2C2C2';
   }
   if (t === 6) {
     this.subscription.unsubscribe();
     this.store.dispatch(new speechactions.SearchAction(false));
   }
 });
}

The related PR regarding speech to text is at https://github.com/fossasia/susper.com/issues/624 .

With this now we have achieved a good UI for handling requests on Speech.

Resources:

Continue ReadingImplementation of Speech UI in Susper

Reducing Initial Load Time Of Susper

Susper used to take long time to load the initial page. So, there was a discussion on how to decrease the initial loading time of Susper.

Later on going through issues raised in official Angular repository regarding the time takento load angular applications, we found some of the solutions. Those include:

  • Migrating from development to production during build:
    • This shrinks vendor.js and main.js by minimising them and also removing all packages that are not required on production.
    • Enables inline html and extracting CSS.
    • Disables source maps.
  • Enable Ahead of Time (AoT) compilation.
  • Enable service workers.

After these changes we found the following changes in Susper:

File Name Before (content-length) After
vendor.js 709752 216764
main.js 56412 138361

LOADING TIMES GRAPHS:

After:

Vendor file:

Main.js

Before:

Vendor file:

Main.js

Also we could see that all files are now initiated by service worker:

More about Service Workers could be read at Mozilla and Service Workers in Angular.

Implementation:

While deploying our application, we have added –prod and –aot as extra attributes to ng build .This enables angular to use production mode and ahead of time compilation.

For service workers we have to install @angular/service-worker module. One can install it by using:

npm install @angular/service-worker --save
ng set apps.0.serviceWorker=true

The whole implementation of this is available at this pull:

https://github.com/fossasia/susper.com/pull/597/files

Resources:


Continue ReadingReducing Initial Load Time Of Susper

Hiding Intelligence of Susper When a Query is Empty or Erased with Angular

Recently, we have implemented intelligence feature in Susper using SUSI chat API to provide users answer a question without going deeper in search results. When a user types “height of Trump”, it shows answer like this:

Problem which we faced after implementing the feature:

When a user was erasing a query or query field was empty, Susper was still showing the answer of the intelligence component like this:

The answer should not be displayed when a query is empty because the user is not asking any question. The answer was still displayed because it had received a response from SUSI API.

How did we solve the problem?

The problem was solved in two ways.

  1. By using if/else condition: We checked if the statement shown inside the component is similar to the if-and-else condition. If the condition is true, it should hide the component.
  2. Using [hidden] attribute method: The Angular 4 supports [hidden] attribute which acts as { display:none; } . [hidden] attribute generally works as ngShow and ngHide which was earlier supported by Angular 2.

We preferred both the methods to solve the problem. The intelligence component is being loaded inside results component using <app-intelligence> element. Further, we added [hidden] attribute to this element like this :

<appintelligence [hidden]=“hideIntelligence”></app-intelligence>
We created hideIntelligence as variable and assign it as boolean. To check if a query is empty, searchdata variable was used.
searchdata: any = {
  query: ‘ ‘,
  rows: 10,
  start: 0
};
And then checked if a query is empty using if-else condition :
// checks if query is empty or erased
if (this.searchdata.query === ‘ ‘) {// display: none; is true
  this.hideIntelligence = true;

} else {
// display: none; is false
  this.hideIntelligence = false;
}


Applying this solution, we succeeded in hiding the intelligence component. We would also had used *ngIf statement but we preferred using [hidden]. [hidden] modifies the display property.  *ngIf is a structural directive which creates or destroys content inside DOM.

The source code for the implementation can be found here: https://github.com/fossasia/susper.com/pull/613

Resources:


Continue ReadingHiding Intelligence of Susper When a Query is Empty or Erased with Angular

Implementing Intelligence Feature in Susper

Susper gives answers to your questions using SUSI AI. We want to give users best experience while they are searching for solutions to their questions. To achieve this, we have incorporated with features like infobox and intelligence using SUSI.

Google has this feature where users can ask questions like ‘Who is president of USA?’ and get answers directly without encouraging the users to deep-dive into the search results to know the answer.

Similarly Susper gives answer to the user:

It also gives answer to question which is related to real time data like temperature.


How we have implemented this feature?

We used the API Endpoint of SUSI at http://api.asksusi.com/

Using SUSI API is as simple as sending query as a URL parameter in GET request http://api.susi.ai/susi/chat.json?q=YOUR_QUERY

You can also get various action types in the response. Eg: An anwser type response for http://api.susi.ai/susi/chat.json?q=hey%20susi is:

actions: [
  {
    type: "answer",
    expression: "Hi, I'm Susi"
  }
],


Documentation regarding SUSI is available at here.

Implementation in Susper:

We have created an Intelligence component to display answer related to a question. You can check it here: https://github.com/fossasia/susper.com/tree/master/src/app/intelligence

It takes care about rendering the information and styling of the rendered data received from SUSI API.

The intelligence.component.ts makes a call to Intelligence Service with the required query and the intelligence service makes a GETrequest to the SUSI API and retrieves the results.

Intelligence.component.ts

this.intelligence.getintelligentresponse(data.query).subscribe(res => {
  if (res && res.answers && res.answers[0].actions) {
     this.actions = res.answers[0].actions;
       for (let action of this.actions) {
         if (action.type === 'answer' && action.mood !== 'sabta') {
           this.answer = action.expression;
         } else {
             this.answer = '';
         }
      }
   } else {
       this.answer = '';
   }
});


Intelligence.service.ts

export class IntelligenceService {
 server = 'http://api.susi.ai';
 searchURL = 'http://' + this.server + '/susi/chat.json';
 constructor(private http: Http, private jsonp: Jsonp, private store: Store<fromRoot.State>) {
 }
 getintelligentresponse(searchquery) {
   let params = new URLSearchParams();
   params.set('q', searchquery);
   params.set('callback', 'JSONP_CALLBACK');
   return this.jsonp
     .get('http://api.asksusi.com/susi/chat.json', {search: params}).map(res =>
       res.json()

     );
 }

Whenever the getintelligenceresponse of intelligenceService is called, it creates a URLSearchParams() object and set required parameters in it and send them in jsonp.get request. We also set callback to ‘JSONP_CALLBACK’ to inform the API to send us data in JSONP.

Thereby, the intelligence component retrieves the answer and displays it with search resultson Susper.

Source code for this implementation could be found in this pull:

https://github.com/fossasia/susper.com/pull/569

Resources:

Continue ReadingImplementing Intelligence Feature in Susper

Customizing Results Count in Susper Angular Front-end

Problem: Earlier users were not having any option to customise results count in Susper.

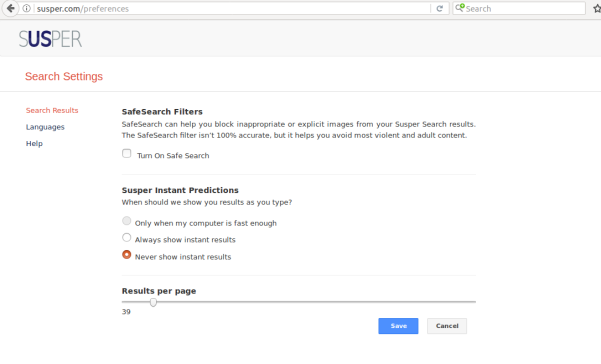
Susper is a Frontend for Peer to Peer Search Engine Yacy built using Angular. So, we implemented ‘results count’ feature and used to have a strict restriction of only 10 results per page. Now, users can customise search results in Susper when instant results are turned off. By default, Susper shows only 10 results per page. If the user requires more results per page he can modify the count of results in Susper. To customise the result count visit http://susper.com/preferences and you will find a range bar to customise the results. Change the value of the range bar to the desired value and save it. (Right now we support only results till maximum size of 100)

How did we implement this feature?

searchsettings.component.html:

<div>
 <h4><strong>Results per page</strong></h4>
 <div class="range-slider">
   <input class="range-slider__range" type="range" [disabled]="instantresults" [(ngModel)]="resultCount" value="100" min="0" max="100">
   <span class="range-slider__value">{{resultCount}}</span>
 </div>

</div>

The user is displayed with a range slider, that could slide between 0 and 100. The value of the range slider is stored in a resultscount variable in search settings component using ngModel.

searchsettings.component.ts: Later when user clicks on save button, it triggers onSave() function.The resultscount is stored into localStorage of the browser and an action is triggered to inform all other components about the change in the value of resultscount.


onSave() {
 if (this.instantresults) {
   localStorage.setItem('instantsearch', JSON.stringify({value: true}));
   localStorage.setItem('resultscount', JSON.stringify({ value: 10 }));
   this.store.dispatch(new queryactions.QueryServerAction({'query': '', start: 0, rows: 10, search: false}));

 } else {
   localStorage.removeItem('instantsearch');
   localStorage.setItem('resultscount', JSON.stringify({ value: this.resultCount }));
   this.store.dispatch(new queryactions.QueryServerAction({'query': '', start: 0, rows: this.resultCount, search: false}));
 }
 this.router.navigate(['/']);
}

app.component.ts

Later new resultscount value is used in other components to request the server for search results with new resultscount.

if (localStorage.getItem('resultscount')) {
 this.store.dispatch(new queryactions.QueryServerAction({'query': '', start: 0, rows: this.resultscount, search: false}));
}

The complete working of Susper’s result count could be seen in this gif


Source code can be found here: https://github.com/fossasia/susper.com/pull/546 .

References

Continue ReadingCustomizing Results Count in Susper Angular Front-end

Changing Dimensions of Search Box Dynamically in Susper

Earlier the Susper search box had a fixed dimension. When a user types in a query, the dimensions of the search box remained fixed. This approach resulted in several issues like:

  • Matching the dimensions of the search bar following the market leader.
  • When dimensions are dynamically changing, it should not disturb alignment w.r.t tabs in the results page.

What actually happens is, when a user enters a query, the search box quickly changes its dimensions when results appear. I will be discussing below how we achieved this goal.

On the home page, we created the dimensions of a search bar with 584 x 44 pixels.

On the results page, we created the dimensions of search bar 632 x 44 similar to market leader:

How we proceeded?

Susper is built on Angular v4.1.3. It automatically comes with a function ngOnInit() whenever a new component has been created. ngOnInit() is a part of life cycle hook in Angular 4 (in Angular 2 as well). The function is called up or initialized when the component is rendered completely. This was the key for changing dimensions of search bar dynamically as soon as a component is created.

What happens is when a user types a query on the homepage and hits enter then, results component is created. As soon as, it is created – ngOnInit() function is called.

The default dimensions of search bar have been provided as follows:

search-bar.component.css

#navgroup {
  height: 44px;
  width: 584px;
}
When the homepage loads up, dimensions by default are 584 x 44.

search-bar.component.ts

private navbarWidth: any;
ngOnInit() {
  this.navbarWidth = 632px;
}

search-bar.component.html

We used [style.width] attribute to change the dimensions dynamically. Add this attribute inside input element.

<input #input type=“text” name=“query” class=“form-control” id=“nav-input” (ngModelChange)=“onquery($event)” [(ngModel)]=“searchdata.query” autocomplete=“off” (keypress)=“onEnter($event)” [style.width]=“navbarWidth”>
As soon as results component is loaded, the dimensions of search bar change to 632 x 44. In this way, we change the dimensions of search bar dynamically as soon as results are loaded.

Resources

Continue ReadingChanging Dimensions of Search Box Dynamically in Susper

Aligning Images to Same Height Maintaining Ratio in Susper

In this blog, I’ll be sharing the idea how we have perfectly aligned images to the same height in Susper without disturbing their ratio. When it comes to aligning images perfectly, they should have:

  • Same height.
  • A proper ratio to maintain the image quality. Many developers apply same width and height without keeping in mind about image ratio which results in:
    • Blurred image,
    • Image with a lot of pixels,
    • Cropping of an image.

Earlier Susper was having image layout like this:

In the screenshot, images are not properly aligned.  They are also not having the same height. We wanted to improve the layout of images just like market leaders Google and DuckDuckGo.

  • How we implemented a better layout for images?

<div class=“container”>
  <div class=“grid” *ngIf=“Display(‘images’)”>
    <div class=“cell” *ngFor=“let item of item$ | async”>
      <a class=“image-pointer” href=“{{item.link}}”>
        <img class=“responsive-image” src=“{{item.link}}”></a>
    </div>
  </div>
</div>
I have created a container, in which images will be loaded from yacy server. Then I have created a grid with an equal number of rows and column. I have adjusted the height and width of rows and columns to obtain a grid which contains each division as a cell. The image will load inside the cell. Each cell consists of one image.
.grid {
  paddingleft: 80px;
}
.container {
  width: 100%;
  margin: 0;
  top: 0;
  bottom: 0;
  padding: 0;
}

After implementing it, we were facing issues like cropping of the image inside a cell. So, to avoid cropping and maintain the image ratio we introduced .responsive-image class which will avoid cropping of images inside cell.

.responsiveimage {
  maxwidth: 100%;
  height: 200px;
  paddingtop: 20px;
  padding: 0.6%;
  display: inlineblock;
  float: left;
}

This is how Susper’s image section looks now:

It took some time to align images, but somehow we succeeded in creating a perfect layout for the images.

We are facing some issues regarding images. Some of them don’t appear due to broken link. This issue will be resolved soon on the server.

Resources

Continue ReadingAligning Images to Same Height Maintaining Ratio in Susper

Adding tip to drop downs in Susper using CSS in Angular

To create simple drop downs using twitter bootstrap, it is fairly easy for developers. The issue faced in Susper, however, was to add a tip on the top over such dropdowns similar to Google:

This is how it looks finally, in Susper, with a tip over the standard rectangular drop-down:

This is how it was done:

  1. First, make sure you have designed your drop-down according to your requirements, added the desired height, width and padding. These were the specifications used in Susper’s drop-down.

.dropdown-menu{
height: 500px;
width: 327px;
padding: 28px;
}
  1. Next add the following code to your drop-down class css:

.dropdown-menu:before {
position: absolute;
top: -7px;
right: 19px;
display: inlineblock;
border-right: 7px solid transparent;
border-bottom: 7px solid #ccc;
border-left: 7px solid transparent;
border-bottom-color: rgba(0, 0, 0, 0.2);
content: ;
}
.dropdown-menu:after {
position: absolute;
top: -5px;
right: 20px;
display: inlineblock;
border-right: 6px solid transparent;
border-bottom: 6px solid #ffffff;
border-left: 6px solid transparent;
content: ;
}

In css, :before inserts the style before any other html, whereas :after inserts the style after the html is loaded. Some of the parameters are explained here:

  • Top: can be used to change the position of the menu tip vertically, according to the position of your button and menu.
  • Right: can be used to change the position of the menu tip horizontally, so that it can be positioned used below the menu icon.
  • Position : absolute is used to make sure all our values are absolute and not relative to the higher div hierarchically
  • Border: All border attributes are used to specify border thickness, color and transparency before and after, which collectively gives the effect of a tip for the drop down.
  • Content : This value is set to a blank string ‘’, because otherwise none of our changes will be visible, since the divs will have no space allocated to them.

Resources

Continue ReadingAdding tip to drop downs in Susper using CSS in Angular