Enhancing SUSI Desktop to Display a Loading Animation and Auto-Hide Menu Bar by Default

SUSI Desktop is a cross platform desktop application based on electron which presently uses chat.susi.ai as a submodule and allows the users to interact with susi right from their desktop. The benefits of using chat.susi.ai as a submodule is that it inherits all the features that the webapp offers and thus serves them in a nicely build native application.

Display a loading animation during DOM load.

Electron apps should give a native feel, rather than feeling like they are just rendering some DOM, it would be great if we display a loading animation while the web content is actually loading, as depicted in the gif below is how I implemented that.
Electron provides a nice, easy to use API for handling BrowserWindow, WebContent events. I read through the official docs and came up with a simple solution for this, as depicted in the below snippet.

onload = function () {
	const webview = document.querySelector('webview');
	const loading = document.querySelector('#loading');

	function onStopLoad() {
		loading.classList.add('hide');
	}

	function onStartLoad() {
		loading.classList.remove('hide');
	}

	webview.addEventListener('did-stop-loading', onStopLoad);
	webview.addEventListener('did-start-loading', onStartLoad);
};

Hiding menu bar as default

Menu bars are useful, but are annoying since they take up space in main window, so I hid them by default and users can toggle their display on pressing the Alt key at any point of time, I used the autoHideMenuBar property of BrowserWindow class while creating an object to achieve this.

const win = new BrowserWindow({
	
	show: false,
	autoHideMenuBar: true
});

Resources

1. More information about BrowserWindow class in the official documentation at electron.atom.io.
2. Follow a quick tutorial to kickstart creating apps with electron at https://www.youtube.com/watch?v=jKzBJAowmGg.
3. SUSI Desktop repository at https://github.com/fossasia/susi_desktop.

Continue ReadingEnhancing SUSI Desktop to Display a Loading Animation and Auto-Hide Menu Bar by Default

Automatic Signing and Publishing of Android Apps from Travis

As I discussed about preparing the apps in Play Store for automatic deployment and Google App Signing in previous blogs, in this blog, I’ll talk about how to use Travis Ci to automatically sign and publish the apps using fastlane, as well as how to upload sensitive information like signing keys and publishing JSON to the Open Source repository. This method will be used to publish the following Android Apps:

Current Project Structure

The example project I have used to set up the process has the following structure:

It’s a normal Android Project with some .travis.yml and some additional bash scripts in scripts folder. The update-apk.sh file is standard app build and repo push file found in FOSSASIA projects. The process used to develop it is documented in previous blogs. First, we’ll see how to upload our keys to the repo after encrypting them.

Encrypting keys using Travis

Travis provides a very nice documentation on encrypting files containing sensitive information, but a crucial information is buried below the page. As you’d normally want to upload two things to the repo – the app signing key, and API JSON file for release manager API of Google Play for Fastlane, you can’t do it separately by using standard file encryption command for travis as it will override the previous encrypted file’s secret. In order to do so, you need to create a tarball of all the files that need to be encrypted and encrypt that tar instead. Along with this, before you need to use the file, you’ll have to decrypt in in the travis build and also uncompress it for use.

So, first install Travis CLI tool and login using travis login (You should have right access to the repo and Travis CI in order to encrypt the files for it)

Then add the signing key and fastlane json in the scripts folder. Let’s assume the names of the files are key.jks and fastlane.json

Then, go to scripts folder and run this command to create a tar of these files:

tar cvf secrets.tar fastlane.json key.jks


secrets.tar will be created in the folder. Now, run this command to encrypt the file

travis encrypt-file secrets.tar


A new file secrets.tar.enc will be created in the folder. Now delete the original files and secrets tar so they do not get added to the repo by mistake. The output log will show the the command for decryption of the file to be added to the .travis.yml file.

Decrypting keys using Travis

But if we add it there, the keys will be decrypted for each commit on each branch. We want it to happen only for master branch as we only require publishing from that branch. So, we’ll create a bash script prep-key.sh for the task with following content

#!/bin/sh
set -e

export DEPLOY_BRANCH=${DEPLOY_BRANCH:-master}

if [ "$TRAVIS_PULL_REQUEST" != "false" -o "$TRAVIS_REPO_SLUG" != "iamareebjamal/android-test-fastlane" -o "$TRAVIS_BRANCH" != "$DEPLOY_BRANCH" ]; then
    echo "We decrypt key only for pushes to the master branch and not PRs. So, skip."
    exit 0
fi

openssl aes-256-cbc -K $encrypted_4dd7_key -iv $encrypted_4dd7_iv -in ./scripts/secrets.tar.enc -out ./scripts/secrets.tar -d
tar xvf ./scripts/secrets.tar -C scripts/


Of course, you’ll have to change the commands and arguments according to your need and repo. Specially, the decryption command keys ID

The script checks if the repo and branch are correct, and the commit is not of a PR, then decrypts the file and extracts them in appropriate directory

Before signing the app, you’ll need to store the keystore password, alias and key password in Travis Environment Variables. Once you have done that, you can proceed to signing the app. I’ll assume the variable names to be $STORE_PASS, $ALIAS and $KEY_PASS respectively

Signing App

Now, come to the part in upload-apk.sh script where you have the unsigned release app built. Let’s assume its name is app-release-unsigned.apk.Then run this command to sign it

cp app-release-unsigned.apk app-release-unaligned.apk
jarsigner -verbose -tsa http://timestamp.comodoca.com/rfc3161 -sigalg SHA1withRSA -digestalg SHA1 -keystore ../scripts/key.jks -storepass $STORE_PASS -keypass $KEY_PASS app-release-unaligned.apk $ALIAS


Then run this command to zipalign the app

${ANDROID_HOME}/build-tools/25.0.2/zipalign -v -p 4 app-release-unaligned.apk app-release.apk


Remember that the build tools version should be the same as the one specified in .travis.yml

This will create an apk named app-release.apk

Publishing App

This is the easiest step. First install fastlane using this command

gem install fastlane


Then run this command to publish the app to alpha channel on Play Store

fastlane supply --apk app-release.apk --track alpha --json_key ../scripts/fastlane.json --package_name com.iamareebjamal.fastlane


You can always configure the arguments according to your need. Also notice that you have to provide the package name for Fastlane to know which app to update. This can also be stored as an environment variable.

This is all for this blog, you can read more about travis CLI, fastlane features and signing process in these links below:

Continue ReadingAutomatic Signing and Publishing of Android Apps from Travis

Auto Deployment of SUSI Web Chat on gh-pages with Travis-CI

SUSI Web Chat uses Travis CI with a custom build script to deploy itself on gh-pages after every pull request is merged into the project. The build system auto updates the latest changes hosted on chat.susi.ai. In this blog, we will see how to automatically deploy the repository on gh pages.

To proceed with auto deploy on gh-pages branch,

  1. We first need to setup Travis for the project.
  2. Register on https://travis-ci.org/ and turn on the Travis for this repository.

Next, we add .travis.yml in the root directory of the project.

# Set system config
sudo: required
dist: trusty
language: node_js

# Specifying node version
node_js:
  - 6

# Running the test script for the project
script:
  - npm test

# Running the deploy script by specifying the location of the script, here ‘deploy.sh’ 

deploy:
  provider: script
  script: "./deploy.sh"


# We proceed with the cache if there are no changes in the node_modules
cache:
  directories:
    - node_modules

branches:
  only:
    - master

To find the code go to https://github.com/fossasia/chat.susi.ai/blob/master/.travis.yml

The Travis configuration files will ensure that the project is building for every change made, using npm test command, in our case, it will only consider changes made on the master branch.

If one wants to watch other branches one can add the respective branch name in travis configurations. After checking for build passing we need to automatically push the changes made for which we will use a bash script.

#!/bin/bash

SOURCE_BRANCH="master"
TARGET_BRANCH="gh-pages"

# Pull requests and commits to other branches shouldn't try to deploy.
if [ "$TRAVIS_PULL_REQUEST" != "false" -o "$TRAVIS_BRANCH" != "$SOURCE_BRANCH" ]; then
    echo "Skipping deploy; The request or commit is not on master"
    exit 0
fi

# Save some useful information
REPO=`git config remote.origin.url`
SSH_REPO=${REPO/https:\/\/github.com\//git@github.com:}
SHA=`git rev-parse --verify HEAD`

ENCRYPTED_KEY_VAR="encrypted_${ENCRYPTION_LABEL}_key"
ENCRYPTED_IV_VAR="encrypted_${ENCRYPTION_LABEL}_iv"
ENCRYPTED_KEY=${!ENCRYPTED_KEY_VAR}
ENCRYPTED_IV=${!ENCRYPTED_IV_VAR}
openssl aes-256-cbc -K $ENCRYPTED_KEY -iv $ENCRYPTED_IV -in deploy_key.enc -out ../deploy_key -d

chmod 600 ../deploy_key
eval `ssh-agent -s`
ssh-add ../deploy_key

# Cloning the repository to repo/ directory,
# Creating gh-pages branch if it doesn't exists else moving to that branch
git clone $REPO repo
cd repo
git checkout $TARGET_BRANCH || git checkout --orphan $TARGET_BRANCH
cd ..

# Setting up the username and email.
git config user.name "Travis CI"
git config user.email "$COMMIT_AUTHOR_EMAIL"

# Cleaning up the old repo's gh-pages branch except CNAME file and 404.html
find repo/* ! -name "CNAME" ! -name "404.html" -maxdepth 1  -exec rm -rf {} \; 2> /dev/null
cd repo

git add --all
git commit -m "Travis CI Clean Deploy : ${SHA}"

git checkout $SOURCE_BRANCH

# Actual building and setup of current push or PR.
npm install
npm run build
mv build ../build/

git checkout $TARGET_BRANCH
rm -rf node_modules/
mv ../build/* .
cp index.html 404.html

# Staging the new build for commit; and then committing the latest build
git add -A
git commit --amend --no-edit --allow-empty

# Deploying only if the build has changed
if [ -z `git diff --name-only HEAD HEAD~1` ]; then

  echo "No Changes in the Build; exiting"
  exit 0

else
  # There are changes in the Build; push the changes to gh-pages
  echo "There are changes in the Build; pushing the changes to gh-pages"

  # Actual push to gh-pages branch via Travis
  git push --force $SSH_REPO $TARGET_BRANCH
fi

This bash script will enable Travis CI user to push changes to gh pages, for this we need to store the credentials of the repository in encrypted form.

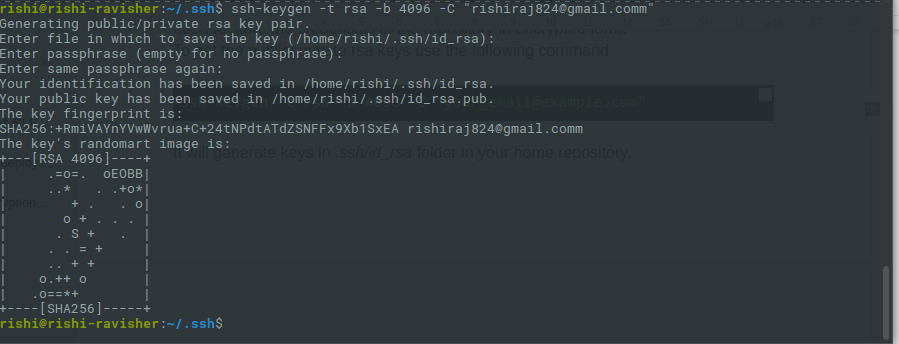
1. To get the public/private rsa keys we use the following command

ssh-keygen -t rsa -b 4096 -C "your_email@example.com"

2.  It will generate keys in .ssh/id_rsa folder in your home repository.

  1. Make sure you do not enter any passphrase while generating credentials otherwise Travis will get stuck at the time of decryption of the keys.
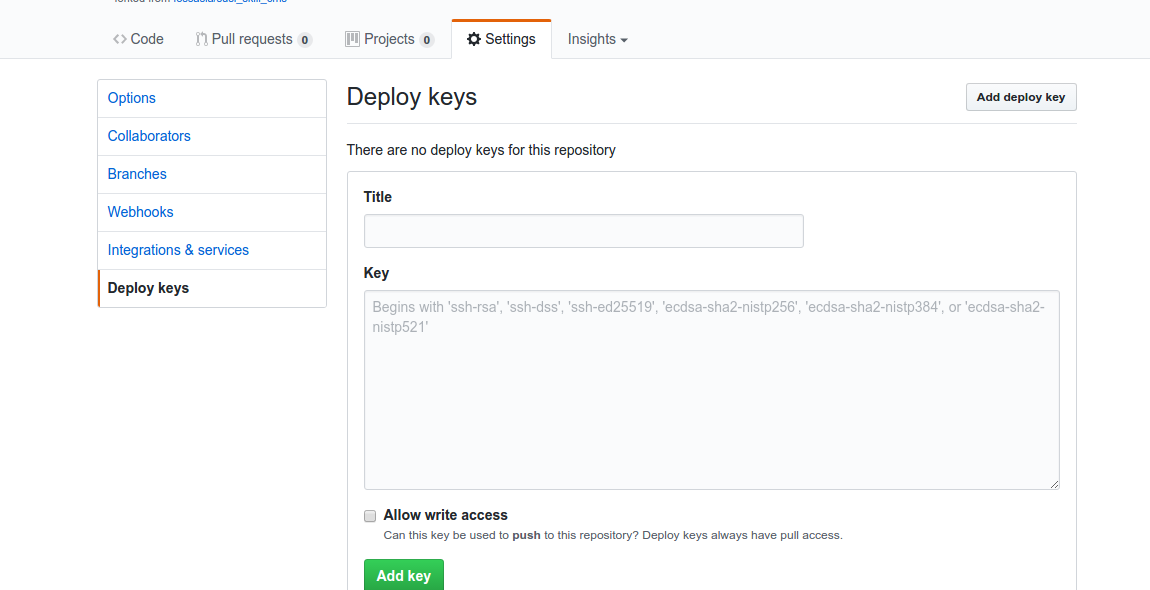
  2. Copy the public key and deploy the key to repository by visiting  

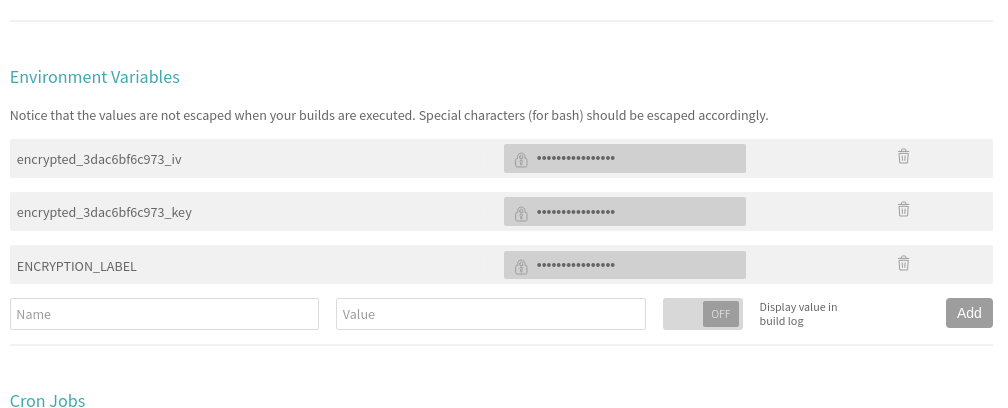
5. We also need to set the environment variable ENCRYPTED_KEY in Travis. Here’s a screenshot where to set it in the Travis repository dashboard.

6. Next, install Travis for encryption of keys.

sudo apt install ruby ruby-dev
sudo gem install travis

7. Make sure you are logged in to Travis, to login use the following command.

travis login

8. Make sure you have copied the ssh to deploy_key and then encrypt your private deploy_key and add it to root of your repository, use command –

travis encrypt-file deploy_key

9. After successful encryption, you will see a message

Please add the following to your build script (before_install stage in your .travis.yml, for instance):

openssl aes-256-cbc -K $encrypted_3dac6bf6c973_key -iv $encrypted_3dac6bf6c973_iv -in deploy_key.enc -out ../deploy_key -d
  1. Add the above-generated deploy_key in Travis and push the changes on your master branch. Do not push the deploy_key only the encryption file i.e., deploy_key.enc
  1. Finally, push the changes and create a Pull request and merge it to test the deployment. Visit Travis logs for more details and debugging.

Resources

Continue ReadingAuto Deployment of SUSI Web Chat on gh-pages with Travis-CI

Link Preview Service from SUSI Server

 SUSI Webchat, SUSI Android app, SUSI iOS app are various SUSI clients which depend on response from SUSI Server. The most common response of SUSI Server is in form of links. Clients usually need to show the preview of the links to the user. This preview may include featured image, description and the title of the link.  Clients show this information by using various 3rd party APIs and libraries. We planned to create an API endpoint for this on SUSI Server to give the preview of the link. This service is called LinkPreviewService.
String url = post.get("url", "");
        if(url==null || url.isEmpty()){
            jsonObject.put("message","URL Not given");
            jsonObject.put("accepted",false);
            return new ServiceResponse(jsonObject);
        }

This API Endpoint accept only 1 get parameter which is the URL whose preview is to be shown.

Here we also check if no parameter or wrong URL parameter was sent. If that was the the case then we return an error message to the user.

 SourceContent sourceContent =     TextCrawler.scrape(url,3);
        if (sourceContent.getImages() != null) jsonObject.put("image", sourceContent.getImages().get(0));
        if (sourceContent.getDescription() != null) jsonObject.put("descriptionShort", sourceContent.getDescription());
        if(sourceContent.getTitle()!=null)jsonObject.put("title", sourceContent.getTitle());
        jsonObject.put("accepted",true);
        return new ServiceResponse(jsonObject);
    }

The TextCrawler function accept two parameters. One is the url of the website which is to be scraped for the preview data and the other is depth. To get the images, description and title there are methods built in. Here we just call those methods and set them in our JSON Object.

 private String htmlDecode(String content) {
        return Jsoup.parse(content).text();
    }

Text Crawler is based on Jsoup. Jsoup is a java library that is used to scrape HTML pages.

To get anything from Jsoup we need to decode the content of HTML to Text.

public List<String> getImages(Document document, int imageQuantity) {
        Elements media = document.select("[src]");
        while(var5.hasNext()) {
            Element srcElement = (Element)var5.next();
            if(srcElement.tagName().equals("img")) {
                ((List)matches).add(srcElement.attr("abs:src"));
            }
        }

 The getImages method takes the HTML document from the JSoup and find the image tags in that. We have given the imageQuantity parameter in the function, so accordingly it returns the src attribute of the first n images it find.

This API Endpoint can be seen working on

http://127.0.0.1:4000/susi/linkPreview.json?url=<ANY URL>

A real working example of this endpoint would be http://api.susi.ai/susi/linkPreview.json?url=https://techcrunch.com/2017/07/23/dear-tech-dudes-stop-being-such-idiots-about-women/

Resources:

Web Crawlers: https://www.promptcloud.com/data-scraping-vs-data-crawling/

JSoup: https://jsoup.org/

JSoup Api Docs: https://jsoup.org/apidocs/

Parsing HTML with JSoup: http://www.baeldung.com/java-with-jsoup

Continue ReadingLink Preview Service from SUSI Server

Deleting SUSI Skills from Server

SUSI Skill CMS is a web application to create and edit skills. In this blog post I will be covering how we made the skill deleting feature in Skill CMS from the SUSI Server.
The deletion of skill was to be made in such a way that user can click a button to delete the skill. As soon as they click the delete button the skill is deleted it is removed from the directory of SUSI Skills. But admins have an option to recover the deleted skill before completion of 30 days of deleting the skill.

First we will accept all the request parameters from the GET request.

        String model_name = call.get("model", "general");
        String group_name = call.get("group", "Knowledge");
        String language_name = call.get("language", "en");
        String skill_name = call.get("skill", "wikipedia");

In this we get the model name, category, language name, skill name and the commit ID. The above 4 parameters are used to make a file path that is used to find the location of the skill in the Susi Skill Data repository.

 if(!DAO.deleted_skill_dir.exists()){
            DAO.deleted_skill_dir.mkdirs();
   }

We need to move the skill to a directory called deleted_skills_dir. So we check if the directory exists or not. If it not exists then we create a directory for the deleted skills.

  if (skill.exists()) {
   File file = new File(DAO.deleted_skill_dir.getPath()+path);
   file.getParentFile().mkdirs();
   if(skill.renameTo(file)){
   Boolean changed =  new File(DAO.deleted_skill_dir.getPath()+path).setLastModified(System.currentTimeMillis());
     }

This is the part where the real deletion happens. We get the path of the skill and rename that to a new path which is in the directory of deleted skills.

Also here change the last modified time of the skill as the current time. This time is used to check if the skill deleted is older than 30 days or not.

    try (Git git = DAO.getGit()) {
                DAO.pushCommit(git, "Deleted " + skill_name, rights.getIdentity().isEmail() ? rights.getIdentity().getName() : "anonymous@");
                json.put("accepted", true);
                json.put("message", "Deleted " + skill_name);
            } catch (IOException | GitAPIException e) {

Finally we add the changes to Git. DAO.pushCommit pushes to commit to the Susi Skill Data repository. If the user is logged in we get the email of the user and set that email as the commit author. Else we set the username “anonymous@”.

Then in the caretaker class there is a method deleteOldFiles that checks for all the files whose last modified time was older than 30 days. If there is any file whose last modified time was older than 30 days then it quietly delete the files.

public void deleteOldFiles() {
     Collection<File> filesToDelete = FileUtils.listFiles(new         File(DAO.deleted_skill_dir.getPath()),
     new 
(DateTime.now().withTimeAtStartOfDay().minusDays(30).toDate()),
            TrueFileFilter.TRUE);    // include sub dirs
        for (File file : filesToDelete) {
               boolean success = FileUtils.deleteQuietly(file);
            if (!success) {
                System.out.print("Deleted skill older than 30 days.");
            }
      }
}

To test this API endpoint, we need to call http://localhost:4000/cms/deleteSkill.txt?model=general&group=Knowledge&language=en&skill=<skill_name>

Resources

JGit Documentation: https://eclipse.org/jgit/documentation/

Commons IO: https://commons.apache.org/proper/commons-io/

Age Filter: https://commons.apache.org/proper/commons-io/javadocs/api-1.4/org/apache/commons/io/filefilter/AgeFileFilter.html

JGit User Guide: http://wiki.eclipse.org/JGit/User_Guide

JGit Repository access: http://www.codeaffine.com/2014/09/22/access-git-repository-with-jgit/

Continue ReadingDeleting SUSI Skills from Server

Getting SUSI Skill at a Commit ID

Susi Skill CMS is a web app to edit and create new skills. We use Git for storing different versions of Susi Skills. So what if we want to roll back to a previous version of the skill? To implement this feature in Susi Skill CMS, we needed an API endpoint which accepts the name of the skill and the commit ID and returns the file at that commit ID.

In this blog post I will tell about making an API endpoint which works similar to git show.

First we will accept all the request parameters from the GET request.

        String model_name = call.get("model", "general");
        String group_name = call.get("group", "Knowledge");
        String language_name = call.get("language", "en");
        String skill_name = call.get("skill", "wikipedia");
        String commitID  = call.get("commitID", null);

In this we get the model name, category, language name, skill name and the commit ID. The above 4 parameters are used to make a file path that is used to find the location of the skill in the Susi Skill Data repository.

This servlet need CommitID to work and if commit ID is not given in the request parameters then we send an error message saying that the commit id is null and stop the servlet execution.

    Repository repository = DAO.getRepository();
    ObjectId CommitIdObject = repository.resolve(commitID);

Then we get the git repository of the skill from the DAO and initialize the repository object.

From the commitID that we got in the request parameters we create a CommitIdObject.

   (RevWalk revWalk = new RevWalk(repository)) {
   RevCommit commit = revWalk.parseCommit(CommitIdObject);
   RevTree tree = commit.getTree();


Now using commit’s tree, we will find the find the path and get the tree of the commit.

From the TreeWalk in the repository we will set a filter to find a file. This searches recursively for the files inside all the folders.

                revWalk = new RevWalk(repository)) {
                try (TreeWalk treeWalk = new TreeWalk(repository)) {
                    treeWalk.addTree(tree);
                    treeWalk.setRecursive(true);
                    treeWalk.setFilter(PathFilter.create(path));
                    if (!treeWalk.next()) {
                        throw new IllegalStateException("Did not find expected file");
                    }

If the TreeWalk reaches to an end and does not find the specified skill path then it returns anIllegal State Exception with an message saying did not found the file on that commit ID.

       ObjectId objectId = treeWalk.getObjectId(0);
       ObjectLoader loader = repository.open(objectId);
       OutputStream output = new OutputStream();
       loader.copyTo(output);

And then one can the loader to read the file. From the treeWalk we get the object and create an output stream to copy the file content in it. After that we create the JSON and put the OutputStream object as as String in it.

       json.put("file",output);

This Servlet can be seen working api.susi.ai: http://api.susi.ai/cms/getFileAtCommitID.json?model=general&group=knowledge&language=en&skill=bitcoin&commitID=214791f55c19f24d7744364495541b685539a4ee

Resources

JGit Documentation: https://eclipse.org/jgit/documentation/

JGit User Guide: http://wiki.eclipse.org/JGit/User_Guide

JGit Repository access: http://www.codeaffine.com/2014/09/22/access-git-repository-with-jgit/

JGit Github: https://github.com/eclipse/jgit

Continue ReadingGetting SUSI Skill at a Commit ID

Enabling Google App Signing for Android Project

Signing key management of Android Apps is a hectic procedure and can grow out of hand rather quickly for large organizations with several independent projects. We, at FOSSASIA also had to face similar difficulties in management of individual keys by project maintainers and wanted to gather all these Android Projects under singular key management platform:

To handle the complexities and security aspect of the process, this year Google announced App Signing optional program where Google takes your existing key’s encrypted file and stores it on their servers and asks you to create a new upload key which will be used to sign further updates of the app. It takes the certificates of your new upload key and maps it to the managed private key. Now, whenever there is a new upload of the app, it’s signing certificate is matched with the upload key certificate and after verification, the app is signed by the original private key on the server itself and delivered to the user. The advantage comes where you lose your key, its password or it is compromised. Before App Signing program, if your key got lost, you had to launch your app under a new package name, losing your existing user base. With Google managing your key, if you lose your upload key, then the account owner can request Google to reassign a new upload key as the private key is secure on their servers.

There is no difference in the delivered app from the previous one as it is still finally signed by the original private key as it was before, except that Google also optimizes the app by splitting it into multiple APKs according to hardware, demographic and other factors, resulting in a much smaller app! This blog will take you through the steps in how to enable the program for existing and new apps. A bit of a warning though, for security reasons, opting in the program is permanent and once you do it, it is not possible to back out, so think it through before committing.

For existing apps:

First you need to go to the particular app’s detail section and then into Release Management > App Releases. There you would see the Get Started button for App Signing.

The account owner must first agree to its terms and conditions and once it’s done, a page like this will be presented with information about app signing infrastructure at top.

So, as per the instructions, download the PEPK jar file to encrypt your private key. For this process, you need to have your existing private key and its alias and password. It is fine if you don’t know the key password but store password is needed to generate the encrypted file. Then execute this command in the terminal as written in Step 2 of your Play console:

java -jar pepk.jar –keystore={{keystore_path}} –alias={{alias}} –output={{encrypted_file_output_path}} –encryptionkey=eb10fe8f7c7c9df715022017b00c6471f8ba8170b13049a11e6c09ffe3056a104a3bbe4ac5a955f4ba4fe93fc8cef27558a3eb9d2a529a2092761fb833b656cd48b9de6a

You will have to change the bold text inside curly braces to the correct keystore path, alias and the output file path you want respectively.

Note: The encryption key has been same for me for 3 different Play Store accounts, but might be different for you. So please confirm in Play console first

When you execute the command, it will ask you for the keystore password, and once you enter it, the encrypted file will be generated on the path you specified. You can upload it using the button on console.

After this, you’ll need to generate a new upload key. You can do this using several methods listed here, but for demonstration we’ll be using command line to do so:

keytool -genkey -v -keystore {{keystore_path}} -alias {{alias_name}} -keyalg RSA -keysize 2048 -validity 10000

The command will ask you a couple of questions related to the passwords and signing information and then the key will be generated. This will be your public key and be used for further signing of your apps. So keep it and the password secure and handy (even if it is expendable now).

After this step, you need to create a PEM upload certificate for this key, and in order to do so, execute this command:

keytool -export -rfc -keystore {{keystore_path}} -alias {{alias_name}} -file {{upload_certificate.pem}}

After this is executed, it’ll ask you the keystore password, and once you enter it, the PEM file will be generated and you will have to upload it to the Play console.

If everything goes right, your Play console will look something like this:


Click enrol and you’re done! Now you can go to App Signing section of the Release Management console and see your app signing and new upload key certificates


You can use the SHA1 hash to confirm the keys as to which one corresponds to private and upload if ever in confusion.

For new apps:

For new apps, the process is like a walk in park. You just need to enable the App Signing, and you’ll get an option to continue, opt-out or re-use existing key.


If you re-use existing key, the process is finished then and there and an existing key is deployed as the upload key for this app. But if you choose to Continue, then App Signing will be enabled and Google will use an arbitrary key as private key for the app and the first app you upload will get its key registered as the upload key


This is the screenshot of the App Signing console when there is no first app uploaded and you can see that it still has an app signing certificate of a key which you did not upload or have access to.

If you want to know more about app signing program, check out these links:

Continue ReadingEnabling Google App Signing for Android Project

Implementing Skill Listing in SUSI iOS

Skills are basically a set of rules which respond to the user’s queries through any client app. All the skills are defined in the SUSI Skill Data repo where the user’s queries are matched with the already present skills and the server responds accordingly. Apps like Alexa, Google Assistant have an interface to view skills with a set of sample queries that can be used therefore, we are adding the same skill display UI in the SUSI iOS app.

Implementation

All the skills are arranged into categories or groups, so we first need to fetch all those groups followed by fetching skills from each group. For listing all the groups, we use the endpoint below:

http://api.susi.ai/cms/getGroups.json

Which returns all the groups in the groups object like below:

{
  "session": {"identity": {
    "type": "host",
    "name": "67.214.191.117",
    "anonymous": true
  }},
  "accepted": true,
  "groups": [
    "Social",
    "News",
    "Food and Drink",
    "Travel and Transportation",
    "Connected Car",
    "Movies and TV",
    "Problem Solving",
    "Knowledge",
    "Business and Finance",
    "Productivity",
    "Games, Trivia and Accessories",
    "Lifestyle",
    "Health and Fitness",
    "Music and Audio",
    "Shopping",
    "Communication",
    "Novelty and Humour",
    "Utilities",
    "Sports", 
    "Weather"
  ],
  "message": "Success: Fetched group list"
}

After the groups have been fetched, we need to get the skills for each group. Here, we use the endpoint below:

http://api.susi.ai/cms/getSkillList.json?group=GROUP_NAME

Since, we have a number of groups, we need to make the above API call as many times as the group count is. A sample call would look like:

http://api.susi.ai/cms/getSkillList.json?group=News

which would fetch all the skills in the News group.

{
  "accepted": true,
  "model": "general",
  "group": "News",
  "language": "en",
  "skills": {"news": {
    "image": "images/news.png",
    "author_url": "https://github.com/AliAyub007",
    "examples": [
      "News",
      "latest news",
      "most viewed articles in science today",
      "most viewed articles in science in the last week",
      "most viewed articles in science in the last month",
      "most shared articles in science today",
      "can you tell me last week's most shared articles in science",
      "do you know most shared articles in arts in the last month",
      "most emailed articles today in arts",
      "most emailed articles in science in the last week",
      "can you tell me most emailed articles in science in the last month",
      "articles in science",
      "show me articles",
      "most emailed articles",
      "most shared articles",
      "tell me news in tech world"
    ],
    "developer_privacy_policy": null,
    "author": "Ali Ayub Khan",
    "skill_name": "NEWS",
    "dynamic_content": true,
    "terms_of_use": null,
    "descriptions": "A skill to give news.",
    "skill_rating": null
  }},
  "message": "Success: Fetched skill list",
  "session": {"identity": {
    "type": "host",
    "name": "23.94.137.239",
    "anonymous": true
  }}
}

Each such json object gives us the following values:

  • Model
  • Group
  • Language
  • Image Path
  • Author’s URL
  • Author’s Name
  • A list of sample queries
  • Skill Name
  • Licence and terms of use
  • Rating
  • Description

Implementation in SUSI iOS

The UI for listing skills is a little complex as it consists of a UITableView where each UITableViewCell consists of a UILabel(group name) and a UICollectionVIew (horizontal scroll).

Let’s see the step by step process to implement the skill listing.

  1. First, we need to fetch all the groups available using the endpoint above.
// get all groups
func getAllGroups() {
  Client.sharedInstance.getAllGroups { (groups, success, message) in
    DispatchQueue.main.async {
      if success {
        self.groups = groups
        self.tableView.reloadData()
      } else {
        print(message ?? "error")
      }
    }
  }
}
  1. After the response from the above call is obtained, the groups object containing all the groups is returned to the controller which the group name to set the UILabel.
var groupName: String? {
  didSet {
    backgroundColor = Color.grey.lighten3
    groupNameLabel.text = groupName
  }
}
  1. After the label is set, each cell makes another API call to populate the collection view, since these calls are concurrent, the collection view populates as soon as the response is fetched.
  2. The response from the above API call is used to create an array of Skill Model objects which is used to parse the response and to effectively use the data to display.
if let skills = response[Client.SkillListing.skills] as? [String : AnyObject],
  let model = response[Client.SkillListing.model] as? String,
  let group = response[Client.SkillListing.group] as? String,
  let language = response[Client.SkillListing.language] as? String,
  skills.count > 0 {
    let skillData = Skill.getAllSkill(skills, model, group, language)
    completion(skillData, true, nil)
    return
}
static func getAllSkill(_ skills: [String : AnyObject], _ model: String, _ group: String, _ language: String) -> [Skill] {
  var skillData = [Skill]()
  for skill in skills {
    let newSkill = Skill(dictionary: skill.value as! [String : AnyObject])
    newSkill.imagePath = getImagePath(model, group, language, newSkill.imagePath)
    skillData.append(newSkill)
  }
  return skillData
}
  1. At last, the skill object for the collection view is used to populate it as below:
var skill: Skill? {
  didSet {
    if let skill = skill {
      if let url = URL(string: skill.imagePath) {
        imageView.kf.setImage(with: url)
      }
      exampleQueryLabel.text = "\(skill.examples.first?.debugDescription ?? "")"
      skillNameLabel.text = skill.skillName
      skillDescription.text = skill.skillDescription
    }
  }
}

Here, we make use of the didSet method to populate the collection view. We have used Kingfisher to display the images.

That’s all for the scope of this tutorial. We learned how to fetch the skill groups followed by fetching the skills and displaying the skill data using the skill model object.

Below is the final UI we see after implementation.

Resources

Continue ReadingImplementing Skill Listing in SUSI iOS