

Stepper Motors Experiment with PSLab
PSLab device is capable of building up a complete science lab almost anywhere. While the privilege is mostly taken by high school students and teachers to perform scientific experiments, electronic hobbyists can greatly be influenced from the device. One of the usages is to test and debug sensors and other electronic components before actually using them in their projects. This blog will explain how steppers motors can be used with PSLab.
A stepper motor is an electromechanical device which converts electrical power into mechanical power. Also it is a brushless, synchronous electric motor that can divide a full rotation into an expansive number of steps. The stepper motor uses the theory of operation for magnets to make the motor shaft turn a precise distance when a pulse of electricity is provided. Stepper motors are similar to switched reluctance motors. [1]

Figure 1: Showing the working of a stepper motor [4]
Figure 1 shows the animation of a simplified stepper motor. Unlike a brushless DC motor which rotates continuously when a fixed DC voltage is applied to it, a step motor rotates in discrete step angles as shown in the above figure.
How Stepper Motors Work?
- Stepper Motor works on the principle of electromagnetism.
- Stepper motors consist of a permanent magnetic rotating shaft, called the rotor, and electromagnets on the stationary portion that surrounds the motor, called the stator.
- Figure 1 illustrates one complete rotation of a stepper motor. At position 1, we can see that the rotor is beginning at the upper electromagnet, which is currently active (has voltage applied to it).
- To move the rotor clockwise (CW), the upper electromagnet is deactivated and the right electromagnet is activated, causing the rotor to move 90 degrees CW, aligning itself with the active magnet.
- This process is repeated in the same manner at the south and west electromagnets until we once again reach the starting position.

Figure (2): Showing different stages of stepper motors’ working cycle [3]
What are the most common reasons to choose stepper motors over other types? [2]
- Positioning – Since steppers move in precise repeatable steps, they excel in applications requiring precise positioning such as 3D printers, CNC, Camera platforms and X,Y Plotters. Some disk drives also use stepper motors to position the read/write head.
- Speed Control – Precise increments of movement also allow for excellent control of rotational speed for process automation and robotics.
- Low Speed Torque – Normal DC motors don’t have very much torque at low speeds. A Stepper motor has maximum torque at low speeds, so they are a good choice for applications requiring low speed with high precision.
Applications of Stepper Motors [2]
- Industrial Machines – Stepper motors are used in automotive gauges and machine tooling automated production equipments.
- Office Equipments – Stepper motors are incorporated inside PC based scanning equipment, data storage tape drives, optical disk drive head driving mechanism, printers, bar-code printers, scanners
- Medical – Stepper motors are used inside medical scanners, samplers, and also found inside digital dental photography, fluid pumps, respirators and blood analysis machinery.
- Consumer Electronics – Stepper motors in cameras for automatic digital camera focus and zoom functions.

Figure (3) :Figure showing stepper motors being used in robo -arms [5]
Implementation of Stepper Motor in PSLab

Figure (4) :A screenshot of Stepper Motor Experiment using PSLab Android App.
- In the PSLab the stepper motor experiment is implemented to tell the user what a stepper motor is and how to use it.
- There is one field to enter the number of steps i.e the breaks in one one rotation which the stepper motor will have.
- Using PSLab device experiment “Stepper Motor”, a user can acquire any number of steps just by entering the step value in the text box.
- The following code is implemented for executing the function.
private void setSteps() {
         int stepCount = Integer.parseInt(steps.getText().toString());
         if (stepCount > 0) {
               stepForward(stepCount);
         } else {
               stepBackward(stepCount);
         }
}
- The other two buttons are designed for choosing the direction in which the motor will rotate.
- The following code is for the backward function.
private void stepBackward(final int steps) {
    java.lang.Runnable runnable = new java.lang.Runnable() {
        @java.lang.Override
        public void run() {
            scienceLab.stepBackward(steps, 100);
        }
    };
    new java.lang.Thread(runnable).start();
}
- Thus when the stepper motor is connected to the PSLab device and the android application experiment is made to run, the stepper motor will rotate accordingly.
Resources
- https://learn.adafruit.com/all-about-stepper-motors/what-is-a-stepper-motor
- https://www.elprocus.com/stepper-motor-types-advantages-applications/
- https://www.imagesco.com/articles/picstepper/02.html
- https://en.wikipedia.org/wiki/Stepper_motor
- https://www.instructables.com/id/Robot-Arm-MK2-Plus-Stepper-Motor-Used/

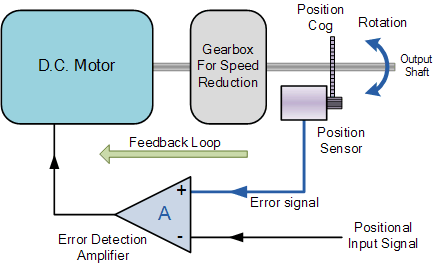 In the current context, we are concerned about stepper motors and servo motors. They cannot be powered up using direct currents to them. Inside these motors, the structure is different and they require a set of controlled signals to function. The following diagram from electronics-tutorials illustrates the feedback loop inside a servo motor. A servo motor is functional using a PWM wave. Depending on the duty cycle, the rotational angle will be determined. PSLab device is capable of generating four different square waves at any duty cycle varying from 0% to 100%. This gives us freedom to acquire any angle we desire from a servo motor. The experiment “Servo Motors” implement the following method where it accepts four angles.
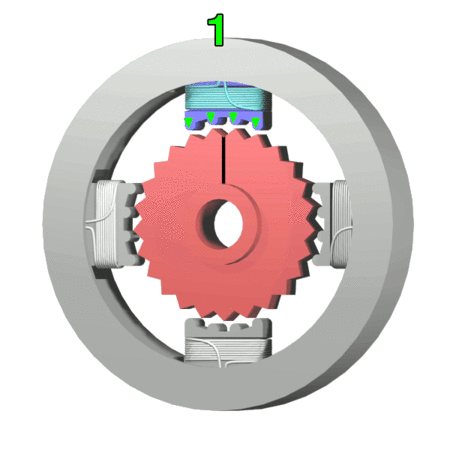 The last type of motor is stepper motor. As the name says it, this motor can produce steps. Inside of the motor, there are four coils and and five wires coming out of the motor body connecting these coils. The illustration from Wikipedia shows how four steps are acquired by powering up the respective coil in order. This powering up process needs to be controlled and hard to do manually. Using PSLab device experiment “Stepper Motor”, a user can acquire any number of steps just by entering the step value in the text box. The implementation consists of a set of method calls;
You must be logged in to post a comment.