Implementing Stripe payment in Eventyay Attendee

In Eventyay Attendee, getting tickets for events has always been a core function that we focus on. When searching for events based on location, autosuggestion based on user input really comes out as a great feature to increase the user experience. Let’s take a look at the implementation

  • Why using Stripe?
  • Implementing Stripe Payment in Eventyay Attendee
  • Conclusion
  • Resources

WHY USING STRIPE?

There are many great APIs to be taken into consideration for making payments but we choose Stripe as one of our payment gateways because of simple implementations, detailed documentation, a good number of supported card type and good security support

IMPLEMENTING STRIPE PAYMENT IN EVENTYAY ATTENDEE

Step 1: Setup dependency in the build.gradle

// Stripe
implementation 'com.stripe:stripe-android:10.3.0'

Step 2: Set up UI to take card information

The information needed for making payments are Card Number, CVC, Expiration Date, which can be made with simple UI (EditText, Spinner,…). Stripe support getting information with CardInputWidget but we made a custom UI for that. Here is the UI we created.

Step 3: Create a card and validate information

Stripe has an object called Card, which takes card number, expiration date and CVC number as parameter to detect the card type and validate the card information with function .validateCard()

PAYMENT_MODE_STRIPE -> {
   card = Card.create(rootView.cardNumber.text.toString(), attendeeViewModel.monthSelectedPosition,
       rootView.year.selectedItem.toString().toInt(), rootView.cvc.text.toString())

   if (!card.validateCard()) {
       rootView.snackbar(getString(R.string.invalid_card_data_message))
       false
   } else {
       true
   }
}

Step 4: Send the token to the server

If card information is valid, we can create a token from the Card and then send it to the server. The token will act as the identifier of the card in order for the server to charge the payment and create tickets for the user. 

private fun sendToken(card: Card) {
   Stripe(requireContext())
       .createToken(card, BuildConfig.STRIPE_API_KEY, object : TokenCallback {
           override fun onSuccess(token: Token) {
               val charge = Charge(attendeeViewModel.getId().toInt(), token.id, null)
               attendeeViewModel.chargeOrder(charge)
           }
           override fun onError(error: Exception) {
               rootView.snackbar(error.localizedMessage.toString())
           }
       })
}

Step 5: So the rest is already handled by the server. Android application will then just receive the response from the server to see if the order is charged successfully or not.

CONCLUSION

With Stripe, user can easily make payments to get tickets for events. Stripe is a great payment gateway as it is really easy to implement in Android. Hopefully, this blog post will help you create a great shopping cart app or any kind of application that requires fast, simple and easy payments.

RESOURCES

Eventyay Attendee Pull Request on Stripe: https://github.com/fossasia/open-event-attendee-android/pull/1863

Documentation from Stripe for Android: https://stripe.com/docs/mobile/android


Continue ReadingImplementing Stripe payment in Eventyay Attendee

Implementing pagination with Retrofit in Eventyay Attendee

Pagination (Paging) is a common and powerful technique in Android Development when making HTTP requests or fetching data from the database. Eventyay Attendee has found many situations where data binding comes in as a great solution for our network calls with Retrofit. Let’s take a look at this technique.

  • Problems without Pagination in Android Development
  • Implementing Pagination with Kotlin with Retrofit
  • Results and GIF
  • Conclusions

PROBLEMS WITHOUT DATABINDING IN ANDROID DEVELOPMENT

Making HTTP requests to fetch data from the API is a basic work in any kind of application. With the mobile application, network data usage management is an important factor that affects the loading performance of the app. Without paging, all of the data are fetched even though most of them are not displayed on the screen. Pagination is a technique to load all the data in pages of limited items, which is much more efficient

IMPLEMENTING DATABINDING IN FRAGMENT VIEW

Step 1:  Set up dependency in build.gradle

// Paging
implementation "androidx.paging:paging-runtime:$paging_version"
implementation "androidx.paging:paging-rxjava2:$paging_version"

Step 2:  Set up retrofit to fetch events from the API

@GET("events?include=event-sub-topic,event-topic,event-type")
fun searchEventsPaged(
   @Query("sort") sort: String,
   @Query("filter") eventName: String,
   @Query("page[number]") page: Int,
   @Query("page[size]") pageSize: Int = 5
): Single<List<Event>>

Step 3: Set up the DataSource

DataSource is a base class for loading data in the paging library from Android. In Eventyay, we use PageKeyedDataSource. It will fetch the data based on the number of pages and items per page with our default parameters. With PageKeyedDataSource, three main functions loadInitial(), loadBefore(), loadAfter() are used to to load each chunks of data.

class EventsDataSource(
   private val eventService: EventService,
   private val compositeDisposable: CompositeDisposable,
   private val query: String?,
   private val mutableProgress: MutableLiveData<Boolean>

) : PageKeyedDataSource<Int, Event>() {
   override fun loadInitial(
       params: LoadInitialParams<Int>,
       callback: LoadInitialCallback<Int, Event>
   ) {
       createObservable(1, 2, callback, null)
   }

   override fun loadAfter(params: LoadParams<Int>, callback: LoadCallback<Int, Event>) {
       val page = params.key
       createObservable(page, page + 1, null, callback)
   }

   override fun loadBefore(params: LoadParams<Int>, callback: LoadCallback<Int, Event>) {
       val page = params.key
       createObservable(page, page - 1, null, callback)
   }

   private fun createObservable(
       requestedPage: Int,
       adjacentPage: Int,
       initialCallback: LoadInitialCallback<Int, Event>?,
       callback: LoadCallback<Int, Event>?
   ) {
       compositeDisposable +=
           eventService.getEventsByLocationPaged(query, requestedPage)
               .withDefaultSchedulers()
               .subscribe({ response ->
                   if (response.isEmpty()) mutableProgress.value = false
                   initialCallback?.onResult(response, null, adjacentPage)
                   callback?.onResult(response, adjacentPage)
               }, { error ->
                   Timber.e(error, "Fail on fetching page of events")
               }
           )
   }
}

Step 4: Set up the Data Source Factory

DataSourceFactory is the class responsible for creating DataSource object so that we can create PagedList (A type of List used for paging) for events.

class EventsDataSourceFactory(
   private val compositeDisposable: CompositeDisposable,
   private val eventService: EventService,
   private val query: String?,
   private val mutableProgress: MutableLiveData<Boolean>
) : DataSource.Factory<Int, Event>() {
   override fun create(): DataSource<Int, Event> {
       return EventsDataSource(eventService, compositeDisposable, query, mutableProgress)
   }
}

Step 5: Adapt the current change to the ViewModel. 

Previously, events fetched in List<Event> Object are now should be turned into PagedList<Event>.

sourceFactory = EventsDataSourceFactory(
   compositeDisposable,
   eventService,
   mutableSavedLocation.value,
   mutableProgress
)
val eventPagedList = RxPagedListBuilder(sourceFactory, config)
   .setFetchScheduler(Schedulers.io())
   .buildObservable()
   .cache()

compositeDisposable += eventPagedList
   .subscribeOn(Schedulers.io())
   .observeOn(AndroidSchedulers.mainThread())
   .distinctUntilChanged()
   .doOnSubscribe {
       mutableProgress.value = true
   }.subscribe({
       val currentPagedEvents = mutablePagedEvents.value
       if (currentPagedEvents == null) {
           mutablePagedEvents.value = it
       } else {
           currentPagedEvents.addAll(it)
           mutablePagedEvents.value = currentPagedEvents
       }
   }, {
       Timber.e(it, "Error fetching events")
       mutableMessage.value = resource.getString(R.string.error_fetching_events_message)
   })

Step 6: Turn ListAdapter into PagedListAdapter

PageListAdapter is basically the same ListAdapter to update the UI of the events item but specifically used for Pagination. In here, List objects can also be null.

class EventsListAdapter : PagedListAdapter<Event, EventViewHolder>(EventsDiffCallback()) {

   var onEventClick: EventClickListener? = null
   var onFavFabClick: FavoriteFabClickListener? = null
   var onHashtagClick: EventHashTagClickListener? = null

   override fun onCreateViewHolder(parent: ViewGroup, viewType: Int): EventViewHolder {
       val binding = ItemCardEventsBinding.inflate(LayoutInflater.from(parent.context), parent, false)
       return EventViewHolder(binding)
   }

   override fun onBindViewHolder(holder: EventViewHolder, position: Int) {
       val event = getItem(position)
       if (event != null)
           holder.apply {
               bind(event, position)
               eventClickListener = onEventClick
               favFabClickListener = onFavFabClick
               hashTagClickListAdapter = onHashtagClick
           }
   }

   /**
    * The function to call when the adapter has to be cleared of items
    */
   fun clear() {
       this.submitList(null)
   }

AND HERE ARE THE RESULTS…

CONCLUSION

Databinding is the way to go when working with a complex UI in Android Development. This helps reducing boilerplate code and to increase the readability of the code and the performance of the UI. One problem with data-binding is that sometimes, it is pretty hard to debug with unhelpful log messages. Hopefully, you can empower your UI in your project now with data-binding. 

Pagination is the way to go for fetching items from the API and making infinite scrolling. This helps reduce network usage and improve the performance of Android applications. And that’s it. I hope you can make your application more powerful with pagination. 

RESOURCES

Open Event Codebase: https://github.com/fossasia/open-event-attendee-android/pull/2012

Documentation: https://developer.android.com/topic/libraries/architecture/paging/ 

Google Codelab: https://codelabs.developers.google.com/codelabs/android-paging/#0

Continue ReadingImplementing pagination with Retrofit in Eventyay Attendee

Adding time counter on ordering tickets in Eventyay Attendee

In Eventyay Attendee, ordering tickets for events has always been a core functionality that we focus on. When ordering tickets, adding a time counter to make a reservation and release tickets after timeout is a common way to help organizers control their tickets’ distribution and help users save up their tickets. Let’s take a look at how to implement this feature

  • Implementing the time counter 
  • Some notes on implementing time counter
  • Conclusion
  • Resources

INTEGRATING TIME COUNTER TO YOUR SYSTEM

Step 1: Create the UI for your time counter. In here, we made a simple View container with TextView inside to update the time.

Step 2: Set up the time counter with Android CountdownTimer with the total countdown time and the ticking time. In Eventyay, the default countdown time is 10 minutes (600,000 ms) with the ticking time is (1,000 ms), which means the UI is updated every one second.

private fun setupCountDownTimer(orderExpiryTime: Int) {
   rootView.timeoutCounterLayout.isVisible = true
   rootView.timeoutInfoTextView.text =
       getString(R.string.ticket_timeout_info_message, orderExpiryTime.toString())

   val timeLeft: Long = if (attendeeViewModel.timeout == -1L) orderExpiryTime * 60 * 1000L
                           else attendeeViewModel.timeout
   timer = object : CountDownTimer(timeLeft, 1000) {
       override fun onFinish() {
           findNavController(rootView).navigate(AttendeeFragmentDirections
               .actionAttendeeToTicketPop(safeArgs.eventId, safeArgs.currency, true))
       }

       override fun onTick(millisUntilFinished: Long) {
           attendeeViewModel.timeout = millisUntilFinished
           val minutes = millisUntilFinished / 1000 / 60
           val seconds = millisUntilFinished / 1000 % 60
           rootView.timeoutTextView.text = "$minutes:$seconds"
       }
   }
   timer.start()
}

Step 3: Set up creating a pending order when the timer starts counting so that users can hold a reservation for their tickets. A simple POST request about empty order to the API is made

fun initializeOrder(eventId: Long) {
   val emptyOrder = Order(id = getId(), status = ORDER_STATUS_INITIALIZING, event = EventId(eventId))

   compositeDisposable += orderService.placeOrder(emptyOrder)
       .withDefaultSchedulers()
       .subscribe({
           mutablePendingOrder.value = it
           orderIdentifier = it.identifier.toString()
       }, {
           Timber.e(it, "Fail on creating pending order")
       })
}

Step 4: Set up canceling order when the time counter finishes. As time goes down, the user should be redirected to the previous fragment and a pop-up dialog should show with a message about reservation time has finished. There is no need to send an HTTP request to cancel the pending order as it is automatically handled by the server.

Step 5: Cancel the time counter in case the user leaves the app unexpectedly or move to another fragment. If this step is not made, the CountdownTimer still keeps counting in the background and possibly call onFinished() at some point that could evoke functions and crash the app

override fun onDestroy() {
   super.onDestroy()
   if (this::timer.isInitialized)
       timer.cancel()
}

RESULTS

CONCLUSION

For a project with a ticketing system, adding a time counter for ordering is a really helpful feature to have. With the help of Android CountdownTimer, it is really to implement this function to enhance your user experience.

RESOURCES

Eventyay Attendee Android Codebase: https://github.com/fossasia/open-event-android

Eventyay Attendee Android PR: #1843 – Add time counter on ordering ticket

Documentation: https://developer.android.com/reference/android/os/CountDownTimer

Continue ReadingAdding time counter on ordering tickets in Eventyay Attendee

Implementing places autosuggestion with Mapbox for searching events in Eventyay Attendee

In Eventyay Attendee, searching for events has always been a core function that we focus on. When searching for events based on location, autosuggestion based on user input really comes out as a great feature to increase the user experience. Let’s take a look at the implementation

  • Why using Mapbox?
  • Integrating places autosuggestion for searching
  • Conclusion
  • Resources

WHY USING MAPBOX?

There are many Map APIs to be taken into consideration but we choose Mapbox as it is really to set up and use, good documentation and reasonable pricing for an open-source project compared to other Map API.

INTEGRATING PLACES AUTOSUGGESTION FOR SEARCHING

Step 1: Setup dependency in the build.gradle + the MAPBOX key

//Mapbox java sdk
implementation 'com.mapbox.mapboxsdk:mapbox-sdk-services:4.8.0'

Step 2: Set up functions inside ViewModel to handle autosuggestion based on user input:

private fun loadPlaceSuggestions(query: String) {
   // Cancel Previous Call
   geoCodingRequest?.cancelCall()
   doAsync {
       geoCodingRequest = makeGeocodingRequest(query)
       val list = geoCodingRequest?.executeCall()?.body()?.features()
       uiThread { placeSuggestions.value = list }
   }
}

private fun makeGeocodingRequest(query: String) = MapboxGeocoding.builder()
   .accessToken(BuildConfig.MAPBOX_KEY)
   .query(query)
   .languages("en")
   .build()

Based on the input, the functions will update the UI with new inputs of auto-suggested location texts. The MAPBOX_KEY can be given from the Mapbox API.

Step 3: Create an XML file to display autosuggestion strings item and set up RecyclerView in the main UI fragment

Step 4: Set up ListAdapter and ViewHolder to bind the list of auto-suggested location strings. Here, we use CamenFeature to set up with ListAdapter as the main object. With the function .placeName(), information about the location will be given so that ViewHolder can bind the data

class PlaceSuggestionsAdapter :
   ListAdapter<CarmenFeature,
       PlaceSuggestionViewHolder>(PlaceDiffCallback()) {

   var onSuggestionClick: ((String) -> Unit)? = null

   override fun onCreateViewHolder(parent: ViewGroup, viewType: Int): PlaceSuggestionViewHolder {
       val itemView = LayoutInflater.from(parent.context)
           .inflate(R.layout.item_place_suggestion, parent, false)
       return PlaceSuggestionViewHolder(itemView)
   }

   override fun onBindViewHolder(holder: PlaceSuggestionViewHolder, position: Int) {
       holder.apply {
           bind(getItem(position))
           onSuggestionClick = this@PlaceSuggestionsAdapter.onSuggestionClick
       }
   }

   class PlaceDiffCallback : DiffUtil.ItemCallback<CarmenFeature>() {
       override fun areItemsTheSame(oldItem: CarmenFeature, newItem: CarmenFeature): Boolean {
           return oldItem.placeName() == newItem.placeName()
       }

       override fun areContentsTheSame(oldItem: CarmenFeature, newItem: CarmenFeature): Boolean {
           return oldItem.equals(newItem)
       }
   }
}
fun bind(carmenFeature: CarmenFeature) {
   carmenFeature.placeName()?.let {
       val placeDetails = extractPlaceDetails(it)
       itemView.placeName.text = placeDetails.first
       itemView.subPlaceName.text = placeDetails.second
       itemView.subPlaceName.isVisible = placeDetails.second.isNotEmpty()

       itemView.setOnClickListener {
           onSuggestionClick?.invoke(placeDetails.first)
       }
   }
}

Step 5: Set up RecyclerView with Adapter created above:

private fun setupRecyclerPlaceSuggestions() {
   rootView.rvAutoPlaces.layoutManager = LinearLayoutManager(context)
   rootView.rvAutoPlaces.adapter = placeSuggestionsAdapter

   placeSuggestionsAdapter.onSuggestionClick = {
       savePlaceAndRedirectToMain(it)
   }
}

RESULTS

CONCLUSION

Place Autocorrection is a really helpful and interesting feature to include in your next project. With the help of Mapbox SDK, it is really easy to implement to enhance your user experience in your application.

RESOURCES

Eventyay Attendee Android Codebase: https://github.com/fossasia/open-event-android

Eventyay Attendee PR: #1594 – feat: Mapbox Autosuggest

Documentation: https://docs.mapbox.com/android/plugins/overview/places/

Continue ReadingImplementing places autosuggestion with Mapbox for searching events in Eventyay Attendee

Data Binding with Kotlin in Eventyay Attendee

Databinding is a common and powerful technique in Android Development. Eventyay Attendee has found many situations where data binding comes in as a great solution for our complex UI. Let’s take a look at this technique.

  • Problems without data binding in Android Development
  • Implementing Databinding with Kotlin inside Fragment
  • Implementing Databinding with Kotlin inside RecyclerView/Adapter
  • Results and GIF
  • Conclusions

PROBLEMS WITHOUT DATABINDING IN ANDROID DEVELOPMENT

Getting the data and fetching it to the UI is a basic work in any kind of application. With Android Development, the most common way to do is it to call function like .setText(), isVisible = True/False,.. in your fragment. This can create many long boilerplate codes inside Android classes. Databinding removes them and moves to the UI classes (XML).

IMPLEMENTING DATABINDING IN FRAGMENT VIEW

Step 1: Enabling data binding in the project build.gradle

android {
   dataBinding {
       enabled = true
   }

Step 2: Wrap the current layout with <layout></layout> tag. Inside that, put <data></data> to indicate any variables needed for data binding. For example, this code here display an event variable for our fragment about event details:

<layout xmlns:android="http://schemas.android.com/apk/res/android"
   xmlns:app="http://schemas.android.com/apk/res-auto"
   xmlns:bind="http://schemas.android.com/tools">

   <data>

       <variable
           name="event"
           type="org.fossasia.openevent.general.event.Event" />
   </data>

   <androidx.coordinatorlayout.widget.CoordinatorLayout
       android:id="@+id/eventCoordinatorLayout"
       android:layout_width="match_parent"
       android:layout_height="match_parent"
       android:background="@android:color/white">

Step 3: Bind your data in the XML file and create a Binding Adapter class for better usage

With the setup above, you can start binding your data with “@{<data code here>}”

<TextView
   android:id="@+id/eventName"
   android:layout_width="0dp"
   android:layout_height="wrap_content"
   android:layout_marginLeft="@dimen/layout_margin_large"
   android:layout_marginTop="@dimen/layout_margin_large"
   android:layout_marginRight="@dimen/layout_margin_large"
   android:text="@{event.name}"
   android:fontFamily="sans-serif-light"
   android:textColor="@color/dark_grey"
   android:textSize="@dimen/text_size_extra_large"
   app:layout_constraintEnd_toEndOf="@+id/eventImage"
   app:layout_constraintStart_toStartOf="@+id/eventImage"
   app:layout_constraintTop_toBottomOf="@+id/eventImage"
   tools:text="Open Source Meetup" />

Sometimes, to bind our data normally we need to use a complex function, then creating Binding Adapter class really helps. For example, Eventyay Attendee heavily uses Picasso function to fetch image to ImageView:

@BindingAdapter("eventImage")
fun setEventImage(imageView: ImageView, url: String?) {
   Picasso.get()
       .load(url)
       .placeholder(R.drawable.header)
       .into(imageView)
}
<ImageView
   android:id="@+id/eventImage"
   android:layout_width="@dimen/layout_margin_none"
   android:layout_height="@dimen/layout_margin_none"
   android:scaleType="centerCrop"
   android:transitionName="eventDetailImage"
   app:layout_constraintDimensionRatio="2"
   app:layout_constraintEnd_toEndOf="parent"
   app:layout_constraintHorizontal_bias="0.5"
   app:layout_constraintStart_toStartOf="parent"
   app:eventImage="@{event.originalImageUrl}"
   app:layout_constraintTop_toBottomOf="@id/alreadyRegisteredLayout" />

Step 4: Finalize data binding setup in Android classes. We can create a binding variable. The binding root will serve as the root node of the layout. Whenever data is needed to be bind, set the data variable stated to that binding variable and call function executePendingBingdings()

private lateinit var rootView: View
private lateinit var binding: FragmentEventBinding
binding = DataBindingUtil.inflate(inflater, R.layout.fragment_event, container, false)
rootView = binding.root
binding.event = event
binding.executePendingBindings()

SOME NOTES

  • In the example mentioned above, the name of the binding variable class is auto-generated based on the name of XML file + “Binding”. For example, the XML name was fragment_event so the DataBinding classes generated name is FragmentEventBinding.
  • The data binding class is only generated only after compiling the project.
  • Sometimes, compiling the project fails because of some problems due to data binding without any clear log messages, then that’s probably because of error when binding your data in XML class. For example, we encounter a problem when changing the value in Attendee data class from firstname to firstName but XML doesn’t follow the update. So make sure you bind your data correctly
<TextView
   android:id="@+id/name"
   android:layout_width="wrap_content"
   android:layout_height="wrap_content"
   android:layout_marginBottom="@dimen/layout_margin_large"
   android:textColor="@color/black"
   android:textSize="@dimen/text_size_expanded_title_large"
   android:text="@{attendee.firstname + ` ` + attendee.lastname}"
   tools:text="@string/name_preview" />

CONCLUSION

Databinding is the way to go when working with a complex UI in Android Development. This helps reducing boilerplate code and to increase the readability of the code and the performance of the UI. One problem with data binding is that sometimes, it is pretty hard to debug with an unhelpful log message. Hopefully, you can empower your UI in your project now with data binding.  

RESOURCES

Eventyay Attendee Android Codebase: https://github.com/fossasia/open-event-android

Eventyay Attendee Android PR: #1961 – feat: Set up data binding for Recycler/Adapter

Documentation: https://developer.android.com/topic/libraries/data-binding

Google Codelab: https://codelabs.developers.google.com/codelabs/android-databinding/#0

Continue ReadingData Binding with Kotlin in Eventyay Attendee

Dependency Injection with Kotlin Koin in Eventyay Attendee

Eventyay Attendee Android app contains a lot of shared components between classes that should be reused. Dependency Injection with Koin really comes in as a great problem solver.

Dependency Injection is a common design pattern used in various projects, especially with Android Development. In short, dependency injection helps to create/provide instances to the dependent class, and share it among other classes.

  • Why using Koin?
  • Process of setting up Koin in the application
  • Results
  • Conclusion
  • Resources

Let’s get into the details

WHY USING KOIN?

Before Koin, dependency injection in Android Development was mainly used with other support libraries like Dagger or Guice. Koin is a lightweight alternative that was developed for Kotlin developers. Here are some of the major things that Koin can do for your project:

  • Modularizing your project by declaring modules
  • Injecting class instances into Android classes
  • Injecting class instance by the constructor
  • Supporting with Android Architecture Component and Kotlin
  • Testing easily

SETTING UP KOIN IN THE ANDROID APPLICATION

Adding the dependencies to build.gradle

// Koin
implementation "org.koin:koin-android:$koin_version"
implementation "org.koin:koin-androidx-scope:$koin_version"
implementation "org.koin:koin-androidx-viewmodel:$koin_version"

Create a folder to manage all the dependent classes.

Inside this Modules class, we define modules and create “dependency” class instances/singletons that can be reused or injected. For Eventyay Attendee, we define 5 modules: commonModule, apiModule, viewModelModule, networkModule, databaseModule. This saves a lot of time as we can make changes like adding/removing/editing the dependency in one place.

Let’s take a look at what is inside some of the modules:

DatabaseModule

val databaseModule = module {

   single {
       Room.databaseBuilder(androidApplication(),
           OpenEventDatabase::class.java, "open_event_database")
           .fallbackToDestructiveMigration()
           .build()
   }

   factory {
       val database: OpenEventDatabase = get()
       database.eventDao()
   }

   factory {
       val database: OpenEventDatabase = get()
       database.sessionDao()
   }

CommonModule

val commonModule = module {
   single { Preference() }
   single { Network() }
   single { Resource() }
   factory { MutableConnectionLiveData() }
   factory<LocationService> { LocationServiceImpl(androidContext()) }
}

ApiModule

val apiModule = module {
   single {
       val retrofit: Retrofit = get()
       retrofit.create(EventApi::class.java)
   }
   single {
       val retrofit: Retrofit = get()
       retrofit.create(AuthApi::class.java)
   }

NetworkModule

single {
   val connectTimeout = 15 // 15s
   val readTimeout = 15 // 15s

   val builder = OkHttpClient().newBuilder()
       .connectTimeout(connectTimeout.toLong(), TimeUnit.SECONDS)
       .readTimeout(readTimeout.toLong(), TimeUnit.SECONDS)
       .addInterceptor(HostSelectionInterceptor(get()))
       .addInterceptor(RequestAuthenticator(get()))
       .addNetworkInterceptor(StethoInterceptor())

   if (BuildConfig.DEBUG) {
       val httpLoggingInterceptor = HttpLoggingInterceptor().apply { level = HttpLoggingInterceptor.Level.BODY }
       builder.addInterceptor(httpLoggingInterceptor)
   }
   builder.build()
}

single {
   val baseUrl = BuildConfig.DEFAULT_BASE_URL
   val objectMapper: ObjectMapper = get()
   val onlineApiResourceConverter = ResourceConverter(
       objectMapper, Event::class.java, User::class.java,
       SignUp::class.java, Ticket::class.java, SocialLink::class.java, EventId::class.java,
       EventTopic::class.java, Attendee::class.java, TicketId::class.java, Order::class.java,
       AttendeeId::class.java, Charge::class.java, Paypal::class.java, ConfirmOrder::class.java,
       CustomForm::class.java, EventLocation::class.java, EventType::class.java,
       EventSubTopic::class.java, Feedback::class.java, Speaker::class.java, FavoriteEvent::class.java,
       Session::class.java, SessionType::class.java, MicroLocation::class.java, SpeakersCall::class.java,
       Sponsor::class.java, EventFAQ::class.java, Notification::class.java, Track::class.java,
       DiscountCode::class.java, Settings::class.java, Proposal::class.java)

   Retrofit.Builder()
       .client(get())
       .addCallAdapterFactory(RxJava2CallAdapterFactory.create())
       .addConverterFactory(JSONAPIConverterFactory(onlineApiResourceConverter))
       .addConverterFactory(JacksonConverterFactory.create(objectMapper))
       .baseUrl(baseUrl)
       .build()
}

As described in the code, Koin support single for creating a singleton object, factory for creating a new instance every time an object is injected.

With all the modules created, it is really simple to get Koin running in the project with the function startKoin() and a few lines of code. We use it inside the application class:

startKoin {
   androidLogger()
   androidContext(this@OpenEventGeneral)
   modules(listOf(
       commonModule,
       apiModule,
       viewModelModule,
       networkModule,
       databaseModule
   ))
}

Injecting created instances defined in the modules can be used in two way, directly inside a constructor or injecting into Android classes.  

Here is an example of dependency injection to the constructor that we used for a ViewModel class and injecting that ViewModel class into the Fragment:

class EventsViewModel(
   private val eventService: EventService,
   private val preference: Preference,
   private val resource: Resource,
   private val mutableConnectionLiveData: MutableConnectionLiveData,
   private val config: PagedList.Config,
   private val authHolder: AuthHolder
) : ViewModel() {
class EventsFragment : Fragment(), BottomIconDoubleClick {
   private val eventsViewModel by viewModel<EventsViewModel>()
   private val startupViewModel by viewModel<StartupViewModel>()

For testing, it is also really easy with support library from Koin.

@Test
fun testDependencies() {
   koinApplication {
       androidContext(mock(Application::class.java))
       modules(listOf(commonModule, apiModule, databaseModule, networkModule, viewModelModule))
   }.checkModules()
}

CONCLUSION

Koin is really easy to use and integrate into Kotlin Android project. Apart from some of the basic functionalities mention above, Koin also supports other helpful features like Scoping or Logging with well-written documentation and examples. Even though it is only developed a short time ago, Koin has proved to be a great use in the Android community. So the more complicated your project is, the more likely it is that dependency injection with Koin will be a good idea.

RESOURCES 

Documentation: https://insert-koin.io/

Eventyay Attendee Android Codebase: https://github.com/fossasia/open-event-android

Continue ReadingDependency Injection with Kotlin Koin in Eventyay Attendee

Omise Integration in Open Event Frontend

This blog post will elaborate on how omise has been integrated into the Open Event Frontend project. Omise is Thailand’s leading online payment gateway offering a wide range of processing solutions for this project and integrating it as a payment option widens the possibilities for user base and ease of payment workflow.

Similar to Paypal, Omise offers two alternatives for using their gateway, Test mode and Live mode, where the former is generally favoured for usage in Development and Testing phase while the latter is used in actual production for capturing live payments. Both these modes require a Public key and Secret key each and are only update-able on the admin route.

This was implemented by introducing appropriate fields in the settings model.

// app/models/setting.js
omiseMode            : attr('string'),
omiseTestPublic      : attr('string'),
omiseTestSecret      : attr('string'),
omiseLivePublic      : attr('string'),
omiseLiveSecret      : attr('string')

Once your Omise credentials are configured, you can go ahead and include the options in your event creation form. You will see an option to include Omise in your payment options if you have configured your keys correctly and if the gateway supports the currency your event is dealing with, for example, even if your keys are correctly configured, you will not get the option to use omise gateway for money collection if the currency is INR.

For showing omise option in the template, a simple computed property did the trick canAcceptOmise  in the form’s component file and the template as follows:

// app/components/forms/wizard/basic-details-step.js
canAcceptOmise: computed('data.event.paymentCurrency', 'settings.isOmiseActivated', function() {
  return this.get('settings.isOmiseActivated') && find(paymentCurrencies, ['code', this.get('data.event.paymentCurrency')]).omise;
})
// app/templates/components/forms/wizard/basic-details-step.js
{{#
if canAcceptOmise}}
      <
label>{{t 'Payment with Omise'}}</label>
      <
div class="field payments">
        <
div class="ui checkbox">
          {{input type='checkbox' id='payment_by_omise' checked=data.event.canPayByOmise}}
          <
label for="payment_by_omise">
            {{t 'Yes, accept payment through Omise Gateway'}}
            <
div class="ui hidden divider"></div>
            <
span class="text muted">
              {{t 'Omise can accept Credit and Debit Cards , Net-Banking and AliPay. Find more details '}}
              <
a href="https://www.omise.co/payment-methods" target="_blank" rel="noopener noreferrer">{{t 'here'}}</a>.
            </
span>
          </
label>
        </
div>
      </
div>
      {{#
if data.event.canPayByOmise}}
        <
label>{{t 'Omise Gateway has been successfully activated'}}</label>
      {{/
if}}
    {{/
if}}

Once the event has the payment option enabled, an attendee has chosen the option to pay up using omise, they will encounter this screen on their pending order page 

On entering the credentials correctly, they will be forwarded to order completion page. On clicking the “Pay” button, the omise cdn used hits the server with a POST request to the order endpoint  and is implemented as follows :

//controllers/orders/pending.js
isOmise: computed('model.order.paymentMode', function() {
  return this.get('model.order.paymentMode') === 'omise';
}),

publicKeyOmise: computed('settings.omiseLivePublic', 'settings.omiseLivePublic', function() {
  return this.get('settings.omiseLivePublic') || this.get('settings.omiseTestPublic');
}),

omiseFormAction: computed('model.order.identifier', function() {
  let identifier = this.get('model.order.identifier');
  return `${ENV.APP.apiHost}/v1/orders/${identifier}/omise-checkout`;
})
// app/templates/orders/pending.hbs
    {{#
if isOmise}}
      <
div>
        <
form class="checkout-form" name="checkoutForm" method='POST' action={{omiseFormAction}}>
          <
script type="text/javascript" src="https://cdn.omise.co/omise.js"
                  data-key="{{publicKeyOmise}}"
                  data-amount="{{paymentAmount}}"
                  data-currency="{{model.order.event.paymentCurrency}}"
                  data-default-payment-method="credit_card">
          </
script>
        </
form>
      </
div>
    {{/
if}}

Thus primarily using Omise.js CDN and introducing the omise workflow, the project now has accessibility to Omise payment gateway service and the organiser can see his successful charge.

Resources

Related Work and Code Repository

Continue ReadingOmise Integration in Open Event Frontend

UNESCO Hackathon Vietnam 2018 Wrap Up

204 participants gathered at the UNESCO Hackathon over the weekend of October 13 – 14 in Ho Chi Minh City to develop digital applications that tackle climate change and sustainable development challenges in Vietnam and the Mekong region. The event was a great success thanks to support from the Government of Malaysia, UNESCO YouthMobile Initiative and Officience.

24 project teams were formed during the Hackathon. With the dedication of team members and mentorship from facilitators, all teams managed to complete their hacks. It was challenging for the judges to make their final decision as all proposed solutions appeared to be innovative and applicable. The three winning teams were Klima Kage, Climap & Bird’s Eye View. Additionally, the judges also selected three runner-ups ThreeWolves, DBTFC & GreenELF, whose projects directly address the issues related to climate change in the country.

Winning Projects: Klima Kage, Bird’s Eye View and Climap

Klima Kage is a website application which consists of two parts: main page and community page. The main page contains data from open source database and tutorials extracted from the UNESCO handbook for journalists on climate change and sustainable development in Asia Pacific, which directly assist journalists in selecting data to monitor.

On the community side, there is a forum for discussion and a news section where relevant articles will be published. The team decided to give priority to female journalists (ration 6:4) in reviewing and releasing news articles on this page, as a way to raise public awareness on gender dimension. SUSI.AI was also integrated into the web app to record users’ behaviour and offer suggestions for their next visits.

Klima Kage (Sieben) Team

Bird’s Eye View is a mobile game built in unity with an objective to educate people about the impacts of climate change on all kind of creatures under the sea. In each level of the game, players are brought into a different coastal city in Vietnam, where they learn about the real problems which are happening to the regional aquatic animals.

The game was designed to target on younger age groups, who generally have less awareness on environmental issues, yet are expected to create big differences in the community once they grow up. In the future, the development team hopes to expand the application, to include more terrains and other kinds of animals in order to provide players with a more overall image of the situation in Vietnam and the region.

Bird’s Eye View app presented by ‘Why triple teas?’ Team

Climap is the last project selected as a winner of the hackathon. Proposed and developed by a team of young developers from Ho Chi Minh City, Climap acts as an EXIF based Image Sharing System that enables users to to collect and instantly share data/images of places before, during and after disasters happen (due to the impacts of climate change). 

By using Climap, users can view all relevant data from the uploaded photos including: its location, weather index, and the occurred events/incidents, etc. They can write tags for each picture to label what was happening at that moment so the data can be further analyzed by local authorities or responsible institutions.

Climap by BIT Team

Talks and Workshops

Alongside with the hacking competition, tech talks and workshops were hosted to support the participants and provide them crucial knowledge of the topics.

Panel Discussion: A Green Planet for All

At the beginning of the hackathon, Hong Phuc Dang (FOSSASIA Founder) led a panel discussing featuring Misako Ito (UNESCO Advisor for Information and Communication), Pham Lan Phuong (Author Khai Don) and Tran Le Thu Giang (Youtuber GiangOi) to uncover the concepts of climate change and sustainable development under the own perspectives. The conversation offered the audience specific answers on how they can practice sustainable development in every aspects of their daily lives.

Panel Discussion: A Green Planet for All

Workshops: Working with Git/Github and Doing Electronics Experiments with PSLab

PadMal M, FOSSASIA/PSLab Lead Developer delivered two workshops, when he showed participants how contributors can effectively work together on an open source project using Github and what electronics experiments can be performed using PSLab (Pocket Science Lab – a hardware device by FOSSASIA). Together with FOSSASIA robotics expert, Marco Gutiérrez, the two successfully developed and integrated a robot into the PSLab device, which amazed participants and audience alike.

Learn how to perform scientific experiments using PSLab

Robotics integration on PSLab device by Marco Gutiérrez and Padmal M

Experience the world’ first portable CO2 Laser Cutter by LionsForge

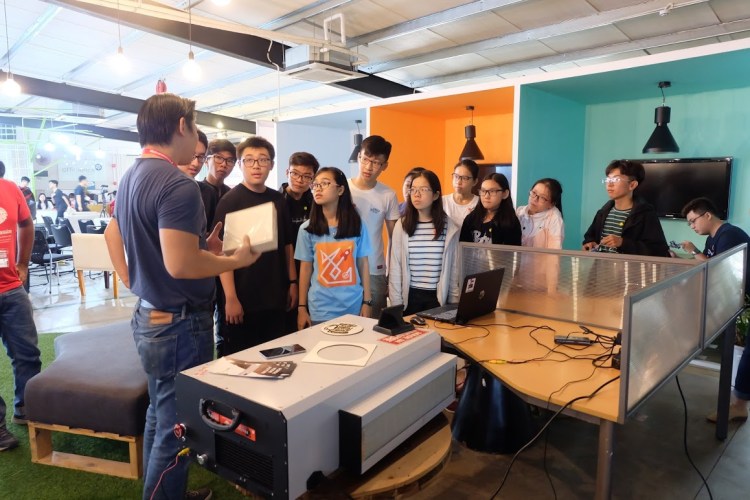
Kee Wee Teng, Founder at LionsForge is a maker at heart, he always felt that the laser cutter, being such a useful tool, should be more accessible. He believed this type of machine should be safer so that everyone can use it for their own needs. After two years working on several designs and samples, Kee Wee and his team finally introduced to the world the CraftLaser laser cutter, a portable yet powerful machine that can be safely use at home, in the schools or even in public places.

Kee Wee Teng, Founder/CEO at LionsForge explained the CraftLaser’s operation procedures,

then shared how he successfully got the project fully funded from Indiegogo in just a week.

Video Footage of UNESCO Hackathon Vietnam 2018

Links

Hackathon Photos: https://photos.app.goo.gl/tJRN2b3mayNy6FcE6

FOSSASIA on Twitter: https://twitter.com/fossasia

FOSSASIA Videos: https://www.youtube.com/fossasiaorg

FOSSASIA Calendar: https://calendar.fossasia.org

Posts on the Web

UNESCO Bangkok: UNESCO Hackathon sets its sights on climate change solutions in Asia-Pacific

LionsForge Singapore: UNESCO Hackathon in Ho Chi Minh, Vietnam

Vietnamese-German University News: VGU students won first prize at UNESCO Hackathon Vietnam  

Share your write-ups about UNESCO Hackathon by making a tweet using hashtag #UNESCOHackathon #YouthMobile @fossasia @YouthMobile_ 

Continue ReadingUNESCO Hackathon Vietnam 2018 Wrap Up

Adding Preference Settings using Preference Fragment Compat

It is very much likely that one needs to add preferences to their app which span the entire application and therefore can be accessed anywhere in the app without storing anything in database or making global variables. For an instance, in Open Event Organizer App we added the preferences to store the privacy policy, cookie policy etc. The user can access these items in Settings Preference which in device settings. In this blog post we will see how to add preference settings to the app by storing the data in shared preferences.

Specifications

The benefit of storing the data in shared preference and not in local storage is that the access time for the data is drastically reduced and the data persists even when the app is closed. We will use this library which is built on top of official preference-v7 library.

Firstly, we will make a preference resource layout file and add the preference for privacy policy and cookie policy in the preference screen.

<PreferenceScreen xmlns:android=”http://schemas.android.com/apk/res/android”>

<Preference
android:key=”@string/privacy_policy_key”
android:title=”@string/privacy_policy” />

<Preference
android:key=”@string/cookie_policy_key”
android:title=”@string/cookie_policy” />

</PreferenceScreen>

Make a separate preference fragment class named LegalPreferenceFragment which extends PreferenceFragmentCompat. Then we will override onCreatePreferenceFix() method.

Inside this, we will create an instance of Preference Manager and set shared preference name for it and set the preference using the layout file. This enables us to use findPreference() method to retrieve the layout preferences by their key. After, retrieving the preference we will set onClick listener to launch activity with an intent to open browser for the url passed in data bundle.

@Override
public void onCreatePreferencesFix(@Nullable Bundle bundle, String rootKey) {
PreferenceManager manager = getPreferenceManager();
manager.setSharedPreferencesName(Constants.FOSS_PREFS);

setPreferencesFromResource(R.xml.legal_preferences, rootKey);

findPreference(getString(R.string.privacy_policy_key)).setOnPreferenceClickListener(preference -> {
BrowserUtils.launchUrl(getContext(), PRIVACY_POLICY_URL);
return true;
});
findPreference(getString(R.string.cookie_policy_key)).setOnPreferenceClickListener(preference -> {
BrowserUtils.launchUrl(getContext(), COOKIE_POLICY_URL);
return true;
});
}

References

  1. Preference Fragment Compat library by Takisoft https://github.com/Gericop/Android-Support-Preference-V7-Fix
  2. Android Preference Documentation https://developer.android.com/reference/android/preference/PreferenceGroup
Continue ReadingAdding Preference Settings using Preference Fragment Compat

Implementing Timeline for Attendees Activity in Organizer App

Open Event Organizer App offers the functionality to Checkin/checkout attendees but the Organizer was unable to view when a particular attendee was checkin or checkout. We decided to implement a feature to view the timeline of checkin/checkout for each attendee.

Let’s begin by adding the dependency in build.gradle.

implementation “com.github.vipulasri:timelineview:”1.0.6”

In the recyclerview item layout add the TimeLineView layout. Following are some of the useful attributes.

  1. app:markerInCenter – This defines the position of the round marker within the layout. Setting it to true, position it in center.
  2. app:marker – Custom drawables can be set as marker.
<com.github.vipulasri.timelineview.TimelineView
android:id=”@+id/time_marker”
android:layout_width=”wrap_content”
android:layout_height=”match_parent”
app:marker=”@drawable/ic_marker_active”
app:line=”#aaa4a4″
app:lineSize=”2dp”
app:linePadding=”3dp”
app:markerInCenter=”true”
app:markerSize=”20dp” />

The ViewHolder class will extend the RecyclerView,ViewHolder class. In the constructor, we will add a parameter viewType and then set it to TimeLine Marker layout using method initLine.

public CheckInHistoryViewHolder(CheckInHistoryLayoutBinding binding, int viewType) {
super(binding.getRoot());
this.binding = binding;
binding.timeMarker.initLine(viewType);
}

In RecyclerViewAdapter, we will override the getItemViewType() method. Here we will use the getTimeLineViewType method which takes in position and total size of the recycler view list and returns a TimeLineView type object.

@Override
public int getItemViewType(int position) {
return TimelineView.getTimeLineViewType(position, getItemCount());
}

References

  1. TimeLineView library by VipulAsri https://github.com/vipulasri/Timeline-View
  2. Android Documentation for RecyclerViewAdapter https://developer.android.com/reference/android/support/v7/widget/RecyclerView.Adapter
  3. Android Documentation for RecyclerViewView https://developer.android.com/reference/android/support/v7/widget/RecyclerView
Continue ReadingImplementing Timeline for Attendees Activity in Organizer App