Using OpenCV for Native Image Processing in Phimpme Android
OpenCV is very widely used open-source image processing library. After the integration of OpenCV Android SDK in the Phimpme Android application, the image processing functions can be written in Java part or native part. Taking runtime of the functions into consideration we used native functions for image processing in the Phimpme application.
We didn’t have the whole application written in native code, we just called the native functions on the Java OpenCV Mat object. Mat is short for the matrix in OpenCV. The image on which we perform image processing operations in the Phimpme Android application is stored as Mat object in OpenCV.
Creating a Java OpenCV Mat object
Mat object of OpenCV is same whether we use it in Java or C++. We have common OpenCV object in Phimpme for accessing from both Java part and native part of the application. We have a Java bitmap object on which we have to perform image processing operations using OpenCV. For doing that we need to create a Java Mat object and pass its address to native. Mat object of OpenCV can be created using the bitmap2Mat() function present in the OpenCV library. The implementation is shown below.
Mat inputMat = new Mat(bitmap.getWidth(), bitmap.getHeight(), CvType.CV_8UC3);
Utils.bitmapToMat(bitmap, inputMat);
“bitmap” is the Java bitmap object which has the image to be processed. The third argument in the Mat function indicates that the Mat should be of type 8UC3 i.e. three color channels with 8-bit depth. With the second line above, the bitmap gets saved as the OpenCV Mat object.
Passing Mat Object to Native
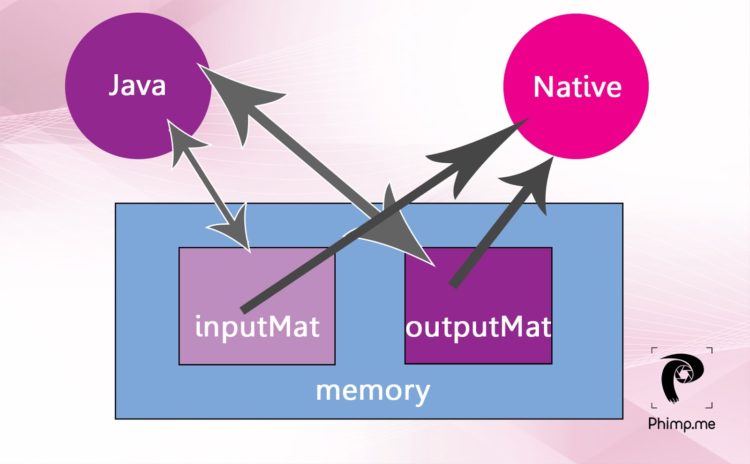
We have the OpenCV Mat object in the memory. If we pass the whole object again to native, the same object gets copied from one memory location to another. In Phimpme application, instead of doing all that we can just get the memory location of the current OpenCV Mat object and pass it to native. As we have the address of the Mat, we can access it directly from native functions. Implementation of this is shown below.
Native Function Definition:
private static native void nativeApplyFilter(long inpAddr);
Native Function call:
nativeApplyFilter(inputMat.getNativeObjAddr());
Getting Native Mat Object to Java
We can follow the similar steps for getting the Mat from the native part after processing. In the Java part of Phimpme, we created an OpenCV Mat object before we pass the inputMat OpenCV Mat object to native for processing. So we have inputMat and outputMat in the memory before we send them to native. We get the memory locations of both the Mat objects and pass those addresses to native part. After the processing is done, the data gets written to the same memory location and can be accessed in Java. The above functions can be modified and rewritten for this purpose as shown below

Native Function Definition:
private static native void nativeApplyFilter(long inpAddr, long outAddr );
Native Function call:
nativeApplyFilter(inputMat.getNativeObjAddr(),outputMat.getNativeObjAddr());
inputMat.release();

if (outputMat !=null){
   Bitmap outbit = Bitmap.createBitmap(bitmap.getWidth(),bitmap.getHeight(),bitmap.getConfig());
   Utils.matToBitmap(outputMat,outbit);
   outputMat.release();
   return outbit;
}
Native operations on Mat using OpenCV
The JNI function in the native part of Phimpme application receives the memory locations of both the OpenCV Mat objects. As we have the addresses, we can create Mat object pointing that memory location and can be passed to processing functions for performing native operations just like all OpenCV functions. This implementation is shown below.
#include <jni.h>
#include <opencv2/core/core.hpp>
#include <opencv2/imgproc/imgproc.hpp>
#include "enhance.h"
using namespace std;
using namespace cv;

JNIEXPORT void JNICALL
Java_org_fossasia_phimpme_editor_editimage_filter_PhotoProcessing_nativeApplyFilter(JNIEnv *env, jclass type, jlong inpAddr,jlong outAddr) {
       Mat &src = *(Mat*)inpAddr;
       Mat &dst = *(Mat*)outAddr;
       applyFilter(src, dst);
}
applyFilter() function can have any image processing operation. The implementation of edge detection function using OpenCV in the Phimpme Android is shown below. We were able to do this in very few lines which otherwise would have needed an extremely large code.
Mat grey,detected_edges;
cvtColor( src, grey, CV_BGR2GRAY );
blur( grey, detected_edges, Size(3,3) );
dst.create( grey.size(), grey.type() );
Canny( detected_edges, detected_edges, 70, 200, 3 );
dst = Scalar::all(0);
detected_edges.copyTo( dst, detected_edges);


The general structure of an OpenCV function which is necessary for implementing custom image processing operations can be understood by referring this below-mentioned brightness adjustment function.
int x,y,bright;
cvtColor(src,src,CV_BGRA2BGR);
dst = Mat::zeros( src.size(), src.type() );
for (y = 0; y < src.rows; y++) {
   for (x = 0; x < src.cols; x++) {
       dst.at<Vec3b>(y, x)[0] =
                  saturate_cast<uchar>((src.at<Vec3b>(y, x)[0]) + bright);
       dst.at<Vec3b>(y, x)[1] =
               saturate_cast<uchar>((src.at<Vec3b>(y, x)[1]) + bright);
       dst.at<Vec3b>(y, x)[2] =
               saturate_cast<uchar>((src.at<Vec3b>(y, x)[2]) + bright);
   }
}


Resources:
- OpenCV official Android documentation http://docs.opencv.org/2.4/doc/tutorials/introduction/android_binary_package/O4A_SDK.html
- OpenCV sample function tutorial blog http://opencv-srf.blogspot.in/2013/07/change-brightness.html
- An answer on StackOverflow explaining similar method https://stackoverflow.com/a/20212613/5699055
- OpenCV examples http://opencvexamples.blogspot.com/p/learning-opencv-functions-step-by-step.html


You must be logged in to post a comment.