Designing A Virtual Laboratory With PSLab

What is a virtual laboratory

A virtual lab interface gives students remote access to equipment in laboratories via the Internet without having to be physically present near the equipment. The idea is that lab experiments can be made accessible to a larger audience which may not have the resources to set up the experiment at their place. Another use-case scenario is that the experiment setup must be placed at a specific location which may not be habitable.

The PSLab’s capabilities can be increased significantly by setting up a framework that allows remote data acquisition and control. It can then be deployed in various test and measurement scenarios such as an interactive environment monitoring station.

What resources will be needed for such a setup

The proposed virtual lab will be platform independent, and should be able to run in web-browsers. This necessitates the presence of a lightweight web-server software running on the hardware to which the PSLab is connected. The web-server must have a framework that must handle multiple connections, and allow control access to only authenticated users.

Proposed design for the backend

The backend framework must be able to handle the following tasks:

  • Communicate with the PSLab hardware attached to the server
  • Host lightweight web-pages with various visual aids
  • Support an authentication framework via a database that contains user credentials
  • Reply with JSON data after executing single commands on the PSLab
  • Execute remotely received python scripts, and relay the HTML formatted output. This should include plots

Proposed design for the frontend

  • Responsive, aesthetic layouts and widget styles.
  • Essential utilities such as Sign-up and Sign-in pages.
  • Embedded plots with basic zooming and panning facilities.
  • Embedded code-editor with syntax highlighting
  • WIdgets to submit the code to the server for execution, and subsequent display of received response.

A selection of tools that can assist with this project, and the purpose they will serve:

Backend

  • The Python communication library for the PSLab
  • FLASK: ‘Flask is a BSD Licensed microframework for Python based on Werkzeug, Jinja 2 and good intentions.’   . It can handle concurrent requests, and will be well suited to serve as our web server
  • MySQL: This is a database management utility that can be used to store user credentials, user scripts, queues etc
  • WerkZeug: The utilities to create and check password hashes are essential for exchanging passwords via the database
  • Json: For relaying measurement results to the client
  • Gunicorn + Nginx: Will be used when more scalable deployment is needed, and the built-in webserver of Flask is unable to handle the load.

Frontend

  • Bootstrap-css: For neatly formatted, responsive UIs
  • Jqplot: A versatile and expandable js based plotting library
  • Ace code editor: A browser based code editor with syntax highlighting, automatic indentation and other user-friendly features. Written in JS
  • Display documentation:  These can be generated server side from Markdown files using Jekyll. Several documentation files are already available from the pslab-desktop-apps, and can be reused after replacing the screenshot images only.

Flow Diagram

Recommended Reading

[1]: Tutorial series  for creating a web-app using python-flask and mysql. This tutorial will be extensively followed for creating the virtual-lab setup.

[2]: Introduction to the Virtual Labs initiative by the Govt of India

[3]: Virtual labs at IIT Kanpur

Continue ReadingDesigning A Virtual Laboratory With PSLab

Dockerizing PHP and Mysql application

Docker Introduction

Docker is based on the concept of building images which contain the necessary software and configuration for applications. We can also build distributable images that contain pre-configured software like an Apache server, Caching server, MySQL server, etc. We can share our final image on the Docker HUB to make it accessible to everyone.

First we need to install docker on our local machine. Steps to install docker for ubuntu

Prerequisites

  • Docker requires a 64-bit installation regardless of your Ubuntu version.
  • Your kernel must be 3.10 at minimum. The latest 3.10 minor version or a newer maintained version are also acceptable.

To check your current kernel version, open a terminal and use uname -r to display your kernel version:

$ uname -r
3.11.0-15-generic

Update your apt sources

Docker’s APT repository contains Docker 1.7.1 and higher. To set APT to use packages from the new repository:

  1. Log into your machine as a user with sudo or root privileges.
  2. Open a terminal window.
  3. Update package information, ensure that APT works with the https method, and that CA certificates are installed.
     $ sudo apt-get update
     $ sudo apt-get install apt-transport-https ca-certificates
    
  4. Add the new GPG key.
    $ sudo apt-key adv --keyserver hkp://p80.pool.sks-keyservers.net:80 --recv-keys 58118E89F3A912897C070ADBF76221572C52609D
    
  5. Open the /etc/apt/sources.list.d/docker.list file in your favorite editor.If the file doesn’t exist, create it.
  6. Remove any existing entries.
  7. Add an entry for your Ubuntu operating system
  8. On Ubuntu Trusty 14.04 (LTS)
    deb https://apt.dockerproject.org/repo ubuntu-trusty main
    
  • Save and close the /etc/apt/sources.list.d/docker.list file.
  • Update the APT package index.
    $ sudo apt-get update

For Ubuntu Trusty, Wily, and Xenial, it’s recommended to install the linux-image-extra kernel package. The linux-image-extra package allows you use the aufs storage driver.

Install both the required and optional packages.

$ sudo apt-get install linux-image-generic-lts-trusty

INSTALL

Log into your Ubuntu installation as a user with sudo privileges.

  1. Update your APT package index.
    $ sudo apt-get update
    
  2. Install Docker.
    $ sudo apt-get install docker-engine
    
  3. Start the docker daemon.
    $ sudo service docker start
    
  4. Verify docker is installed correctly.
    $ sudo docker run hello-world
    

    This command downloads a test image and runs it in a container. When the container runs, it prints an informational message. If it runs successfully then docker is installed.

Docker Images

Docker images are the basis of containers. An image can be considered a class definition. We define its properties and behavior. To browse the available images, we can visit the Docker HUB and run docker pull <image> to download them to the host machine.

Listing images on the host

$ docker images

REPOSITORY          TAG                 IMAGE ID            CREATED             SIZE
ubuntu              14.04               1d073211c498        3 days ago          187.9 MB
busybox             latest              2c5ac3f849df        5 days ago          1.113 MB
training/webapp     latest              54bb4e8718e8        5 months ago        348.7 MB

Working with Dockerfile

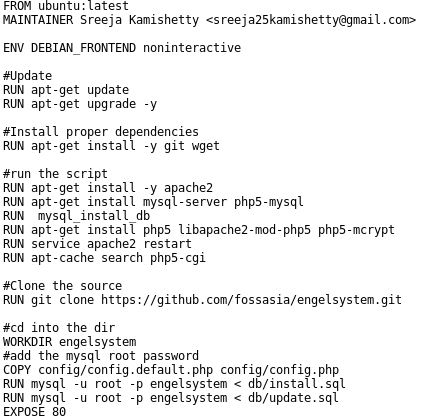
Create a Dockerfile in your PHP project. This is the docker file for engelsystem.

Our Dockerfile is now complete and ready to be built:

Screenshot from 2016-07-18 09:08:52

Building the Image

The docker build . command will build the Dockerfile inside the current directory:

Our image is now labeled and tagged. The final step is to push it to the Docker HUB. This step is optional, but it’s still useful if we’re planning on sharing the image and and helping others with their development environment.

Continue ReadingDockerizing PHP and Mysql application

Implementing Database Migrations

Database Migrations Using Phinx

Database migrations can transform your database in many ways such as creating new tables, inserting rows, adding indexes and modifying columns. It avoids the use of writing MYSQL by hand and instead offers a powerful API for creating migrations using PHP code.

Advantages of using Phinx

  • Phinx keeps track of which migrations have been run so you can worry less about the state of your database and instead focus on building better software
  • Each migration is represented by a PHP class in a unique file. We can write our migrations using the Phinx PHP API, or raw SQL.
  • Phinx has an easy installation process and easy to use command line instructions and easy to Integrate with various other PHP tools (Phing, PHPUnit) and web frameworks.

Installating Phinx

Phinx should be installed using Composer. Composer is a tool for dependency management in PHP. We need to require the dependency in composer.json.

php composer.phar require robmorgan/phinx

Then run Composer:

php composer.phar install --no-dev

Now Create a folder in your database directory called migrations with adequate permissions. It is where we write our migrations. In engelsystem it is created in db directory

Phinx can now be executed from within your project:

php vendor/bin/phinx init

Writing Migrations For SQL files

Creating a New Migration

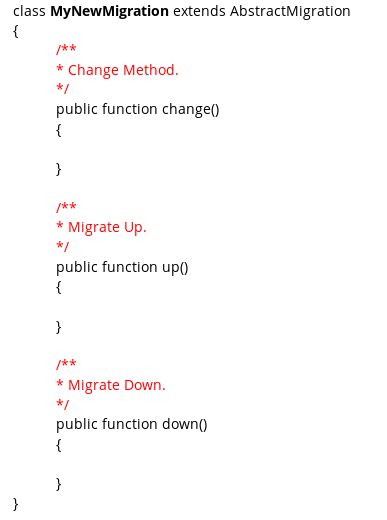
Let’s start by creating a new Phinx migration. Run Phinx using the create command. This will create a new migration in the format YYYYMMDDHHMMSS_my_new_migration.php where the first 14 characters are replaced with the current timestamp down to the second. This will create a skeleton file with a single method.

$ php vendor/bin/phinx create MyNewMigration

The File looks something like this

Screenshot from 2016-07-18 08:22:42

Explaining the File

The AbstractMigration Class

Abstraction class provides the necessary support to create your database migrations. All Phinx migrations extend from the AbstractMigration class. Phinx provides different methods in the abstraction class like change, up and down method.

The Change Method

This is the default migration method. I will explain how to write the change method for an example MYSQL query. For example following MYSQL query can also be executed using Phinx change method.

MYSQL Query

ALTER TABLE `AngelTypes` ADD `requires_driver_license` BOOLEAN NOT NULL;

Equivalent change method

public function change()
 {
   $table = $this->table('AngelTypes');
   $table->addColumn('requires_driver_license', 'boolean', array('null' => 'false'))
               ->update();
 }

The Up Method

We should use the up method to transform the database with your intended changes. For example following MYSQL query to create a new settings table can be executed using equivalent up method.

MYSQL Query

DROP TABLE IF EXISTS `Settings`;
 CREATE TABLE IF NOT EXISTS `Settings` (
    `event_name` varchar(255) DEFAULT NULL,
   `buildup_start_date` int(11) DEFAULT NULL,
   `event_start_date` int(11) DEFAULT NULL,
   `event_end_date` int(11) DEFAULT NULL,
   `teardown_end_date` int(11) DEFAULT NULL,
   `event_welcome_msg` varchar(255) DEFAULT NULL
    ) ENGINE=InnoDB DEFAULT CHARSET=utf8 ;

Equivalent up method

public function up()
 {
 $table = $this->table('Settings');
 $table->addColumn('event_name', 'string', array('limit' => 255))
 ->addColumn('buildup_start_date', 'integer', array('limit' => 11))
 ->addColumn('event_start_date', 'integer', array('limit' => 11))
 ->addColumn('event_end_date', 'integer', array('limit' => 11))
 ->addColumn('teardown_end_date', 'integer', array( 'limit' => 11))
 ->addColumn('event_welcome_msg', 'string', array('limit' => 255))
 ->save();
 }We have now created a table. Now we will learn to insert data into the tables using migrations.MYSQL QueryINSERT INTO `Privileges` (`id`, `name`, `desc`) VALUES (39, 'admin_settings', 'Admin Settings');
 INSERT INTO `GroupPrivileges` (`id`, `group_id`, `privilege_id`) VALUES (218, -4, 39);public function up()
{
    // inserting into Privileges
   $Rows = [
     [
     'id'   => 39,
     'name' => 'admin_settings',
     'desc' => 'Admin Settings'
     ]
   ];
  $this->insert('Privileges', $Rows);
  // inserting into GroupPrivileges.
   $rows = [
    [
    'id'    => 218,
    'group_id'  => -4,
    'privilege_id' => 39                                                 
  ]
   ];
  $this->insert('GroupPrivileges', $rows);
}

The Down Method

The down method is automatically run by Phinx when you are migrating down. We should use the down method to reverse/undo the transformations described in the up method.

MYSQL Query

DELETE * FROM  `Users`;

Equivalent Down method

public function down()
    {
        $this->execute('DELETE FROM Users');
    }

Since we have learned how to write migrations. Now we will execute the created migrations.

Configuring phinx.yml

When you initialize your project using the init command, Phinx creates a default file called phinx.yml.We can edit the database name, environment. We need to add the password for mysql user. The file looks something like this.Screenshot from 2016-07-18 07:56:13

Executing the migrations

To Migrate the database we use Migrate command. It runs over all the available migrations. Command to migrate for development environment is:

$ phinx migrate -e development

To migrate to a specific version we use the --target parameter or -t for short.

$ phinx migrate -e development -t 20110103081132

To know whether all your migrations have run successfully we use the status command

$ phinx status -e development

After migrating the database for engelsystem. The status command gives the following output.

88114b3e-4753-11e6-9afa-207e55650c1e

Continue ReadingImplementing Database Migrations

Import Excel File Data in MYSQL Database using PHP

In this post I will explain how to Import Excel Sheet Data in MySQL Database using PHP. If you follow the below steps we will successfully achieve the target.

For this tutorial we are going to work with a sample CSV file, which has the following fields. I will show an example of User Table of Engelsystem which contains the following fields Nick Name, First Name, Last Name, Email, Current City, Password, Mobile Number, Age.

Steps to Import Excel File Data in MYSQL Database using PHP

Step 1

First you have to create mysql database.

mysql> CREATE DATABASE engelsystem;

Step 2

Create table in your choosen database.

mysql> use DATABASE engelsystem;

The Table schema looks something like this.

 -- Table structure for table `User`
mysql> CREATE TABLE IF NOT EXISTS `User` (
  `UID` int(11) NOT NULL AUTO_INCREMENT,
  `Nick` varchar(23) NOT NULL DEFAULT '',
  `First Name` varchar(23) NOT NULL DEFAULT '',
  `Last Name` varchar(23) NOT NULL DEFAULT '',
  `email` varchar(123) DEFAULT NULL,
  `Age` int(4) DEFAULT NULL,      
  `current_city` varchar(255) DEFAULT NULL,
  `Password` varchar(128) DEFAULT  NULL,               
  `Mobile` varchar(40) DEFAULT NULL,
  PRIMARY KEY (`UID`),
  UNIQUE KEY `Nick` (`Nick`),
) ENGINE=InnoDB  DEFAULT CHARSET=utf8 AUTO_INCREMENT=5 ;

Step 3

create your php excelsheet data uploading file. This is a sample code which I used for my project.

Ex: import_data.php

<?php

function admin_import() {

  if (isset($_REQUEST['upload'])) {
    $ok = true;
    $file = $_FILES['csv_file']['tmp_name'];
    $handle = fopen($file, "r");
    if ($file == NULL) {
      error(_('Please select a file to import'));
      redirect(page_link_to('admin_export'));
    }
    else {
      while(($filesop = fgetcsv($handle, 1000, ",")) !== false)
        {
          $nick_name = $filesop[0];
          $first_name = $filesop[1];
          $last_name = $filesop[2];
          $email = $filesop[3];
          $age = $filesop[4];
          $current_city = $filesop[5];
          $password = $filesop[6];
          $mobile = $filesop[7];
// example error handling. We can add more as required for the database.

        if ( strlen($email) && preg_match("/^[a-z0-9._+-]{1,64}@(?:[a-z0-9-]{1,63}\.){1,125}[a-z]{2,63}$/", $mail) > 0) {
          if (! check_email($email)) {
            $ok = false;
            $msg .= error(_("E-mail address is not correct."), true);
          }
        }
// error handling for password        
        if (strlen($password) >= MIN_PASSWORD_LENGTH) {
            $ok = true;
          } else {
            $ok = false;
            $msg .= error(sprintf(_("Your password is too short (please use at least %s characters)."), MIN_PASSWORD_LENGTH), true);
        }
 // If the tests pass we can insert it into the database.       
        if ($ok) {
          $sql = sql_query("
            INSERT INTO `User` SET
            `Nick Name`='" . sql_escape($nick_name) . "',
            `First Name`='" . sql_escape($first_name) . "',
            `Last Name`='" . sql_escape($last_name) . "',
            `email`='" . sql_escape($email) . "',
            `Age`='" . sql_escape($age) . "',
            `current_city`='" . sql_escape($current_city) . "',
            `Password`='" . sql_escape($password) . "',
             `mobile`='" . sql_escape($mobile) . "',");
        }
      }

      if ($sql) {
        success(_("You database has imported successfully!"));
        redirect(page_link_to('admin_export'));
      } else {
        error(_('Sorry! There is some problem in the import file.'));
        redirect(page_link_to('admin_export'));
        }
    }
  }
//form_submit($name, $label) Renders the submit button of a form
//form_file($name, $label) Renders a form file box

 return page_with_title("Import Data", array(
   msg(),
  div('row', array(
          div('col-md-12', array(
              form(array(
                form_file('csv_file', _("Import user data from a csv file")),
                form_submit('upload', _("Import"))
              ))
          ))
      ))
  ));
}
?>

Step 4

The view of import_data.php looks something like this. Now that import_data.php is up and running. Access it through server browser and select the excel file to be imported.Screenshot from 2016-07-08 23:43:43.png

Step 5

Prepare the excelsheet data and save it as .csv format.

Screenshot from 2016-07-08 23:50:30.png

Step 6

Now just browse the csv file and upload it.

Screenshot from 2016-07-08 23:53:23.png

Step 7

If we see the success message after importing. Then the data is successfully imported. We can also check whether the data is inserted in phpMYAdmin

Screenshot from 2016-07-08 23:56:40.png

Englesystem

Development: https://github.com/fossasia/engelsystem

Issues/Bugs: Issues

Continue ReadingImport Excel File Data in MYSQL Database using PHP

Deploying PHP and Mysql Apps on Heroku

This tutorial will help you deploying a PHP and Mysql app.

Prerequisites

  1. a free Heroku account.
  2. PHP installed locally.
  3. Composer installed locally.

Set up

In this step you will install the Heroku Toolbelt. This provides you access to the Heroku Command Line Interface (CLI), which can be used for managing and scaling your applications and add-ons.

To install the Toolbelt for ubuntu/Debian

 wget -O- https://toolbelt.heroku.com/install-ubuntu.sh | sh

After installing Toolbelt you can use the heroku command from your command shell.

$ heroku login
Enter your Heroku credentials.
Email: dz@example.com
Password:
...

Authenticating is required to allow both the heroku and git commands to operate.

Prepare the app

In this step, you will prepare a fossasia/engelsystem application that can be deployed.

To clone the sample application so that you have a local version of the code that you can then deploy to Heroku, execute the following commands in your local command shell or terminal:

$ git clone --recursive https://github.com/fossasia/engelsystem.git
$ cd engelsystem/

If it is not a git repository you follow these steps

$ cd engelsystem/
$ git init

You now have a functioning git repository that contains a simple application now we need to add a composer.json file. Make sure you’ve installed Composer.

The Heroku PHP Support will be applied to applications only when the application has a file named composer.json in the root directory. Even if an application has no Composer dependencies, it must include at least an empty ({}) composer.json in order to be recognized as a PHP application.

When Heroku recognizes a PHP application, it will respond accordingly during a push:

$ git push heroku master
-----> PHP app detected

Define a Procfile

A Procfile is a text file in the root directory of your application that defines process types and explicitly declares what command should be executed to start your app. Your Procfile will look something like this for engelsystem:

web: vendor/bin/heroku-php-apache2 public/

Since our folder named public that contains your JavaScript, CSS, images and index.php file, your Procfile would define the Apache web server with that directory used as document root.

Create the app

In this step you will create the app to Heroku.

Create an app on Heroku, which prepares Heroku to receive your source code:

$ heroku create
Creating sharp-rain-871... done, stack is cedar-14
http://sharp-rain-871.herokuapp.com/ | https://git.heroku.com/sharp-rain-871.git
Git remote heroku added

When you create an app, a git remote (called heroku) is also created and associated with your local git repository.

Heroku generates a random name (in this case sharp-rain-871) for your app, or you can pass a parameter to specify your own app name.

But Once you open http://sharp-rain-871.herokuapp.com/ we will not be able to view the site if there are database connections. We need to migrate the database using Cleardb

ClearDB MySQL

Migrating database

Creating your ClearDB database

To create your ClearDB database, simply type the following Heroku command:

$ heroku addons:create cleardb:ignite
-----> Adding cleardb to sharp-mountain-4005... done, v18 (free)

This will automatically provision your new ClearDB database for you and will return the database URL to access it.

You can retrieve your new ClearDB database URL by issuing the following command:

$ heroku config | grep CLEARDB_DATABASE_URL
CLEARDB_DATABASE_URL: mysql://bda37eff166954:69445d28@us-cdbr-iron-east-04.cleardb.net/heroku_3c94174e0cc6cd8?reconnect=true

After getting the cleardb database url we can import the tables by following command:

$mysql -u bda37eff166954 -h us-cdbr-iron-east-04.cleardb.net -p heroku_3c94174e0cc6cd8

than you well get a mysql prompt with connection to the database. Than you can import the tables using the following commands

mysql> source [path to engelsystem]/engelsystem/db/install.sql;
mysql> source [path to engelsystem]/engelsystem/db/update.sql;
mysql> exit;

Now the tables are migrated successfully.

Declare app dependencies

Since we have added the mysql database we need to add the dependencies also.

{
  "require": {
    "ext-mysql": "*"
  },
   "require": {
      "ext-gettext": "*"
    },
   "require-dev": {
      "heroku/heroku-buildpack-php": "*"
   }
}

The composer.json file specifies the dependencies that should be installed with your application. When an app is deployed, Heroku reads this file and installs the appropriate dependencies into the vendor directory.

Run the following command to install the dependencies, preparing your system for running the app locally:

$ composer update
Loading composer repositories with package information
Updating dependencies (including require-dev)
  - Installing psr/log (1.0.0)
    Loading from cache
...
Writing lock file
Generating autoload files

You should always check composer.json and composer.lock into your git repo. The vendor directory should be included in your .gitignore file.

Using ClearDB with PHP

Connecting to ClearDB from PHP merely requires the parsing of the CLEARDB_DATABASE_URL environment variable and passing the extracted connection information to your MySQL library of choice, e.g. MySQLi:

we need to modify it in the config/config.php file

$url = parse_url(getenv("CLEARDB_DATABASE_URL"));
$server = $url["host"];
$username = $url["user"];
$password = $url["pass"];
$db = substr($url["path"], 1);

$config = array(
    'host' => $server ,
    'user' => $username ,
    'pw' => $password,
    'db' => $db 
);

Deploy the app

All the steps are completed now we need to deploy it. Push the code to Heroku. For pushing pushing development branch we need to follow these commands.

$ git add -A
$ git commit -m "heroku deploy"
$ git push heroku development:master
Initializing repository, done.
Counting objects: 7, done.
Delta compression using up to 4 threads.
Compressing objects: 100% (4/4), done.
Writing objects: 100% (7/7), 1.66 KiB | 0 bytes/s, done.
Total 7 (delta 0), reused 0 (delta 0)

-----> PHP app detected
-----> Setting up runtime environment...
       - PHP 5.5.12
       - Apache 2.4.9
       - Nginx 1.4.6
-----> Installing PHP extensions:
       - opcache (automatic; bundled, using 'ext-opcache.ini')
-----> Installing dependencies...
       Composer version 64ac32fca9e64eb38e50abfadc6eb6f2d0470039 2014-05-24 20:57:50
       Loading composer repositories with package information
       Installing dependencies from lock file
...
         - Installing monolog/monolog (1.9.1)
       Generating optimized autoload files
-----> Building runtime environment...
-----> Discovering process types
       Procfile declares types -> web
-----> Compressing... done, 57.4MB
-----> Launching... done, v3
       http://sharp-rain-871.herokuapp.com/ deployed to Heroku

To git@heroku.com:sharp-rain-871.git
 * [new branch]      development -> master

Now your app is successfully deployed you can view it here http://sharp-rain-871.herokuapp.com/

Englesystem

Development: https://github.com/fossasia/engelsystem

Issues/Bugs: Issues


Continue ReadingDeploying PHP and Mysql Apps on Heroku