Flask App to Upload Wallpaper On the Server for Meilix Generator

We had a problem of getting a wallpaper from the user using Meilix Generator and use the wallpaper with the Meilix build scripts to generate the ISO. So, we were required to host the wallpaper on the server and downloaded by Travis CI during the build to include it in the ISO.

A solution is to render HTML templates and access data sent by POST using the request object from the flask. Redirect and url_for will be used to redirect the user once the upload is done and send_from_directory will help us to host the file under the /uploads that the user just uploaded which will be downloaded by the Travis for building the ISO.

We start by creating the HTML form marked with enctype=multipart/form-data.

<form action="upload" method="post" enctype="multipart/form-data">
        <input type="file" name="file"><br /><br />
        <input type="submit" value="Upload">
 </form>


First, we need imports of modules required. Most important is werkzeug.secure_filename().

import os
from flask import Flask, render_template, request, redirect, url_for, send_from_directory
from werkzeug import secure_file


Now, we’ll define where to upload and the type of file allowed for uploading. The path to upload directory on the server is defined by the extensions in app.config which is uploads/ here.

app.config['UPLOAD_FOLDER'] = 'uploads/'
app.config['ALLOWED_EXTENSIONS'] = set(['png', 'jpg', 'jpeg'])


This functions will check for valid extension for the wallpaper which are png, jpg and jpeg in this case defined above in app.config.

def allowed_file(filename):
    return '.' in filename and \
           filename.rsplit('.', 1)[1] in app.config['ALLOWED_EXTENSIONS']


After, getting the name of uploaded file from the user then using above function check if there are allowed file type and store it in a variable filename after that it move the files to the upload folder to save it.

Upload function check if the file name is safe and remove unsupported characters (line 3) after that moves it from a temporal folder to the upload folder. After moving, it renames the file as wallpaper so that the download link is same always which we have used in Meilix build script to download from server.

def upload():
    file = request.files['file']
    if file and allowed_file(file.filename):
        filename = secure_filename(file.filename)
        file.save(os.path.join(app.config['UPLOAD_FOLDER'], filename))
         os.rename(UPLOAD_FOLDER + filename, UPLOAD_FOLDER+'wallpaper')
         filename = 'wallpaper'


At this point, we have only uploaded the wallpaper and renamed the uploaded file to ‘wallpaper’ only. We cannot access the file outside the server it will result in 403 error so to make it available, the uploaded file need to be registered and then hosted using below code snippet.

We can also register uploaded_file as build_only rule and use the SharedDataMiddleware.

@app.route('/uploads/<filename>')
def uploaded_file(filename):
    return send_from_directory(app.config['UPLOAD_FOLDER'],filename)

The hosted wallpaper is used by Meilix in Travis CI to generate ISO using the download link which remains same for the uploaded wallpaper.

Why should we use secure secure_filename() function?

just imagine someone sends the following information as the filename to your app.

filename = "../../../../home/username/.sh"


If the number of ../ is correct and you would join this with your UPLOAD_FOLDER the hacker might have the ability to modify a file on the server’s filesystem that he or she should not modify.

Now, let’s look how the function works.

secure_filename('../../../../home/username/.sh')
'home_username_.sh'

Improving the uploads

We can add validation to the size of the file to be uploaded so that in case a user tries to upload a file too much big that may increase load on the server.

from flask import Flask, Request
app = Flask(__name__)
app.config['MAX_CONTENT_LENGTH'] = 16 * 1024 * 1024

Resources

Continue ReadingFlask App to Upload Wallpaper On the Server for Meilix Generator

How Meilix Generator sends Email Notifications with SendGrid

We wanted to notify the users once the build was ready for download. To solve this we attempted making an email server on Meilix Generator but that can send email when it starts but it would take around 20 minutes to get the build ready so we thought of checking the deploy link status and send email whenever the link status was available (200) but the problem with this method was that the link can be pre available if ISO is rebuilt for same event.

Then, we attempted sending mail by Travis CI but the problem in that was closed SMTP ports (they have a strict policy about that) then we thought that Travis CI can trigger the Sendgrid which can send email to the user with the help of API.

We will use this code so that once the deployment of ISO by Travis CI is done it can execute the email script which requests Sendgrid to send email to the user.

after_deploy:
  - ./mail.py


We can create code using code generation service of Sendgrid we are going to choose python as it is easier to manipulate strings in python and we are going to use email as an environment variable.

After generation of python 3 code from the sendgrid website we are going to edit the message and email and hide the API key as an environment variable and create an authorization string to be used there too.

The URL will be generated by the below script as the body of url remains same only two things will change the TRAVIS_TAG which is event name and date.

date = datetime.datetime.now().strftime('%Y%m%d')
url="https://github.com/xeon-zolt/meilix/releases/download/"+os.environ["TRAVIS_TAG"]+"/meilix-zesty-"+date+"-i386.iso"


We can use this to hide the api key and use it as an environment variable because if the api key is visible in logs anyone can use it to exploit it and use it for spamming purpose.

authorization = "Bearer " + os.environ["mail_api_key"]
headers = {
    'authorization': authorization,


The main thing left to edit in the script is the message which is in the payload and is a string type so we are going to use the email received by Meilix generator as an environment variable and concatenate it with the payload string the message sent is in the value which is in the HTML format and we add the generated URL in similar way we added email variable to string.

payload = "{\"personalizations\":[{\"to\":[{\"email\":\"" + os.environ["email"] + "\"}],\"subject\":\"Your ISO is Ready\"}],\"from\":{\"email\":\"xeon.harsh@gmail.com\",\"name\":\"Meilix Generator\"},\"reply_to\":{\"email\":\"xeon.harsh@gmail.com\",\"name\":\"Meilix Generator\"},\"subject\":\"Your ISO is ready\",\"content\":[{\"type\":\"text/html\",\"value\":\"<html><p>Hi,<br>Your ISO is ready<br>URL : "+url+"<br><br>Thank You,<br>Meilix Generator Team</p></html>\"}]}"


The sent email looks like this

References

Continue ReadingHow Meilix Generator sends Email Notifications with SendGrid

Package Manager Translation for Meilix

There are many Linux distros and all of them use variety of different package managers. So a particular user of that specific Linux distro is familiar with that distro package manager commands only. Due to which when that user is out at a event or someplace else and require to install or remove or update package using the commands he is familiar with, he may get errors in doing so if that distro doesn’t have a package manager that he is familiar with.

To overcome this problem we can have a solution of adding package manager command translating functionality to Meilix. To translate the commands of package manager like pacman, apt, yum, zypper we have build translation modules for each. To install these modules we first check the Linux distro and map it to the package manager it is using. For this we write the following script.

 declare -A osInfo;
  osInfo[/etc/redhat-release]=yum
  osInfo[/etc/arch-release]=pacman
  osInfo[/etc/gentoo-release]=emerge
  osInfo[/etc/SuSE-release]=zypp
  osInfo[/etc/debian_version]=apt-get


Then after checking the native package manager it copy the modules required for that packet manger to the bin and makes them executable.These modules can be called by the names of the packet manager not available on

These modules can be called by the names of the packet manager not available on system. The module reads the arguments and convert command according to it. Like for pacman to apt module, a simple pacman command to install a app is

Now, the pacman is a module called from bin using two arguments and these two arguments use a switch statement are converted.

Example of commands in ubuntu / debian based system using apt but the user was familiar with pacman

Installing package:

pacman -S PACKAGE

Gets translated to:

apt install PACKAGE

Remove package:

apt install PACKAGE

Gets translated to:

apt remove PACKAGE

Update software database :

pacman -Syy

Gets translated to:

apt update

Show updatable packages:

pacman -Qu

Gets translated to:

apt list --upgradable

Update all:

pacman -Syu

Gets translated to:

apt upgrade


Mew ensures the cross distro package manager command compatibility by providing translations which is a helpful tool especially at events where users may find it difficult to operate system if he cannot install or add the specific package he requires at that time. Mew helps in making the user experience better as the user don’t have to struggle with the package manager commands he is not familiar with.

contribute to the project by forking: https://github.com/fossasia/mew

Continue ReadingPackage Manager Translation for Meilix

Customizing Chromium for the Meilix Generator

Imagine if you are able to vanish that star icon of the bookmark which is on the extreme right of address bar. Disable auto-fill option, disable some particular extension to get install and many more things. And you could even distribute it to any friend to get the same setting within just copy and paste. We are working on such features for the FOSSASIA Meilix generator for Chromium.

Chromium is one of the most popular browsers. But had you ever thought how grateful it would be if you are able to customize your chromium to a larger extent? Sometimes it feels that few features are there which we merely used.

So here it is the way to tailor cut the specification of the browser and you can even give it to your friend to try out the feature. It just needs to copy and paste a file for your friend. Not forget to mention from where do I get this file: fossasia/meilix

How can you do that?

This gist is a .json file which has to be copied in the etc/chromium-browser/policies/managed with the name chrome.json. That’s it.

Chrome.json
It’s a policy template of Linux for the browser Chromium. This file contains different policies and they are commented. Uncomment the required values and set your desired values.

Format of the policy of the JSON file.

Each policy is well-structured so that a person can easily understand and change its values.

Let’s take an example:

1 // Enable Bookmark Bar
2 //-------------------------------------------------------------------------
3 // Enables the bookmark bar on Google Chrome.  If you enable this setting,
4 // Google Chrome will show a bookmark bar.  If you disable this setting, users
5 // will never see the bookmark bar.  If you enable or disable this setting,
6 // users cannot change or override it in Google Chrome.  If this setting is
7 // left not set the user can decide to use this function or not.
8 //"BookmarkBarEnabled": true,

This is an example of controlling of bookmark bar which is mention on line 1
Line 2 is left intentionally for proper formatting
Line 3-7 explains the purpose of the policy, it explains itself quite briefly
Line 8 is the by default set option, to alter it, uncomment it and reverse the values.

This same way is being followed throughout. There are many other options which act as a boon.

Edit the file and share it with your friends and ask them to copy it in the same location and then they can also get the benefit of the feature.

Continue ReadingCustomizing Chromium for the Meilix Generator

Building Metapackages to Customize the Meilix Linux Distro Generator

This article will guide you to build a metapackage with your required configuration and to use it inside the meilix distro to customize and use the inbuild metapackages to customize the configuration file of packages and properties of various browsers.
Metapackages are scripts which contain the link to existing packages. It’s a .deb file. As packages include dependencies analogically metapackages include packages. So, we can say that metapackages do not contain actual software, they depend upon packages. This guide will help you to make your own metapackage easily, configure it and distribute it among your friends and other Linux users.

How to get started to build a metapackage for meilix?

At first one needs to sort out the metapackages that it needs to be there in the metapackages. One can also come up with the package which he don’t want to install but that comes under dependency of the some package.
It’s easy, a few lines of commands and you will have a .deb metapackage in your hand.
We will use equivs as a tool to build metapackages.

Install equivs :

sudo apt-get install equivs
equivs-control ns-control

This will create a file with the name ns-control and that files looks similar to this:

1.### Commented entries have reasonable defaults.
2.### Uncomment to edit them.
3.# Source: <source package name; defaults to package name>
4.Section: misc
5.Priority: optional
6.# Homepage: <enter URL here; no default>
7.Standards-Version: 3.9.2
8.Package: <package name; defaults to equivs-dummy>
9.# Version: <enter version here; defaults to 1.0>
10.# Maintainer: Your Name <yourname@example.com>
11.# Pre-Depends: <comma-separated list of packages>
12.# Depends: <comma-separated list of packages>
13.# Recommends: <comma-separated list of packages>
14.# Suggests: <comma-separated list of packages>
15.# Provides: <comma-separated list of packages>
16.# Replaces: <comma-separated list of packages>
17.# Architecture: all
18.# Multi-Arch: <one of: foreign|same|allowed>
19.# Copyright: <copyright file; defaults to GPL2>
20.# Changelog: <changelog file; defaults to a generic changelog>
21.# Readme: <README.Debian file; defaults to a generic one>
22.# Extra-Files: <comma-separated list of additional files for the doc directory>
23.# Files: <pair of space-separated paths; First is file to include, second is destination>
24.# <more pairs, if there's more than one file to include. Notice the starting space>
25.Description: <short description; defaults to some wise words>
long description and info

second paragraph


Now the question is what to do with this:
Line 3-7 : the control information of the source packages.
Line 8-25 : the control information for the binary packages
Source packages are those packages which contain the source code of the package. One can compile the source and install it in any architecture of the machine .
Binary packages are those packages which are specific to the architecture of machine. And one can easily install it with a click.

Description of important lines:
Line 3: The name of the source package, same to Line 8
Line 4: section of the distribution
There are various categories in which a source package can be put into.
Line 9: version of the package, it is helpful if you want it install packages of a particular version
Line 11: you have to write the dependencies of the packages #better remain this commented
Line 12 : Include the name of the packages that you want to include in the metapackage
Line 17: Architecture is set to all that is for both 32 and 64 bit.
Line 25: Provide description

Next is what
Then after filling up the text file, now it’s time to build it.

Build the package:

equivs-build ns-control

Now it will run and will give you a .deb file.
dpkg i *.deb will install the deb file.

This is the metapackage which contains the packages which you have included.
I have used this wiki as a source for the required information.

Suppose one of most popular metapackage : gnome-desktop-environment – It is the a desktop environment gnome flavoured. It gives the graphical user interface to the user with popular email, office tools, music and other wide range of applications.

How a common Linux user can get the benefit of it?

We know that most of the people avoid Linux because of its beautiful command line feature. They just want to use mouse/touchpad throughout.
With the help of this, a person can build a metapackage. This one can distribute to its friend and can also use for the future purpose.
One can also use this to make a collection of metapackages of different packages like hacking tools, text tools, etc.

How we uses the metapackages?

Meilix script uses the metapackages for building of all the required packages. In our webapp version (meilix-generator) we made several metapackages that will be asked from the user and a user can choose one among them according to its requirement. It will also contain the information that which packages the metapackage is made of.

Suppose event metapackages include the packages needed by the people for the events purpose which will predefined by us and they will consist of lightweight text editor, media player, document viewer etc. In an education related metapackage one contain packages related to school, workshop.

Now meilix repo contains its own metapackages that it uses to contain the distro.

How meilix metapackage is used to control distro configuration?

We can even control the distro properties including the browser configuration, it’s startup page, search page and many more things through metapackages. Let’s see how:

We created a metapackage with the name meilix-default-settings and used it to config various features in the distro. The meilix settings metapackage consists of etc folder where we can made the changes to get it on the distro. We can even include property folder in the .config under skel folder to copy the changes into the home folder of the new user. To change the chrome configuration, we need to edit the chrome.json file. To change firefox configuration we need to edit prefs.js file.

The metapackage folder is: https://github.com/fossasia/meilix/tree/master/meilix-default-settings

Repository using metapackages

https://github.com/fossasia/meilix
https://github.com/fossasia/meilix-generator  (the webapp)

Continue ReadingBuilding Metapackages to Customize the Meilix Linux Distro Generator

Meilix System Lock

Meilix-Systemlock has to two main shell files: lock.sh and unlock.sh. The purpose of the script is that if the lock.sh is called, the content inside the home directory will be reset after rebooting of the system. And it will be in that state of getting back reset to home directory until unlock.sh is being called.

An Example to illustrate

Suppose in a computer lab, the students are given computers and they make changes which don’t seem convenient to the maintainer of the lab. The maintainer freezes the system to have a clean state, and the students use the computer and make it “dirty”, and the reboot restores to the clean state when maintainer running freeze. As soon as the lock.sh is being called system will copy the files in the home directory to another place, then reboot. Reboot and copying don’t occur parallelly.

The system remains in the frozen state and every time when its get rebooted, it gets to the same state of home directory when it is being frozen. This can be stopped by calling unlock.sh. This can be helpful for the maintainer for creating a new freeze point.
I get the idea through chat with Yeo Wei and used the logo from here.

Diagram for clear representation

How does it solve someone’s problem in daily life?
As I explained in the example, it can easily solve the problem of a computer lab assistant at a school, college, public cafe, etc. I request this idea should reach to them, and they can run the lock.sh to freeze the system so as to avoid the dirtiness made by a third person. Maintainer generally left out this dirt for next user who is going to work on the same PC. But this technique will make the PC new and new user doesn’t have to clean the dirt made by the previous user and they can setup their environment freshly.

Understanding the Important Code Mechanism:

In the lock.sh script

Line: 44

echo “sudo rsync -a –delete /etc/.ofris/$ofris_user/ /home/$ofris_user/” >> ofris_tmp

– this line restore the files stored in /etc/.ofris/user to /home/user” into /etc/rc.local (which runs every time computer boots).

Line: 38, 39

if [ $ofris_rst = 1 ]; then 
echo "Error: The system has been locked, please select the fourth choice to unfreeze the system..."

– this line stops the execution of lock.sh if it hasn’t been unlocked yet.

In the unlock.sh script

Line: 1

grep -v "sudo rsync -a --delete /etc/" /etc/rc.local > ofris_tmp_b

– this check if the rc.local is being modified or not.
And rest command removes the created folder and restore the home folder to its original state.

The important repository containing:
https://github.com/fossasia/meilix-systemlock

Continue ReadingMeilix System Lock

Meilix System Lock released

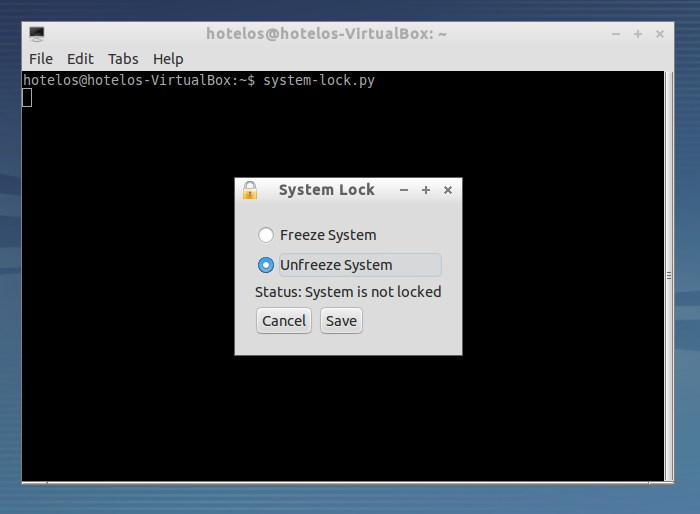
We released the first version 0.1 of Meilix System Lock. It is an application that can lock or “freeze” your system.

The application is based on Ofris, but it offers more features like a simple graphic interface to lock or unlock the system. Main developer is Hon Nguyen (Vanhonit) from Vietnam, who started the tool as part of his Google Summer of Code project for FOSSASIA.

The sourcecode is here on github: https://github.com/meilix/systemlock

A couple of Meilix System Lock Screenshots.

Meilix System Lock

Continue ReadingMeilix System Lock released