Handling Data Requests in Open Event Organizer Android App

Open Event Organizer is a client side application of Open Event API Server created for event organizers and entry managers. The app maintains a local database and syncs it with the server when required. I will be talking about handling data requests in the app in this blog.

The app uses ReactiveX for all the background tasks including data accessing. When a user requests any data, there are two possible ways the app can perform. The one where app fetches the data directly from the local database maintained and another where it requests data from the server. The app has to decide one of the ways. In the Organizer app, AbstractObservableBuilder class takes care of this. The relevant code is:

final class AbstractObservableBuilder<T> {

   private final IUtilModel utilModel;
   private boolean reload;
   private Observable<T> diskObservable;
   private Observable<T> networkObservable;

   ...
   ...

   @NonNull
   private Callable<Observable<T>> getReloadCallable() {
       return () -> {
           if (reload)
               return Observable.empty();
           else
               return diskObservable
                   .doOnNext(item -> Timber.d("Loaded %s From Disk on Thread %s",
                       item.getClass(), Thread.currentThread().getName()));
       };
   }

   @NonNull
   private Observable<T> getConnectionObservable() {
       if (utilModel.isConnected())
           return networkObservable
               .doOnNext(item -> Timber.d("Loaded %s From Network on Thread %s",
                   item.getClass(), Thread.currentThread().getName()));
       else
           return Observable.error(new Throwable(Constants.NO_NETWORK));
   }

   @NonNull
   private <V> ObservableTransformer<V, V> applySchedulers() {
       return observable -> observable
           .subscribeOn(Schedulers.io())
           .observeOn(AndroidSchedulers.mainThread());
   }

   @NonNull
   public Observable<T> build() {
       if (diskObservable == null || networkObservable == null)
           throw new IllegalStateException("Network or Disk observable not provided");

       return Observable
               .defer(getReloadCallable())
               .switchIfEmpty(getConnectionObservable())
               .toList()
               .flatMap(items -> diskObservable.toList())
               .flattenAsObservable(items -> items)
               .compose(applySchedulers());
   }
}


DiskObservable is a data request to the local database and networkObservable is a data request to the server. The build function decides which one to use and returns a correct observable accordingly. The class object takes a boolean field reload which is used to decide which observable to subscribe. If reload is true, that means the user wants data from the server, hence networkObservable is returned to subscribe. Also switchIfEmpty in the build method checks whether the data fetched using diskObservable is empty, if found empty it switches the observable to the networkObservable to subscribe.

This class object is used for every data access in the app. For example, this is a code snippet of the gettEvents method in EventRepository class.

@Override
public Observable<Event> getEvents(boolean reload) {
   Observable<Event> diskObservable = Observable.defer(() ->
       databaseRepository.getAllItems(Event.class)
   );

   Observable<Event> networkObservable = Observable.defer(() ->
       eventService.getEvents(JWTUtils.getIdentity(getAuthorization()))
           ...
           ...
           .flatMapIterable(events -> events));

   return new AbstractObservableBuilder<Event>(utilModel)
       .reload(reload)
       .withDiskObservable(diskObservable)
       .withNetworkObservable(networkObservable)
       .build();
}


Links:
1. Documentation of ReactiveX API
2. Github repository link of RxJava – Reactive Extension for JVM

Continue ReadingHandling Data Requests in Open Event Organizer Android App

Using Android Palette with Glide in Open Event Organizer Android App

Open Event Organizer is an Android Application for the Event Organizers and Entry Managers. The core feature of the App is to scan a QR code from the ticket to validate an attendee’s check in. Other features of the App are to display an overview of sales, ticket management and basic editing in the Event Details. Open Event API Server acts as a backend for this App. The App uses Navigation Drawer for navigation in the App. The side drawer contains menus, event name, event start date and event image in the header. Event name and date is shown just below the event image in a palette. For a better visibility Android Palette is used which extracts prominent colors from images. The App uses Glide to handle image loading hence GlidePalette library is used for palette generation which integrates Android Palette with Glide. I will be talking about the implementation of GlidePalette in the App in this blog.

The App uses Data Binding so the image URLs are directly passed to the XML views in the layouts and the image loading logic is implemented in the BindingAdapter class. The image loading code looks like:

GlideApp
   .with(imageView.getContext())
   .load(Uri.parse(url))
   ...
   .into(imageView);


So as to implement palette generation for event detail label, it has to be implemented with the event image loading. GlideApp takes request listener which implements methods on success and failure where palette can be generated using the bitmap loaded. With GlidePalette most of this part is covered in the library itself. It provides GlidePalette class which is a sub class of GlideApp request listener which is passed to the GlideApp using the method listener. In the App, BindingAdapter has a method named bindImageWithPalette which takes a view container, image url, a placeholder drawable and the ids of imageview and palette. The relevant code is:

@BindingAdapter(value = {"paletteImageUrl", "placeholder", "imageId", "paletteId"}, requireAll = false)
public static void bindImageWithPalette(View container, String url, Drawable drawable, int imageId, int paletteId) {
   ImageView imageView = (ImageView) container.findViewById(imageId);
   ViewGroup palette = (ViewGroup) container.findViewById(paletteId);

   if (TextUtils.isEmpty(url)) {
       if (drawable != null)
           imageView.setImageDrawable(drawable);
       palette.setBackgroundColor(container.getResources().getColor(R.color.grey_600));
       for (int i = 0; i < palette.getChildCount(); i++) {
           View child = palette.getChildAt(i);
           if (child instanceof TextView)
               ((TextView) child).setTextColor(Color.WHITE);
       }
       return;
   }
   GlidePalette<Drawable> glidePalette = GlidePalette.with(url)
       .use(GlidePalette.Profile.MUTED)
       .intoBackground(palette)
       .crossfade(true);

   for (int i = 0; i < palette.getChildCount(); i++) {
       View child = palette.getChildAt(i);
       if (child instanceof TextView)
           glidePalette
               .intoTextColor((TextView) child, GlidePalette.Swatch.TITLE_TEXT_COLOR);
   }
   setGlideImage(imageView, url, drawable, null, glidePalette);
}


The code is pretty obvious. The method checks passed URL for nullability. If null, it sets the placeholder drawable to the image view and default colors to the text views and the palette. The GlidePalette object is generated using the initializer method with which takes the image URL. The request is passed to the method setGlideImage which loads the image and passes the GlidePalette to the GlideApp as a listener. Accordingly, the palette is generated and the colors are set to the label and text views accordingly. The container view in the XML layout looks like:

<LinearLayout
   android:layout_width="match_parent"
   android:layout_height="wrap_content"
   android:orientation="vertical"
   app:paletteImageUrl="@{ event.largeImageUrl }"
   app:placeholder="@{ @drawable/header }"
   app:imageId="@{ R.id.image }"
   app:paletteId="@{ R.id.eventDetailPalette }">


Links:
1. Documentation for Glide Image Loading Library
2. GlidePalette Github Repository
3. Android Palette Official Documentation

Continue ReadingUsing Android Palette with Glide in Open Event Organizer Android App

Making App Name Configurable for Open Event Organizer App

Open Event Organizer is a client side android application of Open Event API server created for event organizers and entry managers. The application provides a way to configure the app name via environment variable app_name. This allows the user to change the app name just by setting the environment variable app_name to the new name. I will be talking about its implementation in the application in this blog.

Generally, in an android application, the app name is stored as a static string resource and set in the manifest file by referencing to it. In the Organizer application, the app name variable is defined in the app’s gradle file. It is assigned to the value of environment variable app_name and the default value is assigned if the variable is null. The relevant code in the manifest file is:

def app_name = System.getenv('app_name') ?: "eventyay organizer"

app/build.gradle

The default value of app_name is kept, eventyay organizer. This is the app name when the user doesn’t set environment variable app_name. To reference the variable from the gradle file into the manifest, manifestPlaceholders are defined in the gradle’s defaultConfig. It is a map of key value pairs. The relevant code is:

defaultConfig {
   ...
   ...
   manifestPlaceholders = [appName: app_name]
}

app/build.gradle

This makes appName available for use in the app manifest. In the manifest file, app name is assigned to the appName set in the gradle.

<application
   ...
   ...
   android:label="${appName}"

app/src/main/AndroidManifest.xml

By this, the application name is made configurable from the environment variable.

Links:
1. ManifestPlaceholders documentation
2. Stackoverflow answer about getting environment variable in gradle

Continue ReadingMaking App Name Configurable for Open Event Organizer App

Adding Number of Sessions Label in Open Event Android App

The Open Event Android project has a fragment for showing tracks of the event. The Tracks Fragment shows the list of all the Tracks with title and TextDrawable. But currently it is not showing how many sessions particular track has. Adding TextView with rounded corner and colored background showing number of sessions for track gives great UI. In this post I explain how to add TextView with rounded corner and how to use Plurals in Android.

1. Create Drawable for background

Firstly create track_rounded_corner.xml Shape Drawable which will be used as a background of the TextView. The <shape> element must be the root element of Shape drawable. The android:shape attribute defines the type of the shape. It can be rectangle, ring, oval, line. In our case we will use rectangle.

<?xml version="1.0" encoding="utf-8"?>
<shape xmlns:android="http://schemas.android.com/apk/res/android"
    android:shape="rectangle">

    <corners android:radius="360dp" />

    <padding
        android:bottom="2dp"
        android:left="8dp"
        android:right="8dp"
        android:top="2dp" />
</shape>


Here the <corners> element creates rounded corners for the shape with the specified value of radius attribute. This tag is only applied when the shape is a rectangle. The <padding> element adds padding to the containing view. You can modify the value of the padding as per your need. You can feel shape with appropriate color using <solid> as we are setting color dynamically we will not set color here.

2. Add TextView and set Drawable

Now add TextView in the track list item which will contain number of sessions text. Set  track_rounded_corner.xml drawable we created before as background of this TextView using background attribute.

<TextView
        android:id="@+id/no_of_sessions"
        android:layout_width="wrap_content"
        android:layout_height="wrap_content"
        android:background="@drawable/track_rounded_corner"
        android:textColor="@color/white"
        android:textSize="@dimen/text_size_small"/>


Set color and text size according to your need. Here don’t add padding in the TextView because we have already added padding in the Drawable. Adding padding in the TextView will override the value specified in the drawable.

3.  Create TextView object in ViewHolder

Now create TextView object noOfSessions and bind it with R.id.no_of_sessions using ButterKnife.bind() method.

public class TrackViewHolder extends RecyclerView.ViewHolder {
    ...

    @BindView(R.id.no_of_sessions)
    TextView noOfSessions;

    private Track track;

    public TrackViewHolder(View itemView, Context context) {
        super(itemView);
        ButterKnife.bind(this, itemView);

    public void bindTrack(Track track) {
        this.track = track;
        ...
    }   
}


Here TrackViewHolder is a RecycleriewHolder for the TracksListAdapter. The bindTrack() method of this view holder is used to bind Track with ViewHolder.

4.  Add Quantity Strings (Plurals) for Sessions

Now we want to set the value of TextView. Here if the number of sessions of the track is zero or more than one then we need to set text  “0 sessions” or “2 sessions”. If the track has only one session than we need to set text “1 session” to make text meaningful. In android we have Quantity Strings which can be used to make this task easy.

<resources>
    <!--Quantity Strings(Plurals) for sessions-->
    <plurals name="sessions">
        <item quantity="zero">No sessions</item>
        <item quantity="one">1 session</item>
        <item quantity="other">%d sessions</item>
    </plurals>
</resources>


Using this plurals resource we can get appropriate string for specified quantity like “zero”, “one” and  “other” will return “No sessions”, “1 session”, and “2 sessions”. accordingly. 2 can be any value other than 0 and 1.

Now let’s set background color and test for the text view.

int trackColor = Color.parseColor(track.getColor());
int sessions = track.getSessions().size();

noOfSessions.getBackground().setColorFilter(trackColor, PorterDuff.Mode.SRC_ATOP);
noOfSessions.setText(context.getResources().getQuantityString(R.plurals.sessions,
                sessions, sessions));


Here we are setting background color of textview using getbackground().setColorFilter() method. To set appropriate text we are using getQuantityString() method which takes plural resource and quantity(in our case no of sessions) as parameters.

Now we are all set. Run the app it will look like this.

Conclusion

Adding TextView with rounded corner and colored background in the App gives great UI and UX. To know more about Rounded corner TextView and Quantity Strings follow the links given below.

Continue ReadingAdding Number of Sessions Label in Open Event Android App

Using ThreeTenABP for Time Zone Handling in Open Event Android

The Open Event Android project helps event organizers to organize the event and generate Apps (apk format) for their events/conferences by providing API endpoint or zip generated using Open Event server. For any Event App it is very important that it handles time zone properly. In Open Event Android App there is an option to change time zone setting. The user can view date and time of the event and sessions in Event Timezone and Local time zone in the App. ThreeTenABP provides a backport of the Java SE 8 date-time classes to Java SE 6 and 7. In this blog post I explain how to use ThreeTenABP for time zone handling in Android.

Add dependency

To use ThreeTenABP in your application you have to add the dependency in your app module’s build.gradle file.

dependencies {
      compile    'com.jakewharton.threetenabp:threetenabp:1.0.5'
      testCompile   'org.threeten:threetenbp:1.3.6'
}

Initialize ThreeTenABP

Now in the onCreate() method of the Application class initialize ThreeTenABP.

AndroidThreeTen.init(this);

Create getZoneId() method

Firstly create getZoneId() method which will return ZoneId according to user preference. This method will be used for formatting and parsing dates Here showLocal is user preference. If showLocal is true then this function will return Default local ZoneId otherwise ZoneId of the Event.

private static ZoneId geZoneId() {
        if (showLocal || Utils.isEmpty(getEventTimeZone()))
            return ZoneId.systemDefault();
        else
            return ZoneId.of(getEventTimeZone());
}

Here  getEventTimeZone() method returns time zone string of the Event.

ThreeTenABP has mainly two classes representing date and time both.

  • ZonedDateTime : ‘2011-12-03T10:15:30+01:00[Europe/Paris]’
  • LocalDateTime : ‘2011-12-03T10:15:30’

ZonedDateTime contains timezone information at the end. LocalDateTime doesn’t contain timezone.

Create method for parsing and formating

Now create getDate() method which will take isoDateString and will return ZonedDateTime object.

public static ZonedDateTime getDate(@NonNull String isoDateString) {
        return ZonedDateTime.parse(isoDateString).withZoneSameInstant(getZoneId());;
}


Create formatDate() method which takes two arguments first is format string and second is isoDateString. This method will return a formatted string.

public static String formatDate(@NonNull String format, @NonNull String isoDateString) {
        return DateTimeFormatter.ofPattern(format).format(getDate(isoDateString));
}

Use methods

Now we are ready to format and parse isoDateString. Let’s take an example. Let “2017-11-09T23:08:56+08:00” is isoDateString. We can parse this isoDateString using getDate() method which will return ZonedDateTime object.

Parsing:

String isoDateString = "2017-11-09T23:08:56+08:00";

DateConverter.setEventTimeZone("Asia/Singapore");
DateConverter.setShowLocalTime(false);
ZonedDateTime dateInEventTimeZone = DateConverter.getDate(isoDateString);

dateInEventTimeZone.toString();  //2017-11-09T23:08:56+08:00[Asia/Singapore]


TimeZone.setDefault(TimeZone.getDefault());
DateConverter.setShowLocalTime(true);
ZonedDateTime dateInLocalTimeZone = DateConverter.getDate(dateInLocalTimeZone);

dateInLocalTimeZone.toString();  //2017-11-09T20:38:56+05:30[Asia/Kolkata]


Formatting:

String date = "2017-03-17T14:00:00+08:00";
String formattedString = formatDate("dd MM YYYY hh:mm:ss a", date));

formattedString // "17 03 2017 02:00:00 PM"

Conclusion

As you can see, ThreeTenABP makes Time Zone handling so easy. It has also support for default formatters and methods. To learn more about ThreeTenABP follow the links given below.

Continue ReadingUsing ThreeTenABP for Time Zone Handling in Open Event Android

Shift from Java to Kotlin in SUSI Android

Previously SUSI Android was written in JAVA. But recently Google announced that it will officially support Kotlin on Android as a first class language so we decided to shift from Java to Kotlin. Kotlin runs on Java Virtual Machine and hence we can use Kotlin for Android app development. Kotlin is new programming language developed by JetBrains, which also developed IntelliJ-the IDE that Android Studio is based on. So Android Studio has excellent support for Kotlin.

Advantages of Kotlin over Java

  • Kotlin is a null safe language. It changes all the instances used in the code to non nullable type thus it ensures that the developers don’t get any nullPointerException.
  • Good Android Studio support. Kotlin tool is included with Android Studio 3.0 by default. But for Android Studio 2.x we need to install the required plugin for Kotlin.
  • Kotlin also provides support for Lambda function and other high order functions.
  • One of Kotlin’s greatest strengths as a potential alternative to Java is interoperability between Java and Kotlin. You can even have Java and Kotlin code existing side by side in the same project.
  • Kotlin provides the way to declare Extension function similar to that of C# and Gosu. We can use this function in the same way as we use the member functions of our class.

After seeing the above points it is now clear that Kotlin is much more effective than Java. In this blog post, I will show you how ForgotPasswordActivity is shifted from JAVA to Kotlin in SUSI Android.

How to install Kotlin plugin in Android Studio 2.x

We are using Android Studio 2.3.0 in our android project. To use Kotlin in Android Studio 2.x we need to install Kotlin plugin.

Steps to include Kotlin plugin in Android Studio 2.x are:

  • Go to File
  • After that select Settings
  • Then select Plugin Option from the left sidebar.
  • After that click on Browse repositories.
  • Search for Kotlin and install it.

Once it is installed successfully, restart Android Studio. Now configure Kotlin in Android Studio.

Shift  SUSI Android from JAVA to Kotlin

Kotlin is compatible with JAVA. Thus it allows us to change the code bit by bit instead of all at once. In SUSI Android app we implemented MVP architecture with Kotlin. We converted the code by one activity each time from JAVA to Kotlin. I converted the ForgotPassword of SUSI Android from JAVA to Kotlin with MVP architecture. I will discuss only shifting of SUSI Android from JAVA to Kotlin and not about MVP architecture implementation.

First thing is how to extend parent class. In JAVA we need to use extend keyword

public class ForgotPasswordActivity extends AppCompatActivity

but in Kotlin parent class is extended like

class ForgotPasswordActivity : AppCompatActivity ()

Second is no need to bind view in Kotlin. In JAVA we bind view using Butter Knife.

@BindView(R.id.forgot_email)

protected TextInputLayout email;

and

email.setError(getString(R.string.email_invalid_title));

but in Kotlin we can directly use view using id.

forgot_email.error = getString(R.string.email_invalid_title)

Another important thing is that instead of using setError and getError we can use only error for both purposes.

forgot_email.error

It can be used to get error in TextInputLayout ‘forgot_email’ and

forgot_email.error = getString(R.string.email_invalid_title)

can be use to set error in TextInputLayout ‘forgot_email’.

Third one is in Kotlin we don’t need to define variable type always

val notSuccessAlertboxHelper = AlertboxHelper(this@ForgotPasswordActivity, title, message, null, null, button, null, color)

but in JAVA we need to define it always.

AlertboxHelper notSuccessAlertboxHelper = new AlertboxHelper(ForgotPasswordActivity.this, title, message, null, null, positiveButtonText, null, colour);

And one of the most important feature of Kotlin null safety. So you don’t need to worry about NullPointerException. In java we need to check for null otherwise our app crash

if (url.getEditText() == null)

      throw new IllegalArgumentException(“No Edittext hosted!”);

But in Kotlin there is no need to check for null. You need to use ’?’ and Kotlin will handle it itself.  

input_url.editText?.text.toString()

You can find the previous ForgotPasswordActivity here. You can compare it with new ForgotPaswordActivity.

Reference

Continue ReadingShift from Java to Kotlin in SUSI Android

Introducing Stream Servlet in loklak Server

A major part of my GSoC proposal was adding stream API to loklak server. In a previous blog post, I discussed the addition of Mosquitto as a message broker for MQTT streaming. After testing this service for a few days and some minor improvements, I was in a position to expose the stream to outside users using a simple API.

In this blog post, I will be discussing the addition of /api/stream.json endpoint to loklak server.

HTTP Server-Sent Events

Server-sent events (SSE) is a technology where a browser receives automatic updates from a server via HTTP connection. The Server-Sent Events EventSource API is standardized as part of HTML5 by the W3C.

Wikipedia

This API is supported by all major browsers except Microsoft Edge. For loklak, the plan was to use this event system to send messages, as they arrive, to the connected users. Apart from browser support, EventSource API can also be used with many other technologies too.

Jetty Eventsource Plugin

For Java, we can use Jetty’s EventSource plugin to send events to clients. It is similar to other Jetty servlets when it comes to processing the arguments, handling requests, etc. But it provides a simple interface to send events as they occur to connected users.

Adding Dependency

To use this plugin, we can add the following line to Gradle dependencies –

compile group: 'org.eclipse.jetty', name: 'jetty-eventsource-servlet', version: '1.0.0'

[SOURCE]

The Event Source

An EventSource is the object which is required for EventSourceServlet to send events. All the logics for emitting events needs to be defined in the related class. To link a servlet with an EventSource, we need to override the newEventSource method –

public class StreamServlet extends EventSourceServlet {
    @Override
    protected EventSource newEventSource(HttpServletRequest request) {
        String channel = request.getParameter("channel");
        if (channel == null) {
            return null;
        }
        if (channel.isEmpty()) {
            return null;
        }
        return new MqttEventSource(channel);
    }
}

[SOURCE]

If no channel is provided, the EventSource object will be null and the request will be rejected. Here, the MqttEventSource would be used to handle the stream of Tweets as they arrive from the Mosquitto message broker.

Cross Site Requests

Since the requests to this endpoint can’t be of JSONP type, it is necessary to allow cross site requests on this endpoint. This can be done by overriding the doGet method of the servlet –

@Override
protected void doGet(HttpServletRequest request, HttpServletResponse response) throws ServletException, IOException {
     response.setHeader("Access-Control-Allow-Origin", "*");
    super.doGet(request, response);
}

[SOURCE]

Adding MQTT Subscriber

When a request for events arrives, the constructor to MqttEventSource is called. At this stage, we need to connect to the stream from Mosquitto for the channel. To achieve this, we can set the class as MqttCallback using appropriate client configurations –

public class MqttEventSource implements MqttCallback {
    ...
    MqttEventSource(String channel) {
        this.channel = channel;
    }
    ...
    this.mqttClient = new MqttClient(address, "loklak_server_subscriber");
    this.mqttClient.connect();
    this.mqttClient.setCallback(this);
    this.mqttClient.subscribe(this.channel);
    ...
}

[SOURCE]

By setting the callback to this, we can override the messageArrived method to handle the arrival of a new message on the channel. Just to mention, the client library used here is Eclipse Paho.

Connecting MQTT Stream to SSE Stream

Now that we have subscribed to the channel we wish to send events from, we can use the Emitter to send events from our EventSource by implementing it –

public class MqttEventSource implements EventSource, MqttCallback {
    private Emitter emitter;


    @Override
    public void onOpen(Emitter emitter) throws IOException {
        this.emitter = emitter;
        ...
    }

    @Override
    public void messageArrived(String topic, MqttMessage message) throws Exception {
        this.emitter.data(message.toString());
    }
}

[SOURCE]

Closing Stream on Disconnecting from User

When a client disconnects from the stream, it doesn’t makes sense to stay connected to the server. We can use the onClose method to disconnect the subscriber from the MQTT broker –

@Override
public void onClose() {
    try {
        this.mqttClient.close();
        this.mqttClient.disconnect();
    } catch (MqttException e) {
        // Log some warning 
    }
}

[SOURCE]

Conclusion

In this blog post, I discussed connecting the MQTT stream to SSE stream using Jetty’s EventSource plugin. Once in place, this event system would save us from making too many requests to collect and visualize data. The possibilities of applications of such feature are huge.

This feature can be seen in action at the World Mood Tracker app.

The changes were introduced in pull request loklak/loklak_server#1474 by @singhpratyush (me).

Resources

Continue ReadingIntroducing Stream Servlet in loklak Server

Giving Offline Support to the Open Event Organizer Android App

Open Event Organizer is an Android Application for Event Organizers and Entry Managers which uses Open Event API Server as a backend. The core feature of the App is to scan a QR code to validate an attendee’s check in. The App maintains a local database and syncs it with the server. The basic workflow of the attendee check in is – the App scans a QR code on an attendee’s ticket. The code scanned is processed to validate the attendee from the attendees database which is maintained locally. On finding, the App makes a check in status toggling request to the server. The server toggles the status of the attendee and sends back a response containing the updated attendee’s data which is updated in the local database. Everything described above goes well till the App gets a good network connection always which cannot be assumed as a network can go down sometimes at the event site. So to support the functionality even in the absence of the network, Orga App uses Job Schedulers which handle requests in absence of network and the requests are made when the network is available again. I will be talking about its implementation in the App through this blog.

The App uses the library Android-Job developed by evernote which handles jobs in the background. The library provides a class JobManager which does most of the part. The singleton of this class is initialized in the Application class. Job is the class which is where actually a background task is implemented. There can be more than one jobs in the App, hence the library requires to implement JobCreator interface which has create method which takes a string tag and the relevant Job is returned. JobCreator is passed to the JobManager in Application while initialization. The relevant code is:

JobManager.create(this).addJobCreator(new OrgaJobCreator());

Initialization of JobManager in Application class

public class OrgaJobCreator implements JobCreator {
   @Override
   public Job create(String tag) {
       switch (tag) {
           case AttendeeCheckInJob.TAG:
               return new AttendeeCheckInJob();
           default:
               return null;
       }
   }
}

Implementation of JobCreator

public class AttendeeCheckInJob extends Job {
   ...
   ...
   @NonNull
   @Override
   protected Result onRunJob(Params params) {
       ...
       ...
       Iterable<Attendee> attendees = attendeeRepository.getPendingCheckIns().blockingIterable();
       for (Attendee attendee : attendees) {
           try {
               Attendee toggled = attendeeRepository.toggleAttendeeCheckStatus(attendee).blockingFirst();
               ...
           } catch (Exception exception) {
               ...
               return Result.RESCHEDULE;
           }
       }
       return Result.SUCCESS;
   }

   public static void scheduleJob() {
       new JobRequest.Builder(AttendeeCheckInJob.TAG)
           .setExecutionWindow(1, 5000L)
           .setBackoffCriteria(10000L, JobRequest.BackoffPolicy.EXPONENTIAL)
           .setRequiredNetworkType(JobRequest.NetworkType.CONNECTED)
           .setRequirementsEnforced(true)
           .setPersisted(true)
           .setUpdateCurrent(true)
           .build()
           .schedule();
   }
}

Job class for attendee check in job

To create a Job, these two methods are overridden. onRunJob is where the actual background job is going to run. This is the place where you implement your job logic which should be run in the background. In this method, the attendees with pending sync are fetched from the local database and the network requests are made. On failure, the same job is scheduled again. The process goes on until the job is done. scheduleJob method is where the related setting options are set. This method is used to schedule an incomplete job.

So after this implementation, the workflow described above is changed. Now on attendee is found, it is updated in local database before making any request to the server and the attendee is flagged as pending sync. Accordingly, in the UI single tick is shown for the attendee which is pending for sync with the server. Once the request is made to the server and the response is received, the pending sync flag of the attendee is removed and double tick is shown against the attendee.

Links:
1. Documentation for Android-Job Library by evernote
2. Github Repository of Android-Job Library

Continue ReadingGiving Offline Support to the Open Event Organizer Android App

How Switch Case improve performance in PSLab Saved Experiments

PSLab android application contains nearly 70 experiments one can experiment on using the PSLab device and the other necessary circuit components and devices. These experiments span over areas such as Electronics, Electrical, Physical and High school level. All these experiments are accessible via an android adapter in the repository named “PerformExperimentAdapter”. This adapter houses a tab view with two different tabs; one for the experiment details and the other for actual experiment and resultant graphs.

The adapter extends an inbuilt class FragmentPagerAdapter;

public class PerformExperimentAdapter extends FragmentPagerAdapter

This class displays every page attached to its viewpager as a fragment. The good thing about using fragments is that they have a recyclable life cycle. Rather than creating new views for every instance of an experiment, the similar views can be recycled to use once again saving resources and improving performance. FragmentPagerAdapter needs to override a method to display the correct view on the tab select by user.

@Override
public Fragment getItem(int position) {

}

Depending on the value of position, relevant experiment documentation and the experiment implementation fragments are displayed determined using the experiment title. Performance can be critical in this place as if it takes too long to process and render a fragment, user will feel a lag.

The previous implementation was using consecutive if statements.

@Override
public Fragment getItem(int position) {
   switch (position) {
       case 0:
           if (experimentTitle.equals(context.getString(R.string.diode_iv)))
               return ExperimentDocFragment.newInstance("D_diodeIV.html");
           if (experimentTitle.equals(context.getString(R.string.zener_iv)))
               return ExperimentDocFragment.newInstance("D_ZenerIV.html");
           ...
       case 1:
           if (experimentTitle.equals(context.getString(R.string.diode_iv)))
               return ZenerSetupFragment.newInstance();
           if (experimentTitle.equals(context.getString(R.string.zener_iv)))
               return DiodeExperiment.newInstance(context.getString(R.string.half_wave_rectifier));
           ...
       default:
           return ExperimentDocFragment.newInstance("astable-multivibrator.html");
   }
}

This setup was suitable for applications where there is less than around 5 choices to chose between. As the list grows, the elements in the end of the if layers will take more time to load as each of the previous if statements need to be evaluated false in order to reach the bottom statements.

This is when this implementation was replaced using switch case statements instead of consecutive if statements. The theory behind the performance improvement involves algorithm structures; Hash Tables

Hash Tables

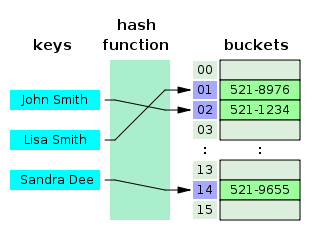
Hash tables use a hash function to calculate the index of the destination cell. This operation on average has a complexity of O(1) which means it will take the same time to access any two elements which are randomly positioned.

This is possible because java uses the hash code of the string to determine the index where the target is situated at. This way it is much faster than consecutive if statement calls where in the worst case it will take O(n) time to reach the statement causing a lag in the application.

Current application uses switch cases in the PerformExperimentAdapter;

@Override
public Fragment getItem(int position) {
   switch (position) {
       case 0:
           switch (experimentTitle) {
               case "Diode IV Characteristics":
                   return ExperimentDocFragment.newInstance("D_diodeIV.html");
               case "Zener IV Characteristics":
                   return ExperimentDocFragment.newInstance("D_ZenerIV.html");
               case "Half Wave Rectifier":
                   return ExperimentDocFragment.newInstance("L_halfWave.html");
           }
       case 1:
           switch (experimentTitle) {
               case "Diode IV Characteristics":
                   return ZenerSetupFragment.newInstance();
               case "Zener IV Characteristics":
                   return ZenerSetupFragment.newInstance();
               case "Half Wave Rectifier":
                   return DiodeExperiment.newInstance(context.getString(R.string.half_wave_rectifier));
           }
       default:
           return ExperimentDocFragment.newInstance("astable-multivibrator.html");
   }
}

There is one downfall in using switch case in the context. That is the inability to use string resources directly as Java requires a constant literals in the evaluation statement of a case.

Resources:

Continue ReadingHow Switch Case improve performance in PSLab Saved Experiments

Adding Sticky Headers for Grouping Sponsors List in Open Event Android App

The Open Event Android project has a fragment for showing sponsors of the event. Each Sponsor model has a name, url, type and level. The SponsorsFragment shows list according to type and level. Each sponsor list item has sponsor type TextView. There can be more than one sponsors with the same type. So instead of showing type in the Sponsor item we can add Sticky header showing type at the top which will group the sponsors with the same type and also gives the great UI. In this post I explain how to add the Sticky headers in the RecyclerView using StickyHeadersRecyclerView library.

1. Add dependency

In order to use Sticky Headers in your app add following dependencies in your app module’s build.gradle file.

dependencies {
	compile 'com.timehop.stickyheadersrecyclerview:library:0.4.3'
}

2. Create layout for header

Create recycler_view_header.xml file for the header. It will contain LinearLayout and simple TextView which will show Sponsor type.

<?xml version="1.0" encoding="utf-8"?>
<LinearLayout xmlns:android="http://schemas.android.com/apk/res/android"
    android:layout_width="match_parent"
    android:layout_height="wrap_content"
    android:orientation="vertical">

    <TextView
        android:id="@+id/recyclerview_view_header"
        android:layout_width="match_parent"
        android:layout_height="wrap_content"
        android:padding="@dimen/padding_medium" />

</LinearLayout>

Here you can modify layout according to your need.

3.  Implement StickyRecyclerHeadersAdapter

Now implement StickyRecyclerHeadersAdapter in the List Adapter. Override getHeaderId(), onCreateHeaderViewHolder(), onBindHeaderViewHolder
() methods of the StickyRecyclerHeadersAdapter.

public class SponsorsListAdapter extends BaseRVAdapter<Sponsor, SponsorViewHolder> implements StickyRecyclerHeadersAdapter {
    ...

    @Override
    public long getHeaderId(int position) {...}

    @Override
    public RecyclerView.ViewHolder onCreateHeaderViewHolder(ViewGroup parent) {...}

    @Override
    public void onBindHeaderViewHolder(RecyclerView.ViewHolder holder, int position) {...}
}


The getHeaderId() method is used to give an id to the header. It is the main part of the implementation here all the sponsors with the same type should return the same id. In our case we are returning sponsor level because all the sponsor types have corresponding levels.

String level = getItem(position).getLevel();
return Long.valueOf(level);


The onCreateHeaderViewHolder() returns Recycler ViewHolder for the header. Here we will use in the inflate() method of  LayoutInflater to get View object of recycler_view_header.xml file. Then return new RecyclerView.ViewHolder object using View object.

View view = LayoutInflater.from(parent.getContext())
                .inflate(R.layout.recycler_view_header, parent, false);
return new RecyclerView.ViewHolder(view) {};


The onBindHeaderViewHolder() binds the sponsor to HeaderViewHolder. In this method we sets the sponsor type string to the TextView we have created in the recycler_view_header.xml file.

TextView textView = (TextView) holder.itemView.findViewById(R.id.recyclerview_view_header);
textView.setGravity(Gravity.CENTER_HORIZONTAL);

String sponsorType = getItem(position).getType();
if (!Utils.isEmpty(sponsorType))  
   textView.setText(sponsorType.toUpperCase());

Here you can also modify TextView according to your need. We are centering text using setGravity() method.

4.  Setup RecyclerView

Now create RecyclerView and set adapter using setAdapter() method. Also as we want the linear list of sponsors so set the LinearLayoutManager using setLayoutManager() method.

SponsorsListAdapter sponsorsListAdapter = new SponsorsListAdapter(getContext(), sponsors);
sponsorsRecyclerView.setAdapter(sponsorsListAdapter);
sponsorsRecyclerView.setLayoutManager(new LinearLayoutManager(getActivity()));


Create StickyRecyclerHeadersDecoration object and add it in the RecyclerView using addItemDecoration() method.

final StickyRecyclerHeadersDecoration headersDecoration = new StickyRecyclerHeadersDecoration(sponsorsListAdapter);

sponsorsRecyclerView.addItemDecoration(headersDecoration);
sponsorsListAdapter.registerAdapterDataObserver(new RecyclerView.AdapterDataObserver(){
    @Override
    public void onChanged {
            headersDecoration.invalidateHeaders();
    }
});

Now add AdapterDataObserver using registerAdapterDataObserver() method. The onChanged() method in this observer is called whenever dataset changes. So in this method invalidate headers using invalidateHeaders() method of HeaderDecoration.

Now we are all set. Run the app it will look like this.

Conclusion

Sticky headers in the App gives great UI and UX. You can also add a click listener to the headers. To know more about Sticky Headers follow the links given below.

Continue ReadingAdding Sticky Headers for Grouping Sponsors List in Open Event Android App