Implementation of Image Scraper and Teaser Text in Query Server

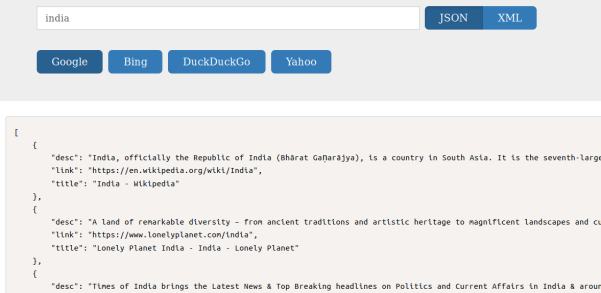
Query server helps one to scrap search engines like Google, Yahoo, Bing, DuckDuckGo and get the results in json/ xml format. Also it stores retrieved results in mongoDB for analytical purposes.We have used beautiful soup for scraping results from query server We have used beautiful soup for scraping results from query server In this blogpost I will discuss two recent implementations in query server and then end with the introduction of different scrappers for query server. Implementation of teaser text for Google, Yahoo, and DuckDuckgo: Teaser text is basically description that is provided by search engines for all search results, this could be implemented by scrapping the description of each result and push it into a list. This is done in query server using beautiful. Implementation details of this feature is available at pull: https://github.com/fossasia/query-server/pull/72 And finally we have achieved scaping teaser text for all supported search engines: Implementation of Image scraper for google in query server: Scapping images in google is a bit different from scrapping normal text results. Google has metadata of the original image in rg_meta tag of div containing the thumbnail of the image. We cannot scrap just the thumbnail, because thumbnails are basically of low quality, and also are stored in google server, whereas the links available in the meta data are from the original source. Finally using the metadata of images available we have scraped the images in google. Implementation details of image scraper to google is available at https://github.com/fossasia/query-server/pull/73 Also we have separated one scraper file for each of the search engine using Object Oriented Paradigm, where as before we used to have only one scraper file for all search engines https://github.com/fossasia/query-server/pull/67 Resources BeautifulSoup: https://www.crummy.com/software/BeautifulSoup/bs4/doc/

Continue ReadingImplementation of Image Scraper and Teaser Text in Query Server

Google Authentication and sharing Image on Google Plus from Phimpme Android

In this blog, I will be explaining how I implemented Google Authentication and sharing an Image on GooglePlus from Phimpme Android application. Adding Google Plus authentication in accounts activity in Phimpme Android In accounts Activity, we added Google Plus option. This is done by adding “Googleplus” in accountName.   public static String[] accountName = { "Facebook", "Twitter", "Drupal", "NextCloud", "Wordpress", "Pinterest", "Flickr", "Imgur", "Dropbox", "OwnCloud", "Googleplus"}; Add this to your Gradle Build. Please note that the version of Google:play-services in the grade should be same. In the case of Phimpme the version is 10.0.1, so all the services from Google should be 10.0.1. compile 'com.google.android.gms:play-services-auth:10.0.1 In onCreate we need to make the object of the GoogleSignInOptions. This is required to call methods: requestEmail() and build. GoogleSignInOptions gso = new GoogleSignInOptions.Builder(GoogleSignInOptions.DEFAULT_SIGN_IN)       .requestEmail()       .build(); Building GoogleApiClient with access to the Google Sign and the option specified by the gso. mGoogleApiClient = new GoogleApiClient.Builder(this)       .enableAutoManage(this , AccountActivity.this)       .addApi(Auth.GOOGLE_SIGN_IN_API, gso)       .build(); Signing in Google Authentication can take place through intent which calls logged in users on the phone. The user will choose an option to select the account he or she wants to authenticate the application. private void signInGooglePlus() {   Intent signInIntent = Auth.GoogleSignInApi.getSignInIntent(mGoogleApiClient);   startActivityForResult(signInIntent, RC_SIGN_IN); } Adding Google Plus account in the Realm Database HandleSignInResult() function is used to handle Sign in result. This result includes: Storing the received data in the Realm Database. Showing the appropriate username in the Accounts activity and handling login failed. Checking if login is successful or not If the login is successful a Toast message will pop up to show the appropriate message.   private void handleSignInResult(GoogleSignInResult result) {   if (result.isSuccess())       GoogleSignInAccount acct = result.getSignInAccount();//acct.getDisplayName()       Toast.makeText(AccountActivity.this, R.string.success, Toast.LENGTH_SHORT).show(); Creating Object to store the details in Realm Database. First, we need to begin realm transaction.Then add logged in username in the database. To display the username we will create the function setUserName(acct.getDisplayName()). And then finally commit everything to Realm database.         realm.beginTransaction();       account = realm.createObject(AccountDatabase.class,       accountName[GOOGLEPLUS]);       account.setUsername(acct.getDisplayName());       realm.commitTransaction();   } Adding Google Plus option in Sharing Activity. To add Google Plus option in the sharing Activity we first added Google Plus icon in the resource folder. The Google Plus icon is SVG(scalable vector) format so that we can manipulate it to apply any colour and size. <vector xmlns:android="http://schemas.android.com/apk/res/android"   android:width="24dp"   android:height="24dp"   android:viewportHeight="32.0"   android:viewportWidth="32.0">   <path       android:fillColor="#00000000"       android:pathData="M16,16m-16,0a16,16 0,1 1,32 0a16,16 0,1 1,-32 0" />   <path       android:fillColor="#000000"       android:pathData="M16.7,17.2c-0.4,-0.3 -1.3,-1.1 -1.3,-1.5c0,-0.5 0.2,-0.8 1,-1.4c0.8,-0.6 1.4,-1.5 1.4,-2.6c0,-1.2 -0.6,-2.5 -1.6,-2.9h1.6L18.8,8h-5c-2.2,0 -4.3,1.7 -4.3,3.6c0,2 1.5,3.6 3.8,3.6c0.2,0 0.3,0 0.5,0c-0.1,0.3 -0.3,0.6 -0.3,0.9c0,0.6 0.3,1 0.7,1.4c-0.3,0 -0.6,0 -0.9,0c-2.8,0 -4.9,1.8 -4.9,3.6c0,1.8 2.3,2.9 5.1,2.9c3.1,0 4.9,-1.8 4.9,-3.6C18.4,19 18,18.1 16.7,17.2zM14.1,14.7c-1.3,0 -2.5,-1.4 -2.7,-3.1c-0.2,-1.7 0.6,-3 1.9,-2.9c1.3,0 2.5,1.4 2.7,3.1C16.2,13.4 15.3,14.8 14.1,14.7zM13.6,23.2c-1.9,0 -3.3,-1.2 -3.3,-2.7c0,-1.4 1.7,-2.6 3.6,-2.6c0.4,0 0.9,0.1 1.2,0.2c1,0.7 1.8,1.1 2,1.9c0,0.2 0.1,0.3 0.1,0.5C17.2,22.1 16.2,23.2 13.6,23.2zM21.5,15v-2h-1v2h-2v1h2v2h1v-2h2v-1H21.5z" /> </vector> Sharing Image on Google Plus from Sharing Activity After creating the appropriate button, we need to send the image to Google Plus. We need to import the PlusShare files in the SharingActivity. import com.google.android.gms.plus.PlusShare; Share Image function To share the image on Google Plus we have used PlusShare function which comes in Google Plus…

Continue ReadingGoogle Authentication and sharing Image on Google Plus from Phimpme Android

FOSSASIA at Google Code-In 2016 Grand Prize Trip

This year FOSSASIA came up with a whopping number of GCI participants, making it to the top. FOSSASIA is a mentor organization at the Google Code-In contest, which introduces pre-university students towards open source development. Every year Google conducts the grand prize trip to all the GCI winners and I represented FOSSASIA as a mentor. FOSSASIA GCI winners and Mentor at Google Mountain View Campus. Day 1: Meet and Greet with the Diverse Communities We all headed towards the San Francisco Google office and had a great time interacting with members from diverse open source organizations from different parts of the world. I had some interactive conversations with the kids, on how they scheduled their sleep hours in order to complete the task and got feedback from the mentors from different time zones! I was also overwhelmed while listening to their interests apart from open source contributions. “I am a science enthusiast, mainly interested in Computer Science and its wide range of applications. I also enjoy playing the piano, reading, moving, and having engaging conversations with my friends. As a participant in the GCI contest, I got the chance to learn by doing, I got an insight of how it is like to work on a real open-source project, met some great people, helped others (and received help myself). Shortly, it was amazing, and I'm proud to have been a part of it. ” Shared by one of our Winner Oana Rosca. There were people from almost 14 different countries, in fact, FOSSASIA, as a team, was the most diverse group :) Day 2: Award Ceremony We had two winners from FOSSASIA, Arkhan Kaiser from Indonesia and Oana Rosca from Romania. There were 8 organizations with 16 winners. The award ceremony was celebrated on day 2 and each winner was felicitated by Chris DiBona, the director of the Google open source team. Talks by Googlers We had amazing speakers from Google who spoke about their work, experiences, and journey to Google. Our first speaker was Jeremy Allison, a notable contributor to “Samba” which is a free software re-implementation of the SMB/CIFS networking protocol. He spoke on “How the Internet works” and gave a deeper view of the internet magic. We had various speakers from different domains such as Grant Grundler from the Chrome team, Lyman Missimer from Google Expeditions, Katie Dektar from the Making and Science team, Sean Lip from Oppia(Googler and Oppia org admin), Timothy Papandreou from Waymo and Andrew Selle from TensorFlow. Day 3: Fun Activities We had various fun activities organized by the Google team. I had a great time cruising towards the Alcatraz island.  Later we had a walk on the Golden Gate bridge. Here comes the fun part of the tour “the cruise dinner” which was the best part of the day. Day 4: End of the trip Oana, Arkhan and I gave a nice presentation about our work during GCI. We spoke about all the amazing projects under FOSSASIA. One cool thing we did…

Continue ReadingFOSSASIA at Google Code-In 2016 Grand Prize Trip

Controlling Camera Actions Using Voice Interaction in Phimpme Android

In this blog, I will explain how I implemented Google voice actions to control camera features on the Phimpme Android project. I will cover the following features I have implemented on the Phimpme project: Opening the application using Google Voice command. Switching between the cameras. Clicking a Picture and saving it through voice command. Opening application when the user gives a command to Google Now.                       When the user gives command “Take a selfie” or “Click a picture” to Google Now it directly opens Phimpme camera activity.  First                                                                                                                                        We need to add an intent filter to the manifest file so that Google Now can  detect Phimpme camera activity <activity   android:name=".opencamera.Camera.CameraActivity"   android:screenOrientation="portrait"   android:theme="@style/Theme.AppCompat.NoActionBar">   <intent-filter>       <action android:name="android.media.action.IMAGE_CAPTURE"/>       <category android:name="android.intent.category.DEFAULT"/>       <category android:name="android.intent.category.VOICE"/>   </intent-filter> </activity> category android:name=”android.intent.category.VOICE” is added to the IMAGE_CAPTURE intent filter for the Google Now to detect the camera activity. For the Google Now assistance to accept the command in the camera activity we need to add the following in the STILL_IMAGE_CAMERA intent filter in the camera activity. <intent-filter>   <action android:name="android.media.action.STILL_IMAGE_CAMERA"/>   <category android:name="android.intent.category.DEFAULT"/>   <category android:name="android.intent.category.VOICE"/> </intent-filter> So, now when the user says “OK Google” and “Take a Picture” the camera activity on Phimpme opens. Integrating Google Voice assistance in Camera Activity Second,                                                                                                                               After opening the camera application the Google Assistance should ask a question. The cameraActivity in Phimpme can be opened in two ways, such as: When opened from a different application. When given the command to Goole Now assistance. We need to check whether the camera activity is prompted from Google assistance or not to activate voice command. We will check it in onResume function. @Override public void onResume() { if (CameraActivity.this.isVoiceInteraction()) {     startVoiceTrigger();  } } If is.VoiceInteraction gives “true” then voice Assistance prompts.             Assistance to ask which camera to use Third,                                                                                                                              …

Continue ReadingControlling Camera Actions Using Voice Interaction in Phimpme Android

Implement Marker Clustering in the Open Event Android App

Markers are an integral part of any map based service. In the Open Event Android App for samples like Mozilla All Hands 2017, there are a lot of microlocations that the organizers want to integrate into the app’s map fragment. Due to the presence of large number of markers, the map fragment clutters, thereby harming the user experience. As an example, imagine yourself as the user and you see the map as in the image given below! Therefore to tackle problem like this, the markers are grouped into clusters. On click of the cluster, the markers get declustered and fall into their respective locations with the map zoomed in. Implementation First and foremost, define the libraries to be used by the utilities in the build.gradle of your app module. Make to import the latest versions. // Googleplay Variant googleplayCompile 'com.google.android.gms:play-services-maps:10.2.6' googleplayCompile 'com.google.android.gms:play-services-location:10.2.6' googleplayCompile 'com.google.maps.android:android-maps-utils:0.4'   Implement the ClusterItem interface in your location POJO which will house a marker’s location. The POJO will therefore override the getPostion() method of the ClusterItem interface where you will return the LatLng. public class MicrolocationClusterWrapper implements ClusterItem { @Override public LatLng getPosition() { return latLng; } }   Create a custom Cluster Renderer class that will extend the default cluster renderer with you location POJO as parameter. Implement ClusterManager’s onClusterItemClickListener to listen to marker clicks and add custom colors to them. Set the custom marker properties before the marker items are rendered with the markerOptions inside the onBeforeClusterItemRendered(). @Override protected void onBeforeClusterItemRendered(MicrolocationClusterWrapper item, MarkerOptions markerOptions) { super.onBeforeClusterItemRendered(item, markerOptions); markerOptions.title(item.getMicrolocation().getName()); if (microlocationClusterWrapper != null && item.equals(microlocationClusterWrapper)) { markerOptions.icon(ImageUtils.vectorToBitmap(context, R.drawable.map_marker, R.color.color_primary)); } else { markerOptions.icon(ImageUtils.vectorToBitmap(context, R.drawable.map_marker, R.color.dark_grey)); } } @Override protected void onClusterItemRendered(final MicrolocationClusterWrapper clusterItem, Marker marker) { super.onClusterItemRendered(clusterItem, marker); clusterItem.setMarker(marker); } @Override public boolean onClusterItemClick(MicrolocationClusterWrapper item) { if (microlocationClusterWrapper != null) { getMarker(microlocationClusterWrapper).setIcon(ImageUtils.vectorToBitmap(context, R.drawable.map_marker, R.color.dark_grey)); } microlocationClusterWrapper = item; getMarker(item).setIcon(ImageUtils.vectorToBitmap(context, R.drawable.map_marker, R.color.color_primary)); return false; } }   Finally in your map fragment, initialize your map, cluster manager class and your custom cluster renderer you just created. Implement the MapReadyCallback so that the Google Map object is not null. Remember to pass the cluster renderer as a listener for the cluster manager’s cluster item click listener. Use the setOnClusterClickListener to zoom the map on the click of cluster. private void handleClusterEvents() { clusterManager.setOnClusterItemClickListener(clusterRenderer); clusterManager.setOnClusterClickListener(cluster -> { mMap.animateCamera(CameraUpdateFactory.newLatLngZoom( cluster.getPosition(), (float) Math.floor(mMap .getCameraPosition().zoom + 2)), 300, null); return true; }); mMap.setOnMapClickListener(clusterRenderer); }   Conclusion Maps are an integral part of any event based apps and marker clustering undoubtedly enhances the user experience in Maps. Resources Marker Clustering Android documentation https://developers.google.com/maps/documentation/android-api/utility/marker-clustering Complete Code Reference https://github.com/fossasia/open-event-android/pull/1777 Marker Customization in the case of Clustering https://github.com/googlemaps/google-maps-ios-utils/issues/21

Continue ReadingImplement Marker Clustering in the Open Event Android App

Google Maps Api

OpenEvent uses it everywhere. Let me explain it. The first problem that we faced was user current location. We wanted to get location based on geolocation method then display this results on the map. To get geolocation we use HTML5. Take a look on geolocate() function   function geolocate() {        if (navigator.geolocation) {            navigator.geolocation.getCurrentPosition(function (position) {            }        }    }   From variable position you can get longitude and latitude params. These values allow us to move marker on the map on right position and get the name of user current location. Based on these data we are able to find the closest events and display it in a distance order. To get information about city or country location you have to execute a simple GET request to google MAPS. In that case you need:   curl http://maps.googleapis.com/maps/api/geocode/json?latlng=17.0112,15.06   above result returns json file where you can find name of location: Nguigmi, Niger   Then, we faced a new challenge- we had to choose which map would be better for OpenEvent - Open Street Map or Google Maps. Finally we have chosen google maps because it wa more comfortable for our team.   OpenEvent simple searching engine is based on latitude and longitude params. So we transform all requests which contain city or country names to longitude and latitude params using Google Api. It allows us to avoid having problems with different locations’ names which occur in different nationalities.  

Continue ReadingGoogle Maps Api

FOSSASIA joining Google Code-In Program for Students Age 13-17

We are proud to announce that FOSSASIA has been chosen as a mentor organization for Google Code-In 2015. FOSSASIA is one of twelve global organizations participating in the program for students from the 13-17 years old.Google Code-In is a global, online contest for 13-17 year old pre-university students interested in learning more about Open Source development. Students work on bite-sized tasks for real-world open source projects in a variety of categories.Students can register and take over tasks starting from December 1, 2014 and work on tasks until January 19. All tasks are listed on the website at http://www.google-melange.com/gci/homepage/google/gci2014Contest TimelineDecember 1, 2014, 9:00 AM Pacific Time / 17:00 UTC: Contest opens for entries by student participantsJanuary 18, 2015, 9:00 AM Pacific Time/ 17:00 UTC: No more tasks can be claimed by students after this timeJanuary 19, 2015, 9:00 AM Pacific Time / 17:00 UTC: All work stops, Contest endsJanuary 26, 2015: Mentoring Organizations submit their grand prize winner nominees to Google Open Source Programs OfficeFebruary 2, 2015: Google Open Source Programs Office announces the grand prize winners via blog postJune 2015: Grand Prize trip to Google and northern California Links* Google Code-In http://www.google-melange.com/gci/homepage/google/gci2014* FOSSASIA at Google Code-In http://www.google-melange.com/gci/org/google/gci2014/fossasia

Continue ReadingFOSSASIA joining Google Code-In Program for Students Age 13-17