Scraping Concurrently with Loklak Server

At Present, SearchScraper in Loklak Server uses numerous threads to scrape Twitter website. The data fetched is cleaned and more data is extracted from it. But just scraping Twitter is under-performance.

Concurrent scraping of other websites like Quora, Youtube, Github, etc can be added to diversify the application. In this way, single endpoint search.json can serve multiple services.

As this Feature is under-refinement, We will discuss only the basic structure of the system with new changes. I tried to implement more abstract way of Scraping by:-

1) Fetching the input data in SearchServlet

Instead of selecting the input get-parameters and referencing them to be used, Now complete Map object is referenced, helping to be able to add more functionality based on input get-parameters. The dataArray object (as JSONArray) is fetched from DAO.scrapeLoklak method and is embedded in output with key results

    // start a scraper
    inputMap.put("query", query);
    DAO.log(request.getServletPath() + " scraping with query: "
           + query + " scraper: " + scraper);
    dataArray = DAO.scrapeLoklak(inputMap, true, true);


2) Scraping the selected Scrapers concurrently

In DAO.java, the useful get parameters of inputMap are fetched and cleaned. They are used to choose the scrapers that shall be scraped, using getScraperObjects() method.

Timeline2.Order order= getOrder(inputMap.get("order"));
Timeline2 dataSet = new Timeline2(order);
List<String> scraperList = Arrays.asList(inputMap.get("scraper").trim().split("\\s*,\\s*"));


Threads are created to fetch data from different scrapers according to size of list of scraper objects fetched. input map is passed as argument to the scrapers for further get parameters related to them and output data according to them.

List<BaseScraper> scraperObjList = getScraperObjects(scraperList, inputMap);
ExecutorService scraperRunner = Executors.newFixedThreadPool(scraperObjList.size());

try{
    for (BaseScraper scraper : scraperObjList)
    {
        scraperRunner.execute(() -> {
            dataSet.mergePost(scraper.getData());
        });

    }

} finally {
    scraperRunner.shutdown();

    try {
        scraperRunner.awaitTermination(24L, TimeUnit.HOURS);
    } catch (InterruptedException e) { }
}


3) Fetching the selected Scraper Objects in DAO.java

Here the variable of abstract class BaseScraper (SuperClass of all search scrapers) is used to create List of scrapers to be scraped. All the scrapers’ constructors are fed with input map to be scraped accordingly.

List<BaseScraper> scraperObjList = new ArrayList<BaseScraper>();
BaseScraper scraperObj = null;

if (scraperList.contains("github") || scraperList.contains("all")) {
    scraperObj = new GithubProfileScraper(inputMap);
    scraperObjList.add(scraperObj);
}
.
.
.


References:

Continue ReadingScraping Concurrently with Loklak Server

Registering Organizations’ Repositories for Continuous Integration with Yaydoc

Among various features implemented in Yaydoc was the introduction of a modal in the Web Interface used for Continuous Deployment. The modal was used to register user’s repositories to Yaydoc. All the registered repositories then had their documentation updated continuously at each commit made to the repository. This functionality is achieved using Github Webhooks.

The implementation was able to perform the continuous deployment successfully. However, there was a limitation that only the public repositories owned by a user could be registered. Repositories owned by some organisations, which the user either owned or had admin access to couldn’t be registered to Yaydoc.

In order to perform this enhancement, a select tag was added which contains all the organizations the user have authorized Yaydoc to access. These organizations were received from Github’s Organization API using the user’s access token.

/**
 * Retrieve a list of organization the user has access to
 * @param accessToken: Access Token of the user
 * @param callback: Returning the list of organizations
 */
exports.retrieveOrgs = function (accessToken, callback) {
  request({
    url: ‘https://api.github.com/user/orgs’,
    headers: {
      ‘User-Agent’: ‘request’,
      ‘Authorization’: ‘token ’ + accessToken
    }
  }, function (error, response, body) {
    var organizations = [];
    var bodyJSON = JSON.parse(body);
    bodyJSON.forEach(function (organization) {
      organizations.push(organization.login);
    });
    return callback(organizations);
  });
};

On selecting a particular organization from the select tag, the list of repositories is updated. The user then inputs a query in a search input which on submitting shows a list of repositories that matches the tag. An AJAX get request is sent to Github’s Search API in order to retrieve all the repositories matching the keyword.

$(function () {
  ....
$.get(`https://api.github.com/search/repositories?q=user:${username}+fork:true+${searchBarInput.val()}`, function (result) {
    ....
    result.items.forEach(function (repository) {
      options +=<option>+ repo.full_name +</option>’;
    });
    ....
  });
  ....
});

The selected repository is then submitted to the backend where the repository is registered in Yaydoc’s database and a hook is setup to Yaydoc’s CI, as it was happening with user’s repositories. After a successful registration, every commit on the user’s or organization’s repository sends a webhook on receiving which, Yaydoc performs the documentation generation and deployment process.

Resources:

  1. Github’s Organization API: https://developer.github.com/v3/orgs/
  2. Github’s Search API: https://developer.github.com/v3/search/
  3. Simplified HTTP Request Client: https://github.com/request/request
Continue ReadingRegistering Organizations’ Repositories for Continuous Integration with Yaydoc

Continuous Integration in Yaydoc using GitHub webhook API

In Yaydoc,  Travis is used for pushing the documentation for each and every commit. But this leads us to rely on a third party to push the documentation and also in long run it won’t allow us to implement new features, so we decided to do the continuous documentation pushing on our own. In order to build the documentation for each and every commit we have to know when the user is pushing code. This can be achieved by using GitHub webhook API. Basically we have to register our api to specific GitHub repository, and then GitHub will send a POST request to our API on each and every commit.

“auth/ci” handler is used to get access of the user. Here we request user to give access to Yaydoc such as accessing the public repositories , read organization details and write permission to write webhook to the repository and also I maintaining state by keeping the ci session as true so that I can know that this callback is for gh-pages deploy or ci deployOn

On callback I’m keeping the necessary informations like username, access_token, id and email in session. Then based on ci session state, I’m redirecting to the appropriate handler. In this case I’m redirecting to “ci/register”.After redirecting to the “ci/register”, I’m getting all the public repositories using GitHub API and then I’m asking the users to choose the repository on which users want to integrate Yaydoc CI

After redirecting to the “ci/register”, I’m getting all the public repositories using GitHub API and then I’m asking the users to choose the repository on which users want to integrate Yaydoc CI

router.post('/register', function (req, res, next) {
      request({
        url: `https://api.github.com/repos/${req.session.username}/${repositoryName}/hooks?access_token=${req.session.token}`,
        method: 'POST',
        json: {
          name: "web",
          active: true,
          events: [
            "push"
          ],
          config: {
            url: process.env.HOSTNAME + '/ci/webhook',
            content_type: "json"
          }
        }
      }, function(error, response, body) {
        repositoryModel.newRepository(req.body.repository,
          req.session.username,
          req.session.githubId,
          crypter.encrypt(req.session.token),
          req.session.email)
          .then(function(result) {
            res.render("index", {
              showMessage: true,
              messages: `Thanks for registering with Yaydoc.Hereafter Documentation will be pushed to the GitHub pages on each commit.`
            })
          })
      })
    }
  })

After user choose the repository, they will send a POST request to “ci/register” and then I’m registering the webhook to the repository and I’m saving the repository, user details in the database, so that it can be used when GitHub send request to push the documentation to the GitHub Pages.

router.post('/webhook', function(req, res, next) {
  var event = req.get('X-GitHub-Event')
  if (event == 'Push') {
      repositoryModel.findOneRepository(
        {
          githubId: req.body.repository.owner.id,
          name: req.body.repository.name
        }
      ).
      then(function(result) {
        var data = {
          email: result.email,
          gitUrl: req.body.repository.clone_url,
          docTheme: "",
        }
        generator.executeScript({}, data, function(err, generatedData) {
            deploy.deployPages({}, {
              email: result.email,
              gitURL: req.body.repository.clone_url,
              username: result.username,
              uniqueId: generatedData.uniqueId,
              encryptedToken: result.accessToken
            })
        })
      })
      res.json({
        status: true
      })
   }
})

After you register on webhook, GitHub will send a request to the url which we registered on the repository. In our case “https:/yaydoc.herokuapp.com/ci/auth” is the url. The type of the event can be known by reading ‘X-GitHub-Event’ header. Right now I’m registering only for the push event. So we’ll only be getting the push event. GitHub also gives us the repository details in the request body.

When the user makes a commit to the repository, GitHub will send a POST request to the Yaydoc’s server. Then, we’ll get the repository name and Github’s user ID from the request body. By use of this, I’ll retrieve the access token from the database which we already registered while the user registers the repository to the CI. The documentation will be generated using generate script and pushed to GitHub pages using deploy script.

Now Yaydoc generates documentation on every push when the user commits to the repository and also it will enable us to integrate new features in our own custom environment. We also plan to build a full featured CI platform.

Resources:

Continue ReadingContinuous Integration in Yaydoc using GitHub webhook API

sTeam Server Object permissions and Doxygen Documentation

(ˢᵒᶜⁱᵉᵗʸserver) aims to be a platform for developing collaborative applications.
sTeam server project repository: sTeam.
sTeam-REST API repository: sTeam-REST

sTeam Server object permissions

sTeam command line lacks the functionality to read and set the object access permissions. The permission bits are: read,write, execute, move, insert,
annotate, sanction. The permission function was designed analogous to the getfacl() command in linux. It should display permissions as: rwxmias corresponding to the  permission granted on the object.

The the key functions are get_sanction, which returns a list of objects and permissions and sanction_object, which adds a new object and its set of permissions. The permissions is stored as an integer and the function should break the individual bits like getfact().

The permission bits for the sTeam objects are declared in the
access.h

// access.h: The permission bits

#define FAIL           -1 
#define ACCESS_DENIED   0
#define ACCESS_GRANTED  1
#define ACCESS_BLOCKED  2

#define SANCTION_READ          1
#define SANCTION_EXECUTE       2
#define SANCTION_MOVE          4
#define SANCTION_WRITE         8
#define SANCTION_INSERT       16
#define SANCTION_ANNOTATE     32

The get_sanction method defined in the access.pike returns a mapping which has the ACL(Access Control List) of all the objects in the sTeam server.


// Returns the sanction mapping of this object, if the caller is privileged
// the pointer will be returned, otherwise a copy.
final mapping
get_sanction()
{
    if ( _SECURITY->trust(CALLER) )
	return mSanction;
    return copy_value(mSanction);
}

The functions gets the permission values which are set for every object in the server.

The sanction_object method defined in the object.pike sets the permissions for the new objects.


// Set new permission for an object in the acl. Old permission are overwritten.
int sanction_object(object grp, int permission)
{
    ASSERTINFO(_SECURITY->valid_proxy(grp), "Sanction on non-proxy!");
    if ( query_sanction(grp) == permission )
      return permission; // if permissions are already fine

    try_event(EVENT_SANCTION, CALLER, grp, permission);
    set_sanction(grp, permission);

    run_event(EVENT_SANCTION, CALLER, grp, permission);
    return permission;
} 

This method makes use of the set_sanction which sets the permission onthe object. The task ahead is to make use of the above functions and write a sTeam-shell command which would provide the user to easily access and change the permissions for the objects.

Merging into the Source

The work done during GSOC 2016 by Siddhant and Ajinkya on the sTeam server was merged into the gsoc201-societyserver-devel and gsoc2016-source branches in the societyserver repository.
The merged code can be found at:

https://github.com/societyserver/sTeam/tree/gsoc2016-source
https://github.com/societyserver/sTeam/tree/gsoc2016-societyserver-devel

The merged code needs to be tested before the debian package for the sTeam server is prepared. The testing has resulted into resolving of minor bugs.

Doxygen Documentation

The documentation for the sTeam is done using doxygen. The doxygen.pike is written and used to make the documentation for the sTeam server. The Doxyfile which includes the configuration for generating the sTeam documentation is modified and input files are added. The generated documentation is deployed on the gh-pages in the societyserver/sTeam repository.
The documentation can be found at:


http://societyserver.github.io/sTeam/files.html

The header files and the constants defined are also included in the sTeam documentation.

sTeam Documentation:

SocietyserverDoc

sTeam defined constants:

SocietyServerConstants

sTeam Macro Definitions:

SocietyServerMacroDefnitions

Feel free to explore the repository. Suggestions for improvements are welcomed.

Checkout the FOSSASIA Idea’s page for more information on projects supported by FOSSASIA.

Continue ReadingsTeam Server Object permissions and Doxygen Documentation

GET and POST requests

If you wonder how to get or update page resource, you have to read this article.

It’s trivial if you have basic knowledge about HTTP protocol. I’d like to get you little involved to this subject.

So GET and POST are most useful methods in HTTP protocol.

What is HTTP?

Hypertext transfer protocol – allow us to communicate between client and server side. In Open Event project we use web browser as client and for now we use Heroku for server side.

Difference between GET and POST methods

GET – it allows to get data from specified resources

POST – it allows to submit new data to specified resources for example by html form.

GET samples:

For example we use it to get details about event

curl http://open-event-dev.herokuapp.com/api/v2/events/95

Response from server:

Of course you can use this for another needs, If you are a poker player I suppose that you’d like to know how many percentage you have on hand.

curl http://www.propokertools.com/simulations/show?g=he&s=generic&b&d&h1=AA&h2=KK&h3&h4&h5&h6&_

POST samples:

curl -X POST https://example.com/resource.cgi

You can often find this action in a contact page or in a login page.

How does request look in python?

We use Requests library to communication between client and server side. It’s very readable for developers. You can find great documentation  and a lot of code samples on their website. It’s very important to see how it works.

>>> r = requests.get('https://api.github.com/user', auth=('user', 'pass'))
>>> r.status_code
200

I know that samples are very important, but take a look how Requests library fulfils our requirements in 100%. We have decided to use it because we would like to communicate between android app generator and orga server application. We have needed to send request with params(email, app_name, and api of event url) by post method to android generator resource. It executes the process of sending an email – a package of android application to a provided email address.

data = {
    "email": login.current_user.email,
    "app_name": self.app_name,
    "endpoint": request.url_root + "api/v2/events/" + str(self.event.id)
}
r = requests.post(self.app_link, json=data)


Continue ReadingGET and POST requests

Writing Installation Script for Github Projects

I would like to discuss how to write a bash script to setup any github project and in particular PHP and mysql project. I would like take the example of engelsystem for this post.

First, we need to make a list of all environments and dependencies for our github project. For PHP and mysql project we need to install LAMP server.

The script to install all the dependencies for engelsystem are

echo "Update your package manager"
apt-get update

echo "Installing LAMP"
echo "Install Apache"
apt-get install apache2

echo "Install MySQL"
apt-get install mysql-server php5-mysql

echo "Install PHP"
apt-get install php5 libapache2-mod-php5 php5-mcrypt

echo "Install php cgi"
apt-cache search php5-cgi

We can even add echo statements with instructions.

Once we have installed LAMP. We need to clone the project from github. We need to install git and clone the repository. Script for installing git and cloning github repository are

echo "Install git"
apt-get install git
cd /var/www/html
echo "Cloning the github repository"
git clone --recursive https://github.com/fossasia/engelsystem.git
cd engelsystem

Now we are in the project directory. Now we need to set up the database and migrate the tables. We are creating a database engelsystem and migrating the tables in install.sql and update.sql.

echo "enter mysql root password"
# creating new database engelsystem
echo "create database engelsystem" | mysql -u root -p
echo "migrate the table to engelsystem database"
mysql -u root -p engelsystem < db/install.sql
mysql -u root -p engelsystem < db/update.sql

Once we are done with it. We need to copy config-sample.default.php to config.php and add the database and password for mysql.

echo "enter the database name username and password"
cp config/config-sample.default.php config/config.php

Now edit the config.php file. Once we have done this we need to restart apache then we can view the login page at localhost/engelsystem/public

echo "Restarting Apache"
service apache2 restart
echo "Engelsystem is successfully installed and can be viewed on local server localhost/engelsystem/public"

We need to add all these instructions in install.sh file.

Now steps to execute a bash file.

Change the permissions of install.sh file

$ chmod +x install.sh

Now run the file from your terminal by executing the following command

$ ./install.sh

Developers who are interested in contributing can work with us.

Development: https://github.com/fossasia/engelsystem

Issues/Bugs:https://github.com/fossasia/engelsystem/issues

Continue ReadingWriting Installation Script for Github Projects

Using Heroku pipelines to set up a dev and master configuration

The open-event-webapp project, which is a generator for event websites, is hosted on heroku. While it was easy and smooth sailing to host it on heroku for a single branch setup, we moved to a 2-branch policy later on. We make all changes to the development branch, and every week once or twice, when the codebase is stable, we merge it to master branch.

So we had to create a setup where  –

master branch –> hosted on –> heroku master

development branch –> hosted on –> heroku dev

Fortunately, for such a setup, Heroku provides a functionality called pipelines and a well documented article on how to implement git-flow


First and foremost, we created two separate heroku apps, called opev-webgen and opev-webgen-dev

To break it down, let’s take a look at our configuration. First step is to set up separate apps in the travis deploy config, so that when development branch is build, it pushed to open-webgen-dev and when master is built, it pushes to opev-webgen app. The required lines as you can see are –

https://github.com/fossasia/open-event-webapp/blob/master/.travis.yml#L25

https://github.com/fossasia/open-event-webapp/blob/development/.travis.yml#L25

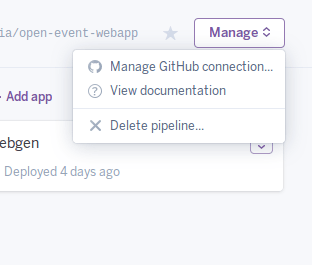
Now, we made a new pipeline on heroku dashboard, and set opev-webgen-dev and opev-webgen in the staging and production stages respectively.

Screenshot from 2016-07-31 04-33-30 Screenshot from 2016-07-31 04-34-41

Then, using the “Manage Github Connection” option, connect this app to your github repo.

Screenshot from 2016-07-31 04-36-17

Once you’ve done that, in the review stage of your heroku pipeline, you can see all the existing PRs of your repo. Now you can set up temporary test apps for each PR as well using the Create Review App option.

Screenshot from 2016-07-31 04-37-38

So now we can test each PR out on a separate heroku app, and then merge them. And we can always test the latest state of development and master branches.

Continue ReadingUsing Heroku pipelines to set up a dev and master configuration

Push your apk to your GitHub repository from Travis

In this post I’ll guide you on how to directly upload the compiled .apk from travis to your GitHub repository.

Why do we need this?

Well, assume that you need to provide an app to your testers after each commit on the repository, so instead of manually copying and emailing them the app, we can setup travis to upload the file to our repository where the testers can fetch it from.

So, lets get to it!

Step 1 :

Link Travis to your GitHub Account.

Open up https://travis-ci.org.

Click on the green button in the top right corner that says “Sign in with GitHub”

screenshot-area-2016-07-15-205733.png<

Step 2 :

Add your existing repository to Travis

Click the “+” button next to your Travis Dashboard located on the left.

screenshot-area-2016-07-15-210630.png<

Choose the project that you want to setup Travis from the next page

screenshot-area-2016-07-15-210916.png
Toggle the switch for the project that you want to integrate

Click the cog here and add an Environment Variable named GITHUB_API_KEY.
Proceed by adding your Personal Authentication Token there.
Read up here on how to get the Token.

 screenshot-area-2016-07-15-213931.png<

Great, we are pretty much done here.

Let us move to the project repository that we just integrated and create a new file in the root of repository by clicking on the “Create new file” on the repo’s page.

Name it .travis.yml and add the following commands over there

language: android 
jdk:
  - oraclejdk8
android:
  components:
    - tools
    - build-tools-24.0.0
    - android-24
    - extra-android-support
    - extra-google-google_play_services
    - extra-android-m2repository
    - extra-google-m2repository
    - addon-google_apis-google-24
 before_install:
 - chmod +x gradlew
 - export JAVA8_HOME=/usr/lib/jvm/java-8-oracle
 - export JAVA_HOME=$JAVA8_HOME
 after_success:
 - chmod +x ./upload-gh-pages.sh
 - ./upload-apk.sh
 script:
 - ./gradlew build

Next, create a bash file in the root of your repository using the same method and name it upload-apk.sh

  #create a new directory that will contain out generated apk
  mkdir $HOME/buildApk/ 
  #copy generated apk from build folder to the folder just created
  cp -R app/build/outputs/apk/app-debug.apk $HOME/android/
  #go to home and setup git
  cd $HOME
  git config --global user.email "useremail@domain.com"
  git config --global user.name "Your Name" 
  #clone the repository in the buildApk folder
  git clone --quiet --branch=master  https://user-name:$GITHUB_API_KEY@github.com/user-name/repo-name  master > /dev/null
  #go into directory and copy data we're interested
  cd master  cp -Rf $HOME/android/* .
  #add, commit and push files
  git add -f .
  git remote rm origin
  git remote add origin https://user-name:$GITHUB_API_KEY@github.com/user-name/repo-name.git
  git add -f .
  git commit -m "Travis build $TRAVIS_BUILD_NUMBER pushed"
  git push -fq origin master > /dev/null
  echo -e "Donen"

Once you have done this, commit and push these files, a Travis build will be initiated in few seconds.
You can see it ongoing in your Dashboard at https://travis-ci.org/.

After the build has completed, you will can see an app-debug.apk in your Repository.

IMPORTANT NOTE :

You might be wondering as to why did I write [skip ci] in the commit message.

Well the reason for that is, Travis starts a new build as soon as it detects a commit made on the master branch of your repository.

So once the apk is uploaded, that will trigger another build in Travis and hence forming an infinite loop.

We can prevent this in 2 ways :

First, simply write [skip ci] somewhere in the commit message and it will cause Travis to ignore the commit.

Or, push the apk to any other branch which is not configured for Travis build.

So well, that’s almost it.

I hope that you found this tutorial helpful, and if you have any doubts regarding this feel free to comment down below, I would love to help you out.

Cheers.

Continue ReadingPush your apk to your GitHub repository from Travis

How can you add a bug?

It’s very simple to start testing, You don’t need any special experience in testing area.To start testing in Open Event project you need to open our web application http://open-event.herokuapp.com/ and you can start.Isn’t it easy? So You should focus on finding as many bugs as possible to provide your users with perfectly working software. If you find a bug you need to describe many details

How can you report a bug to Open Event?

Go to Github page issues, click new issue(green button).

Screen Shot 2016-07-01 at 21.03.45.png

Our Requirements:

Good description – If you found a bug you have to reproduce it, so you have nice background to describe it very well. It’s important because, good issue’s description saves developers time. They don’t need to ask announcer about details of bug. The best description which tester can add is how developer can simply achieve a bug step by step.

Logs – description is sometimes not enough so you need to attach logs which are generated from our server(It’s nice if you have access, if you don’t have ask me)

Pictures – it’s helpful, because we can quickly find where bug is located

Labels – You need to assign Screen Shot 2016-07-01 at 21.26.17.png label to issue

That’s all!


Continue ReadingHow can you add a bug?

How do we work? Agile

It’s not typical team. We don’t meet face-to-face each other on daily basis, one trouble is that we have to work from different time zones, and we have different operating system, the way of working, or even culture. But we are FOSSASIA Open Event team of six amazing developers so it does not discourage us to achieve our goals.

But even if we experience all these things we have to learn how to work together successfully. We are trying, and I think it is becoming better and better every day, the Agile methodology.

So first of all, before coding started, we had prepared user stories in issues. Every issue had been very well documented, and we had divided each issue to smaller ones. It brings us a lot of benefits, because it doesn’t matter where you work. If sub issue is empty you can take it. Due to the fact that issue is very well documented you don’t need to even ask someone what to do. This case saves a lot of time. I know that writing clear issues is very boring and It could seemed not to be beneficial, but it’s. We are still trying to improve our performance and we are looking for new opportunities where and how we can improve our work, without lost quality of our development process.

Then, we have one week sprint (milestones). It helps us to control our work and we know where are we, what have we done, and what is still to do. We know if our speed is enough or we have to move faster. And it also enables us to see our progress.Screen Shot 2016-06-25 at 11.27.08.png

Moreover, we have daily scrums. We answer three following questions – what did you do yesterday, what do you plan to do today and what is preventing you from achieving your goals. Furthermore, we follow continues integration system. We push code to our common Open Event repository on daily basis. It helps us to control our code and fix bugs quickly. I am sure we will continue along this path, and successfully finish to code an amazing Open Event web app.

Continue ReadingHow do we work? Agile