Deploying BadgeYaY with Docker on Docker Cloud

We already have a Dockerfile present in the repository but  there is problem in many lines of code.I studied about Docker and learned how It is deployed and I am now going to explain how I deployed BadgeYaY on Docker Cloud.

To make deploying of Badgeyay easier we are now supporting Docker based installation.

Before we start to deploy, let’s have a quick brief about what is docker and how it works ?

What is Docker ?

Docker is an open-source technology that allows you create, deploy, and run applications using containers. Docker allows you deploy technologies with many underlying components that must be installed and configured in a single, containerized instance.Docker makes it easier to create and deploy applications in an isolated environment.

Now, let’s start with how to deploy on docker cloud:

Step 1 – Installing Docker

Get the latest version of docker. See the offical site for installation info for your platform.

Step 2 – Create Dockerfile

With Docker, we can just grab a portable Python runtime as an image, no installation necessary. Then, our build can include the base Python image right alongside our app code, ensuring that our app, its dependencies, and the runtime, all travel together.

These portable images are defined by something called a Dockerfile.

In DockerFile, there are all the commands a user could call on the command line to assemble an image. Here’s is the Dockerfile of BadgeYaY.

# The FROM instruction initializes a new build stage and sets the Base Image for subsequent instructions.
FROM python:3.6

# We copy just the requirements.txt first to leverage Docker cache
COPY ./app/requirements.txt /app/


# The WORKDIR instruction sets the working directory for any RUN, CMD, ENTRYPOINT, COPY and ADD instructions that follow it in the Dockerfile.
WORKDIR /app


# The RUN instruction will execute any commands in a new layer on top of the current image and commit the results.
RUN pip install -r requirements.txt


# The COPY instruction copies new files.
COPY . /app


# An ENTRYPOINT allows you to configure a container that will run as an executable.
ENTRYPOINT [ "python" ]

# The main purpose of a CMD is to provide defaults for an executing container.
CMD [ "main.py" ]


Step 3 – Build New Docker Image

sudo docker build -t badgeyay:latest .


When the command completed successfully, we can check the new image with the docker command below:

     sudo docker images


Step 4 – Run the app

Let’s run the app in the background, in detached mode:

 sudo docker run -d -p 5000:5000 badgeyay


We get the long container ID for our app and then are kicked back to our terminal.Our container is running in the background.Now use docker container stop to end the process, using the CONTAINER ID, like so :


docker container stop 1fa4ab2cf395


Step 5 – Publish the app.

Log in to the Docker public registry on your local machine.

docker login


Upload your tagged image to the repository:

docker push username/repository:tag


From now on, we can use docker run and run our app on any machine. No matter where docker run executes, it pulls your image, along with Python and all the dependencies from requirements.txt, and runs your code. It all travels together in a neat little package, and the host machine doesn’t have to install anything but Docker to run it.

Docker Cloud

Docker Cloud provides a hosted registry service with build and testing facilities for Dockerized application images; tools to help you set up and manage host infrastructure; and application lifecycle features to automate deploying (and redeploying) services created from images.

In BadgeYaY, we  also have a Deploy button button which directly deploys on Docker cloud with a single click .

The related PR of this work is https://github.com/fossasia/badgeyay/pull/401 .

Resources :

  • Docker documentation: Link
  • Get Started With Docker: Link
Continue ReadingDeploying BadgeYaY with Docker on Docker Cloud

Setting up Codecov in Badgeyay


BadgeYaY already has Travis CI and Codacy to test code quality and Pull Request but there was no support for testing Code Coverage in repository against every Pull Request. So I decided to go with setting up Codecov to test the code coverage.

In this blog post, I’ll be discussing how I have set up codecov in BadgeYaY in my Pull Request.

First, let’s understand what is codecov and why do we need it. For that we have to first understand what is code coverage then we will move on to how to add Codecov with help of Travis CI .

Let’s get started and understand it step by step.

What is Code Coverage ?

Code coverage is a measurement used to express which lines of code were executed by a test suite. We use three primary terms to describe each lines executed.

  • hit indicates that the source code was executed by the test suite.
  • partial indicates that the source code was not fully executed by the test suite; there are remaining branches that were not executed.
  • miss indicates that the source code was not executed by the test suite.

Coverage is the ratio of hits / (hit + partial + miss). A code base that has 5 lines executed by tests out of 12 total lines will receive a coverage ratio of 41% . In BadgeYaY , Code Coverage is 100%.

How CodeCov helps in Code Coverage ?

Codecov focuses on integration and promoting healthy pull requests. Codecov delivers <<<or “injects”>>> coverage metrics directly into the modern workflow to promote more code coverage, especially in pull requests where new features and bug fixes commonly occur.

I am listing down top 5 Codecov Features:

We can change the configuration of how Codecov processes reports and expresses coverage information. Let’s see how we configure it according to BadgeYaY by integrating it with Travis CI.

Now generally, the codecov works better with Travis CI. With the one line

 bash <(curl -s https://codecov.io/bash)


the code coverage can now be easily reported.

Add a script for testing:

"scripts": {
   - nosetests app/tests/test.py -v --with-coverage
}

Here is a particular example of travis.yml from the project repository of BadgeYaY:

Script:
- python app/main.py >> log.txt 2>&1  &
- nosetts app/tests/test.py -v --with-coverage
- python3 -m pyflakes

after_success:
- bash <(curl -s https://codecov.io/bash)


Let’s have a look at Codecov.yml to check exact configuration that I have used for BadgeYaY.

Codecov:
  # yes: will delay sending notifications until all ci is finished
  notify:
    require_ci_to_pass: yes

coverage:
  # how many decimal places to display in the UI: 0 <= value <= 4
  precision: 2
  # how coverage is rounded: down/up/nearest
  round: down 
  # custom range of coverage colors from red -> yellow -> green 
  range: "70...100"

  status:
     # measuring the overall project coverage
    project: yes
     # pull requests only: this commit status will measure the
       entire pull requests Coverage Diff. Checking if the lines
       adjusted are covered at least X%.
    patch: yes
     # if there are any unexpected changes in coverage
    changes: no

Comment:

  layout: "reach, diff, flags, files, footer"
  behavior: default
  require_changes: no


Now when anyone makes a Pull Request to BadgeYaY, Codecov will analyze the Pull Request according to above configuration and generate a Report showing the code coverage of that Pull Request.


Below is the screenshot of all test passing in BadgeYaY repository

This is how we setup codecov in BadgeYaY repository. And like this way, it can be set up in other repositories as well.

The related PR of this work is https://github.com/fossasia/badgeyay/pull/400

Resources :

  • CodeCov Documentation – Link
Continue ReadingSetting up Codecov in Badgeyay

Contributing to Open Event Android App

The Open Event Android project consists of two components. The App Generator is a web application that is hosted on a server and generates an event Android app from a zip with JSON and binary files (examples here) or through an API. The second component we are developing in the project is a generic Android app – the output of the app generator. The Android app has a standard configuration file, that sets the details of the app (e.g. color scheme, logo of event, link to JSON app data).

The process for making a contribution in the project starts with making your account on GitHub. Secondly find the open source projects that interest you. Now as for me I started with open-event-android. Then follow these steps:

  1. Go through the project’s README.md file and get information about the various aspects and technologies of the project.
  2. Now fork that repo in your account.
  3. Open or setup the project as per the given information present in its documentation, for example for the sample android app you have to clone the project in your local machine and open it up using Android Studios.

Now you have your version of the project now it’s time for you to use the project on your own.

While doing so you have to work like a tester of the project, so you should explore each and every bit and find out any possible anomaly in the project that you would like to work on. Once you have that you are ready to create an issue.

Following are the steps to create a new issue,

Navigate to the main repo link, you will see an issues section as follows:

  • Click the new issue button and report every detail about the issue. For eg. The first issue that i worked on was Issue-1934
  • Even if you don’t find any problem in the project on your own you can always work on issues created by others, you just have to let the maintainers know that you want to work on the issue by commenting in it Issue 1709.
  • Now the next step is to work on that issue
  • On your machine you don’t have to change the code in the development branch as it’s considered to be as a bad practice. Hence checkout as a new branch. For eg. I checked out for the above issue as ‘crashfixed’
  • Make the necessary changes to that branch and test that the code is compiling and the issue is fixed followed by
  • The add command is used to bring the changes to the staging area so that they are ready to be committed/saved. You can also add individual files with the command
  • Next we want to save the changes that we made till now which can be done through git commit.
  • Finally we would push the changes that we made to our forked repository in github.
  • Now navigate to the repo and you will an option to create a Pull Request.
    Mention the Issue number and description and changes you done ,include screenshots of the fixed app.For eg.My first PR was  Pull Request 1936.

Sending the pull request is asking the maintainers of the code to add your changes to the main project which would be visible to all the contributors. But before getting merged your code may have to pass through several tests as in my case were:

-codacy/pr

-continuous-integration/travis-ci/pr

After your code passes the above tests you you would require one approved review from one of the maintainers of the project to get your code merged into the main one.

If your code is perfect in the very first attempt it would be accepted by the maintainer otherwise you would be asked to do some changes in it. You could carry out the changes on your local machine and once you are done with them you could push them to your forked repository and the changes would be amended in your pull request on its own.

Resources

Continue ReadingContributing to Open Event Android App

Automatically deploy SUSI Web Chat on surge after Travis passes

We are using surge from the very beginning of this SUSI web chat and SUSI skill cms projects development. We used surge for provide preview links for Pull requests. Surge is really easy tool to use. We can deploy our static web pages really easily and quickly.  But If user had to change something in pull request user has to deploy again in surge and update the link. If we can connect this operation with travis ci we can minimise re-works. We can embed the deploying commands inside the travis.yml.

We can tell travis to make a preview link (surge deployment) if test cases are passed by embedding the surge deployment commands inside the travis.yml like below.

This is travis.yml file

sudo: required
dist: trusty
language: node_js
node_js:
 - 6
script:
 - npm test
after_success:
 - bash ./surge_deploy.sh
 - bash ./deploy.sh
cache:
 directories:
   - node_modules
branches:
 only:
   - master

Surge deployment commands are inside the “surge_deploy.sh” file.
In that we have to check the status of the pull request whether it is passing test cases or not. We can do it like below.

if [ "$TRAVIS_PULL_REQUEST" == "false" ]; then
   echo "Not a PR. Skipping surge deployment"
   exit 0
fi

Then we have to install surge in the environment. Then after install all npm packages and run build.

npm i -g surge
npm install
npm run build

Since there is a issue with displaying moving to child routes we have to take a copy of index.html file and name it as a 404.html.

cp ./build/index.html ./build/404.html

Then make two environment variables for your surge email address and surge token

export SURGE_LOGIN=fossasiasusichat@example.com
# surge Token (run ‘surge token’ to get token)
export SURGE_TOKEN=d1c28a7a75967cc2b4c852cca0d12206

Now we have to make the surge deployment URL (Domain). It should be unique so we made a URL that contains pull request number.

export DEPLOY_DOMAIN=https://pr-${TRAVIS_PULL_REQUEST}-susi-web-chat.surge.sh
surge --project ./build/ --domain $DEPLOY_DOMAIN;

Since all our static contents which made after the build process are in “build” folder we have to tell surge to get static html files from that.
Now make a pull request. you would find the deployment link in travis ci report after travis passed.

Expand the output of the surge_deploy.sh

You will find the deployment link as we defined in the surge_deploy.sh file

References:

  • Integrating with travis ci – https://surge.sh/help/integrating-with-travis-ci
  • React Routes to Deploy 404 page on gh-pages and surge – https://blog.fossasia.org/react-routes-to-deploy-404-page-on-gh-pages-and-surge/
Continue ReadingAutomatically deploy SUSI Web Chat on surge after Travis passes

Getting Started Developing on Phimpme Android

Phimpme is an Android app for editing photos and sharing them on social media. To participate in project start by learning how people contribute in open source, learning about the version control system Git and other tools like Codacy and Travis.

Firstly, sign up for GitHub. Secondly, find the open source projects that interest you. Now as for me I started with Phimpme. Then follow these steps:

  1. Go through the project ReadMe.md and read all the technologies and tools they are using.
  2. Now fork that repo in your account.
  3. Open the Android Studio/Other applications that are required for that project and import the project through Git.
  4. For Android Studio sync all the Gradle files and other changes and you are all done and ready for the development process.

Install the app and run it on a phone. Now explore each and every bit use this app as a tester, think about the end cases and boundary condition that will make the app ‘ANR’ (App not responding) dialog appear. Congratulations you are ready to create an issue if that is a verified and original and actually is a bug.

Next,

  • Navigate to the main repo link, you will see an issues section as follows:
  • Create a new issue and report every detail about the issue (logcat, screenshots) For eg. Refer to Issue-1120
  • Now the next step is to work on that issue
  • On your machine, you don’t have to change the code in the development branch as it’s considered to be as a bad practice. Hence checkout as a new branch.
    For eg., I checked out for the above issue as ‘crashfixed’
git checkout -b "Any branch name you want to keep"
  • Make the necessary changes to that branch and test that the code is compiling and the issue is fixed followed by
git add.
git commit -m "Fix #Issue No -Description "
git push origin branch-name
  • Now navigate to the repo and you will an option to create a Pull Request.
    Mention the Issue number and description and changes you done, include screenshots of the fixed app.For eg. Pull Request 1131.

Hence you have done your first contribution in open source while learning with git. The pull request will initiate some checks like Codacy and Travis build and then if everything works it is reviewed and merged by co-developers.

The usual way how this works is, that it should be reviewed by other co-developers. These co-developers do not need merge or write access to the repository. Any developer can review pull requests. This will also help contributors to learn about the project and make the job of core developers easier.

Resources

Continue ReadingGetting Started Developing on Phimpme Android

Deleting Meilix Github Releases

Meilix is the repository which uses build script to generate community version of lubuntu as LXQT Desktop. Meilix-Generator is the webapp which uses Meilix to generate ISO and deploy it on Meilix Github Release. Then the webapp mail the link of the ISO to the user.
Increasing number of ISO will increase the number of releases which results in dirty looking of Meilix repository. So we need to delete older releases after certain interval of time to make the repository release page looks good and decrease unwanted space.
This releases_maintainer.sh script will do this work for us.

#!/usr/bin/env bash
set -e
echo "This is a script to delete obsolete meilix iso builds by Abishek V Ashok"
echo "You have to add an authorization token to make it functional."

# jq is the JSON parser we will be using
sudo apt-get -y install jq

# Storing the response to a variable for future usage
response=`curl https://api.github.com/repos/fossasia/meilix/releases | jq '.[] | .id, .published_at'`

index=1  # when index is odd, $i contains id and when it is even $i contains published_date
delete=0 # Should we delete the release?
current_year=`date +%Y`  # Current year eg) 2001
current_month=`date +%m` # Current month eg) 2
current_day=`date +%d`   # Current date eg) 24

for i in $response; do
    if [ $((index % 2)) -eq 0 ]; then # We get the published_date of the release as $i's value here
        published_year=${i:1:4}
        published_month=${i:6:2}
        published_day=${i:9:2}

        if [ $published_year -lt $current_year ]; then
             let "delete=1"
        else
            if [ $published_month -lt $current_month ]; then
                let "delete=1"
            else
                if [ $((current_day-$published_day)) -gt 10 ]; then
                    let "delete=1"
                fi
            fi
        fi
    else # We get the id of the release as $i`s value here
        if [ $delete -eq 1 ]; then
            curl -X DELETE -H "Authorization: token $KEY" https://api.github.com/repos/fossasia/meilix/releases/$i
            let "delete=0"
        fi
    fi
    let "index+=1"
done

This code uses Github API to curl the Meilix releases. Github API is very useful in providing lots of information but here we are only concerned with the release date and time of the build.
Then we setup a condition if that satisfies then the release will automatically will get deleted.

For taking care of the authentication, a token has been uploaded to the Travis settings of Meilix of FOSSASIA.

The personal token has been generated by a user with write access to the repository with repo scope token.

This sort out the issue of having bulk of releases in the Meilix repository of FOSSASIA.

References:
Users Github API  by REST API v3
Repo Github API   by REST API v3

Continue ReadingDeleting Meilix Github Releases

Auto Deployment of SUSI Web Chat on gh-pages with Travis-CI

SUSI Web Chat uses Travis CI with a custom build script to deploy itself on gh-pages after every pull request is merged into the project. The build system auto updates the latest changes hosted on chat.susi.ai. In this blog, we will see how to automatically deploy the repository on gh pages.

To proceed with auto deploy on gh-pages branch,

  1. We first need to setup Travis for the project.
  2. Register on https://travis-ci.org/ and turn on the Travis for this repository.

Next, we add .travis.yml in the root directory of the project.

# Set system config
sudo: required
dist: trusty
language: node_js

# Specifying node version
node_js:
  - 6

# Running the test script for the project
script:
  - npm test

# Running the deploy script by specifying the location of the script, here ‘deploy.sh’ 

deploy:
  provider: script
  script: "./deploy.sh"


# We proceed with the cache if there are no changes in the node_modules
cache:
  directories:
    - node_modules

branches:
  only:
    - master

To find the code go to https://github.com/fossasia/chat.susi.ai/blob/master/.travis.yml

The Travis configuration files will ensure that the project is building for every change made, using npm test command, in our case, it will only consider changes made on the master branch.

If one wants to watch other branches one can add the respective branch name in travis configurations. After checking for build passing we need to automatically push the changes made for which we will use a bash script.

#!/bin/bash

SOURCE_BRANCH="master"
TARGET_BRANCH="gh-pages"

# Pull requests and commits to other branches shouldn't try to deploy.
if [ "$TRAVIS_PULL_REQUEST" != "false" -o "$TRAVIS_BRANCH" != "$SOURCE_BRANCH" ]; then
    echo "Skipping deploy; The request or commit is not on master"
    exit 0
fi

# Save some useful information
REPO=`git config remote.origin.url`
SSH_REPO=${REPO/https:\/\/github.com\//git@github.com:}
SHA=`git rev-parse --verify HEAD`

ENCRYPTED_KEY_VAR="encrypted_${ENCRYPTION_LABEL}_key"
ENCRYPTED_IV_VAR="encrypted_${ENCRYPTION_LABEL}_iv"
ENCRYPTED_KEY=${!ENCRYPTED_KEY_VAR}
ENCRYPTED_IV=${!ENCRYPTED_IV_VAR}
openssl aes-256-cbc -K $ENCRYPTED_KEY -iv $ENCRYPTED_IV -in deploy_key.enc -out ../deploy_key -d

chmod 600 ../deploy_key
eval `ssh-agent -s`
ssh-add ../deploy_key

# Cloning the repository to repo/ directory,
# Creating gh-pages branch if it doesn't exists else moving to that branch
git clone $REPO repo
cd repo
git checkout $TARGET_BRANCH || git checkout --orphan $TARGET_BRANCH
cd ..

# Setting up the username and email.
git config user.name "Travis CI"
git config user.email "$COMMIT_AUTHOR_EMAIL"

# Cleaning up the old repo's gh-pages branch except CNAME file and 404.html
find repo/* ! -name "CNAME" ! -name "404.html" -maxdepth 1  -exec rm -rf {} \; 2> /dev/null
cd repo

git add --all
git commit -m "Travis CI Clean Deploy : ${SHA}"

git checkout $SOURCE_BRANCH

# Actual building and setup of current push or PR.
npm install
npm run build
mv build ../build/

git checkout $TARGET_BRANCH
rm -rf node_modules/
mv ../build/* .
cp index.html 404.html

# Staging the new build for commit; and then committing the latest build
git add -A
git commit --amend --no-edit --allow-empty

# Deploying only if the build has changed
if [ -z `git diff --name-only HEAD HEAD~1` ]; then

  echo "No Changes in the Build; exiting"
  exit 0

else
  # There are changes in the Build; push the changes to gh-pages
  echo "There are changes in the Build; pushing the changes to gh-pages"

  # Actual push to gh-pages branch via Travis
  git push --force $SSH_REPO $TARGET_BRANCH
fi

This bash script will enable Travis CI user to push changes to gh pages, for this we need to store the credentials of the repository in encrypted form.

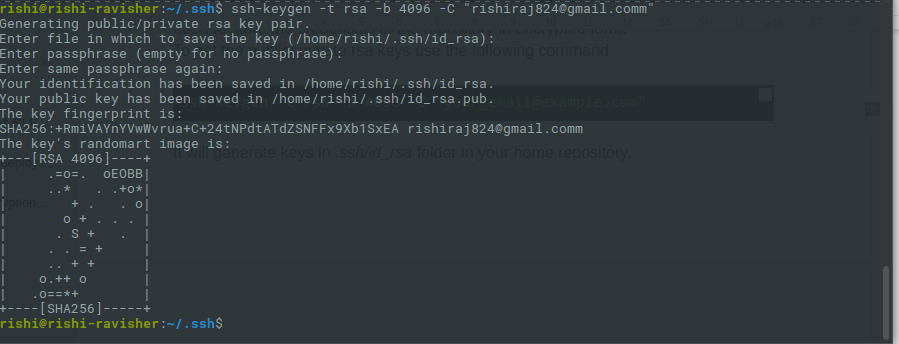
1. To get the public/private rsa keys we use the following command

ssh-keygen -t rsa -b 4096 -C "your_email@example.com"

2.  It will generate keys in .ssh/id_rsa folder in your home repository.

  1. Make sure you do not enter any passphrase while generating credentials otherwise Travis will get stuck at the time of decryption of the keys.
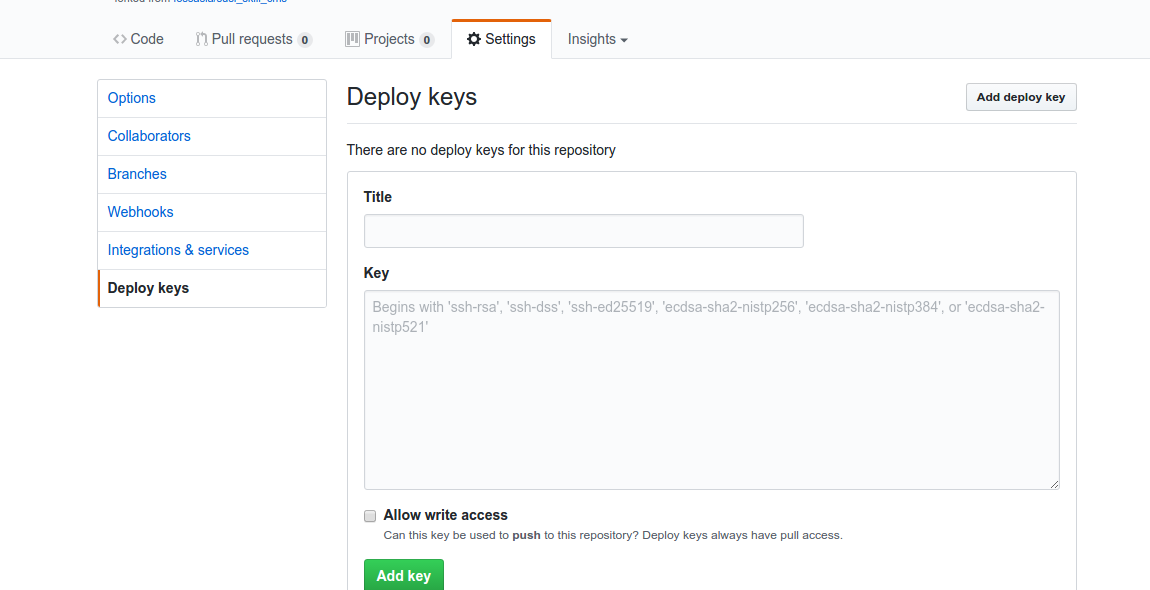
  2. Copy the public key and deploy the key to repository by visiting  

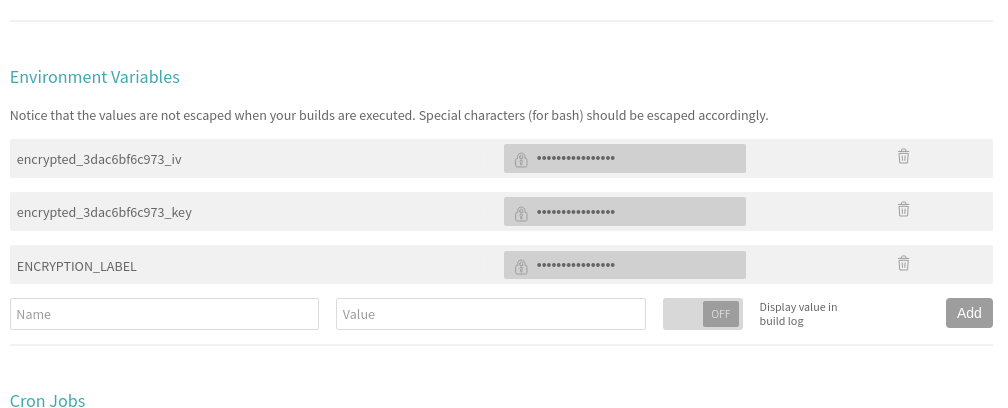
5. We also need to set the environment variable ENCRYPTED_KEY in Travis. Here’s a screenshot where to set it in the Travis repository dashboard.

6. Next, install Travis for encryption of keys.

sudo apt install ruby ruby-dev
sudo gem install travis

7. Make sure you are logged in to Travis, to login use the following command.

travis login

8. Make sure you have copied the ssh to deploy_key and then encrypt your private deploy_key and add it to root of your repository, use command –

travis encrypt-file deploy_key

9. After successful encryption, you will see a message

Please add the following to your build script (before_install stage in your .travis.yml, for instance):

openssl aes-256-cbc -K $encrypted_3dac6bf6c973_key -iv $encrypted_3dac6bf6c973_iv -in deploy_key.enc -out ../deploy_key -d
  1. Add the above-generated deploy_key in Travis and push the changes on your master branch. Do not push the deploy_key only the encryption file i.e., deploy_key.enc
  1. Finally, push the changes and create a Pull request and merge it to test the deployment. Visit Travis logs for more details and debugging.

Resources

Continue ReadingAuto Deployment of SUSI Web Chat on gh-pages with Travis-CI

Showing Pull Request Build logs in Yaydoc

In Yaydoc, I added the feature to show build status of the Pull Request. But there was no way for the user to see the reason for build failure, hence I decided to show the build log in the Pull Request similar to that of TRAVIS CI. For this, I had to save the build log into the database, then use GitHub status API to show the build log url in the Pull Request which redirects to Yaydoc website where we render the build log.

StatusLog.storeLog(name, repositoryName, metadata,  `temp/admin@fossasia.org/generate_${uniqueId}.txt`, function(error, data) {
                            if (error) {
                              status = "failure";
                            } else {
                              targetBranch = `https://${process.env.HOSTNAME}/prstatus/${data._id}`
                            }
                            github.createStatus(commitId, req.body.repository.full_name, status, description, targetBranch, repositoryData.accessToken, function(error, data) {
                              if (error) {
                                console.log(error);
                              } else {
                                console.log(data);
                              }
                            });
                          });

In the above snippet, I’m storing the build log which is generated from the build script to the mongodb and I’m appending the mongodb unqiueID to the `prstatus` url so that we can use that id to retrieve build log from the database.

exports.createStatus = function(commitId, name, state, description, targetURL, accessToken, callback) {
  request.post({
    url: `https://api.github.com/repos/${name}/statuses/${commitId}`,
    headers: {
      'User-Agent': 'Yaydoc',
      'Authorization': 'token ' + crypter.decrypt(accessToken)
    },
    "content-type": "application/json",
    body: JSON.stringify({
      state: state,
      target_url: targetURL,
      description: description,
      context: "Yaydoc CI"
    })
  }, function(error, response, body) {
    if (error!== null) {
      return callback({description: 'Unable to create status'}, null);
    }
    callback(null, JSON.parse(body));
  });
};

After saving the build log, I’m sending the request to GitHub for showing the status of the build along with build log url where user can click the detail link and can see the build log.

Resources:

Continue ReadingShowing Pull Request Build logs in Yaydoc

Showing Pull Request Build Status in Yaydoc

Yaydoc is integrated to various open source projects in FOSSASIA.  We have to make sure that the contributors PR should not break the build. So, I decided to check whether the PR is breaking the build or not. Then, I would notify the status of the build using GitHub status API.

exports.registerHook = function (data, accessToken) {
  return new Promise(function(resolve, reject) {
    var hookurl = 'http://' + process.env.HOSTNAME + '/ci/webhook';
    if (data.sub === true) {
      hookurl += `?sub=true`;
    }
    request({
      url: `https://api.github.com/repos/${data.name}/hooks`,
      headers: {
        'User-Agent': 'Yaydoc',
        'Authorization': 'token ' + crypter.decrypt(accessToken)
      },
      method: 'POST',
      json: {
        name: "web",
        active: true,
        events: [
          "push",
          "pull_request"
        ],
        config: {
          url: hookurl,
          content_type: "json"
        }
      }
    }, function(error, response, body) {
      if (response.statusCode !== 201) {
        console.log(response.statusCode + ': ' + response.statusMessage);
        resolve({status: false, body:body});
      } else {
        resolve({status: true, body: body});
      }
    });
  });
};

I’ll register the webhook, when user registers the repository to yaydoc for push and pull request event. Push event will be for building documentation and hosting the documentation to the GitHub pages. Pull_request event would be for checking the build of the pull request.

github.createStatus(commitId, req.body.repository.full_name, "pending", "Yaydoc is checking your build", repositoryData.accessToken, function(error, data) {
                    if (!error) {
                      var user = req.body.pull_request.head.label.split(":")[0];
                      var targetBranch = req.body.pull_request.head.label.split(":")[1];
                      var gitURL = `https://github.com/${user}/${req.body.repository.name}.git`;
                      var data = {
                        email: "admin@fossasia.org",
                        gitUrl: gitURL,
                        docTheme: "",
                        debug: true,
                        docPath: "",
                        buildStatus: true,
                        targetBranch: targetBranch
                      };
                      generator.executeScript({}, data, function(error, generatedData) {
                        var status, description;
                        if(error) {
                          status = "failure";
                          description = error.message;
                        } else {
                          status = "success";
                          description = generatedData.message;
                        }
                        github.createStatus(commitId, req.body.repository.full_name, status, description, repositoryData.accessToken, function(error, data) {
                          if (error) {
                            console.log(error);
                          } else {
                            console.log(data);
                          }
                       });
                 });
              }
        });

When anyone opens a new PR, GitHub will send  a request to yaydoc webhook. Then, I’ll send the status to GitHub saying that “Yaydoc is checking your build” with status `pending`. After, that I’ll documentation will be generated.Then, I’ll check the exit code. If the exit code is zero,  I’ll send the status `success` otherwise I’ll send `error` status.
Resources:

Continue ReadingShowing Pull Request Build Status in Yaydoc

Adding Github buttons to Generated Documentation with Yaydoc

Many times repository owners would want to link to their github source code, issue tracker etc. from the documentation. This would also help to direct some users to become a potential contributor to the repository. As a step towards this feature, we added the ability to add automatically generated GitHub buttons to the top of the docs with Yaydoc.

To do so we created a custom sphinx extension which makes use of http://buttons.github.io/ which is an excellent service to embed GitHub buttons to any website. The extension takes multiple config values and using them generates the `html` which it adds to the top of the internal docutils tree using a raw node.

GITHUB_BUTTON_SPEC = {
    'watch': ('eye', 'https://github.com/{user}/{repo}/subscription'),
    'star': ('star', 'https://github.com/{user}/{repo}'),
    'fork': ('repo-forked', 'https://github.com/{user}/{repo}/fork'),
    'follow': ('', 'https://github.com/{user}'),
    'issues': ('issue-opened', 'https://github.com/{user}/{repo}/issues'),
}

def get_button_tag(user, repo, btn_type, show_count, size):
    spec = GITHUB_BUTTON_SPEC[btn_type]
    icon, href = spec[0], spec[1].format(user=user, repo=repo)
    tag_fmt = '<a class="github-button" href="{href}" data-size="{size}"'
    if icon:
        tag_fmt += ' data-icon="octicon-{icon}"'
    tag_fmt += ' data-show-count="{show_count}">{text}</a>'
    return tag_fmt.format(href=href,
                          icon=icon,
                          size=size,
                          show_count=show_count,
                          text=btn_type.title())

The above snippet shows how it takes various parameters such as the user name, name of the repository, the button type which can be one of fork, issues, watch, follow and star, whether to display counts beside the buttons and whether a large button should be used. Another method named get_button_tags is used to read the various configs and call the above method with appropriate parameters to generate each button.

The extension makes use of the doctree-resolved event emitted by sphinx to hook into the internal doctree. The following snippet shows how it is done.

def on_doctree_resolved(app, doctree, docname):
    if not app.config.github_user_name or not app.config.github_repo:
        return
    buttons = nodes.raw('', get_button_tags(app.config), format='html')
    doctree.insert(0, buttons)

Finally we add the custom javascript using the add_javascript method.

app.add_javascript('https://buttons.github.io/buttons.js')

To use this with yaydoc, users would just need to add the following to their .yaydoc.yml file.

build:
  github_button:
    buttons:
      watch: true
      star: true
      issues: true
      fork: true
      follow: true
    show_count: true
    large: true

Resources

  1.  Homepage of Github:buttons – http://buttons.github.io/
  2. Sphinx extension Tutorial – http://www.sphinx-doc.org/en/stable/extdev/tutorial.html
Continue ReadingAdding Github buttons to Generated Documentation with Yaydoc