Map Responses from SUSI Server

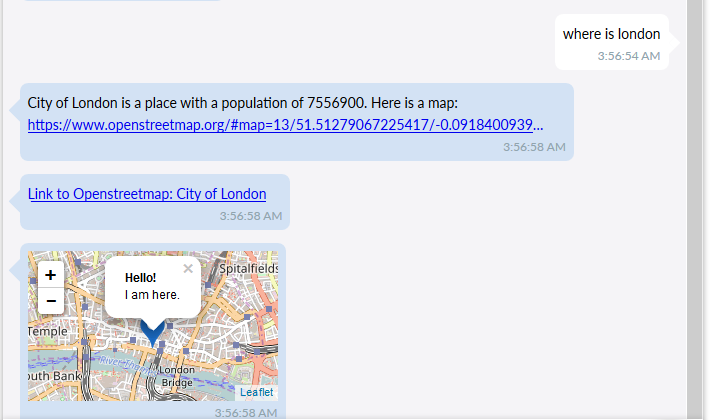
Giving user responses in Maps is a very common reply of various assistants. Android and iOS clients of SUSI.AI can Render their own custom map views but there is a challenge in doing that in Bots and other clients which can only render Images.

The MapServlet in SUSI-Server is a servlet that takes the constraints of a map as input parameters and returns PNG Image of the rendered map.

This is a simple HttpServlet. Since it does not requires any auth or user rights we do not extend AbstactAPIHandler in this class.

 
public class MapServlet extends HttpServlet {

This is to method which runs whenever the Servlet receives a GET Query. After getting the query the function call another function “process(…)” which processes the input parameters.

 
@Override
protected void doGet(HttpServletRequest request, HttpServletResponse          response) throws ServletException, IOException {
Query post = RemoteAccess.evaluate(request);

This line is the for DDOS Protection.  It checks if the user query rate is too high and rate limit his queries. If Server suspects that the post is a DDOS then it returns a 503 error.

if (post.isDoS_blackout()) {
  response.sendError(503, "your request frequency is too high"); return;
} 
process(request, response, post);

The process method get the zoom, latitude, longitude, width and the height of the map and checks for the errors in them.

if (map.getHeight() > height || map.getWidth() > width) {
            BufferedImage bi = map.getImage();

            int xoff = (map.getWidth() - width) / 2;
            int yoff = (map.getHeight() - height) / 2;

            bi = bi.getSubimage(xoff, yoff, width, height);
            map = new RasterPlotter(width, height, RasterPlotter.DrawMode.MODE_REPLACE, "FFFFFF");
            map.insertBitmap(bi, 0, 0);
        }

Then we compute our image using RasterPlotter.

map.setDrawMode(DrawMode.MODE_SUB);
map.setColor(0xffffff);
if (text.length() > 0) PrintTool.print(map, 6, 12, 0, uppercase ? text.toUpperCase() : text, -1, false, 100);
PrintTool.print(map, map.getWidth() - 6, map.getHeight() - 6, 0, "MADE WITH LOKLAK.ORG", 1, false, 50);

Here we calculate the height of the map. If a user passed a height and width in get parameters, we scale the map according to that but if not its 256×256.

    int mx = (int) (map.getWidth() * (lon - west_lon) / (east_lon - west_lon));
    int my = (int) (map.getHeight() * (lat - north_lat) / (south_lat - north_lat));

// the marker has a height of 40 pixel and a width of 25 pixel
    final BufferedImage logo = ImageIO.read(FileSystems.getDefault().getPath("html").resolve("artwork").resolve("marker-red.png").toFile());
    map.insertBitmap(logo, Math.min(map.getWidth() - 25, Math.max(0, mx - 12)), Math.min(map.getHeight() - 40, Math.max(0, my - 40)), FilterMode.FILTER_ANTIALIASING);

We use the code below to set some text on the map for example the name of the place or the city etc.

map.setDrawMode(DrawMode.MODE_SUB);
map.setColor(0xffffff);
if (text.length() > 0) PrintTool.print(map, 6, 12, 0, uppercase ? text.toUpperCase() : text, -1, false, 100);
PrintTool.print(map, map.getWidth() - 6, map.getHeight() - 6, 0, "MADE WITH LOKLAK.ORG", 1, false, 50);

Finally we draw a marker on map

    int mx = (int) (map.getWidth() * (lon - west_lon) / (east_lon - west_lon));
    int my = (int) (map.getHeight() * (lat - north_lat) / (south_lat - north_lat));
      
    final BufferedImage logo = ImageIO.read(FileSystems.getDefault().getPath("html").resolve("artwork").resolve("marker-red.png").toFile());
    map.insertBitmap(logo, Math.min(map.getWidth() - 25, Math.max(0, mx - 12)), Math.min(map.getHeight() - 40, Math.max(0, my - 40)), FilterMode.FILTER_ANTIALIASING);

  At last we set the copyright message of OPENSTREETMAP at the bottom left.

PrintTool.print(map, 6, map.getHeight() - 6, 0, "(C) OPENSTREETMAP CONTRIBUTORS", -1, false, 100);

At the end we write the image and set the headers for Cross Origin Access.

    response.addHeader("Access-Control-Allow-Origin", "*");
        RemoteAccess.writeImage(fileType, response, post, map);
        post.finalize();
    }
}

 The servlet can be tested locally at

http://localhost:4000/vis/map.png?text=Test&mlat=1.28373&mlon=103.84379&zoom=18

Or on the live SUSI Server
http://api.susi.ai/vis/map.png?text=Test&mlat=1.28373&mlon=103.84379&zoom=18

Output:

References:

https://www.openstreetmap.org/

http://wiki.openstreetmap.org/wiki/Java_Access_Example

https://github.com/fossasia/susi_server/

Continue ReadingMap Responses from SUSI Server

Setting up Your Own Custom SUSI AI server

When you chat with any of the SUSI clients, all the requests are made to standard SUSI server. But let us say that you have implemented some features on server and want to test it. Simply launch your server and you get your own SUSI server. You can then change the option to use your own server on the SUSI Android and Web Chat client.

The first step to get your own copy of the SUSI server is browse to https://github.com/fossasia/susi_server and fork it. Clone your origin head to your local machine and make the changes that you want. There are various tutorials on how to add more servlets to SUSI server, how to add new parameters to an existing action type or maybe modification or a similar type of memory servlet.

To start coding, you can either use some IDE like IDEA by Intelij (download it from here) or open the files you want to modify in a text editor. To start the SUSI server via command line terminal (and not IDE) do the following:


Open the terminal in the project directory cloned. Now write in the following command (It is expected that you have your JAVA installed with JAVA_PATH variable setup):

./gradlew build

This will install all the project dependencies required for the support of the project. Next execute :

bin/start.sh

This will take a little time but you will soon see a popped up window in your default browser and the server will start. The landing page of the website will launch. Make the modifications in the server you were aiming. The server is up now. You can access it at local ip address here:

http://127.0.0.1/

But if you try to add this local address in the URL field of any client, it will not work and give you an error. To access this server using a client, open your terminal and execute

ipconfig	//if you are running a windows machine{not recommended}
ifconfig	//if you are running a linux machine{recommended for better performance}


This will give you a list of various IP. Find Wireless LAN adapter Wi-Fi. Copy the IPv4 IP address. This is the link you need to enter in the server URL field in the client (Do not forget to add http:// before your IP address). Now sign up and you will be good to go.

Additional Resources :

Continue ReadingSetting up Your Own Custom SUSI AI server

Implementing Speech To Text in SUSI iOS

SUSI being an intelligent bot has the capabilities by which the user can provide input in a hands-free mode by talking and not requiring to even lift the phone for typing. The speech to text feature is available in SUSI iOS with the help of the Speech framework which was released alongside iOS 10 which enables continuous speech detection and transcription. The detection is really fast and supports around 50 languages and dialects from Arabic to Vietnamese. The speech recognition API does its heavy tasks of detection on Apple’s servers which requires an internet connection. The same API is also not always available on all newer devices and also provides the ability to check if a specific language is supported at a particular time.

How to use the Speech to Text feature?

  • Go to the view controller and import the speech framework
  • Now, because the speech is transmitted over the internet and uses Apple’s servers for computation, we need to ask the user for permissions to use the microphone and speech recognition feature. Add the following two keys to the Info.plist file which displays alerts asking user permission to use speech recognition and for accessing the microphone. Add a specific sentence for each key string which will be displayed to the user in the alerts.
    1. NSSpeechRecognitionUsageDescription
    2. NSMicrophoneUsageDescription

The prompts appear automatically when the functionality is used in the app. Since we already have the Hot word recognition enabled, the microphone alert would show up automatically after login and the speech one shows after the microphone button is tapped.

3) To request the user for authorization for Speech Recognition, we use the method SFSpeechRecognizer.requestAuthorization.

func configureSpeechRecognizer() {
        speechRecognizer?.delegate = self

        SFSpeechRecognizer.requestAuthorization { (authStatus) in
            var isEnabled = false

            switch authStatus {
            case .authorized:
                print("Autorized speech")
                isEnabled = true
            case .denied:
                print("Denied speech")
                isEnabled = false
            case .restricted:
                print("speech restricted")
                isEnabled = false
            case .notDetermined:
                print("not determined")
                isEnabled = false
            }

            OperationQueue.main.addOperation {

                // handle button enable/disable

                self.sendButton.tag = isEnabled ? 0 : 1

                self.addTargetSendButton()
            }
        }
    }

4)   Now, we create instances of the AVAudioEngine, SFSpeechRecognizer, SFSpeechAudioBufferRecognitionRequest,SFSpeechRecognitionTask

let speechRecognizer = SFSpeechRecognizer(locale: Locale.init(identifier: "en-US"))
var recognitionRequest: SFSpeechAudioBufferRecognitionRequest?
var recognitionTask: SFSpeechRecognitionTask?
let audioEngine = AVAudioEngine()

5)  Create a method called `readAndRecognizeSpeech`. Here, we do all the recognition related stuff. We first check if the recognitionTask is running or not and if it does we cancel the task.

if recognitionTask != nil {
  recognitionTask?.cancel()
  recognitionTask = nil
}

6)  Now, create an instance of AVAudioSession to prepare the audio recording where we set the category of the session as recording, the mode and activate it. Since these might throw an exception, they are added inside the do catch block.

let audioSession = AVAudioSession.sharedInstance()

do {

    try audioSession.setCategory(AVAudioSessionCategoryRecord)

    try audioSession.setMode(AVAudioSessionModeMeasurement)

    try audioSession.setActive(true, with: .notifyOthersOnDeactivation)

} catch {

    print("audioSession properties weren't set because of an error.")

}

7)  Instantiate the recognitionRequest.

recognitionRequest = SFSpeechAudioBufferRecognitionRequest()

8) Check if the device has an audio input else throw an error.

guard let inputNode = audioEngine.inputNode else {

fatalError("Audio engine has no input node")

}

9)  Enable recognitionRequest to report partial results and start the recognitionTask.

recognitionRequest.shouldReportPartialResults = true

recognitionTask = speechRecognizer?.recognitionTask(with: recognitionRequest, resultHandler: { (result, error) in

  var isFinal = false // to indicate if final result

  if result != nil {

    self.inputTextView.text = result?.bestTranscription.formattedString

    isFinal = (result?.isFinal)!

  }

  if error != nil || isFinal {

    self.audioEngine.stop()

    inputNode.removeTap(onBus: 0)

    self.recognitionRequest = nil

    self.recognitionTask = nil

  }
})

10) Next, we start with writing the method that performs the actual speech recognition. This will record and process the speech continuously.

  • First, we create a singleton for the incoming audio using .inputNode
  • .installTap configures the node and sets up the buffer size and the format
let recordingFormat = inputNode.outputFormat(forBus: 0)

inputNode.installTap(onBus: 0, bufferSize: 1024, format: recordingFormat) { (buffer, _) in

    self.recognitionRequest?.append(buffer)

}

11)  Next, we prepare and start the audio engine.

audioEngine.prepare()

do {

  try audioEngine.start()

} catch {

  print("audioEngine couldn't start because of an error.")

}

12)  Create a method that stops the Speech recognition.

func stopSTT() {

    print("audioEngine stopped")

    audioEngine.inputNode?.removeTap(onBus: 0)

    audioEngine.stop()

    recognitionRequest?.endAudio()

    indicatorView.removeFromSuperview()


    if inputTextView.text.isEmpty {

        self.sendButton.setImage(UIImage(named: ControllerConstants.mic), for: .normal)

    } else {

        self.sendButton.setImage(UIImage(named: ControllerConstants.send), for: .normal)

    }

        self.inputTextView.isUserInteractionEnabled = true
}

13)  Update the view when the speech recognition is running indicating the user its status. Add below code just below audio engine preparation.

// Listening indicator swift

self.indicatorView.frame = self.sendButton.frame

self.indicatorView.isUserInteractionEnabled = true

let gesture: UITapGestureRecognizer = UITapGestureRecognizer(target: self, action: #selector(startSTT))

gesture.numberOfTapsRequired = 1

self.indicatorView.addGestureRecognizer(gesture)
self.sendButton.setImage(UIImage(), for: .normal)

indicatorView.startAnimating()

self.sendButton.addSubview(indicatorView)

self.sendButton.addConstraintsWithFormat(format: "V:|[v0(24)]|", views: indicatorView)

self.sendButton.addConstraintsWithFormat(format: "H:|[v0(24)]|", views: indicatorView)

self.inputTextView.isUserInteractionEnabled = false

The screenshot of the implementation is below:


References

Continue ReadingImplementing Speech To Text in SUSI iOS

How to make a SUSI chat bot skill for Cortana

Cortana is assistant from Microsoft just like Siri from Apple. We can make a skill for Cortana i.e Creating your own bot with in cortana so that you can use your bot through cortana by activating it using invocation name. To create SUSI cortana skill we will use SUSI API and Microsoft bot framework. First of all we will have to make a bot on microsoft bot framework and to do so follow this tutorial. Change code in this tutorial with code given below.

var restify = require('restify');
var builder = require('botbuilder');
var request = require('request');
var http = require('http');

// Setup Restify Server
var server = restify.createServer();
server.listen(process.env.port || process.env.PORT || 8080, function() {
   console.log('listening to ', server.name, server.url);
});
// Create chat bot
var connector = new builder.ChatConnector({
   appId: process.env.appId,
   appPassword: process.env.appPassword
});

setInterval(function() {
       http.get(process.env.HerokuURL);
   }, 1200000);

var bot = new builder.UniversalBot(connector);
server.post('/api/messages', connector.listen());

//getting response from SUSI API upon receiving messages from User
bot.dialog('/', function(session) {
   var msg = session.message.text;
   var options = {
       method: 'GET',
       url: 'http://api.asksusi.com/susi/chat.json',
       qs: {
           timezoneOffset: '-330',
           q: session.message.text
       }
   };
//sending request to SUSI API for response
   request(options, function(error, response, body) {
       if (error) throw new Error(error);
       var ans = (JSON.parse(body)).answers[0].actions[0].expression;
       //responding back to user
       session.say(ans,ans);

   })
});

After making bot we have to configure this bot for Cortana and to do so select cortana from list of channel on your bot from https://dev.botframework.com and add following detail shown in figure below.

Invocation name is name which you will call to use your bot. There are many ways to in invoke your skill like Run <invocation name> , Launch <invocation name>. Here is the complete list of invocation commands. How SUSI skill in cortana actually works is when user invoke SUSI skill cortana acts as middleware to send and receive responses from skill to user. After configuring your bot for Cortana test it with cortana with same hotmail account which you have used for bot framework by calling invocation name. Here is the demo video for testing SUSI Skill https://youtu.be/40yX16hxcls.

You have complete creating a skill for cortana now if you want to publish it to world select manage cortana dashboard from your bots in https://dev.botframework.com and publish it to first by filling form.

If you want to learn more about bot framework refer to https://docs.microsoft.com/en-us/Bot-Framework/index

References:
SUSI Cortana Repository: https://github.com/fossasia/susi_cortana_skill
Tutorial for bot: https://blog.fossasia.org/susi-ai-bots-with-microsofts-bot-framework/

Continue ReadingHow to make a SUSI chat bot skill for Cortana

How to make SUSI kik bot

To make SUSI kik bot first you have to configure a bot. To configure bot go to https://dev.kik.com/ and make your bot by scanning code from your kik mobile app.You have to answer following questions from botsworth and make your bot.


After logging in to your dashboard get your api key by going to configuration menu on top.

After your bot is setup follow given steps to create your first susi kik bot.

Steps:

  1. Install Node.js from the link below on your computer if you haven’t installed it already.
    https://nodejs.org/en/
  2. Create a folder with any name and open shell and change your current directory to the new folder you created.
  3. Type npm init in command line and enter details like name, version and entry point.
  4. Create a file with the same name that you wrote in entry point in above given step. i.e index.js and it should be in same folder you created.
  5. Type following commands in command line  npm install –save @kikinteractive/kik. After @kikinteractive/kik is installed type npm install –save http after http is installed type npm install –save request when all the modules are installed check your package.json these modules will be included within dependencies portion.

  6. Your package.json file should look like this.

     
    {
     "name": "susi_kikbot",
       "version": "1.0.0",
     "description": "susi kik bot",
     "main": "index.js",
     "scripts": {
       "test": "node tests/sample.js"
     },
     "license": "MIT",
     "dependencies": {
       "@kikinteractive/kik": "^2.0.11",
       "request": "^2.75.0"
     }
    }
    
    
  7. Copy following code into file you created i.e index.js and add your bot name to it in place of username.

    var http = require('http');
    var Bot = require('@kikinteractive/kik');
    var request = require('request')
    var answer;
     
    var bot = new Bot({
     
        username: '<your-bot-name>',
        apiKey: process.env.API_KEY,
        baseUrl: process.env.HEROKU_URL
     
    });
     
    bot.updateBotConfiguration();
     
    bot.onTextMessage((message) => {
     
        request('http://api.asksusi.com/susi/chat.json?q=' + encodeURI(query), function(error, response, body) {
     
            if (!error && response.statusCode == 200) {
     
                answer = JSON.parse(body).answers[0].actions[0].expression;
     
            } else {
     
                answer = "Oops, Looks like Susi is taking a
                break, She will be back soon";
     
            }
     
        });
     
        message.reply(answer)
    });
     
    http.createServer(bot.incoming()).listen(process.env.PORT || 5000)
    
    
  8. Before deploying our bot to heroku so that it can be active we have to make a github repository for chatbot to make github repository follow these steps.In shell change current directory to folder we created above and  write
    git init
    git add .
    git commit -m”initial”
    git remote add origin <URL for remote repository>
    git remote -v
    git push -u origin master

    You will get URL for remote repository by making repository on your github and copying this link of your repository.

  9. To deploy your bot to heroku you need an account on Heroku and after making an account make an app.


  10. Deploy app using github deployment method.
  11. Select Automatic deployment method.
  12. Go to settings of your app and config variables and paste your API key for bot to this and name it as API_KEY and get your heroku app url and make a variable for it named HEROKU_URL.
  13. Your susi bot is ready now test it by massaging it.

If you want to learn more about kik API then refer to https://dev.kik.com/#/docs/messaging


Resources:

Github Repository: https://github.com/fossasia/susi_kikbot
KIK bot API: https://dev.kik.com/#/docs/messaging

Continue ReadingHow to make SUSI kik bot

SUSI AI Bots with Microsoft’s Bot Framework

The Bot Framework is used to build intelligent chatbots and it supports .NET, Node.js, and REST. To learn about building bots using bot framework go to  https://docs.microsoft.com/en-us/bot-framework/bot-builder-overview-getstarted . Now to build SUSI AI bot for different platforms like facebook, telegram, kik, skype follow below given steps.

  1. Install Node.js from the link below on your computer if you haven’t installed it already.
    https://nodejs.org/en/
  2. Create a folder with any name and open a shell and change your current directory to the new folder you created.
  3. Type npm init in shell and enter details like name, version and entry point.
  4. Create a file with the same name that you wrote in entry point in above given step. i.e index.js and it should be in same folder you created.
  5. Type following commands in command line  npm install –save restify.After restify is installed type npm install –save botbuilder   after botbuilder is installed type npm install –save request when all the modules are installed check your package.json modules will be included within dependencies portion.

  6. Your package.json file should look like this.

    {
    "name": "skype-bot",
    "version": "1.0.0",
    "description": "SUSI AI Skype Bot",
    "main": "app.js",
    "scripts": {
      "test": "echo \"Error: no test specified\" && exit 1",
      "start": "node app.js"
    },
    "author": "",
    "license": "ISC",
    "dependencies": {
      "botbuilder": "^3.8.1",
      "request": "^2.81.0",
      "restify": "^4.3.0"
    }
    }
    
  7. Copy following code into file you created i.e index.js

    var restify = require('restify');
    var builder = require('botbuilder');
    var request = require('request');
    
    // Setup Restify Server
    var server = restify.createServer();
    server.listen(process.env.port || process.env.PORT || 8080, function() {
       console.log('%s listening to %s', server.name, server.url);
    });
    
    // Create chat bot
    var connector = new builder.ChatConnector({
     appId: process.env.appId,
     appPassword: process.env.appPassword
    });
    
    var bot = new builder.UniversalBot(connector);
    server.post('/api/messages', connector.listen());
    //When bot is added by user
    bot.on('contactRelationUpdate', function(message) {
       if (message.action === 'add') {
           var name = message.user ? message.user.name : null;
           var reply = new builder.Message()
               .address(message.address)
               .text("Hello %s... Thanks for adding me. You can talk to SUSI now.", name || 'there');
           bot.send(reply);
       }
    });
    //getting response from SUSI API upon receiving messages from User
    bot.dialog('/', function(session) {
       var options = {
           method: 'GET',
           url: 'http://api.asksusi.com/susi/chat.json',
           qs: {
               timezoneOffset: '-330',
               q: session.message.text
           }
       };
    //sending request to SUSI API for response 
       request(options, function(error, response, body) {
           if (error) throw new Error(error);
           var ans = (JSON.parse(body)).answers[0].actions[0].expression;
           //responding back to user
           session.send(ans);
    
       })
    });
    
  8. You have to replace appID and appPassword with your own ID and Password which you can get by below given steps.
  9. Sign in/Sign up to this https://dev.botframework.com/. After signing in go to My Bots option at the top of the page and Create/Register your bot. Enter details of your bot and click on “Create Microsoft App ID and password”. 
  10. Leave messaging endpoint for now after getting app ID and password we will write messaging endpoint.
  11. Copy your APP ID and Password and save them for later use. Paste your App ID in box given for ID on bot registration page.

  12. Now we have to create messaging endpoint to listen for requests. Make a github repository and push the files in the folder we created above.

    In command line change current directory to folder we created above and  write
    git init
    git add .
    git commit -m”initial”
    git remote add origin <URL for remote repository>
    git remote -v
    git push -u origin master  You will URL for remote repository by making repository on your github and copying this link of your repository.

  13. Now we have to deploy this github repository to heroku to get url for messaging endpoint. If you don’t have account on heroku sign up here https://www.heroku.com/ else just sign in and create a new app.
  14. Deploy your repository onto heroku from deploy option and choosing github as a deployment method.
  15. Select automatic deployment so that you make any changes in github repository they should be deployed to heroku.

  16. Open you app from option on top right and copy the link of your heroku app and append it with /api/messages and enter this url as messaging endpoint.

    https://{Your_App_Name}.herokuapp.com/api/messages
  17. Register the bot and add APP ID and password you saved to your heroku app in settings->config variables.
  18. Now go to  https://dev.botframework.com/. and then in My Bots go to your bot and click on Skype bot then add it to contact and start chatting.
  19. You can connect same bot to different channels like kik, slack, telegram, facebook and many others.

    Add different channels in your bot page and follow these links for deploying onto different platforms.

If you want to learn more about bot framework you can refer to https://docs.microsoft.com/en-us/Bot-Framework/index

Resources:
Code: https://github.com/fossasia/susi_skypebot
Bot Framework: https://docs.microsoft.com/en-us/bot-framework/bot-builder-overview-getstarted

Continue ReadingSUSI AI Bots with Microsoft’s Bot Framework

Deploy SUSI.AI to a Messenger

Integration of SUSI AI to messenger platform has become a vital step as to enhance the popularity of this chatbot and to target a large base of users. For example – Viber claims that it has a user base of 800 million. So just integrating SUSI AI to Viber can increase its user base exponentially. This integration also proves to be a big boon, if the chat bot learns with the number and variations in the questions being asked. Like in the case of the web chat client (Susi AI).

This blog post will walk you through on how to deploy SUSI.AI to a messenger platform (Viber and Line messengers are used as an example in this post). We will be using Node.js and REST API technology in our example integrations. The repository of deployment of Susi AI to Viber can be found at susi_viberbot, and to Line messenger at susi_linebot. The SUSI AI Viberbot can be followed from here and Linebot by scanning this QR code.

The diagram below will give you an overview on what flow is followed to deploy SUSI AI chatbot to various messenger platforms.

Fig: Integration of Susi AI to chat messengers.

Let’s walk through each of the steps mentioned in the above diagram.

  1. To get familiar with SUSI.AI chatbot.

We have an API from where we fetch answers. To get a reply for the query ‘hi’, we can visit the API link with the query ‘hi’ appended to it (http://api.susi.ai/susi/chat.json?q=hi). You can chat with SUSI AI here.

  1. To set up a private SUSI AI chatbot account.

A account must be set up in the messenger platform, so that the user can message in that account to get a reply by the chatbot. Steps to set up the chatbot account is dependent on the messenger platform.

  1. To set up a webhook url.

The message sent to the chatbot account, must somehow connect to the chatbot. This message can be fed as a query to the chatbot, so that accordingly chatbot can think of a reply. To achieve this we need a url referred to as the webhook url.

The messages sent by the user, to the SUSI AI chatbot account on the messenger, can then be redirected to this url.

(Heroku platform allows 5 apps to be hosted on its platform for free, so you can check this documentation on how to host a node js app there.)

Now we need to think on how to handle these messages.

  1. To host code on our webhook url

As said earlier, we will be using Node js technology.

Generally, the messages from our SUSI AI chatbot account on the messenger will travel as requests to our webhook url. These come as POST requests to our url. To handle that we can use this piece of code:

app.post('/', function(request, response) {
    response.writeHead(200);

    // first step here, getting the message string from the request body

    // second step, calling the chatbot to get the reply to this message

    // third step, to send this reply back to our messenger's API
    
    response.end();
}

Let’s go through the three steps:

  • Getting the message string from the request body:

Request body is in JSON in case of REST API. To be extra sure, we use:

var reqBody = JSON.parse(request.body);

What property of this reqBody has our message string is dependent on the messenger platform. Suppose we have our message in the actions property of the reqBody, we can access that by:

var message = reqBody.actions;

For example in Viber, we need to use this piece of code:

app.post('/', function(req, response) {
    response.writeHead(200);

    // If user sends a message in 1-on-1 chat to the susi public account
    if(req.body.event === 'message'){
        // call chatbot or it’s API with event.message.text as the message string.
    }
}

In Line messenger, we accept the request at ‘/webhook’:

// register a webhook handler with middleware
app.post('/webhook', line.middleware(config), (req, res) => {
  // here events property has our message string somewhere nested in it.
  Promise
      .all(req.body.events.map(handleEvent))
      .then((result) => res.json(result));
});

// event handler
function handleEvent(event) {
  if (event.type !== 'message' || event.message.type !== 'text') {
      // ignore non-text-message event
      return Promise.resolve(null);
  }
  // call chatbot API with event.message.text as the query string.
}

So the code is dependent on the messenger platform.

  • Calling the SUSI AI chatbot API to get the reply to this message(‘hi susi’ in this case).

This part of our code will remain constant, for any messenger platform.

Let’s first see SUSI API’s answer to query “hi susi” and get familiar with it. Visit http://api.asksusi.com/susi/chat.json?q=hi susi from the browser and get familiar with the JSON object returned.

We get a JSON object as follows:

The answer can be found as the value of the key named expression. In this case it is “Hi, I’m Susi”.

To fetch the answer through coding, we can use this code snippet in Node js:

// including request module
var request = require(‘request’);

// setting options to make a successful call to Susi API.
var options = {
    method: 'GET',          
    url:'http://api.asksusi.com/susi/chat.json',
    qs:
    {
        timezoneOffset: '-330',
        q:'hi susi'
    }
};

// A request to the Susi bot
request(options, function (error, response, body) {
    if (error)
        throw new Error(error);
    // answer fetched from susi
    ans = (JSON.parse(body)).answers[0].actions[0].expression;
}

The properties required for the call are set up through a json object (i.e. options). Pass the options object to our request function as its first parameter. The response by the API will be stored in ‘body’ variable. We need to parse this body, to be able to access the properties of that body object. Hence, fetching the answer from Susi API.

  • To send the answer fetched from our SUSI API, back to our messenger.

This feature too is dependent on the messenger platform. Initially as the messenger platform requests us with a request which has the user message string. Now, it’s our time to send a request back to our messenger platform with a reply(i.e. the answer we will fetch from our chat bot’s API).

Generally, it is sent as a POST request.

The basic code to send a message to the messenger API:

// Assuming ans variable has the reply by our chatbot.
// setting options to request the chat api of viber.
var options1 = {
    method: 'POST',
    url: MESSENGER_API_URL,
    headers: headerBody,
    body:
    {
        // other properties dependent to the messenger
        text: ans
        // the property name can be different from 'text'
    },
    json: true
};

// request to the api of messenger.
request(options1, function (error1, res, body1) {
    if (error1) 
        throw new Error(error1);
    console.log(body1);
});

In case of Viber, we set up an options variable and request Viber’s chat API:

// setting options to request the chat api of viber.
var options1 = {
    method: 'POST',
    url: 'https://chatapi.viber.com/pa/send_message',
    headers: headerBody,
    body:
    {
        receiver: req.body.sender.id,
        min_api_version: 1,
        sender:
        {
            name: 'Susi',
            avatar: ''
        },
        tracking_data: 'tracking data',
        type: 'text',
        text: ans
    },
    json: true
};

// request to the chat api of viber.
request(options1, function (error1, res, body1) {
    if (error1) throw new Error(error1);
        console.log(body1);
});

In case of Line messenger, we use it’s reply API:

const answer = {
    type: 'text',
    text: ans
};

// use reply API
return client.replyMessage(event.replyToken, answer);
Continue ReadingDeploy SUSI.AI to a Messenger

Using react-url-query in SUSI Chat

For SUSI Web Chat, I needed a query parameter which can be passed to the components directly to activate the SUSI dreams in my textarea using just the URL which is not easy when one is using react-router. React URL Query is a package for managing state through query parameters in the URL in React. It integrates well with React Router and Redux and provides additional tools specifically targeted at serializing and deserializing state in URL query parameters. So for example, if one wants to pass some parameters to populate in your component directly through the URL, you can use react-url-query. Eg. http://chat.susi.ai/?dream=fossasia will populate fossasia in our textarea section without actually typing the term textarea.

So this in the URL,
Screenshot from 2017-06-29 09.46.33

Will produce this in the textarea,

To achieve this. the following steps are required:

  1. First we proceed with installing the packages (Dependencies  – history)
npm install history --save
npm install react-url-query --save
  1.   We then instantiate a history in our component where we want to listen to the parameters like the following code. Our class ChatApp is where we want to pass the params.

ChatApp.react.js

import history from '../history'; 
//Import the history object from the History package.
    
 // force an update if the URL changes inside the componentDidMount function
  componentDidMount() {
      history.listen(() => this.forceUpdate());
   }
  1.  Next, we define the props of the parameters in our Message Section. For that we need the following props-
  • urlPropsQueryConfig – this is where we define our URLConfig
  • Static proptypes – the query param to which we want to pass the value, so for me it’s dream.
  • The defaultProps when no such value is being passed to our param should be left a blank.
  • And then we finally assign the props.
  • This is then passed to the Message Composer Section from where we receive the value passed.

MessageSection.react.js

// Adding the UrlConfig
const urlPropsQueryConfig = {
  dream: { type: UrlQueryParamTypes.string }
};

 // Defining the query param inside our ClassName
  static propTypes = {
    dream: PropTypes.string
  }
// Setting the default param

  static defaultProps = {     
dream: ''
  }

 //Assigning the props inside the render() function
    const {
      dream
    } = this.props;
 //Passing the dream to the MessageComposer Section

                  <MessageComposer
                    threadID={this.state.thread.id}
                    theme={this.state.darkTheme}
                    dream={dream} />                
//Exporting our Class

export default addUrlProps({ urlPropsQueryConfig })(ClassName);
  1. Next we update the Message Composer section by the props we had passed. For this we first check if the props are null, we don’t populate it in our textarea if it is, otherwise we populate the textarea with the value ‘dream + props.dream’ so the value passed in the URL will be prepend by a word dream to enable the ‘dream value’ in our textarea.

The full file is available at MessageComposer.js

 //Add Check to the constructor
 constructor(props) {
    super(props);
    this.state = {text: ''};
    if(props.dream!==''){   //Setting the text as received ‘dream dreamPassed’
      this.state= {text: 'dream '+ props.dream}
    }
  }
// Populate the textarea
        <textarea
          name="message"
          value={this.state.text}
          onChange={this._onChange.bind(this)}
          onKeyDown={this._onKeyDown.bind(this)}
          ref={(textarea)=> { this.nameInput = textarea; }}
          placeholder="Type a message..."
        />
// Add props to the component
MessageComposer.propTypes = {
  /* other props */,
  dream: PropTypes.string //Setting Proptypes to receive the prop from the MessageSection
};

Now we have the full code working for querying any dream. Head over to chat.susi.ai?dream=fossasia Change fossasia to see the text change.

Resources

Continue ReadingUsing react-url-query in SUSI Chat

Using SUSI as your dictionary

SUSI can be taught to give responses from APIs as well. I made use of an API called Datamuse which is a premier search engine for English words, indexing 10 million unique words and phrases in more than 1000 dictionaries and glossaries.

1. First, we head towards creating our dream pad for creating rules for the skill. To do this we need to create a dream at dream.susi.ai and give it a name, say dictionary.

2. After that one needs to go to the API and check the response generated.

3. Going through the docs of the API, one can create various queries to produce informative responses as follows –

  • Word with a similar meaning.

define *| Meaning of *| one word for *

!console: $word$
{
"url":"https://api.datamuse.com/words?ml=$1$",
"path":"$.[0]"
}
eol
  • Word related to something that start with a given letter.

word related to * that start with the letter *

!console: $word$
{
"url":"https://api.datamuse.com/words?ml=$1$&sp=$2$*",
"path":"$.[0]"
}
eol

  • Word that sound like a given word..

word that sound like *|sounding like *

!console: $word$
{
"url":"https://api.datamuse.com/words?sl=$1$",
"path":"$.[0]"
}
eol

  • Words that are spelled similarly to a given word.

words that are spelled similarly to *| similar spelling to *| spelling of *

!console: $word$
{
"url":"https://api.datamuse.com/words?sp=$1$",
"path":"$.[0]"
}
eol

  • Word that rhyme with a given word.

rhyme *| word rhyming with *

!console: $word$
{
"url":"https://api.datamuse.com/words?rel_rhy=$1$",
"path":"$.[0]"
}
eol

  • Adjectives that are often used to describe a given word.

adjective to describe *|show adjective for *|adjective for *

!console: $word$
{
"url":"https://api.datamuse.com/words?rel_jjb=$1$",
"path":"$.[0]"
}
eol

  • Suggestions for a given word.

suggestions for *| show words like *| similar words to * | words like *

!console: $word$
{
"url":"https://api.datamuse.com/sug?s=$1$",
"path":"$.[0]"
}
eol

This is a sample query response for define *

To create more dictionary skills go to http://dream.susi.ai/p/dictionary and add skills from the API. To contribute by adding more skills, send a pull request to the susi_skill_data.  To test the skills, you can go to chat.susi.ai

Continue ReadingUsing SUSI as your dictionary

20 Amazing Things SUSI can do for You

SUSI.AI has a collection of varied skills in numerous fields such as knowledge, entertainment, problem solving, small-talk, assistants etc. Here’s a list of top skills which SUSI possesses.

Knowledge Based

  1. Ask SUSI to describe anything.

Sample Queries describe *

  1. Ask SUSI the distance between any two cities.

Sample queries – distance between * and *|What is distance between * and * ?| What is distance between * and *         

  1. Ask SUSI about your site’s rank.

Sample Query – site rank of *                

  1. Ask SUSI to know the location of any place.

Sample Queries – where is *


  1. Ask SUSI the time in any city.

 Sample Query – current time in *


  1. Ask SUSI the weather information of any city.

Sample Queries – temperature in * , hashtags * *, mentions * *, weather in *, Tell me about humidity in *|What is humidity in *|Humidity in *|* Humidity, Tell me tomorrow’s weather in *|Weather forecast of *


  1. Ask SUSI to wiki about anything.

Sample Query – wiki *


  1. Ask SUSI about any word, words etc.

Sample Queries – define *| Meaning of *| one word for *, word related to * that start with the letter *, word that sound like *|sounding like *, words that are spelled similarly to *| similar spelling to *| spelling of *, rhyme *| word rhyming with *, adjective to describe *|show adjective for *|adjective for *, suggestions for *| show words like *| similar words to * | words like *

  1. Ask SUSI about a day in the calendar.

Sample Queries – Date * ?, Day * ?, Day on year * month * date *?


  1. Ask to convert a currency to USD for you. 

Sample Queries –  convert * to USD


Problem Solving Based

  1. Ask SUSI to solve a problem for you in Mathematics.

  Sample Queries – compute *| Compute *| Calculate *| calculate *


Entertainment Based

  1. Ask SUSI to draw a card for you.

Sample Query – draw a card


  1. Ask SUSI to toss a coin for you.

Sample Query – flip a coin


  1. Ask SUSI to tell you a Big Bang Theory Joke.

Sample Query – * big bang theory| tell me about big bang theory|geek jokes|geek joke|big bang theory *

  1. Ask SUSI to generate a meme for you.

 Sample Query – get me a meme


  1. Ask SUSI to give you a recipe. 

Sample Queries – * cook *, cook *|how to cook *|recipe for


  1. Ask SUSI to tell you a random joke.

Sample Queries – tell me a joke|recite me a joke|entertain me

  1. Ask SUSI to give you a random gif.

Sample Query – random gif


Assistants

  1. Ask SUSI to translate something for you

Sample Queries – What is * in french|french for * , What is * in german|german for *, What is * in spanish|spanish for *,  What is * in hindi|hindi for *

  1. Ask SUSI to search anything for you.

Sample Queries – search *|query *|duckduckgo *


To contribute to the above skills you can follow the tutorial here. To test or chat with SUSI you can go to chat.susi.ai

Continue Reading20 Amazing Things SUSI can do for You