Implementing the Feedback Functionality in SUSI Web Chat

SUSI AI now has a feedback feature where it collects user’s feedback for every response to learn and improve itself. The first step towards guided learning is building a dataset through a feedback mechanism which can be used to learn from and improvise the skill selection mechanism responsible for answering the user queries.

The flow behind the feedback mechanism is :

  1. For every SUSI response show thumbs up and thumbs down buttons.
  2. For the older messages, the feedback thumbs are disabled and only display the feedback already given. The user cannot change the feedback already given.
  3. For the latest SUSI response the user can change his feedback by clicking on thumbs up if he likes the response, else on thumbs down, until he gives a new query.
  4. When the new query is given by the user, the feedback recorded for the previous response is sent to the server.

Let’s visit SUSI Web Chat and try this out.

We can find the feedback thumbs for the response messages. The user cannot change the feedback he has already given for previous messages. For the latest message the user can toggle feedback until he sends the next query.

How is this implemented?

We first design the UI for feedback thumbs using Material UI SVG Icons. We need a separate component for the feedback UI because we need to store the state of feedback as positive or negative because we are allowing the user to change his feedback for the latest response until a new query is sent. And whenever the user clicks on a thumb, we update the state of the component as positive or negative accordingly.

import ThumbUp from 'material-ui/svg-icons/action/thumb-up';
import ThumbDown from 'material-ui/svg-icons/action/thumb-down';

feedbackButtons = (
  <span className='feedback' style={feedbackStyle}>
    <ThumbUp
      onClick={this.rateSkill.bind(this,'positive')}
      style={feedbackIndicator}
      color={positiveFeedbackColor}/>
    <ThumbDown
      onClick={this.rateSkill.bind(this,'negative')}
      style={feedbackIndicator}
      color={negativeFeedbackColor}/>
  </span>
);

The next step is to store the response in Message Store using saveFeedback Action. This will help us later to send the feedback to the server by querying it from the Message Store. The Action calls the Dispatcher with FEEDBACK_RECEIVED ActionType which is collected in the MessageStore and the feedback is updated in the Message Store.

let feedback = this.state.skill;

if(!(Object.keys(feedback).length === 0 &&    
feedback.constructor === Object)){
  feedback.rating = rating;
  this.props.message.feedback.rating = rating;
  Actions.saveFeedback(feedback);
}

case ActionTypes.FEEDBACK_RECEIVED: {
  _feedback = action.feedback;
  MessageStore.emitChange();
  break;
}

The final step is to send the feedback to the server. The server endpoint to store feedback for a skill requires other parameters apart from feedback to identify the skill. The server response contains an attribute `skills` which gives the path of the skill used to answer that query. From that path we need to parse :

  • Model : Highest level of abstraction for categorising skills
  • Group : Different groups under a model
  • Language : Language of the skill
  • Skill : Name of the skill

For example, for the query `what is the capital of germany` , the skills object is

"skills": ["/susi_skill_data/models/general/smalltalk/en/English-Standalone-aiml2susi.txt"]

So, for this skill,

    • Model : general
    • Group : smalltalk
    • Language : en
    • Skill : English-Standalone-aiml2susi

The server endpoint to store feedback for a particular skill is :

BASE_URL+'/cms/rateSkill.json?model=MODEL&group=GROUP&language=LANGUAGE&skill=SKILL&rating=RATING'

Where Model, Group, Language and Skill are parsed from the skill attribute of server response as discussed above and the Rating is either positive or negative and is collected from the user when he clicks on feedback thumbs.

When a new query is sent, the sendFeedback Action is triggered with the required attributes to make the server call to store feedback on server. The client then makes an Ajax call to the rateSkill endpoint to send the feedback to the server.

let url = BASE_URL+'/cms/rateSkill.json?'+
          'model='+feedback.model+
          '&group='+feedback.group+
          '&language='+feedback.language+
          '&skill='+feedback.skill+
          '&rating='+feedback.rating;

$.ajax({
  url: url,
  dataType: 'jsonp',
  crossDomain: true,
  timeout: 3000,
  async: false,
  success: function (response) {
    console.log(response);
  },
  error: function(errorThrown){
    console.log(errorThrown);
  }
});

This is how the feedback feedback mechanism works in SUSI Web Chat. The entire code can be found at SUSI Web Chat Repository.

Resources


Continue ReadingImplementing the Feedback Functionality in SUSI Web Chat

Adding a Scroll To Bottom button in SUSI WebChat

SUSI Web Chat now has a scroll-to-bottom button which helps the users to scroll the app automatically to the bottom of the scroll area on button click. When the chat history is lengthy and the user has to scroll down manually it results in a bad UX. So the basic requirements of this scroll-to-bottom button are:

  1. The button must only be displayed when the user has scrolled up the message section
  2. On clicking the scroll-to-bottom button, the scroll area must be automatically scrolled to bottom.

Let’s visit SUSI Web Chat and try this out.

The button is not visible until there are enough messages to enable scrolling and the user has scrolled up. On clicking the button, the app automatically scrolls to the bottom pointing to the most recent message.

How was this implemented?

We first design our scroll-to-bottom button using Material UI  Floating Action Button and SVG Icons.

import FloatingActionButton from 'material-ui/FloatingActionButton';
import NavigateDown from 'material-ui/svg-icons/navigation/expand-more';

The button needs to be styled to be displayed at a fixed position on the bottom right corner of the message section. Positioning it on top of MessageSection above the MessageComposer, the button is also aligned with respect to the edges.

const scrollBottomStyle = {
  button : {
    float: 'right',
    marginRight: '5px',
    marginBottom: '10px',
    boxShadow:'none',
  },
  backgroundColor: '#fcfcfc',
  icon : {
    fill: UserPreferencesStore.getTheme()==='light' ? '#90a4ae' : '#7eaaaf'
  }
}

The button must only be displayed when the user has scrolled up. To implement this we need a state variable showScrollBottom which must be set to true or false accordingly based on the scroll offset.

{this.state.showScrollBottom &&
  <div className='scrollBottom'>
    <FloatingActionButton mini={true}
      style={scrollBottomStyle.button}
      backgroundColor={scrollBottomStyle.backgroundColor}
      iconStyle={scrollBottomStyle.icon}
      onTouchTap={this.forcedScrollToBottom}>
      <NavigateDown />
    </FloatingActionButton>
  </div>
}

Now we have to set our state variable showScrollBottom corresponding to the scroll offset. It must be set to true is the user has scrolled up and false if the scrollbar is already at the bottom. To implement this we need to listen to the scrolling events. We used react-custom-scrollbars for the scroll area wrapping the message section. We can listen to the scrolling events using the onScroll props. We also need to tag the scroll area using refs to access the scroll area instead of using findDOMNode as it is being deprecated.

import { Scrollbars } from 'react-custom-scrollbars';

<Scrollbars
  ref={(ref) => { this.scrollarea = ref; }}
  onScroll={this.onScroll}
>
  {messageListItems}
</Scrollbars>

Now, whenever a scroll action is performed, the onScroll() function is triggered. We now have to know if the scroll bar is at the bottom or not. We make use of the scroll area’s props to get the scroll offsets. The getValues() function returns an object containing different scroll offsets and scroll area dimensions. We are interested in values.top which tells about the scroll-top’s progress from 0 to 1 i.e when the scroll bar is at the top most point values.top is 0 and when its on the bottom most point, values.top is 1. So whenever values.top is 1, showScrollBottom is false else true.

onScroll = () => {
  let scrollarea = this.scrollarea;
  if(scrollarea){
    let scrollValues = scrollarea.getValues();
    if(scrollValues.top === 1){
      this.setState({
        showScrollBottom: false,
      });
    }
    else if(!this.state.showScrollBottom){
      this.setState({
        showScrollBottom: true,
      });
    }
  }
}

Finally, we need to scroll the chat app to the bottom on button click. Whenever showScrollBottom is updated, the state is changed, so componentDidUpdate is triggered which calls the _scrollToBottom() function. But we should change this to avoid scrolling to bottom on showScrollBottom update and the user is intending to scroll here. We use the function forcedScrollToBottom to be triggered on clicking the scroll-to-bottom button, which resets the scrollTop value to the height of the scroll area, thus pointing the scrollbar to the bottom.

forcedScrollToBottom = () => {
  let ul = this.scrollarea;
  if (ul) {
    ul.scrollTop(ul.getScrollHeight());
  }
}

We don’t have to worry about resetting showScrollBottom on forced scroll to bottom as the scrolling will trigger the onScroll function where the showScrollBottom state is handled accordingly.

This is how the scroll to bottom button has been implemented in SUSI Web Chat. The entire code can be found at SUSI Web Chat Repository.

Resources


Continue ReadingAdding a Scroll To Bottom button in SUSI WebChat

Adding IBM Watson TTS Support in Susi Assistant on Raspberry Pi

Susi Hardware project aims at creating a smart assistant for your home that you can run on your Raspberry Pi or similar Development Boards.
I previously wrote a blog on choosing a perfect Text to Speech engine for Susi AI and had used Flite as the solution for it. While Flite is an Open Source solution that can run locally on a client, it does not provide the same quality of voice and speed as cloud providers. We always crave for a more natural voice for better interaction with our assistant. It is always good to have more options. We, therefore, added IBM Watson Text to Speech API in SUSI Hardware project.

IBM Watson TTS can be added to a Python Project easily using the IBM Watson Developer SDK.

For using the IBM Watson Developer SDK for Text to Speech, first of all, we need to sign up for Bluemix
https://console.bluemix.net/registration/

After that, we will get the empty dashboard without any service added currently. We need to create a Text to Speech Service. To do so, click on Create Watson Service button


Select Watson on the left pane and then select Text to Speech service from the list.

Select the standard plan from the options and then click on create button.

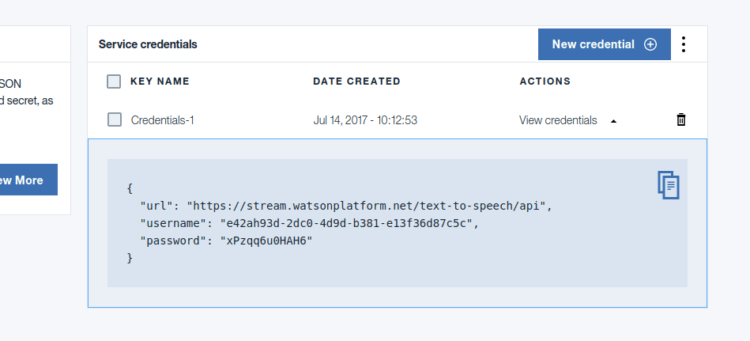
You will get service credentials for your newly created text to speech service. Save it for future reference.

After that, we need to add Watson developer cloud python package.

sudo pip3 install watson-developer-cloud

On Ubuntu with Python 3.5 watson-developer-cloud has some extra dependencies. Install them using the following command.

sudo apt install libssl-dev

Now we can add Text to Speech to our project. For that, we need to first import TextToSpeechV1 library. It can be added using following import statement.

from watson_developer_cloud import TextToSpeechV1

Now we need to create a new TextToSpeechV1 object using the Service Credentials we created earlier.

text_to_speech = TextToSpeechV1(
   username='API_USERNAME',
   password='API_PASSWORD')

We can now perform synthesis of a text input and write the incoming speech stream from IBM Watson API to a file.

with open('output.wav', 'wb') as audio_file:
   audio_file.write(
       text_to_speech.synthesize(text, accept='audio/wav’, voice='en-US_AllisonVoice'))

In the above code snippet,  we are opening an output file ‘output.wav’ for writing. We then write the binary audio data returned by text_to_speech.synthesize method. IBM Watson provides many free voices. We supply an argument specifying which voice we need to use. We are using English female ‘en-US_AllisonVoice’. You may test out more voices in the online demo here and select the voice that you find best.

We can play the ‘output.wav’ file using the play command from SoX. To do so, we need to install SoX binary.

sudo apt install sox libsox-fmt-all

We can play the file easily now using the following code.

import os
os.system('play output.wav')

The above code invokes the ‘play’ command from the SoX package to play the audio file. We can also use PyAudio to play the audio file but it would require us to manage the audio thread separately. Thus, SoX is a better solution.

Resources:

Continue ReadingAdding IBM Watson TTS Support in Susi Assistant on Raspberry Pi

Setup SUSI Assistant on Raspberry Pi in under 30 minutes

With our ever growing list of list of platforms supported by Susi AI, we now have a client that can run on Raspberry Pi and you can access it hands-free!! Here is a video that you can refer for its working.

But it might have left you wondering how you can replicate such a setup yourself? It is fairly easy and will be done fairly easy. Just follow the following instructions.

You need to have following hardware in order to have your own SUSI Assistant running on Raspberry Pi.

  • A Raspberry Pi (prefer 2 or 3) with Raspbian Jessie OS.
  • A stable internet connection.  ( Recommended 4 Mbps )
  • A USB Microphone /  USB Webcam with Microphone. You may buy one like this.
  • A Speaker that connects through 3.5mm jack. You may buy one like this.

After you get all the above items in order, you need to get access to a terminal of your Raspberry Pi. You can have that by either connecting a monitor to Raspberry Pi temporarily or by connecting to Raspberry Pi over SSH.

Once this is done, next step is the installation of the dependencies. The installation of the SUSI on Raspberry is automated after dependencies are installed. Run the following command on Raspberry Pi terminal.

sudo apt install git swig3.0 portaudio19-dev pulseaudio libpulse-dev unzip sox libatlas-dev libatlas-base-dev libsox-fmt-all python3

After this, you may check if your output and input devices are working alright. For this, run rec recording.wav . It will start recording audio and saving it to a file named recording.wav. Play back the file using play recording.wav If you hear your audio clearly, setup is done right else you need to configure your Audio Devices correctly.  Most of the time the configuration of Audio works out the box and devices are plug and play so you would not encounter any errors. If you are successful in configuring your devices, install extra dependencies for SUSI Hardware by running the automated install script. In your terminal run,

$ git clone https://github.com/fossasia/susi_hardware.git
$ cd susi_hardware
$ ./install.sh 

This will install all the remaining dependencies. After the above step is complete, you may run configuration file generator script to choose the Text to Speech and Speech to Text service according to your wish. For doing so, you need to run

$ python3 config_generator.py

Follow the instructions in the script. It will ask you to configure the default service for Text to Speech and Speech to Text and other options. After the configuration is complete, you can simply run the following command to start SUSI.

$ python3 main.py

This will start SUSI in a continuously listening mode. You may invoke SUSI anytime, just by saying SUSI followed by a query. The query will be answered by SUSI subsequently.

Since configurations for different hardware devices may vary, you may encounter some problems. In such a scenario, you may refer to the following resources to solve the issues.

Resources:

Continue ReadingSetup SUSI Assistant on Raspberry Pi in under 30 minutes

Implementing Text-to-Speech (TTS) in SUSI Android

Mobile assistants are designed to perform tasks that the user “commands” through by chat UI or speech. The Android OS already provides Text to speech (TTS) and Speech to text (STT) features. This feature is available from Android version 1.6 onward. In this blog post I will show how tts is implemented in SUSI Android and how I fix the issue ‘delay in speech response’.

TextToSpeech class controls the tts engine. To use TextToSpeech class import it in the activity where you want to use text to speech feature.

import android.speech.tts.TextToSpeech;

After you import TextToSpeech class now we need to initialize TextToSpeech

TextToSpeech tts = new TextToSpeech(this,this);

Here first parameter is the Context and the other one is the listener. The listener is  use  to  inform our app that the engine is ready to use. In order to be notified we have to  implement  TextToSpeech.OnInitListener.

TextToSpeech.OnInitListener listener = new  TextToSpeech.OnInitListener {
@Override
public void onInit(int status) {
if (status == TextToSpeech.SUCCESS)
tts.setLanguage(Locale.UK/* set the default language*/);
}
}

Hence the engine can be initialized asIf status is success then, it means that TTS is initialized successfully and now we can use it. Otherwise, we can’t use it. setLanguage method is used to set language in which we want reply.

TextToSpeech tts = new TextToSpeech(getApplicationContext,listener)

When you use TTS one thing you have to remember that TTS run  on main thread so sometimes it may cause delays in text to speech conversion or it may block UI for a while. It is better to wrap it like below code.

new Handler().post(new Runnable() {
      @Override
      public void run() {
         tts = new TextToSpeech(getApplicationContext(), listener);
        }
    });

Now our engine is ready to speak, we need simply pass the string we want to read.

tts.speak(text to read,TextToSpeech.QUEUE_FLUSH, null, null);

But before tts.speak, it is important to check for the audio focus change request. It is important because only one audio source can have focus at a time. You can check it using below code.

private AudioManager.OnAudioFocusChangeListener afChangeListener =
           new AudioManager.OnAudioFocusChangeListener() {
                 public void onAudioFocusChange(int focusChange) {
                                                        //check for focus
                                                   }
                                           };

OnAudioFocusChangeListener is called when audio focus of the system is changed and according to value of focusChange either we stop TTS or keep using it.

AudioManager audiofocus = (AudioManager)                                    getSystemService(Context.AUDIO_SERVICE);

audiofocus is instance of AudioManager class. We need it to call requestAudioFocus method of AudioManager class. requestAudioFocus method returns the status of request for audio focus change. This method requires three parameter  instance of AudioManager.OnAudioFocusChangeListener, stream type and duration hint. If request is granted only then we can we can use tts.speak .

int result = audiofocus.requestAudioFocus(afChangeListener,AudioManager.STREAM_MUSIC, AudioManager.AUDIOFOCUS_GAIN);

if (result == AudioManager.AUDIOFOCUS_REQUEST_GRANTED) {

tts.speak(text to read,TextToSpeech.QUEUE_FLUSH, null, null);

}

We were continuously facing issue ‘delay in speech response’ because voiceReply method implementation was wrong. We were initializing TextToSpeech on each call of voiceReply method and since onInit method runs on main thread causing delay in voice response. So I removed it and instead of initializing tts each time I used the tts instance already initialized when activity create.

 String spoken = reply;

textToSpeech.speak(spoken, TextToSpeech.QUEUE_FLUSHnull);

You can also control how the engine read text. Like we can modify pitch and speech rate.

tts.setPitch((float)pitch);

tts.setSpeechRate((float)speed);

Resource

Continue ReadingImplementing Text-to-Speech (TTS) in SUSI Android

Managing States in SUSI MagicMirror Module

SUSI MagicMirror Module is a module for MagicMirror project by which you can use SUSI directly on MagicMirror. While developing the module, a problem I faced was that we need to manage the flow between the various stages of processing of voice input by the user and displaying SUSI output to the user. This was solved by making state management flow between various states of SUSI MagicMirror Module namely,

  • Idle State: When SUSI MagicMirror Module is actively listening for a hotword.
  • Listening State: In this state, the user’s speech input from the microphone is recorded to a file.
  • Busy State: The user has finished speaking or timed out. Now, we need to transcribe the audio spoken by the user, send the response to SUSI server and speak out the SUSI response.

The flow between these states can be explained by the following diagram:

As clear from the above diagram, transitions are not possible from a state to all other states. Only some transitions are allowed. Thus, we need a mechanism to guarantee only allowed transitions and ensure it triggers on the right time.

For achieving this, we first implement an abstract class State with common properties of a state. We store the information whether a state can transition into some other state in a map allowedTransitions which maps state names “idle”, “listening” and “busy” to their corresponding states. The transition method to transition from one state to another is implemented in the following way.

protected transition(state: State): void {
   if (!this.canTransition(state)) {
       console.error(`Invalid transition to state: ${state}`);
       return;
   }

   this.onExit();
   state.onEnter();
}

private canTransition(state: State): boolean {
   return this.allowedStateTransitions.has(state.name);
}

Here we first check if a transition is valid. Then we exit one state and enter into the supplied state.  We also define a state machine that initializes the default state of the Mirror and define valid transitions for each state. Here is the constructor for state machine.

constructor(components: IStateMachineComponents) {
        this.idleState = new IdleState(components);
        this.listeningState = new ListeningState(components);
        this.busyState = new BusyState(components);

        this.idleState.AllowedStateTransitions = new Map<StateName, State>([["listening", this.listeningState]]);
        this.listeningState.AllowedStateTransitions = new Map<StateName, State>([["busy", this.busyState], ["idle", this.idleState]]);
        this.busyState.AllowedStateTransitions = new Map<StateName, State>([["idle", this.idleState]]);

        this.currentState = this.idleState;
        this.currentState.onEnter();
}

Now, the question arises that how do we detect when we need to transition from one state to another. For that we subscribe on the Snowboy Detector Observable. We are using Snowboy library for Hotword Detection. Snowboy detects whether an audio stream is silent, has some sound or whether hotword was spoken. We bind all this information to an observable using the ReactiveX Observable pattern. This gives us a stream of events to which we can subscribe and get the results. It can be understood in the following code snippet.

detector.on("silence", () => {
   this.subject.next(DETECTOR.Silence);
});

detector.on("sound", () => {});

detector.on("error", (error) => {
   console.error(error);
});

detector.on("hotword", (index, hotword) => {
   this.subject.next(DETECTOR.Hotword);
});
public get Observable(): Observable<DETECTOR> {
   return this.subject.asObservable();
}

Now, in the idle state, we subscribe to the values emitted by the observable of the detector to know when a hotword is detected to transition to the listening state. Here is the code snippet for the same.

this.detectorSubscription = this.components.detector.Observable.subscribe(
   (value) => {
   switch (value) {
       case DETECTOR.Hotword:
           this.transition(this.allowedStateTransitions.get("listening"));
           break;
   }
});

In the listening state, we subscribe to the states emitted by the detector observable to find when silence is detected so that we can stop recording the audio stream for processing and move to busy state.

this.detectorSubscription = this.components.detector.Observable.subscribe(
   (value) => {
   switch (value) {
       case DETECTOR.Silence:
           record.stop();
           this.transition(this.allowedStateTransitions.get("busy"));
           break;
   }
});

The task of speaking the audio and displaying results on the screen is done by a renderer. The communication to renderer is done via a RendererCommunicator object using a notification system. We also bind its events to an observable so that we know when SUSI has finished speaking the result. To transition from busy state to idle state, we subscribe to renderer observable in the following manner.

this.rendererSubscription = this.components.rendererCommunicator.Observable.subscribe((type) => {
   if (type === "finishedSpeaking") {
       this.transition(this.allowedStateTransitions.get("idle"));
   }
});

In this way, we transition between various states of MagicMirror Module for SUSI in an efficient manner.

Resources

Continue ReadingManaging States in SUSI MagicMirror Module

Hotword Detection on SUSI MagicMirror with Snowboy

Magic Mirror in the story “Snow White and the Seven Dwarfs” had one cool feature. The Queen in the story could call Mirror just by saying “Mirror” and then ask it questions. MagicMirror project helps you develop a Mirror quite close to the one in the fable but how cool it would be to have the same feature? Hotword Detection on SUSI MagicMirror Module helps us achieve that.

The hotword detection on SUSI MagicMirror Module was accomplished with the help of Snowboy Hotword Detection Library. Snowboy is a cross platform hotword detection library. We are using the same library for Android, iOS as well as in MagicMirror Module (nodejs).

Snowboy can be added to a Javascript/Typescript project with Node Package Manager (npm) by:

$ npm install --save snowboy

For detecting hotword, we need to record audio continuously from the Microphone. To accomplish the task of recording, we have another npm package node-record-lpcm16. It used SoX binary to record audio. First we need to install SoX using

Linux (Debian based distributions)

$ sudo apt-get install sox libsox-fmt-all

Then, you can install node-record-lpcm16 package using npm using

$ npm install node-record-lpcm16

Then, we need to import it in the needed file using

import * as record from "node-record-lpcm16";

You may then create a new microphone stream using,

const mic = record.start({
   threshold: 0,
   sampleRate: 16000,
   verbose: true,
});

The mic constant here is a NodeJS Readable Stream. So, we can read the incoming data from the Microphone and process it.

We can now process this stream using Detector class of Snowboy. We declare a child class extending Snowboy Hotword Decoder to suit our needs.

import { Detector, Models } from "snowboy";

export class HotwordDetector extends Detector {
  
  1 constructor(models: Models) {
       super({
           resource: `${process.env.CWD}/resources/common.res`,
           models: models,
           audioGain: 2.0,
       });
       this.setUp();
   }

   // other methods
}

First, we create a Snowboy Detector by calling the parent constructor with resource file as common.res and a Snowboy model as argument. Snowboy model is a file which tells the detector which Hotword to listen for. Currently, the module supports hotword Susi but it can be extended to support other hotwords like Mirror too. You can train the hotword for SUSI for your voice and get the latest model file at https://snowboy.kitt.ai/hotword/7915 . You may then replace the susi.pmdl file in resources folder with our own susi.pmdl file for a better experience.

Now, we need to delegate the callback methods of Detector class to know about the current state of detector and take an action on its basis. This is done in the setUp() method.

private setUp(): void {
   this.on("silence", () => {
      // handle silent state
   });

   this.on("sound", () => {
      // handle sound detected state
   });

   this.on("error", (error) => {
      // handle error
   });

   this.on("hotword", (index, hotword) => {
      // hotword detected 
   });
}

If you go into the implementation of Detector class of Snowboy, it extends from NodeJS.WritableStream. So, we can pipe our microphone input read stream to Detector class and it handles all the states. This can be done using

mic.pipe(detector as any);

So, now all the input from Microphone will be processed by Snowboy detector class and we can know when the user has spoken the word “SUSI”. We can start speech recognition and do other changes in User Interface based on the different states.

After this, we can simply say “Susi” followed by our query to ask SUSI on the MagicMirror. A video implementation of the same can be seen here: 

Resources:

Continue ReadingHotword Detection on SUSI MagicMirror with Snowboy

Implementing the Message Response Status Indicators In SUSI WebChat

SUSI Web Chat now has indicators reflecting the message response status. When a user sends a message, he must be notified that the message has been received and has been delivered to server. SUSI Web Chat implements this by tagging messages with ticks or waiting clock icons and loading gifs to indicate delivery and response status of messages ensuring good UX.

This is implemented as:

  • When the user sends a message, the message is tagged with a `clock` icon indicating that the message has been received and delivered to server and is awaiting response from the server
  • When the user is waiting for a response from the server, we display a loading gif
  • Once the response from the server is received, the loading gif is replaced by the server response bubble and the clock icon tagged to the user message is replaced by a tick icon.

Lets visit SUSI WebChat and try it out.

Query : Hey

When the message is sent by the user, we see that the displayed message is tagged with a clock icon and the left side response bubble has a loading gif indicating that the message has been delivered to server and are awaiting response.

When the response from server is delivered, the loading gif disappears and the user message tagged with a tick icon.


How was this implemented?

The first step is to have a boolean flag indicating the message delivery and response status.

let _showLoading = false;

getLoadStatus(){
  return _showLoading;
},

The `showLoading` boolean flag is set to true when the user just sends a message and is waiting for server response.  When the user sends a message, the CREATE_MESSAGE action is triggered. Message Store listens to this action and along with creating the user message, also sets the showLoading flag as true.

case ActionTypes.CREATE_MESSAGE: {

  let message = action.message;
  _messages[message.id] = message;
  _showLoading = true;
  MessageStore.emitChange();
  
  break;
}

The showLoading flag is used in MessageSection to display the loading gif. We are using a saved gif to display the loading symbol. The loading gif is displayed at the end after displaying all the messages in the message store. Since this loading component must be displayed for every user message, we don’t save this component in MessageStore as a loading message as that would lead to repeated looping thorugh the messages in message store to add and delete loading component.

import loadingGIF from '../../images/loading.gif';

function getLoadingGIF() {

  let messageContainerClasses = 'message-container SUSI';

  const LoadingComponent = (
    <li className='message-list-item'>
      <section className={messageContainerClasses}>
        <img src={loadingGIF}
          style={{ height: '10px', width: 'auto' }}
          alt='please wait..' />
      </section>
    </li>
  );
  return LoadingComponent;
}

We then use this flag in MessageListItem class to tag the user messages with the clock icons. We used Material UI SVG Icons to display the clock and tick messages. We display these beside the time in the messages.

import ClockIcon from 'material-ui/svg-icons/action/schedule';

statusIndicator = (
  <li className='message-time' style={footerStyle}>
    <ClockIcon style={indicatorStyle}
      color={UserPreferencesStore.getTheme()==='light' ? '#90a4ae' : '#7eaaaf'}/>
  </li>
);

When the response from server is received, the CREATE_SUSI_MESSAGE action is triggered to render the server response. This action is again collected in MessageStore where the `showLoading` boolean flag is reset to false. This event also triggers the state of MessageSection where we are listening to showLoading value from MessageStore, hence triggering changes in MessageSection and accordingly in MessageListItem where showLoading is passed as props, removing the loading gif component and displaying the server response and replacing the clock icon with tick icon on the user message.

case ActionTypes.CREATE_SUSI_MESSAGE: {
  
  let message = action.message;
  MessageStore.resetVoiceForThread(message.threadID);
  _messages[message.id] = message;
  _showLoading = false;
  MessageStore.emitChange();
  
  break;
}

This is how the status indicators were implemented for messages. The complete code can be found at SUSI WebChat Repo.

Resources

Continue ReadingImplementing the Message Response Status Indicators In SUSI WebChat

How SUSI WebChat Implements RSS Action Type

SUSI.AI now has a new action type called RSS. As the name suggests, SUSI is now capable of searching the internet to answer user queries. This web search can be performed either on the client side or the server side. When the web search is to be performed on the client side, it is denoted by websearch action type. When the web search is performed by the server itself, it is denoted by rss action type. The server searches the internet and using RSS feeds, returns an array of objects containing :

  • Title
  • Description
  • Link
  • Count

Each object is displayed as a result tile and all the results are rendered as swipeable tiles.

Lets visit SUSI WebChat and try it out.

Query : Google
Response: API response

SUSI WebChat uses the same code abstraction to render websearch and rss results as both are results of websearch, only difference being where the search is being performed i.e client side or server side.

How does the client know that it is a rss action type response?

"actions": [
  {
    "type": "answer",
    "expression": "I found this on the web:"
  },
  {
    "type": "rss",
    "title": "title",
    "description": "description",
    "link": "link",
    "count": 3
  }
],

The actions attribute in the JSON API response has information about the action type and the keys to be parsed for title, link and description.

  • The type attribute tells the action type is rss.
  • The title attribute tells that title for each result is under the key – title for each object in answers[0].data.
  • Similarly keys to be parsed for description and link are description and link respectively.
  • The count attribute tells the client how many results to display.

We then loop through the objects in answers,data[0] and from each object we extract title, description and link.

let rssKeys = Object.assign({}, data.answers[0].actions[index]);

delete rssKeys.type;

let count = -1;

if(rssKeys.hasOwnProperty('count')){
  count = rssKeys.count;
  delete rssKeys.count;
}

let rssTiles = getRSSTiles(rssKeys,data.answers[0].data,count);

We use the count attribute and the length of answers[0].data to fix the number of results to be displayed.

// Fetch RSS data

export function getRSSTiles(rssKeys,rssData,count){

  let parseKeys = Object.keys(rssKeys);
  let rssTiles = [];
  let tilesLimit = rssData.length;

  if(count > -1){
    tilesLimit = Math.min(count,rssData.length);
  }

  for(var i=0; i<tilesLimit; i++){
    let respData = rssData[i];
    let tileData = {};

    parseKeys.forEach((rssKey,j)=>{
      tileData[rssKey] = respData[rssKeys[rssKey]];
    });

    rssTiles.push(tileData);
  }

return rssTiles;

}

We now have our list of objects with the information parsed from the response.We then pass this list to our renderTiles function where each object in the rssTiles array returned from getRSSTiles function is converted into a Paper tile with the title and description and the entire tile is hyperlinked to the given link using Material UI Paper Component and few CSS attributes.

// Draw Tiles for Websearch RSS data

export function drawTiles(tilesData){

let resultTiles = tilesData.map((tile,i) => {

  return(
    <div key={i}>
      <MuiThemeProvider>
        <Paper zDepth={0} className='tile'>
          <a rel='noopener noreferrer'
          href={tile.link} target='_blank'
          className='tile-anchor'>
            {tile.icon &&
            (<div className='tile-img-container'>
               <img src={tile.icon}
               className='tile-img' alt=''/>
             </div>
            )}
            <div className='tile-text'>
              <p className='tile-title'>
                <strong>
                  {processText(tile.title,'websearch-rss')}
                </strong>
              </p>
              {processText(tile.description,'websearch-rss')}
            </div>
          </a>
        </Paper>
      </MuiThemeProvider>
    </div>
  );

});

return resultTiles;
}

The tile title and description is processed for HTML special entities and emojis too using the processText function.

case 'websearch-rss':{

let htmlText = entities.decode(text);
processedText = <Emojify>{htmlText}</Emojify>;
break;

}

We now display our result tiles as a carousel like swipeable display using react-slick. We initialise our slider with few default options specifying the swipe speed and the slider UI.

import Slider from 'react-slick';

// Render Websearch RSS tiles

export function renderTiles(tiles){

  if(tiles.length === 0){
    let noResultFound = 'NO Results Found';
    return(<center>{noResultFound}</center>);
  }

  let resultTiles = drawTiles(tiles);
  
  var settings = {
    speed: 500,
    slidesToShow: 3,
    slidesToScroll: 1,
    swipeToSlide:true,
    swipe:true,
    arrows:false
  };

  return(
    <Slider {...settings}>
      {resultTiles}
    </Slider>
  );
}

We finally add CSS attributes to style our result tile and add overflow for text maintaining standard width for all tiles.We also add some CSS for our carousel display to show multiple tiles instead of one by default. This is done by adding some margin for child components in the slider.

.slick-slide{
  margin: 0 10px;
}

.slick-list{
  max-height: 100px;
}

We finally have our swipeable display of rss data tiles each tile hyperlinked to the source of the data. When the user clicks on a tile, he is redirected to the link in a new window i.e the entire tile is hyperlinked. And when there are no results to display, we show a `NO Results Found` message.

The complete code can be found at SUSI WebChat Repo. Feel free to contribute

Resources


Continue ReadingHow SUSI WebChat Implements RSS Action Type