Metadata Updation in Badgeyay

Badgeyay is a simple badge generator service to develop badges for technical events and conferences developed by FOSSASIA. Badgeyay is a SPA (Single Page Application) developed in ember, whose backend is in Flask. Now when user logins, he can see an option for user profile, in which all the metadata of its profile can be seen (extracted from Firebase). Now user should be able to change its metadata like profile image and username etc. So we will look how the profile image is being changed and updated in badgeyay.

Procedure

  1. Create function in frontend to listen for onclick events and initiate a file upload dialog box for selecting an image. We will use document property to initiate a dummy click event, else there will be a button with the text to upload a file and that won’t look consistent as we only need an image and nothing else on the UI.

class=“ui small circular image profile-image”>
    “{{user.photoURL}}”>
    “display: none;” id=“profileImageSelector” type=“file” onchange={{action “profileImageSelected”}}>
    

“profile-change” onclick={{action “updateProfileImage”}}>Change


</div>


  1. Function to upload file and initiate a dummy click event
updateProfileImage() {
    // Initate a dummy click event
    document.getElementById(‘profileImageSelector’).click();
  },

  profileImageSelected(event) {
    const reader = new FileReader();
    const { target } = event;
    const { files } = target;
    const [file] = files;
    const _this = this;

    reader.onload = () => {
      _this.get(‘sendProfileImage’)(reader.result, file.type.split(‘/’)[1]);
    };

    reader.readAsDataURL(file);
  }


  1. Profile update function in the main controller to call the API endpoint to upload the data to backend. This will send the payload to backend which will later upload the image to cloud storage and save in the link in the database.
updateProfileImage(profileImageData, extension) {
    const _this = this;
    const user = this.get(‘store’).peekAll(‘user’);
    user.forEach(user_ => {
      _this.set(‘uid’, user_.get(‘id’));
    });
    let profileImage = _this.get(‘store’).createRecord(‘profile-image’, {
      image   : profileImageData,
      uid   : _this.uid,
      extension : ‘.’ + extension
    });
    profileImage.save()
      .then(record => {
        user.forEach(user_ => {
          user_.set(‘photoURL’, record.photoURL);
        });
      })
      .catch(err => {
        let userErrors = profileImage.get(‘errors.user’);
        if (userErrors !== undefined) {
          _this.set(‘userError’, userErrors);
        }
      });
  }
  1. Route to update profile image from backend
@router.route(‘/profileImage’, methods=[‘POST’])
def update_profile_image():
  try:
      data = request.get_json()[‘data’][‘attributes’]
  except Exception:
      return ErrorResponse(PayloadNotFound().message, 422, {‘Content-Type’: ‘application/json’}).respond()

  if not data[‘image’]:
      return ErrorResponse(ImageNotFound().message, 422, {‘Content-Type’: ‘application/json’}).respond()

  if not data[‘extension’]:
      return ErrorResponse(ExtensionNotFound().message, 422, {‘Content-Type’: ‘application/json’}).respond()

  uid = data[‘uid’]
  image = data[‘image’]
  extension = data[‘extension’]

  try:
      imageName = saveToImage(imageFile=image, extension=extension)
  except Exception:
      return ErrorResponse(ImageNotFound().message, 422, {‘Content-Type’: ‘application/json’}).respond()

  fetch_user, imageLink = update_database(uid, imageName)
  return jsonify(UpdateUserSchema().dump(fetch_user).data)


This will first create a temp file with the data URI and them upload that file to cloud storage and generate the link and then update the user in the database.

def update_database(uid, imageName):
  fetch_user = User.getUser(user_id=uid)
  if fetch_user is None:
      return ErrorResponse(UserNotFound(uid).message, 422, {‘Content-Type’: ‘application/json’}).respond()
  imagePath = os.path.join(app.config.get(‘BASE_DIR’), ‘static’, ‘uploads’, ‘image’) + ‘/’ + imageName
  imageLink = fileUploader(imagePath, ‘profile/images/’ + imageName)
  fetch_user.photoURL = imageLink
  fetch_user.save_to_db()

  try:
      os.unlink(imagePath)
  except Exception:
      print(‘Unable to delete the temporary file’)

  return fetch_user, imageLink


Link to PR – Link

Topics Involved

  • Google Cloud Admin Storage SDK
  • Ember data

Resources

  • Firebase admin sdk documentation – Link
  • Google Cloud Storage SDK Python – Link
  • Blob Management – Link
  • Documents API – Link
Continue ReadingMetadata Updation in Badgeyay

Uploading Badges To Google Cloud Badgeyay

Badgeyay is an open source project developed by FOSSASIA community. This project mainly aims for generating badges for technical conferences and events.The project is divided into two parts mainly. Backend is developed in flask and frontend is developed in emberjs. The problem is after the badge generation, the flask server is storing and serving those files. In practise this is not a good convention to do so. This should be handled by secondary hosting server program like gunicorn or nginx. Better approach would be to consume the firebase storage and admin sdk for storing the badges on google cloud. This will also offload storage needs from the flask server and also give a public link over the network to access.

Procedure

  1. Get the file path of the temporary badge generated on the flask server. Currently badges are saved in the directory of the image file uploaded and final badge generated is written in all-badges.pdf`
badgePath = os.getcwd() + ‘/static/temporary/’ + badgeFolder
badgePath + ‘/all-badges.pdf’


  1. Create the blob path for the storage. Blob can be understood as the final reference to the location where the contents are saved onto the server. This can be a nested directory structure or simply a filename in root directory.
‘badges/’ + badge_created.id + ‘.pdf’


In our case it is the id of the badge that is generated in the badges directory.

  1. Function for uploading the file generated in temporary storage to google cloud storage.
def fileUploader(file_path, blob_path):
  bucket = storage.bucket()
  fileUploaderBlob = bucket.blob(blob_path)
  try:
      with open(file_path, ‘rb’) as file_:
          fileUploaderBlob.upload_from_file(file_)
  except Exception as e:
      print(e)
  fileUploaderBlob.make_public()
  return fileUploaderBlob.public_url


It creates a bucket using the firebase admin SDK and then open the file from the file path. After opening the file from the path it writes the data to the cloud storage. After the data is written, the blob is made public and the public access link to the blob is fetched, which then later returned and saved in the local database.

Topics Involved

  • Firebase admin sdk for storage
  • Google cloud storage sdk

Resources

  • Firebase admin sdk documentation – Link
  • Google Cloud Storage SDK Python – Link
  • Blob Management – Link


Continue ReadingUploading Badges To Google Cloud Badgeyay

Creating step designs from KiCAD for PSLab

PSLab hardware device is developed using KiCAD. It is an open source PCB designing tool which we can use for free and it has almost all the features needed to build a professional PCB. But it lacks one thing. It cannot generate and export 3D models. In fact there is a 3D viewer in KiCAD but there is no way to export it. When manufacturing PSLab devices, it was required by the manufacturers so that they can have a clear understanding how the components are placed. This step is necessary for them to design the production line.

Before we get started, there are few prerequisites to help us get this done. They are as follows;

  1. FreeCAD: Open source 3D modeling software
  2. KiCAD step up tools: External library to import KiCAD PCB layouts to FreeCAD

You may need to follow installation instructions to install FreeCAD from the link given. Once we are all set, extract the KiCAD Stepup tools. There we can find a set of python libraries and some bash scripts. We can either use the scripts or type commands ourselves. I found scripts having some issues configuring paths.

To fire up FreeCAD with KiCAD stepup tools enabled, type the following command on your console;

$ freecad kicad-StepUp-tools.FCMacro

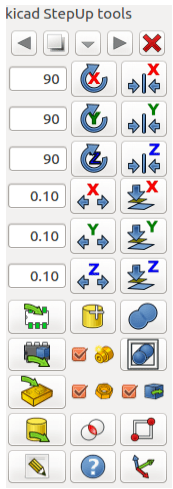
Make sure the console is pointing to the directory where the FCMacro file is located. This will open up FreeCAD and if you opened it already and saw the opening screen of FreeCAD, you’d notice a whole new toolbar is added.

Here you can see many tools related to import and export step files and 3D models from outside libraries and folders. Each tool is specific;

  • Load-kicad-footprint:

This tool is useful to generate a step file for an individual PCB component, say a resistor into a step file.

  • Export-to-kicad:

There are instances where when we design a custom foot print, and KiCAD doesn’t have the 3D model. In such a case we can export such a model to KiCAD

  • Load-kicad:

This is the tool we are using to export PSLab PCB board to step format. Before we move on to this tool there is one last configuration we have to do. FreeCAD doesn’t know where we have put KiCAD 3D models. This library simply transforms the available 3D models in KiCAD into step files and build the final output combining all of them together as in the featured image of this blog post. To setup the 3D model path, in KiCAD, there is a path configuration option. Copy the path under “KISYS3DMOD”.

Figure 2: Path Configuration dialog box in KiCAD

And paste it into the ini file named “ksu-config.ini” which you can find in home folder.

Figure 3: Place to add 3D model path in ksu-config.ini file

Once that is done, click on the Load-KiCAD tool icon and browse to the repository where the PSLab hardware files are located at. Open the board file and FreeCAD will generate part by part and finally output the complete design. Now we can export the design in plenty of formats such as steps, stl another similar file format and many more.

Reference:

  1. https://www.freecadweb.org/wiki/Download
  2. http://kicad-pcb.org/external-tools/stepup/
Continue ReadingCreating step designs from KiCAD for PSLab

Implementing API keys on SUSI.AI server

The clients of SUSI.AI need config keys to work with some APIs like captcha, maps and blog and these keys are stored in the server of SUSI and the clients fetch them using API calls to the server. The admins can add or delete api keys from the server using the

/aaa/apiKeys.json


API. This API stores the API keys in a json format in the apiKeys.json file in the system_keys_dir directory which is in the data directory on the susi server.

For the clients to fetch these API keys and use them in their respective APIs, they need to use

Continue ReadingImplementing API keys on SUSI.AI server

Ember Controller for Badge Generation In Badgeyay

Badgeyay is an open source project developed by FOSSASIA Community. This project aims towards giving a platform for badge generation using several customizations options. Current structure of project is in two parts to maintain modularity, which are namely backend, developed in flask, and frontend, developed in ember.

After refactoring the frontend and backend API we need to create a controller for the badge generation in frontend. Controller will help the components to send and receive data from them and prepare the logic for sending request to API so that badges can be generated and can receive the result as response from the server. Particularly we need to create the controller for badge generation route, create-badges.

As there are many customizations option presented to user, we need to chain the requests so that they sync with each other and the logic should not break for the badge generation.

Procedure

  1. Creating the controller from the ember-cli
ember g controller create-badge


  1. After the component generation, we need to create actions that can be passed to components. Let’s build action to submit form and then chain the different actions together for the badge generation.
submitForm() {
  const _this = this;
  const user = _this.get(‘store’).peekAll(‘user’);
  let uid;
  user.forEach(user_ => {
    uid = user_.get(‘id’);
  });
  if (uid !== undefined && uid !== ) {
    _this.set(‘uid’, uid);
  }

  let badgeData = {
    uid     : _this.uid,
    badge_size : ‘A3’
  };

  if (_this.csvEnable) {
    badgeData.csv = _this.csvFile;
  }
  if (_this.defFontColor !== && _this.defFontColor !== undefined) {
    badgeData.font_color = ‘#’ + _this.defFontColor;
  }
  if (_this.defFontSize !== && _this.defFontSize !== undefined) {
    badgeData.font_size = _this.defFontSize.toString();
  }
  if (_this.defFont !== && _this.defFont !== undefined) {
    badgeData.font_type = _this.defFont;
  }

  _this.send(‘sendManualData’, badgeData);

},


  1. As we can see in the above code snippet that _this.send(action_name, arguments) is calling another action sendManualData. This action then sends a network request to the backend if the Manual data is selected as input source otherwise will go with the CSV upload. If no option is chosen then it will show an error on the user screen, notifying him to select one input source.
sendManualData(badgeData) {
    const _this = this;
    if (_this.manualEnable) {
      let textEntry = _this.get(‘store’).createRecord(‘text-data’, {
        uid   : _this.uid,
        manual_data : _this.get(‘textData’),
        time   : new Date()
      });
      textEntry.save().then(record => {
        _this.set(‘csvFile’, record.filename);
        badgeData.csv = _this.csvFile;
        _this.send(‘sendDefaultImg’, badgeData);
        _this.get(‘notify’).success(‘Text saved Successfully’);
      }).catch(err => {
        let userErrors = textEntry.get(‘errors.user’);
        if (userErrors !== undefined) {
          _this.set(‘userError’, userErrors);
        }
      });
    } else if (_this.csvEnable) {
      if (_this.csvFile !== undefined && _this.csvFile !== ) {
        badgeData.csv = _this.csvFile;
        _this.send(‘sendDefaultImg’, badgeData);
      }
    } else {
      // No Input Source specified Error
    }
  },


The above code will choose the manual data if the manual data boolean flag is set else not, and then does a network request and wait for the promise to be resolved. As soon as the promise is resolved it calls another action to for the default image.

  1. After selecting the input source, now the background for the badge has to be selected. It will look for the boolean flags of the defaultImage, backgroundColorImage, customImage and will make the network request accordingly.
sendDefaultImg(badgeData) {
    const _this = this;
    if (_this.defImage) {
      let imageRecord = _this.get(‘store’).createRecord(‘def-image-upload’, {
        uid    : _this.uid,
        defaultImage : _this.defImageName
      });
      imageRecord.save()
        .then(record => {
          _this.set(‘custImgFile’, record.filename);
          badgeData.image = _this.custImgFile;
          _this.send(‘sendBadge’, badgeData);
        })
        .catch(error => {
          let userErrors = imageRecord.get(‘errors.user’);
          if (userErrors !== undefined) {
            _this.set(‘userError’, userErrors);
          }
        });
    } else if (_this.custImage) {
      if (_this.custImgFile !== undefined && _this.custImgFile !== ) {
        badgeData.image = _this.custImgFile;
        _this.send(‘sendBadge’, badgeData);
      }
    } else if (_this.colorImage && _this.defColor !== undefined && _this.defColor !== ) {
      console.log(_this.defColor);
      let imageRecord = _this.get(‘store’).createRecord(‘bg-color’, {
        uid : _this.uid,
        bg_color : _this.defColor
      });
      imageRecord.save()
        .then(record => {
          badgeData.image = record.filename;
          _this.send(‘sendBadge’, badgeData);
        })
        .catch(error => {
          let userErrors = imageRecord.get(‘errors.user’);
          if (userErrors !== undefined) {
            _this.set(‘userError’, userErrors);
          }
        });
    } else {
      // Inflate error for No Image source.
    }
  },


After the promise resolvement, the final action is called to send badge data payload to backend api for badge generation.

  1. After the complete preparation of the payload, now it’s time to send the payload to the backend api for the badge generation and after the promise resolvement showing the respective downloadable link in the frontend.
sendBadge(badgeData) {
    const _this = this;
    let badgeRecord = _this.get(‘store’).createRecord(‘badge’, badgeData);
    badgeRecord.save()
      .then(record => {
        _this.set(‘badgeGenerated’, true);
        _this.set(‘genBadge’, record.id);
        _this.get(‘notify’).success(‘Badge generated Successfully’);
      })
      .catch(err => {
        console.error(err.message);
      });
  },


Now after the promise resolvement the local variable badgGenerated is set to true so that the success message can be shown in the frontend for successful badge generation along with the link.

Link to respective PR – Link

Topics Involved

  • Chaining of actions and requests
  • Manipulating DOM on the conditional statements
  • Component bindings
  • Ember data
  • Promise resolvement

Resources

  • Link to ember data for the API requests and promise resolvement – Link
  • Implementing Controllers in Ember – Link
  • Chaining actions together in ember – Link
Continue ReadingEmber Controller for Badge Generation In Badgeyay

See events according to location in Open Event Android

In the Open Event Android App until now we were just showing a list of events from the server randomly. This does not makes sense because users are interested in events near them. So it was decided to show events according to a given location in the app. Let’s see how we achieved this.

API endpoint

The API endpoint which we are using looks something like this

https://open-event-api-dev.herokuapp.com/v1/events?sort=name&filter=[{“name”:”location-name”,”op”:”ilike”,”val”:”%India%”}]

This endpoint will return all the events that are happening in India. You can try to copy the above URL in your browser and see the output yourself.

Android Implementation

This function is used to return a list of events which are happening in the location specified by the user. It also saves these events in the local database of the app.

fun getEventsByLocation(locationName: String): Single<List<Event>> {
return eventApi.searchEvents("name", locationName).map {
eventDao.insertEvents(it)
it
}
}


The following piece of code gets called when the user clicks on the submit button in the soft keyboard. If the query is not empty then we store the value of the location in a variable and use it to load events according to location.

eventsViewModel.locationName = rootView.locationEdittext.text.toString()
eventsViewModel.loadLocationEvents()
return@OnEditorActionListener true


We are using a function named loadLocationEvents() above. Let’s have a look what this function is doing. We are using the location name that the user provides in a constant called query then we are sending a GET request to the server to get all events that are happening in that location name. All these networking request are happening in a background thread. As soon as we start the network operation we set the value of progress to true, this will show the progress bar to the user and as soon as the network request has been completed we remove the progress bar.

fun loadLocationEvents() {
val query = "[{\"name\":\"location-name\",\"op\":\"ilike\",\"val\":\"%$locationName%\"}]"

compositeDisposable.add(eventService.getEventsByLocation(query)
.subscribeOn(Schedulers.io())
.observeOn(AndroidSchedulers.mainThread())
.doOnSubscribe({
progress.value = true
}).doFinally({
progress.value = false
}).subscribe({
events.value = it
}, {
Timber.e(it, "Error fetching events")
error.value = "Error fetching events"
}))
}


That’s it. We can now enter a name of the location and we will get a list of all the events that happening there

Resources

  1. ReactiveX official documentation : http://reactivex.io/
  2. Vogella RxJava 2 – Tutorial : http://www.vogella.com/tutorials/RxJava/article.html
  3. Androidhive RxJava Tutorial : https://www.androidhive.info/RxJava/
Continue ReadingSee events according to location in Open Event Android

Integrating Firebase Cloud Functions In Badgeyay

Badgeyay is an open source project developed by FOSSASIA Community for generating badges for conferences and events. The Project is divided into two parts frontend, which is in ember, and backend, which is in flask. Backend uses firebase admin SDK (Python) and Frontend uses firebase javascript client with emberfire wrapper for ember. Whenever an user signs up on the website, database listener that is attached to to the Model gets triggered and uses flask-mail for sending welcome mail to the user and in case of email and password signup, verification mail as well.

Problem is sending mail using libraries is a synchronous process and takes a lot of processing on the server. We can use messaging queues like RabbitMQ and Redis but that will be burden as server cost will increase. The workaround is to remove the code from the server and create a firebase cloud function for the same task.

Firebase cloud functions lets you run backend code on the cloud and can be triggered with HTTP events or listen for the events on the cloud, like user registration.

Procedure

  1. Firebase uses our Gmail ID for login, so make sure to have a Gmail ID and on the first sight we will be greeted with Firebase console, where we can see our created or imported firebase apps.

  2. Create the app by clicking on the Add Project Icon and write the name of the application (e.g. Test Application) and select the region, in my case it is India. Firebase will automatically generated an application ID for the app. Click on Create Project to complete creation of project

  3. After Completion, click on the project to enter into the project. You will be greeted with an overview saying to integrate firebase with your project. We will click on the Add Firebase to web App and save the config as JSON in a file as clientKey.json for later use.

  4. Now we need to install the firebase tools on our local machine so for that execute
    npm i -g firebase-tools
    1. Now login from the CLI so that firebase gets token for the Gmail ID of the user and can access the firebase account of that Gmail ID.
    firebase login
    1. After giving permissions to the firebase CLI from your Gmail account in the new tab opened in browser, create a folder named cloud_functions in the project directory and in that execute
    firebase init
    1. Select only functions from the list of options by pressing space.

    2. After this select the project from the list where you want to use the cloud function. You can skip the step if you later want to add the cloud function to project by selecting don’t setup a default project and can later be used by command
      firebase use –add

    3. Choose the language of choice

    4. If you want, you can enforce eslint on the project and after this the cloud function is set up and the directory structure looks as follows.

    5. We will write our cloud function in index.js. So let’s take a look at index.js
      const functions = require(‘firebase-functions’);

      // // Create and Deploy Your First Cloud Functions
      // // https://firebase.google.com/docs/functions/write-firebase-functions
      //
      // exports.helloWorld = functions.https.onRequest((request, response) => {
      //  response.send(“Hello from Firebase!”);
      // });

      As we can see there is a sample function already given, we don’t need that sample function so we will remove it and will write the logic for sending mail. Before that we need to acquire the key for service accounts so that admin functionality can be accessed in the cloud function. So for that go to project settings and then service accounts and click on Generate New Private Key  and save it as serviceKey.json

    6. Now the directory structure will look like this after adding the clientKey.json and serviceKey.json

    7. We will use node-mailer for sending mails in cloud functions and as there is a limitation on the gmail account to send only 500 mails in a day, we can use third party services like sendGrid and others for sending mails with firebase. Configure node-mailer for sending mails as
      const nodemailer = require(‘nodemailer’);

      const gmailEmail = functions.config().gmail.email;
      const gmailPassword = functions.config().gmail.password;
      const mailTransport = nodemailer.createTransport({
       service: ‘gmail’,
       auth: {
      user: gmailEmail,
      pass: gmailPassword
       }
      });

      Also set the environment variables for the cloud functions like email and password:

      firebase functions:config:set gmail.email=“Email ID” gmail.password=“Password”
      1. Logic for sending Greeting Mail on user registration
      exports.greetingMail = functions.auth.user().onCreate((user) => {
       const email = user.email;
       const displayName = user.displayName;

       return sendGreetingMail(email, displayName);
      });

      function sendGreetingMail(email, displayName) {
       const mailOptions = {
      from: `${APP_NAME}<noreply@firebase.com>`,
      to: email,
       };

       mailOptions.subject = `Welcome to Badgeyay`;
       mailOptions.text = `Hey ${displayName || ”}! Welcome to Badgeyay. We welcome you onboard and pleased to offer you service.`;
       return mailTransport.sendMail(mailOptions).then(() => {
      return console.log(‘Welcome mail sent to: ‘, email)
       }).catch((err) => {
      console.error(err.message);
       });
      }

      Function will get triggered on creation of user in firebase and calls the greeting mail function with parameters as the email id of the registered user and the Display name. Then a default template is used to send mail to the recipient and Logged on successful submission.

      1. Currently firebase admin sdk doesn’t support the functionality to send verification mail but the client SDK does. So the approach which is followed in badgeyay is that admin SDK will create a custom token and client sdk will use that custom token to sign in and them send verification mail to the user.
      exports.sendVerificationMail = functions.auth.user().onCreate((user) => {
       const uid = user.uid;
       if (user.emailVerified) {
      console.log(‘User has email already verified: ‘, user.email);
      return 0;
       } else {
      return admin.auth().createCustomToken(uid)
        .then((customToken) => {
          return firebase.auth().signInWithCustomToken(customToken)
        })
        .then((curUser) => {
          return firebase.auth().onAuthStateChanged((user_) => {
            if (!user.emailVerified) {
              user_.sendEmailVerification();
              return console.log(‘Verification mail sent: ‘, user_.email);
            } else {
              return console.log(‘Email is already verified: ‘, user_.email);
            }
          })
        })
        .catch((err) => {
          console.error(err.message);
        })
       }
      });
      1. Now we need to deploy the functions to firebase.
      firebase deploy –only functions

      Link to the respective PR  : Link

      Topics Involved

      • Firebase Admin SDK
      • Configuring Gmail for third party apps
      • Token Verification and verification mail by client SDK
      • Nodemailer and Express.js

      Resources

      • Firebase Cloud functions – Link
      • Extending authentication with cloud function – Link
      • Custom Token Verification – Link
      • Nodemailer message configuration – Link
      • Issue discussion on sending verification mail with admin SDK – Link
Continue ReadingIntegrating Firebase Cloud Functions In Badgeyay

Use Travis to extract testing APKs for PSLab

Travis CI is a popular continuous integration tool built to test software and deployments done at GitHub repositories. They provide free plans to open source projects. PSLab Android is using Travis to ensure that all the pull requests made and the merges are build-bug frees. Travis can do this pretty well, but that is not all it can do. It’s a powerful tool and we can think of it as a virtual machine (with high specs) installed in a server for us to utilize efficiently.

There was a need in PSLab development that, if we want to test the functionalities of code at a branch. To fulfil this need, one has to download the branch to his local machine and use gradle to build a new apk. This is a tedious task, not to mention reviewers, even developers wouldn’t like to do this.

If the apk files were generated and in a branch, we can simply download them using a console command.

$ wget https://raw.github.com/fossasia/<repository>/<branch>/<file with extension>


With the help of Travis integration, we can create a simple script to generate these apks for us. This is done as follows;

Once the Travis build is complete for a triggering event such as a pull request, it will run it’s “after_success” block. We are going to execute a script at this point. Simply add the following code snippet.

after_success:
  - 'if [ "$TRAVIS_PULL_REQUEST" == "false" ]; then bash <script-name>.sh; fi'


This will run the script you have mentioned using bash. Here we will have the following code snippets in the specified bash script.

First of all we have to define the branch we want to build. This can be done using a variable assignment.

export DEVELOPMENT_BRANCH=${DEVELOPMENT_BRANCH:-development}


Once the build is complete, there will be new folders in the virtual machine. One of them is the app folder. Inside this folder contains the build folder where all the apk files are generated. So the next step is to copy these apk files to a place of our preference. I am using a folder named apk to make it much sense.

cd apk
\cp -r ../app/build/outputs/apk/*/**.apk .
\cp -r ../app/build/outputs/apk/debug/output.json debug-output.json
\cp -r ../app/build/outputs/apk/release/output.json release-output.json
\cp -r ../README.md .


Usually, the build folder has following apk files

  • app-debug.apk
  • app-release-unsigned.apk
  • app-release.apk

Release apks are usually signed with a key and it would cause issues while installation. So we have to filter out the debug apk that we usually use for debugging and get it as the output apk. This involves simple file handling operations in Linux and a bit of git.

First of all, rename the apk file so that it will be different from other files.

# Rename apks with dev prefixes
mv app-debug.apk app-dev-debug.apk


Then add and commit them to a specific branch where we want the output from.

git add -A
git commit -am "Travis build pushed [development]"
git push origin apk --force --quiet> /dev/null


Once it is all done, you will have a branch created and updated with the apk files you have defined.


Figure 1: UI of pslab-android apk branch

Reference:

  1. https://travis-ci.org/
Continue ReadingUse Travis to extract testing APKs for PSLab

Adding event to overview site of Open Event Webapp

Open Event Web app has two components: The generator used for generating event website and the generic web application for any event. The overview site showcases the example events generated using web app generator. The event added to the overview site keeps on updating with every new feature added. The samples on overview site updates whenever Travis build is triggered. This blog will illustrate how to add an event to overview site.

Adding event name and links to overview site

The event to be shown on overview site is added to the ‘index’ page of overview site with the link to event and a link to image as shown below.

<div class="col-md-4 col-xs-12 col-sm-6 event-holder">
   <div class="thumbnail">
       <a href='./SparkSummit2017/index.html' target='_blank'>
           <img src='./SparkSummit17.jpg' onerror="imgError(this, true);">
           <div class="caption">
               <h4 class="name">Spark Summit 2017</h4>
           </div>
       </a>
   </div>
</div>

Adding event image

The event image is chosen and added to the same directory containing the index page for overview site. Following is the image selected for Spark Summit 2017 sample.

Copying the event image to event directory

The samples are kept updated by generating the samples with the modified changes using travis-ci. Therefore, the static files for samples are copied to event folder which is pushed to github later for build. Following is the helper function used for copying the files. The counter keeps track for number of files copied.

it('should copy all the static files', function (done) {
 let staticPath = __dirname + '/../src/backend/overviewSite/';
 let totalFiles = 17;
 let counter = 0;

 function copyStatic(fileName) {
   fs.readFile(staticPath + fileName, function (err, data) {
     if (err) {
       done(err);
       return;
     }
     fs.writeFile(dist.distPath + '/a@a.com/' + fileName, data, function (err) {
       if (err) {
         done(err);
         return;
       }
       counter++;
       if (counter === totalFiles) {
         done();
       }
     });
   });
 }

Adding tests for the event and regenerating on every build

The sample is rebuilt on every modified change in the project, so every feature added is reflected in the samples present on the overview site. The generator procedure ‘createDistDir’ is called with the required data being passed to it. Following is an example for generating Spark Summit 2017 sample and testing the sample generation in event directory.

it('should generate the Spark Summit 2017 event', function (done) {
 let data = {};

 data.body = {
   "email": 'a@a.com',
   "theme": 'light',
   "sessionMode": 'expand',
   "apiVersion": 'api_v2',
   "datasource": 'eventapi',
   "apiendpoint": 'https://raw.githubusercontent.com/fossasia/open-event/master/sample/SparkSummit17',
   "assetmode": 'download'
 };


 generator.createDistDir(data, 'Socket', function (appFolder) {
   assert.equal(appFolder, "a@a.com/SparkSummit2017");
   done();
 });

});

Resources

Continue ReadingAdding event to overview site of Open Event Webapp

I2C communication in PSLab Android

PSLab device is a compact electronic device with a variety of features. One of them is the ability to integrate sensors and get readings from them. One might think that why they should use PSLab device to get sensor readings and they can use some other hardware like Arduino. In those devices, user has to create firmware and need to know how to interface them with correct sampling rates and settings. But with PSLab, they all come in the whole package. User just have to plug the device to his phone and the sensor to device and he’s ready.

The idea of this blog post is to show how this sophisticated process is actually happening. Before that, let me give you a basic introduction on how I2C communication protocol works. I2C protocol is superior to UART and SPI protocols as they are device limited or requires many wires. But with I2C, you can literally connect thousands of sensors with just 4 wires. These wires are labeled as follows;

  • VCC – Power line
  • GND – Ground line
  • SDA – Data line
  • SCL – Signal clock

It is required that the SDA and SCL lines need to be connected to VCC line using two pull up resistors. But that’s just hardware. Let’s move on to learn how I2C communicate.

Here there is this communicating concept called master and slave. To start communication, master issues a global signal like a broadcast to all the devices connected to SCL and SDA lines. This signal contains the address of the slave, master needs to address and get data from. If the slave received this call to him, he will pull down the SDA line to signal the master that he heard him and ready to communicate with him. Here communication means reading or writing data. Then the communication happens and the link between master and slave breaks giving opportunity to other masters and slaves.

One might think this is a slow process. But these signals are transmitted at high frequencies. In PSLab it is at 100 kHz and that is one millisecond.

PSLab library has a special class to handle I2C communication. That is

public class I2C {/**/}


Once this class is initiated, one has to call the start function to start communication. This method requires the address we wish to communicate with and the mode of operation stating if it is a read or write operation

public int start(int address, int rw) throws IOException {
   packetHandler.sendByte(commandsProto.I2C_HEADER);
   packetHandler.sendByte(commandsProto.I2C_START);
   packetHandler.sendByte((address << 1) | rw & 0xff);
   return (packetHandler.getAcknowledgement() >> 4);
}


Once the address is sent out, protocol requires us to stop and wait for acknowledgement.

public void wait() throws IOException {
   packetHandler.sendByte(commandsProto.I2C_HEADER);
   packetHandler.sendByte(commandsProto.I2C_WAIT);
   packetHandler.getAcknowledgement();
}


If there are no congestion in the lines such as reading from multiple devices, the acknowledgement will be instantaneous. Once that is complete, we can start communication either byte-wise or bulk-wise

public int send(int data) throws IOException {
   packetHandler.sendByte(commandsProto.I2C_HEADER);
   packetHandler.sendByte(commandsProto.I2C_SEND);
   packetHandler.sendByte(data);
   return (packetHandler.getAcknowledgement() >> 4);
}


As an example, reading sensor values at a given interval can be done using the following method call.

public ArrayList<Byte> read(int length) throws IOException {
   ArrayList<Byte> data = new ArrayList<>();
   for (int i = 0; i < length - 1; i++) {
       packetHandler.sendByte(commandsProto.I2C_HEADER);
       packetHandler.sendByte(commandsProto.I2C_READ_MORE);
       data.add(packetHandler.getByte());
       packetHandler.getAcknowledgement();
   }
   packetHandler.sendByte(commandsProto.I2C_HEADER);
   packetHandler.sendByte(commandsProto.I2C_READ_END);
   data.add(packetHandler.getByte());
   packetHandler.getAcknowledgement();
   return data;
}


Once we get the data bundle, either we can save them or display in a graph whatever the way it’s convenient.

Reference:

  1. https://en.wikipedia.org/wiki/I%C2%B2C
Continue ReadingI2C communication in PSLab Android